
Background
At certain point the HK team was in a very unlucky situation regarding funding as the bear market jumped in a perfect storm. A DHF proposal was posted and with the help of all the stakeholders that supported it, the proposal is being funded.
One of the things we decided as team is to use resources to create open source projects for all the other devs in the HIVE blockchain, this way more value can be created more efficiently for the entire network.
This is our first contribution and me (liuke) wanna say thanks again to everyone that supported the proposal. This is for you
NFT RANDOMIZER
Our friend @acidyo requested this first project.
The goal of the NFT randomizer is a totally customizable NFT minter to create projects at the style of BORED APES. You can add as many layers you want, change the droprate of the rarities, select your favorite IFPS service and the NFTs are minted in ENGINE.
Please remember this is first version of this project and that we will be working in improving it. With that said, enjoy it!
Presentation made by our dev @rama142694
STEPS
Hello to all our beloved community! In this post we are going to be announcing and explaining the first version of this great NFT project in which any developer or anyone who is interested in creating their own NFT project will be able to use.
In this Github repository you will be able to find a random NFTs generator which by making a few configurations you will be able to use and create your random NFTs for your projects!
GITHUB REPOSITORY
The repository is divided into two folders. The “web” folder in which they have a basic frontend/interface that sends the mint request to the backend with the amount of nfts they want to mint. This interface is in case you want to use it and customize it so that the users themselves when they buy the nft automatically mint it.
The second folder is the “api” folder in which you will be able to find all the logic and configuration of this random NFT generation system.
In order to configure the system and make it work for your project, you will have to configure the following 3 parts:
NFT Image Creation
In a folder called layers, all the parts that are going to be used in the nfts will be added.
The structure of that folder is:
- First by parts of the nft (head, body, feet, etc)
- second for rarities. Rarities are named after
- original
- rare
- epic
- legendary
At the moment the rarities are static (the names cannot be changed) but in a future version we plan to modify this so that they can change the names or add new rarities.
In the case of not looking for rarities, simply use a folder with the name "original" with everything.
Rarities can be skipped, it is not necessary for a piece to have all of them. For example they can have the Head part only with original rarity and then the Body part with epic and rare rarities.
- Once all the folders have been uploaded, go to the config.js file and configure the layers with the names of the folders
const layersOrder = [
  { name: "Layer 1" },
  { name: "Layer 2" },
  { name: "Layer 3" },
];
- Each rarity listed above will have a certain chance of being chosen. This is also configurable from the config.js script in the rarityProbabilites part
const raritiesProbabilities = {
  original: 0.5,
  rare: 0.7,
  epic: 0.95,
}
To select the rarities, the system will select a random number from 0 to 1 for each part/layer/layer that will have its NFT, so each part has a different rarity.
So for example if that number falls between 0 and 0.5 the chosen rarity will be original, in the case that it falls between 0.5 and 0.7 the rarity will be rare and for the epic between 0.7 and 0.95. As you can see, the legendary rarity is not in the configuration and it is because its value is what remains to reach one, that is, in this case it would be from 0.95 to 1.
You may also wonder what happens if the number selects a rarity and I didn't put parts of that rarity in my NFTS. No problem, the system will detect that there are no parts of that rarity and it will select another random number again until another rarity is chosen that does have that part of the NFT.
After selecting the rarity, the system will select a random part that is inside the folder of that rarity.
- With that already configured, it would only be necessary to make some minor configurations of canvas size and if your NFT is going to have a background or not and the opacity of the background.
const format = {
  width: 512,
  height: 512,
};

const background = {
  generate: true,
  brightness: "80%",
};
IFPS Configurtion
Now we come to the part of saving images in IPFS. For those who do not know IPFS or Interplanetary Fyle System is a decentralized file storage system in which we upload a file and it will be replicated in different nodes which allows the file not to be found in only one location and if that location dies the file is lost but will continue to exist on other nodes for use.
We are going to be using this system to save the images of the NFTs and have a reference to this image in its metadata.
To use IPFS there is a long list of APIs which are services that help us pin our files to various nodes automatically.
We are going to be using NFT Storage for this system, which seemed excellent to us, but you can use the one you prefer.
We leave you this link in which you will find a large list of available APIs and information on each one about what they offer and their prices.
Link
IMPORTANT: In case you decide to use another API, know that each one has its own system, so the code and implementation may vary in each one. To modify this the script that you are probably going to have to modify is saveInIpfs.js which is located in the api/src/utils folder.
To use NFT Storage is very simple. Go to this website https://nft.storage/ and create an account.
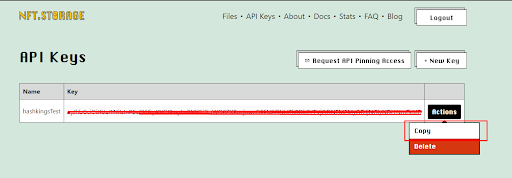
Once you have your account created, you will have to generate the api key for your project. To do this, go to the Api Keys tab

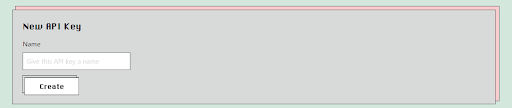
Once there select New Key

This tab will appear. give it a name and Create
Once created in the previous tab, your api key will appear, which you will go to Actions and copy and paste in the config.js script, which we have already been modifying, in the IpfsToken variable
MINTING NFTs
Well, we already have our random image creator and our save system configured in ipfs but we are missing the most important part which is the mining of the NFTs. For this we will have to do the following
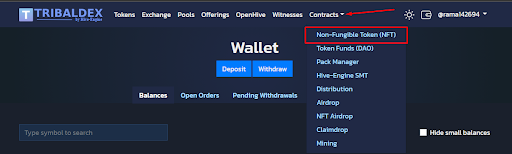
- In tribaldex https://tribaldex.com/ logged in with your Hive account you will go to the Contracts part and go to the Non Fungible Token (NFT) selection
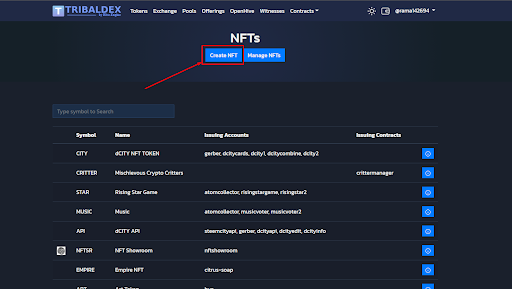
- Go the "Create NFT" section
- In this section he will ask you and explain all the data you have to enter to create your NFT. Remember that to create your collection of NFTs which will be able to have three properties each, you will need 100 BEE. And then if you want to add more properties you will have to pay 100 BEE more for each property.
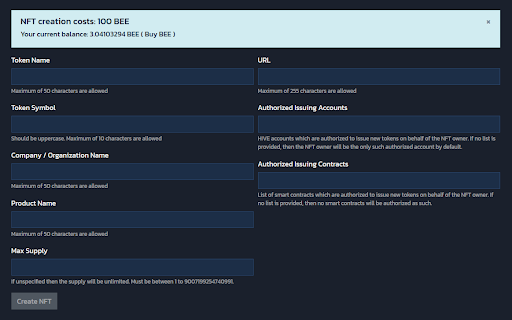
When they have finished completing everything, they give Create NFT and it will open their keychain for them to pay the 100 BEE.
- After a few minutes a panel will load where you will be able to see your created NFTs collection
It is the same tab that you can go to from Manage NFTs by going to Contract and Non fungible Tokens (NFT) as we did before.
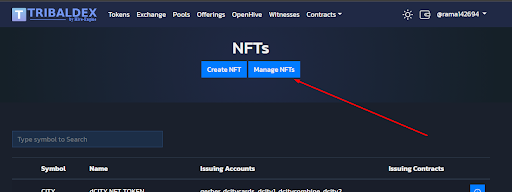

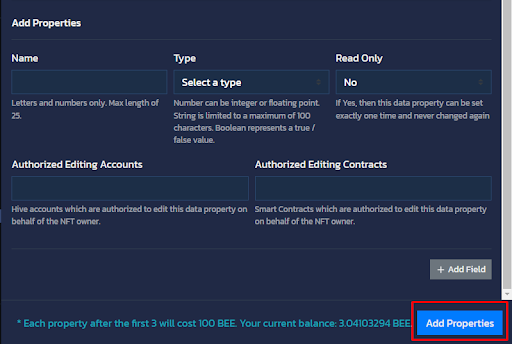
- In that panel you will be able to see all the info of your NFTs collection. What they have to do now is add the properties to it. To do this enter the icon shown in the image below
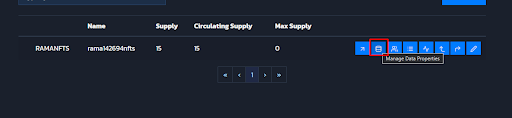
Once inside you have to add three properties:
- dna
- yam
- picture
As you will see in the image I already have them added. But for you to add them you will have to place the name in the Add property section that stands out in the image
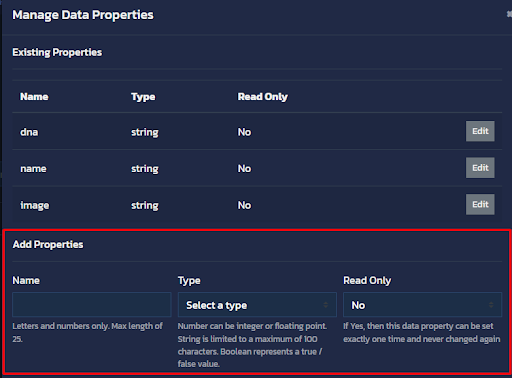
It is important that they have these names as our system works only with these names. In addition, it is also important that they are of Type string and the readonly does not matter much to us in this case, but just in case, leave it in no, since if they put it in yes once the NFT has been minted, they will not be able to modify that property.
Once you have added the three properties, click Save Properties and the keychain transaction will appear again so that you can accept it.
- With all this created and configured, we only need to return to our config.js script which we have already been configuring and modify the following variables with the information of our NFTs
const CONTRACT_CREATOR = "The contract that create the nfts, if you dont have a contract is your hive account name";
const UTILITY_TOKEN_SYMBOL = "The symbol of your nfts";
const ACTIVEKEY = 'Your Active private key from your hive account';
CONTRACT_CREATOR: Your contract that will create the nfts. If you don't have one, it's your Hive account.
UTILITY_TOKEN_SYMBOL: The Token Symbol of your collection
An example of The data in my case:
CONTRACT_CREATOR:”rama142694
”UTILITY_TOKEN_SYMBOL: “RAMANFTS”
ACTIVEKEY: Your Private Active key for your Hive account. You can get it from the Hive Engine extension in Configuration → Manage Accounts —> Active Password (you have to click on it to show them because the one that comes by default without hiding is the public one which will not work for you).
USING THE NFT RANDOMIZER
DONE! With all this already configured, what you have to do is run the API. To do this, from the terminal of your preferred code editor, place it on the api folder with the command
cd ./api
and then run
node ./index.js
This will open the api on port 3001

Finally, what you are going to have to do is go to the “web” folder and open the index.html file in your browser.
It will open a page like this:
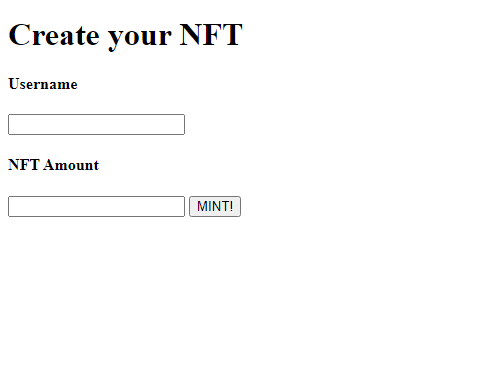
Here you only put the name of the Hive account to which they want to send the NFTs and the amount and that's it! you will already have your NFTs with random parts, rarities, with their img saved in ipfs and minted in the hive blockchain.
IMPORTANT: To mint NFTs, Hive charges a minimum fee that is set to be paid in PAL, so the account that is going to create the NFTs must have PAL to pay the mint.
NOTES: In the event that they are going to use this screen for users to use, you would have to modify the front to add Hivepay so that users pay the transaction.
We wanted to remember as we said at the beginning that this is the first version of this system so we do not rule out the possibility that it has bugs and improvements which we will be making whenever we can. That is why we appreciate that those who are going to use this system give us their feedback and do not hesitate to contact us about any errors that the system may have.
Glossary
In this glossary we decided to explain a little the main functions of the system so that any developer who decides to use it and modify it for their project has a guide to facilitate the process.
We will start with the function that executes all the other functions necessary for this system to work. This function is found in the index.js script and is the CreateNFTs function.
let CreateNfts = async (amount, account) => {
    console.log('Building Setup...');
    buildSetup();
    console.log('Finish Building Setup...');
    console.log('Creating Images...');
    await createImages(amount);
    console.log('Finish Creating Images...');
    console.log('Saving Files in Ipfs...');
    await SaveFile().then(async () => {
        console.log('Finish Saving Files in Ipfs...');
        console.log('Minting Nfts...');
        await mintNfts(hivejs, account);
        console.log('Finish Minting Nfts...');
    });
}
This function is quite basic but it allows you to call the other functions and show where the NFT creation process is going.
The functions found within CreateNFTs are the main ones of the system, so these are the ones we are going to explain.
buildSetup(): Found in the functions.js script in the src folder. It is the most basic function of all since it cleans the build folder, which is where the nfts images are stored. Delete the images of previously created nfts so that new ones can be created.
createImages() is located in the functions.js script in the src folder. It is where we create the images and the json with the metadata that the NFTs will carry. This function uses other smaller functions for the creation of the DNA of the nfts, the rarities of the parts to be chosen (this is explained more in depth in the step-by-step explanation), the creation of the json and finally, As its name indicates, the creation of the images
SaveFile() Found in the saveInIpfs.js script in the src/utils folder. Function that allows us to upload our images to Ipfs. In the event that you want to use another API other than NFT Storage, this is the function that you will have to modify. This function also calls another important function which is UpdateMetadata() which is where we update our previously created json in createImages() to place the link to each image once our Ipfs API has uploaded them.
mintNfts() Found in the mintNfts.js script in the src/utils folder. As its name indicates, it is the function in charge of mining the nfts. In this function they can change the currency in which the mining fee will be charged. By default it is in PAL which is the one we use.
Another function that I want to mention is GetLastNFTMinted.js(). This function searches the nfts of your collection to know which was the last minted and what to follow with the numbering chain. In case you don't want to do this or you call your nfts different you can modify it for your convenience.
¿How to participate in HK?
Each HK startup will have its own methodology so it will depend in what you're interested in. If you are a HIVE developer/Ceo and want to start a partnership with us in any of our startup you can reach us in our official discord.
- Read about HIVEKINGS
- Read about HK-UNIVERSITY
~~~ embed:1559351233403822080 twitter metadata:b0FjaWRvfHxodHRwczovL3R3aXR0ZXIuY29tL29BY2lkby9zdGF0dXMvMTU1OTM1MTIzMzQwMzgyMjA4MHw= ~~~
The rewards earned on this comment will go directly to the people( @papilloncharity, @acidyo ) sharing the post on Twitter as long as they are registered with @poshtoken. Sign up at https://hiveposh.com.
As I've mentioned before, with front-ends like @peakd and more enabling verified nft profile pics and the connection accounts have with each other on Hive compared to other chains I think they can become quite popular and fun. Looking forward to see what kind of nft profile pic projects people come up with using this service to make it easy!
Very cool!!!!
You know im a very popular NFt artist :D
IMO it is huge to have an open source minting code for hive!
Congratulations @hivekings! You have completed the following achievement on the Hive blockchain and have been rewarded with new badge(s):
Your next target is to reach 600 upvotes.
You can view your badges on your board and compare yourself to others in the Ranking
If you no longer want to receive notifications, reply to this comment with the word
STOPCheck out the last post from @hivebuzz:
Support the HiveBuzz project. Vote for our proposal!
This is huge, very under the radar right now!
Just a question, when you have already set up the 100 BEE payment for the NFT minting in Tribaldex, is that a one payment transaction just to set up the NFT minting parameters you set out when initialising with the BEE payment?
As in if I make it 100 NFTs with the three properties, when the front end is implemented and the user who mints through that and pays the PAL token there will not be anymore BEE being paid for the mints?
Hi @akumagai! The 100 BEE is one payment only to create the NFTs Collection. Then you have to paid only a little amount of PAL for each mint!
Post votado por la Curación de la Comunidad de Mundo Virtual. Recibes algunos Huesos
Te invitamos a que conozcas nuestra Comunidad de Hive
Great guide. Maybe I would launch my NFT collection here one day.
Hopefully there's an NFT bridger from the to ETH, BNB and other chains too.