Hola amigos, ¡bienvenidos a mi mundo!
Espero que todos estén muy bien. Yo estoy bien, en mi casa jugando mucho y viendo videos en YouTube de Minecraft.
Hoy voy a aprovechar que tengo mucho tiempo libre y les voy a enseñar cómo hago mis portadas con la aplicación de Canva, para los que todavía no saben cómo hacerlas.
Eso fue lo primero que mi mamá me enseñó a hacer cuando yo iba a comenzar con mi blog, porque ella dice que es importante porque es lo primero que se ve.
Nosotras usamos Canva para las portadas, pero la aplicación que ella descargó en su celular por Play Store porque no tenemos computadora.
Así que vamos a aprender paso a paso a hacer una portada desde la aplicación en tu celular.
PASO A PASO

Escoge el tamaño
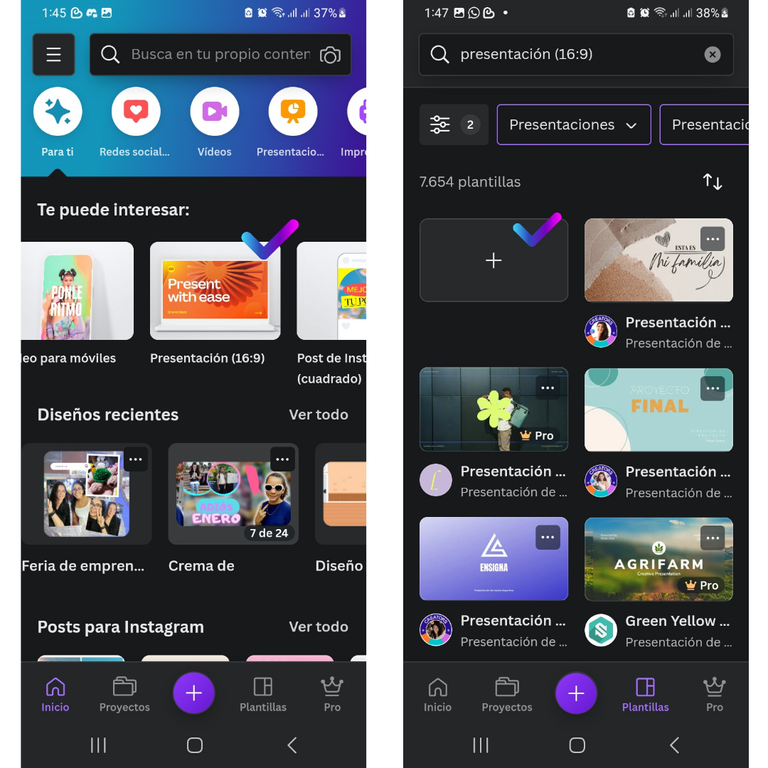
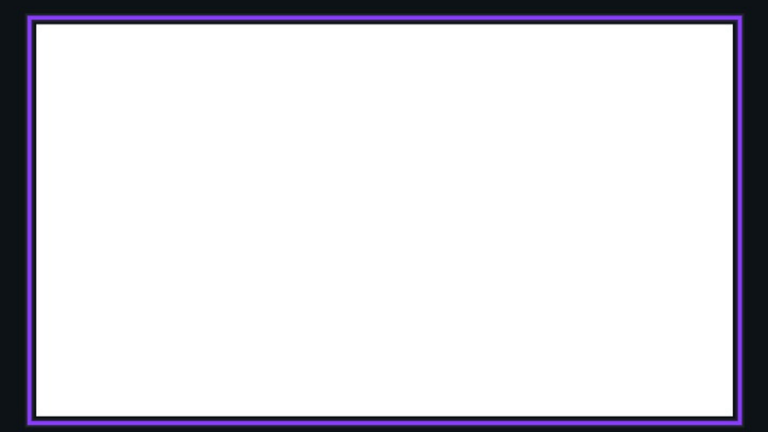
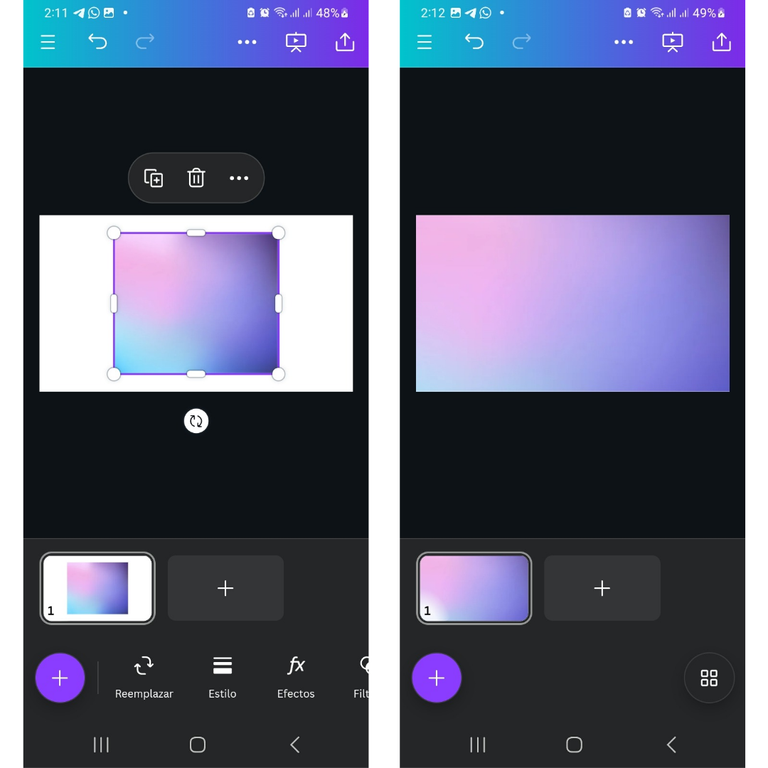
Lo primero que hay que hacer es escoger el tamaño de la portada que queremos y esto está en la parte de arriba de la aplicación. Yo uso la que dice presentación (16:9). Esa la tocas y te abre otra página y ahí escojo la que está de primera que no tiene nada.
Las demás son unas plantillas que puedes ver si te gusta alguna, pero mi mamá dice que es mejor en blanco y ponerle lo que yo quiera. Entonces tocas ahí en el + y abre otra página que está una hoja en blanco y ahí es donde hago la portada.
Escoge el fondo
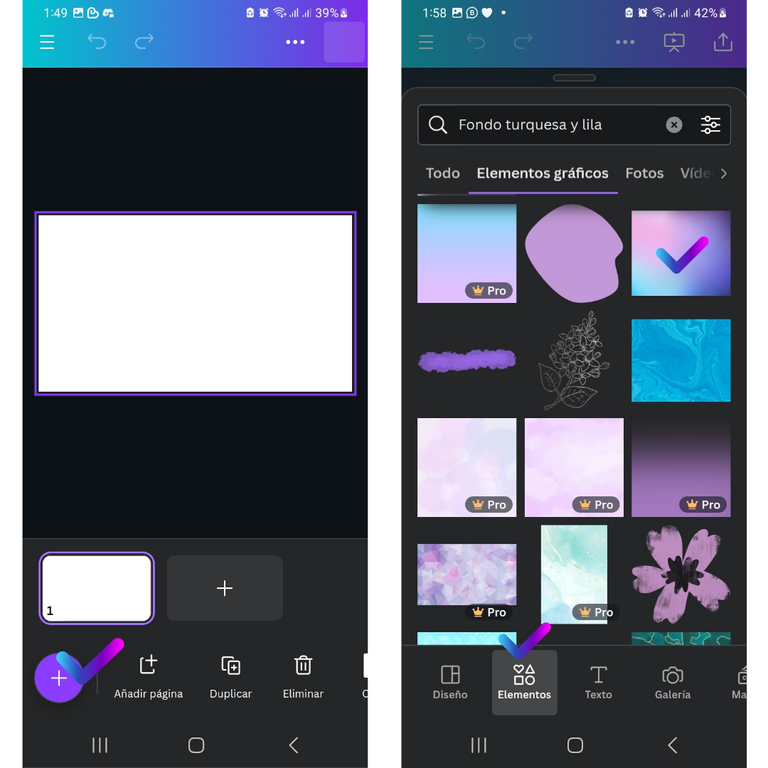
El fondo puede ser lo que tú quieras, una foto o un fondo de colores. Eso lo vas a escoger en la parte de abajo, en la izquierda, en el círculo morado que tiene el +.
Cuando le das ahí, te salen unas imágenes y abajo hay una barra. Esas imágenes son plantillas, pero yo no lo uso. Entonces ven que hay una parte que dice elementos y otro que dice galería.
En elementos están los fondos y muchas imágenes y en galería se buscan las fotos que están en la cámara.
Yo uso un fondo que es siempre el mismo, entonces voy a apretar en elementos. Ahí en la lupa voy a buscar lo que quiero. Yo puse fondo lila y turquesa porque esos son mis colores favoritos y ahí escogí el que me gustó y lo toqué.
Entonces aparece en la página en blanco y lo pongo más grande para que quede toda la página de ese color. Lo halo por las líneas blancas y ya. Queda listo.
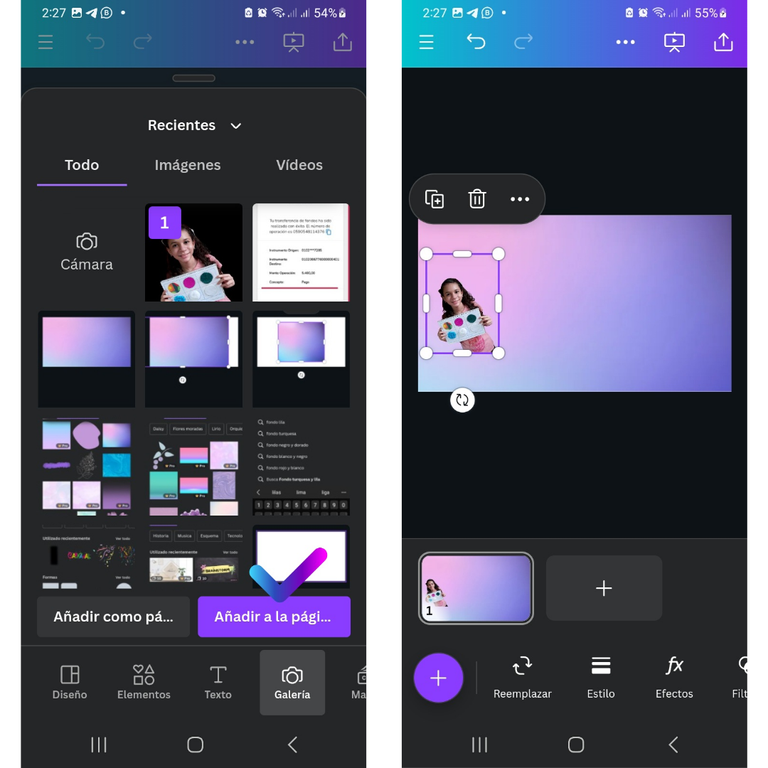
Escoge la imagen
Casi siempre yo uso una foto mía que le quito el fondo. Hacía eso antes en Canva porque mi tía tenía Canva Pro y nos prestaba, pero ya lo quitó y ahora lo hago en esta página, y la descargo.
Después para buscarla toco otra vez el + morado de la esquina y busco en galería y ahí aparece, la toco, la pongo del tamaño que quiero y ya.
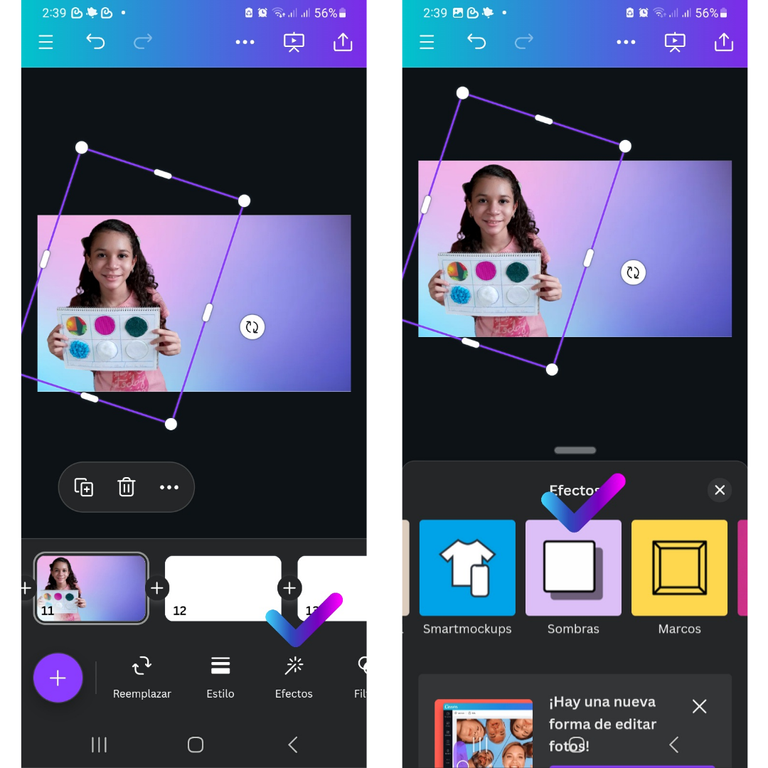
Yo casi siempre le pongo un borde que brille en el color que quiera, lo busco abajo donde está la varita mágica que dice efectos. Lo toco y busco donde dice sombras y después donde dice brillante.
Ahí escojo el color, el grueso y si quiero que se vea borroso o fuerte el color. Ya así está lista esa parte.
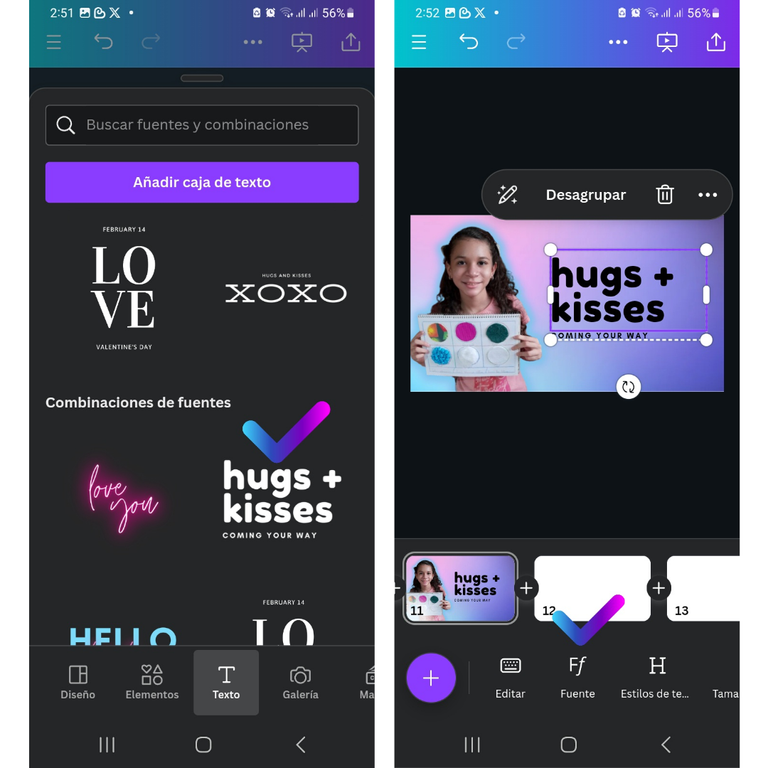
Escoger el texto
Otra vez toco el + y luego en la barra de abajo toco donde dice texto. Y van a ver muchos modelos y escogen el que más les guste.
A eso le pueden cambiar el tipo de letra, el color, el tamaño y lo pueden desagrupar que es que se separa todo.
Cambio la letra donde dice fuente, yo siempre uso dos, una que se llama Adigiana toy box para las letras grandes y para las pequeñas lovelo. Después les pongo color y en efectos las pongo como quiero.
En la barra de abajo las pueden poner en el medio o para un lado. Como ustedes quieran. Yo las pongo en el medio y pongo las letras grandes de colores y con un brillo. Y escribo el título.
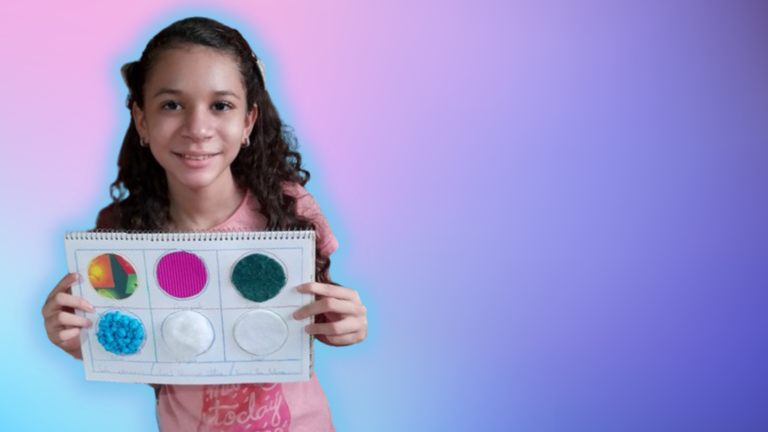
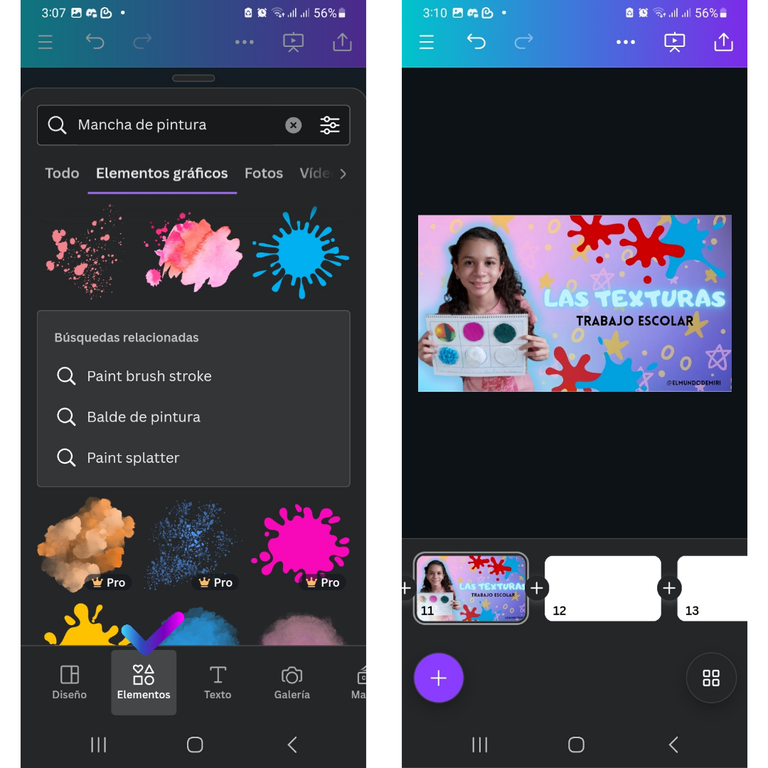
Otras imágenes
Ya así está casi lista, nada más le pongo imágenes para que sea linda. Como es de pintura, abajo en la barra busco imágenes y veo lo que me gusta y lo pongo y todo lo que me guste. Yo a esa les puse estrellas también.
¿Ven que es muy fácil? En la barra de abajo hay de todo, nada más hay que buscar lo que necesitamos y probar porque si se equivocan se puede borrar. En la parte de arriba hay dos flechas en la esquina y ahí puedes quitar y volver a poner lo que sea.
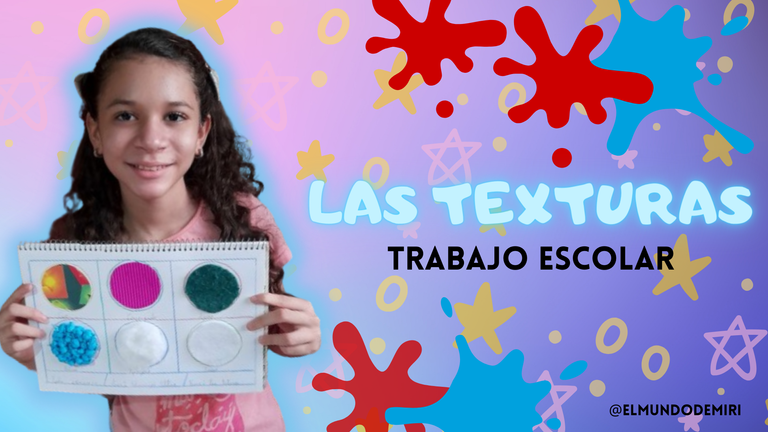
Bueno amigos, eso es todo lo que hago para hacer mis portadas con Canva, ojalá hayan entendido todo y hagan las suyas muy bellas.
Chaooo 💗💗

Hello friends, welcome to my world!
I hope everyone is doing great. I'm fine, at home playing a lot and watching YouTube videos of Minecraft.
Today I'm going to take advantage that I have a lot of free time and I'm going to show you how I make my covers with the Canva application, for those who still don't know how to make them.
That was the first thing my mom taught me to do when I was going to start my blog, because she says it's important because it's the first thing you see.
We use Canva for the covers, but the app she downloaded on her phone through the Play Store because we don't have a computer.
So let's learn step by step how to make a cover from the app on your cell phone.
STEP BY STEP
Choose the size
The first thing to do is to choose the size of the cover we want and this is at the top of the app. I use the one that says presentation (16:9). That one you touch and it opens another page and there I choose the first one that has nothing.
The others are templates that you can see if you like any of them, but my mom says it's better blank and put whatever I want. Then you click on the + and it opens another page with a blank page and that's where I make the cover.
Choose the background
The background can be whatever you want, a photo or a colored background. You will choose it at the bottom, on the left, in the purple circle with the +.
When you click on it, you get some images and below there is a bar. Those images are templates, but I don't use it. Then you see that there is a part that says elements and another one that says gallery.
In elements there are the backgrounds and many images and in gallery you look for the pictures that are in the camera.
I use a background that is always the same, so I click on elements. There in the magnifying glass I will look for what I want. I put lilac and turquoise background because those are my favorite colors and there I chose the one I liked and touched it.
Then it appears on the page in white and I make it bigger so that the whole page is in that color. I drag it along the white lines and that's it. That's it.
Choose the image
I almost always use a photo of myself that I remove the background. I used to do that before in Canva because my aunt had Canva Pro and she lent it to us, but she removed it and now I do it on this page, and I download it.
Then to look for it I touch again the purple + in the corner and look in gallery and there it appears, I touch it, put it in the size I want and that's it.
I almost always put a border that shines in the color I want, I look for it below where the magic wand that says effects. I touch it and look where it says shadows and then where it says shimmer.
There I choose the color, the thickness and if I want the color to be blurry or strong. Now that part is ready.
Choose the text
Again I click on the + and then in the bottom bar I click on the text field. And you will see many models and choose the one you like the most.
You can change the font, the color, the size and you can ungroup it, that is, you can separate everything.
I change the font where it says font, I always use two, one called Adigiana toy box for the big letters and lovelo for the small ones. Then I color them and in effects I put them as I want.
In the bottom bar you can put them in the middle or to one side. As you want. I put them in the middle and put the big colored letters with a glitter. And I write the title.
Other Images
It's almost ready, I just add images to make it pretty. As it is a painting, I look for images in the bar below and I see what I like and I put it and whatever I like. I put stars on that one too.
See how easy it is? In the bottom bar there is everything, you just have to look for what you need and try it because if you make a mistake you can delete it. At the top there are two arrows in the corner and there you can remove and replace anything.
Well friends, that's all I do to make my covers with Canva, hopefully you have understood everything and make yours very beautiful.
Byeee 💗💗

Tus portadas son hermosas 😍 me encantan!!! Realmente resaltan en el feed. En general toda tu publicación es organizada y bonita, te felicito por eso, se nota que haces las cosas con dedicación y cariño💗
Hola 💗 muchas gracias. Mi mamá se queda conmigo a ver como voy por si me olvido de algo. Después que me acostumbre bien ya me deja sola.
A mí me gusta mucho hacer mi blog y la portada más.
Te mando un abrazo 🤗 💕
Muy util tutorial, yo soy muy anticuado y todavia uso photoshop y me da pereza hacer cosas elaboradas , asi que siempre hago cosas poco esteticas, pero me cuesta adaptarme a las nuevas tecnologias. Ahora veo que es suammente sencillo con Canvas, me puedo ahorrar tiempo y me queda bonito. saludos. Gracias.
Es una muy buena herramienta, bastante intuitiva y fácil de usar, es muy bueno que hayas decidido mostrarla a todos aquellos que no sepan de ella para que también mejoren su contenido. Muy buen post, te felicito :3
¡Felicitaciones!
Estás participando para optar a la mención especial que se efectuará el domingo 18 de febrero del 2024 a las 8:00 pm (hora de Venezuela), gracias a la cual el autor del artículo seleccionado recibirá la cantidad de 1 HIVE transferida a su cuenta.
¡También has recibido 1 ENTROKEN! El token del PROYECTO ENTROPÍA impulsado por la plataforma Steem-Engine.
1. Invierte en el PROYECTO ENTROPÍA y recibe ganancias semanalmente. Entra aquí para más información.
2. Contáctanos en Discord: https://discord.gg/hkCjFeb
3. Suscríbete a nuestra COMUNIDAD y apoya al trail de @Entropia y así podrás ganar recompensas de curación de forma automática. Entra aquí para más información sobre nuestro trail.
4. Visita nuestro canal de Youtube.
Atentamente
El equipo de curación del PROYECTO ENTROPÍA
Bella esa portada, gracias por enseñarnos a usar canva, saludos
Te felicito una muy buena explicación, te quedan muy bellas ,lo.voy a intemtar .
Excelente tutorial, era lo que necesitaba 😊👌
Que bueno que te sirvió
Hola Miri.. ❤️ Gracias por compartir como realizas tus portadas. Me encanto tu paso a paso. Se entiende todo con claridad. Te cuento que con tu guía estoy practicando, porque no sabía cómo hacer una portada así en el estilo que tu las haces. Me encanta.
Tus portadas quedan preciosas ❤️ tan lindas como tú.
Feliz Día mi niña ❤️