
El lenguaje Markdown no es tan difícil.
Sé que a muchos nos ha parecido un verdadero lío utilizar el lenguaje Markdown para hacer que nuestras publicaciones sean más agradables a la vista del lector. Después de escribir algunos artículos utilizando esta sintaxis y leer varias publicaciones al respecto me he dado cuenta que es cuestión de práctica. En cada publicación trato de aplicar una nueva etiqueta para así ir teniendo más dominio sobre el tema y es que Markdown en realidad está hecho para facilitarnos el trabajo a la hora de darle formato al texto. En mi caso ha sido cuestión de Investigación - Acción.
¿Qué es lo básico para dominar Markdown?
Lo primero que debes conocer es la sintaxis, aprender para qué sirve cada etiqueta o cada atributo es esencial, sin eso no vas a lograr entrarle por más que lo intentes; las más comunes son las siguientes:
- text-justify: alinea el texto en formato justificado.
- center: centra una imagen o texto, con la salvedad que para centrar un texto se utiliza text-center.
- text-right: para alinear el texto a la derecha.
- text-left: para alinear el texto a la izquierda.
- blockquote: se usa para citar texto, en este caso el signo > cumple la misma función.
- br : introduce un salto en la línea actual.
- **: coloca un texto en negrita, se debe escribir la frase entre asteriscos.
- sub: Se usa para colocar las letras más pequeñas, ideal para citar fuentes.
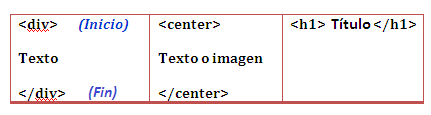
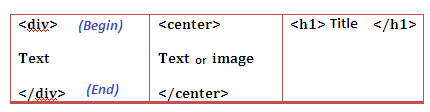
Al maquetar tu publicación el contenido se agrupa como si estuviera en una caja, cada caja lleva una etiqueta de inicio que se denota colocándola entre los signos "< >" y otra etiqueta final acompañada del carácter “/”, indicando que hasta esa línea se aplicarán los atributos señalados para esa caja. Debes estar muy pendiente de colocar los respectivos cierres, de lo contrario el texto se mostraría de una manera que no es la deseada. Fíjese en la siguiente tabla como abre y cierra cada caja de acuerdo al formato especificado:
|
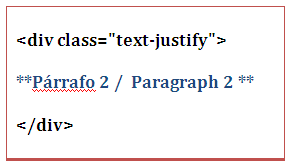
La etiqueta div utiliza clases de atributos para darle formato al contenido ya sea centrado, o justificado, alineado a la derecha o a la izquierda. Si queremos que el texto quede justificado debe colocarse la siguiente sintaxis: |
|
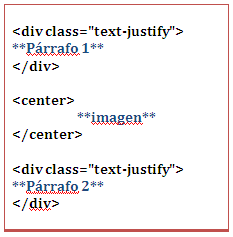
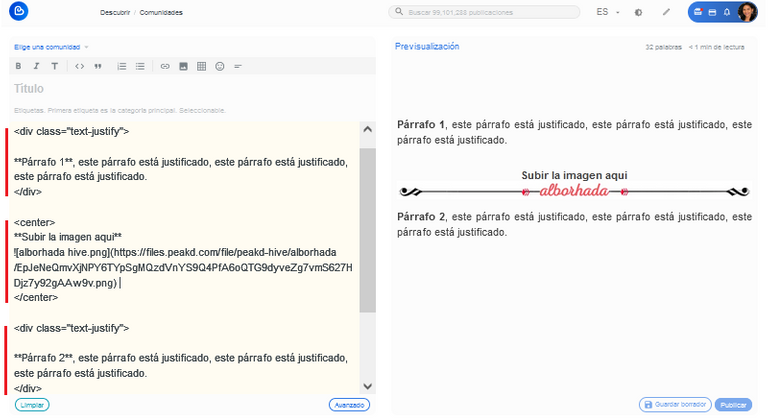
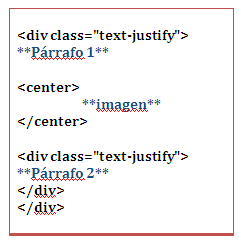
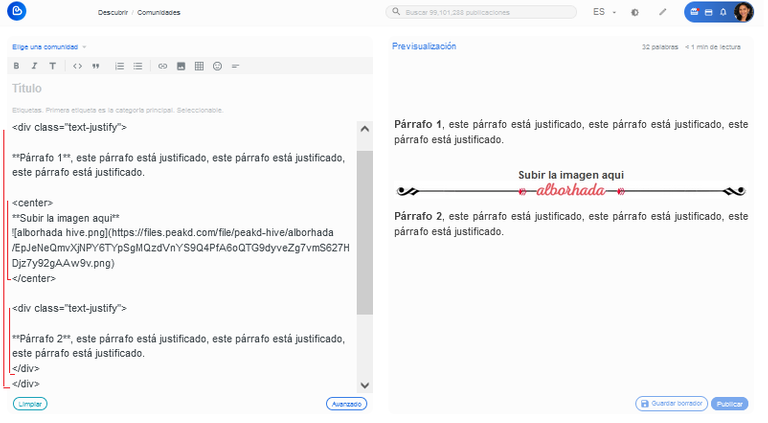
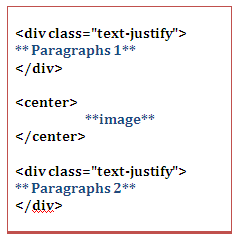
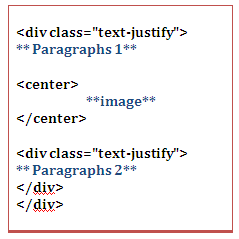
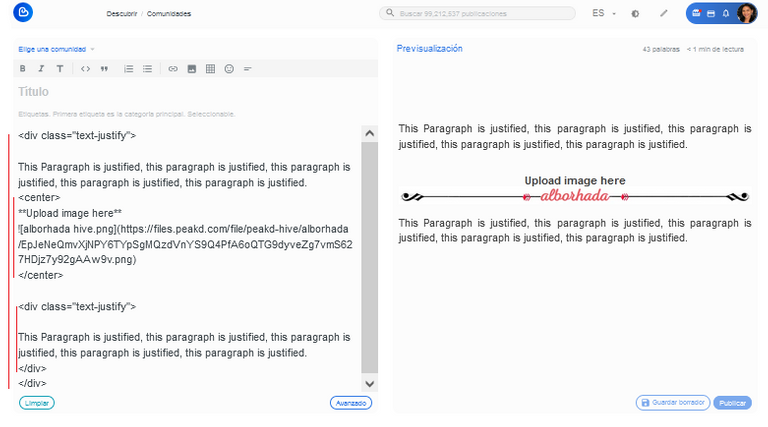
Si desea escribir dos párrafos justificados e intercalar una imagen centrada, entonces debe indicar los atributos por separado. En este caso la sintaxis quedaría así: |
|
También puede cerrar el primer div al final del contenido y producirá el mismo efecto: |
|
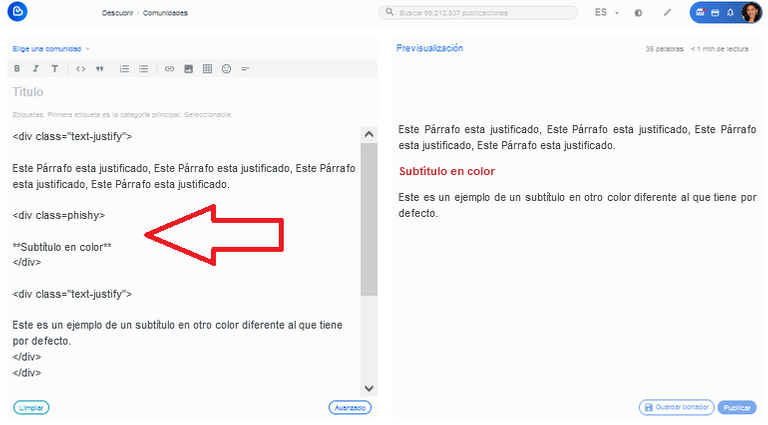
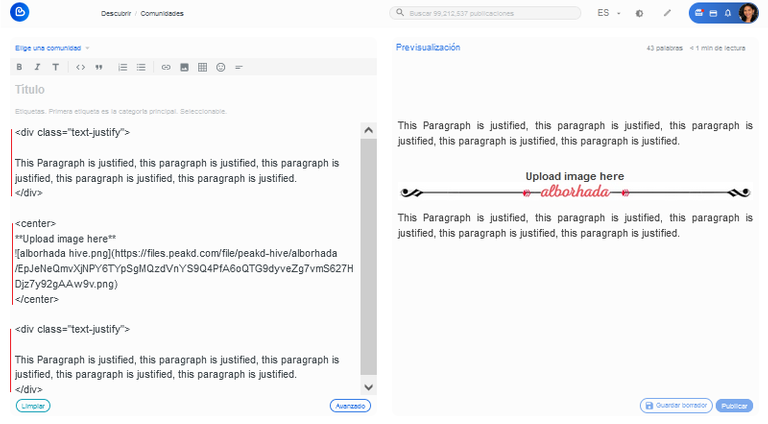
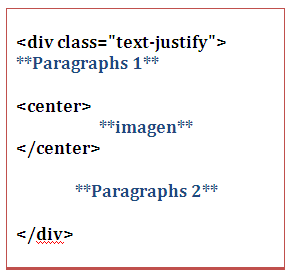
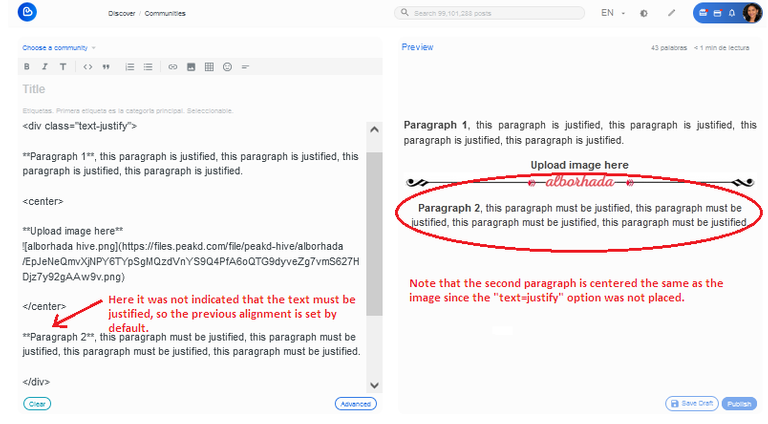
Observe la diferencia si no se indican los atributos para cada párrafo por separado; por ejemplo, si se coloca solo al inicio el atributo de alineación de texto justificada, entonces va a quedar el primer párrafo justificado, la imagen centrada y el segundo párrafo también centrado, tal como se muestra en las siguientes imagenes: |
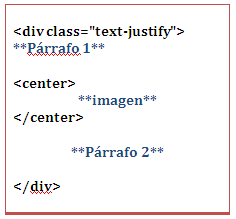
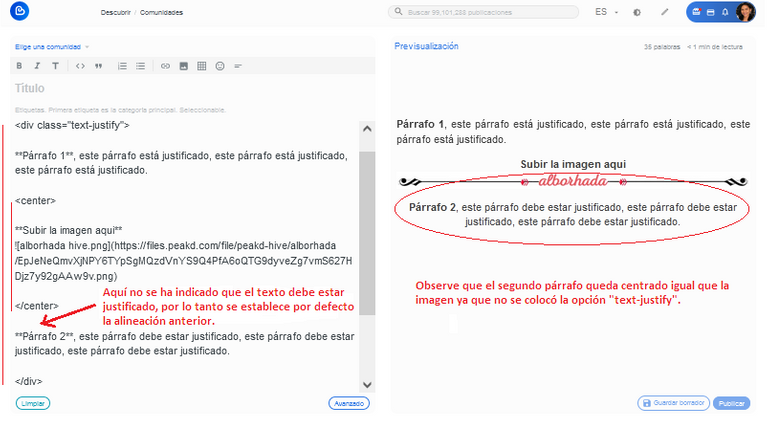
En el ejemplo anterior no se indicaron los atributos del párrafo 2, por lo tanto éste toma la alineación de la imagen centrada. Aún cuando haya colocado la etiqueta /center esta alineación se queda como predeterminada para el contenido que sigue. Esto se corrige indicando que el texto va justificado, agregando la etiqueta div class="text-justify" antes del párrafo 2:

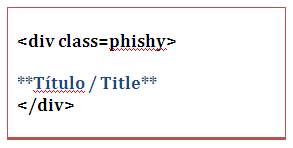
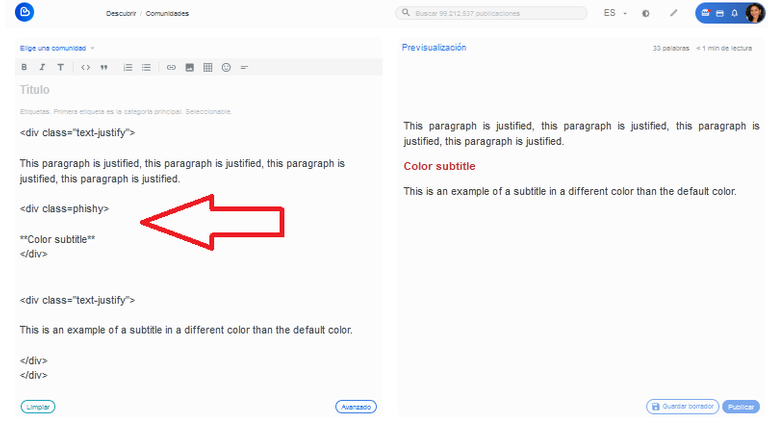
¿Cómo colocar títulos en color?
Esto se logra con la clase llamada phishy, la cual le asigna un color diferente al texto indicado. Ejemplo:
Tip adicional:
Si te gusta la maquetación del contenido en algún post de Hive puedes ver su código fuente al sustituir en la barra de direcciones del navegador, el inicio de la dirección del post con la frase hiveblocks.com, de esa manera se puede ubicar el párrafo deseado y observar la sintaxis para aplicar ese efecto en tus contenidos. Ejemplo:
https://hive.blog/spanish/@alborhada/comenzar-a-comentar-en-hive-blog-start-commenting-on-hive-blog
Sustituir con:
En conclusión se puede decir que maquetar las publicaciones con Markdown no es una tarea complicada, solo hay que ser muy cuidadoso con la sintaxis. Por tal razón es recomendable tener una plantilla con el esquema básico a usar y en base a esta comenzar a completar el contenido.
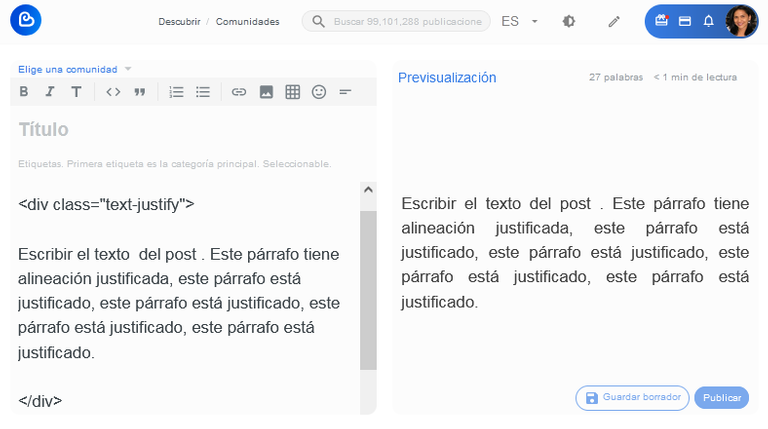
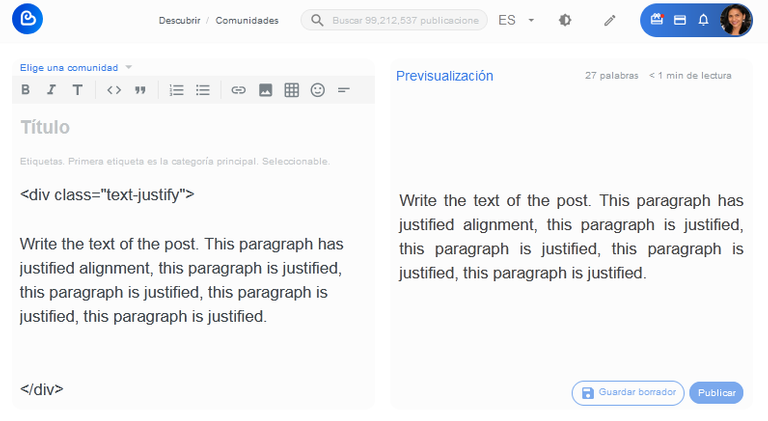
Si conoces algún tip de utilidad puedes dejarlo en los comentarios. Para visualizar los ejemplos se utilizó el editor de ecency pero también funciona igual si se utiliza el editor de Peak o Hive Blog.
El contenido es de mi autoría como resultado de las investigaciones realizadas en internet. Si desea profundizar más sobre el tema le recomiendo los siguientes enlaces:
- 🌟Tutorial de Markdown COMPLETO🌟 |Traducción Autorizada
- Tutorial Markdown y HTML
- 7 Trucos inusuales de formateo y maquetado que no conocías!
- How to Write Faster, Better & Longer: The Ultimate Guide to Markdown
Las imágenes han sido capturadas y elaboradas desde mi computadora; la imagen de portada, el baner y los separadores han sido diseñados por mí en Canva.
Traducido con www.DeepL.com/Translator (versión gratuita).

English Translation:
Markdown language is not so difficult.
I know that many of us have found it a real mess to use Markdown language to make our publications more pleasing to the reader's eye. After writing some articles using this syntax and reading several publications about it, I have realized that it is a matter of practice. In each publication I try to apply a new tag in order to have more mastery over the subject and Markdown is actually made to make our work easier when it comes to formatting text. In my case it has been a matter of Research - Action.
What are the basics to master Markdown?
The first thing you need to know is the syntax, learning what each tag or attribute is for is essential, without that you will not be able to get into it no matter how hard you try. The most common are the following:
- text-justify: aligns text in justified format.
- center: centers an image or text. To center a text, use text-center.
- text-right: to align the text to the right.
- text-left: to align the text to the left.
- blockquote: is used to quote text, in this case the > sign fulfills the same function.
- br: enters a break in the current line.
- ** : places a text in bold, the sentence must be written between asterisks
- sub: It is used to place smaller letters, ideal for quoting fonts.
When you layout your publication the content is grouped as if it were in a box, each box has a start tag which is denoted by placing it between the signs "< >" and another end tag accompanied by the character "/", indicating that up to that line the attributes indicated for that box will be applied. You must be very careful to place the respective closings, otherwise the text will be displayed in a way that is not desired. Notice in the following table how each box opens and closes according to the specified format:
|
|
|
|
In the example above, the attributes of paragraph 2 were not specified, so it takes the alignment of the centered image. Even if you have placed the tag /center this alignment remains as default for the content that follows. This is corrected by indicating that the text is justified by adding the div class="text-justify" tag before paragraph 2:

How to place color titles?
This is achieved with the class called phishy, which assigns a different color to the indicated text. Example:
Additional tip:
If you like the layout of the content in any Hive post you can see its source code by replacing in the address bar of the browser, the beginning of the address of the post with the phrase hiveblocks.com, that way you can locate the desired paragraph and observe the syntax to apply that effect in your content. Example:
https://hive.blog/spanish/@alborhada/comenzar-a-comentar-en-hive-blog-start-commenting-on-hive-blog
Replace with:
In conclusion, it can be said that laying out publications with Markdown is not a complicated task; you just have to be very careful with the syntax. For this reason it is advisable to have a template with the basic scheme to use and based on this start to complete the content.
If you know any useful tip you can leave it in the comments. To visualize the examples we used the ecency editor but it also works the same if you use the Peak or Hive Blog editor.
The content is authored by me as a result of my research on the Internet. If you wish to learn more about the subject, I recommend the following links:
- 🌟Tutorial de Markdown COMPLETO🌟 |Traducción Autorizada
- Tutorial Markdown y HTML
- 7 Trucos inusuales de formateo y maquetado que no conocías!
- How to Write Faster, Better & Longer: The Ultimate Guide to Markdown
The images have been captured and elaborated from my computer; the cover image, banner and dividers have been designed by me in Canva.
Translated with www.DeepL.com/Translator (free version)

Me encantooooo sobre todo la miniatura, hay algunos que yo uso siempre como el <.br> (sin el punto) para darle un espaciado a mis post y que no se vea todo tan pegado, he visto tambien algunos post en donde se pasan de ingeniosos con algunos de los comandos como el de poner imagenes a los lados, definitivamente hay un mundo por descubrir en el markdown lo que me extraña es que nadie se le haya ocurrido hacer plantillas cheveres y publicarlas en Hive! buen post
Si amigo, tambien he usado el llamado salto de carro < "br" >, cuando trabajo con dos columnas es muy útil para cuadrar el texto. También tengo aplicaciones alineadas a la izquierda y a la derecha y quedan fenomenales, quise dejar esa explicación para otro post para no hacer este tan extenso. Gracias por tu visita!
Super útil la información que nos has mostrado amiga, yo recien comienzo en hive y no conozco muy bien las maneras de utilizar los codigos, con este post e resuelto un sin fin de dudas que tenia y aprendido mucho. De ahora en adelante apliacare los metodos que mencionastes, sobre todo el de poner pequeñas las letras para citar fuentes de imagenes. Pues amiga gracias por tu exelente articulo, tenga buen dia. Saludos.
Siempre a la orden. La idea es compartir lo que vamos aprendiendo para que la comunidad siga creciendo. Me contenta que te sea de utilidad. Todo es cuestión de práctica y poco a poco vamos aprendiendo. Trataré de compartirles mas tips en futuras publicaciones. Gracias por tu visita. Un abrazo y bienvenido a Hve!
Me parece que esta bien, sencillo y directo el tutorial, un abrazo :)
Esa era la intención, algo fácil de entender y de recordar. Una vez que dominamos el markdown es fácil aplicarlo en todo, hasta en los comentarios. Si agrego una foto a un comentario ya sé como centrarla, por ejemplo. Gracias por tu visita Jesús!
Siempre que pueda leer y tenga el tiempo para comentar, lo hare :)
Congratulations @alborhada! You have completed the following achievement on the Hive blockchain and have been rewarded with new badge(s):
Your next target is to reach 30 posts.
You can view your badges on your board and compare yourself to others in the Ranking
If you no longer want to receive notifications, reply to this comment with the word
STOPTo support your work, I also upvoted your post!
Check out the last post from @hivebuzz:
Support the HiveBuzz project. Vote for our proposal!
Necesitaba justo esto! Llevo poco tiempo aquí y me pierdo mucho a la hora de escribir por no saber como acomodar el texto. Gran ayuda y muy bien ejemplificado. Me has salvado!😭💕
Me contenta que sea de utilidad para ti. Ahora a poner en práctica toda esa sintaxis, una vez que le agarras el hilo tus publicaciones se verán espléndidas! Bienvenida a Hive! Un abrazo!
Muchísimas gracias! Qué tengas un muy buen fin de semana!😊
Siempre serán buenos los post con la información del markdown en la blockchain, te cuento que con el tiempo que llevo en la plataforma aún no sabía cómo ponerle color rojo a un escrito, que bien nos sirve para resaltar un título. De verdad gracias por esta información valiosa. Saludos!.
Sii, esos títulos de color rojo le dan un toque especial a las publicaciones. Desde que lo descubrí lo incluí en mis plantillas y ahora los uso a menudo. Gracias por la visita!