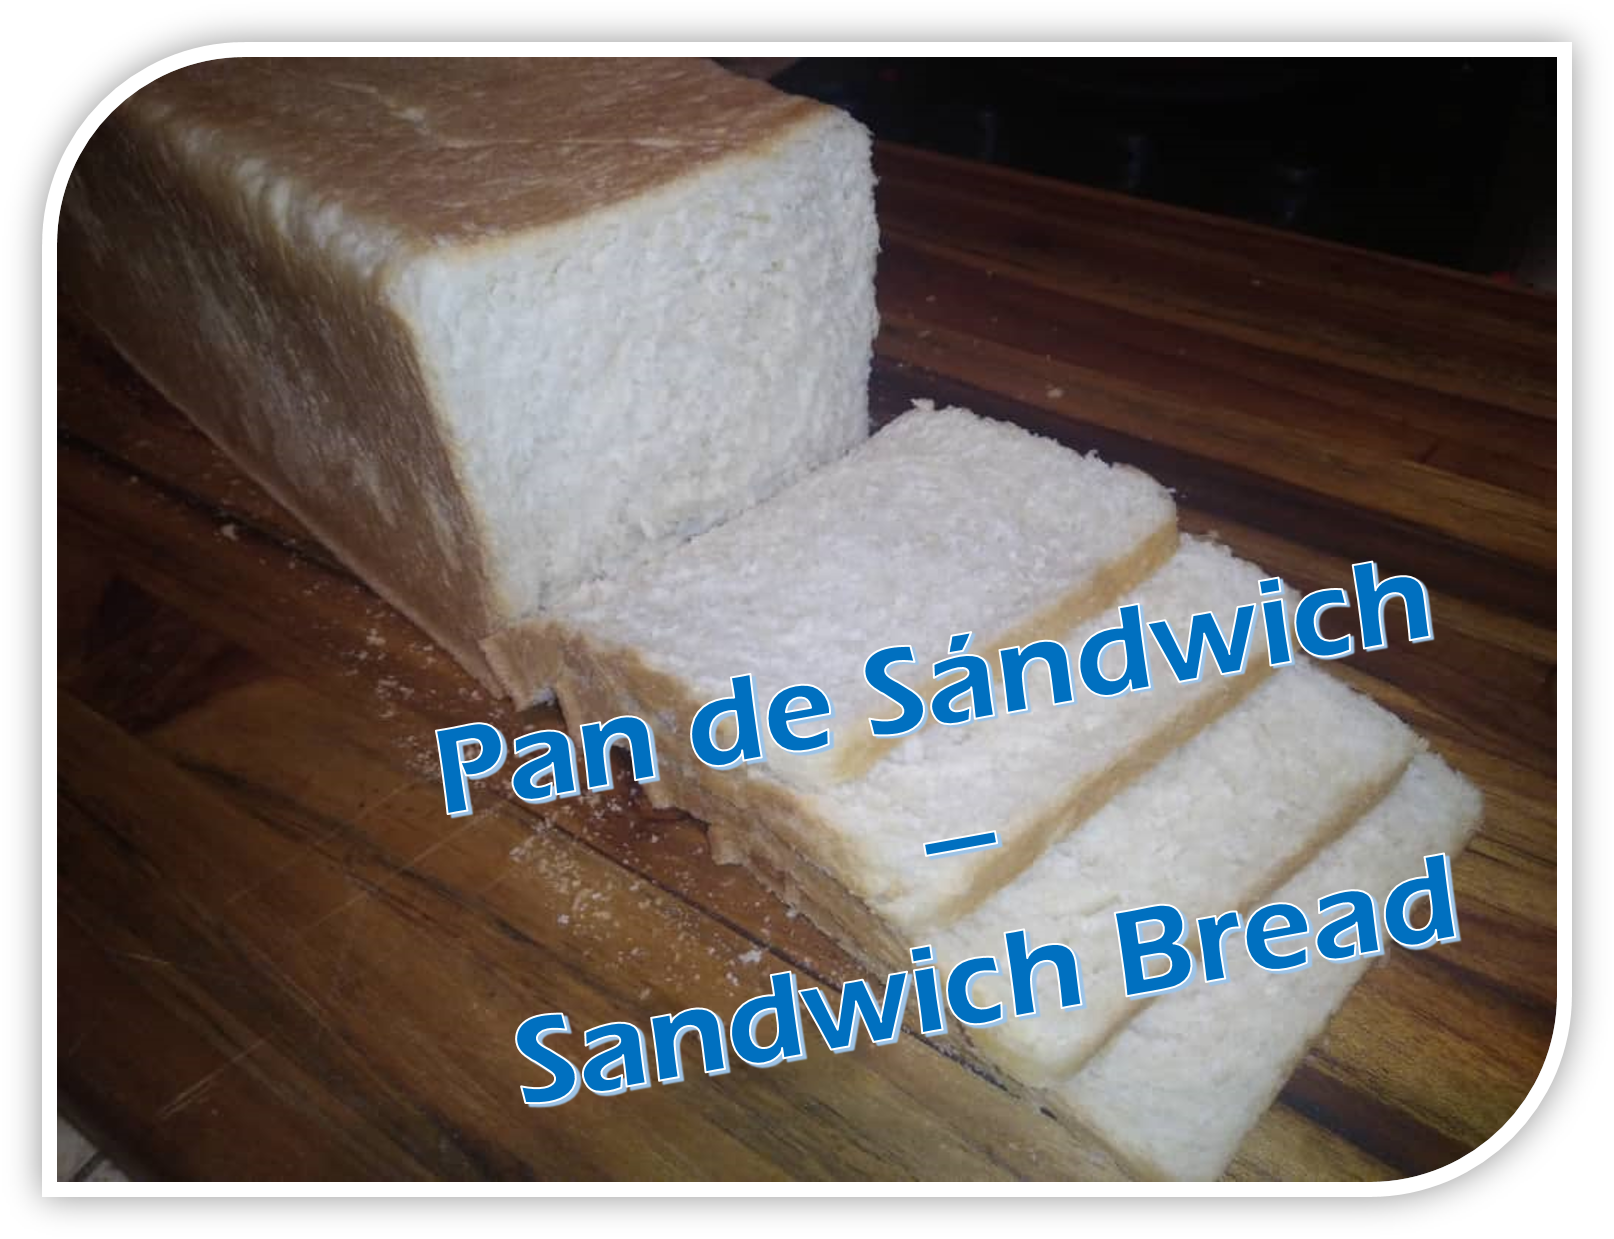
Saludos cordiales, comunidad de Foodies Bee Hive. en esta publicación, les mostraré como preparar en casa su propio pan de sándwich o pan de molde, se trata de una receta fácil y con pocos ingredientes. Espero que les guste.
Greetings, Foodies Bee Hive community. In this post, I will show you how to prepare at home your own sandwich bread, it is an easy recipe with few ingredients. I hope you like it.

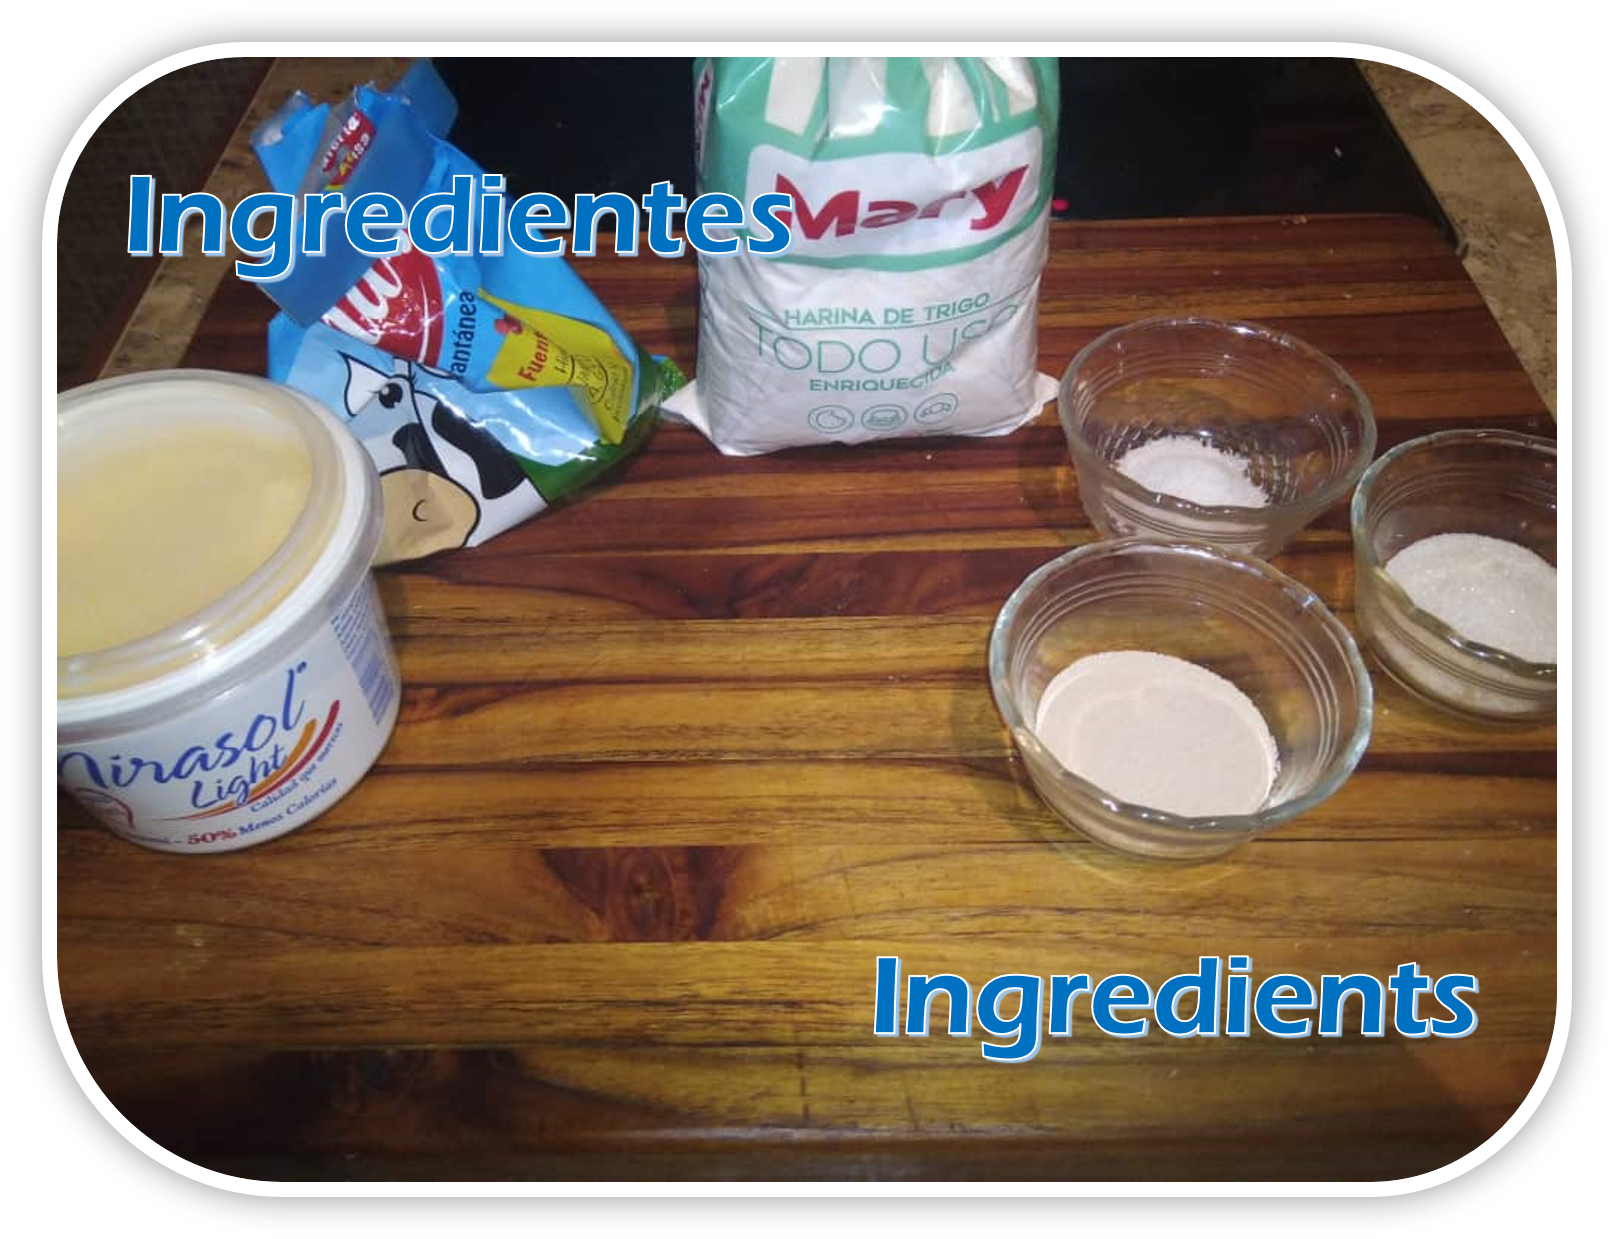
Ingredientes
Para un pan de sándwich pequeño de unos 500 a 600 gramos.
- 450 gr de harina de trigo para todo uso.
- 250 ml de leche tibia.
- 1 cucharada colmada de margarina o mantequilla.
- 1 y 1/2 cucharadas de azúcar.
- 1 y 1/2 cucharaditas de sal.
- 1 cucharada de levadura deshidratada.
- Aceite para engrasar el molde.
Ingredients
For a small sandwich loaf of about 500 to 600 grams.
- 450 grams of all-purpose wheat flour.
- 250 ml of warm milk.
- 1 heaping tablespoon of margarine or butter.
- 1 and 1/2 tablespoons of sugar.
- 1 and 1/2 teaspoons of salt.
- 1 tablespoon of dehydrated yeast.
- Oil to grease the mold.

Procedimiento
Para empezar, colocaremos en el bol de la amasadora la levadura y el azúcar (1), agregaremos aproximadamente la mitad de la leche tibia, mezclaremos bien (2) y dejaremos reposar por unos 15 minutos, para que la levadura se active, lo cual notaremos porque se formará espuma en la superficie de la mezcla (3).
Añadiremos la harina (4) y la margarina o mantequilla (5), llevaremos a la amasadora y empezaremos, de no tener una amasadora podemos hacerlo con una espátula o la mano, agregaremos el resto de la leche y continuaremos mezclando (6).
Procedure
To begin, place the yeast and sugar in the bowl of the mixer (1), add about half of the warm milk, mix well (2) and let stand for about 15 minutes, so that the yeast is activated, which we will notice because foam will form on the surface of the mixture (3).
We will add the flour (4) and the margarine or butter (5), we will take to the mixer and we will start, if we do not have a mixer we can do it with a spatula or the hand, we will add the rest of the milk and we will continue mixing (6).
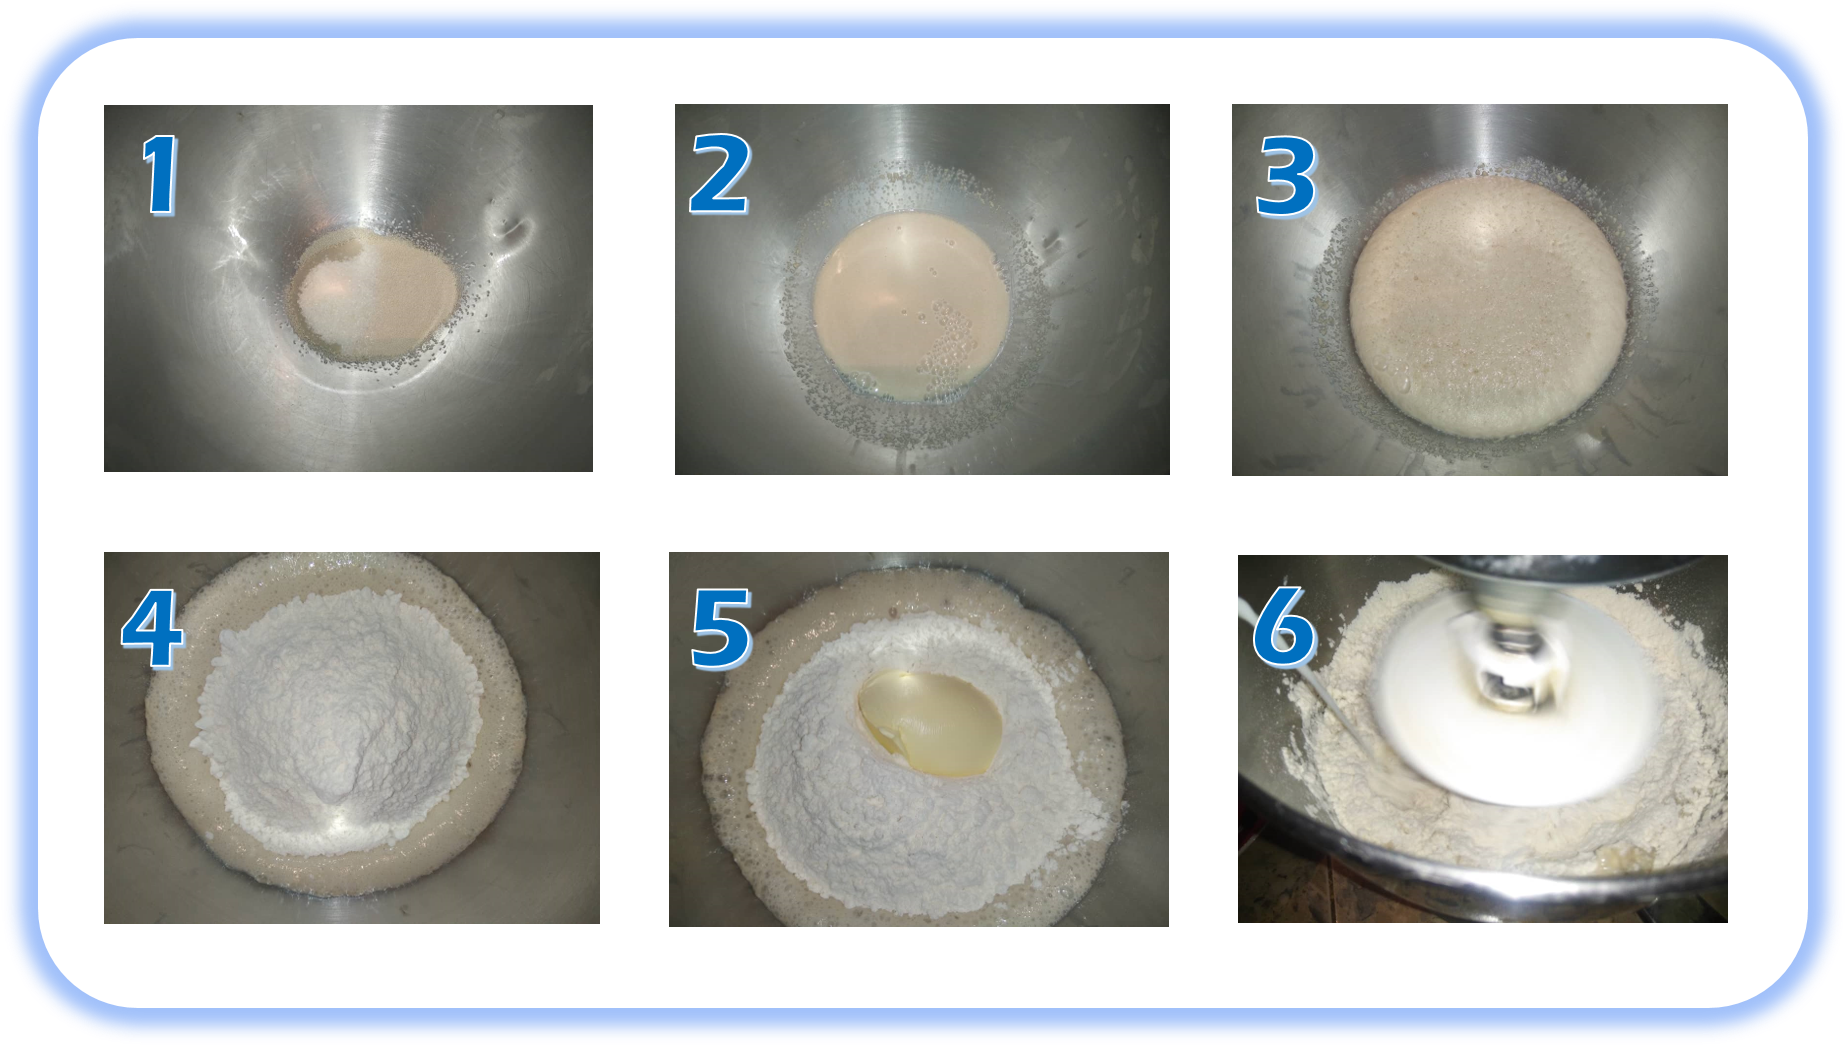
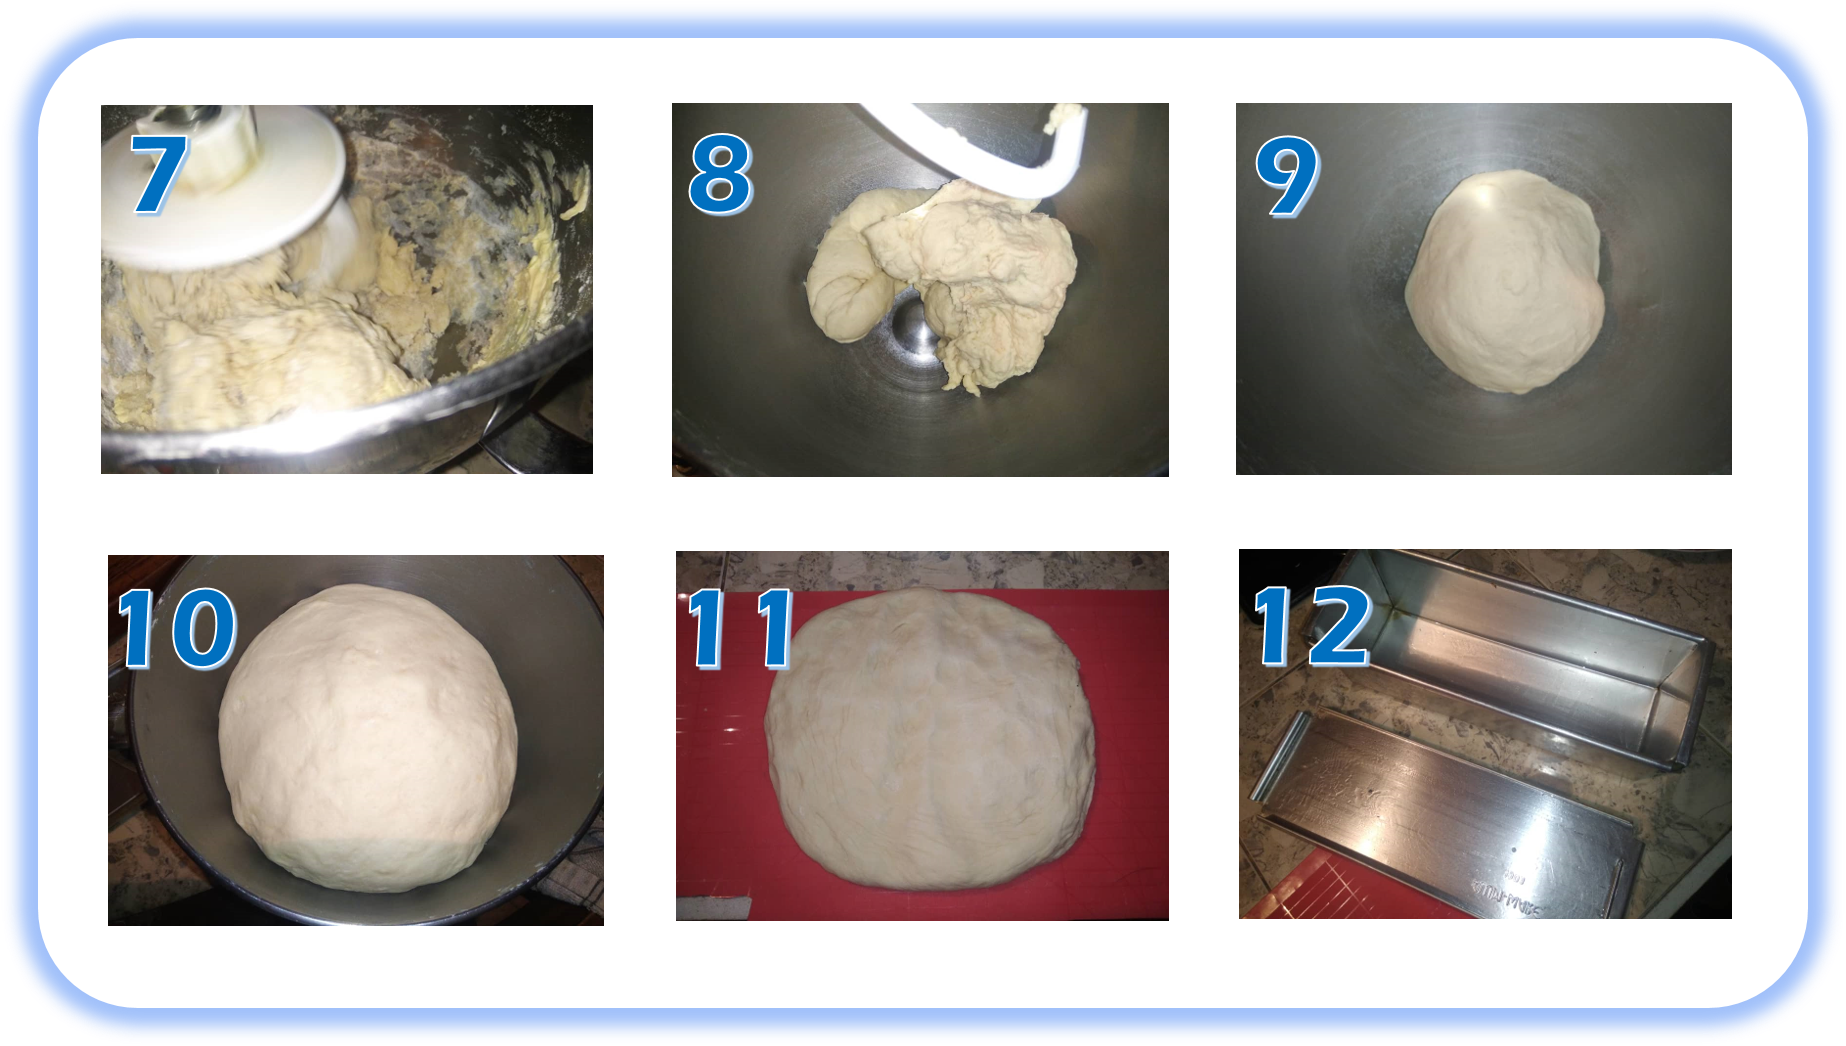
Cuando veamos que el líquido ha sido casi totalmente absorbido por la harina y no podemos ver la espuma de la levadura, agregaremos la sal (7) y continuaremos amasando hasta obtener una masa lisa y que no se pega del bol o las manos (8), la retiraremos de la amasadora, le daremos forma de bola (9) y la dejaremos levar, en un lugar tibio, cubierta con un trapo, por dos horas, o hasta que su volumen haya duplicado (10).
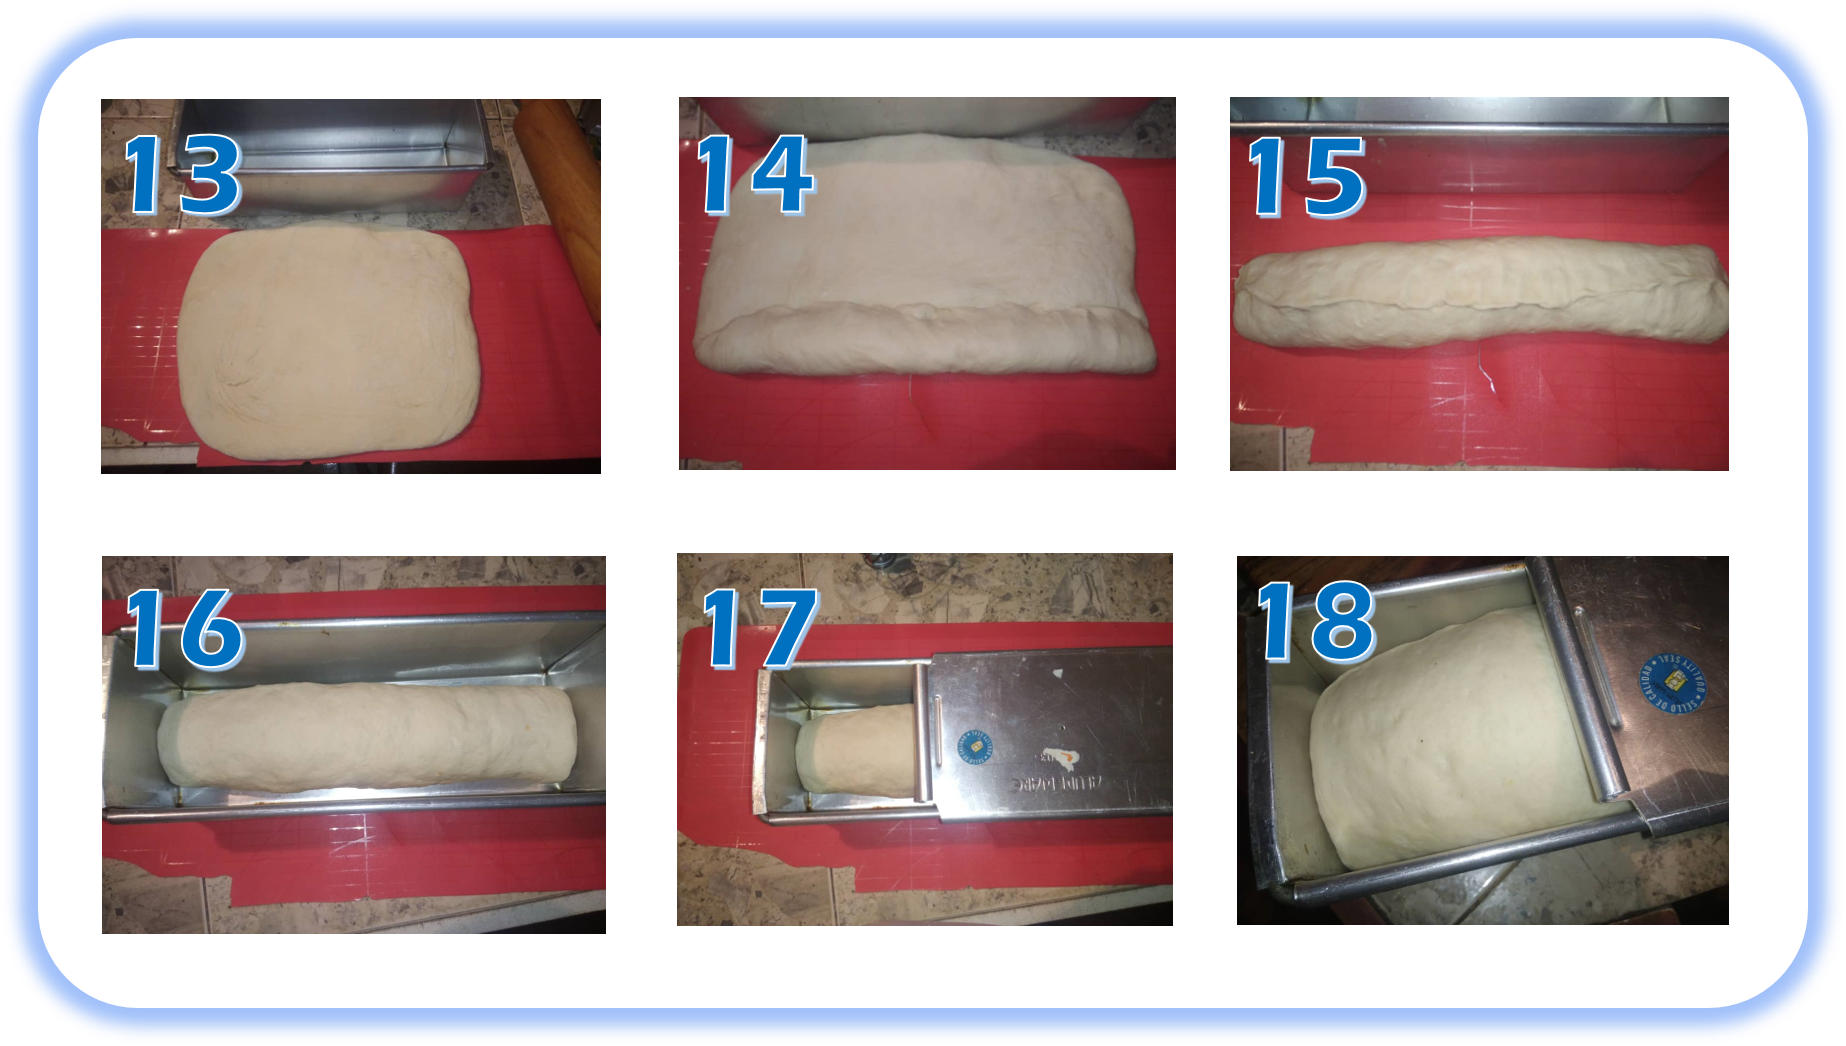
Cuando haya levado, es momento de darle forma a la hogaza de pan, para empezar la sacaremos del bol y la desgasificaremos aplastándola con los dedos y dándole una forma más o menos rectangular (11), luego, para darle forma, usaremos un molde previamente engrasado, por todas sus caras, con un poco de aceite, yo use un molde para pan de sándwich de panadería (12), pueden usar un molde para hacer panques o budines, lo importante es que sea de forma rectangular alargada. El molde que use, tiene tapa y permite hacer un pan con rebanadas casi cuadradas, sin embargo, si prefiere que tenga una parte superior redondeada o con forma de hongo, puede usarse sin la tapa, dejando que la masa leve por fuera del nivel del borde, dándole esa forma redondeada a la hogaza.
When we see that the liquid has been almost totally absorbed by the flour and we cannot see the yeast foam, we will add the salt (7) and we will continue kneading until we obtain a smooth dough that does not stick to the bowl or the hands (8), we will remove it from the mixer, we will shape it into a ball (9) and we will let it rise, in a warm place, covered with a cloth, for two hours, or until its volume has doubled (10).
When it has risen, it is time to shape the loaf of bread, to begin we will take it out of the bowl and we will degasify it by flattening it with the fingers and giving it a more or less rectangular shape (11), then, to shape it, we will use a mold previously greased, on all its sides, with a little oil, I used a bakery sandwich bread mold (12), you can use a mold to make pancakes or puddings, the important thing is that it is of an elongated rectangular shape. The mold I used has a lid and allows you to make a bread with almost square slices, however, if you prefer a rounded or mushroom-shaped top, you can use it without the lid, letting the dough rise outside the level of the edge, giving the loaf that rounded shape.
Usando un rodillo, estiraremos la masa hasta darle una forma rectangular con el mismo ancho del molde (13), entonces empezaremos a enrollarla presionando, en cada vuelta, sobre el borde con los dedos, para que se vaya uniendo y no se abra al hornearse, dejando huecos en el interior de la hogaza (14), al terminar de enrollar, daremos la vuelta y pellizcaremos por el pliegue, para que cierre por completo (15).
Colocaremos el rollo de masa en el molde (16) y lo cerraremos en dos terceras partes (17), esto sólo si desea que el pal sea completamente cuadrado, si no es así, omita la tapa. Lo dejaremos levar hasta que casi toque la tapa del molde (18), entonces cerraremos el molde y lo dejaremos levar cerrado por unos 15 a 30 minutos más, dependiendo que cuanto calor haya en su cocina.
Luego de pasado el tiempo, lo llevaremos a un horno precalentado a 180°C, por 40 minutos, si es posible con el ventilador encendido.
Using a rolling pin, we will stretch the dough to give it a rectangular shape with the same width of the mold (13), then we will begin to roll it up pressing, in each turn, on the edge with our fingers, so that it goes together and does not open when baking, leaving holes inside the loaf (14), when we finish rolling, we will turn over and pinch by the fold, so that it closes completely (15).
We will place the roll of dough in the mold (16) and we will close it in two thirds (17), this only if you want the pal to be completely square, if not, omit the lid. We will let it rise until it almost touches the lid of the mold (18), then we will close the mold and let it rise closed for about 15 to 30 minutes more, depending on how much heat there is in your kitchen.
After the time has passed, we will take it to a preheated oven at 180°C, for 40 minutes, if possible with the fan on.
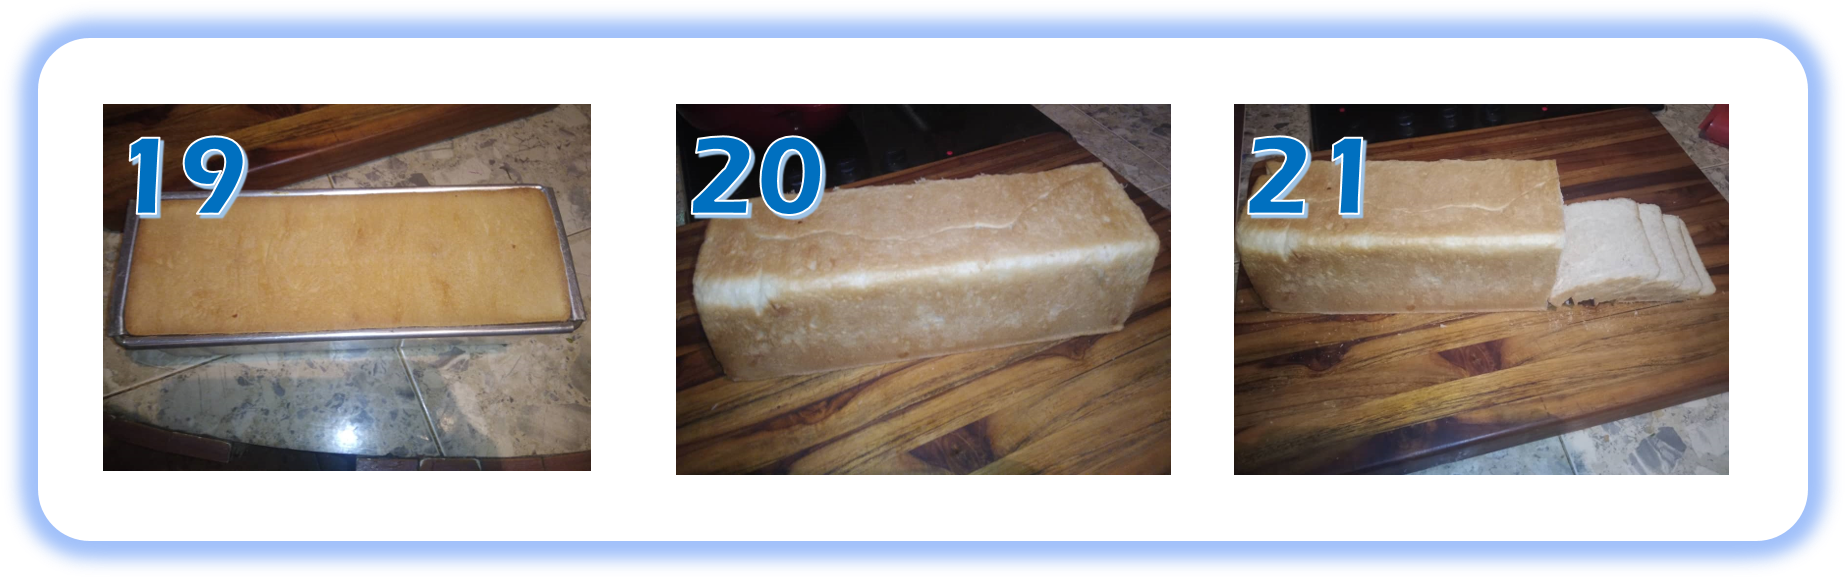
Pasado el tiempo de horneado, lo sacaremos y golpearemos ligeramente el molde por todos lados para que se afloje, sacaremos la tapa (19) y desmoldaremos, sin esperar a que enfríe por completo (20), ahora si lo dejaremos enfriar sobre una rejilla y ya sólo resta usar un cuchillo afilado, para rebanarlo del grueso que prefiramos cada rodaja (21).
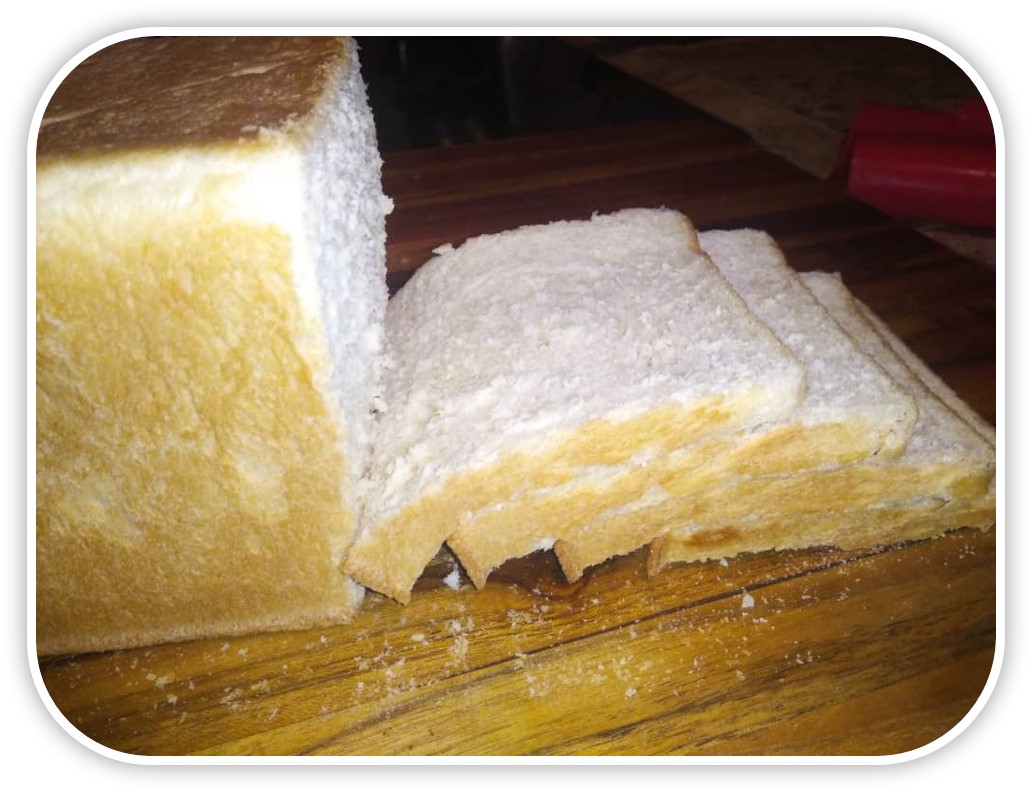
Once the baking time is over, take it out and tap the mold lightly on all sides to loosen it, remove the lid (19) and unmold it, without waiting for it to cool completely (20), now let it cool on a wire rack and all that remains is to use a sharp knife to slice it as thick as you prefer each slice (21).
Obtendremos un pan de sándwich suave y rico, que nada tiene que envidiar al que podemos conseguir en la panadería o super mercado, ideal para hacer nuestros sándwiches o tostadas, espero que puedan hacerlo y lo disfruten.
We will obtain a soft and rich sandwich bread, which has nothing to envy to the one we can get in the bakery or super market, ideal for making our sandwiches or toast, I hope you can do it and enjoy it.
Todas las fotografías fueron tomadas con un movil Redmi 8A
Congratulations, your post has been upvoted by @dsc-r2cornell, which is the curating account for @R2cornell's Discord Community.
Congratulations @amart29! You have completed the following achievement on the Hive blockchain And have been rewarded with New badge(s)
Your next target is to reach 49000 upvotes.
You can view your badges on your board and compare yourself to others in the Ranking
If you no longer want to receive notifications, reply to this comment with the word
STOPCheck out the last post from @hivebuzz:
Support the HiveBuzz project. Vote for our proposal!
~~~ embed:1598259690827235333 twitter metadata:MjY4OTEzNzAyfHxodHRwczovL3R3aXR0ZXIuY29tLzI2ODkxMzcwMi9zdGF0dXMvMTU5ODI1OTY5MDgyNzIzNTMzM3w= ~~~
The rewards earned on this comment will go directly to the people( @edwing357, @francyrios75 ) sharing the post on Twitter as long as they are registered with @poshtoken. Sign up at https://hiveposh.com.
Excelente pan, nada como hacerlo en casa , es más fresco y el sabor mucho mejor , soy amante de la panificación, siempre tengo panes en casa jajaja
Gracias por compartir con nosotros tu receta, fácil y sencilla de elaborar 👨🏻🍳
Join the foodie fun! We've given you a FOODIE boost. Come check it out at @foodiesunite for the latest community updates. Spread your gastronomic delights on and claim your tokens.