Basics and something sweet
For those who missed it, Part I. is available here

Today it's finally time to leave the dry theory behind and turn to what will later not only satisfy but also delight the palate and tongue.
But before the first pot is taken from the shelf, I would like to tell you how the young man in the rubber boots of the hotel scullery became somebody who knows what he is talking about when it comes to processing fresh, edible products.
Looking back:
Soon after noticing my insatiable appetite for knowledge about cooking in general, the chef asked me why I didn't want to start an apprenticeship as a chef. In any case, he would put in a “good word” for me with the personnel manager.
However, since I could observe day after day how much hectic and stress this job entailed and, moreover, I would be tied to this house for three years, I decided on the short and concise NO as an answer. Nevertheless, I asked myself what alternatives were available to me.
A short time later, I was sitting in a classroom again. But this time in a room that belonged to a hotel management school. In just 12 months, I was drilled with the basic knowledge of how things work in a gastronomic business. From accounting, to coordination, service, and kitchen – all this in the mind of someone who actually just wanted to learn about cooking. On the other hand, I recognised entirely new opportunities for my professional future in the variety of possibilities.
Incidentally, I was only able to finance the school because my employer made a voluntary contribution and I continued to work in the company – but now always until late in the evening.
Enough about the past. Perhaps next week I can tell you more about my professional odyssey?

Now (and full steam ahead) we're going to cook. I would like to start with something that one or two overzealous cooks will now give free rein to their disappointment because in the morning they were standing in front of the mirror in the bathroom with the hope that by the evening at the latest they would be able to prepare the fillet of beef in a puff pastry coating, glazed turnips and lamb's lettuce with mustard dressing to perfection.
Don't panic! — Everything will be fine. However, the situation in the kitchen is similar to that of the ambitious runner. Before he dares to run a marathon, he must first tie his shoes. If the basics are not in place, the project is doomed to failure. That is why a clear broth is being made today. A product that must always be on hand in a well-organised kitchen. Whether for soups, sauces, braising or refining, clear stock is a jack-of-all-trades.
The best-known members of this family are probably vegetable, chicken, beef, and fish consommés. I have chosen beef consommé (the official name). As the production of each broth differs only in the main flavour carrier (chicken, beef, or fish), but the processes are otherwise the same, it is up to you to decide which consommé to pick.
What kind of piece of beef is suitable for a good beef bouillon in the first place? While there is not much to think about with chicken and the plucked low flyer without liver ends up in the pot altogether, it's a completely different story with beef. I prefer chunks from the breast (with the bone), which can also be marbled with fat. Oxtail is also a good choice, and for lovers of the Austrian “Tafelspitz” it can (must) be the piece from the leg. As it is absolutely fat-free, I would always add a piece of belly.
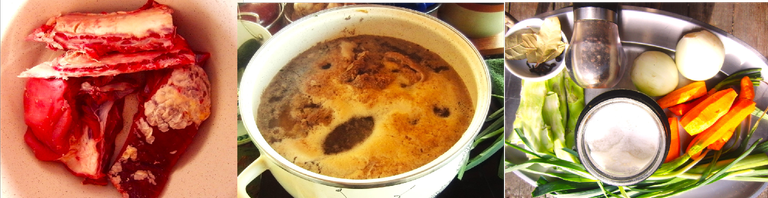
Place the washed beef in a saucepan with cold water. Add enough water to cover the meat by at least 3-4 cm. Add a little salt and bring the whole thing to a boil (100° Celsius). The closer the liquid gets to this temperature, the more protein will float to the surface in the form of foam. This foam must be skimmed off, as the egg white would only make the consommé cloudy. — And that's exactly what we don't want!
When the stock starts to boil, I adjust the temperature of the oven to keep the liquid at 100°. We are not making a whitewash, but a clear consommé.
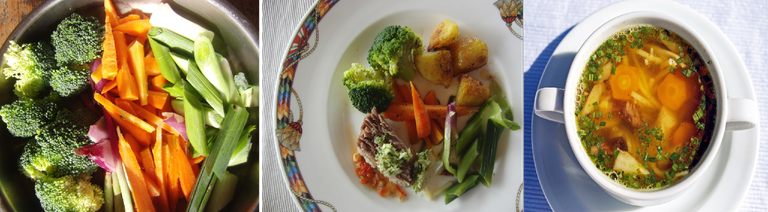
To keep the meat from drowning in loneliness, it desperately needs company. Coarsely chopped root vegetables (leek, carrot, celery, and onion) are best. There is no game of love without the necessary spices. Peppercorns, cloves, bay leaves and juniper berries are perfect additions. But before I add these coarsely ground spices to the stock, I roast them briefly in a dry (fat-free) pan. This allows them to release more of their flavour. Add the salt, the parsley root, the greens and (if available) the celery leaves and lovage.
Now fill the pot with cold water so that the vegetables, spices, and meat are well covered. Heat again so that the broth simmers and then keep calm for about 1 to 2 hours. You should allow almost 2 hours cooking time per kilo of meat. It is also important not to cover the pot completely with a lid. This increases the likelihood that the broth will become cloudy.
After such a long period of preparation, who can blame us for wanting to taste what has been simmering for so long? However, before the consommé is used for the first tasting, it is strained through a fine sieve (or better still, a straining cloth - similar to the cotton nappy used in the old days) into a clean pot.
As we will be using the broth for a long period of time, it will have to be preserved in an appropriate way. There are two ways of doing this. Freezing and canning. Let's say you have made about 4 to 5 litres of consommé. I suggest you put 2 or 3 portions (1 litre each) in freezer bags and freeze them. The rest of the broth is brought to the boil again briefly and filled hot into preserving jars, which are always ready to hand in the fridge later.
However, if you want to taste the soup immediately, cut the vegetables into thin slices or strips, put them in a small saucepan with a little butter, sauté briefly and add the stock. Let the whole thing simmer for about 2 to 3 minutes, then taste to see if nutmeg, salt or (if you like it hot) chilli pepper is still missing. Sprinkle some chopped chives or parsley on top – and your clear soup is ready. If you miss the noodles at this stage, cook them separately, as the starch in the noodles will cloud the dish.

Time for the reward:
Plum and poppy seed cake

I can already hear it, the outcry across the continent:
Who wants this black, grainy stuff in their teeth by choice?
The Austrians and the folks from the Balkans mostly cannot understand this excitement, as poppy seeds and desserts seem almost inseparable in the region. There is a reason for this. Properly handled, there is no need to search for stray poppy seeds.
But first, let's have a look at the ingredients that are essential to the success of poppy-seed cake.
The recipe:
For the shortcrust pastry: 50 g sugar, 100 g butter, 150 g flour, 1 teaspoon baking powder & 1 egg.
Knead all the ingredients together, leave the dough to rest for 1 hour and then roll out thinly on a sheet of baking paper.
For the plum poppy cake: 150 gr. flour, 200 gr. ground poppy seeds, 1 sachet. Baking powder, 200 g yoghurt, 150 g sugar, 150 g softened butter, 4 egg yolks and 4 egg whites. 12 plums and plum jam. (If available, apricots can also be used).
Beat the egg whites until they form stiff peaks. Whisk the butter, sugar and 4 egg yolks until light and fluffy. Add the yoghurt, baking powder, poppy seeds and flour. Gently fold in the beaten egg whites at the very end.

Place the baking paper with the shortcrust pastry in a springform pan (or other round cake tin), spread the pastry generously with jam and then fill with the poppy seed pastry. Place the pitted plums on top and bake the cake at 180° top and bottom heat for 40 minutes.
To create a light, slightly sour contrast, I whipped some cream and mixed it with a thick kefir. Add some sour cherry juice (elderberry is also suitable) for a touch of colour.

Well, all I can do now is wish you all the best and hope you enjoy eating. I don't know yet what dish we'll try next time. But usually a look in the garden and the fridge helps – and vague thoughts grow into a coherent picture.
Stay healthy and happy! Thank you!

(Deutsche Version)
Grundsätzliches und etwas Süßes zur Belohnung
Wer es verpasst haben sollte, Teil I. ist hier abrufbar.
Heute ist es endlich so weit und wir verlassen die trockene Theorie und wenden uns dem zu, was später nicht nur Sättigung, sondern auch Freude am Gaumen und auf der Zunge verschafft.
Doch bevor der erste Topf aus dem Regal genommen wird, möchte ich euch noch verraten, wie es dazu kam, dass aus dem Jüngling in den Gummistiefeln aus der Hotel-Spülküche ein Schreiberling wurde, der weiß, wovon er spricht, wenn es um die Verarbeitung von frischen, essbaren Produkten geht.
Rückblick:
Bereits kurz nachdem der Küchenchef mein schier unstillbares Verlangen nach Wissenswerten über das Kochen im Allgemeinen bemerkt hatte, kam von ihm die Frage, warum ich nicht eine Lehre als Koch in Angriff zu nehmen gedenke. Er würde jedenfalls ein „gutes Wort“ bei dem Personalchef für mich einlegen.
Da ich allerdings Tag für Tag beobachten konnte, wie viel Hektik und Stress diese Tätigkeit mit sich bringt und ich überdies drei Jahre an dieses Haus gebunden wäre, entschied ich mich für das kurze und prägnante NEIN als Antwort. Erkundigte mich aber dennoch, welche Alternativen mir zur Verfügung stünden.
Kurze Zeit später saß ich erneut in einem Klassenzimmer. Doch dieses Mal in einem Raum, der zu einer Hotelfachschule gehörte. In nur 12 Monaten wurde mir das Grundwissen über die Abläufe in einem gastronomischen Betrieb eingetrichtert. Von der Buchhaltung, über die Koordinierung, Service und Küche – all das im Kopf von jemandem, der eigentlich nur etwas über das Kochen erfahren wollte. Andererseits erkannte ich in der Vielfalt der Möglichkeiten ganz neue Chancen für meine berufliche Zukunft.
Finanzieren konnte ich die Schule übrigens nur, weil mein Arbeitgeber einen freiwilligen Teil beisteuerte, ich dafür im Betrieb weiterhin meinen Dienst verrichtete – jetzt allerdings immer bis in die späten Abendstunden.
Genug der Plauderei aus der Vergangenheit. In der nächsten Woche vielleicht etwas mehr aus meiner beruflichen Irrfahrt?
Jetzt (und zwar mit Volldampf) geht es an den Herd. Beginnen möchte ich mit etwas, bei dem der eine oder andere übereifrige Kochschürzenträger nun seiner Enttäuschung freien Lauf lassen wird, weil am Morgen mit ihm die Hoffnung vor dem Spiegel im Badezimmer stand, spätestens am Abend in der Lage zu sein, das Rinderfilet im Blätterteig-Mantel, glasierte Steckrüben und den Feldsalat mit Senf-Dressing in Perfektion zubereiten zu können.
Keine Panik! - Das kommt alles noch. Allerdings verhält es sich in der Küche ähnlich wie bei dem ambitionierten Läufer. Bevor der sich an den Marathon wagt, über er sich zuerst im Schuhe binden. Wenn die Grundlagen nicht vorhanden sind, kann das anzugehende Projekt nur zum Scheitern verurteilt sein. Ebendarum wird heute eine klare Brühe gekocht. Ein Produkt, welches in einer gut organisierten Küche stets griffbereit an seinem Platz stehen muss. Ob für Suppen, Soßen, zum Dünsten oder Verfeinern – die klare Brühe ist der Tausendsassa.
Die uns geläufigsten Vertreter aus dieser Familie sind wohl die Gemüse-, die Hühner-, die Rindfleisch- und die Fischbrühe. Ich habe mich für die Consommé (so der offizielle Name) vom Rindfleisch entschieden. Da die Fertigung der jeweiligen Brühen sich lediglich durch den wichtigsten Geschmacksträger (Huhn, Rind oder Fisch) unterscheidet, ansonsten jedoch die Abläufe gleich sind, bleibt es jedem selbst überlassen, für welche Consommé er sich entscheidet.
Welches Stück vom Rind taugt überhaupt für eine gute Kraftbrühe. Während es beim Huhn nicht viel zu überlegen gibt und der gerupfte Tiefflieger ohne Leber gänzlich im Topf landet, sieht das beim Rind ganz anders aus. Ich bevorzuge Stücke aus der Brust (mit Knochen), die auch mit Fett durchzogen sein dürfen. Der Ochsenschwanz bietet sich zudem an und für Liebhaber des Tafelspitz, kann (muss) es dann das Stück aus der Keule sein. Da absolut fettfrei würde ich immer ein Stück Bauchfleisch zugeben.
Das abgewaschene Rindfleisch wird im Topf mit kaltem Wasser aufgefüllt. So viel Wasser, damit das Fleisch zumindest 3 bis 4 cm überdeckt ist. Etwas Salz hinzugeben und das Ganze erhitzen (100° Celsius). Je näher die Flüssigkeit dieser Temperatur kommt, desto mehr Eiweiß setzt sich in Form von Schaum auf der Oberfläche ab. Diesen Schaum gilt abzuschöpfen, da das Eiweiß die Consommé nur trübe machen würde. - Und genau das wollen wir nicht!
Beginnt die Brühe zu köcheln, stelle ich die Temperatur des Ofens so ein, dass die Flüssigkeit auf 100° gehalten wird. Wir kochen keine Weißwäsche, sondern eine klare Kraftbrühe.
Damit das Fleisch nicht in der Einsamkeit ertrinkt, braucht es dringend Gesellschaft. Bestens geeignet dafür ist grob geschnittenes Wurzelgemüse (Lauch, Karotte, Sellerie und Zwiebel). Kein Liebesspiel ohne die nötige Würze. Pfefferkörner, Nelken, Lorbeerblatt und Wacholderbeeren eignen sich als Zugabe perfekt. Bevor ich jedoch diese grob gestoßenen Gewürze in die Brühe gebe, röste ich sie in einer trockenen (fettfrei) Pfanne kurz an. Dadurch geben sie mehr von ihrem Aroma preis. Was noch fehlt, ist Salz, Petersilienwurzel und das Grün und (wenn vorhanden) Selleriegrün und Liebstöckel.
Jetzt wird er Topf mit kaltem Wasser so weit aufgefüllt, dass Gemüse, Gewürze und Fleisch gut abgedeckt sind. Erneut erhitzen, damit die Brühe köchelt und anschließend circa 1 bis 2 Stunden die Ruhe bewahren. Pro Kilogramm Fleisch sollten nahezu 2 Stunden Garzeit berechnet werden. Was noch zu beachten ist, dass der Topf nicht mit einem Deckel vollständig abgedeckt ist. Dadurch erhöht sich die Wahrscheinlichkeit, dass die Kraftbrühe trüb wird.
Wen mag es verwundern, wenn man nach einer solch langen Vorbereitungszeit gespannt darauf ist, wie schmackhaft das wohl ist, was so lange köchelte? Bevor jedoch die Consommé zur ersten Verkostung genutzt wird, fließt sie durch ein feines Sieb (noch besser, ein Passiertuch – ähnlich einer früher gebrauchten Baumwollwindel) in einen sauberen Topf.
Da wir ja die Kraftbrühe über einen längeren Zeitraum nutzen wollen, muss sie dementsprechend haltbar gemacht werden. Dafür bieten sich zwei Möglichkeiten an. Das Einfrieren und das Einwecken. Davon ausgehend, ungefähr 4 bis 5 Liter Consommé gekocht zu haben, rate ich dazu, 2 oder 3 Portionen (je 1 Liter) in Gefrierbeutel abzufüllen und einzufrieren. Die restliche Brühe wird nochmals kurz aufgekocht und heiß in Einmachgläser gefüllt, die später stets griffbereit im Kühlschrank zu finden sind.
Wer allerdings augenblicklich probieren möchte, wie die Suppe mundet, der schnippelt sich Gemüse in feine Scheiben oder Streifen, gibt die Einlage mit etwas Butter in einen kleinen Topf, schwitzt es kurz an und füllt mit Brühe auf. Das Ganze circa 2 bis 3 Minuten köcheln lassen, abschmecken, ob noch Muskat, Salz oder (wer es scharf mag) Chili-Schote fehlt. Gehackter (fein geschnittener) Schnittlauch oder Petersilie darüber streuen – und fertig ist die klare Brühe mit Einlage. Wenn die Suppennudeln hier vermisst werden, dann diese unbedingt separat kochen, da die Mehlstärke der Nudeln das Gericht eintrüben würde.
Zeit für die Belohnung:
Pflaumen-Mohntorte

Ich kann ihn bereits vernehmen, den Aufschrei quer über den Kontinent:
Wer mag dieses, schwarze, körnige Zeug freiwillig zwischen den Zähnen?
Die Österreicher und die Mädels und Jungs vom Balkan können diese Aufregung meist nicht nachvollziehen, da Mohn und Süßspeisen in der Region nahezu unzertrennlich scheinen. Nicht ohne Grund, da richtig gehandhabt, die Fahndung nach verirrten Mohn-Körnern überflüssig ist.
Doch starten wir mit der Auflistung der Zutaten, die für das Gelingen des Mohnkuchens unverzichtbar sind.
Das Rezept:
Für den Mürbeteig: 50 gr. Zucker, 100 gr. Butter, 150 gr. Mehl, 1 TL Backpulver & 1 Ei
Alle Zutaten miteinander verkneten, 1 Stunde den Teig ruhen lassen und dann auf einem Blatt Backpapier dünn ausrollen.
Für die Pflaumen-Mohntorte: 150 gr. Mehl, 200 gr. gemahlener Mohn, 1 Pack. Backpulver, 200 gr. Joghurt, 150 gr. Zucker, 150 gr. weiche Butter, 4 Eigelb & 4 Eiklar. 12 Pflaumen und Pflaumenmarmelade. (Wenn vorhanden, können auch Marillen genommen werden.)
Das Eiweiß zu einem festen Schnee aufschlagen. Die Butter, den Zucker und die 4 Eigelb zu einer hellen, schaumigen Masse rühren. Unter diese Masse rühren wir den Joghurt, das Backpulver, den Mohn und das Mehl. Ganz zum Schluss wird vorsichtig der Eischnee untergehoben.
Das Backpapier mit dem Mürbeteig in eine Springform (oder sonstige, runde Kuchenform) legen, den Teig kräftig mit Marmelade bestreichen und dann dem Mohn-Teig auffüllen. Die entsteinten Pflaumen auflegen und den Kuchen bei 180° Ober – Unterhitze 40 min. ausbacken.
Ich habe, um einen leichten, etwas säuerlichen Kontrast zu schaffen, dazu Sahne aufgeschlagen und diese mit einem dickflüssigen Kefir vermischt. Dazu, als Farbtupfer, noch etwas Sauerkirschsaft (Holunder passt auch).
Dann kann ich jetzt nur noch ein gutes Gelingen und viel Appetit wünschen. Noch weiß ich es selbst nicht, an welches Gericht wir uns beim nächsten Mal wagen. Meist hilft aber ein Blick in den Garten und in den Kühlschrank – und schon wachsen vage Gedanken zu einem schlüssigen Bild. Bleibt gesund und munter!

Da ich seit meiner Kindheit ein großer Fan von Mohnkuchen bin, hatte ich beim lesen leichte Schwierigkeiten meinen Aufkommenden Appetit und die damit einhergehenden Speichelfluss unter Kontrolle zu halten. Kompliment an den Autor!
Ich gehe auch davon aus das du den Geburtstagskuchen diese Jahr selbst gebacken hast?
Immer alles vom Servierer des Buchstabensalates selbst fabriziert!
Die Presentation selbst sieht schon wie ein Profi aus. Ich kriege sofort Hunger, vor allem von dem Kuchen da. Das Doofe ist.... es ist jetzt 11 Uhr Nacht. Es ist echt keine gute Idee Bilder von Essen anzusehen :-D. Selber Schuld 😓
Einfach nur die Uhr umdrehen – und dann ran an den "Speck"!
😂😂 und in diesem Alter, der Speck geht nicht mehr so einfach weg.
Sehr hartnäckig.
Yum yum, tasty for sure. We usually cook beef soup this way. The onion is cooked whole, with the skin on, to give the soup a little brownish color. Sometimes we add more than one bone. The meat, however, is what is available, I like to add the flank because when it's cooked it's tender and juicy. What is left of the stock is strained and then frozen for the soup base.
The dessert, without going on about it, already looks superb.
Regarding the whole onion (with skin), it is like this. It is used when the chicken has had its last full bath. Then the onion is also cut in half and lightly roasted at the edges. As you say – for colour. This is not usually done with beef, as the broth is darker anyway. But marrow bones are always welcome. Just for the big fat eyes in the soup. But I didn't have any nearby.😣
Yummy! How I wish I could taste this recipe. I like the preparation and everything here seemed so perfect. I must say this is so perfect for my cup of coffee. More delicious foods to cook my friend! Best regards!
Ich gerne das gut Essen -- all of that food looks absolutely marvelous!
Then I'll put one more plate on the table for lunch!😋😊
Habe Dank, @w74!
I am already salivating seeing this 🤤🤤
Wait, what's coming up next?!
Im hungry now xD good post 😃👌🏻
Nice one!
I'm a foodie so I love to see posts relating to food, lol
!BBH
@w74! Your Content Is Awesome so I just sent 1 $BBH (Bitcoin Backed Hive) to your account on behalf of @thehockeyfan-at. (1/1)
@janasilver denkt du hast ein Vote durch @investinthefutur verdient!
@janasilver thinks you have earned a vote of @investinthefutur !
$PIZZA slices delivered:
@janasilver(1/5) tipped @w74
!BEER
!invest_vote !LUV !PIZZA !wine !WITZ !LOLZ !HUGH