

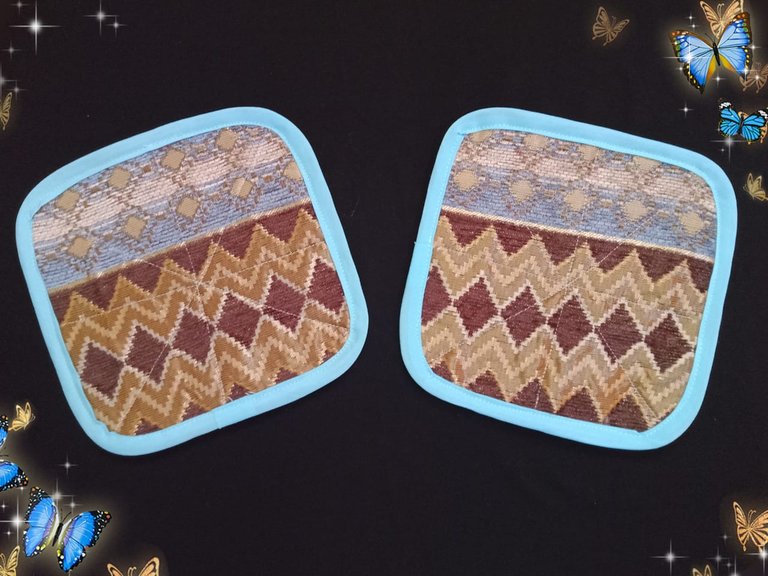
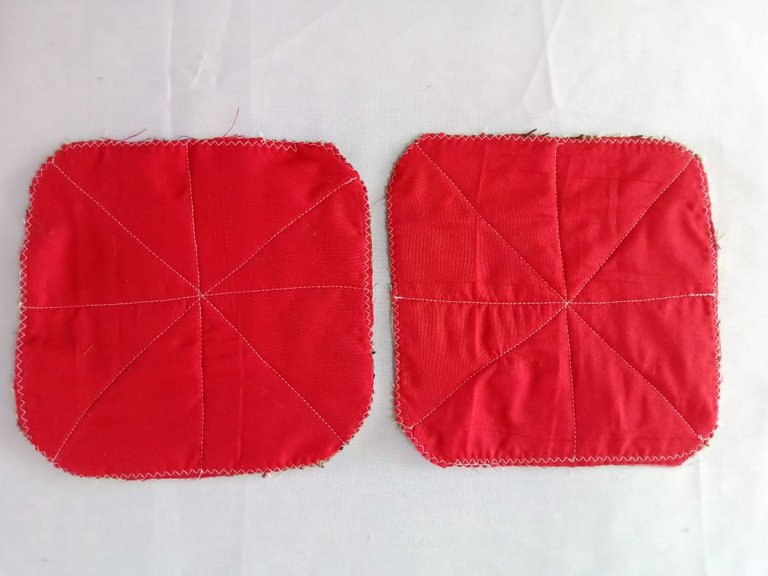
Greetings friends who love threads and needles, I wish you have an excellent and blessed week in the company of your loved ones, this time I share with you the making of a set of pot holders, they are very useful in the kitchen to carry hot objects and protect your hands from possible burns, these are easy to make and require few materials, to do it I used an upholstery fabric of which I had some left in my super cloth bag, I like this one for its thickness, texture and print, to avoid using batting I placed the fabric double and since it is thick it provides enough protection when handling hot objects; on the back I placed a red fabric in contrast with the print of this fabric, which is gold brown and blue, the pot holder can be used on both sides, either solid color or with the printed upholstery fabric, I invite you to join me in the making process.

Saludos amigos amantes de los hilos y las agujas, deseo que tengan una excelente y bendecida semana en unión de sus seres queridos, en esta ocasión les comparto la elaboración de un set de agarradores de ollas, son muy útiles en la cocina para transportar objetos calientes y proteger las manos de posibles quemaduras, estos son sencillos de hacer y requieren pocos materiales, para hacerlo utilicé una tela de tapicería de la cual me quedaba un poco en mi súper bolsa de tela, esta me gusta por su grosor textura y estampado, para no usar guata coloqué la tela doble y como es gruesa brinda la suficiente protección cuando se manipulan objetos calientes; en la parte de atrás le coloqué una tela de color rojo en contraste con el estampado de esta tela, que es dorado marrón y azul, el agarrador de ollas se puede usar por ambos lados, ya sea unicolor o con la tela de tapicería estampada, les invito me acompañen en el proceso de elaboración.


The materials used were:
Printed upholstery fabric
Solid Dacron fabric
Pins
Scissors
Sewing machine
Bias tape
Los materiales usados fueron:
Tela de tapicería estampada
Tela dacrón unicolor
Alfileres
Tijera
Máquina de coser
Sesgo.

Elaboration
The first step in making the potholders was to cut the pieces: four 8 x 8 inch squares from the main fabric and two rectangles from the red fabric that will be the lining. For a better finish, I rounded the corners of the pieces in the main fabric.
Elaboración
El primer paso para elaborar los agarradores fue cortar las piezas; cuatro cuadrados de 20 * 20 centímetros en tela principal y dos rectángulos en tela roja que serán el forro, para un mejor acabado redondeé las esquinas de las piezas en la tela principal.

Once the pieces were cut, the next step was to join the two pieces of patterned fabric together—the top and the lining at the bottom. I pinned them together and drew three straight stitch lines, from one end to the other in an X shape, and one in the middle.
Cortadas las piezas, el siguiente paso fue unir las dos piezas de tela estampada, en la parte superior y el forro en la parte de abajo, fijé con alfileres y tracé tres líneas de costura recta, de un extremo al otro en forma de X y una en la parte central.


Then I removed the excess red fabric. It's recommended to use the largest lining fabric for quilting, as multiple stitching lines tend to shrink the fabric slightly, and with extra fabric, we wouldn't have any issues with the size of the piece.
Luego retiré el exceso de tela roja, para acolchar es recomendable utilizar la tela de forro más grande, ya que al pasar varias líneas de costura esta tiende a reducir un poco y con tela extra no tendríamos ningún inconveniente en cuanto al tamaño de la pieza.

After the stitching lines, I removed the excess fabric and then zigzag-stitched around the entire perimeter of the potholders.
Pasadas las líneas de costura retiré el exceso de tela y luego pasé puntada de zigzag por todo el contorno de los agarradores.
I then measured the perimeter with the bias binding and glued it using a straight stitch. When gluing the bias binding, make sure it covers both the front and back of the piece. With these simple steps, you'll have two useful and beautiful potholders that are very useful in the kitchen.
Luego medí el contorno con el sesgo y lo pegué utilizando puntada recta, al pegar el sesgo se debe ir verificando que éste cubra tanto la parte delantera como trasera de la pieza, con estos sencillos pasos están terminados dos útiles y hermosos agarradores de olla de gran utilidad en la cocina.


I liked the result of the potholders, the fabrics look very nice and will be very useful in the kitchen and will replace the ones I am currently using, they are a little worn and some have the batting showing, now I will have a new and beautiful set of potholders in the kitchen.
Me gustó el resultado de los agarradores, las telas se ven muy bien y serán de gran utilidad en la cocina y reemplazarán a los que estoy usando actualmente, están un poco deteriorados y algunos se les ve la guata, ahora tendré un nuevo y hermoso set de agarradores en la cocina.
Blessings!
Bendiciones!
Hasta luego!

Translated with https://www.deepl.com/translator
              All images are my own


   Todas las imágenes son de mi autoría.
You have shown great skill in this style of sewing with extraordinary skill. Thanks for showing some composite pot holders for keeping pots and pans in this special art.
Greetings @mdakash62, thank you for your visit. It's an easy project to make and very useful in the kitchen.
Yes my pleasure
😊🤗
Saludos con mucho cariño mi querida amiga @belkyscabrera vi tu proyecto y me encanto, los acabados quedaron impecables, estoy animada en hacer los míos, ya los necesitó.
Muchas bendiciones y abrazos🤗😘espero estés bien.
Hola estimada amiga, me alegra que te hayan gustado, son sencillos de hacer y muy útiles en la cocina, espero verlos pronto, seguro te quedarán hermosos.
Feliz noche! 😍
😊
It is colorful and comfortable to use. It looks pretty good. It is nice to see each step of making this. Keep it up!
selected by @rezoanulvibes
Greetings @diyhub and @rezoanulvibes, grateful for the support, they are easy to make and useful in the kitchen.
¡Enhorabuena!
✅ Has hecho un buen trabajo, por lo cual tu publicación ha sido valorada y ha recibido el apoyo de parte de CHESS BROTHERS ♔ 💪
♟ Te invitamos a usar nuestra etiqueta #chessbrothers y a que aprendas más sobre nosotros.
♟♟ También puedes contactarnos en nuestro servidor de Discord y promocionar allí tus publicaciones.
♟♟♟ Considera unirte a nuestro trail de curación para que trabajemos en equipo y recibas recompensas automáticamente.
♞♟ Echa un vistazo a nuestra cuenta @chessbrotherspro para que te informes sobre el proceso de curación llevado a diario por nuestro equipo.
🏅 Si quieres obtener ganancias con tu delegacion de HP y apoyar a nuestro proyecto, te invitamos a unirte al plan Master Investor. Aquí puedes aprender cómo hacerlo.
Cordialmente
El equipo de CHESS BROTHERS
Muchas gracias por el apoyo
Saludos!
¡Felicitaciones!
1. Invierte en el PROYECTO ENTROPÍA y recibe ganancias semanalmente. Entra aquí para más información.
3. Suscríbete a nuestra COMUNIDAD, apoya al trail de @Entropia y así podrás ganar recompensas de curación de forma automática. Entra aquí para más información sobre nuestro trail.
4. Creación de cuentas nuevas de Hive aquí.
5. Visita nuestro canal de Youtube.
Atentamente
El equipo de curación del PROYECTO ENTROPÍA
Saludos @entropia, gracias por el apoyo
This is really a must have in the kitchen. Thanks for sh