Mi trabajo es mi pasión y cuando tu trabajo es tu pasión nada es imposible / My work is my passion and when your work is your passion nothing is impossible
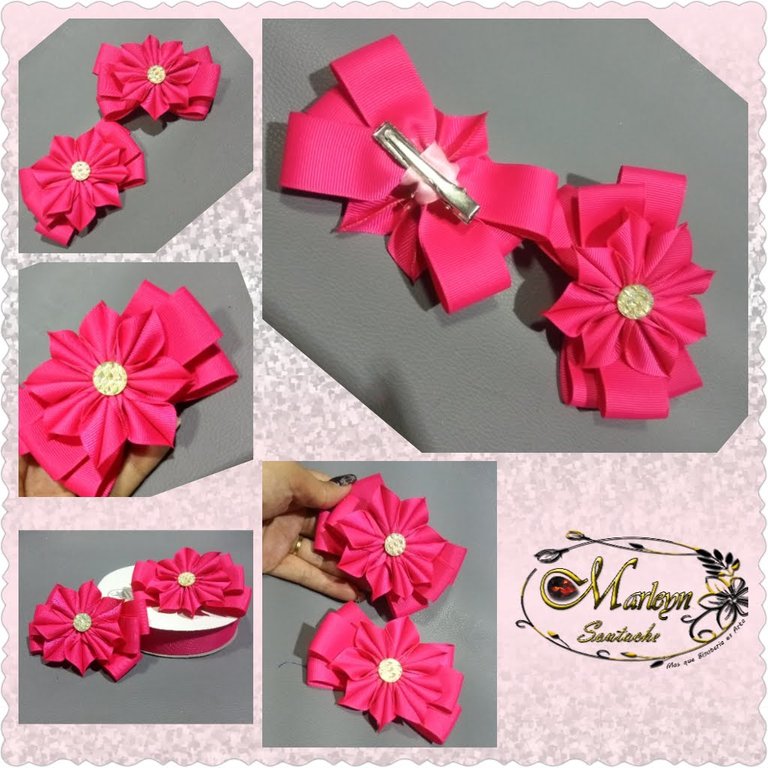
Feliz y Bendecido nuevo inicio de semana! Ha llegado mi amado lunes de aguja de verdad que me encanta este día el día de hoy les e realizado un lazo precioso, tratare de explicarlo a detalle con la ayuda de una secuencia de imágenes para que me entiendan quería publicarles el vídeo pero bueno aun no los se editar. De Corazón deseo estén muy bien con salud abundancia y prosperidad en casa junto a su familia. Todos los Materiales son económicos de fácil acceso y puedes encontrarlos en una mercería, verán muchos tutoriales con este color de cinta es que no tengo mas colores y del fucsia logre comprar un rollo espero eso no sea inconveniente
Happy and Blessed new start of the week! My beloved needle Monday has arrived, I really love this day today and I made a beautiful bow for you, I will try to explain it in detail with the help of a sequence of images so that you understand me I wanted to publish the video but hey not yet I will edit them. From my heart I wish you are very well with health, abundance and prosperity at home with your family. All materials are cheap and easy to access and you can find them in a haberdashery, you will see many tutorials with this color of ribbon is that I do not have more colors and from fuchsia I managed to buy a roll I hope that is not inconvenient

| MATERIALES | MATERIALS |
|---|
| Cinta razo 2.5 centímetros de ancho por 3. 15 metros de largo | Razo ribbon 2.5 centimeters wide by 3.15 meters long |
| 2 Pinzas tipo caimán pequeñas para lazos | 2 Small alligator clips for bows |
| Silicon en barra | Silicon stick |
| 2 Apliques Redondos y planos tornasol para el centro | 2 Round and flat lights iridescent for the center |
| Aguja e Hilo | Needle and thread |
| Tijera y Encendedor | Scissors and Lighter |
| Cinta razo de 1.5 centímetros de ancho por 15 centímetros de largo | Satin ribbon 1.5 centimeters wide by 15 centimeters long |
| Amor por lo que hacemos, Paciencia y Ganas de aprender | Love for what we do, patience and desire to learn |
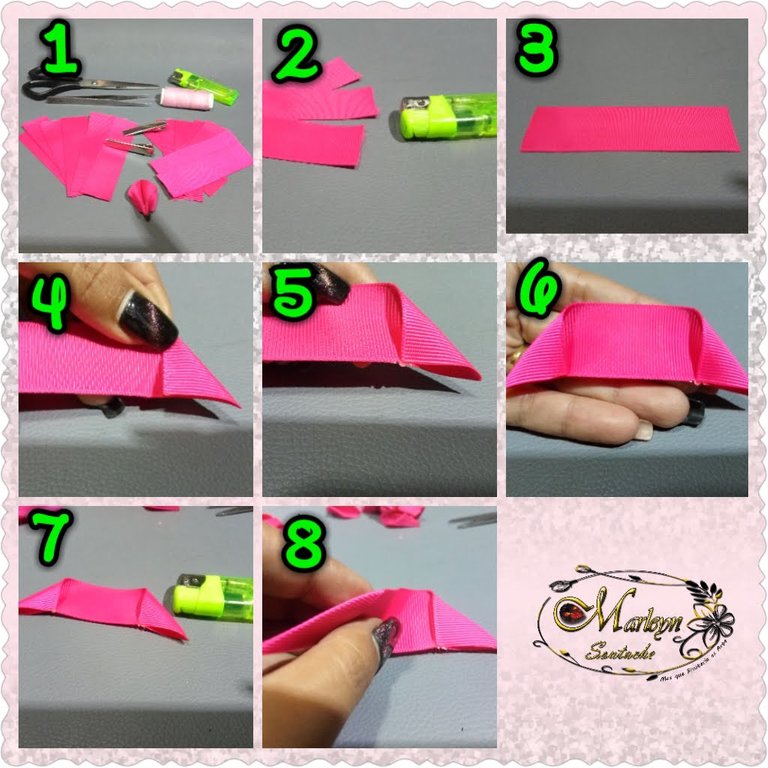
PASO 1: Vamos a cortar 16 tiras de 11 centímetros cada una, con ayuda del encendedor vas a quemar las puntas para sellar, vas a doblar cada punta hacia la parte de adentro como te muestro en la imagen 4, y quemas un poquito con el encendedor para que se quede pegado allí como ves en la imagen 5, realiza este mismo proceso en ambas puntas, de todas las tiras.
STEP 1: We are going to cut 16 strips of 11 centimeters each, with the help of the lighter you are going to burn the ends to seal, you are going to fold each end towards the inside as I show you in image 4, and burn a little with the lighter so that it stays stuck there as you see in image 5, carry out this same process on both ends, of all the strips.
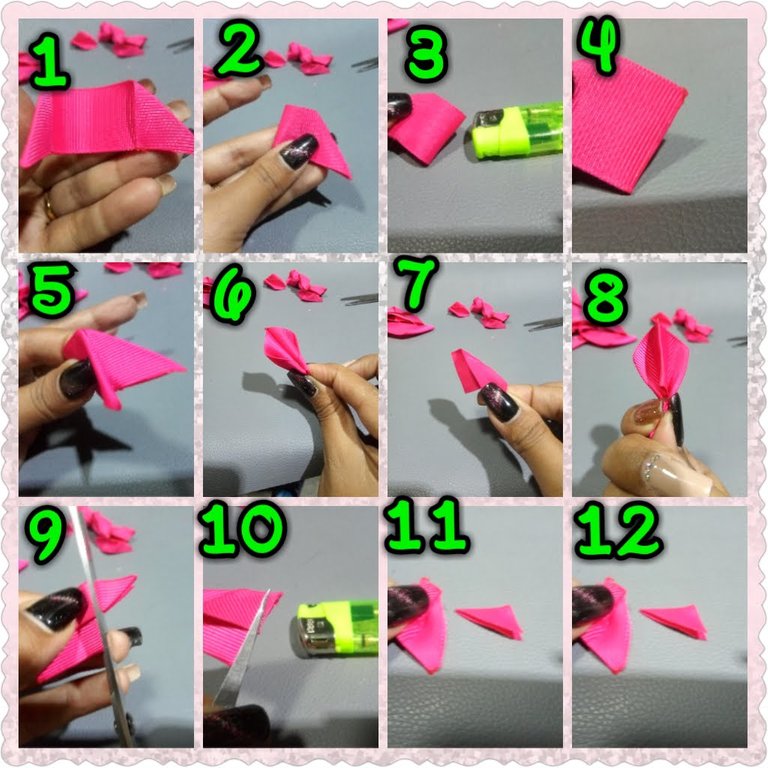
PASO 2: Cuando ya hemos doblado las puntas se debe ver como la imagen numero 1, ahora vamos a doblar nuestra cinta a la mitad, y pasa el encendedor por el centro de manera rápida solo para marcar el centro, y en la parte superior quemar un poquito mas para que se forme una punta ver imagen 2 y 3. Ahora agarra como yo lo hago en la imagen 5 y lleva hacia atrás las puntas debe quedar como te muestro en la imagen 6 y 7. y en la parte de atrás como esta en la imagen 8, ahora corta las puntas sobrantes y quemar con el encendedor para que no se deforme el pétalo, la parte centra también se va a cortar de manera que no quede tan largo abajo como te muestro en la imagen 11 y 12
STEP 2: When we have already bent the tips it should look like image number 1, now we are going to fold our ribbon in half, and pass the lighter through the center quickly only to mark the center, and in the upper part burn a little more so that a point is formed see image 2 and 3. Now grab as I do in image 5 and bring back the tips it should be as I show you in the image 6 and 7. and in the back part like this in image 8, now cut the excess tips and burn with the lighter so that the petal is not deformed, the central part will also be cut so that it is not so long below as I show you in the image 11 and 12
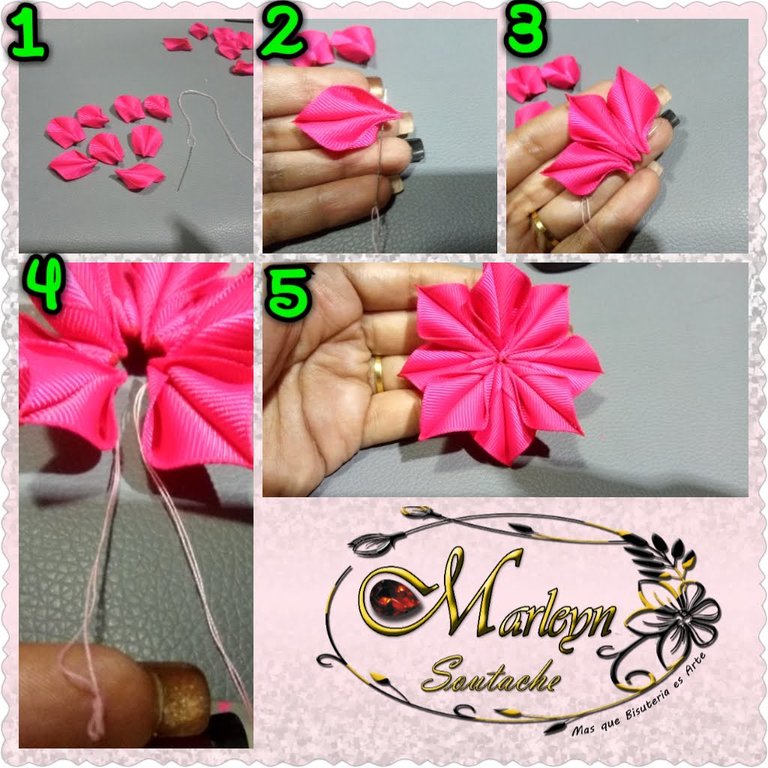
PASO 3: Al terminar de formar todos los pétalos vamos a cocer 2 flores cada una de 8 pétalos, al terminar apretar el hilo y realizar un amarre para que no se suelte realiza este mismo proceso en ambas flores centrales
STEP 3: At the end of forming all the petals we are going to cook 2 flowers each with 8 petals, at the end, tighten the thread and make a tie so that it does not come loose, carry out this same process in both central flowers

PASO 4: Vamos a cortar 2 tiras cada una de 24 centímetros de largo por 2.5 centímetros de ancho doblarlas a la mitad y pasar el encendedor para marcar el centro, luego dobla cada punta hasta el centro y cocer ambas con el mismo hilo al terminar halar el hilo y enrollarlo sobre el mismo lazo un poco luego amarrar y cortar el hilo sobrante, cortar ahora una tira de 21 centímetros de largo y realizar el mismo proceso esta cinta pequeña la coceremos sobre las dos anteriores quedara como te muestro en la ultima imagen, realiza este proceso dos veces para realizar el par de lazos
STEP 4: We are going to cut 2 strips each 24 centimeters long by 2.5 centimeters wide, fold them in half and pass the lighter to mark the center, then fold each end to the center and cook both with the same thread at the end, pull the thread and wind it on the same loop a little then tie and cut the excess thread, now cut a strip of 21 centimeters long and carry out the same process this small ribbon will be cooked on the two previous ones will be as I show you in the last image, carry out this process twice to make the pair of loops
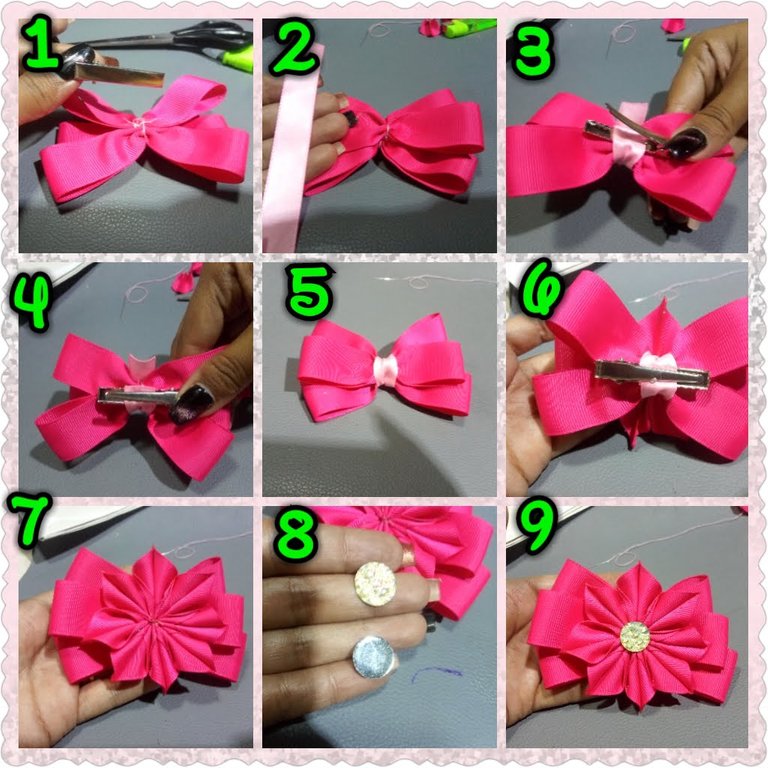
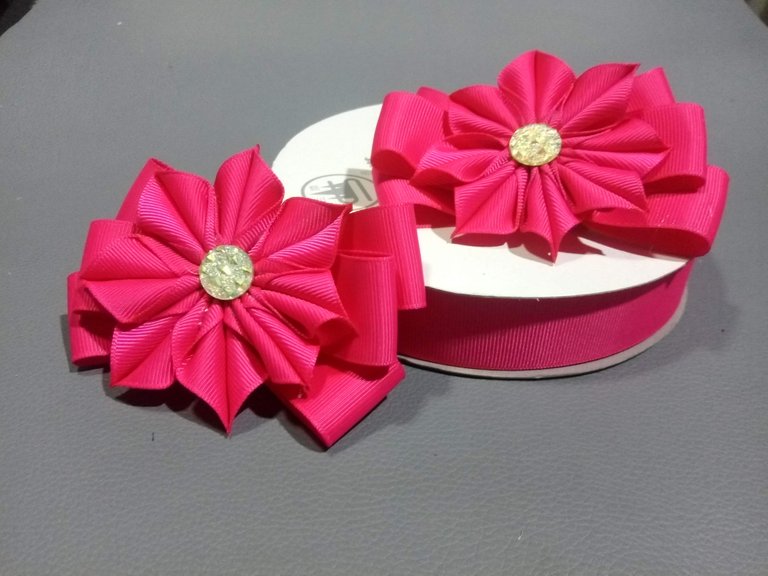
PASO 5: cuando tenemos lista la parte de abajo del lazo, se le pegara la pinza tipo caiman por abajo con un poco de silicon en barra, ahora corta una pequeña cinta de 1.5 centimetros de ancho y se le va a pegar por el mediosujetando con esta tambien la parte de adentro de la pinza para que quede mas segura se vera como esta en la imagen 5 queda lindo hasta se puede utilizar asi, aunque yo le agregue arriba la flor con bastante silicon caliente para que no se suelte, ahora coloca una gota de silicon caliente en el centro de la flor y pega el aplique realiza este proceso dos veces para tener el par de lazos y de esta manera hemos terminado de seguro te quedara Hermoso 😃
STEP 5: when we have the bottom part of the loop ready, the alligator clip will be glued on the bottom with a little silicone stick, now cut a small 1.5 centimeter ribbon of wide and it will stick in the middle, also holding the inside of the clamp with it so that it is more secure, it will look like this in image 5, it looks nice until it can be used like that, although I add the flower above with enough hot silicone so that it does not come loose, now place a drop of hot silicone in the center of the flower and stick the applique perform this process twice to have the pair of bows and in this way we have finished for sure you will be beautiful 😃
Si tienes una duda escríbeme un comentario, estaré feliz de ayudarte con cualquier detalle, Espero que mis diseños les gusten tanto como a mí me gusta, aprendan con placer ...!

Nunca olvides que el Poder es Querer y si quieres Puedes...
Eres Luz eres Energía, TU PUEDES ... Que el universo infinito Conspire para que todo siempre sea mejor ... Se les quiere ...
Venezuela FE
Somos Seres Abundantes! Qué las energías del universo vibren en sintonía con las de cada uno de nosotros en armonía! Cuidemos nuestras palabras, acciones y pensamientos!
If you have a question, write me a comment, I will be happy to help you with any details, I hope you like my designs as much as I like, learn with pleasure ...!
Never forget that Power is Wanting and if you want you can ...
You are Light, you are Energy, YOU CAN ... May the infinite universe Conspire so that everything is always better ... They are loved ...
Venezuela FAITH
We are Abundant Beings! May the energies of the universe vibrate in tune with those of each of us in harmony! Let's take care of our words, actions and thoughts!
Autoría del texto y todas las imágenes: @Marleyn , La edición de las imágenes las realicé yo misma, Por favor no Utilices mis fotos sin mi autorización, edites ni re-publiques mi material ¿Deseas ponerte en contacto conmigo? Escríbeme:
Correo electronico: [email protected]
Discord Marleyn#7821
Twitter: @marleynleal1
Imstagran: @MarleynSoutache
Authorship of the text and all the images: @Marleyn, Editing of the images was done by myself, >Please do not use my photos without my authorization, edit or re-publish my material Do you want to >contact me? Write me:
Email: [email protected]
Discord Marleyn #7821
Twitter: @marleynleal1
Imstagran: @MarleynSoutache
Mi trabajo es mi pasión y cuando tu trabajo es tu pasión nada es imposible / My work is my passion and when your work is your passion nothing is impossible
Se nota que tu trabajo es tu pasión, se ve en el resultado, el cual es impecable. Bonito lazos, y el color precioso. Saludos
Thank you for sharing this amazing post on HIVE!
Your content got selected by our fellow curator @stevenson7 & you just received a little thank you via an upvote from our non-profit curation initiative!
You will be featured in one of our recurring curation compilations and on our pinterest boards! Both are aiming to offer you a stage to widen your audience within and outside of the DIY scene of hive.
Join the official DIYHub community on HIVE and show us more of your amazing work and feel free to connect with us and other DIYers via our discord server!
If you want to support our goal to motivate other DIY/art/music/homesteading/... creators just delegate to us and earn 100% of your curation rewards!
Stay creative & hive on!
Congratulations @marleyn! You have completed the following achievement on the Hive blockchain and have been rewarded with new badge(s) :
You can view your badges on your board and compare yourself to others in the Ranking
If you no longer want to receive notifications, reply to this comment with the word
STOPDo not miss the last post from @hivebuzz:
Those are so pretty - I really am going to have to try to make them too some day soon :)
Que lindo lazo y el color amiga 👍👏😘
Son muy hermosos ❤️ ¿Haces para vender?
Gracias, si vendo por pedidos estamos a la orden