¡Saludos 👋 Queridos 💞 Amigos de #NeedleWorkMonday😘! // Greetings 👋 Dear 💞 Friends of #NeedleWorkMonday😘!
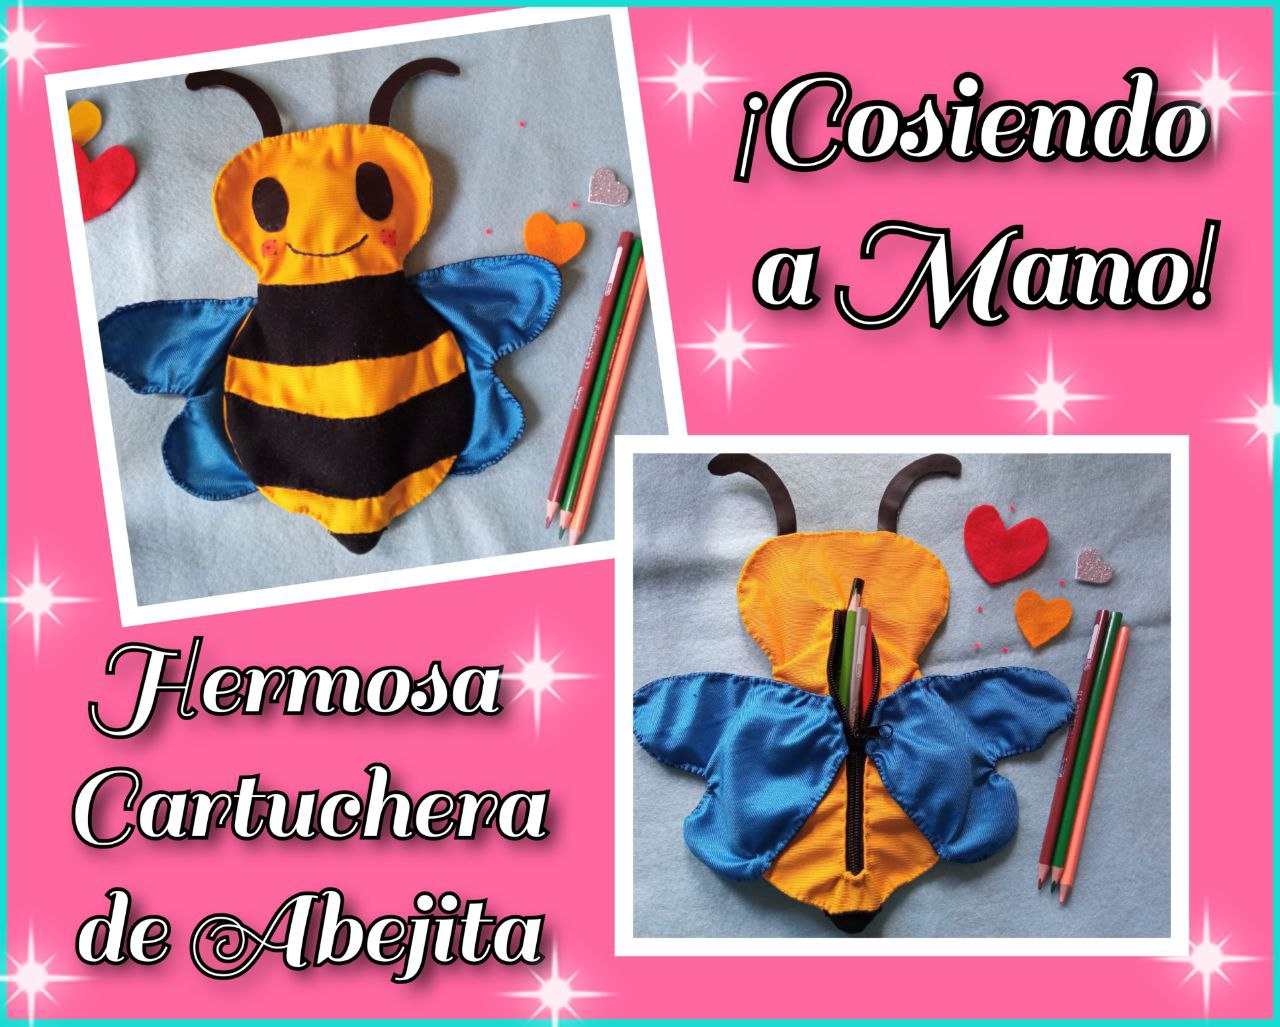
Cartuchera de Abejita 🐝 Cocida a Mano // Bee Cartuchera de Abejita 🐝 Cocida a Mano
Hola, espero que todo estén bien, una vez más vengo por esta maravillosa comunidad para mostrarle un tutorial de Cómo Elaborar una Hermosa 😍 Cartuchera de Abejita 🐝 Cosida a Mano, esta es la tercera cartuchera que elaboró y le explico el paso a paso para que se animen en aprender hacerlas.
Hello, I hope everything is well, once again I come to this wonderful community to show you a tutorial on How to Make a Beautiful 😍 Handmade Bee Case 🐝, this is the third case I made and I explain the step by step to encourage you to learn how to make them.
Me gustan mucho los animales y la mayoría de mis trabajos son inspirados en ellos, esta vez le tocó a la Abejita 🐝 jejejeje!! Sólo les pido que tengan un poco de paciencia 😃 porque cada pieza es cosida a mano y me gustaría que así lo hicieran ya que le da un toque maravilloso 💕.
I really like animals and most of my works are inspired by them, this time it was the Little Bee's turn 🐝 hehehehehehe!!!! I just ask you to have a little patience 😃 because each piece is hand fired and I would like you to do so as it gives it a wonderful touch 💕.
Para la elaboración de esta Hermosa 😍 Cartuchera de Abejita 🐝 les voy a detallar los materiales necesarios para su elaboración.
For the elaboration of this beautiful 😍 Little Bee Card Case 🐝 I am going to detail the necessary materials for its elaboration.
🐝Materiales:🐝
- 🍯Tela de color amarillo.
- 🍯Tela de color negro.
- 🍯Tela de color azul.
- 🍯Un Trozo de cuero sintético negro.
- 🍯Un cierre de 30 cm.
- 🍯Hilo de color amarillo y negro.
- 🍯Tijera.
- 🍯Aguja de coser.
- 🍯Hojas blanca para dibujar la abeja y sacar el patrón.
- 🍯Lápiz.
- 🍯Alfileres.
🐝 Materials:🐝
- 🍯Yellow fabric.
- 🍯Fabric of black color.
- 🍯Blue cloth.
- 🍯A piece of black synthetic leather.
- 🍯A zipper of 30 cm.
- 🍯Yellow and black thread.
- 🍯Scissors.
- 🍯Sewing needle.
- 🍯White sheets to draw the bee and draw the pattern.
- 🍯Pencil.
- 🍯Pins.

🐝 Elaboración:🐝 // 🐝Elaboration:🐝
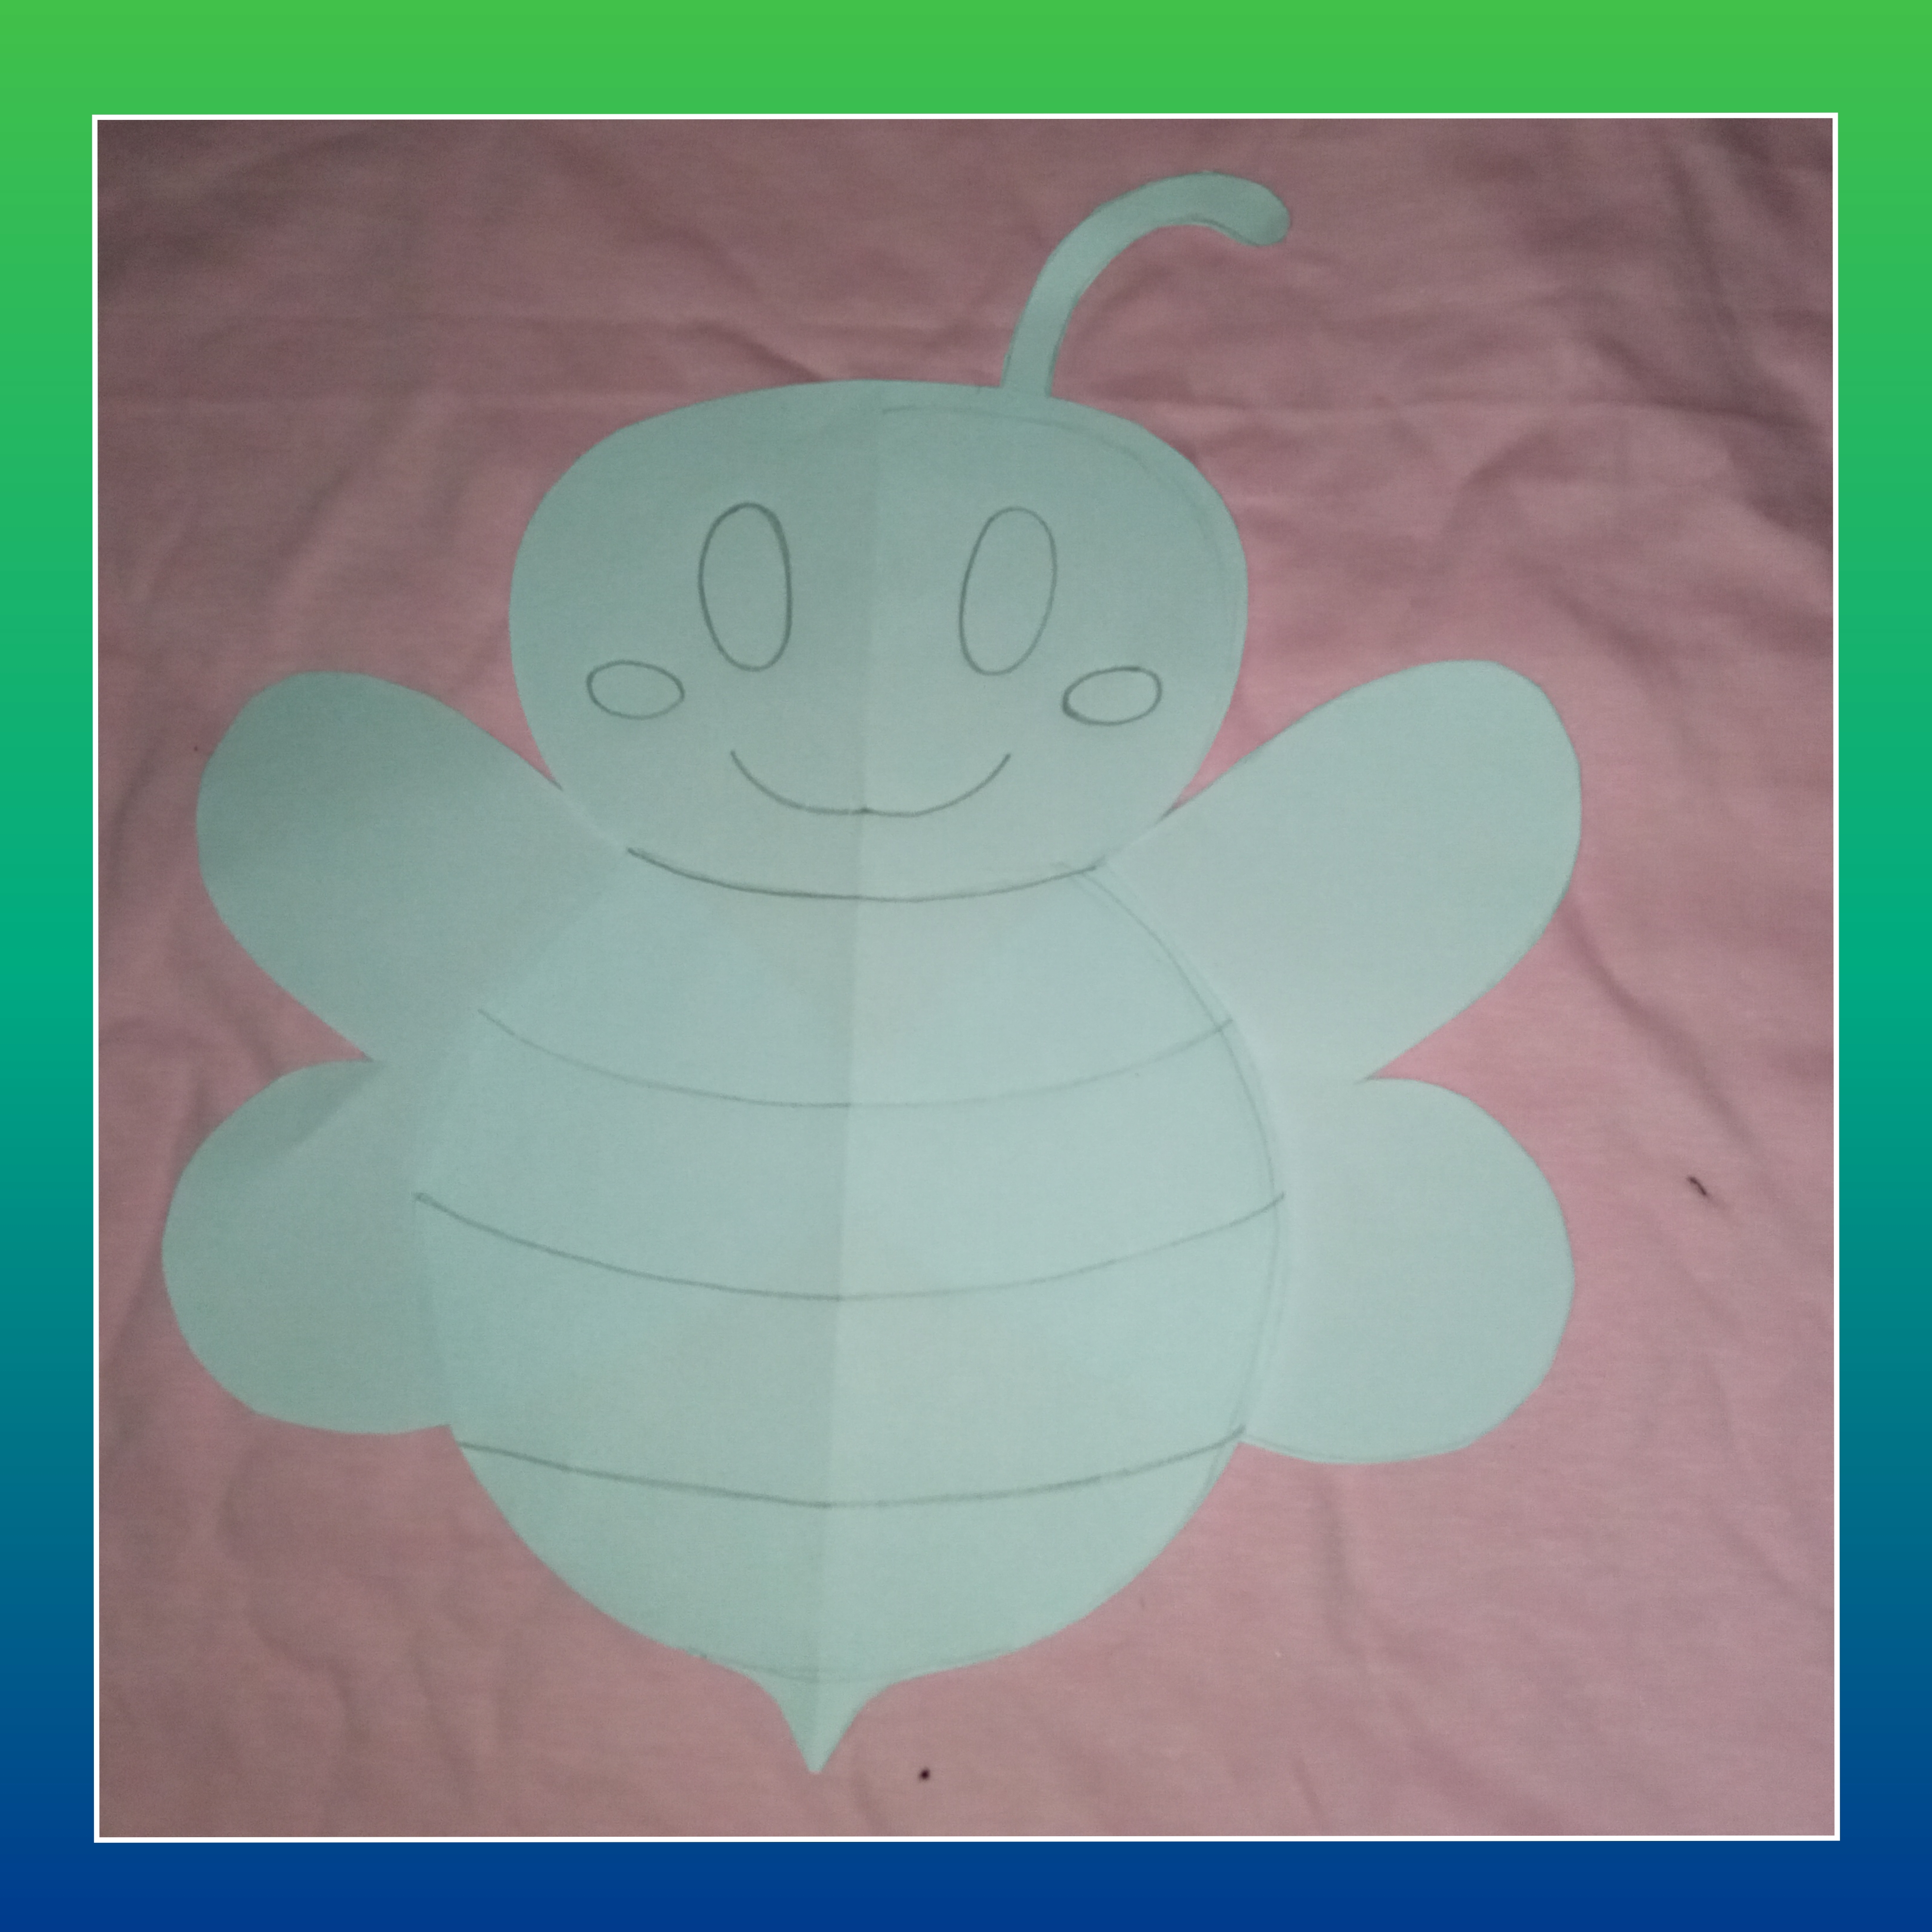
Paso 1:
Para comenzar dibuje una Abejita 🐝 en el papel, después de terminada saqué los patrones y recorte cada uno.
Step 1:
To start I drew a little 🐝 Bee 🐝 on the paper, after I finished I took out the patterns and cut out each one.
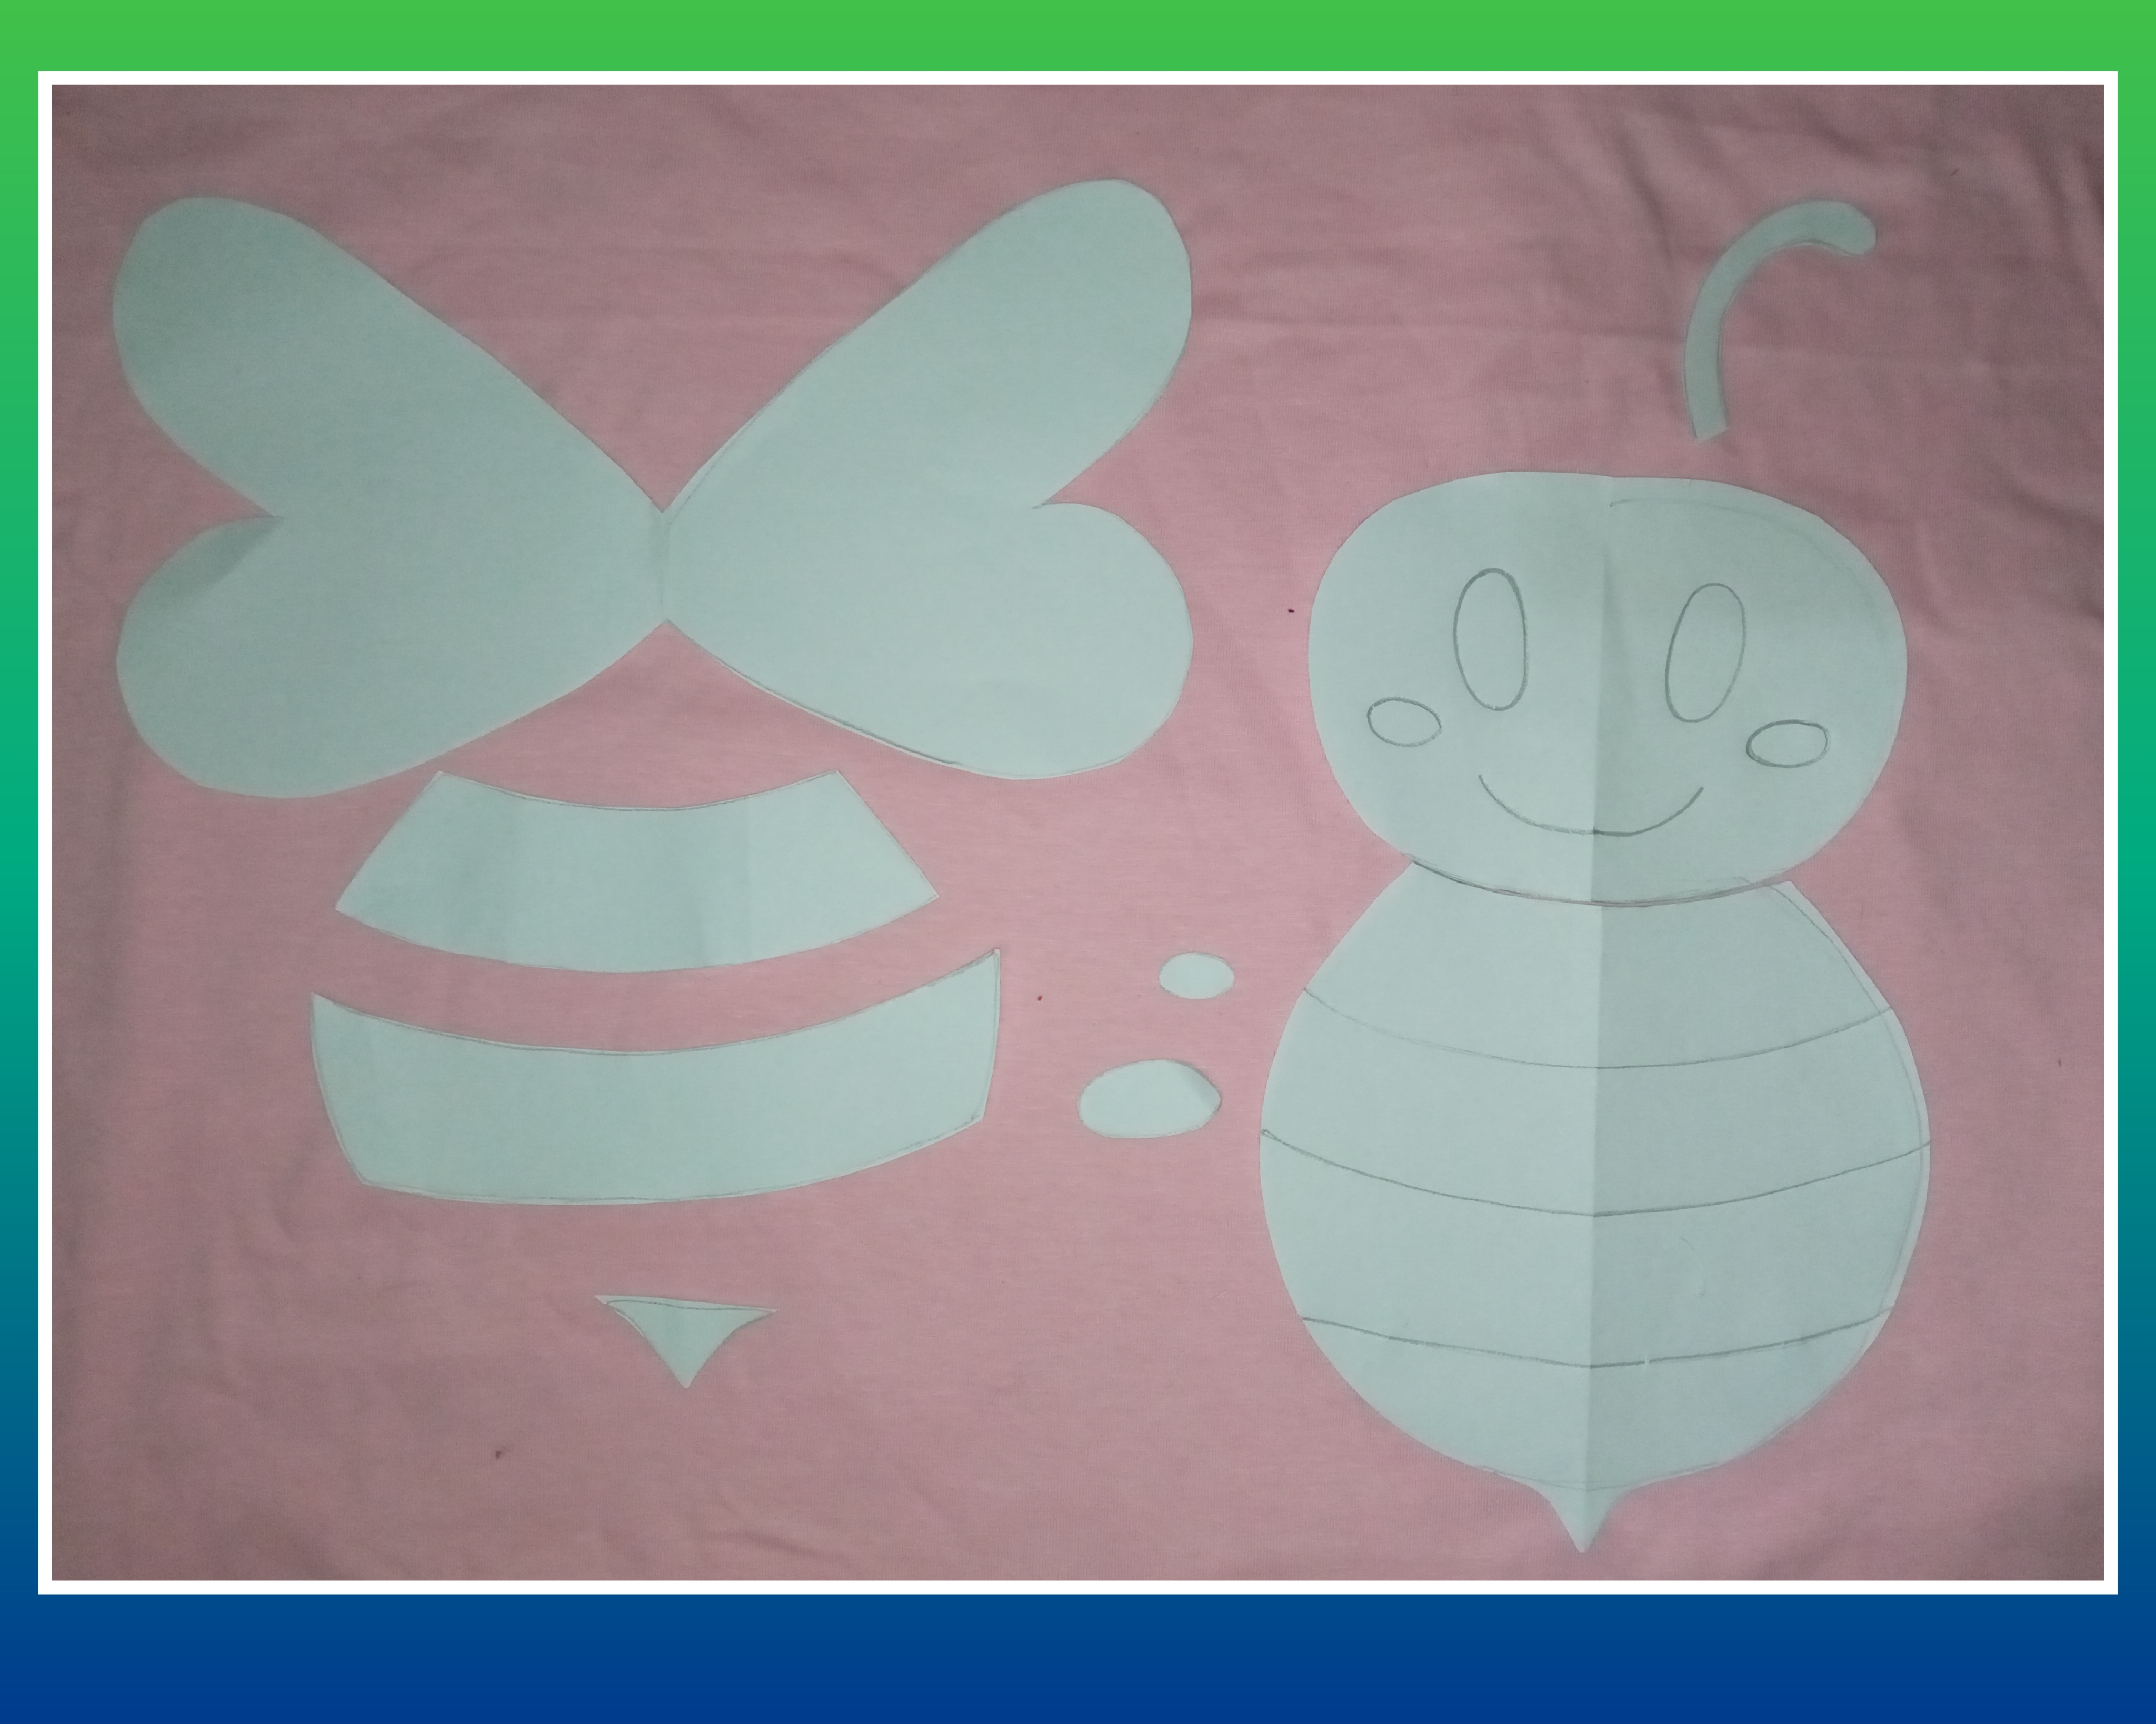
Paso 2:
Tome el patrón del cuerpo de la abeja y marque dos piezas en tela amarilla y corte, luego tome el patrón de las franjas y las marque en tela negra y corte una pieza de las dos primeras, la pieza de la ponzoña corto dos piezas.
Step 2:
Take the bee body pattern and mark two pieces on yellow fabric and cut, then take the stripes pattern and mark them on black fabric and cut one piece from the first two, the punch piece cut two pieces.

Paso 3:
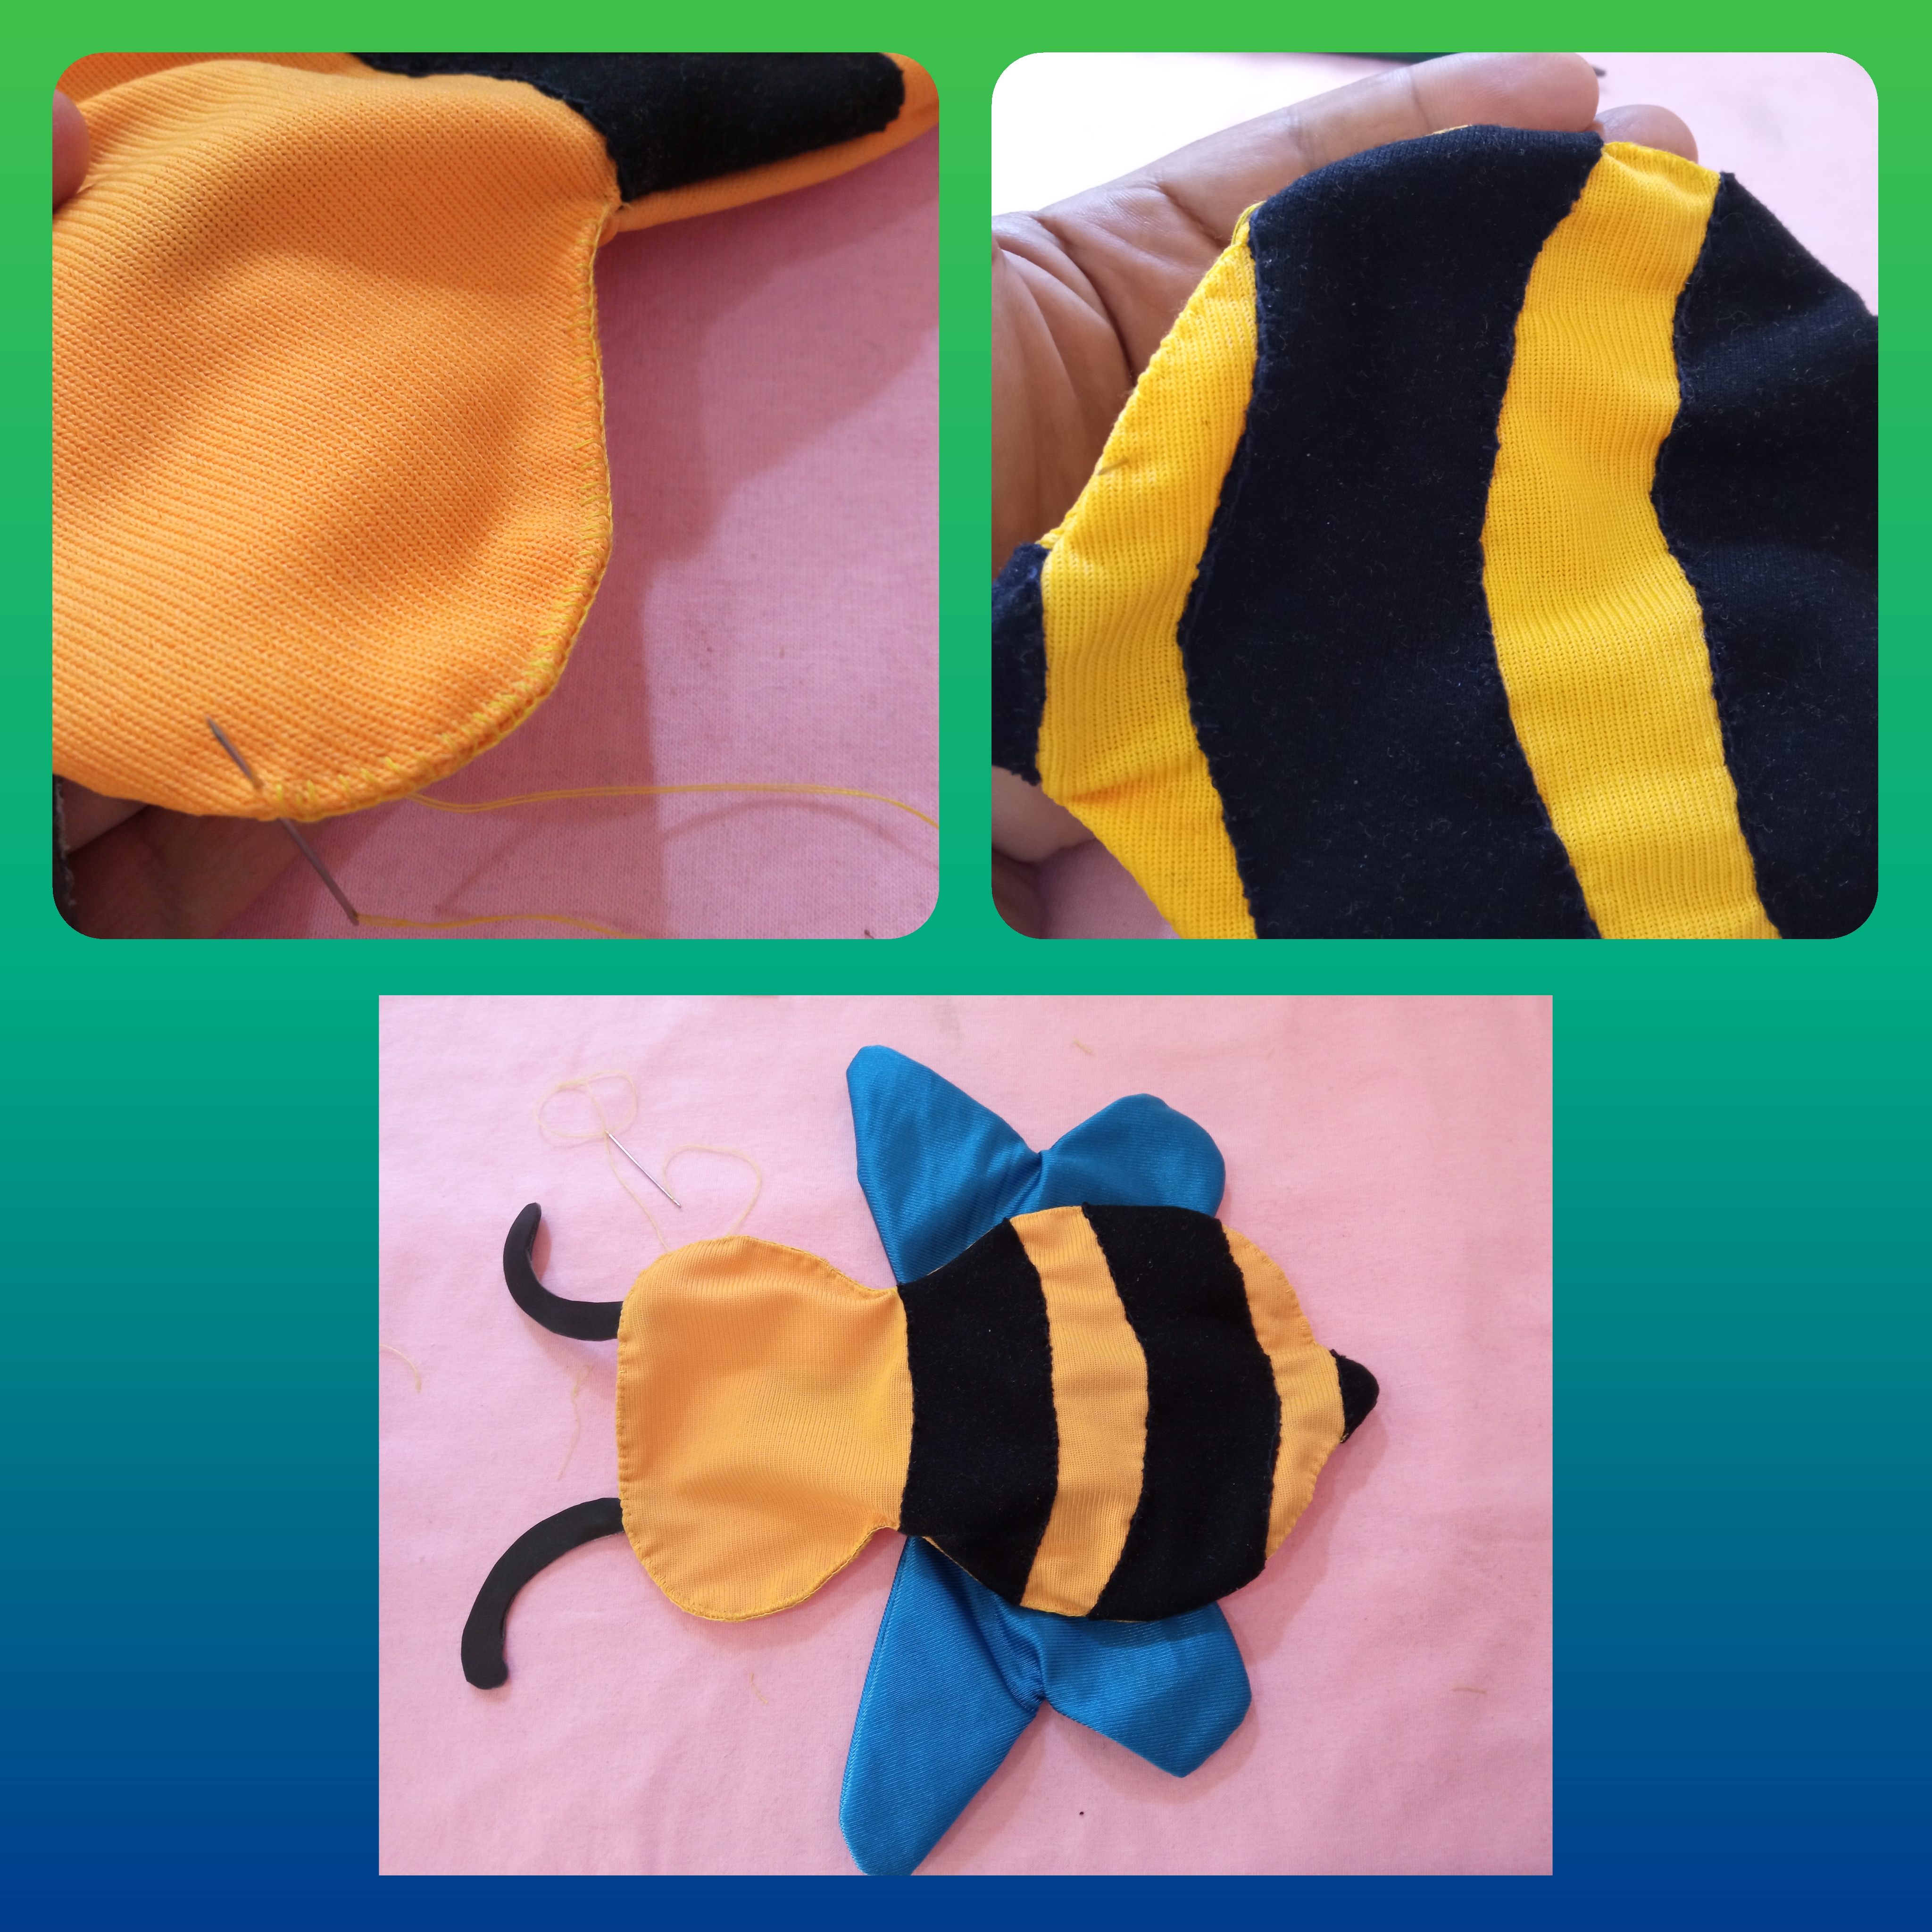
Tomo una pieza de la abeja y voy cosiendo a ella cada franja en hilo negro en punto ojal hasta terminar de coser las 3 franjas.
Step 3:
I take a piece of the bee and sew each stripe to it in black thread in buttonhole stitch until I finish sewing the 3 strips.

Paso 4:
Corto dos piezas de las alas con ayuda del patrón, luego corto a la mitad como ven en la imagen, luego uno las alas con el derecho de frente hacia dentro y coso después volteo cada ala.
Step 4:
I cut two pieces of the wings with the help of the pattern, then cut in half as you see in the picture, then join the wings right side facing in and sew then flip each wing.

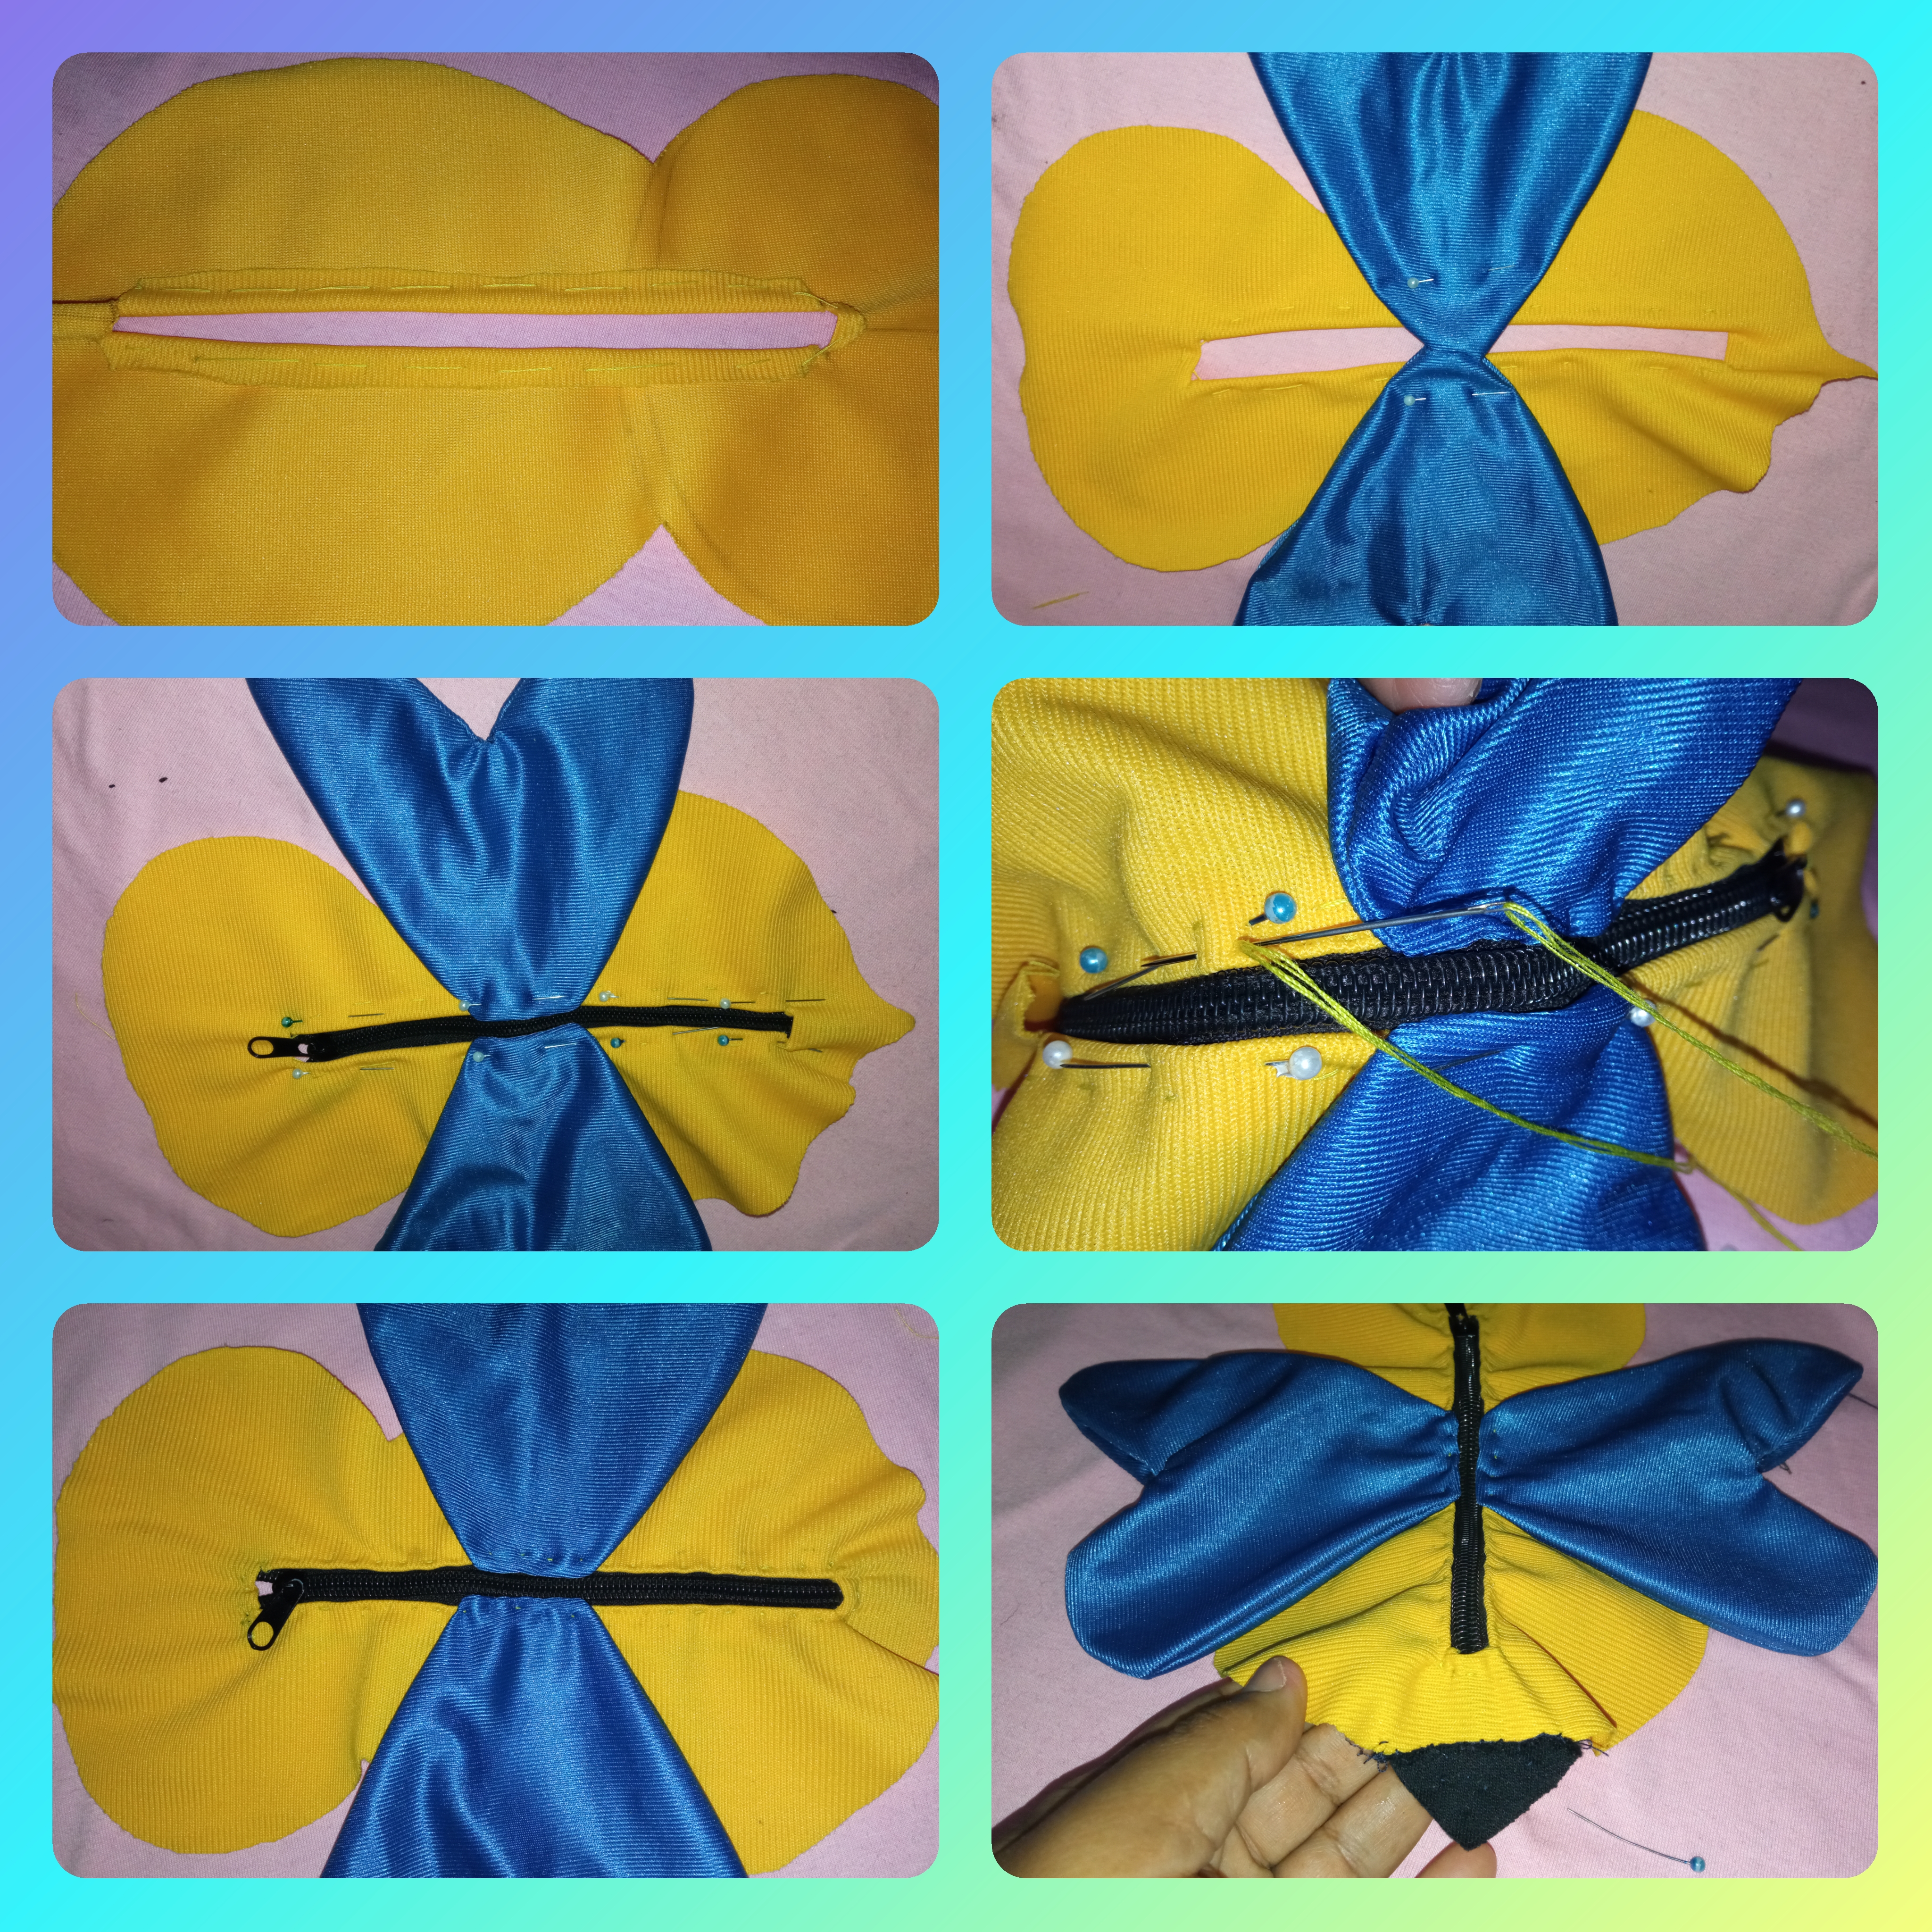
Paso 5:
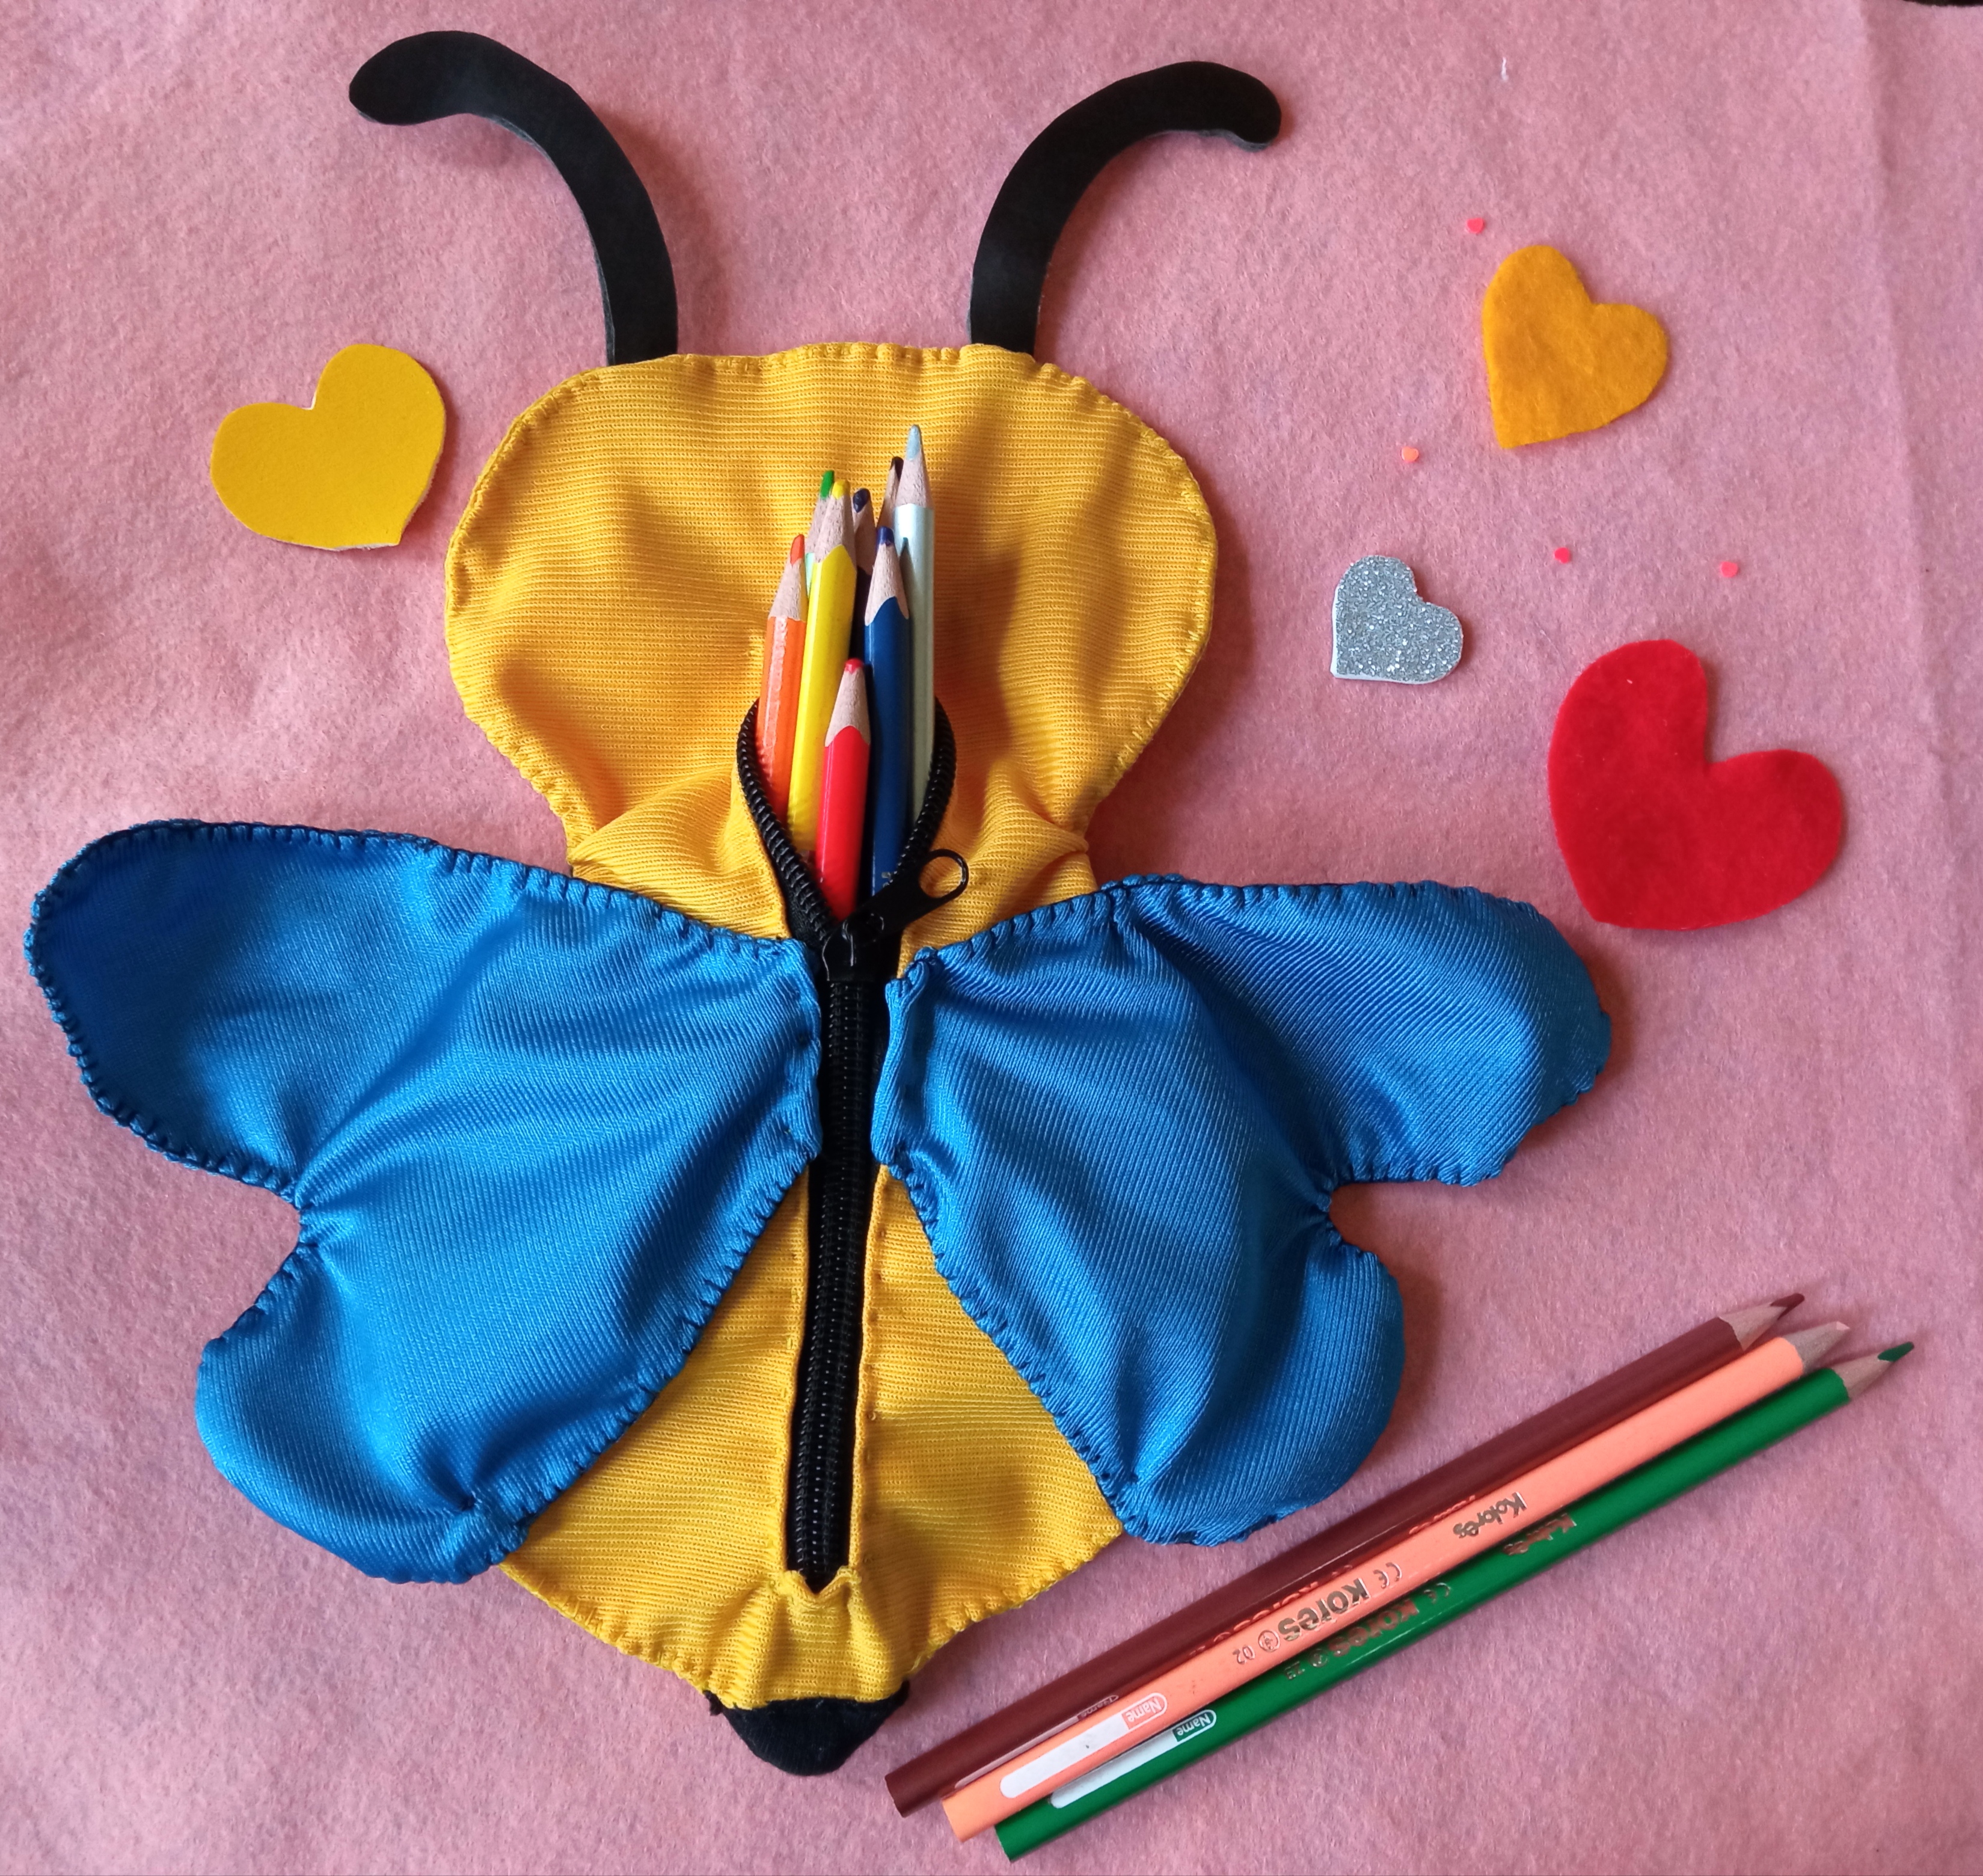
Ahora tomo la otra pieza de la Abejita 🐝 y con una regla marco una línea mido el cierre y luego corto, después al final del corte corto un poco a los lados como muestro en la cuarta imagen.
Step 5:
Now I take the other piece of the Bumblebee 🐝 and with a ruler I mark a line I measure the closure and then cut, then at the end of the cut I cut a little on the sides as I show in the fourth image.

Paso 6:
Doblo hacia dentro y hago una costura provisional, luego coloco las alas de ambos lados y fijo con alfileres, después colocamos el cierre y fijamos también con alfileres, ahora cosemos con hilo amarillo el cierre pasando por las alas y para terminar retirados el hilo de la costura provisional.
Step 6:
I fold inwards and make a provisional seam, then I place the wings on both sides and fix with pins, then we place the zipper and fix also with pins, now we sew with yellow thread the zipper passing through the wings and to finish we remove the thread of the provisional seam.
Paso 7:
Tomo el cuero y corto 2 piezas de las antenas, luego la fijo con alfileres a la cabeza de mi Abejita 🐝, uno al centro las alas y monto la otra pieza de la Abejita 🐝 y coso por todo el alrededor con hilo amarillo la tela amarilla y con hilo negro la parte donde están las franjas negras, al terminar de coser por el cierre volteo al lado derecho la Abejita 🐝.
Step 7:
I take the leather and cut 2 pieces of the antennae, then I fix it with pins to the head of my Little Bee 🐝, one in the center of the wings and I mount the other piece of the Little Bee 🐝 and I sew all around with yellow thread the yellow fabric and with black thread the part where the black stripes are, when I finish sewing the zipper I turn the Little Bee 🐝 to the right side.


Paso 3:
Ya con mi Abejita 🐝 volteada comencemos a coser en punto ojal en hilo amarillo solo la parte amarilla de la Abejita 🐝.
Step 3:
With my 🐝 Little Bee 🐝 turned over, let's start sewing in buttonhole stitch in yellow thread only the yellow part of the 🐝 Little Bee 🐝.
Paso 4:
También cosemos en punto ojal con hilo negro por todo el alrededor de las alas, después de terminar cosemos las alas al cuerpo haciendo una pequeña punta en la parte superior y en la parte inferior como ven en la imagen.
Step 4:
We also sew in buttonhole stitch with black thread all around the wings, after finishing we sew the wings to the body making a small point at the top and at the bottom as you can see in the picture.

Paso 5:
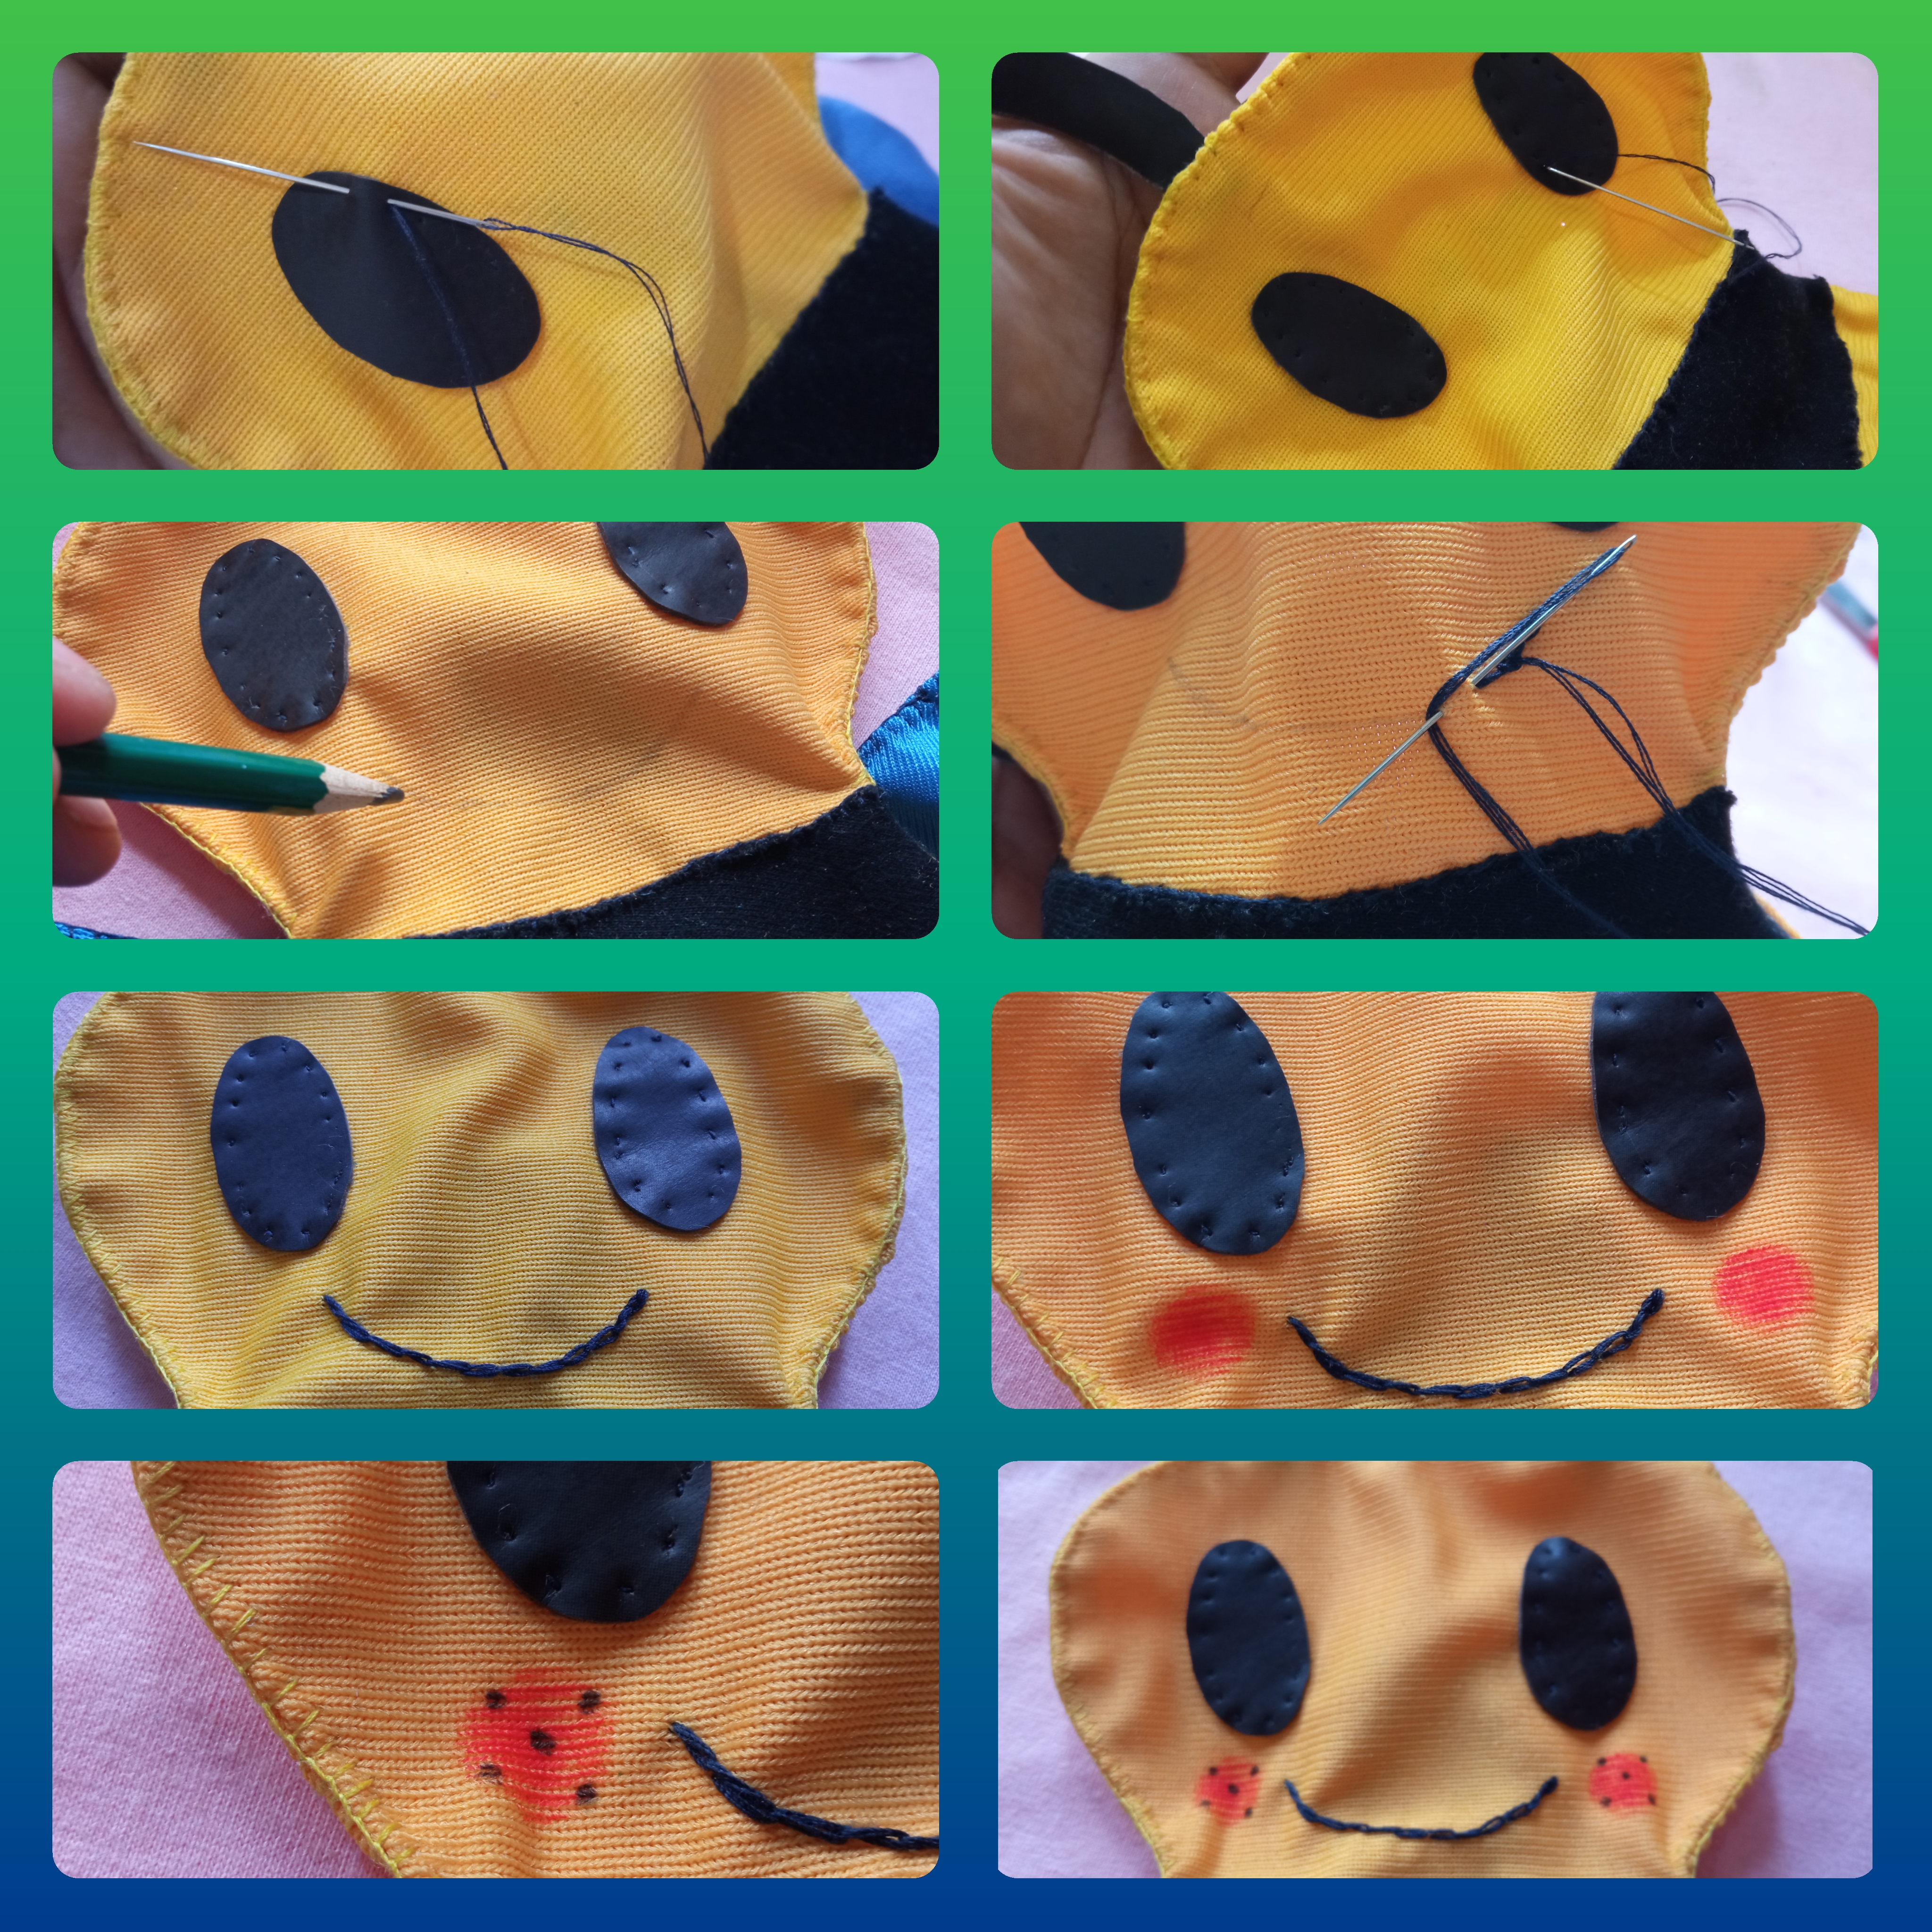
En cuero negro corto los dos ojos y lo coso a la cara de mi Abejita 🐝 al terminar marco con un lápiz la boca luego con hilo negro bordo la boca, después con pintura roja le hago unos círculos y con marcador negro le hago 5 puntos jajajaja! Se verá gracioso!!.
Step 5:
In black leather I cut the two eyes and sew it to the face of my little Bee 🐝 when finished I mark with a pencil the mouth then with black thread I embroider the mouth, then with red paint I make some circles and with black marker I make 5 points hahahaha! It will look funny!!!.
¡Ya mi Hermosa 🤩 Cartuchera de Abejita 🐝 está Terminada! // My beautiful 🤩 Bee Cartuchera 🐝 is finished!
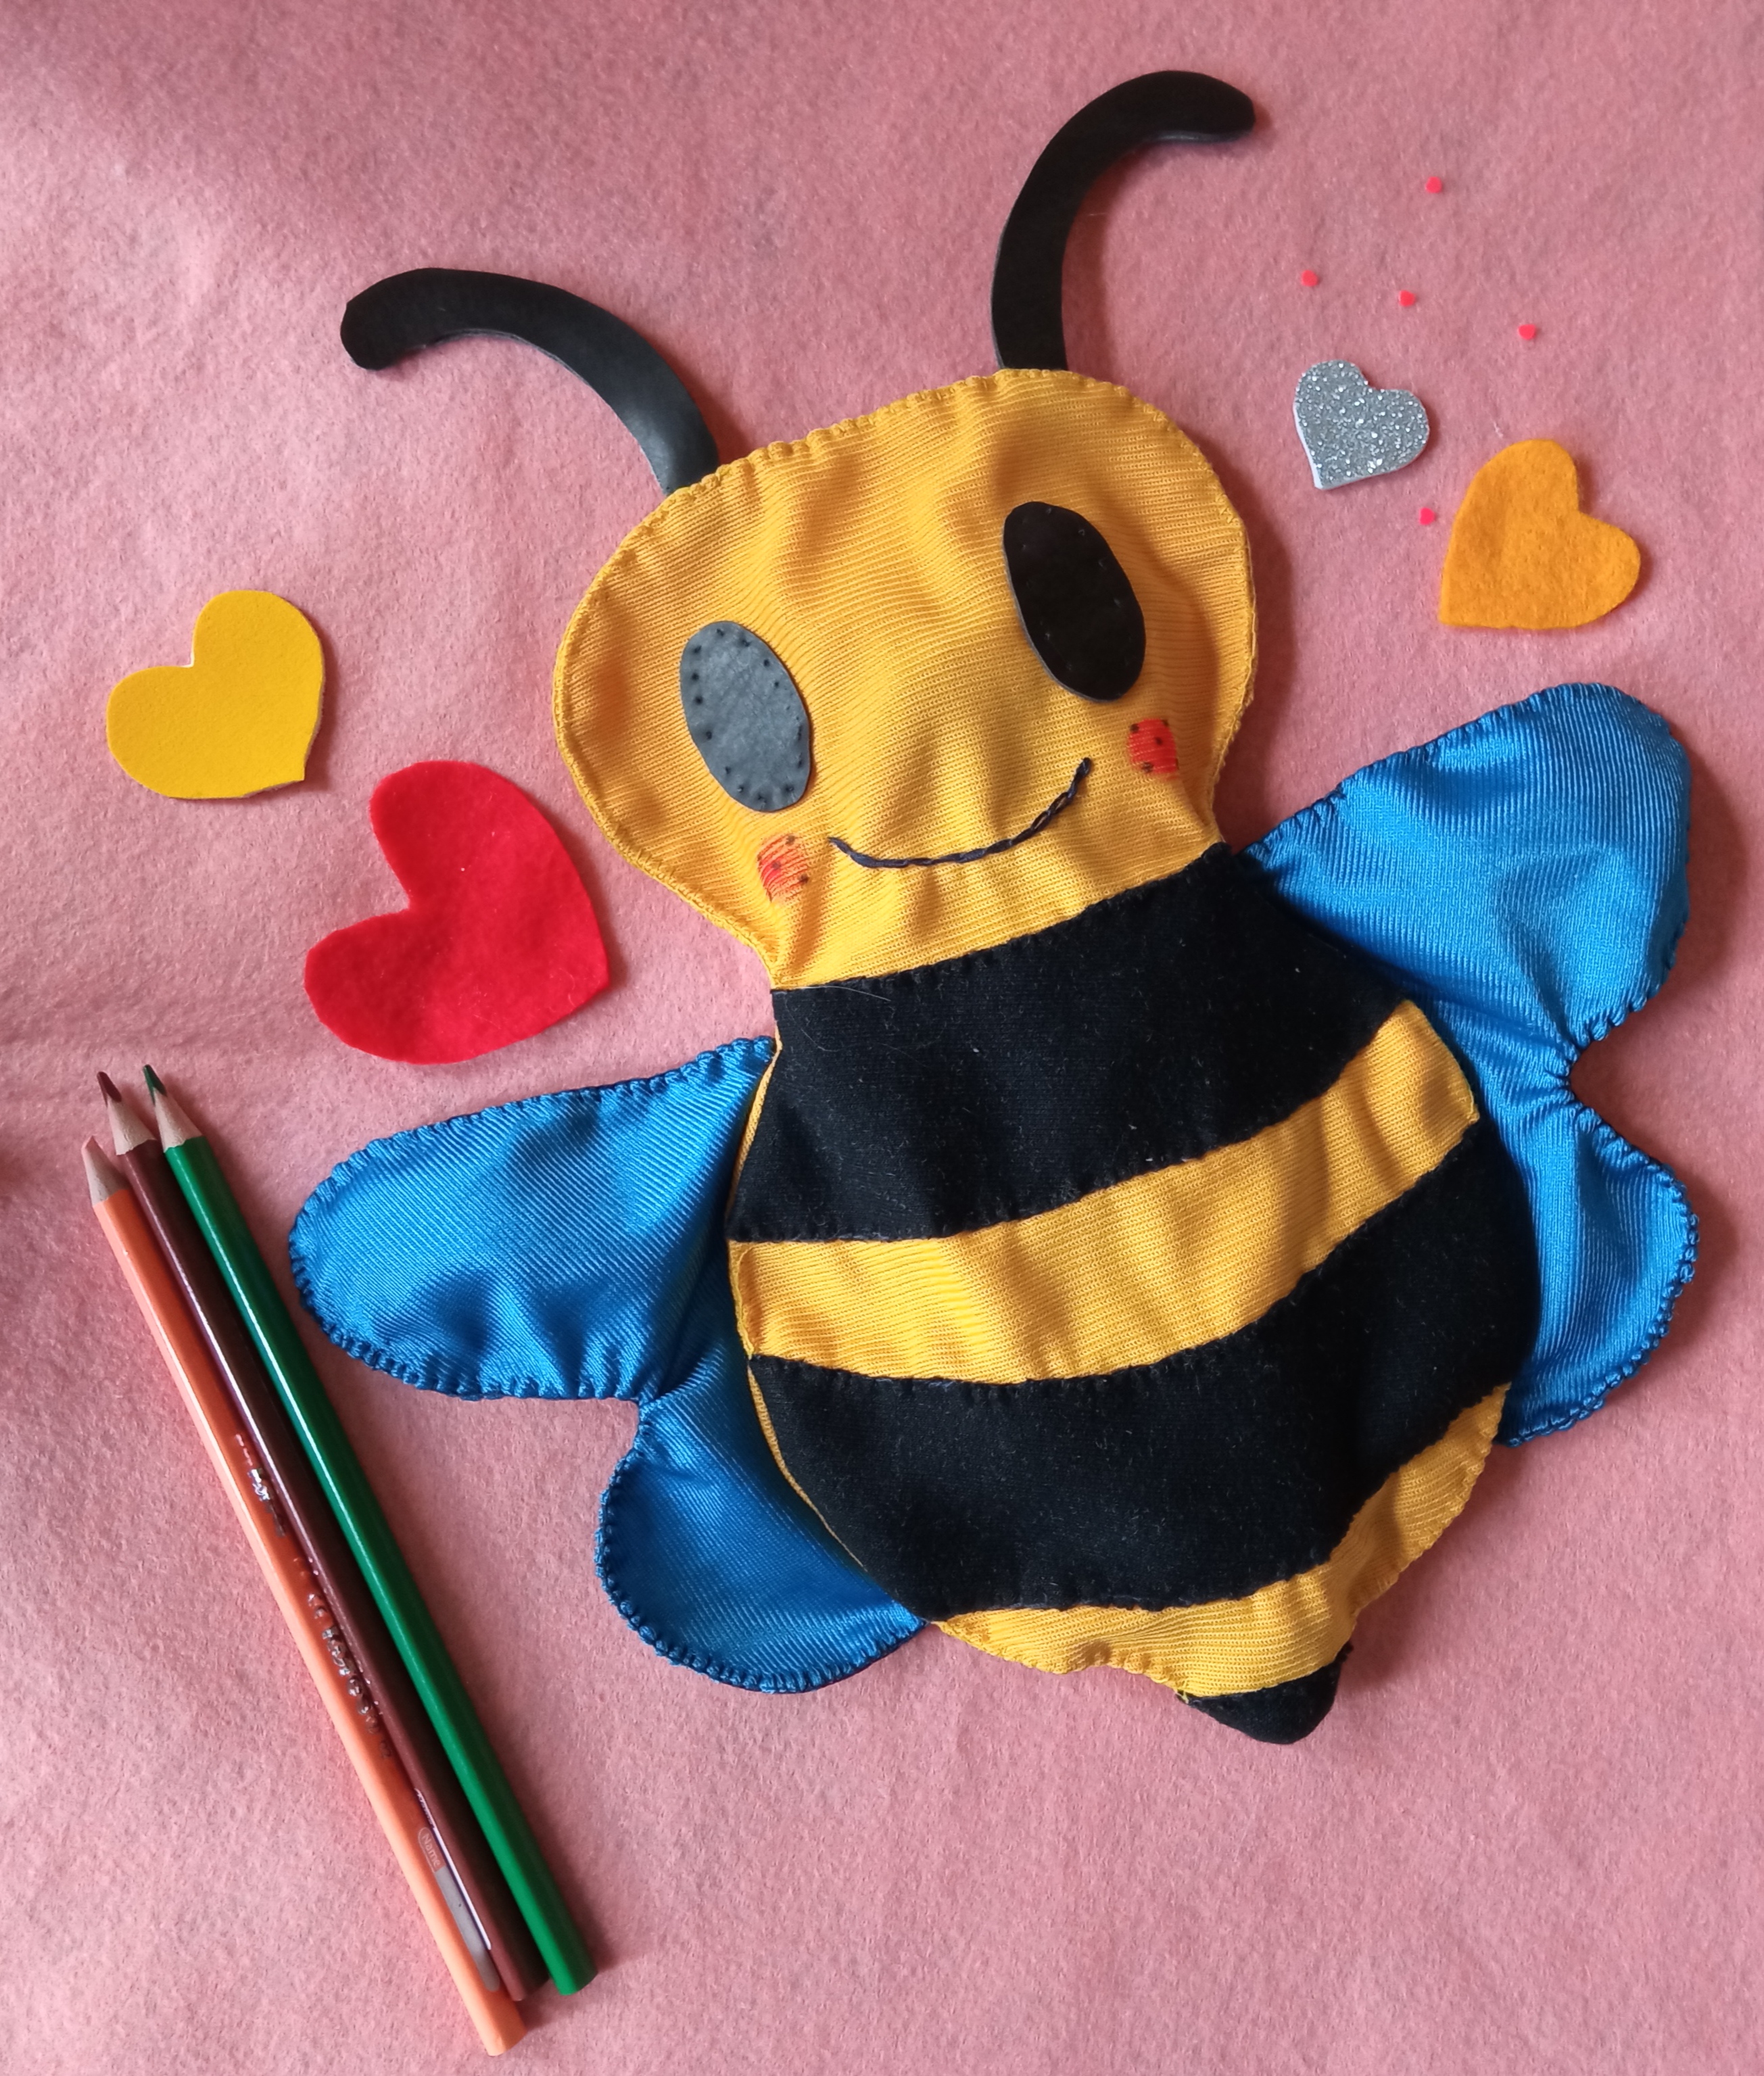
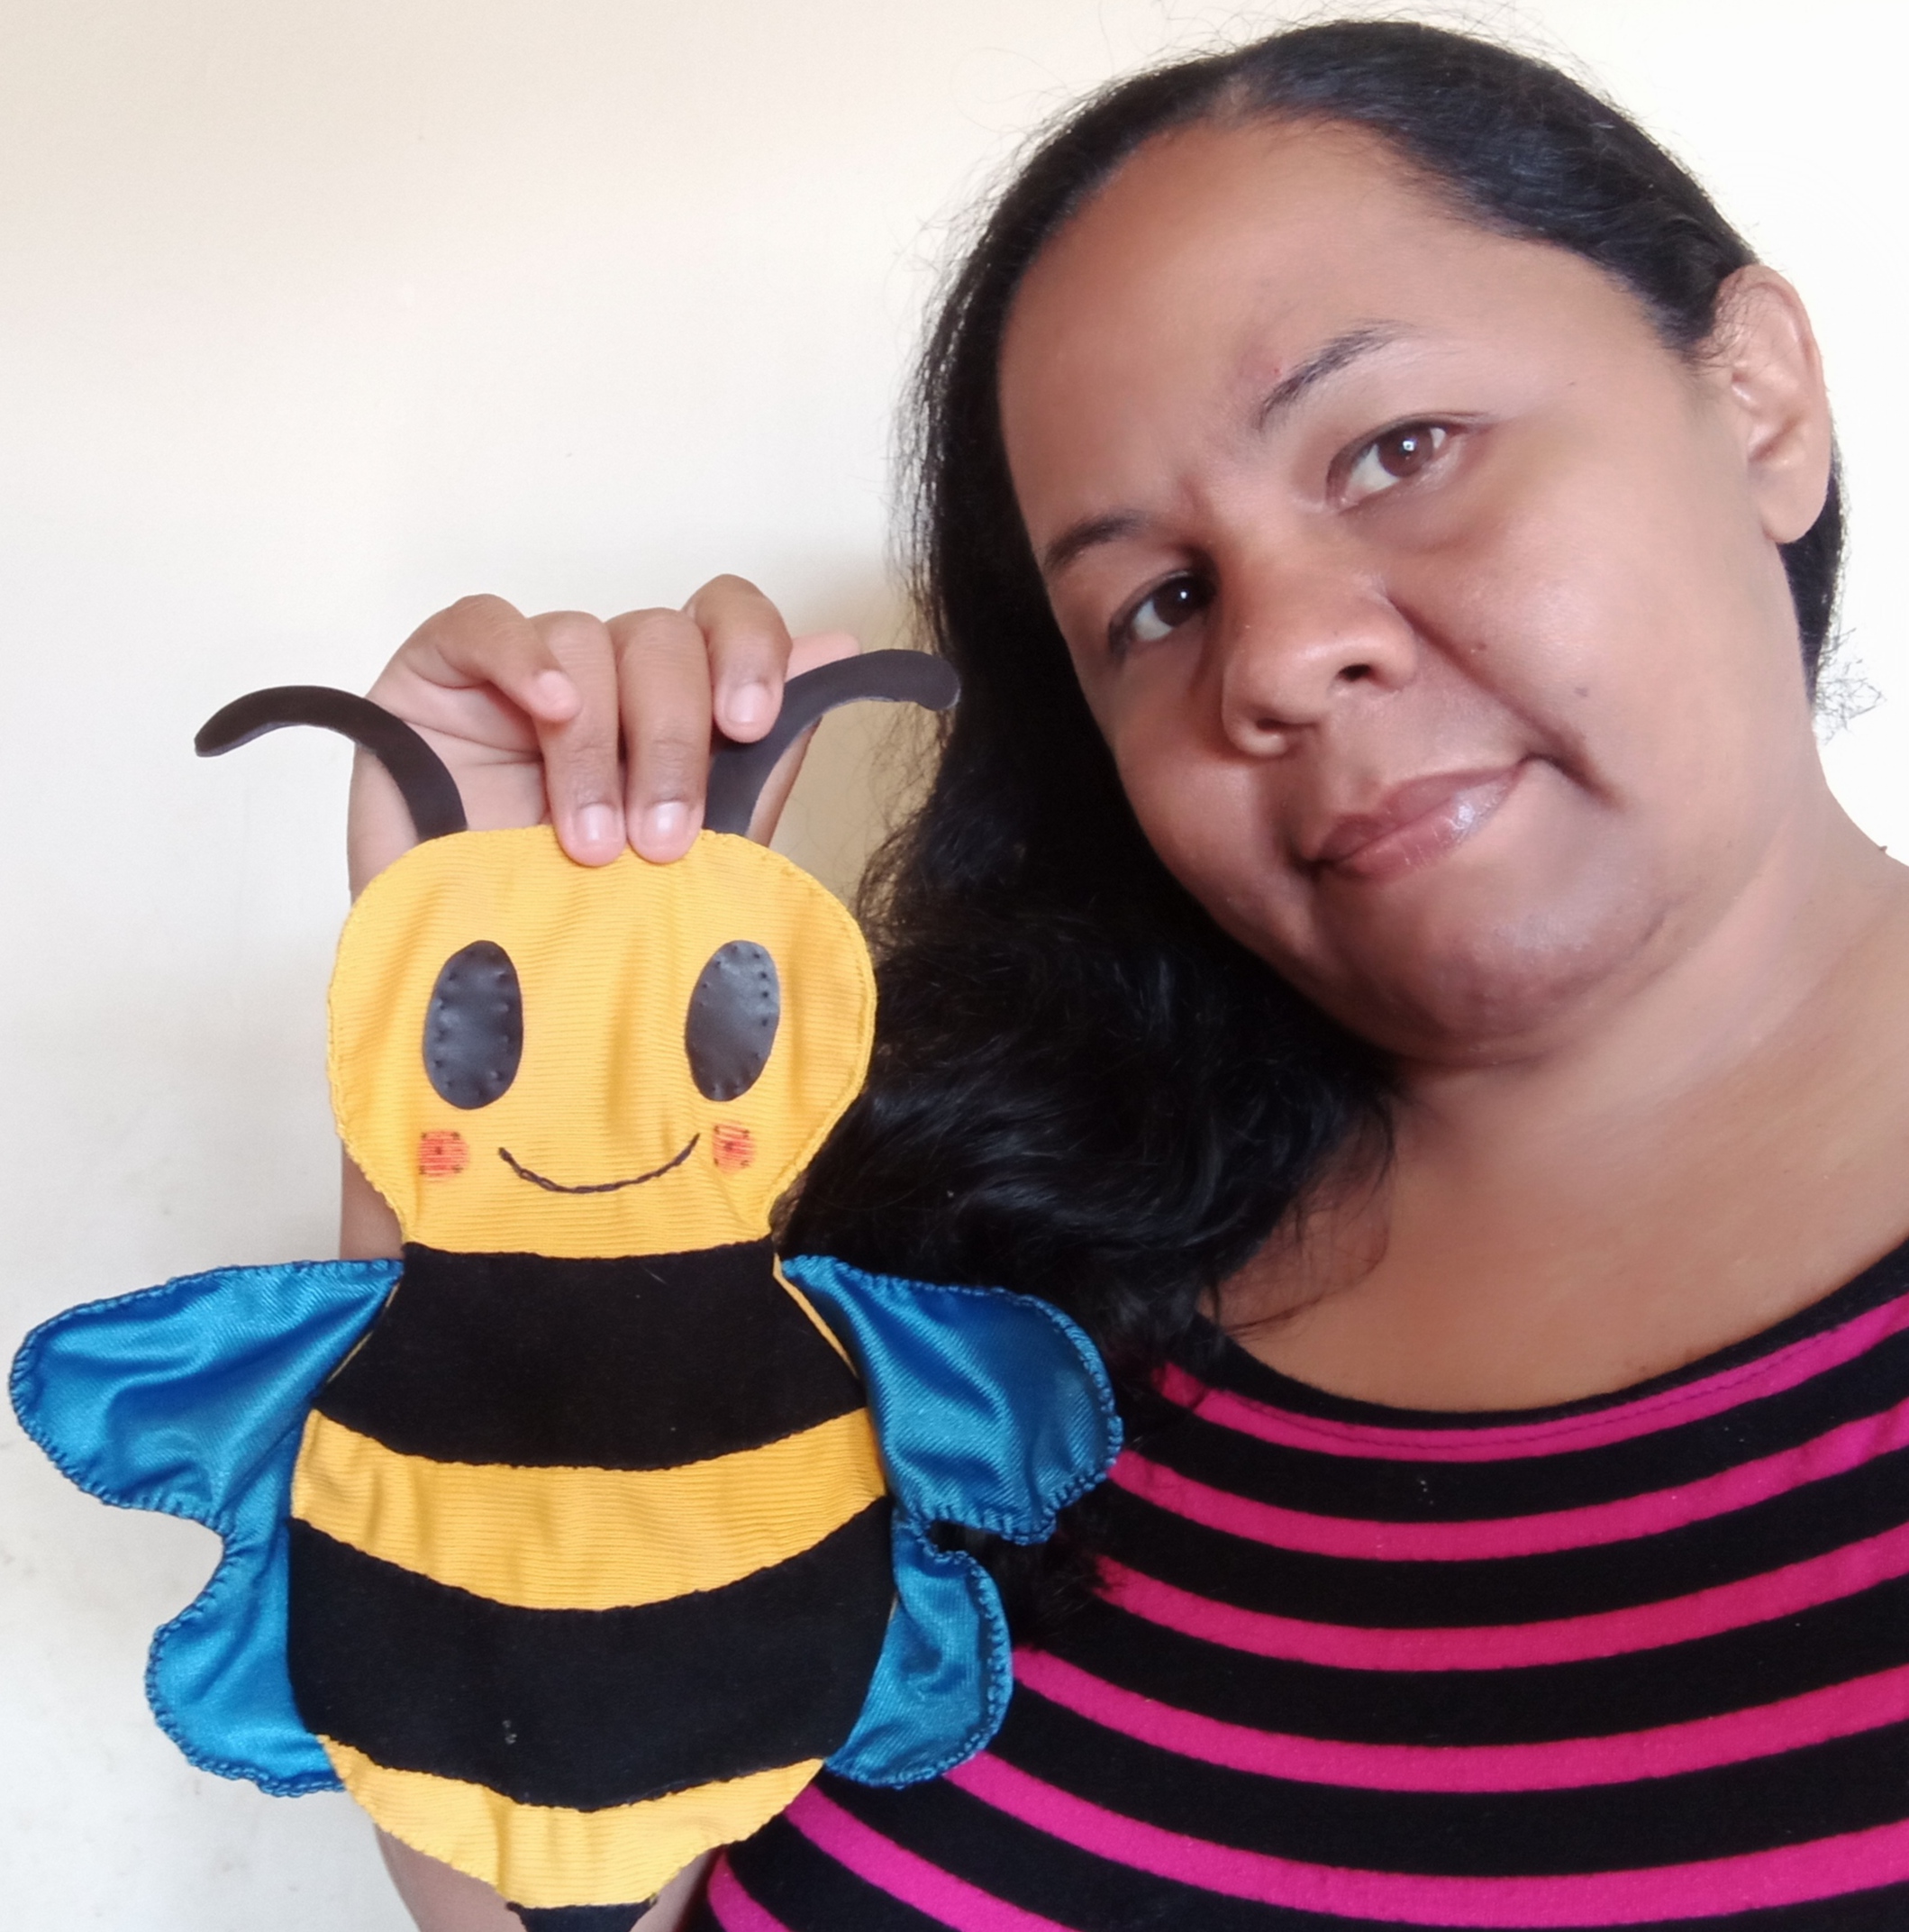
Hasta aquí llegó este tutorial mis queridos amigos 😚, espero les haya gustado cómo quedo esta hermosa Cartuchera Abejita 🐝 Cocida a Mano, solo me queda decirles que se animen en hacerla ya verán que es muy fácil y además a sus pequeños les encantara tener una cartuchera Abejita 🐝 en su bolso escolar.
So much for this tutorial my dear friends 😚, I hope you liked how this beautiful handmade bee pencil case 🐝 was made, I just want to tell you that I encourage you to make it and you will see that it is very easy and also your little ones will love to have a bee pencil case 🐝 in their school bag.
Agradecida con esta comunidad por el apoyo brindado en cada tutorial ¡cosiendo a mano! que preparó para ustedes ☺️. Gracias por acompañarme 😘.
Grateful to this community for the support given in every tutorial I prepared for you ☺️. Thank you for joining me 😘.
This is such a beautiful piece, you've done a great job in crafting and building this masterpiece.
Hi friend 😁, thank you very much for your words I am very glad you will like it.
You're welcome dear, it looks so lovely.
Keep up the good works.
que linda amiga, felicitaciones.
Hola amiga gracias 😀.
The rewards earned on this comment will go directly to the person sharing the post on Twitter as long as they are registered with @poshtoken. Sign up at https://hiveposh.com.
!discovery 26
This post was shared and voted inside the discord by the curators team of discovery-it
Join our community! hive-193212
Discovery-it is also a Witness, vote for us here
Delegate to us for passive income. Check our 80% fee-back Program
Muchas gracias por su apoyo 😊!
Your content has been voted as a part of Encouragement program. Keep up the good work!
Use Ecency daily to boost your growth on platform!
Support Ecency
Vote for new Proposal
Delegate HP and earn more
Gracias por su gran apoyo 🥰!
Muchas gracias por el apoyo y la invitación 😊.
Congratulations @yurimar! You have completed the following achievement on the Hive blockchain and have been rewarded with new badge(s):
Your next target is to reach 5000 upvotes.
You can view your badges on your board and compare yourself to others in the Ranking
If you no longer want to receive notifications, reply to this comment with the word
STOPCheck out the last post from @hivebuzz:
Support the HiveBuzz project. Vote for our proposal!
Holaaa 🥰🥰🥰 Que lindo fue leer tu post y ver el paso a paso de este proyecto. Sé todo el tiempo u trabajo que toma coser a mano así que te felicito por haber hecho este proyecto tan lindo. Está abejita quedó súper simpática, la verdad que como dijiste, la costura a mano le dió un toque distinto. Bien hecho 💖💖.
Hola amiga @lauramica , gracias por detenerte a leer mi post, la prepare con mucho cariño 😍 para mostrarle es paso a paso. La costura a mano es un arte muy hermoso que me relaja y me ayuda a sentirme bien, espero seguir mostrando mis trabajos por esta maravillosa comunidad.
Gracias por tu comentario y apoyo 🥰 lo valoro mucho.
¡Hola!, la abejita en cartuchera quedó divina, de seguro usted es muy creativa. Amo las cartucheras, aunque hacerlas es otra cosa, jaja. Aún me falta aprender a colocarle el cierre. ¡Buenas vibras!.
Hola 👋 amiga, al principio quise colocarle el cierre adelante pero me llegaba hasta la cabeza y reducir el cierre sería muy pequeño y no entrarían los colores entonces decidí colocarlo detrás jejeje!! Fue un diseño pensado y llevado en esta obra.
Gracias 😀 me encantó que te gustará besos 😘!
Thank you for sharing this amazing post on HIVE!
Your content got selected by our fellow curator @stevenson7 & you just received a little thank you via an upvote from our non-profit curation initiative!
You will be featured in one of our recurring curation compilations and on our pinterest boards! Both are aiming to offer you a stage to widen your audience within and outside of the DIY scene of hive.
Join the official DIYHub community on HIVE and show us more of your amazing work and feel free to connect with us and other DIYers via our discord server: https://discord.gg/mY5uCfQ !
If you want to support our goal to motivate other DIY/art/music/homesteading/... creators just delegate to us and earn 100% of your curation rewards!
Stay creative & hive on!
Muchas gracias por su gran apoyo 🥰
Beautiful thanks for sharing
That's a very adorable and useful little purse. I love it!