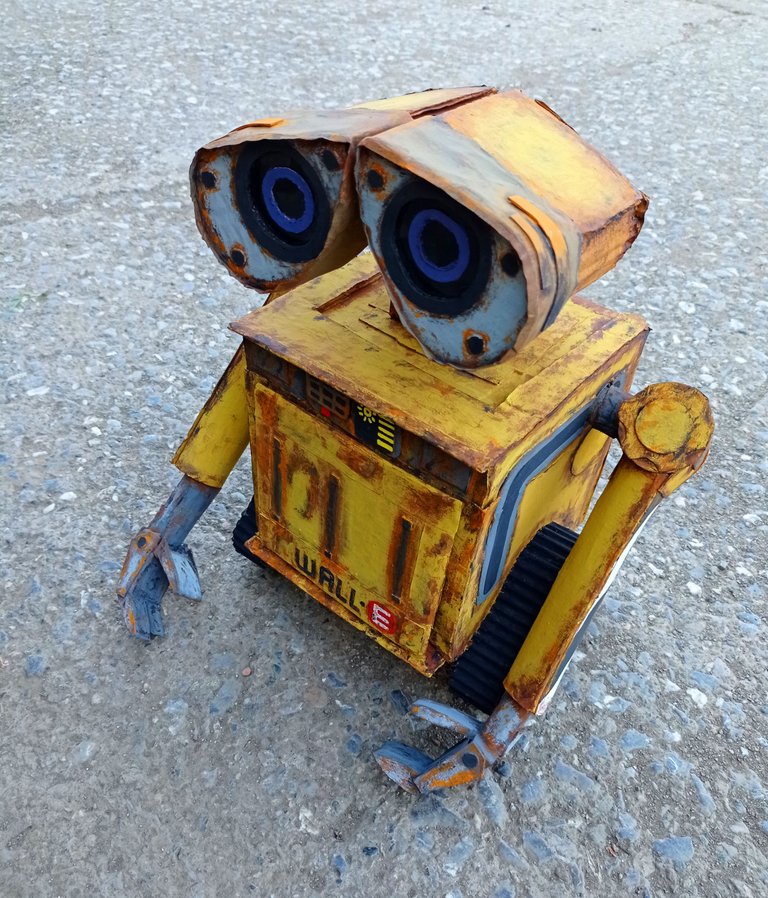
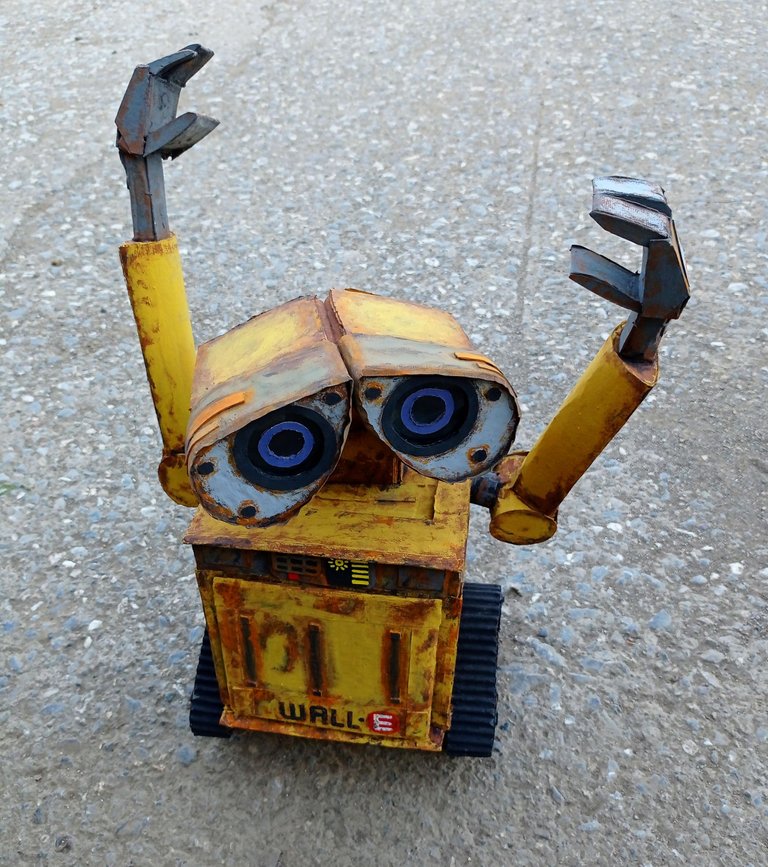
What's up creative friends, this time I share you how I made this adorable robot using recycled cardboard from a food box and pizza boxes.
Que tal amigos creativos, en esta oportunidad comparto como realice este adorable robot utilizando cartón que recicle de una caja de comida y cajas para pizzas.


Materials and tools:
- Cardboard.
- Cold paint.
- White glue.
- Adhesive tape.
- Wire.
- Pencil.
- Cutter.
- Two pieces of magnet.
- Brushes.
- Pieces of plastic material from X-rays.
- Scissors.
Materiales y herramientas:
- Cartón.
- Pintura al frió.
- Pega blanca.
- Cinta adhesiva.
- Alambre.
- Lápiz.
- Cutter.
- Dos trozos de imán.
- Pinceles.
- Trozos de material plástico de radiografías.
- Tijeras.
Process // Proceso:
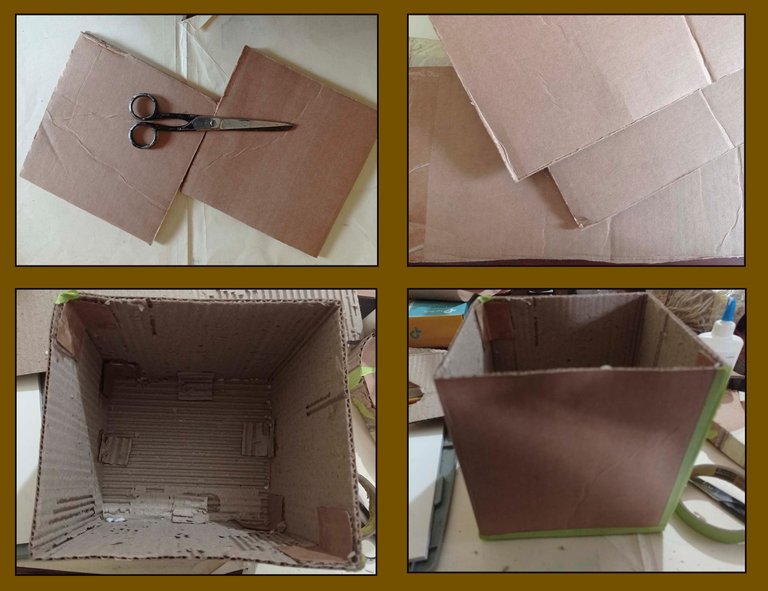
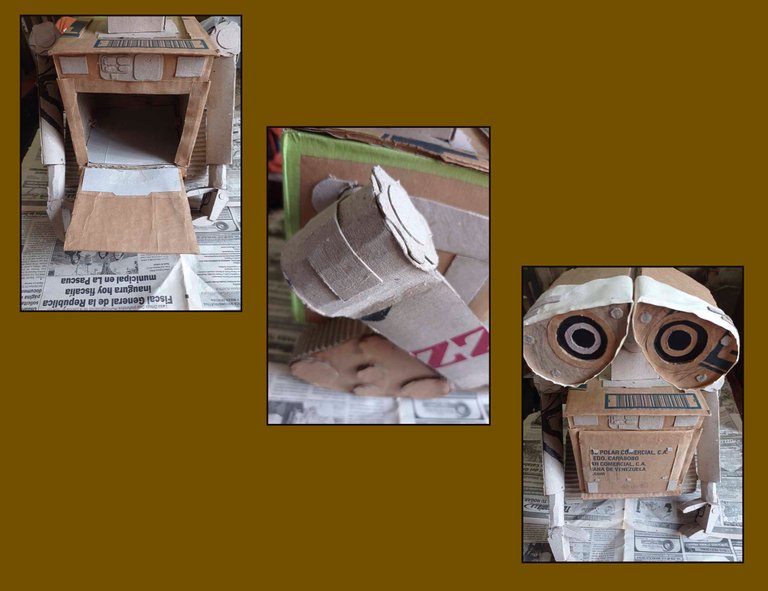
- First I started to make the body or torso of the robot, for this I cut six squares of 18cm on each side.
I joined five of these squares together to form a cube, gluing small pieces of cardboard between them to strengthen the union.
- Primero comencé a fabricar el cuerpo o torso del robot, para esto corte seis cuadrados de 18 cm de cada lado.
Junte cinco de estos cuadrados entre si formado un cubo, pegando pequeños trozos de cartón entre estos para reforzar la unión.
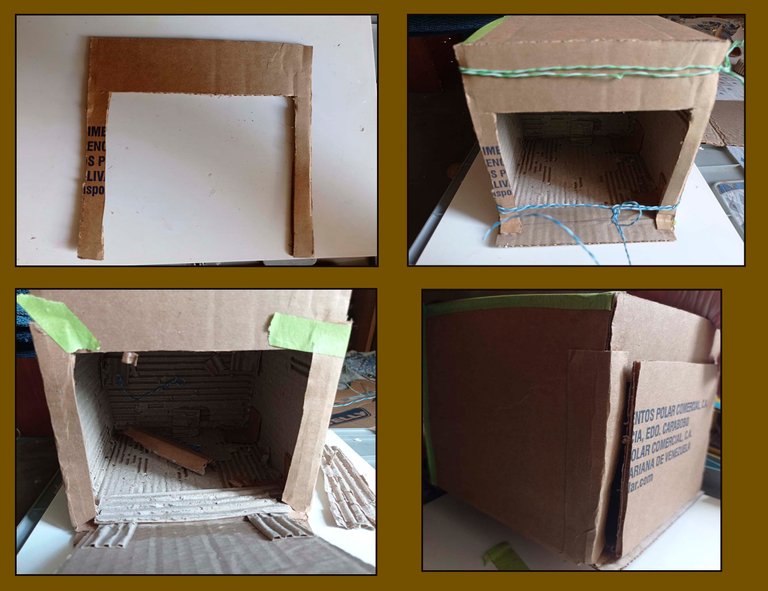
- To the sixth square piece I made a cut of 14cm x 15cm in the place that will be the gate of the robot's body, then I glued it to the cube that I had already formed.
- A la sexta pieza cuadrada le realice un corte de 14cm x 15cm en el lugar que sera la compuerta del cuerpo del robot, luego la pegue al cubo que ya había formado.
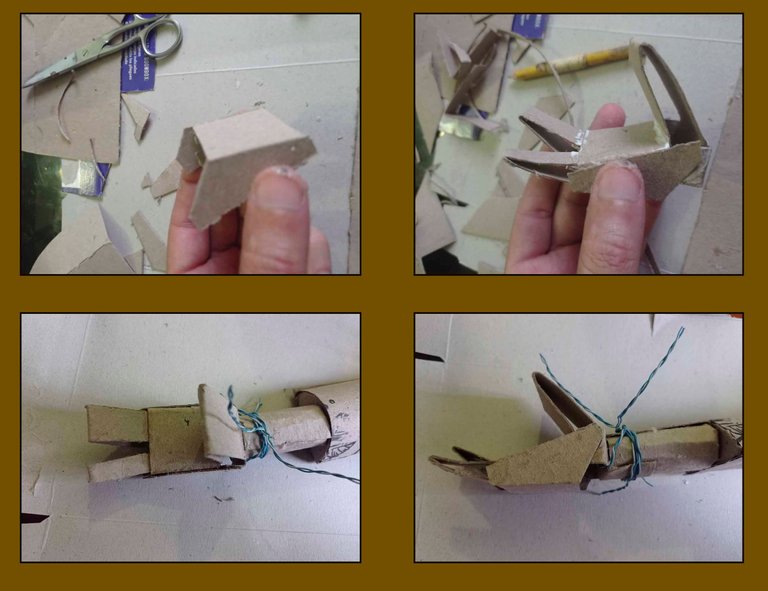
- To make the compartment door, I cut a square piece of cardboard 17cm x 16cm and glued it to the body using pieces of cardboard and other pieces that will function as hinges to open and close the door.
- Para realizar la puerta del compartimiento corte un trozo cuadrado de cartón de 17cm x 16cm y lo pegue al cuerpo empleando trozos de cartón y otros trozos mas que funcionaran como bisagras para poder abrir y cerrar la puerta.
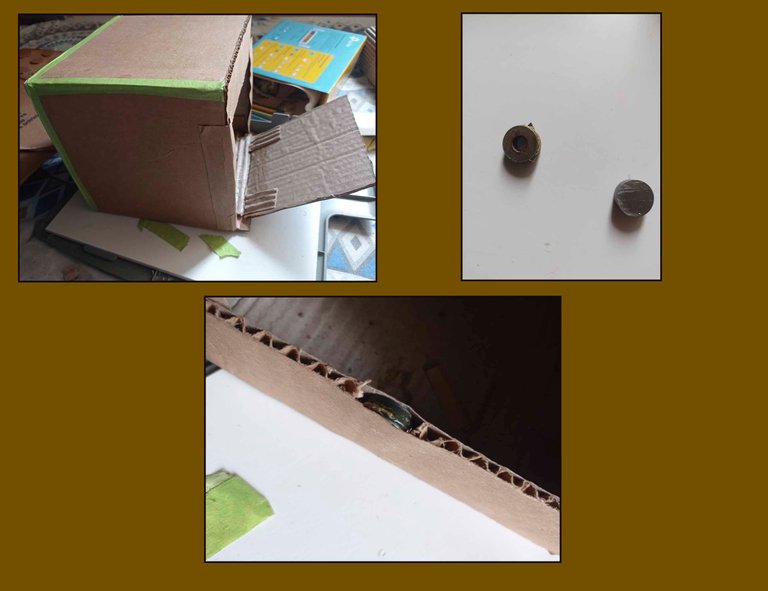
- I made a small incision in the body cardboard and in the door cardboard to insert a piece of magnet in each incision so that when I close the door it will stay closed.
- Hice una pequeña incisión en el cartón del cuerpo y en el cartón de la puerta para introducir un trozo de imán en cada incisión para que cuando cierre la puerta esta se mantenga cerrada.
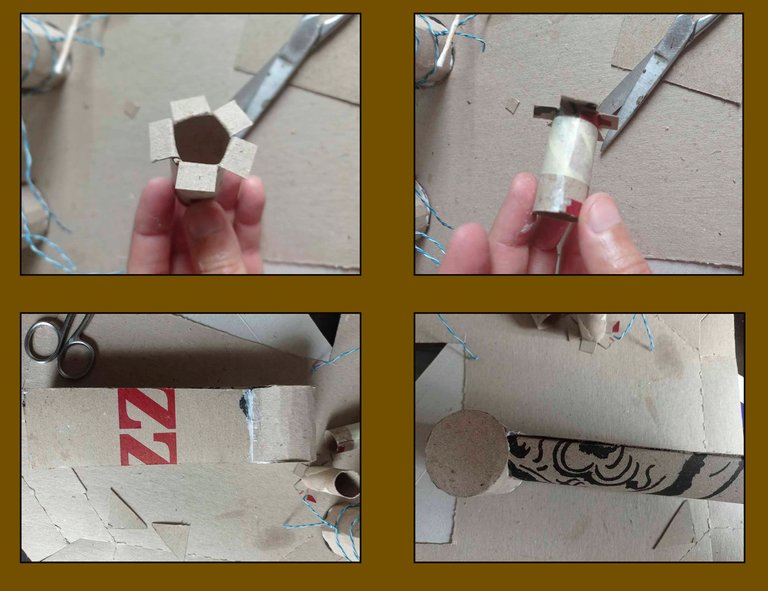
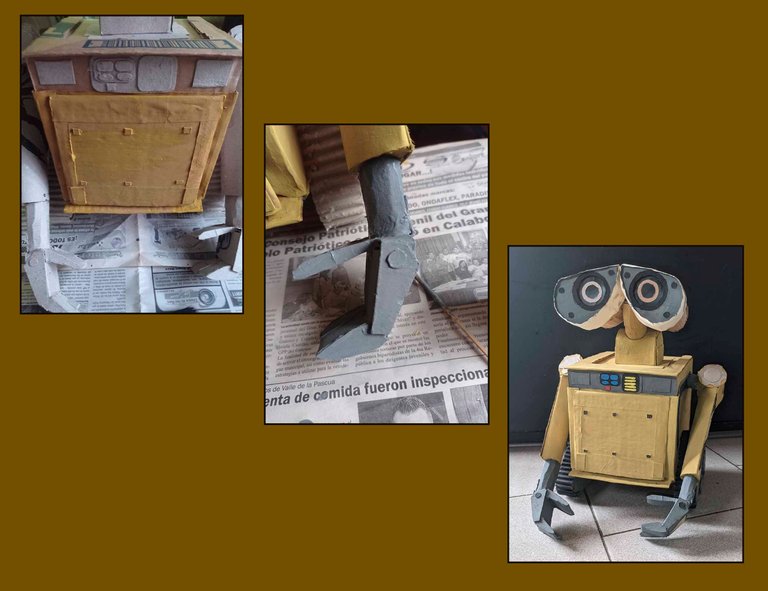
- To make the tracked wheels of the robot I cut four triangular shaped pieces of cardboard with rounded edges and put them together in two pairs.
I then cut two strips of cardboard and using the cutter peeled the strips exposing the corrugated side of the center of the cardboard to resemble the track wheels, glued them to the triangles and cut out six circles and added them to the wheels.
- Para hacer las ruedas orugas del robot yo corte cuatro trozos de cartón de forma triangular con los bordes redondeados y los uní en dos pares.
Luego corte dos cintas de cartón y empleando el cutter pele las cintas exponiendo el lado corrugado del centro del cartón para que se asemeje a las ruedas orugas, las pegue a los triángulos y corte seis círculos y los adiciones a las ruedas.
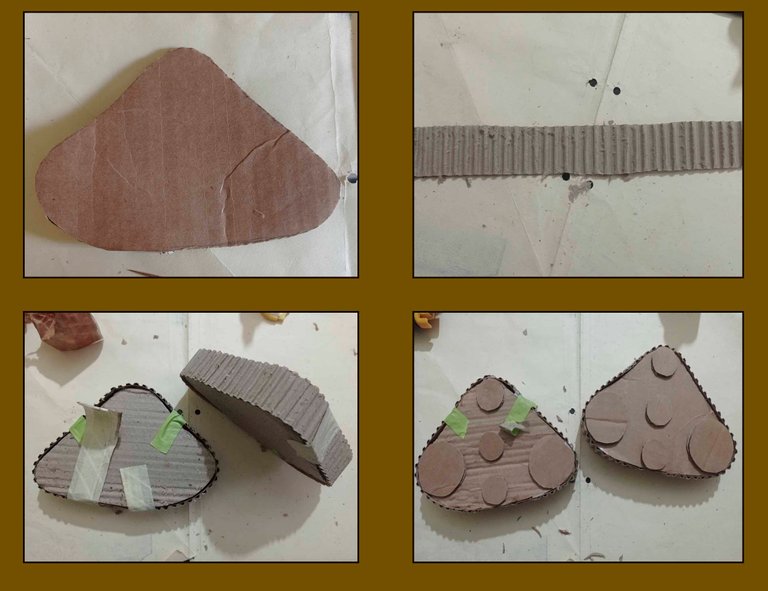
- To attach the tracked wheels to the body of the robot, make incisions in the wheels and in the body to introduce a cardboard rod and glue to join these pieces together.
- Para unir las ruedas orugas al cuerpo del robot realice incisiones en las ruedas y en el cuerpo para introducir una barilla de cartón y pegamento para unir estas piezas entre si.

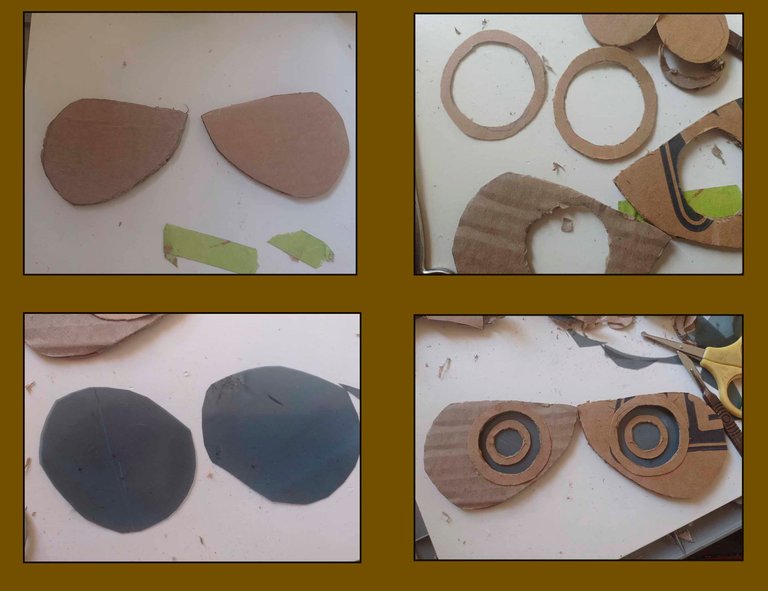
- To make the head, I first made the front part with two shapes similar to a mask and made a circular cut to glue the black plastic underneath, then I glued two cardboard rings to form the eyes.
From the shape of the front part I made the complete head.
- Para realizar la cabeza, primero hice la parte frontal con dos formas semejantes a un antifaz y realice un corte circular para pegar el plástico negro debajo después pegue dos aros de cartón para formar los ojos.
A partir de la forma de la parte frontal realice la cabeza completa.
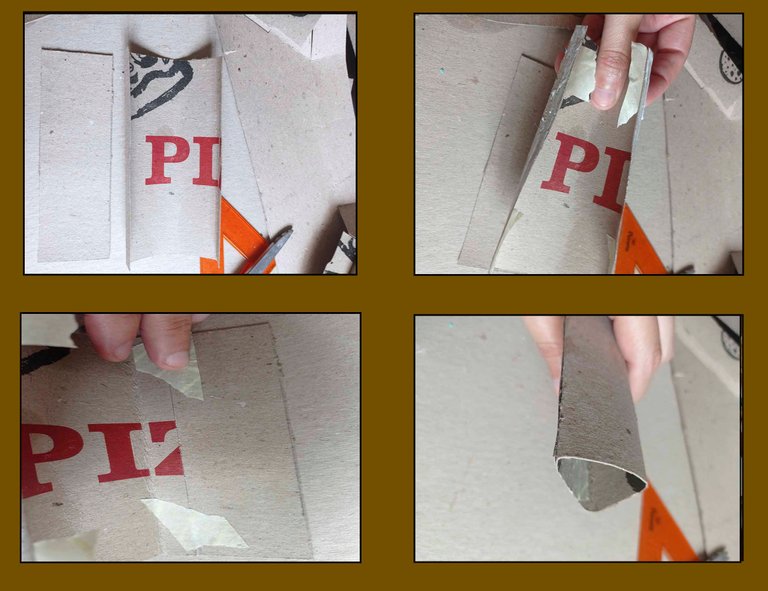
- The arms were made by cutting the cardboard and giving it a semi-triangular cylinder shape.
- Los brazos los hice cortando el cartón y dándole una forma de cilindro semitriangular.
- For the shoulders cut a rectangle and a circle of cardboard for each shoulder and small pieces of cardboard to secure the joint form a cylinder for each shoulder.
- Para los hombros corte un rectángulo y un circulo de cartón para cada hombro y trozos pequeños de cartón para asegurar la unión forme un cilindro para cada hombro.
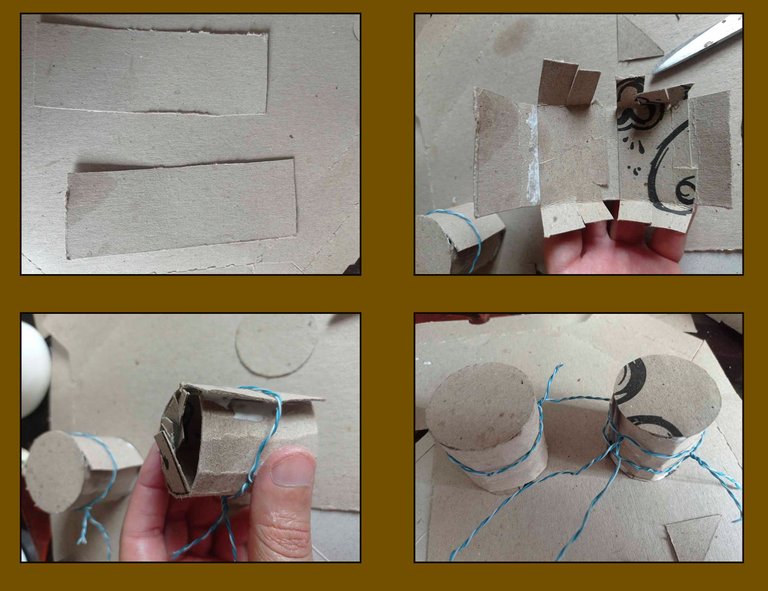
- I made two cylinders that would be the robot's wrists and assembled the arms by gluing the pieces I made for the shoulders, arms and wrists.
- Realice dos cilindros que serian las muñecas del robot y arme los brazos pegando las piezas que hice los hombros, brazos y muñecas.
- I made the hands by cutting strips of cardboard for the three fingers of each hand and gluing them to the semi-square frame I made for the hand.
I then glued them to the wrists to complete the arms.
- Las manos las hice cortando tiras de cartón para los tres dedos de cada mano y pegándolos a la armazón semicuadrada que hice para a mano
y luego las pegue a las muñecas para completar los brazos.
- To connect the arms to the robot body, I make a cardboard cylinder for each arm and glue them to each shoulder then make a circular cut in the body to insert the cylinders connected to the shoulders.
So that the arms do not remain static, do not glue the cylinders directly to the body but make a kind of stop with cardboard strips and glue them at the ends of the cylinders so that the arms can rotate without coming off the body of the robot. Then I cut pieces of cardboard in the shape of gears and glue them to the front of the shoulders.
- Para conectar los brazos al cuerpo del robot, realice un cilindro de cartón para cada brazo y los pegue a cada hombro luego realice un corte circular en el cuerpo para introducir los cilindros conectados a los hombros.
Para que los brazos no quedaran estáticos no pegue los cilindros directamente al cuerpo sino hice una especie de tope con tiras de cartón y los pegue en los extremos de los cilindros así de esta manera los brazos se pueden girar sin que se salgan del cuerpo del robot. Luego corte trozos de cartón en forma de engranajes y los pegue en la parte delantera de los hombros.
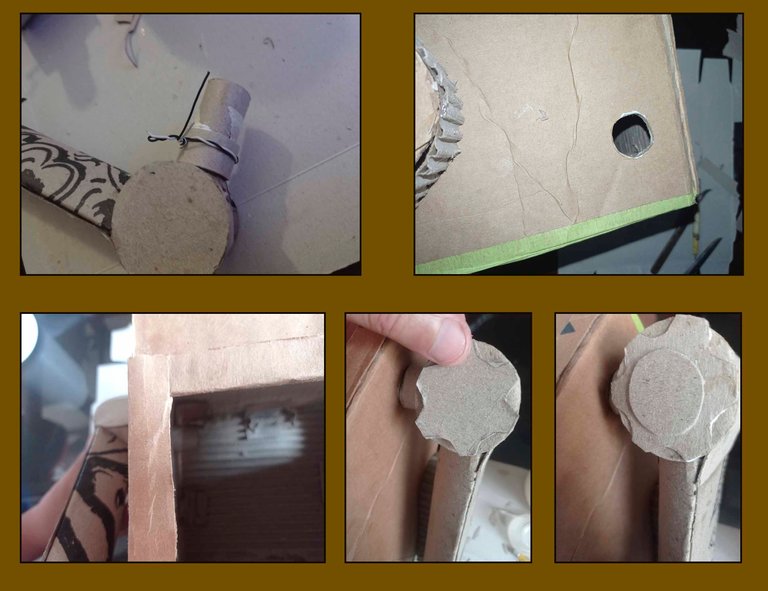
- To connect the head to the body of the robot so that it would not remain static.
First I fabricate the base of the neck as shown in the picture.
- Para conectar la cabeza al cuerpo del robot y que no quedara estática.
Primero fabrique la base del cuello como se puede apreciar en la imagen.

- Then I cut a circular opening in the upper part of the base where a cylinder that I made to connect the head to the base of the neck will be introduced, in the part of the cylinder that is introduced in the base of the neck I glued some stops made with cardboard strips, so in this way the head can rotate and the neck can extend about 5cm without leaving the base.
- Luego corte una abertura circular en la parte superior de la base donde ira introducido un cilindro que hice para conectar la cabeza a la base del cuello, en la parte del cilindro que introducido en la base del cuello le pegue unos topes hecho con tiras de cartón, así de esta manera la cabeza se puede girar y el cuello extenderse unos 5cm sin salirse de la base.

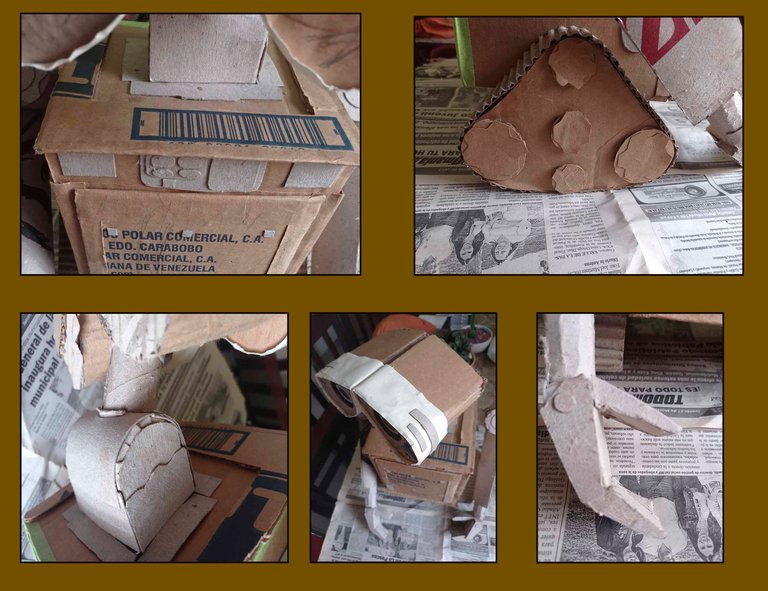
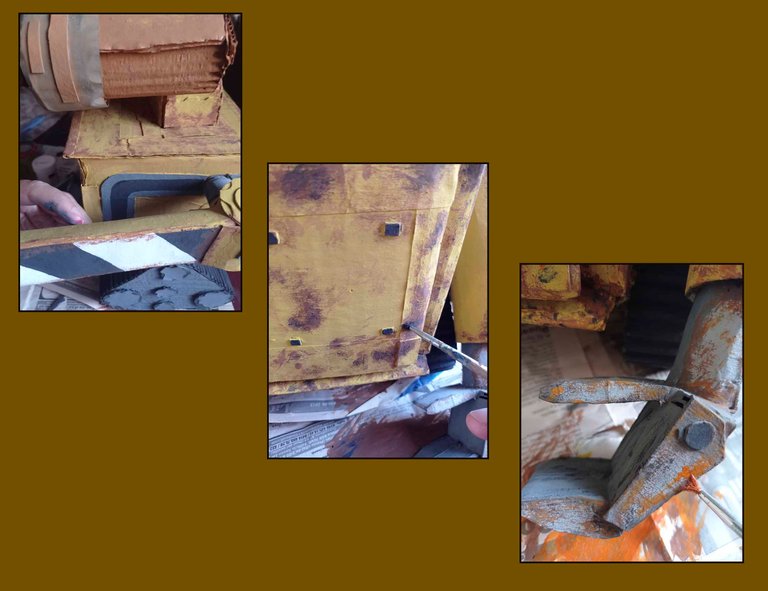
- I was creating and gluing small details all over the robot.
- Fui creando y pegando pequeños detalles en todo el robot.
- Here I apply the base colors predominantly yellow and gray.
- Aquí aplique los colores base predominando el amarillo y el gris.
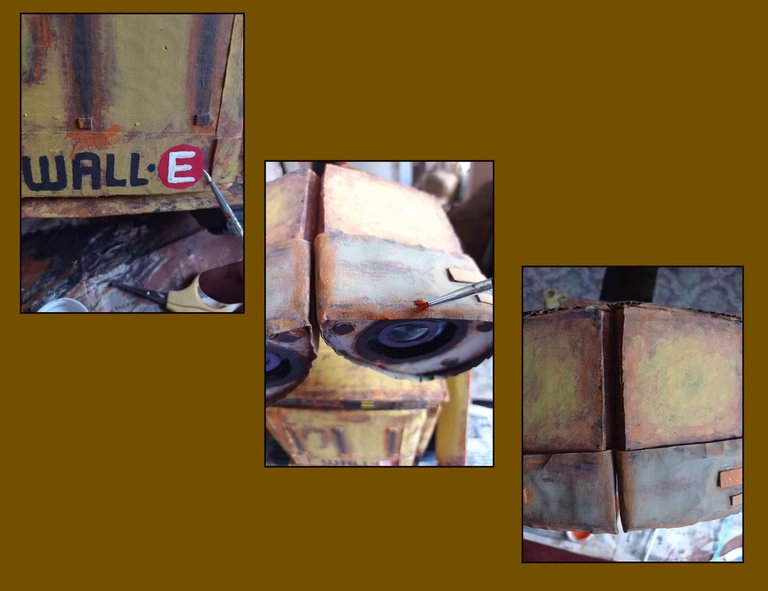
- At this stage I began to combine colors to provide tones of rust and dirt to create that peculiar aging effect of this robot.
- En esta etapa comencé a combinar colores para brindar tonos de oxido y suciedad para crear ese efecto de envejecimiento particular de este robot.
Pueden apreciar las etapas de este proyecto

Here you can see the detail that I applied in the joints of the shoulders with the body and the neck with the body so that the connections of these did not leave it completely static and can have a variety of movements.
Aquí pueden observar el detalle que aplique en la uniones de los hombros con el cuerpo y el cuello con el cuerpo para que las conexiones de estos no lo dejara completamente estático y pueda tener variedad de movimientos.
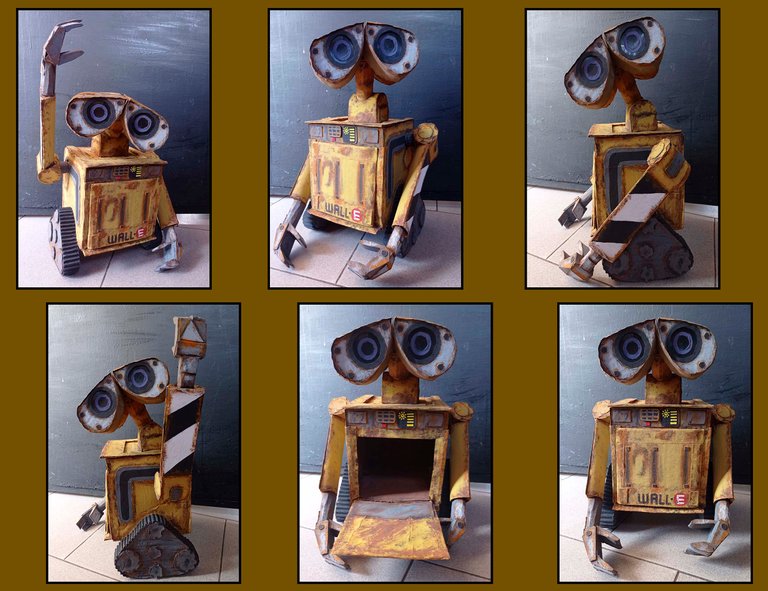
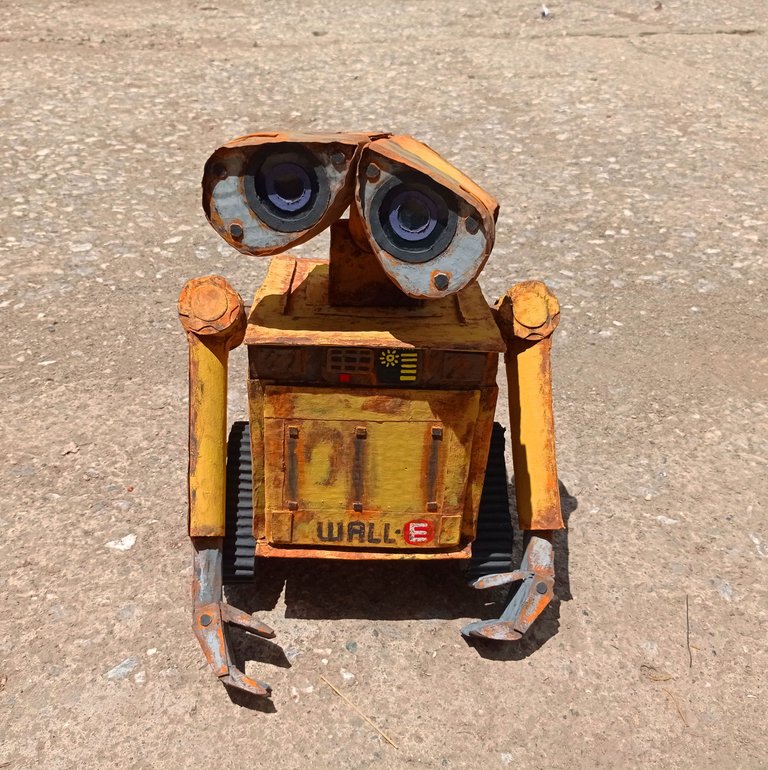
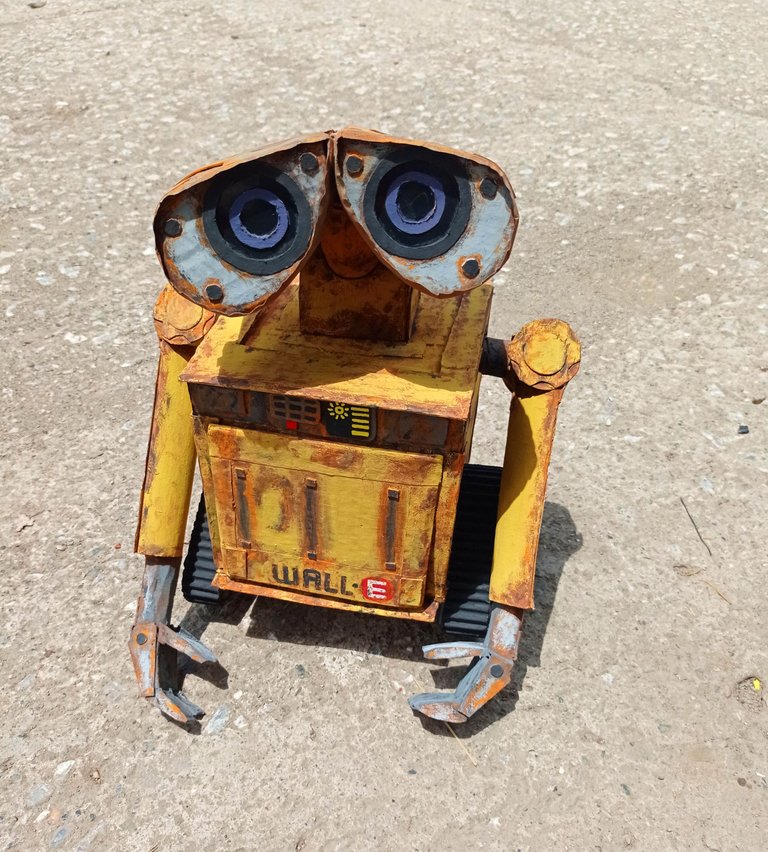
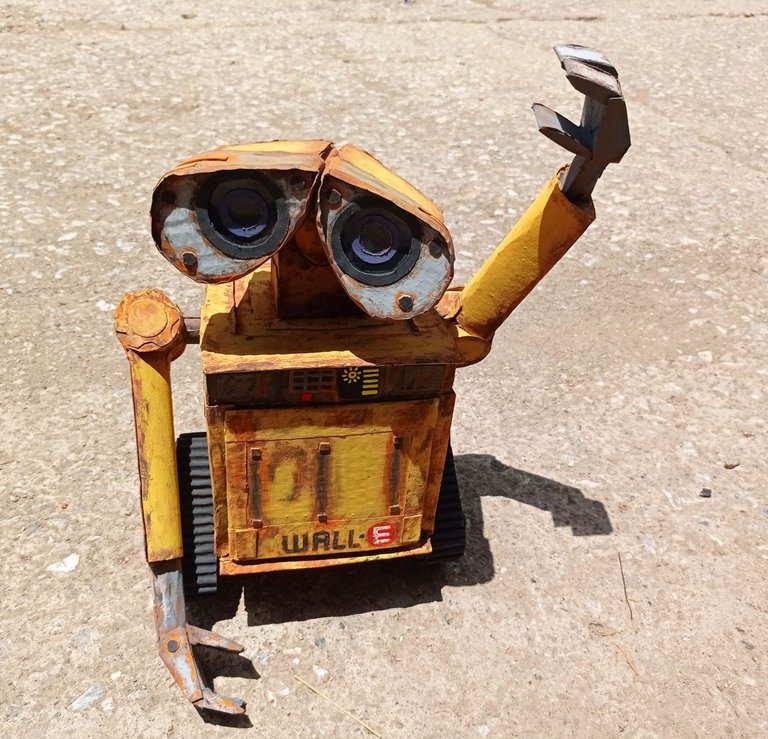
It was a fun project, this robot can work as decoration or toy, my little son was thrilled with his Wall - E.
Fue un divertido proyecto, este robot puede funcionar como decoración o juguete, mi pequeño hijo quedo encantado con su nuevo Wall - E.
Repurpose👌. Rethink♻🧠.
The rewards earned on this comment will go directly to the people sharing the post on Twitter as long as they are registered with @poshtoken. Sign up at https://hiveposh.com.
Mi favorito <3 te ha quedado espectacular.
Hola!
Aprecio que te haya gustado este trabajo.
Saludos...
Your content has been voted as a part of Encouragement program. Keep up the good work!
Use Ecency daily to boost your growth on platform!
Support Ecency
Vote for new Proposal
Delegate HP and earn more
Saludos hermano, quiero felicitarte por lo que has hecho, soy super fan de Wall- E y me ha gustado el resultado, y lo mejor que lo hiciste con cartón, los pasos estuvieron geniales y muy bien explicados, sigue adelante!
Que tal, gracias hermano 👍
A mí también me gusta mucho esa película.
Me honran tus palabras, eres un talentoso artesano.
Woooouuuu. Pero esto si que es una belleza, toda una cuchitura, te quedo espectacular. Mil gracias por compartir este maravilloso paso a paso. Felicidades y mil exitos @anibal-aa ✨
Hola! Gracias por tus agradables palabras.
Igualmente para ti éxitos!
Hola, me encanto tu post Wall una de mis pelicula favorita, tu paso a paso bastante detallado, te felicito mucha creatividad y talento....
Hola! Me agrada que haya gustado. Igual me gusta mucho esa película, es una de las que he visto tantas veces y no me aburre.
Gracias...
Simplemente increíble, me encanta que pueda mover los brazos 🌱 me ha gustado demasiado ✨
Hola! Gracias 🙂
Si esa idea se me ocurrió justo en el momento en que iba a pegar un brazo.
Saludos...
Saludos, es un excelente trabajo, además es con material de reciclaje. Le deseo mucha suerte con la publicacion.
Saludos, gracias!
Siempre me ha gustado crear cosas a partir de material reciclado.
Gracias por los buenos deseos 👍
well would you look at that! It's Wall-E!! Legitly done. I am going to be honest with you, that a lot of work by the looks of it 🤣 I'd rather stick to swinging a wrench. None the less I find it very cool.
It's something that I'll keep in a living room of my house just for the lolZ
!beer
!pizza
Hi! Honestly it was a bit laborious in fact once I finished the body and the head I took a break of several months until my son came across the pieces and reminded me to finish it, then I was inspired again and I finished it.
Thanks for stopping by my post 👍
Atleast you had the right mindset to finish it. See now you've got somewhat rewarded for that effort too ey 😎😎👍... And you taught someone out their how to build that for his kiddo😎😎
I love Wall-E, it's such a shame that the movie never got a lot of attention. Maybe one day in the future I'll attempt to recreate it!
Hello! I love WALL-E too, sometimes I think that may be the fate that awaits us in the future.
I would love to see it.
Thanks for stopping by my post 👍.
Hola! Me agrada que te guste esta creación.
Yo también quedé sorprendido con el resultado final superó mis expectativas.
Gracias 😉