Hello hivefriends! I hope you are well✌
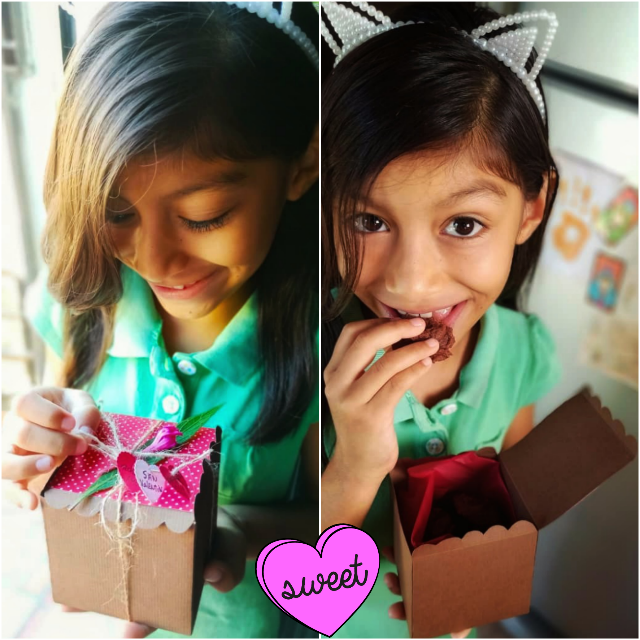
In my previous post about the chocolate cookies I made, I told you that I would also be making a package to store them and give them to my Valentina 😊
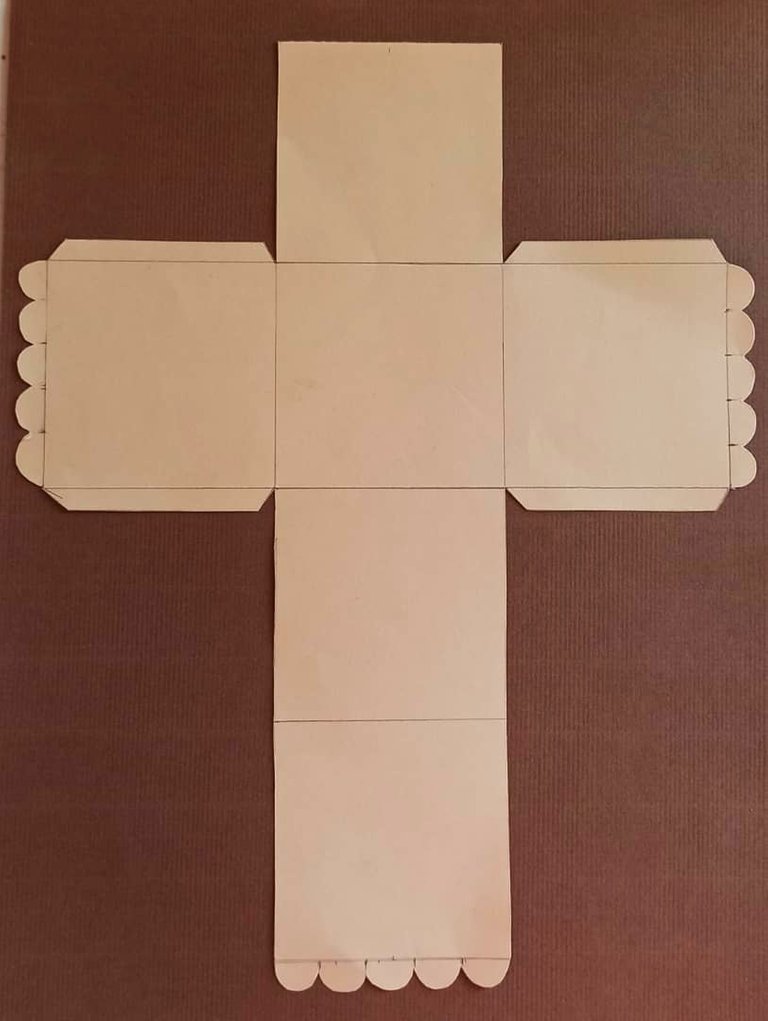
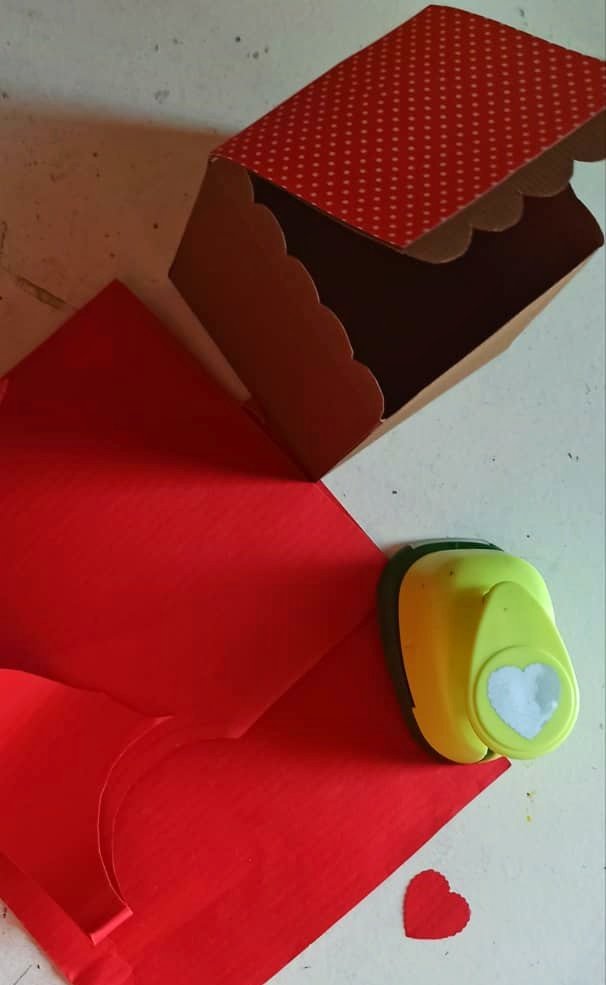
I made the packaging as a box that looked like wood and I made the mold, joining 8cm x 8cm squares, leaving tabs on the squares on the sides to join them and a flap with waves to decorate. Just as I show it in the image 👇
To make it, I used the following materials.
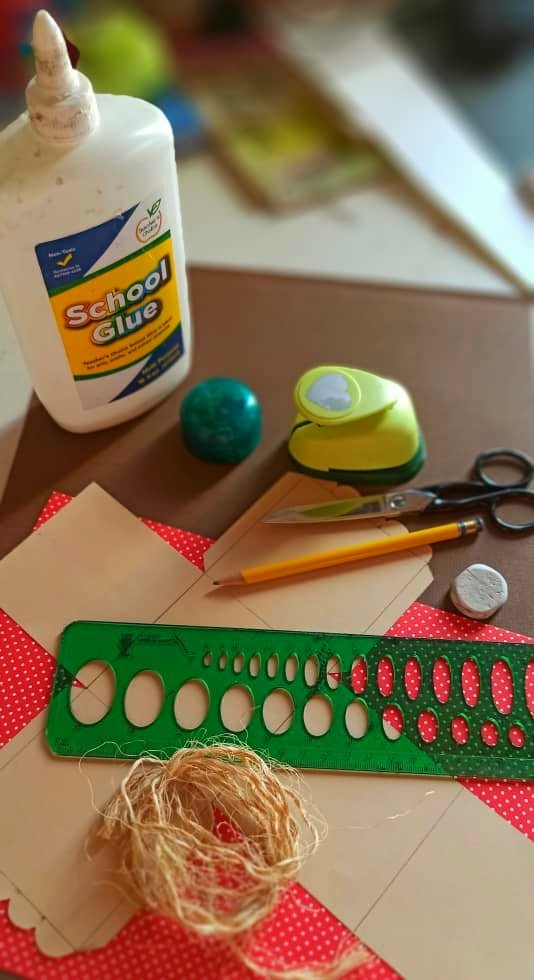
▪Materials:
⚫Tabloid size brown card stock
⚫Printed cardboard
⚫Red and white cardboard
⚫Red tissue paper
⚫White glue
⚫Pita or jute 70cm
⚫Mold
⚫Pencil
⚫Heart shaped hole punch
⚫Rubber
⚫Scissor
⚫Rule
▪Elaboration:
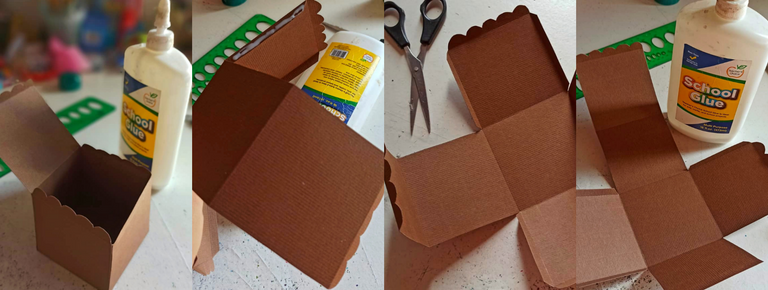
1- To begin, I marked the outline of the mold on the brown cardboard and cut it out, taking special care with the lateral waves and taking into account the internal lines to mark them later, and be able to guide myself when folding.
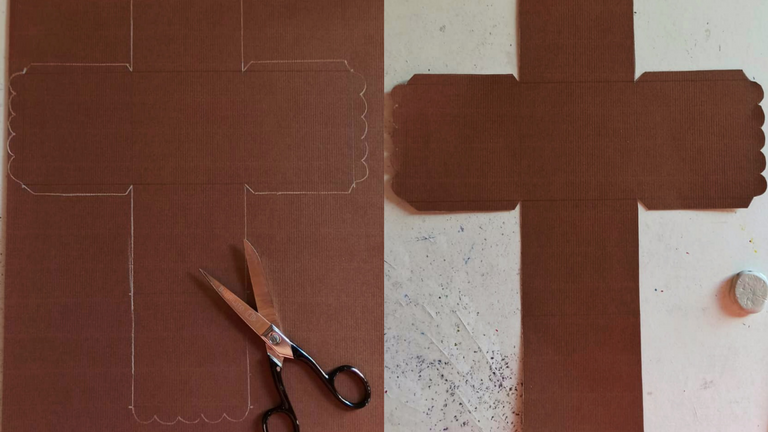
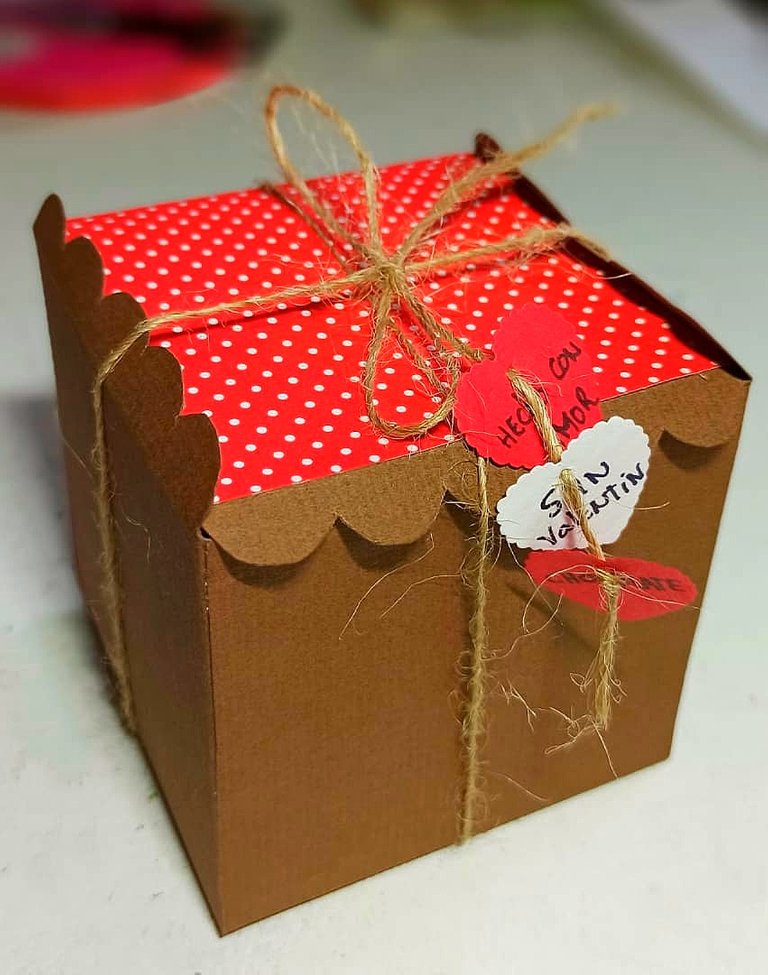
2- Then, with the help of the ruler, I marked the internal lines and exerting a little pressure I began to fold the sides, as well as the tabs and flaps. And I glued the edges with white glue, without adhering the lid to later accommodate the cookies.
3- In the stamped cardboard I made a square a few millimeters smaller than the squares of the mold, that is, less than 8cm by 8cm and I glued it on the upper part (what would be the lid of the box), to give it color and a better finish.
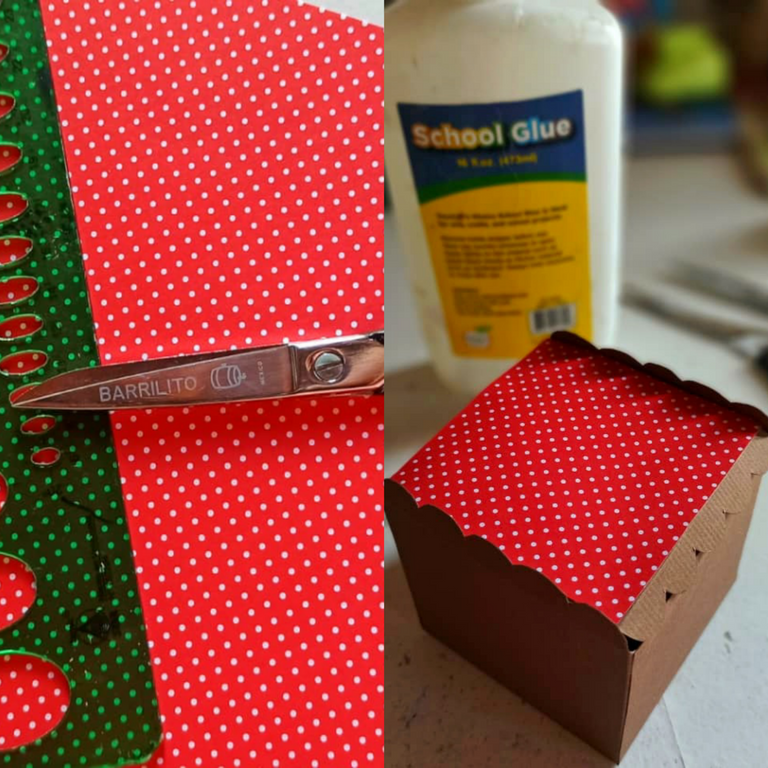
4- On the red cardboard, I took out two hearts with the help of the hole punch and one on the white cardboard. Those would be the cards for the box.
5- To finish, I cut a piece of red tissue paper and put it inside the box and placed the cookies. Tie with the piece of pita or jute and with the help of a blunt needle I placed the cards.
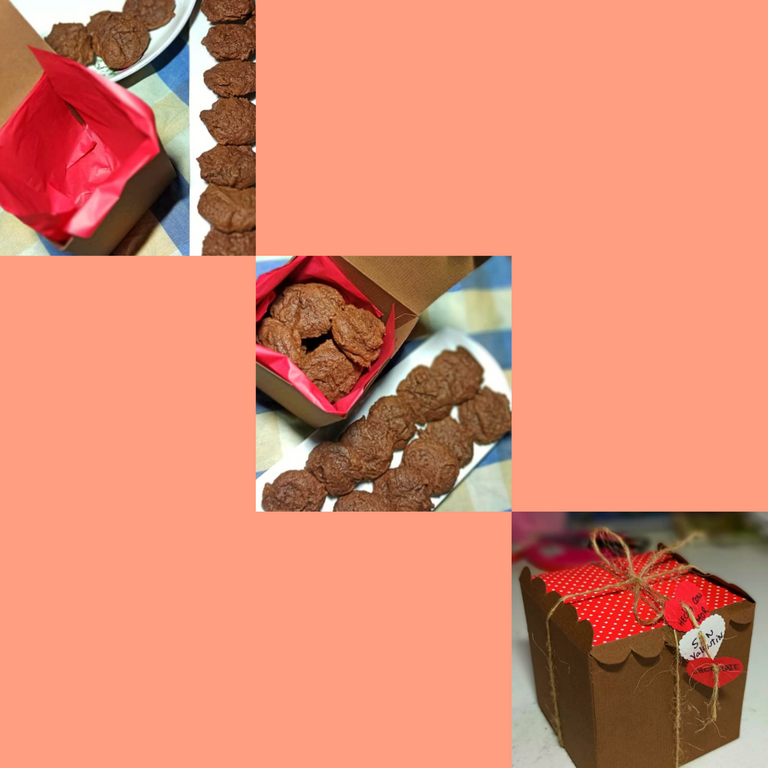
And so the box was ready and finished to be delivered 👌

Thanks for reading me! Until a new post 😊
¡Hola hiveamigos! Espero se encuentren bien✌
En mi post anterior sobre las galletas de chocolate que realicé, les comenté que estaría haciendo también un empaque para guardarlas y regalarlas a mi Valentina😊
El empaque lo hice como una caja que pareciera de madera y realicé el molde, uniendo cuadrados de 8cm x 8cm dejando unas pestañas en los cuadrados de los lados para unirlos y una solapa con ondas para decorar. Así como lo muestro en la imagen 👇
Para realizarla, utilicé los siguientes materiales.
▪Materiales:
⚫Cartulina marrón tamaño tabloide
⚫Cartulina estampada
⚫Cartulina roja y blanca
⚫Papel seda rojo
⚫Pega blanca
⚫Pita o yute 70cm
⚫Molde
⚫Lápiz
⚫Sacabocado de corazón
⚫Goma
⚫Tijera
⚫Regla
▪Elaboración:
1- Para comenzar marqué el contorno del molde en la cartulina marrón y lo recorte, teniendo especial cuidado con las ondas laterales y tomando en cuentas las líneas internas para marcarlas luego, y poder guiarme a la hora de doblar.
2- Luego, con ayuda de la regla marqué las líneas internas y ejerciendo un poco de presión comencé a doblar los lados, al igual que las pestañas y las solapas. Y pegué los bordes con pega blanca, sin adherir la tapa para luego acomodar las galletas.
3- En la cartulina estampada hice un cuadrado unos milímetros más pequeño que los cuadrados del molde, es decir, menos de 8cm por 8cm y lo pegué en la parte superior (lo que seria la tapa de la caja), para darle color y un mejor acabado.
4- En la cartulina roja, saqué dos corazones con ayuda del sacabocado y uno en la cartulina blanca. Esas serian las tarjetitas para la caja.
5- Para finalizar, recorte un pedazo del papel seda rojo y lo puse dentro de la caja y coloqué las galletas. Amarre con el pedazo de pita o yute y con ayuda de una aguja punta Roma coloqué las tarjetitas.
Y así quedó la caja lista y terminada para ser entregada 👌
¡Gracias por leerme! Hasta un nuevo post 😊
Que cajita tan preciosa, @belizanaterah y el detalle para regalar las galletas a la pequeña Valentina es un detalle muy tierno, un gran
!discovery 25
Para ti.
Muchísimas gracias 😊 a ella le encantó el detalle y las galletas son sus favoritas. Siempre me pide que le haga galletas.
✨🎉💕
This post was shared and voted inside the discord by the curators team of discovery-it
Join our community! hive-193212
Discovery-it is also a Witness, vote for us here
Delegate to us for passive income. Check our 80% fee-back Program
Your content has been voted as a part of Encouragement program. Keep up the good work!
Use Ecency daily to boost your growth on platform!
Support Ecency
Vote for new Proposal
Delegate HP and earn more
Hola Bely bienvenida a esta gran casa creativa!!! siéntete a gusto compartiendo y creando con nosotros. Gracias por mostrarnos tu lindo proyecto, nos ha encantado su presentación e idea.
Te invitamos a nuestro Discord: allá podremos asignarte un rol y conozcas más el funcionamiento de la comunidad: https://discord.gg/tYENgKmTHA
Con cariño
Hola Muchísimas gracias. Es un placer para mi hacer trabajos hechos a mano, claro que seguiré creando y compartiéndolo con ustedes. 😊
Congratulations @belizanaterah! You have completed the following achievement on the Hive blockchain and have been rewarded with new badge(s):
Your next target is to reach 20 posts.
You can view your badges on your board and compare yourself to others in the Ranking
If you no longer want to receive notifications, reply to this comment with the word
STOPTo support your work, I also upvoted your post!
Check out the last post from @hivebuzz:
Support the HiveBuzz project. Vote for our proposal!