Blessed and magical day I wish you all.
Me es siempre grato compartir con ustedes algunas de las cosas que hago en el transcurso de la semana porque me ayuda a despejarme, organizar actividades y además mantenerme ocupada. Después de que Lis se marchó de casa, las cosas emocionalmente se desvanecieron para mí y mi salvavidas fue mi pequeño emprendimiento. Además de las tareas dirigidas que imparto desde mi casa a un grupo de niños encantadores de primaria. Con mi emprendimiento, me he fijado como meta aprender, practicar y más. Ayer, felizmente estuve en la oportunidad de tener materiales disponibles para crear algunos lazos que integraré a los accesorios de cabello para niña que ofreceré en KOKO.
It is always a pleasure for me to share with you some of the things I do during the week because it helps me clear my head, organize activities and also keep myself busy. After Lis left home, things emotionally faded for me and my lifeline was my small business. I have immersed myself in learning, practicing and more. Yesterday, I was happily able to have materials available to create some bows that I will integrate into the girls' hair accessories that I will offer at KOKO.
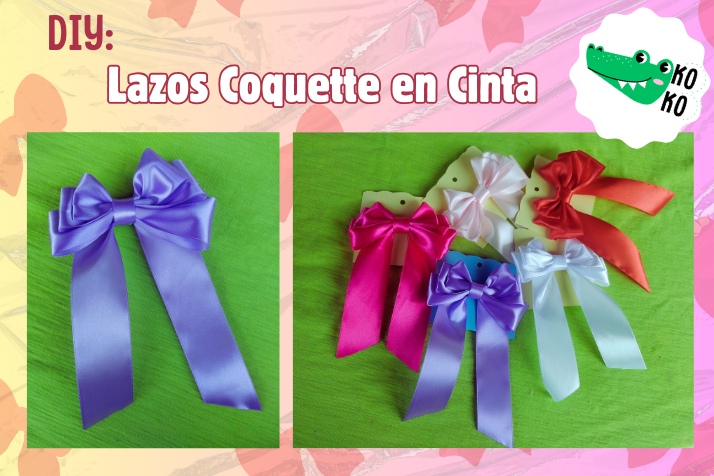
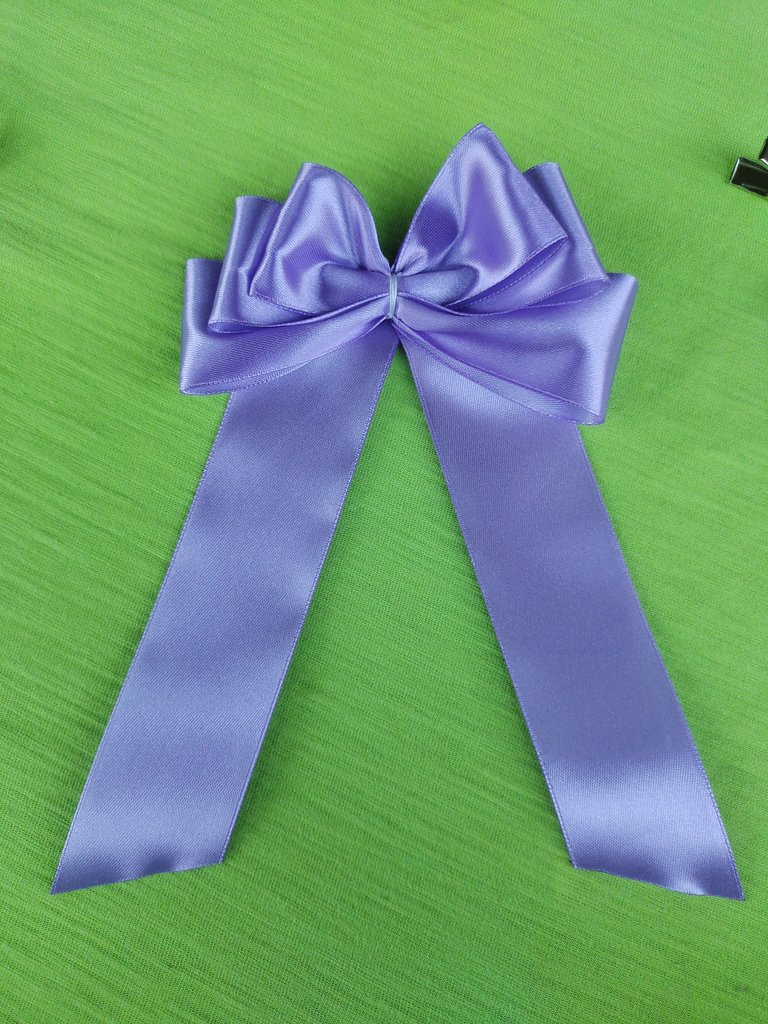
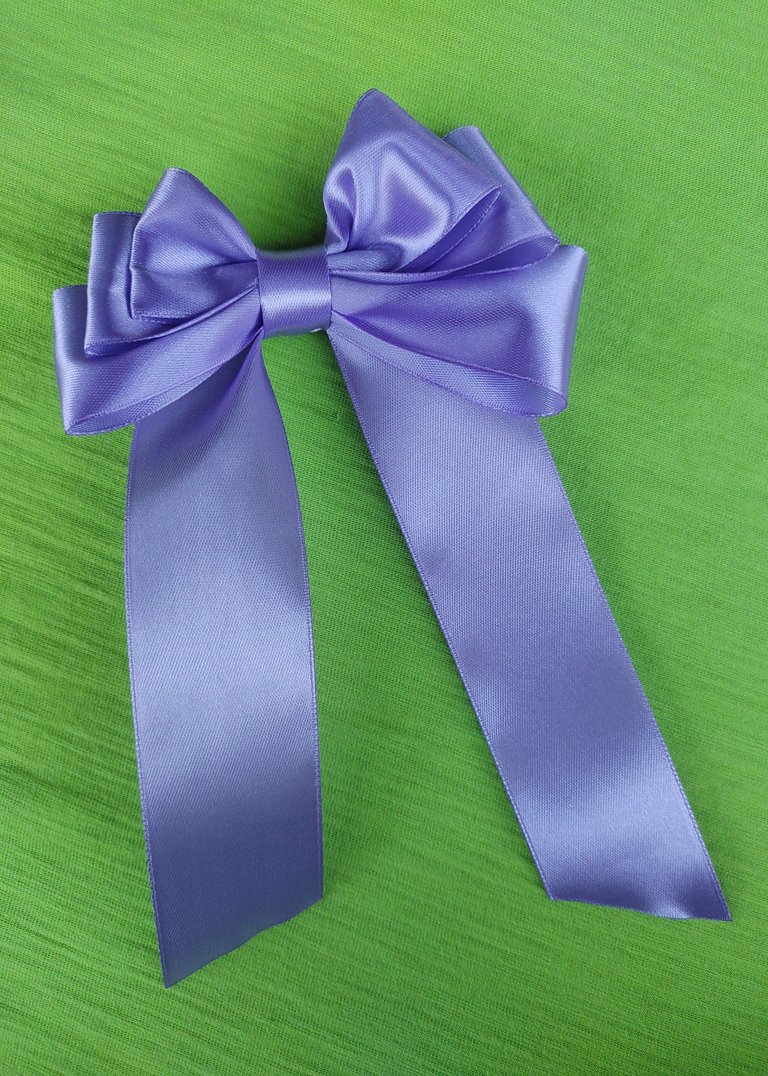
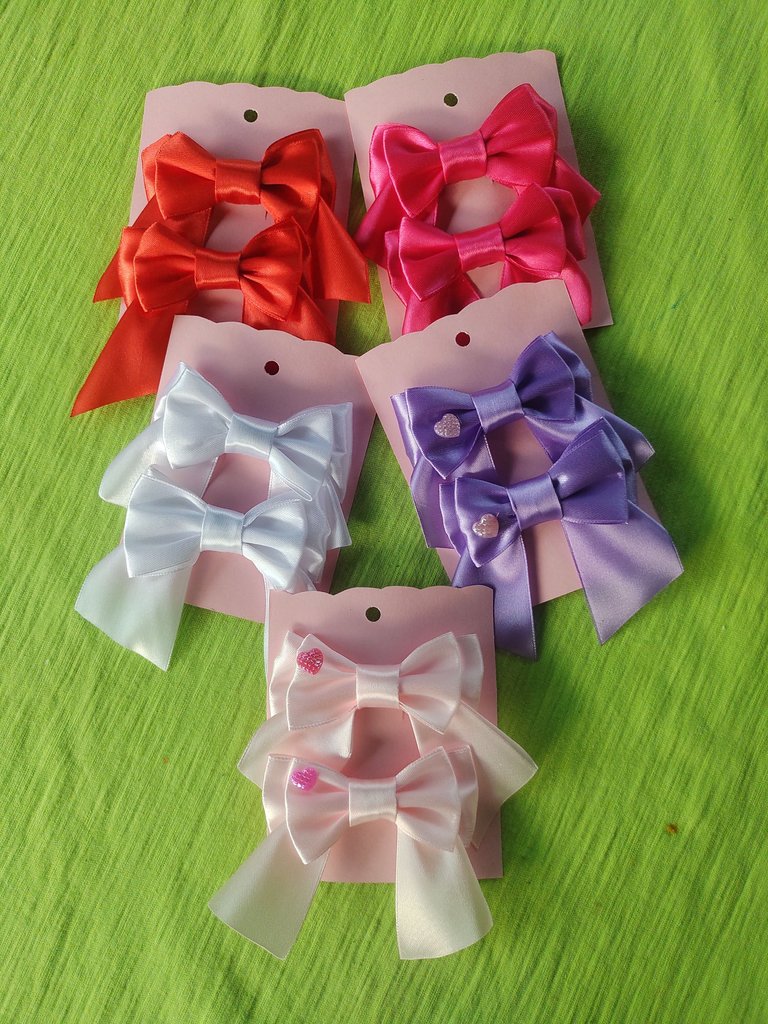
Se trata de lazos en cinta raso, inspirados en la tendencia "Coquette". Son muy lindos porque tienen características algo diferentes como, que se trabaja el lazo en 3 tamaños diferentes que se unen para formar uno. La cola que cae, le da un toque encantador y femenino. Los colores que he usado para crear estos lazos son: Lila, rosa, fucsia, blanco y rojo; más adelante incorporaré otros colores o quizás estampados. Lo que más me gusta de los lazos y accesorios de cabello son el colorido y el realzado general que le brindan al cabello. Por aquí dejo mi pensamiento de: "Siempre viene bien un lindo lazo..."
These are satin ribbon bows, inspired by the "Coquette" trend. They are very cute because they have somewhat different characteristics such as the bow being worked in 3 different sizes that come together to form one. The falling tail gives it a charming and feminine touch. The colors that I have used to create these bows are: Lilac, pink, fuchsia, white and red; Later I will incorporate other colors or perhaps prints. What I like most about bows and hair accessories are the color and overall lift they give to the hair. Here I leave my thoughts: "A nice bow is always good..."

🐊🐊🐊🐊🐊🐊
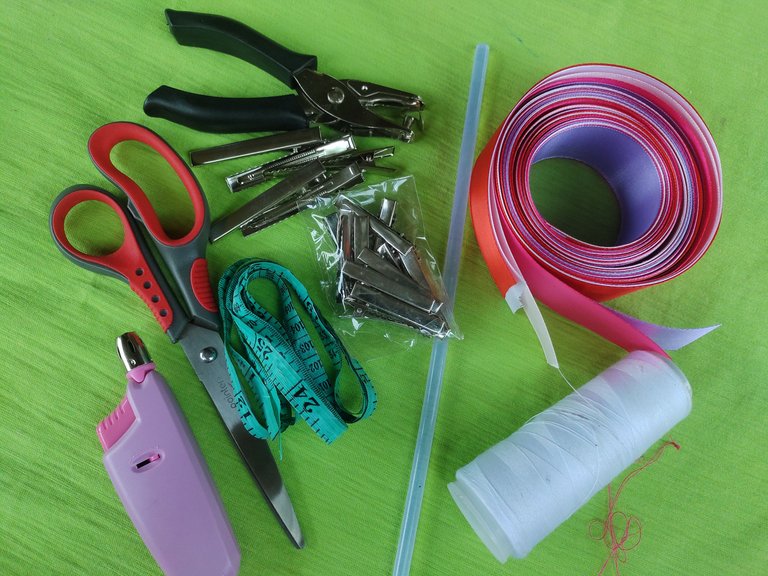
Materiales
- Cinta raso
- Pinza Caimán
- Silicon - Encendedor
- Cinta Metrica
- Aguja e Hilo
Materials
- Satin ribbon
- Alligator Clip
- Silicon - Lighter
- Measuring tape
- Needle and thread
🐊🐊🐊🐊🐊🐊
Proceso de Creación / Creation Process
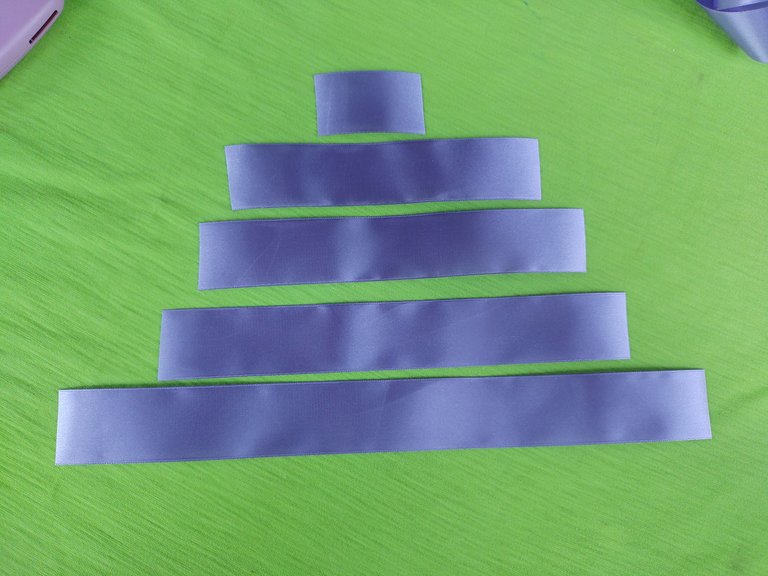
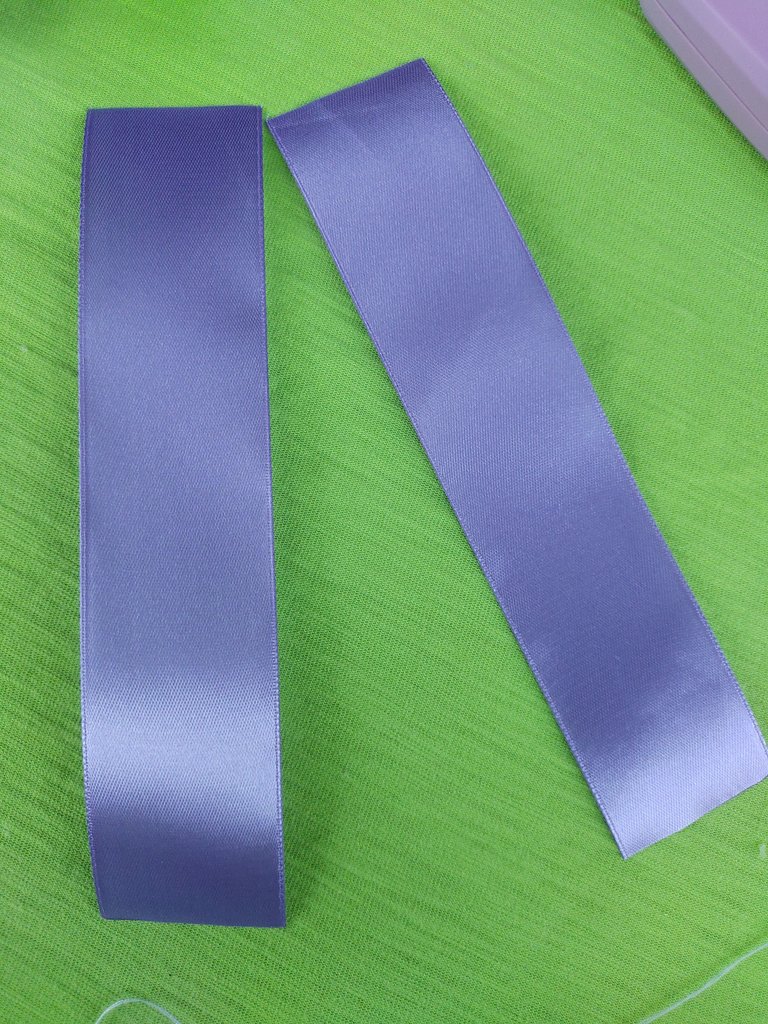
Con la cinta métrica medimos y cortamos los siguientes listones de cinta raso, también pueden usar cinta Gross si así gustan.
6 cm (centro de lazo)
18 cm (capa 1)
22 cm (capa 2)
26 cm (capa 3)
35 cm (cola)
With the measuring tape we measure and cut the following satin ribbon ribbons, you can also use Gross ribbon if you like.
6 cm (loop center)
18 cm (layer 1)
22 cm (layer 2)
26 cm (layer 3)
35 cm (tail)
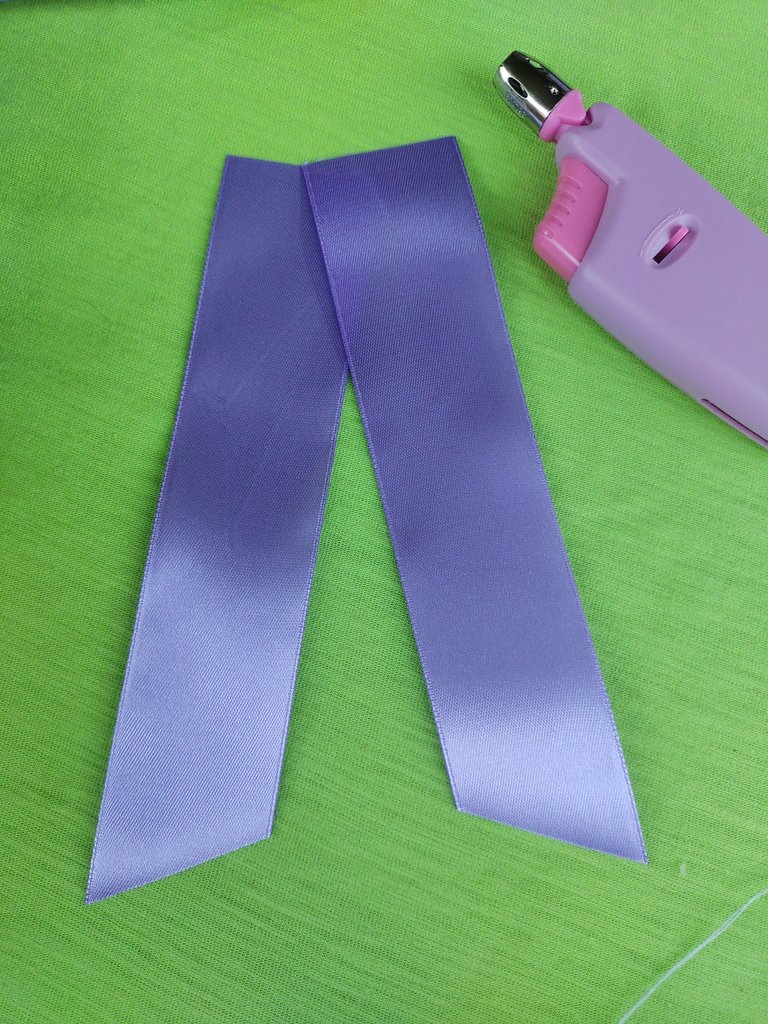
Con el encendedor sellaremos las puntas de cada listón. Doblaremos a mitad cada uno, para colocar la marca del centro y tenerle como guía en el proceso de armado. Ahora, uniremos punta con punta de cada listón. Para ello, usaremos silicon. Procederemos a armar el lazo, donde colocamos en la base el más grande, después el mediano y seguidamente el más pequeño. Partiremos desde la mitad de cada uno para colocar la siguiente capa. Con aguja e hilo atravesaremos el centro con puntadas grandes, fruncimos y damos algunas vueltas al lazo por el medio.
With the lighter we will seal the ends of each strip. We will fold each one in half, to place the center mark and have it as a guide in the assembly process. Now, we will join end to end of each ribbon. For this, we will use silicone. We will proceed to assemble the bow, where we place the largest one at the base, then the medium one and then the smallest one. We will start from the middle of each one to place the next layer. With a needle and thread we will go through the center with large stitches, gather and turn the bow a few times in the middle.
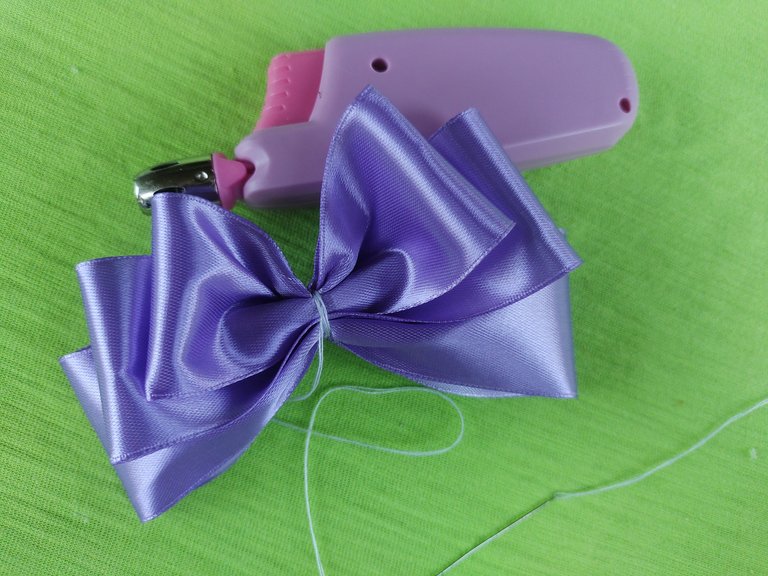
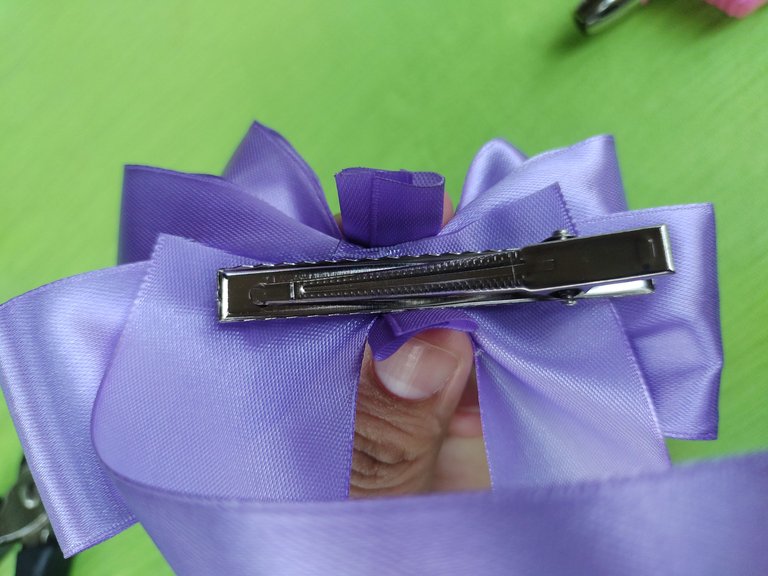
Ahora con la cola, cortamos el listón restante a mitad, ponemos uno casi al lado del otro y con silicón fijamos el lazo sobre los mismos. Cortamos las puntas de la cola y sellamos con el fuego del encededor. Con silicon fijaremos en la parte trasera la pinza caimán. Colocamos el centro del lazo y sellamos desde la parte trasera. Con silicon fijaremos en la parte trasera la pinza caimán. Colocamos el centro del lazo y sellamos desde la parte trasera.
Now with the glue, we cut the remaining ribbon in half, we place one almost next to the other and with silicone we fix the bow on them. We cut the ends of the tail and seal with the fire of the lighter. With silicone we will fix the alligator clip on the back. We place the center of the bow and seal from the back. With silicone we will fix the alligator clip on the back. We place the center of the bow and seal from the back.
 |  |  |
🐊🐊🐊🐊🐊🐊
Resultado / Result :
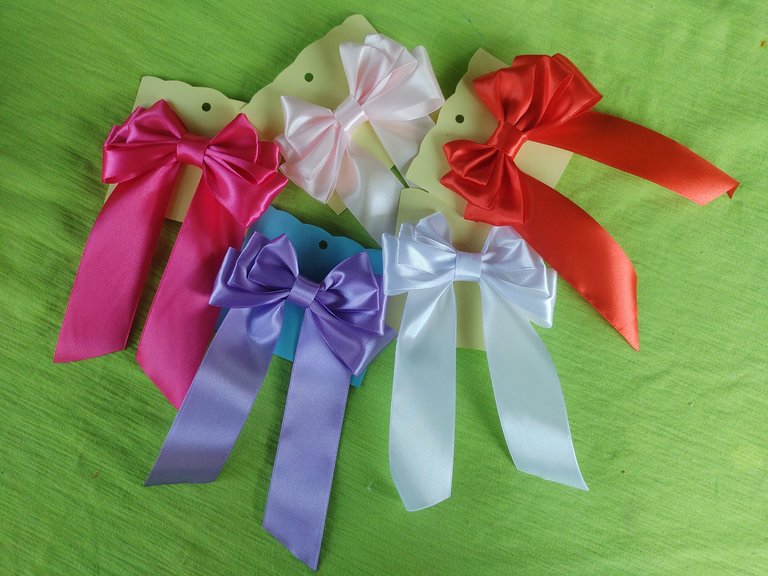
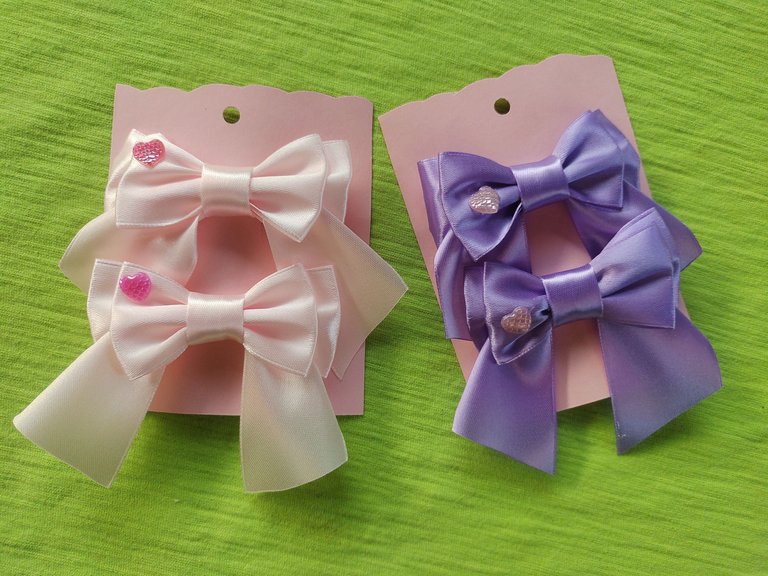
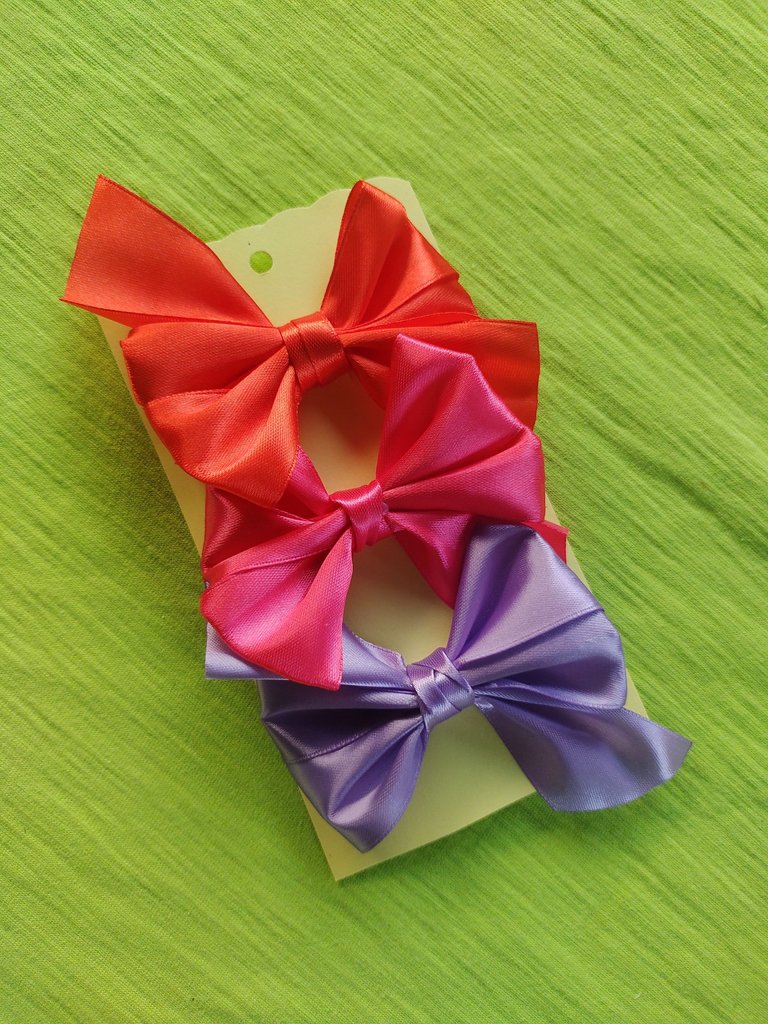
Elaboré este lazos en varios colores:
I made this bow in various colors:
🐊🐊🐊🐊🐊🐊
Sin dudarlo fue una tarde feliz, me centré en realizar lazos, empaquetarlos y guradarlos para la posterior venta. Me gusta colocarle sobre una cartulina de color pastel, con una perforación circular. También elaboré algunos diseños más de lazos, que espero prontamente compartir con ustedes. Aquí les comparto algunas de las fotografías de los mismos:
Without a doubt it was a happy afternoon, I focused on making bows, packaging them and storing them for later sale. I like to place it on a pastel colored cardboard, with a circular perforation. I also made some more bow designs, which I hope to soon share with you. Here I share some of their photographs:
🐊🐊🐊🐊🐊🐊
¡Y hasta aquí el proyecto del día! Espero les haya gustado tanto como a mí.
Si tienes alguna duda o sugerencia, no dudes en dejar un comentario. Las fotos que he colocado a lo largo del texto, las he tomado desde mi móvil Infinix.
¡Hasta la próxima!, tengan todos un bendecido día cargado de salud, paz y amor.
And that's it for the project of the day! I hope you liked it as much as I did.
If you have any questions or suggestions, don't hesitate to leave a comment. The photos that I have placed throughout the text were taken from my Infinix mobile.
Until next time, everyone have a blessed day full of health, peace and love.
¡Qué bellos se ven!
No me he atrevido a usar cintas en mis creaciones, es un material costoso y soy algo torpe con el pegamento. Me encantaría aprender a hacerlos. Quizá más adelante 😉
Te deseo mucho éxito en tus ventas. Estar ocupadas haciendo manualidades es la mejor terapia contra muchos padecimientos amiga. Feliz día.
También pensaba lo mismo antes de proponerme a hacerlos, me atacaban pensamientos como: Si me quedan mal? si daño las cosas?. Pero los aparté y me dediqué a actuar, todo con cuidado siempre. Espero pronto te animes, es muy entretenido. Muchisimas gracias por tus hermosos deseos, y si, sinceramente así es. Las manualidades y costura han desarrollado en mí muchas cosas, incluidas mis ganas de vivir a plenitud. Bendiciones amiga, Dios te guarde.
aha you did a great job with the ribbon. thanks for sharing. keep up the good work.
Thank you very much, blessings.
Hermosos lazos y muy bellos colores
Muchisimas gracias, bendiciones.
¡¡¡Buen trabajo!!! Gracias por publicar tu excelente contenido en Hive Diy, estos hermosos lazos coquette te quedaron asombrosos, me gustaron mucho los colores que elegiste.
Tu comunidad artesana ahora es testigo

Muchisimas gracias, los hago con mucho amor y cuidado. Aprecio mucho el apoyo a mi contenido, es muy significativo para mi y me impulsa a seguir aprendiendo y compartiendo. Bendiciones.
Están preciosos esos lazos coquette con cinta, son elegantes también y hasta mas delicados, los necesito en mi vida 😍
Muchas gracias, estoy segura de que los lazos te quedarían hermosos. Espero pronto los tengas en tu vida! Bendiciones
Hola @belkysmargarita me encanta la técnica con la que realizas tus lazos , son una belleza.
Hola @melissamau muchas gracias, me contenta mucho que te ha gustado. Bendiciones.
Tengo un lazo pero lo compré ya hecho, creo que esta es una de las formas de hacerlo más faciles que he visto y quedan muy bien, tengo una cinta negra guardada para hacer uno pero no me he decidido por miedo a echarla a perder jjjj
Congratulations @belkysmargarita! You have completed the following achievement on the Hive blockchain And have been rewarded with New badge(s)
Your next target is to reach 800 replies.
You can view your badges on your board and compare yourself to others in the Ranking
If you no longer want to receive notifications, reply to this comment with the word
STOP