Hello, everyone!
How are you doing? Are you all right? I hope you're well. Or maybe you're just trying to be good, like I always am.
I can easily say that I have been feeling psychologically bad in the past time. So my family and friends, especially the princess I mentioned in my previous post, tried to help as much as they could.
And I'm someone who doesn't like to leave these efforts empty. That's why I gave myself to handicraft, even though I couldn't do it completely. I actually did lots of things. Maybe I'll share what I've done over time. In fact, the absurdity of the photographs I took with what I did rather than the making amused me a lot. It took my mind off other things for a while.
Now it's time for what I want to show you;
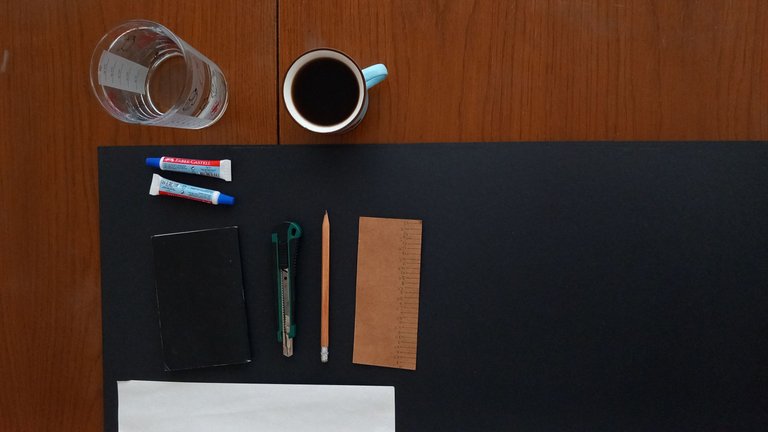
I'm getting in the spirit, aren't I? 😂🤣 First of all, I should talk about the stuff for our crown.

Water and coffee extra 😂 Just to drink. Don't forget to drink water. Stay hydrated 😁
Equipment;
Coloured paper,
Stationery knife/scissors,
Pen,
Ruler,
A4 paper,
Glue
If you are going to use a stationery knife, a hard and flat object underneath.
Actually, you don't need much material. But I was smart (?) as usual and bought cardboard instead of coloured paper... There was no need for such things. Coloured paper is also a material that can work well.
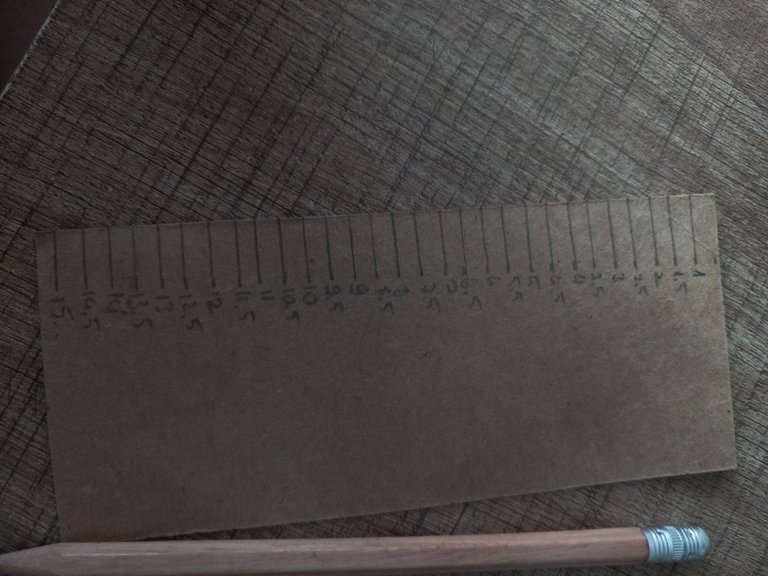
Now, before I start making the crown, I have one thing missing, so I will start making it... Ruler!
Honestly, buying a ruler was much more difficult than making it by hand. 😂 I don't like to go out when I'm melancholic, even though it's not exactly depression, I think some may agree, I don't like to go out. So I rolled up my sleeves and started making my ruler.
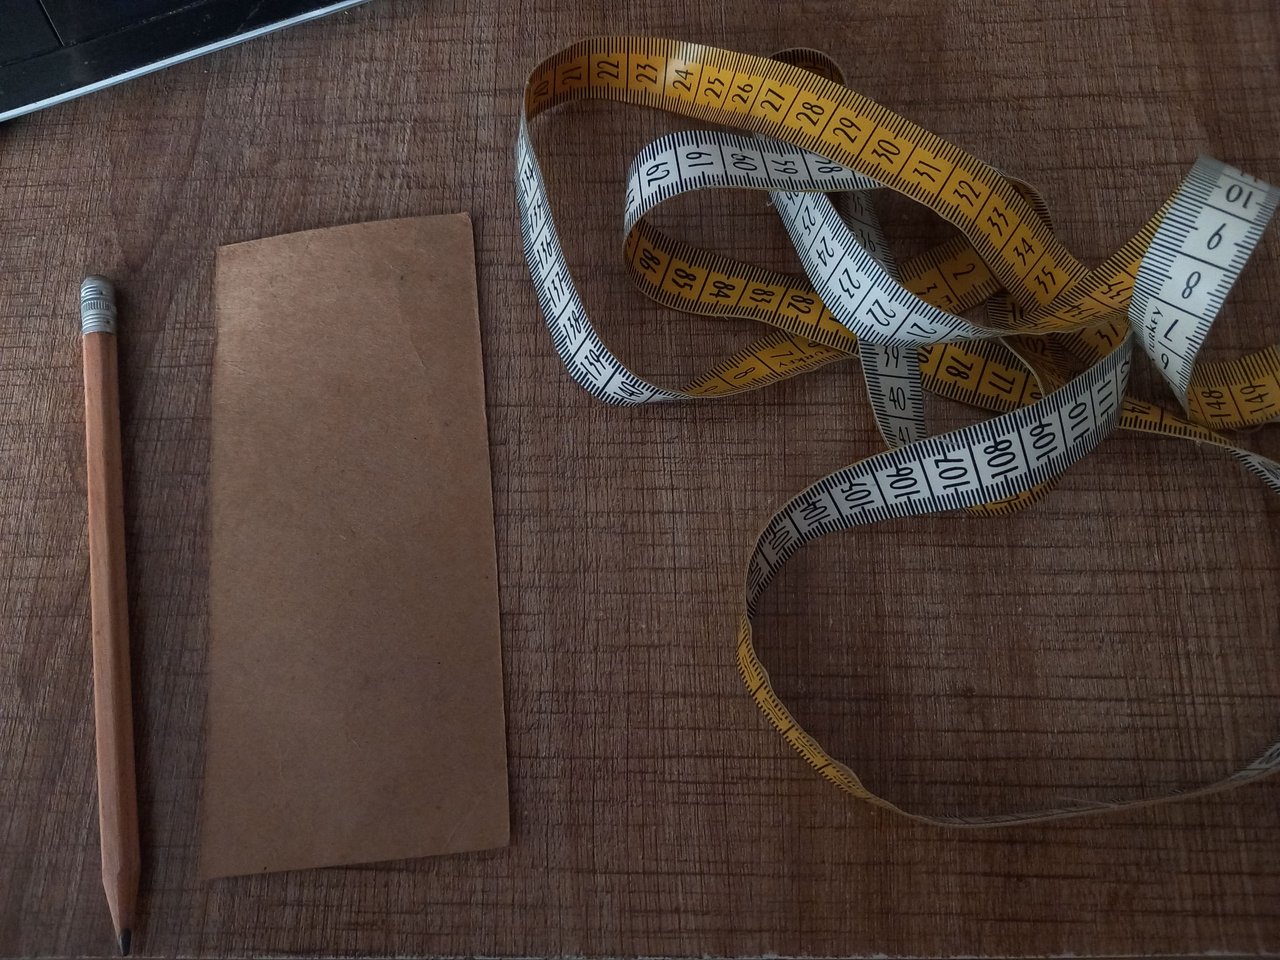
And for that;
Pen,
Tape measure and
An object of your choice
That's enough. Precisely 3 months ago, I shared a candle recycling post with you. Wicks were needed for the candles and the wicks I ordered had 2 thick recyclable papers with information such as instructions for use. I thought there was no harm in using one of these papers.
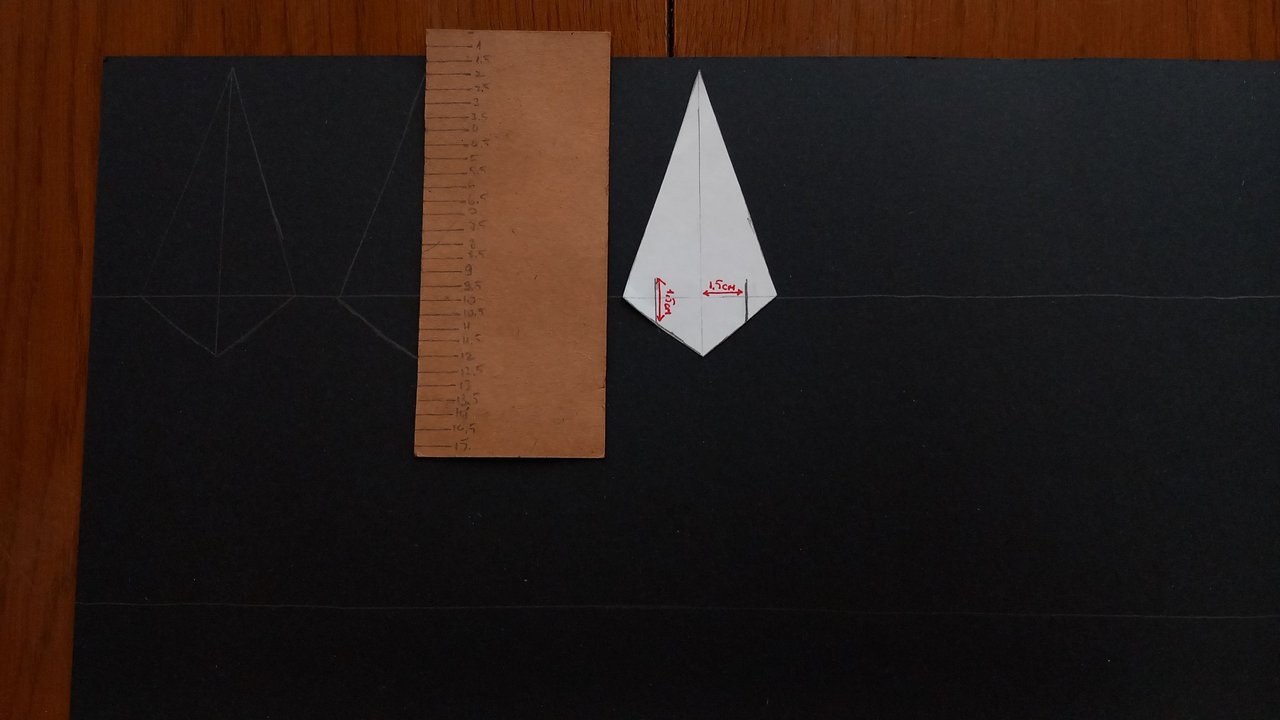
A 15 centimetre ruler was enough for me and this paper was exactly 15 cm.
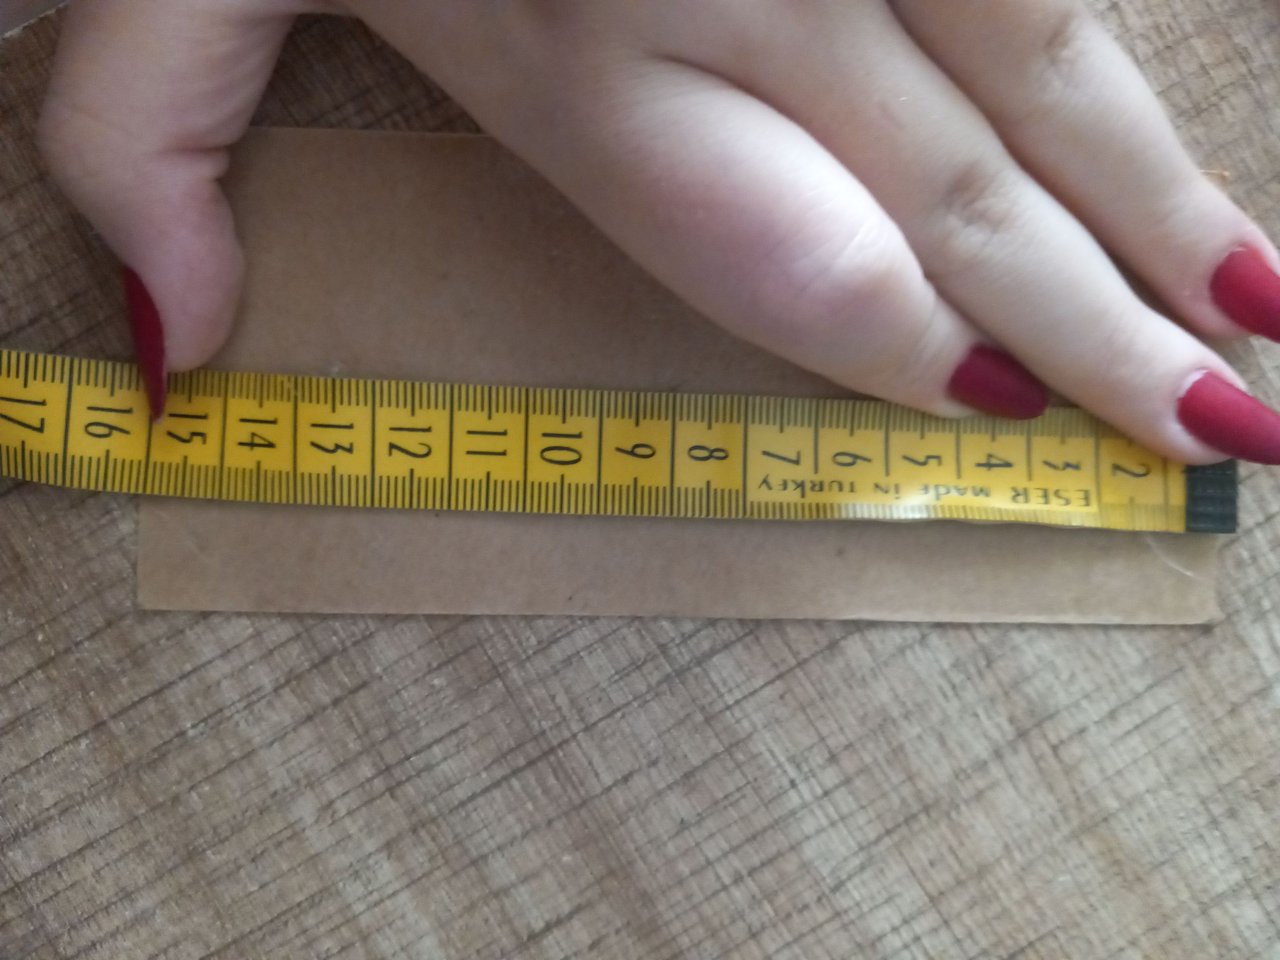
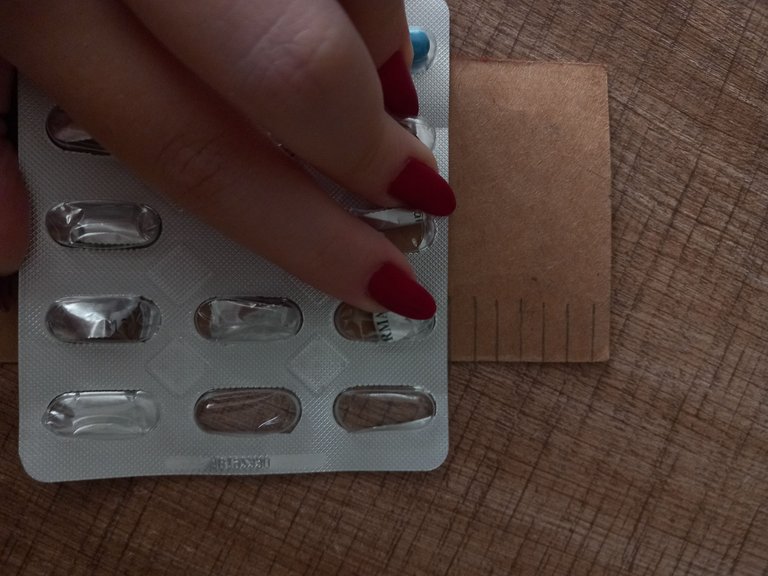
I then marked the paper in half a centimetre and, as one would expect from me, used the medicine box to extend these lines to the tip.


Yes, the ruler is ready. Now I can begin my main task, the crown.
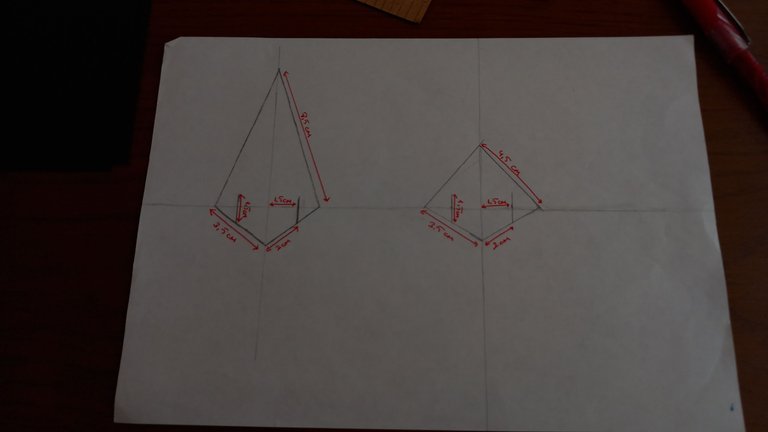
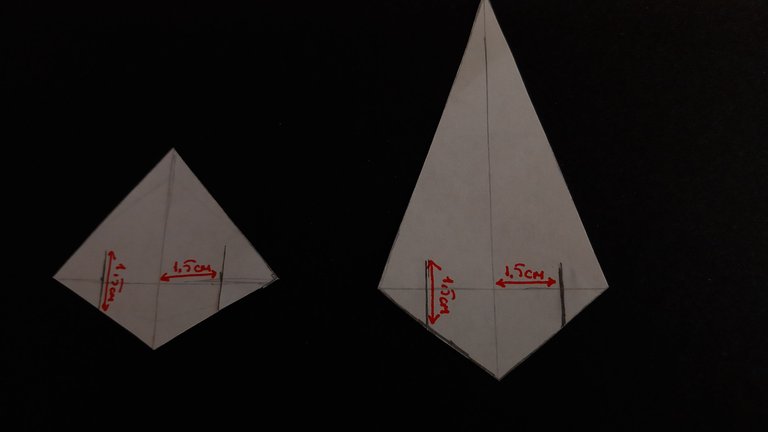
First, it's time to make a sketch for the part of the crown that will make it a crown.

For this, the pen-paper-ruler trio is enough.

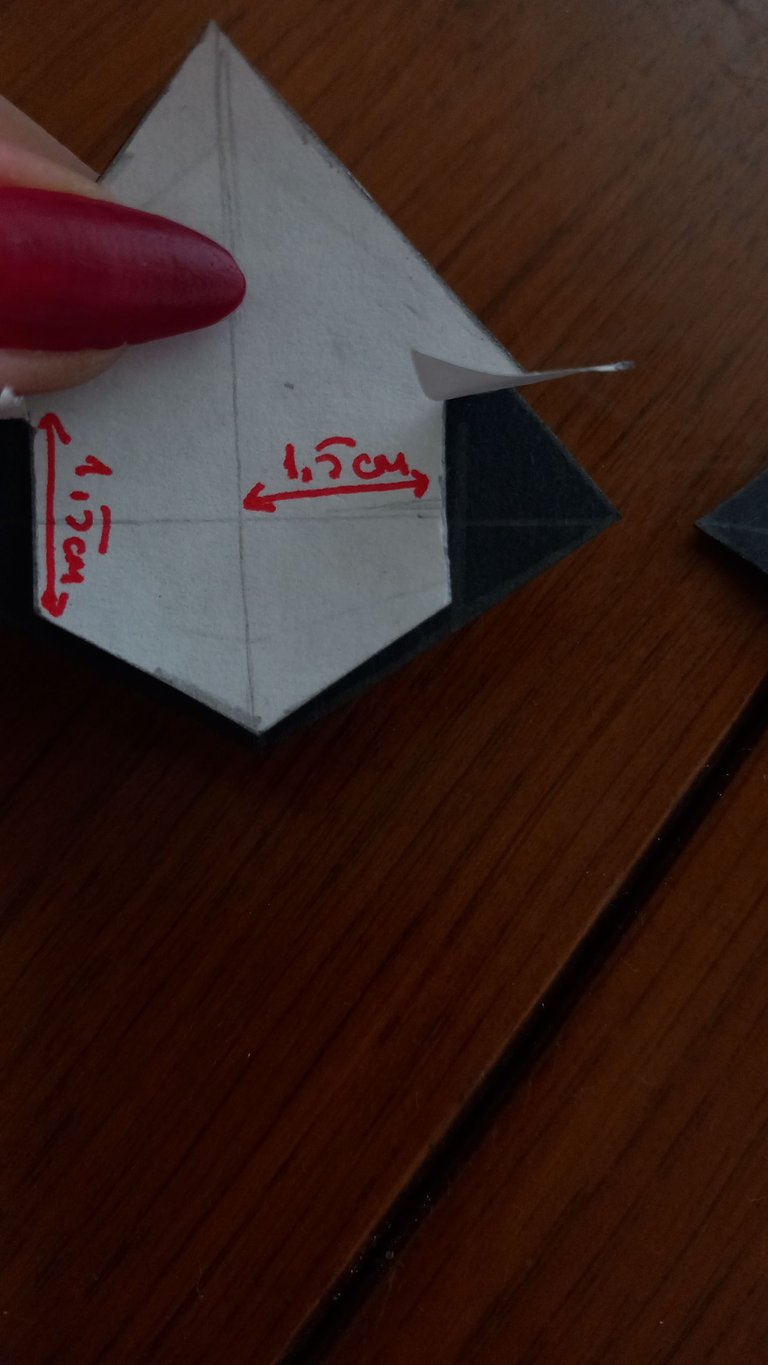
These are the measurements. It is important to draw the structure, which you can see more easily in the photo where I show the materials above. Otherwise, the end point and the centre may be unbalanced.
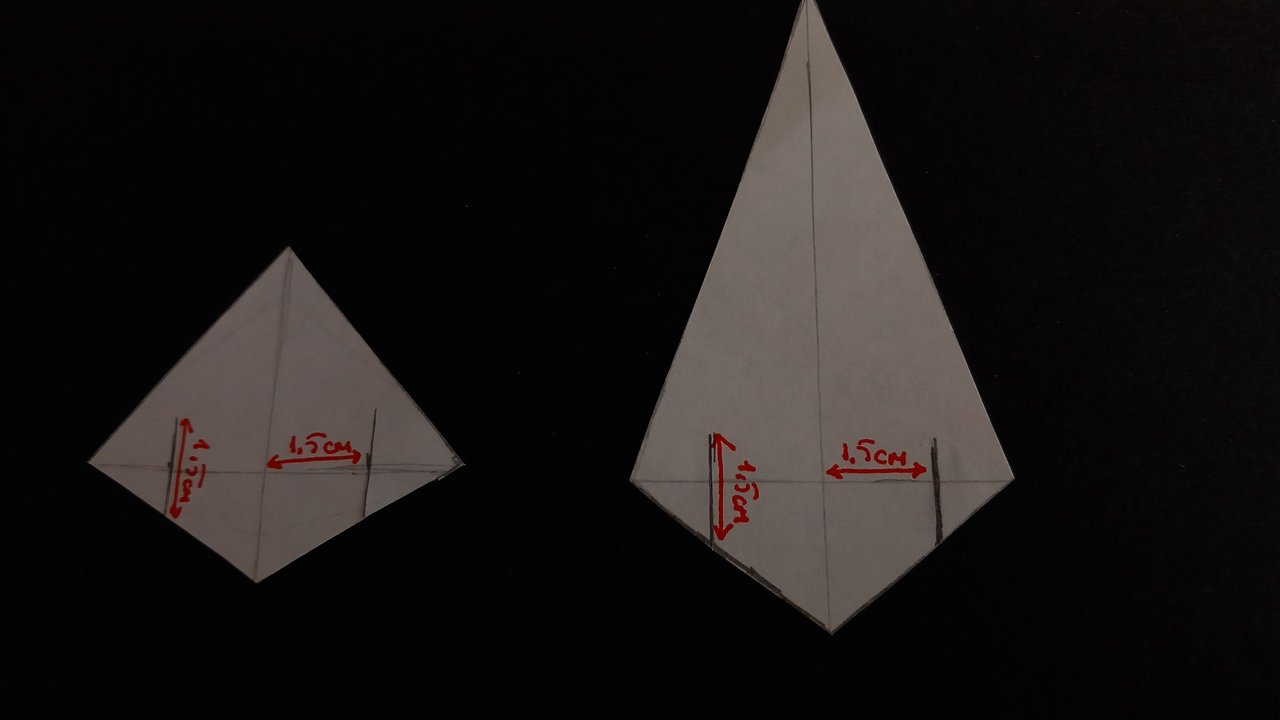
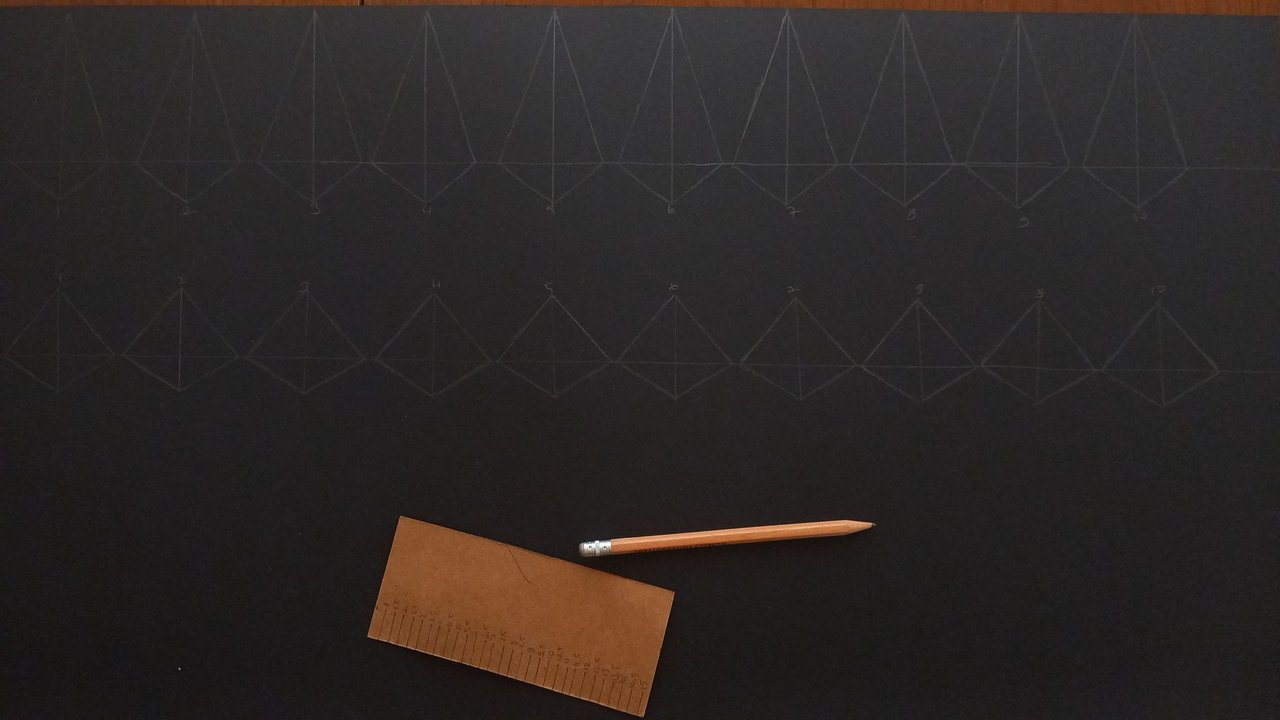
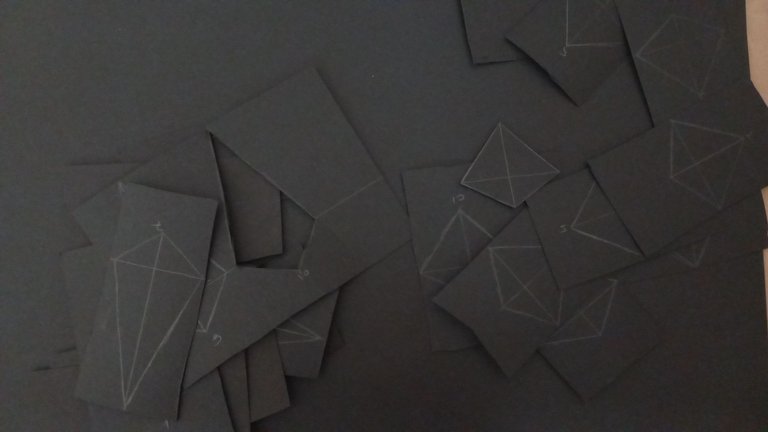
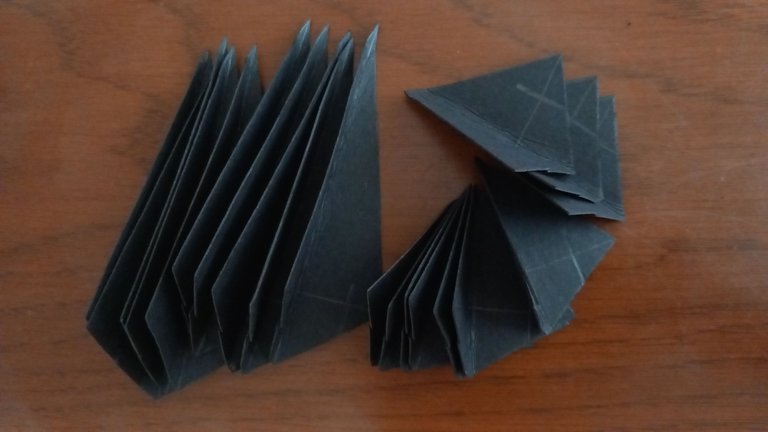
After cutting out the drafts, I started drawing them on my cardboard. You need exactly 10 of each of these two pieces, 20 in total. The cardboard I used was more than enough for all of them. In fact, exactly 3 crowns can come out of 2 pieces of 50x75 (cm) cardboard. I think 4 or 5 pieces of paper will be enough for 1 crown.
Again, after drawing my straight line to guide me, I drew 10 of them on my cardboard, following the outside of the sketch.
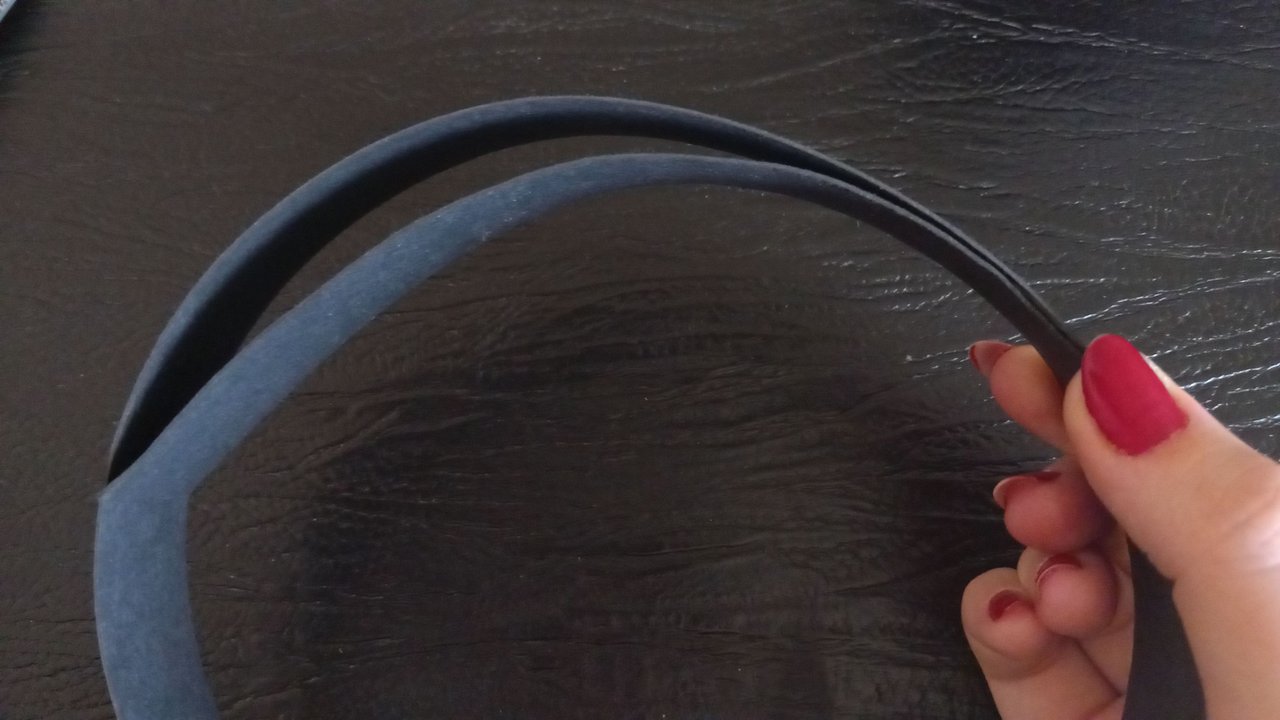
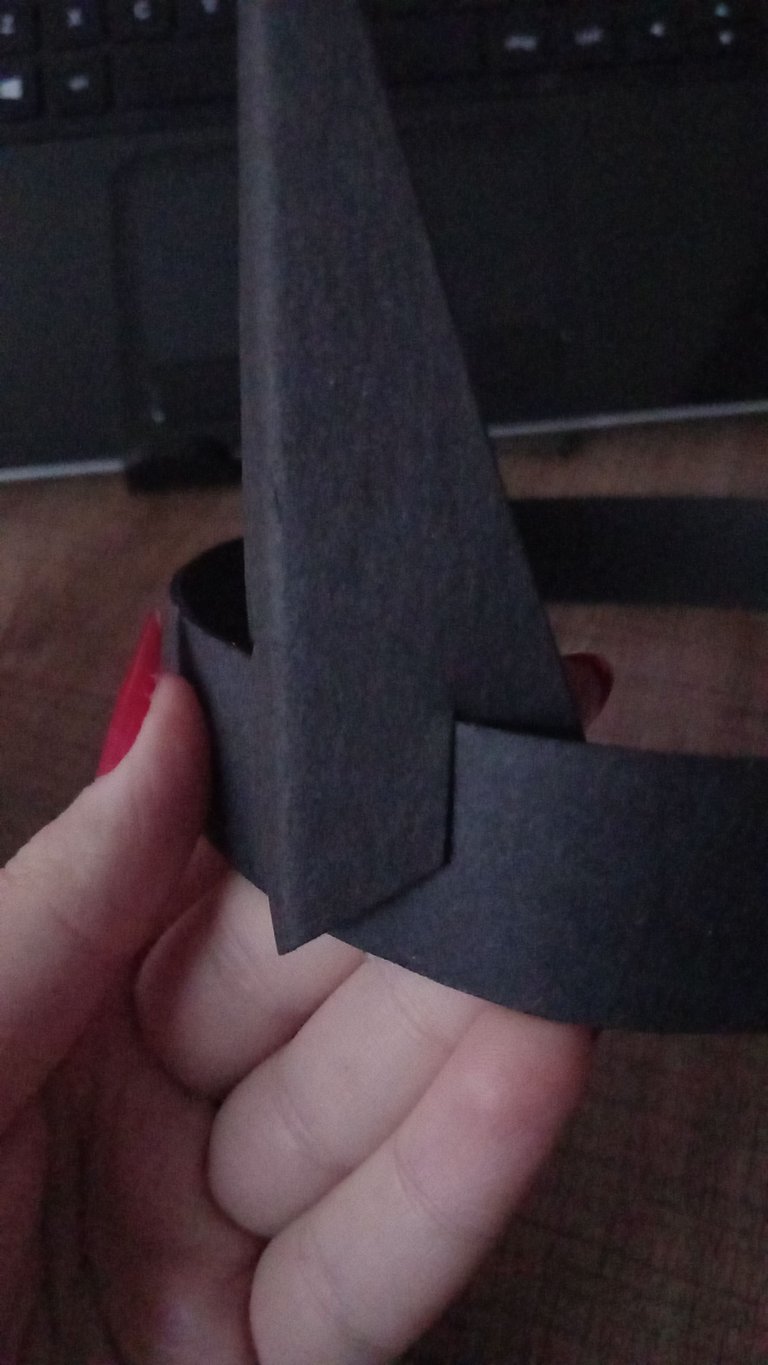
I also cut a flat strip according to my own head measurement. This strip is 3 centimetres thick.

When the cutting process was finished, the part that I can call the real struggle started. Gluing and waiting for it to dry. I can be very impatient with this kind of stuff... I even dried the glue with a hair dryer for a while, but then I thought of the electricity bill and turned it off immediately. 🙃 Yes, it won't have a huge effect, but why should I pay extra? I prefer to wait.
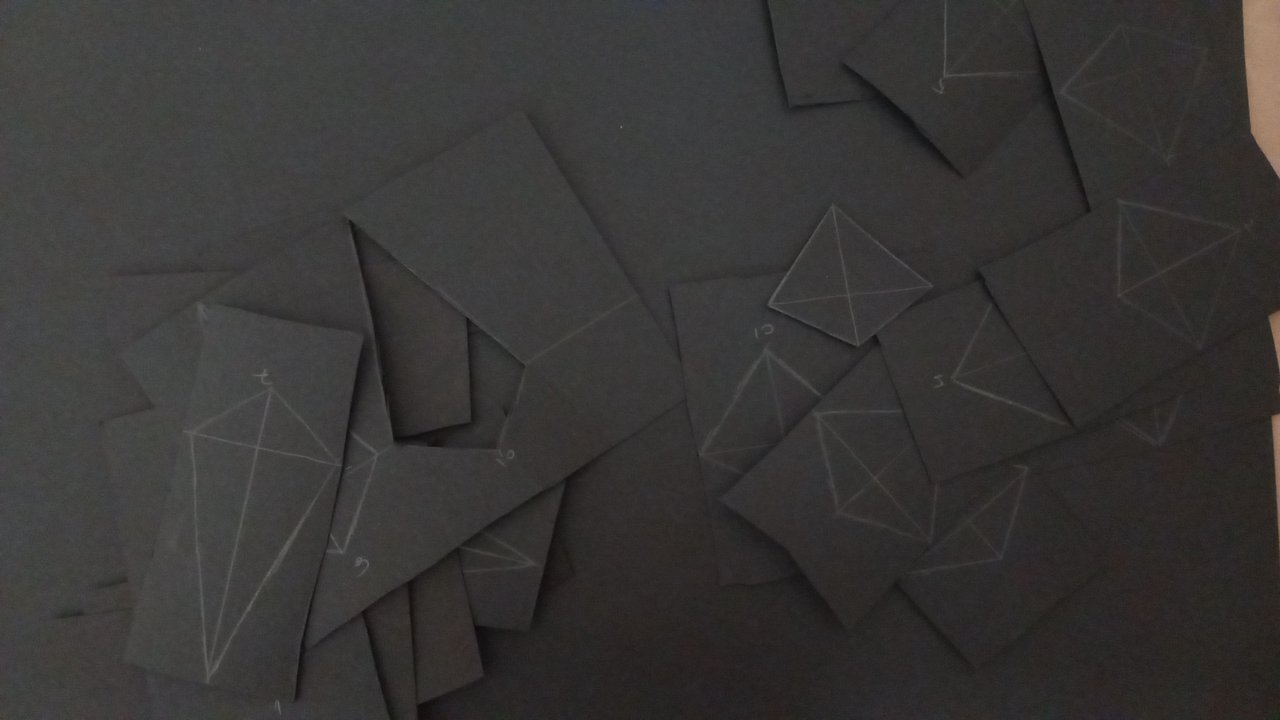
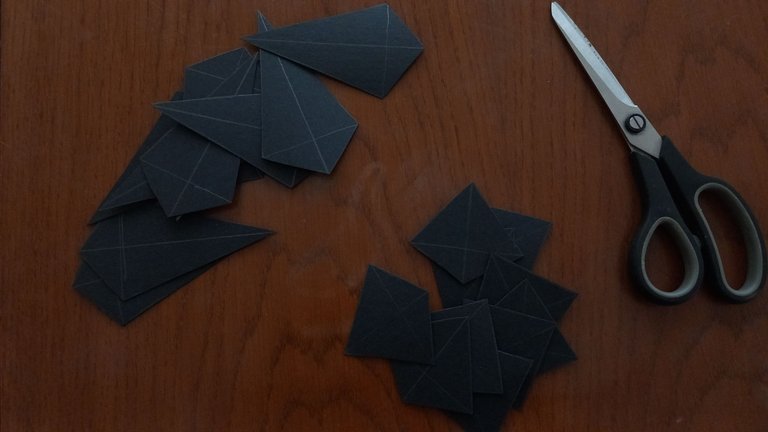
Also, when my hands started shaking again, I put the stationery knife aside and took scissors just in case. I didn't want to deal with cuts.

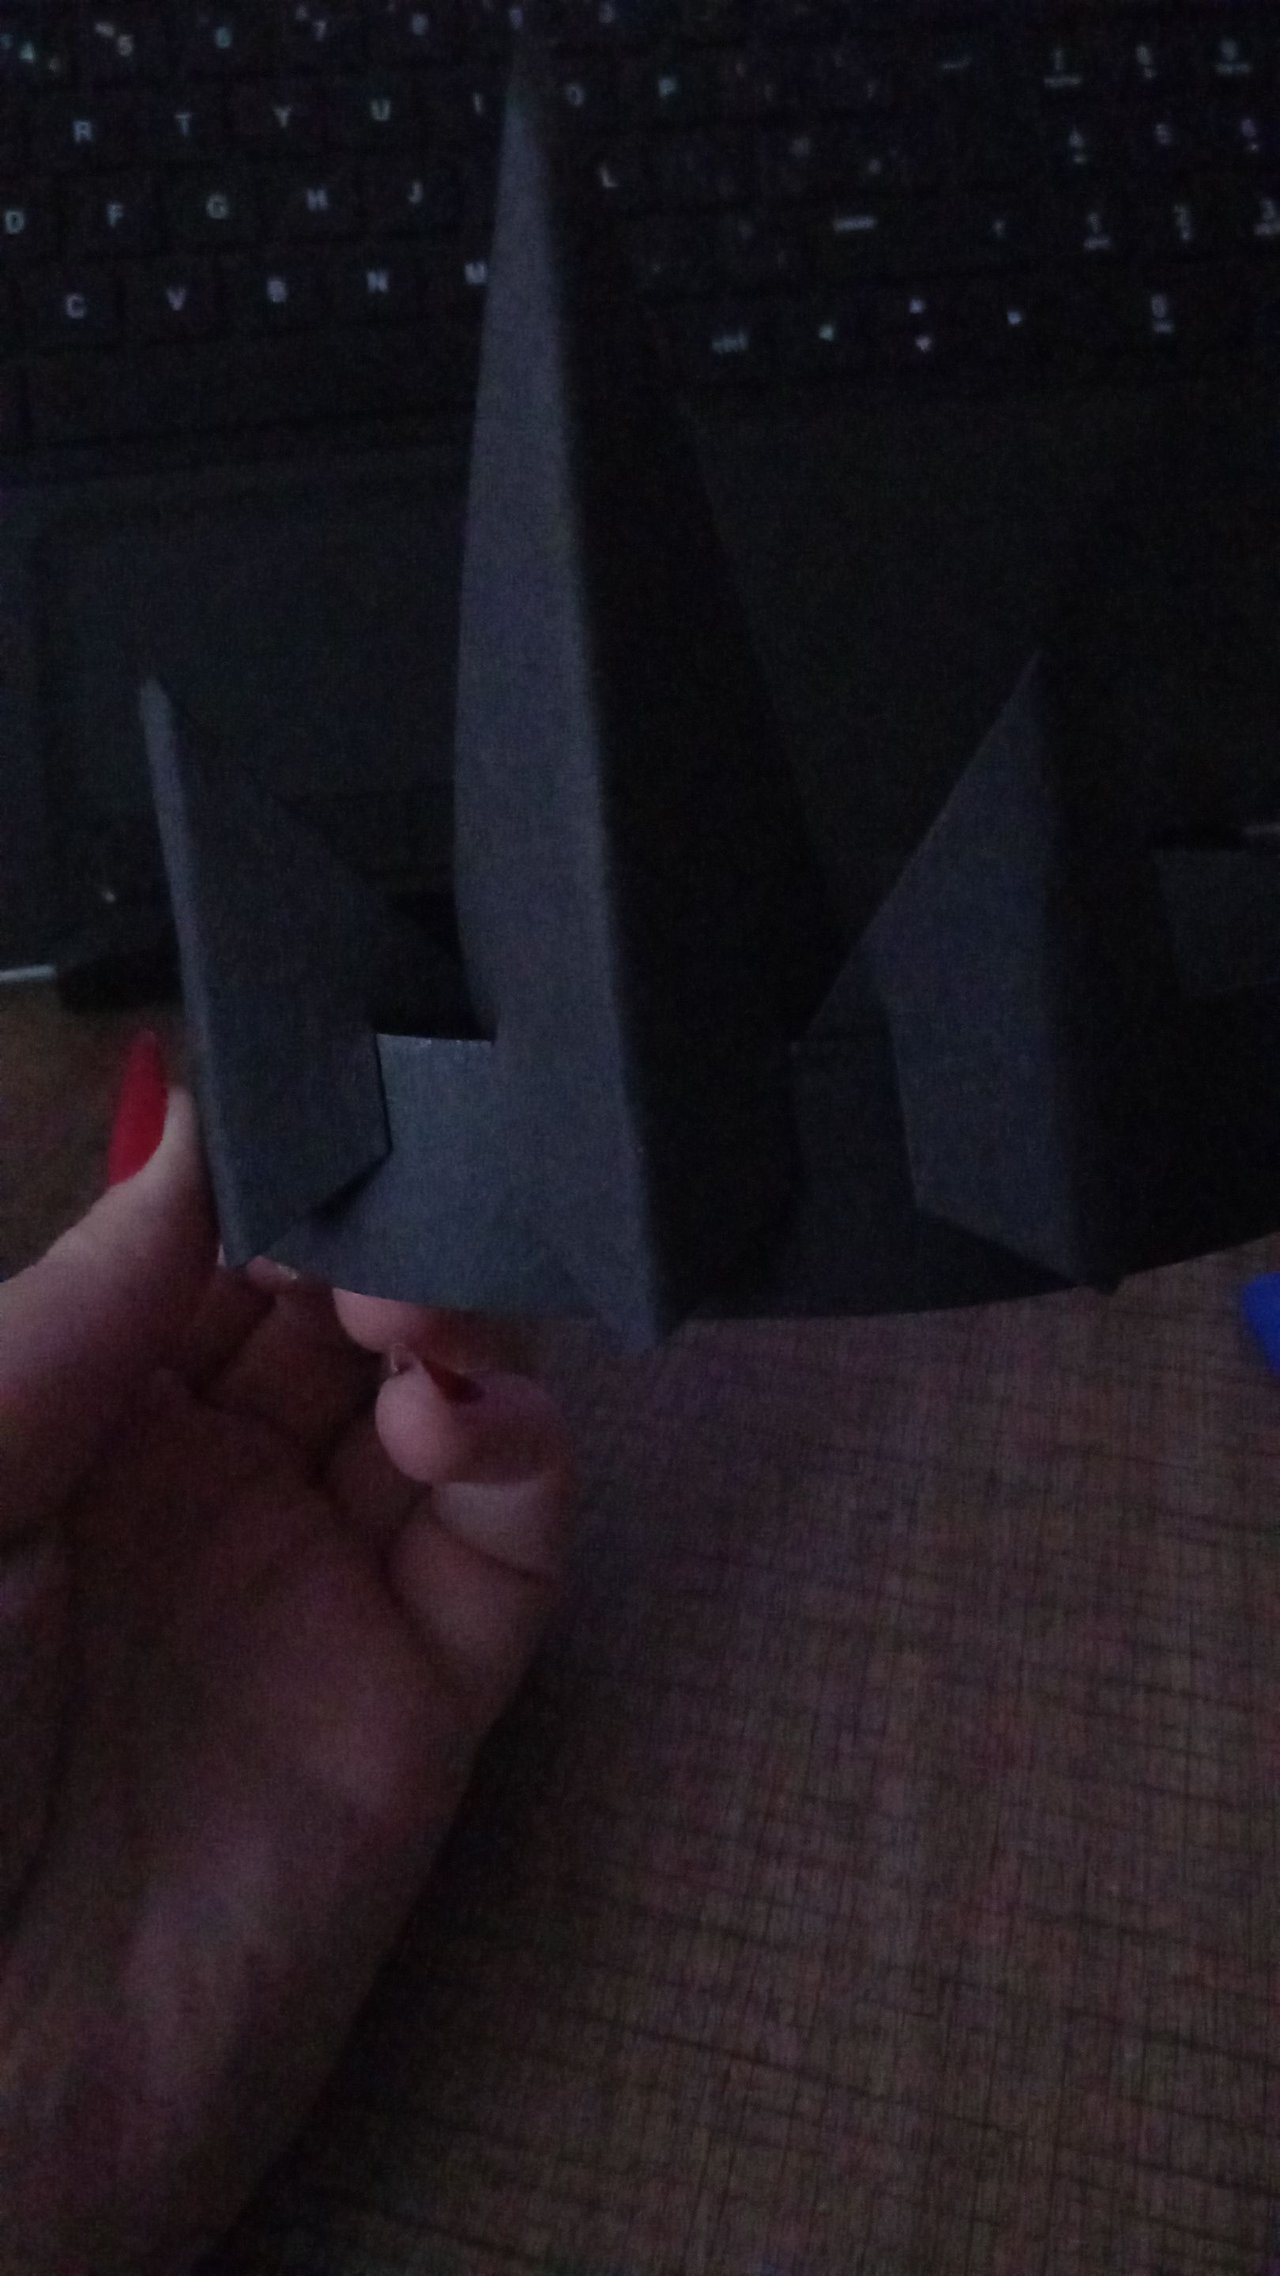
In order for it to hold on to the strap better and for an image that I personally think is more beautiful, I marked and cut it according to the measurements on the inside, which you can see in the sketch. Afterwards, I folded these 20 pieces without folding them exactly in half so that they fit better in the strap.

I continued to glue the strip I cut according to the size of my head. Of course, I did not want to hold it in my hand until it dried, so I fixed it with the help of a clothespin.
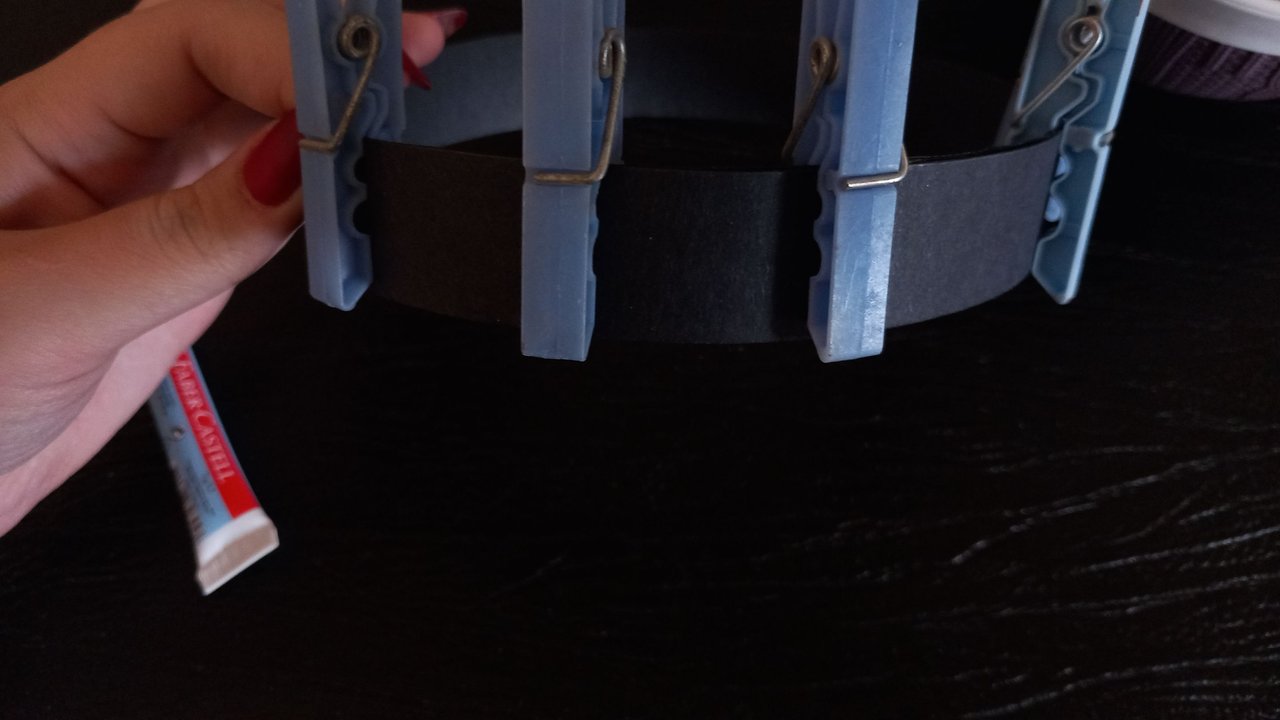
It seemed much more logical to use water-based glue for paper than using adhesive or hot silicone. Of course, hot silicone may be a slightly more logical choice for paper. To hold it better.
Once that was dry, which took a while, I moved on to the more time-consuming part: fitting the 20 pieces into the circle!
I didn't think it could be so boring. I can't focus unless I'm doing 2 or 3 things at the same time, yes, but that doesn't mean I like to shift my focus to another task while I'm doing it. So I opened a film to make waiting times a little more pleasant. Can you guess what it is?
The Deep Web Murdershow, which has just come out. 😁 It wasn't bad. Could it have been better? Maybe... Anyway, back to the crown 😂
After the first piece, I was able to glue at most two pieces at a time so that the other pieces would not move. After the first one dried, I glued 2 pieces, one on the right and one on the left.

Of course, the order of these glued pieces was such that there was one big one and one small one. As you can see in the photo on the right.
Towards the end of the film, all these processes were finished. Fortunately. 💆
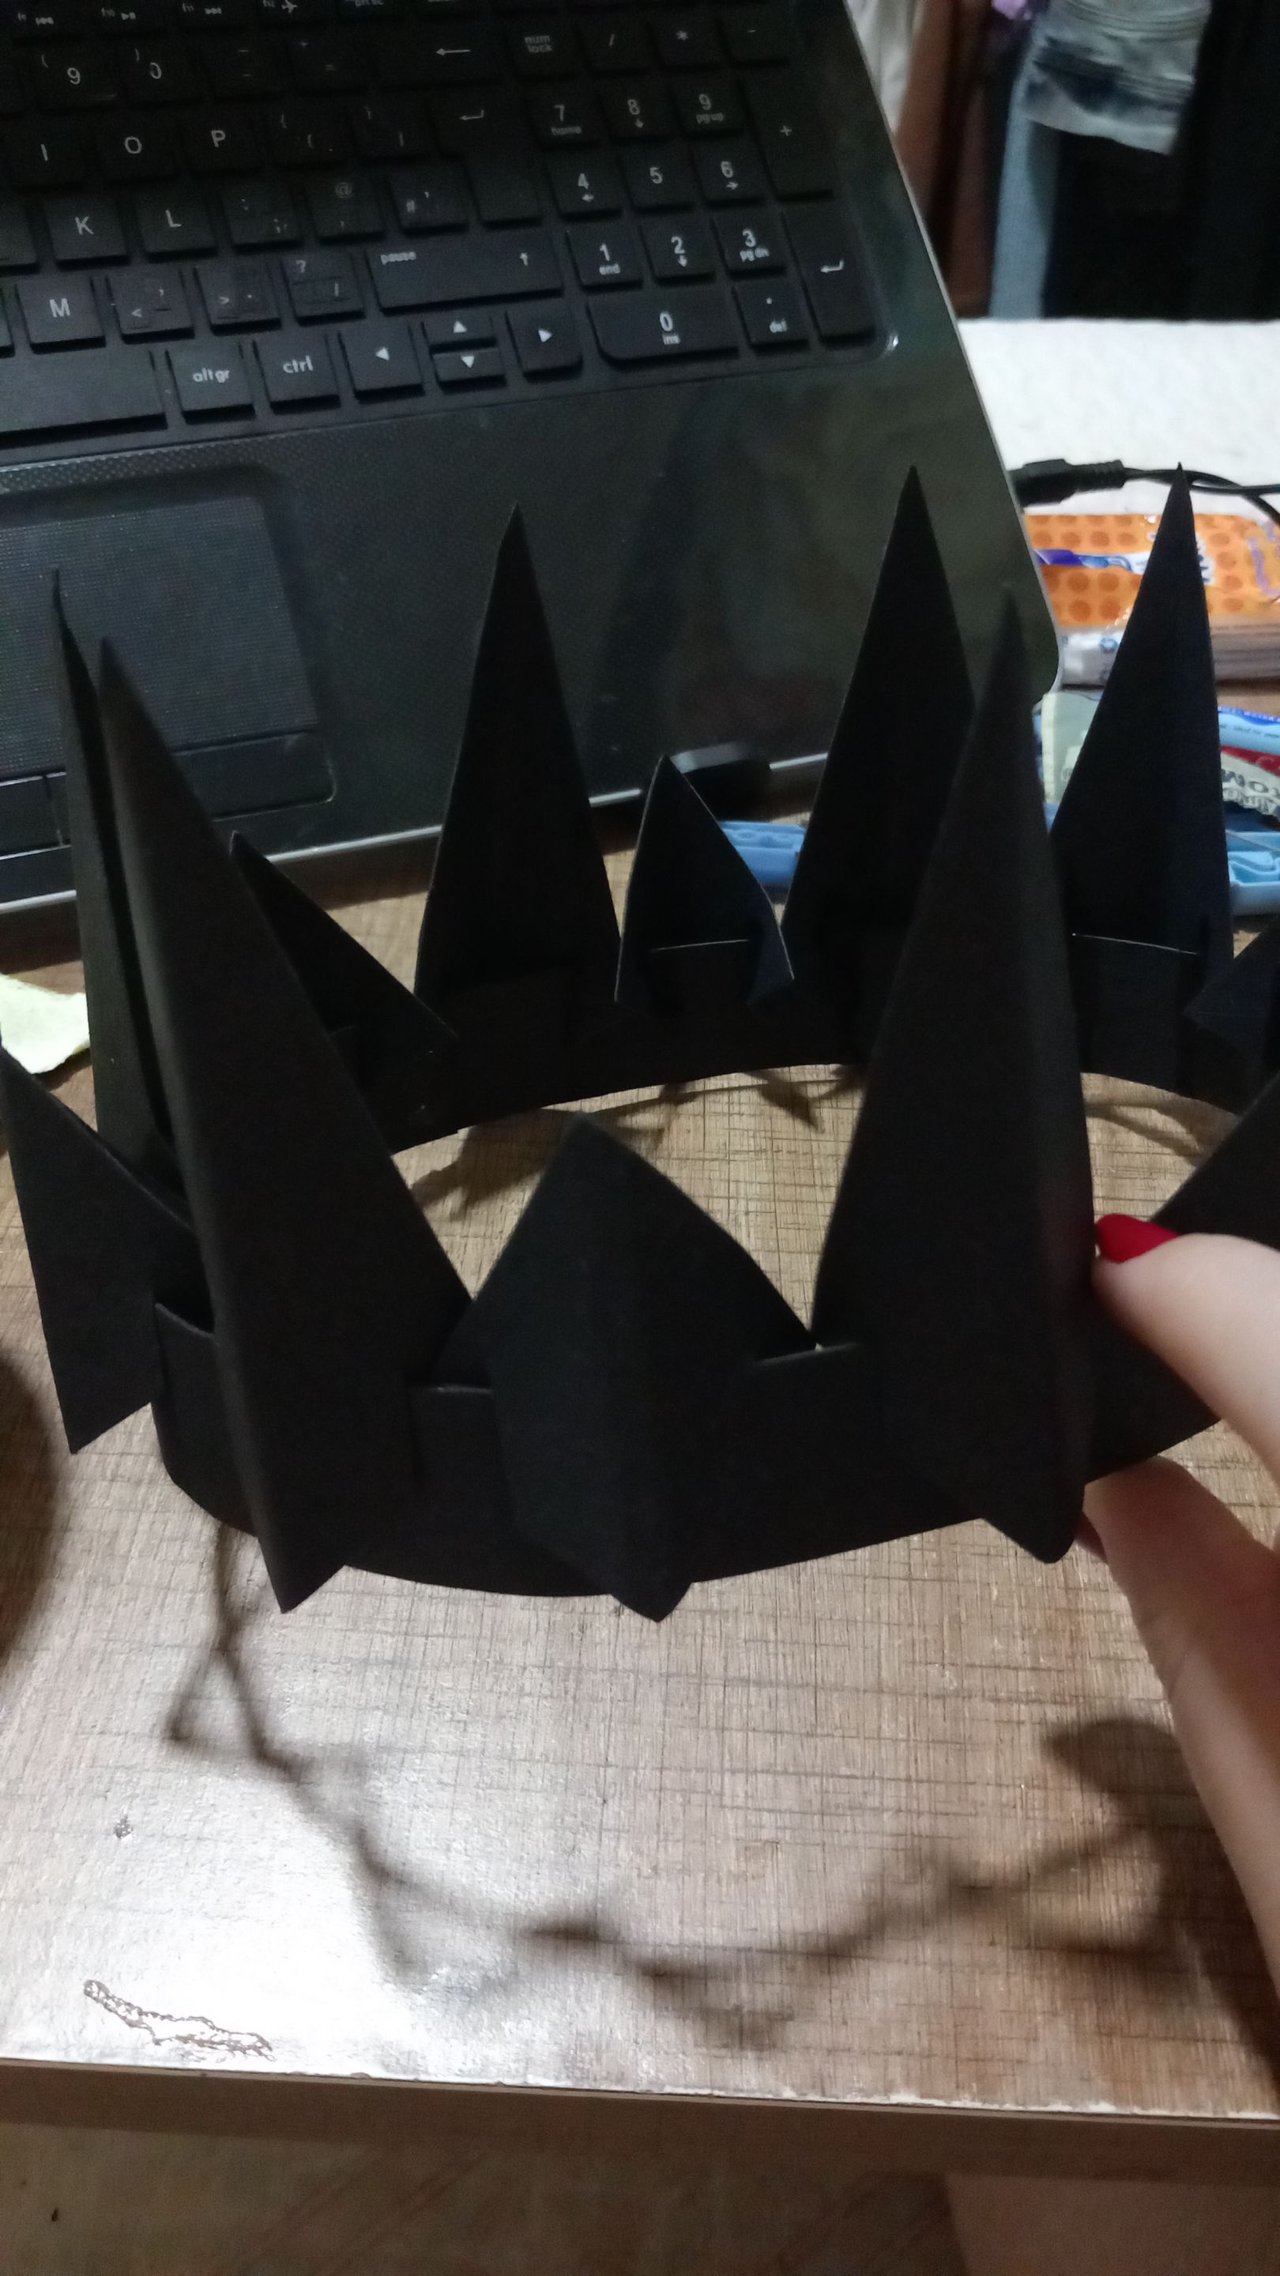
And the finished crown. As it was getting dark, I switched on the light in my room. My table is almost completely covered in glue. But that's just my handiwork. So my table is not dirty! There is only glue 🤣🤣🤣
After this was over, of course, I was in the mood. I opened my application, which also has a timer and can take photos without you touching it, and sat in front of the camera. Queen Elizabeth did not pose like this in her youth. I don't have the heart to put those photos here 😂
As a result, this event, the crown, cheered me up and distracted me for a while.
I had fun with this crown. Maybe if you do it too, be sure that although it is difficult, it is something that will be quite humorous especially in a friendly environment and literally to collect good memories.
Thank you for being with me until here. See you in the next post. Take care of yourself very carefully. The weather is getting bad again. And please remember that;
You are the only one of you.


Herkese merhabaa!!
Nasılsınız iyi misiniz? Umarım iyisinizdir. Ya da her zamanki ben gibi iyi olmaya çalışıyorsunuzdur.
Geçtiğimiz dönemlerde kendimi psikolojik olarak kötü hissettiğimi rahatlıkla söyleyebilirim. Bu yüzden ailem ve arkadaşlarım hele ki bir önceki postumda bahsettiğim prenses ellerinden geldiğince yardım etmeye çalıştılar.
Ve bende bu çabaları boş bırakmayı sevmeyen biriyim. Bu yüzdende kendimi, her ne kadar tamamıyla yapamasam da, el uğraşlarına verdim. Aslında bir sürü şey yaptım. Belki zamanla yaptıklarımı paylaşırım. Hatta yapımından çok yaptığım şeyle çekindiğim fotoğrafların absürtlüğü beni çok eğlendirdi. Bir süre aklımı başka şeylerden almamı sağladı.
Şimdi sıra size göstermek istediğim şey;
Nasıl da havalara girmişim ama değil mi? 😂🤣 İlk önce tacımız için malzemelerden bahsetmeliyim.
Su ve kahve ekstra 😂 Sadece içmek için. Su tüketmeyi unutmayın sakın. Su iyidir 😁
Malzemeler;
Renkli kağıt,
Maket bıçağı/makas,
Kalem,
Cetvel,
A4 Kağıt,
Yapıştırıcı,
Eğer maket bıçağı kullanacaksanız altına sert ve düz bir nesne.
Aslında çok fazla malzemeye gerek yok. Ama ben her zamanki gibi akıllılık (?) yapıp renkli kağıt yerine mukavva aldım... Hiç gerek yokmuş böyle işlere. Renkli kağıt da gayet iş görebilecek bir malzeme.
Şimdi ise tacı yapmaya başlamadan önce bir eksiğim olduğu için onu yapmaktan başlayacağım. Cetvel!
Açıkçası cetvel satın almak elimde yapmaktan çok daha zor geldi. 😂 Tam olarak depresyon olmasa da melankolik olduğum dönemlerde, bazılarının hak verebileceğini düşünüyorum, dışarı çıkmaktan hoşlanmıyorum. Bu yüzden kollarımı sıvadım ve cetvelimi yapmaya başladım.

Bunun için ise;
Kalem,
Mezura ve
Tercih ettiğiniz bir nesne
yeterli. Bundan tam olarak 3 ay önce sizinle bir mum geri dönüşüm postu paylaşmıştım. Mumlar için hâliyle fitiller gerekiyordu ve sipariş ettiğim fitillerin içerisinde kullanım talimatı gibi bilgilerin yazılı olduğu 2 tane kalın geri dönüştürülebilir kağıt bulunuyordu. Bu kağıtlardan birini kullanmakta herhangi bir sakınca yok diye düşündüm.
Bana 15 santimetrelik bir cetvel yeterliydi ve bu kağıt da tam olarak 15 cm idi.

Daha sonrasında ise yarımşar santimetre olarak kağıdı işaretlerdim ve tam da benden beklenilecek bir şekilde ilaç kutusunu kullanarak bu çizgileri uca kadar uzattım.
Evet cetvel hazır. Şimdi asıl görevime yanı tacıma başlayabilirim.
İlk önce işe tacın onu taç yapacak olan kısmı için taslak çıkarmaya geldi.

Bunun için ise kale-kağıt-cetvel üçlüsü yeterli.
Ölçüler bu şekilde. Sadece yukarıdaki malzemeleri gösterdiğim fotoğrafta daha rahat görebileceğiniz iskeleti çizmek önemli. Yoksa uç noktası ve merkez dengesiz olabilir.
Taslakları kesip çıkardıktan sonra ise mukavvama çizmeye başladım. Bu gördüğünüz iki parçadan tam olarak 10'ar tane toplamda 20 tane gerekli. Benim kullandığım mukavvada hepsine fazla fazla yetti. Hatta 2 tane 50x75 mukavvadan tam olarak 3 adet taç çıkabilir. Sanırım kağıt olarak da 4 ya da 5 tane yeterli olacaktır 1 adet taç için.

Yine bana rehberlik etmesi için düz çizgimi çizdikten sonra mukavvama taslağın dışını takıp ederek 10'ar tane çizdim.

Bir de kendi kafa ölçüme göre düz bir şerit de kestim. Bu şeridin kalınlığı 3 santimetre.
Kesim işlemi bittiğinde asıl uğraş diyebileceğim kısım başladı. Yapıştırma ve kurumasını bekleme. Bu tarz şeylerde çok sabırsız olabiliyorum... Hatta bir ara saç kurutma makinası ile yapıştırıcıları kuruttum ama sonra elektrik faturası aklıma geldi ve hemen kapattım. 🙃 Evet, çok büyük bir etkisi olmaz fakat neden ekstra ödeyeyim ki? Beklemeyi tercih ederim.
Bir de ellerim tekrar titremeye başlayınca ne olur ne olmaz diye maket bıçağını kenara bırakıp makas aldım. Kesiklerle uğraşmak istemedim.
Çembere daha iyi tutunabilmesi için ve şahsen daha güzel olduğunu düşündüğüm bir görüntü için taslakta görebileceğiniz iç kısmında bulunan ölçülere göre işaretledim ve kestim. Sonrasında ise bu 20 parçayı tam olarak ikiye katlamadan kıvrım verdim ki çembere daha iyi otursun.
Kafamın ölçüsüne göre kestiğim şeridi yapıştırmaklar devam ettim. Tabi elimde kuruyana kadar tutmak istemediğim için mandal yardımı ile sabitledim.


Kağıt için su bazlı yapıştırıcı kullanmak çok daha mantıklı göründü tutkal ya da sıcak silikondansa. Tabii kağıt için sıcak silikon biraz daha mantıklı bir seçim olabilir. Daha iyi tutabilmesi için.
Bu da kuruduktan sonra ki biraz zaman aldı, daha da zaman alacak olan kısma geçtim. 20 parçayı çembere yerleştirmek!
Bu kadar sıkıcı olabileceğini düşünmemiştim. Aynı anda 2 ya da 3 iş yapmazsam odaklanamıyorum, evet, ama bu iş yaparken odak merkezimi başka bir göreve çekmeyi sevdiğim anlamına gelmiyor bu. Bende bekleme sürelerini biraz daha keyifli kılabilmek için bir film açtım. Tahmin edebilir misiniz ne olduğunu?
Yeni çıkmış sayılabilecek olan The Deep Web Murdershow (Deep Web Cinayet Şovu). 😁 Fena değildi. Daha iyi olabilir miydi? Belki... Neyse taca geri döneyim 😂
Diğer parçaları da yerlerinden oynatmasın diye her seferinde en fazla iki tane yapıştırabildim ilk parçadan sonra. İlki kuruduktan sonra bir tane sağına bir tane de soluna olmak üzere 2 tane.

Tabi bu yapıştırdığım parçaların sırası bir büyük bir tane de küçük olacak şekildeydi. Sağdaki fotoğrafta da görebileceğiniz gibi.
Filmin sonuna doğru da bu işlemlerin hepsi bitti. Neyse ki. 💆

Ve tacın bitmiş hâli. Hava artık karardığı için odamın ışığını açtım. Masamın neredeyse tamamı yapıştırıcı oldu. Ama bu benim el becerim ile ilgili. Yani masam kirli değil! Sadece yapıştırıcı var 🤣🤣
Bu bittikten sonra ise ben havalara girdim tabii ki. Zamanlayıcısı da olan ve sürekli siz dokunmadan fotoğraf çekebilen uygulamamı açtım ve oturdum kameranın karşısına. Kraliçe Elizabeth gençliğinde bu tarz poz vermemiştir. Daha o fotoğrafları buraya koyacak yürek yok bende 😂
Sonuç olarak bu etkinlik, taç bir süre de olsa bana moral oldu ve kafamı dağıttı.
Ben bu taç ile eğlendim. Belki siz de yaparsanız emin olun zor olsa da özellikle arkadaş ortamında esprisi oldukça geçecek bir şey ve tam anlamıyla güzel anılar biriktirmek için.
Buraya kadar benimle olduğunuz için teşekkür ederim. Bir sonraki postta görüşmek üzere. Kendinize çok dikkat edin. Tekrar hastalık havaları geldi. Ve lütfen unutmayın;
Bu dünyada sizden başka bir tane daha yok.
Editing was done using Adobe Express/free version.
Editler Adobe Express/ücretsiz üzerinden yapılmıştır.
Bütün fotoğraflar aksini iddia etmediğim sürece benim tarafımdan, akıllı telefonumla çekilmiştir.
All photos are taken by me, with my smart phone unless otherwise stated.
All of my content is written in Turkish first and then with the help of translators and dictionaries below translated in English.
https://www.seslisozluk.net
https://www.deepl.com/translator
P.S. If you know English AND Turkish, I do that too... If you see a translation discrepancy that was on purpose. I did think this is as proper as I could do. Because there are many differences between these languages.
Not: Hem Türkçe hem de İngilizce biliyorsanız, ben de biliyorum... Eğer çeviri farklılığı görürseniz bunun bilinçli olduğunu bilin lütfen. Bunu yapabileceğim en uygun şekilde yaptığımı düşünüyorum. Çünkü bu iki dil arasında çok fazla fark var.
The crown looks perfect, yes, maybe Queen Elizabeth has a lot of photos, but she didn't make her own crown. You are more successful than her :D
I am looking at the screen with puppy eyes
I try my best 💪
!LUV
!LADY
View or trade
LOHtokens.@pravesh0, you successfully shared 0.1000 LOH with @bemier and you earned 0.1000 LOH as tips. (2/4 calls)
Use !LADY command to share LOH! More details available in this post.
@bemier, @pravesh0(9/10) sent LUV. | connect | community | HiveWiki | NFT | <>< daily
! help(no space) to get help on Hive. InfoThank you so much!
This crown is so beautiful, you've done a great job with your creativity. Thanks for sharing @bemier
Thank you so much for your support. 💫
Congratulations @bemier! You have completed the following achievement on the Hive blockchain And have been rewarded with New badge(s)
Your next target is to reach 6000 upvotes.
You can view your badges on your board and compare yourself to others in the Ranking
If you no longer want to receive notifications, reply to this comment with the word
STOPCheck out our last posts: