Hola a todos... 🐱🐾💕
Hola a mis queridos Hiver y a la querida comunidad de artistas #HiveDiy, esperando que tengan grandiosos días muy productivos, llenos de ideas, y sobre todo bendecidos, con salud, amor y mucha prosperidad. Como siempre me encuentro por acá, muy complacida y emocionada, para mostrarles mi trabajo, que esta hecho con mucho amor, y especialmente para ustedes.
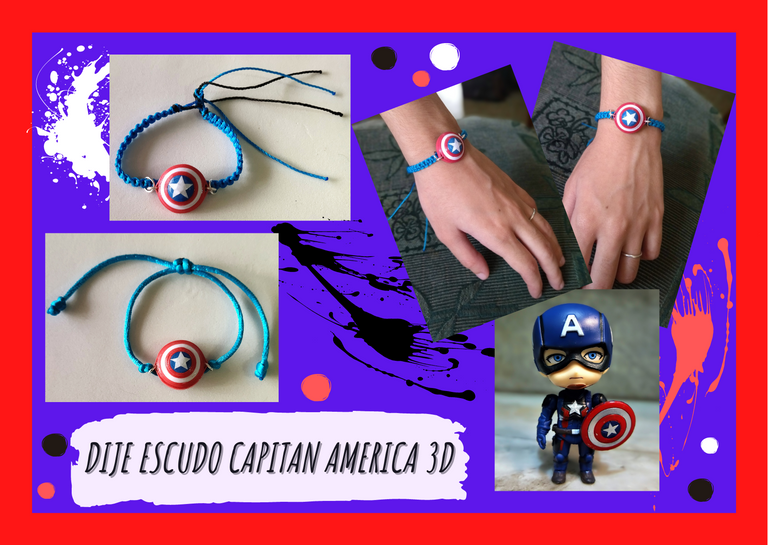
Hoy les traigo a los grandes fans de los Avengers, un dije del escudo del "Capitán América", para ser adaptado a la pulsera de tu preferencia, y sobre todo muy fácil de realizar.😊💙
🐾🐾🐾
Hello everyone... 🐱🐾💕
Hello to my dear Hiver and the dear community of artists #HiveDiy, I hope you have great and productive days, full of ideas, and above all blessed with health, love and prosperity. As always I am here, very pleased and excited to show you my work, which is made with love, and especially for you.
Today I bring to the great fans of the Avengers, a charm of the shield of "Captain America", to be adapted to the bracelet of your choice, and above all very easy to make. 😊💙

Comencemos:😃
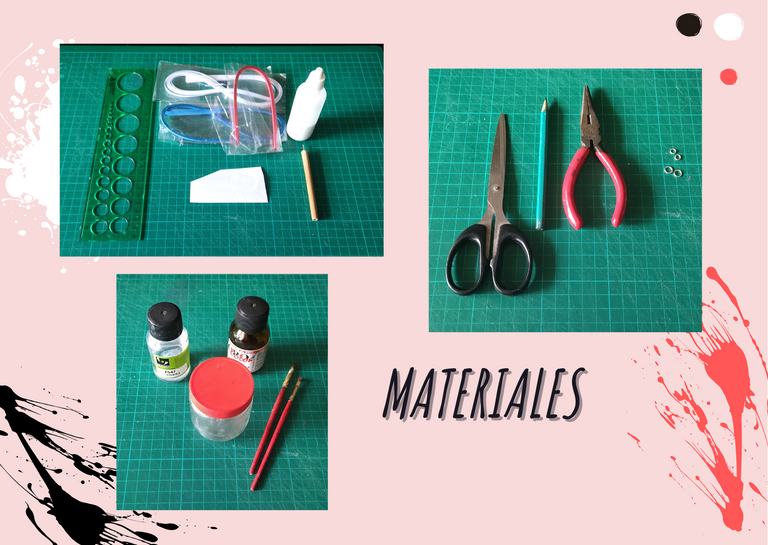
Materiales:📏✏️✂️
•Cintas de quilling de 3 milímetros de ancho, azul, roja y blanca.
• Trozo de papel blanco.
• Aguja para quilling.
• Regla con diversas medidas de circunferencia.
• Pega blanca.
• Tijera.
• Lápiz.
• Pinceles.
• Alicate punta fina.
• Argollas pequeñas y medianas de bisutería.
• Resina Artística.
• Solvente X
• Frasco de vidrio.
🐾🐾🐾
Let's get started: 😃
Materials:📏✏️✂️
- 3 millimeters wide quilling ribbons, blue, red and white.
- Piece of white paper.
- Quilling needle.
- Ruler with different circumference measures.
- White glue.
- Scissors.
- Pencil.
- Brushes.
- Fine-nosed pliers.
- Small and medium size jewelry rings.
- Artistic resin.
- Solvent X
- Glass flask.
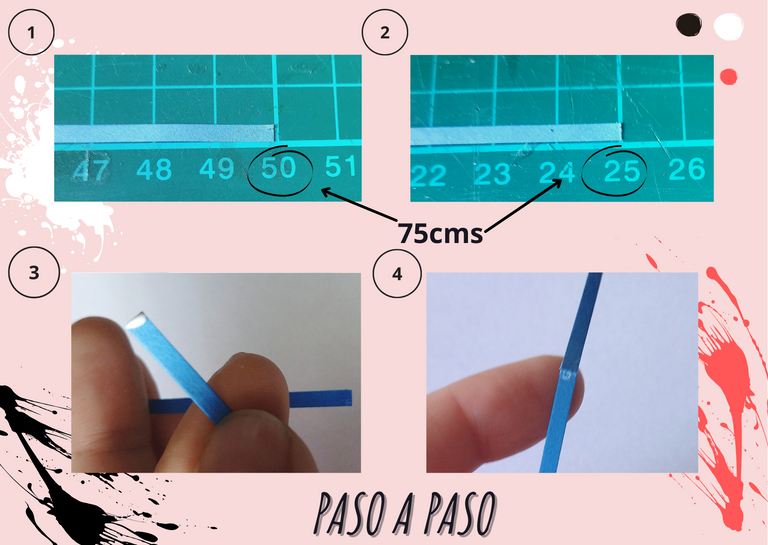
Paso a paso:💖
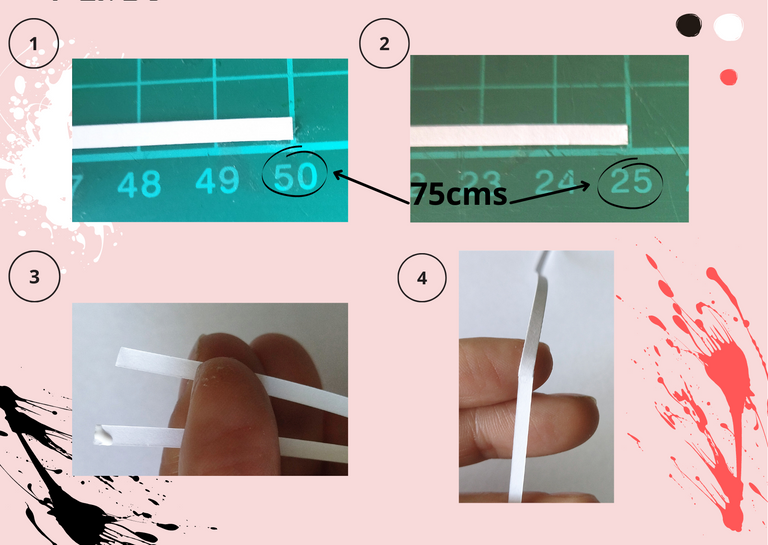
• Tomamos el quiiling azul de 3 milímetros de ancho. En mi caso tengo tiras que miden 50 cms de largo, como requiero de una tira de 75cm cortamos 25 cm de otra tira de 50 cms, las unimos ambas con un punto de pega blanca, esperamos que seque, y de esta manera completamos los 75cm necesarios (reservamos).
🐾🐾🐾
Step by step:💖
- We take the blue quiiling 3 millimeters wide. In my case I have strips that measure 50 cm long, as I require a strip of 75 cm, we cut 25 cm from another strip of 50 cm, we join them both with a white glue dot, we wait for it to dry, and in this way we complete the 75 cm needed (we reserve).
• Ahora tomamos cinta roja de 3mm de ancho vamos a necesitar una tira de 50cms, para esta ya tengo la tira del largo necesario, vamos reservando cada tira de las medidas que les voy dando en orden.
🐾🐾🐾
- Now we take red ribbon of 3mm wide we will need a strip of 50cms, for this I already have the strip of the necessary length, let's reserve each strip of the measures that I am giving you in order.
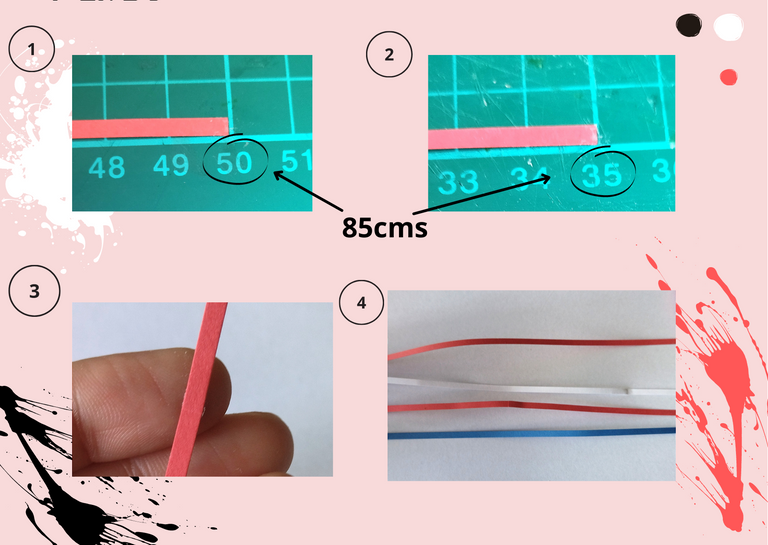
• Tomamos el quiiling blanco de 3mm de esta vamos a necesitar también 75cms, repetimos el mismo proceso que con la azul, cortamos 25cms de una tira de 50cms y unimos con pega hasta que selle, recuerden vamos reservando las tiras en el orden que les voy señalando.
🐾🐾🐾
- We take the 3mm white quiiling of this we will also need 75cms, repeat the same process as with the blue, cut 25cms of a strip of 50cms and join with glue until it seals, remember we are reserving the strips in the order that I'm pointing out.
• Ahora tomamos nuevamente otras tiras de quilling rojo de 3mm de ancho, en esta oportunidad necesitamos 85cms de largo, de una tira de 50cms, corte 35cms y uní con pega para completar los 85cms requeridos. Ya tenemos 4 tiras a usar de diferentes medidas, en un orden establecido.
🐾🐾🐾
- Now we take again other strips of red quilling 3mm wide, this time we need 85cms long, from a strip of 50cms, cut 35cms and joined with glue to complete the 85cms required. We now have 4 strips to use of different sizes, in an established order.
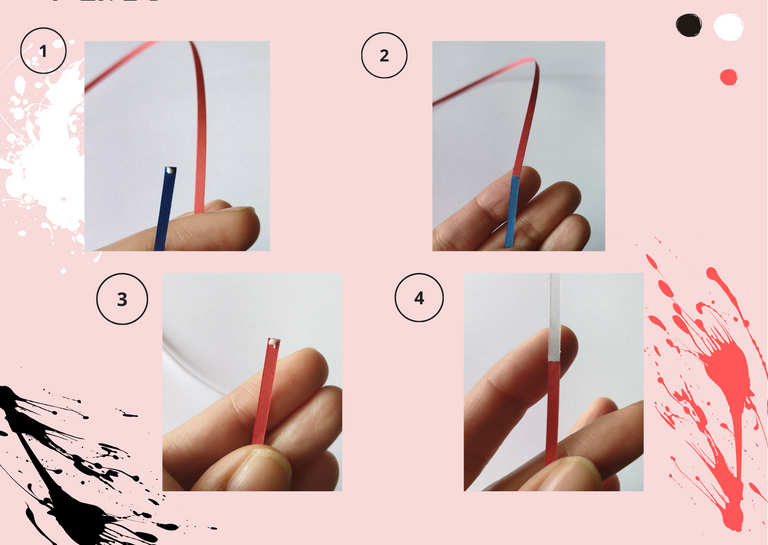
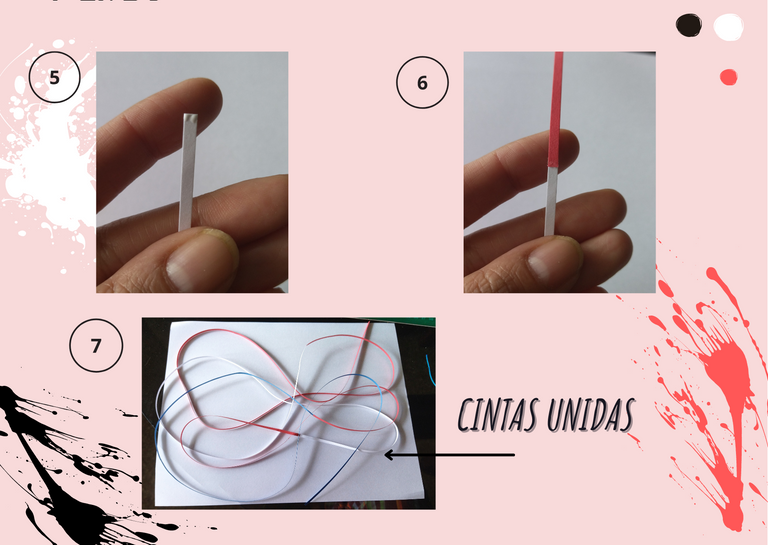
• Ya tenemos nuestras 4 tiras, una azul de 75cms de largo, una roja de 50cms, una blanca de 75cms y por último otra roja de 85cms, procedemos a unirlas en orden con un toque de pega blanca, de esta manera tenemos las 4 tiras para formar un círculo cerrado con ellas unidas.
🐾🐾🐾
- We already have our 4 strips, a blue one of 75cms long, a red one of 50cms, a white one of 75cms and finally another red one of 85cms, we proceed to join them in order with a touch of white glue, in this way we have the 4 strips to form a closed circle with them joined together.
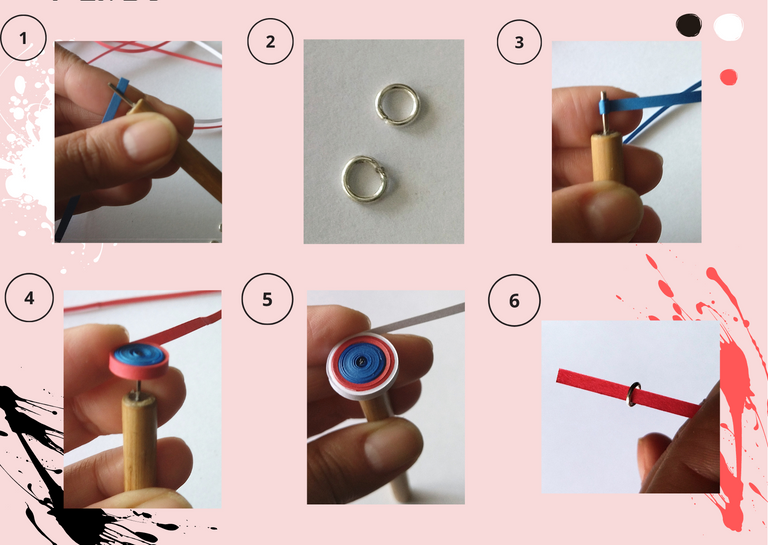
• Tomamos la aguja para quilling y procedemos a meter la punta de la cinta azul en la misma, comenzamos a enrollar, (colocamos las argollas pequeñas de bisutería a la mano ya que las vamos a necesitar), continuamos el proceso de enrollar toda nuestra cinta, cuando estemos por finalizar con la última parte de la cinta roja faltando aproximadamente unas tres vueltas, colocamos las argollas de bisutería, primero una, centramos, y colocamos la otra, si te es más cómodo saca con mucho cuidado la pieza de la aguja y termina de dar las vueltas con la ayuda de tus dedos, metiendo el extremo de la cinta en cada argolla hasta llegar al final, colocamos un punto de pega y sellamos. Ya tenemos un círculo cerrado con sus argollas ajustadas y centradas a los lados.
🐾🐾🐾
- We take the quilling needle and proceed to put the tip of the blue ribbon in it, we begin to roll, (we place the small costume jewelry rings at hand because we will need them), we continue the process of rolling all our ribbon, when we are about to finish with the last part of the red ribbon missing about three laps, we place the bijouterie rings, first one, center it, and place the other, if it is more comfortable for you, take the piece out of the needle very carefully and finish the turns with the help of your fingers, putting the end of the ribbon in each ring until you reach the end, place a glue stitch and seal it. Now we have a closed circle with its rings adjusted and centered on the sides.
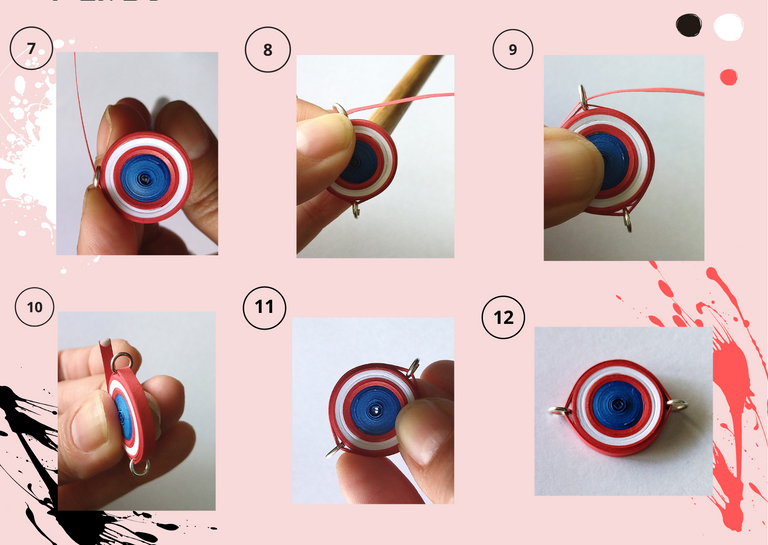
• Llegado a este punto vamos a darle forma de escudo 3D a nuestro circulo cerrado, con la ayuda de nuestros dedos pulgares y siendo muy cuidadosos, sacamos un poco las cintas de la pieza dando una forma redondeada, medimos con una regla y tratamos que mida aproximadamente 1cms de altura.
• Al darle la altura a nuestro escudo procedemos a colocar pega en su parte trasera con ayuda de un pincel para que no se mueva la forma que realizamos. Dejamos secar.
🐾🐾🐾
- At this point we are going to give shape of 3D shield to our closed circle, with the help of our thumbs and being very careful, we take a little bit the ribbons of the piece giving a rounded shape, we measure with a ruler and try to measure approximately 1cms of height.
- When we give the height to our shield we proceed to place glue on the back with the help of a brush so that the shape we made does not move. Let it dry.
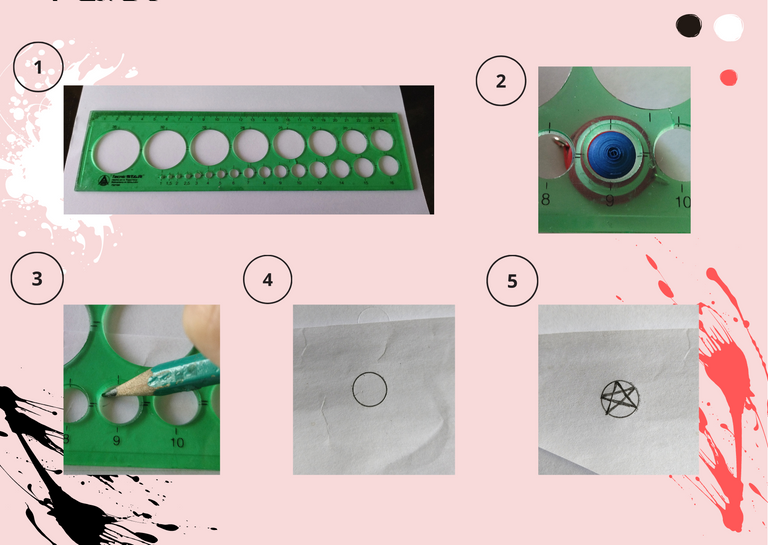
• Vamos a realizar la estrella, tomamos la regla y calculamos la circunferencia del círculo azul del medio, en este caso tiene una medida de aproximadamente 9cms de circunferencia, tomamos el trozo de papel blanco que teníamos reservado y marcamos el círculo de 9cms en la hoja con un lápiz, ahora pintamos nuestra estrella y luego recortamos con la tijera, vamos a utilizar por la parte de atrás donde no se vean las líneas trazadas con el lápiz. Tenemos lista nuestra estrella.
🐾🐾🐾
- We are going to make the star, we take the ruler and calculate the circumference of the blue circle in the middle, in this case it has a measure of approximately 9cms of circumference, we take the piece of white paper that we had reserved and mark the circle of 9cms on the sheet with a pencil, now we paint our star and then cut with the scissors, we will use the back where the lines drawn with the pencil are not seen. Our star is ready.
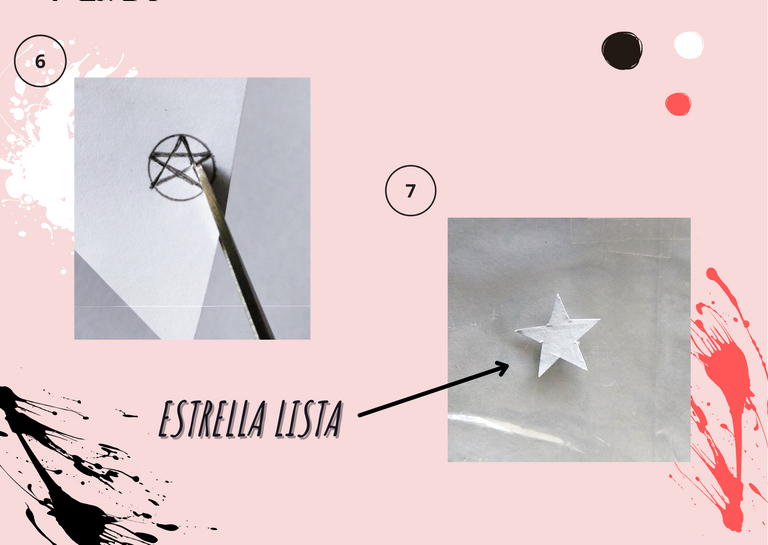
• Ahora tomamos nuestro escudo y vamos a pegar la estrella justo en el centro del círculo azul del mismo, ponemos un poco de pega en el medio y pegamos, dejamos que seque.
🐾🐾🐾
- Now we take our shield and we are going to glue the star right in the center of the blue circle of the shield, put some glue in the middle and glue, let it dry.
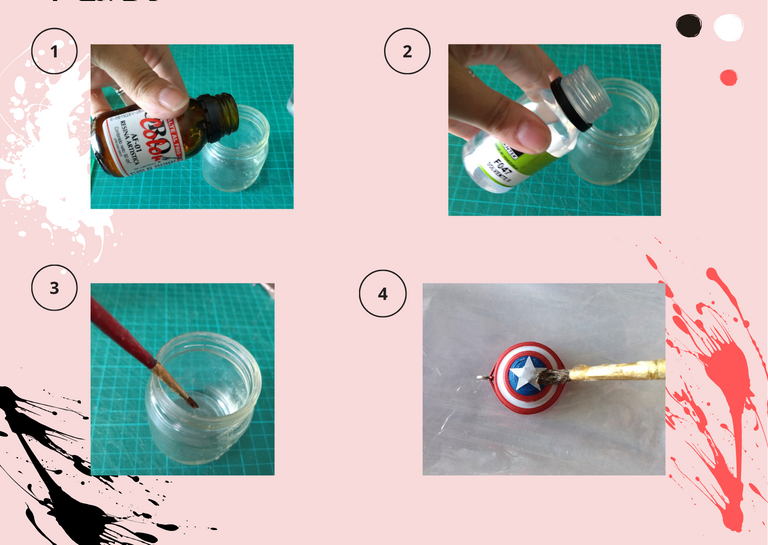
• Vamos a colocar la protección a nuestra pieza, tomamos nuestro frasco de vidrio colocamos una parte de resina artística y otra de solvente x, mezclamos y aplicamos a nuestro escudo por la parte delantera y trasera, dejamos secar unas horas, o preferiblemente de un día para otro.
🐾🐾🐾
- We are going to place the protection to our piece, we take our glass jar and place a part of artistic resin and another part of solvent x, mix and apply to our shield on the front and back, let it dry for a few hours, or preferably from one day to another.
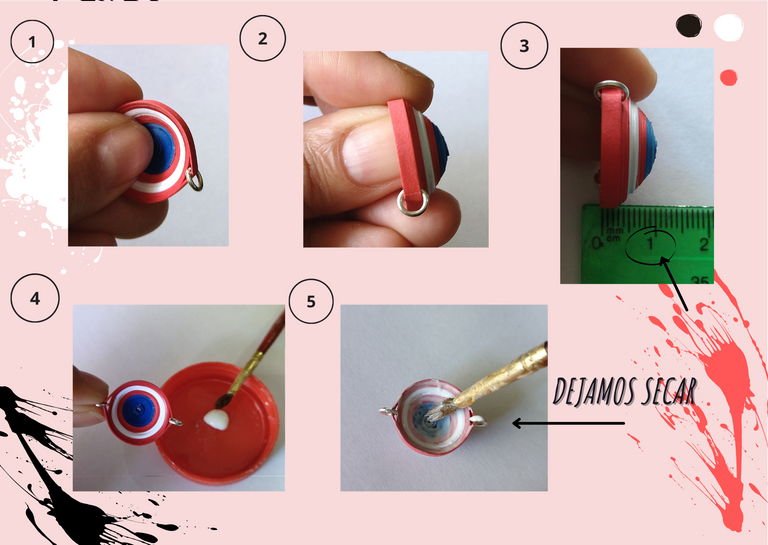
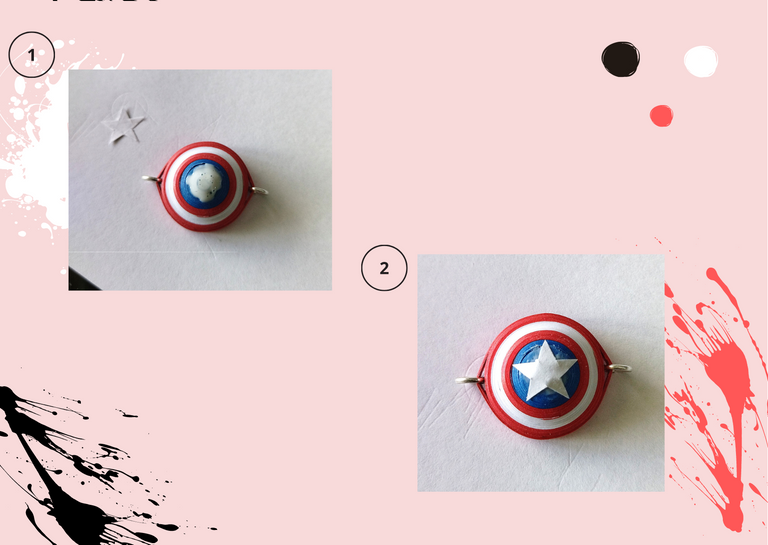
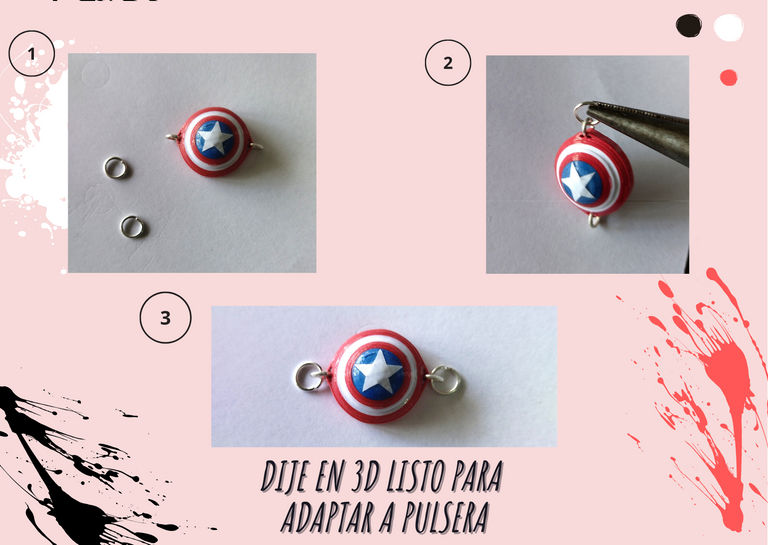
• Ya tenemos nuestro escudo seco, procedemos entonces a colocar las dos argollas medianas de bisutería, entre las dos pequeñas que ya habíamos colocado, esto lo haremos con la ayuda de nuestro alicate punta fina. Y listo ya tenemos nuestro dije del escudo del capitán América en 3D, listo para adaptar a la pulsera de nuestra preferencia.
🐾🐾🐾
- Now that we have our shield dry, we proceed then to place the two medium rings of costume jewelry, between the two small ones that we had already placed, we will do this with the help of our pliers fine tip. And ready we have our Captain America 3D, shield charm ready to adapt to the bracelet of our preference.
Resultado Final:💕
🐾🐾🐾
Final Result:💕

- En mi caso elaboré una pulsera de nudo plano para colocar el escudo, lamentablemente no puedo explicarles el paso a paso para elaborar la pulsera, ya que no cuento con los medios, ni conocimientos necesarios para elaborar un video tutorial en la plataforma, más adelante les prometo haré el esfuerzo de comprar los accesorios que necesito y aprenderé a realizar los tutoriales mediante videos para que mis creaciones sean muchísimos más fáciles de comprender, por lo pronto les ofrezco lo que humildemente está en mis manos. Provisionalmente pueden buscar en las plataformas o redes existentes videos tutoriales de como hacer pulseras hay muchísimos y son hermosas.
Tips:💡
- Las dos últimas argollas se las coloque pensando en el tipo de pulsera que le iba a colocar a mi dije, como les mencioné antes fue una pulsera tejida de nudo plano de dos colores, pero bien sea el caso pueden decidir colocar las argollas o no.
- Podemos adaptar nuestro dije a la pulsera de nuestra preferencia, como ven en el resultado final también tomé un trozo de hilo cola de ratón, y con solo un trozo realicé a los lados de la argolla dos nudos sencillos, en el medio un fácil nudo corredizo y al final de ambos extremos del hilo dos nudos más, para darle una terminación delicada. Podemos embellecer nuestras creaciones de una manera sencilla y sin complicarnos mucho. Solo deja volar tu imaginación.
🐾🐾🐾
- In my case I made a flat knot bracelet to place the shield, unfortunately I can not explain the step by step to develop the bracelet, because I do not have the means or knowledge necessary to develop a video tutorial on the platform, later I promise I will make the effort to buy the accessories I need and learn to make tutorials through videos for my creations, are much easier to understand, for now I offer what is humbly in my hands. Provisionally you can search on existing platforms or networks for video tutorials on how to make bracelets there are many and they are beautiful.
Tips:💡
- The last two rings were placed thinking about the type of bracelet that I was going to place my pendant, as I mentioned before it was a flat knot bracelet woven in two colors, but either way you can decide to place the rings or not.
- We can adapt our pendant to the bracelet of our preference, as you can see in the final result I also took a piece of mouse tail thread, and with only one piece I made two simple knots on the sides of the ring, in the middle an easy slip knot and at the end of both ends of the thread two more knots, to give it a delicate finish. We can embellish our creations in a simple and uncomplicated way. Just let your imagination fly.
🐾🐾🐾
Blooper:😆
Como en otras oportunidades les he mostrado y comentado en mis post, tengo una hermosa asistente michi🐱 en casita, y en esta ocasión no podía faltar su cooperación en mis momentos de trabajo, como verán queriéndome prestar su pata🐾 (apoyo), aterrizo en el cuttimat, para morder la cinta de quilling que tenia en la mano, ocasionando problemas tecnicos. Nunca puede faltar en nuestras vidas un momento adorable y gracioso que nos llene la vida de sonrisas y felicidad, para mi lo es, cada vez que mi asistente michi me quiere ayudar. Jajajajaja... 😅💕
🐾🐾🐾
Blooper:😆
As in other opportunities I have shown you and commented in my posts, I have a beautiful assistant michi🐱 at home, and this time I could not miss her cooperation in my work moments, as you will see wanting to lend me her paw🐾 (support), she landed on the cuttimat, to bite the quilling tape I had in my hand causing technical problems. We can never miss in our lives an adorable and funny moment that fills our lives with smiles and happiness, for me it is, every time my assistant Michi wants to help me. Hahahahahaha... 😅💕

¿Que les pareció, les gustó?
Espero que sí, que les haya gustado mi explicación, procedimiento y fotos, los hice con mucho cariño por y para ustedes.
"Deja salir esa musa que te inspira, y deja volar tu imaginación".
Gracias a todos, nos vemos en la próxima. 🐾🐱💕
🐾🐾🐾
What did you think, did you like it?
I hope you did, I hope you liked my explanation, procedure and photos, I made them with love for you.
"Let out that muse that inspires you, and let your imagination fly".
Thank you all, see you next time. 🐾🐱💕
🐾🐾🐾
Most of the photos used in this post are of my own authorship and have been taken on my personal cell phone a Redmi 9T and edited Canva One of the photos added to the cover image was taken from pixabay Image captain america cover Source Dividers and banner made by me in Paint Tool Sai Translated with the help of DeepL


!discovery 30
This post was shared and voted inside the discord by the curators team of discovery-it
Join our community! hive-193212
Discovery-it is also a Witness, vote for us here
Delegate to us for passive income. Check our 80% fee-back Program
Muchísimas gracias, por tomarme en cuenta... De verdad gracias.💕
Quedo muy bonito! Me gustaria hacer uno de flash 🤩
Gracias corazón. Me alegra que te haya gustado. Hay mil ideas para hacer, estoy segura que hay uno de Flash, vamos a buscar, créeme que te lo hago si esta en mis manos. Lo importante es buscar ideas. Bendiciones, gracias por pasar por aqui, a la orden para lo que necesites....
demasiado brutal, otra vez me sorprendes con algo tan genial!
Que lindo corazón. Para mi tu eres, que digo brutal, Me encanta tu trabajo. En mi caso no hay competencia contigo, créeme...
Saludos amiga 🤗🤗 excelente publicación, con vibra positiva, se nota en tus palabras la alegría que sentías al escribir.
Quedó hermosa la pulcera felicidades! 😊
Gracias cariño, estoy tratando de hacer lo que humildemente este en mis posibilidades, próximamente tratare de dar mas. Por aquí a la orden cualquier duda. Gracias otra vez. 💕
Excelente amiga.❤️😘
Hola amiga, hermosa creación, me gustó mucho.
Gracias mi corazón, Muy complacida de que te haya gustado. Es algo sencillo, pero echo con amor y con ganas de que Uds. puedan también hacerlo. Besos y bendiciones. Por acá a la orden.... 💖
Muy hermoso y creativo, me encantó esta pulserita. Increíble éste trabajo con cintas!
Gracias cariño. Que bueno que te haya gustado. El trabajo con quilling es bastante amplio, con paciencia y dedicación puedes crear cosas inimaginables, por ello me encanta trabajarlo. 💕
Congratulations @dayadam! You have completed the following achievement on the Hive blockchain and have been rewarded with new badge(s):
Your next target is to reach 900 upvotes.
You can view your badges on your board and compare yourself to others in the Ranking
If you no longer want to receive notifications, reply to this comment with the word
STOPCheck out the last post from @hivebuzz:
Support the HiveBuzz project. Vote for our proposal!
The rewards earned on this comment will go directly to the person sharing the post on Twitter as long as they are registered with @poshtoken. Sign up at https://hiveposh.com.