![1644535732146[1].jpg](https://images.hive.blog/768x0/https://files.peakd.com/file/peakd-hive/dayanita2/AKJ2YK2muYu7pAjvSUr9iGTXx554QgnwM2iRdXt1fJecEJaFE6Ba9Y481CjJVae.jpg)
Feliz Viernes mi querid@s amig@s!
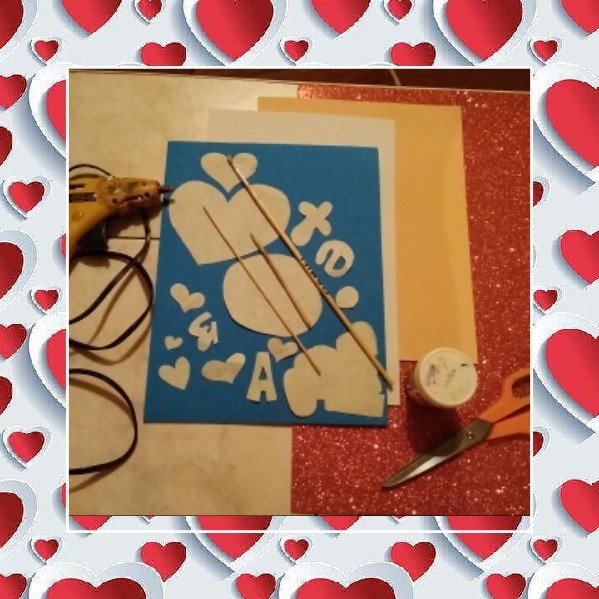
Se acerca el "Día de San Valentín" o "Día del amor"👩❤️👩, como le decimos en algunos países muchos enamorados esperan este 14 de Febrero para obsequiar detalles a la persona amada, aunque siempre he dicho el amor se celebra a diario pero en esta fecha no perdemos la oportunidad de ser detallistas y por eso hoy les traigo este bello "Toppers y grita Te Amo" a ser que esta a tu lado y te hace feliz 😍.
Por acá te invito a realizarlo es fácil, rápido y no necesitas gran cantidad de materiales así que manos a la obra vamos a nuestro paso a paso, comenzaremos buscando los siguientes materiales:
- Foami(goma eva) de color piel, blanco,azul,rojo,también usaremos escarchado rojo
- Pintura al frío marrón coco
- Pistola de silicón
- 1 barrita de silicón
- Marcador fino negro
- Palito de altura o para hacer pinchos
- Plancha o un sartén
Happy Friday my dear friends!
"Valentine's Day" or "Day of Love"👩❤️👩 is coming, as we say in some countries many lovers wait for this February 14 to give details to the loved one, although I have always said love is celebrated daily but on this date we do not miss the opportunity to be retailers and that is why today I bring you this beautiful "Toppers and shout I Love You" unless it is by your side and makes you happy 😍.
Here I invite you to do it, it is easy, fast and you do not need a large amount of materials, so let's get to work, let's go to our step by step, we will start looking for the following materials:
- Foami (rubber eva) skin color, white, blue, red, we will also use frosted red
- Coconut brown paint
- Silicone gun
- 1 silicone stick
- Fine to the cold black marker
- Height stick or to make skewers
- Iron or a frying pan
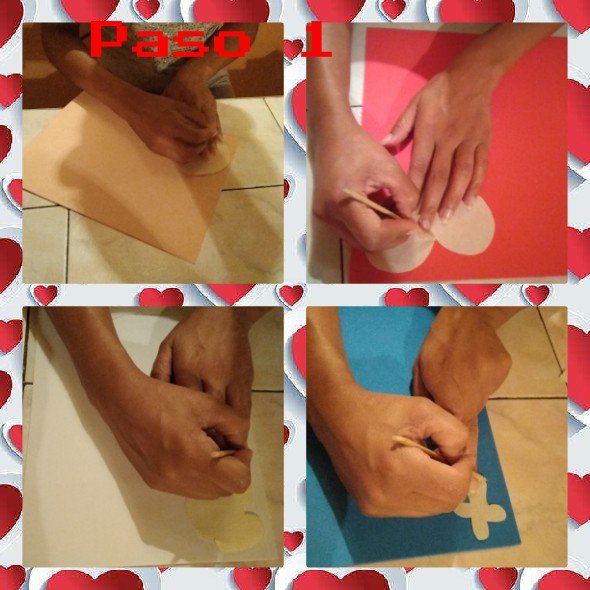
Paso 1
Tomamos nuestro foami(goma eva) de cada uno de los colores mencionados y con apoyo de nuestros patrones marcamos usando un palito de altura.
Un pequeño tips : cuando llegues al escarchado marca tu patrón alreves pues si lo marcas por el lado escarchado no lo podrás apreciar muy bien o corres el riesgo que se caiga la escarcha.
Step 1
We take our foami (rubber eva) of each of the colors mentioned and with the support of our patterns we mark using a height stick.
A little tip: when you get to the frosty mark your pattern upside down because if you mark it on the frosty side you will not be able to appreciate it very well or you run the risk of the frost falling off.
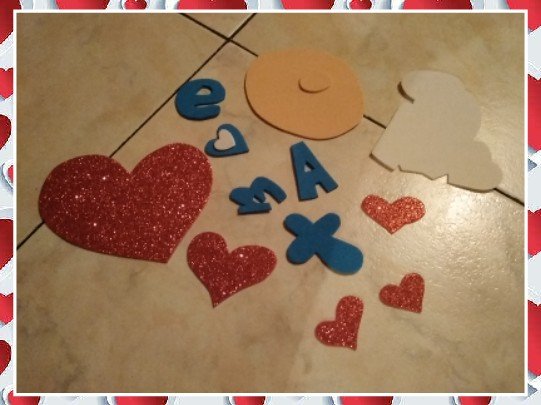
Paso 2
Vamos a recortar con mucho cuidado ya que es muy importante un buen recortado para que nuestro trabajo quede impecable y se vea bonito
Step 2
We are going to cut very carefully since a good cut is very important so that our work is impeccable and looks beautiful

Paso 3
Al tener nuestros patrones listos tomamos el círculo que es la nariz de nuestra cara usaremos una plancha o sartén en mi caso use el sartén lo calente un poco y coloque la narizita de mi figura y deje que inflara un poquito y lo retire,me escanta inflar mis piezas de foami(goma eva) pues le da un toque tridimensional y un tanto real.
Al realizar este paso tengan cuidado de no quemarse ya que estamos manipulando la pieza caliente.
Observen la imagen👇
Step 3
When we have our patterns ready, we take the circle that is the nose of our face. We will use an iron or pan. In my case, I use the pan, heat it a little and place the little nose of my figure and let it inflate a little and remove it, I love to inflate. my pieces of foami (rubber eva) because it gives it a three-dimensional and somewhat real touch.
When performing this step, be careful not to burn yourself since we are handling the hot part.
Look at the image👇
![IMG_20220209_203338[1].jpg](https://images.hive.blog/768x0/https://files.peakd.com/file/peakd-hive/dayanita2/23vho8CviaakshsAsFSTmjkeb9gHRrbmTqxrEGWAm74gGkgfvsPAQyhtAeLaooZzvFmXR.jpg)
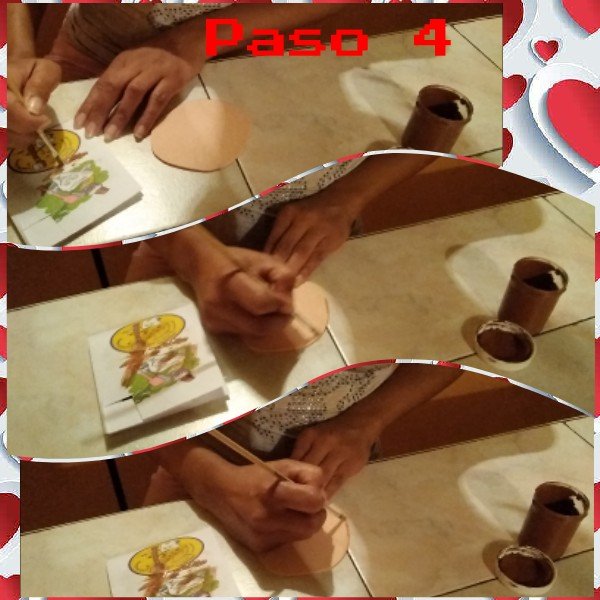
Paso 4
Con un pincel fino mojamos en un poquito de agua y luego en pintura al frío marrón coco, en una hoja descargamos la pintura para que no nos quede muy oscuro y sombreamos nuestra nariz y el rostro de nuestra figura solo por el contorno de la misma, así resaltará mucho más.
Step 4
With a fine brush we dip in a little water and then in coconut brown cold paint, on a sheet we unload the paint so that it is not too dark and we shade our nose and the face of our figure only by the outline of it, This will make it stand out much more.
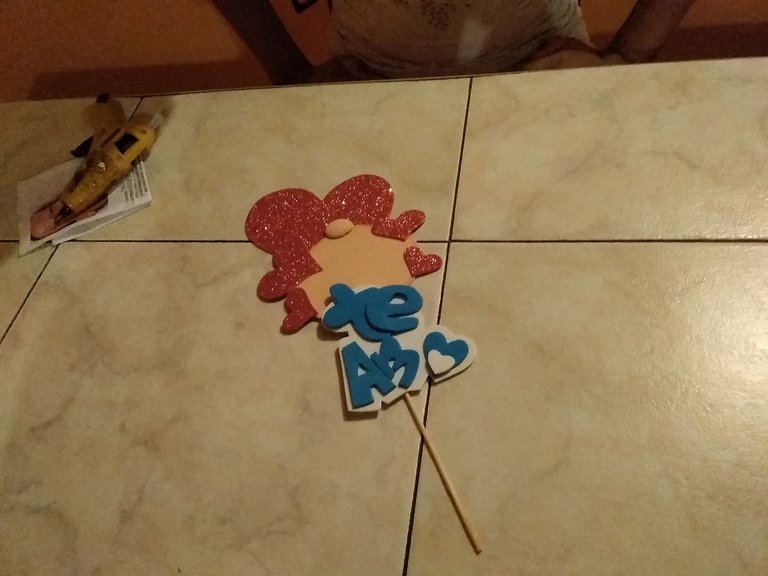
Paso 5
Tomamos nuestros patrones y usando nuestra pistola de silicón pegamos y armamos la figura, al tenerla armadas procedemos a pegarlas en nuestro palito de altura y nos quedará el siguiente resultado 👇
Step 5
We take our patterns and using our silicone gun we paste and assemble the figure, having it armed we proceed to paste them on our height stick and we will have the following result 👇
![1644534942934[1].jpg](https://images.hive.blog/768x0/https://files.peakd.com/file/peakd-hive/dayanita2/AJmt48XuN3dfNBQ9z7aHLHg7RhymW5de82PYsHMV4ngipiJa8ro1Fq5k8oq5pKP.jpg)
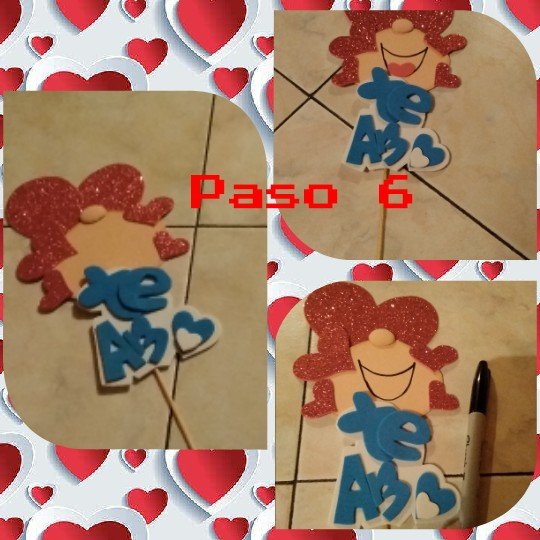
Paso 6
Con el marcador fino negro dibujaremos una sonrisa gigante ya que nuestra figura esta feliz y enamorada y le pegamos la lengua.
Step 6
With the fine black marker we will draw a giant smile since our figure is happy and in love and we stick our tongue out.
![IMG_20220209_205449[1].jpg](https://images.hive.blog/768x0/https://files.peakd.com/file/peakd-hive/dayanita2/23uFaRzxbM5dn1fBJ9maa4hPne8f676U95gBs4VKFwm4pFwjSmsyBuBy1SJWxAr5YvbXg.jpg)
Las fotos fueron tomadas y editadas desde mi celular usando la aplicación mirror collage
Use el traductor de Google
¡Hasta un próximo encuentro!!!🤗
The photos were taken and edited from my cell phone using the mirror collage app
Use google translate
Until a next meeting!!!🤗

Congratulations @dayanita2! You have completed the following achievement on the Hive blockchain and have been rewarded with new badge(s):
Your next target is to reach 500 upvotes.
You can view your badges on your board and compare yourself to others in the Ranking
If you no longer want to receive notifications, reply to this comment with the word
STOPCheck out the last post from @hivebuzz:
Support the HiveBuzz project. Vote for our proposal!