saludos mis queridos amigos de esta bella y creativa comunidad @Hivediy
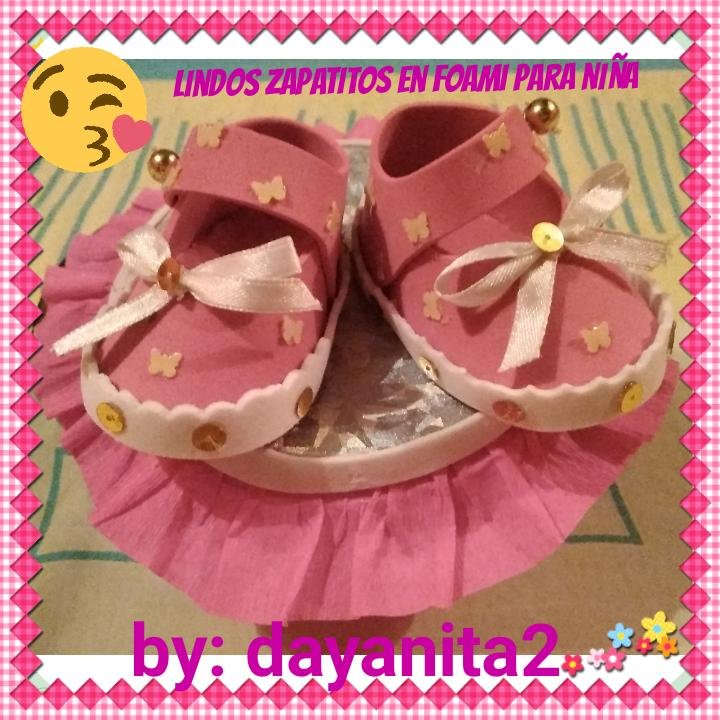
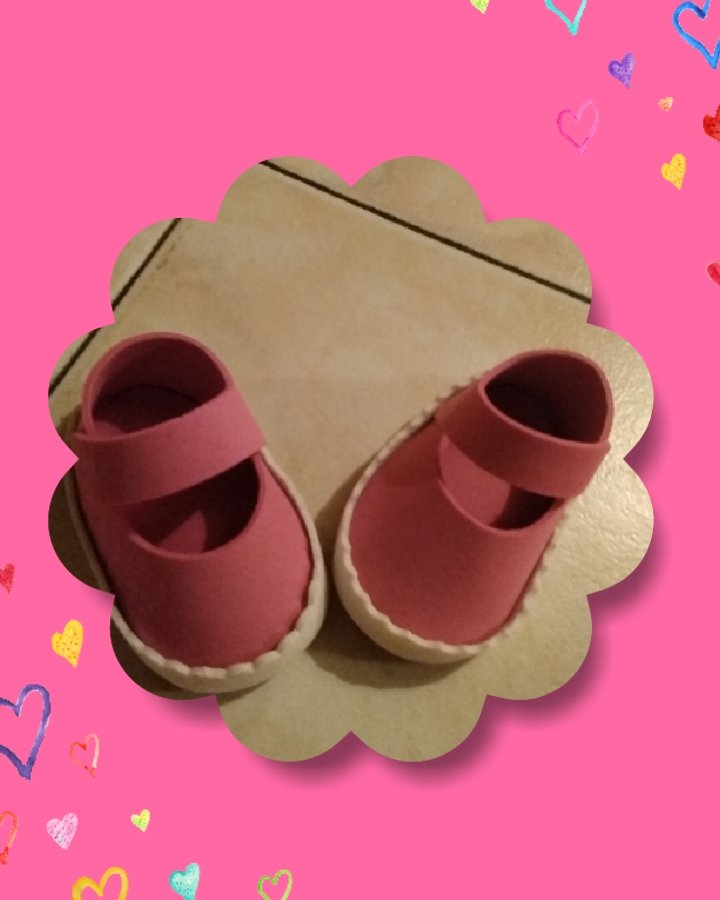
El proyecto de hoy me encanto porque además de ser lindo me inspira ternura, es una propuesta para un centro de mesa para baby shower que hice para una amiga. El porque me encanta este tipo de trabajo? pues todo lo que sea para bebé me gusta, pues mi sueño es realizarlo para mi propio bebé, pero en este ocasión aún no lo es, pero lo hice con todo el esmero, amor como si fuera para mí, se que Dios mediante lo realizaré para mi propia celebración, es una manualidad super sencilla y lleva poco material el toque se lo darán los detalles que se le coloquen para resaltarlo aún más además, el bello color que se escogió ya que es una niña.
Sin más preámbulos les pido que me acompañen al paso a paso:
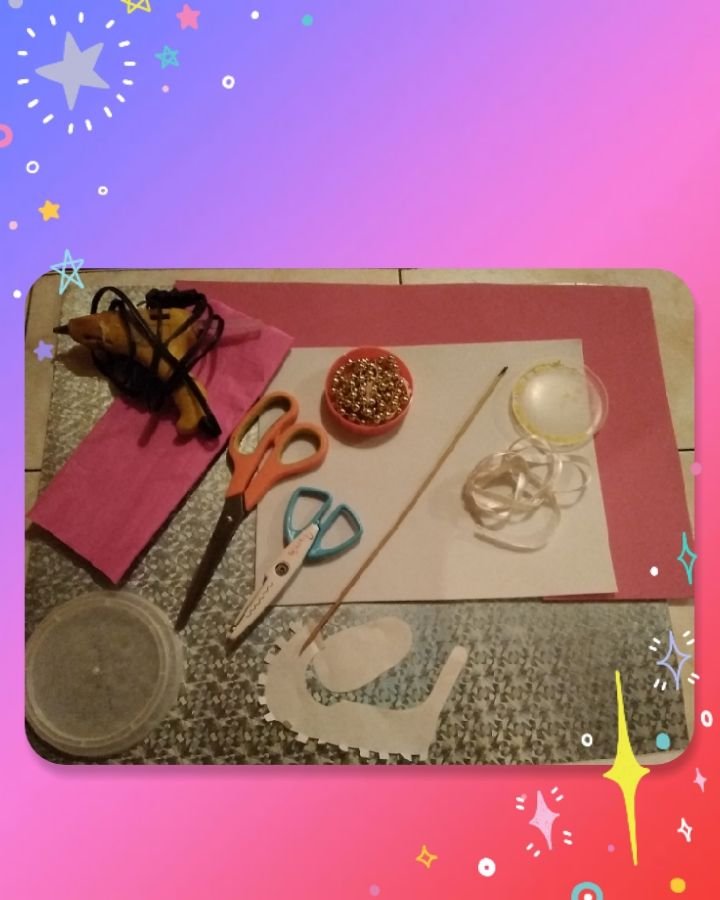
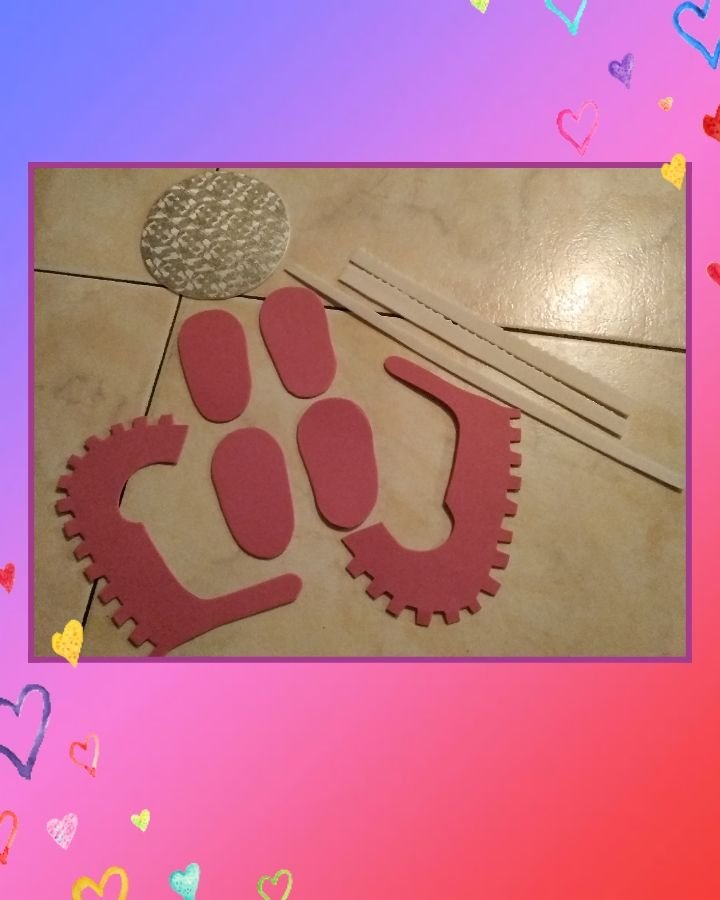
MATERIALES ✍️
🍼 Foami/goma eva de color fucsia,blanco, metalizado
🍼 Papel crepe fucsia
🍼 Cinta de razo delgada blanca
🍼 Tapa circular plástica
🍼 Tijeras de corte recto y zic zac
🍼 Palito de altura de madera
🍼 Perlas doradas medianas
🍼 Lentejuelas doradas y color crema en forma de mariposa
🍼 Pistola de silicón
🍼 Patrones
greetings my dear friends of this beautiful and creative community @Hivediy
I loved today's project because besides being cute it inspires me with tenderness, it's a proposal for a baby shower centerpiece that I made for a friend. Why do I love this kind of work? Well, I like everything that is for a baby, because my dream is to do it for my own baby, but this time it is not yet, but I did it with all the care, love as if it were for me, I know that God willing I will do it for my own celebration, it is a super simple craft and it takes little material, the touch will be given by the details that are placed to highlight it even more, in addition, the beautiful color that was chosen since it is a girl.
Without further ado, I ask you to accompany me step by step:
MATERIALS ✍️
🍼 Fuchsia, white, metallic EVA foam/rubber
🍼 Fuchsia crepe paper
🍼 Thin white satin ribbon
🍼 Plastic circular lid
🍼 Straight cut and zic zac scissors
🍼 Wooden height stick
🍼 Medium Golden Pearls
🍼 Gold and cream colored sequins in the shape of a butterfly
🍼 Glue gun
🍼 Patterns
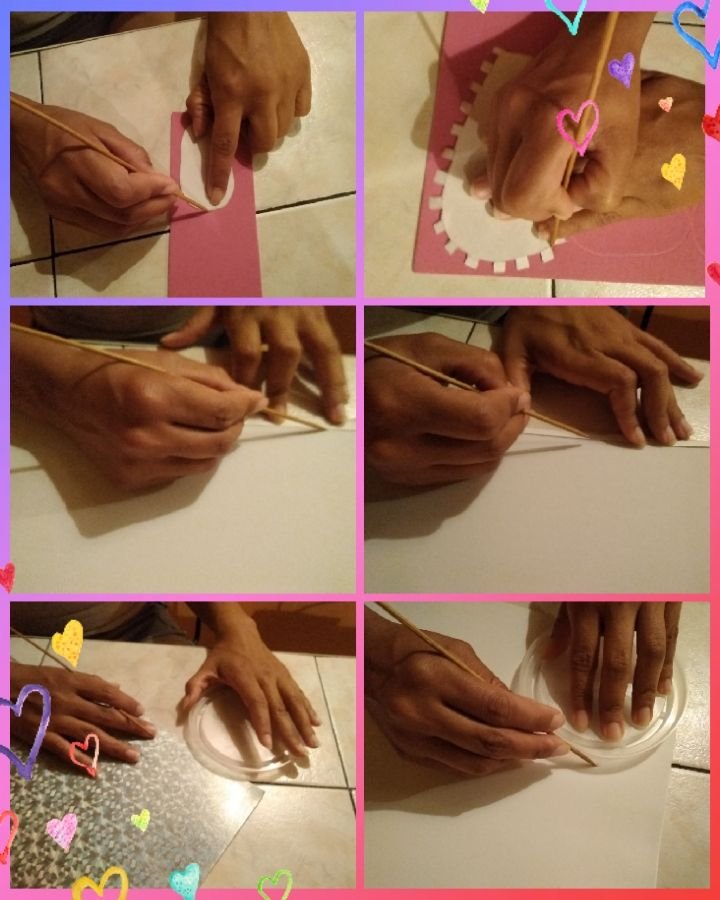
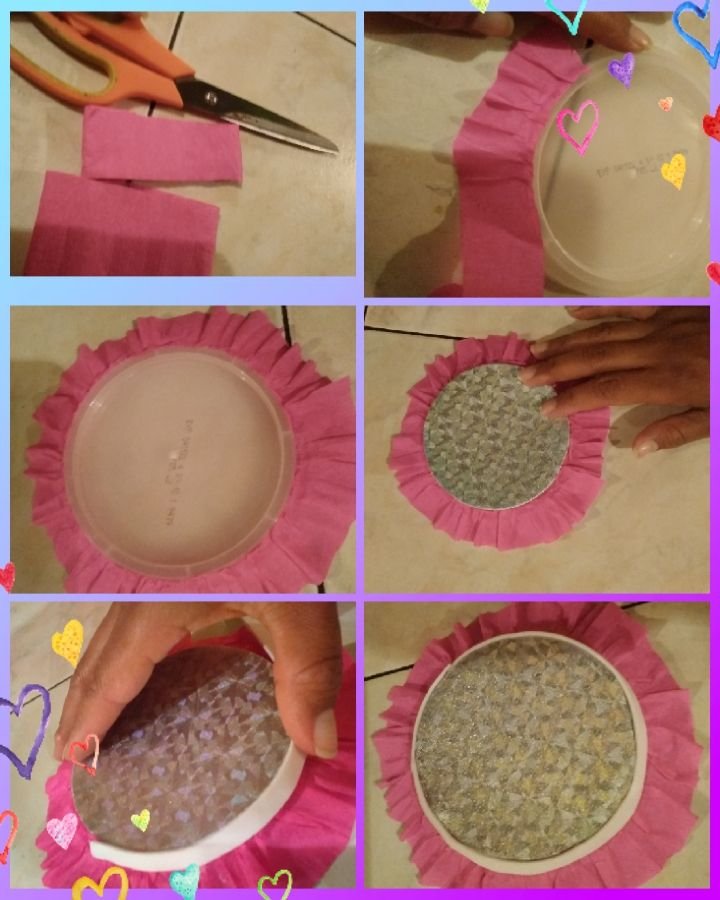
🍼Comenzamos pasando al foami/goma eva nuestros patrones para ello usaremos el palito de altura, también maracaremos el círculo de la tapa, tomando la medida del centro de la tapa ya que este círculo debe encajar en el centro de la misma.
🍼 Del patrón de la base del zapatito marcaremos 4
En el foami/goma eva blanco marcaremos 3 tira.
✏️ Una de 0,50cm de ancho x 35cm de largo
✏️ 2 de 1cm de ancho x 20cm de largo
🍼We start by passing our patterns to the foami/eva rubber, for this we will use the height stick, we will also mark the circle of the lid, taking the measure of the center of the lid since this circle must fit in the center of it.
🍼 From the pattern of the base of the shoe we will mark 4
In the white foami/rubber eva we will mark 3 strips.
✏️ One 0.50cm wide x 35cm long
✏️ 2 of 1cm wide x 20cm long
🍼Tomaremos la tijera ✂️ de corte en zic zac para recortar las dos tiras de 1cm de ancho x 20cm de largo, este corte se hará solo por un lado por el otro lado se hace con la tijera de corte recto.
🍼We will take the zic zac scissors ✂️ to cut the two strips of 1cm wide x 20cm long, this cut will be made only on one side, on the other side it is made with the straight cut scissors.
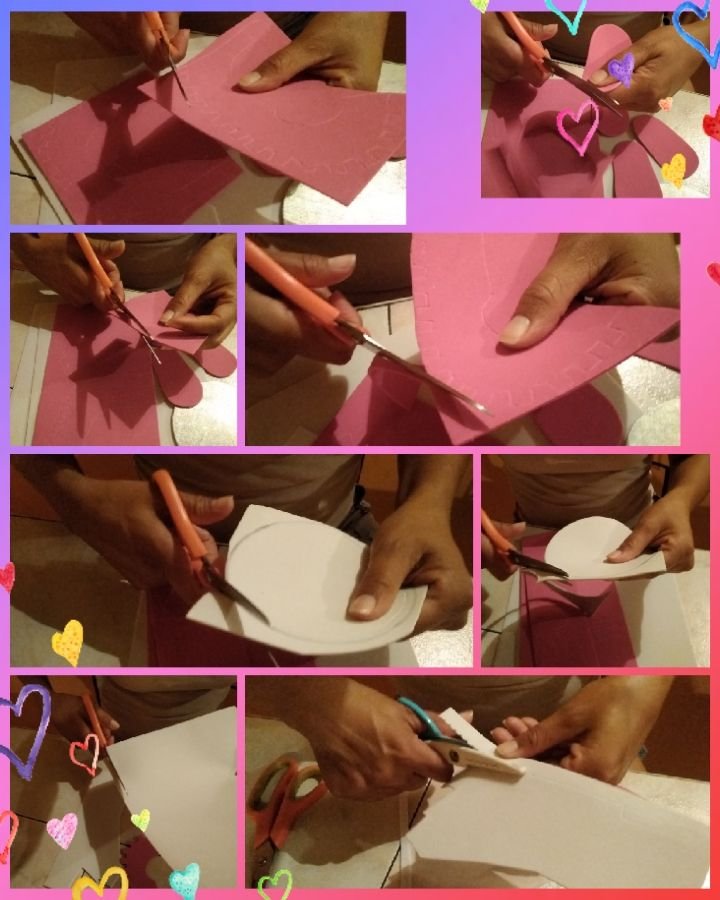
Así nos quedarán nuestras piezas ya recortadas 🤗
This is how our pieces will look already cut 🤗
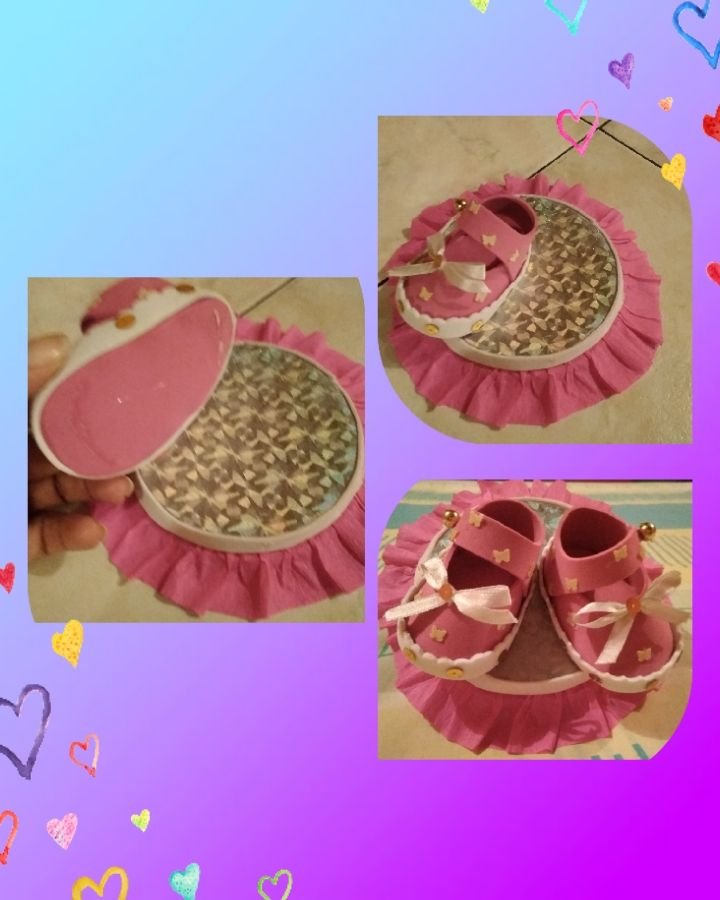
🍼 Hora ⏰ de armar, para ello tomamos nuestras 2 piezas del zapatito y las pestañas las doblamos hacia adentro para que vayan tomando la forma y sean más flexibles a la hora de pegarla, tomamos la plantilla o base del mismo y con la pistola de silicón la vamos pegando por toda nuestra base como puedes observar en la imágen, este procedimiento lo repites en ambas piezas. 👇
🍼 Al tener nuestro zapatito listo la cinta la pegamos al otro extremo, luego la plantilla del mismo se la vamos pegando presionamos unos segundos para que quede bien sellado y así nuestro zapatito va tomando forma.
🍼 Time ⏰ to assemble, for this we take our 2 pieces of the shoe and fold the tabs inwards so that they take shape and are more flexible when it comes to gluing it, we take the template or base of it and with the silicone gun We are sticking it all over our base as you can see in the image, you repeat this procedure in both pieces. 👇
🍼 When we have our little shoe ready, we stick the tape to the other end, then we stick the template to it, we press for a few seconds so that it is well sealed and so our little shoe takes shape.

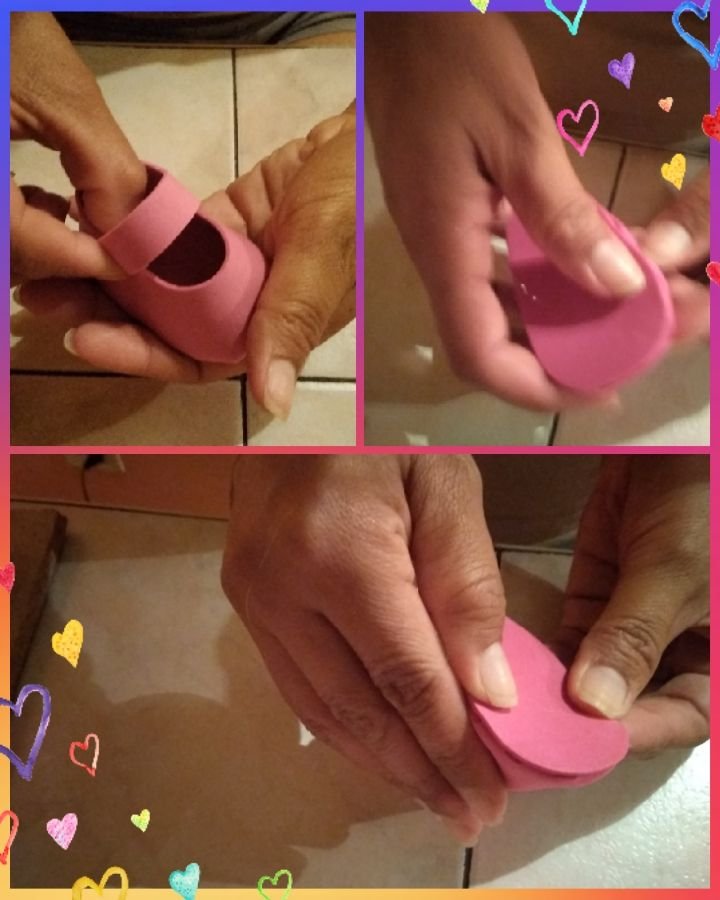
🍼 To seal the joints of the shoe and so that they are not noticed, we will use the strip that we cut with the zic zac scissors, with the silicone gun we will glue around the shoe, this process is repeated in both. 👇
Momento de decorar ✨
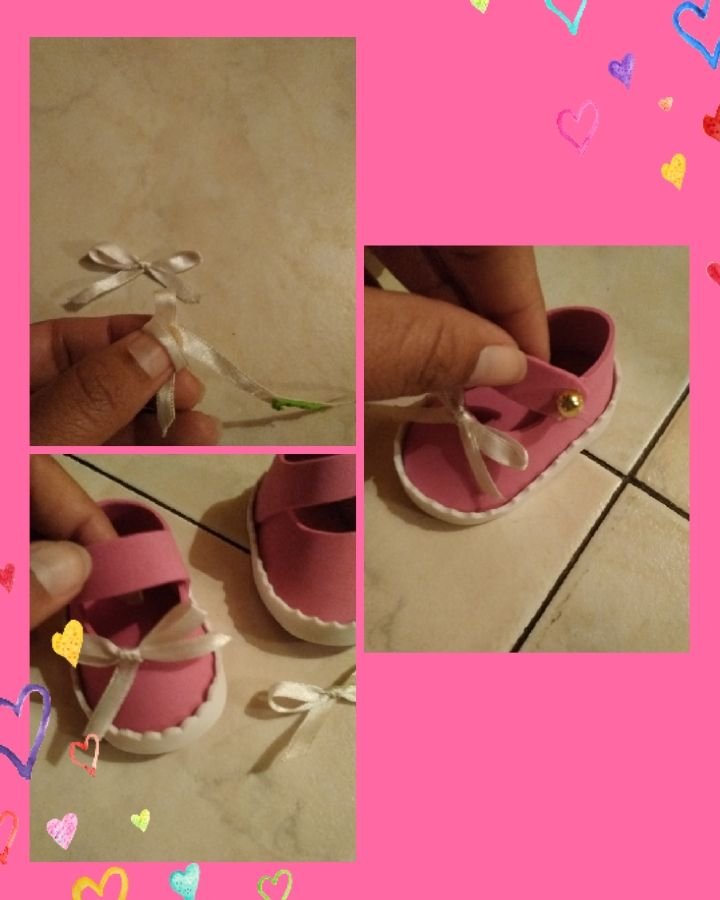
🍼 Tomaremos las perlas doradas y se las pegaremos a los 2 agarradero del zapatito, luego con la cinta de razo haremos 2 lazos pequeños adecuados al tamaño del zapatito y se le pegan en el centro del mismo a ambos.
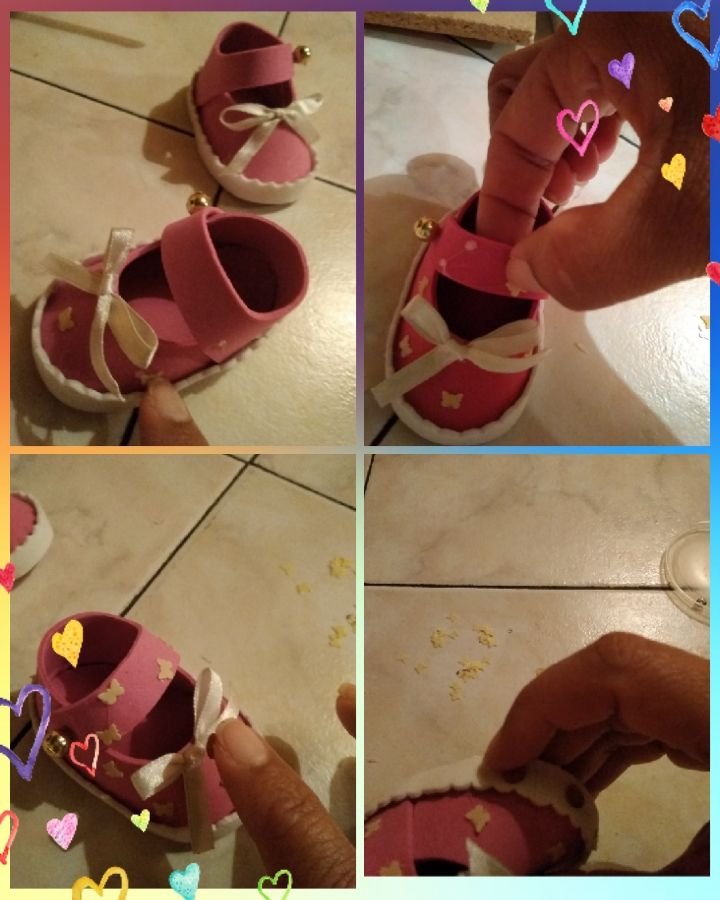
🍼 Para resaltar aún más nuestro trabajo tomamos las lentejuelas con forma de mariposas y se le van pegando de forma aleatoria a ambos zapatitos, luego las doradas circulares una en cada lazito y las otras por todo el borde del zapatito.
Time to decorate ✨
🍼 We will take the golden pearls and stick them to the 2 handles of the shoe, then with the razo ribbon we will make 2 small bows appropriate to the size of the shoe and stick them both in the center of it.
🍼 To highlight our work even more, we take the butterfly-shaped sequins and stick them randomly to both shoes, then the circular gold ones, one on each bow and the others around the edge of the shoe.
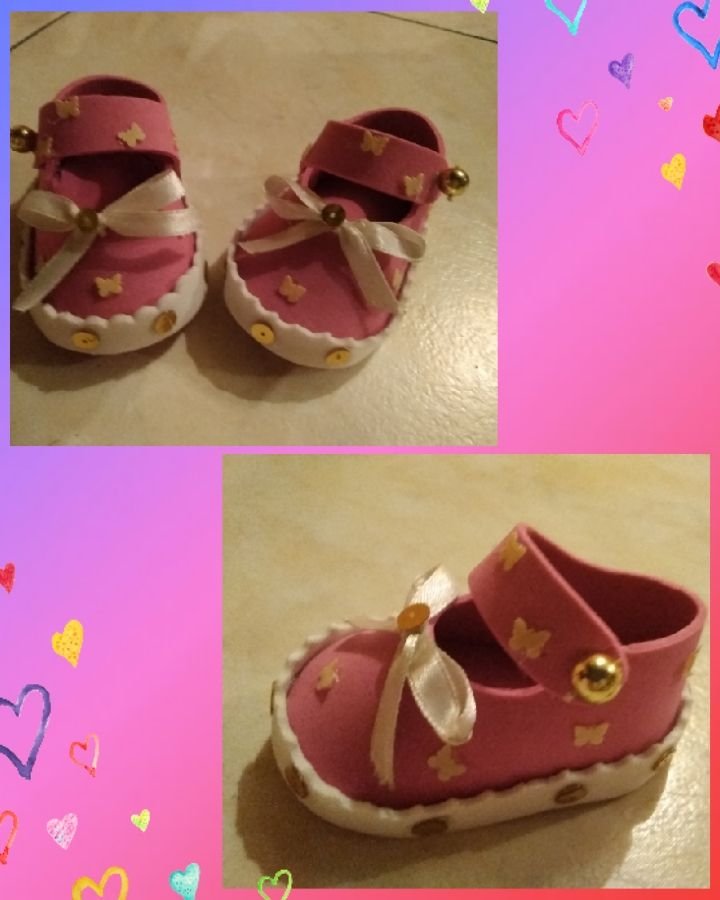
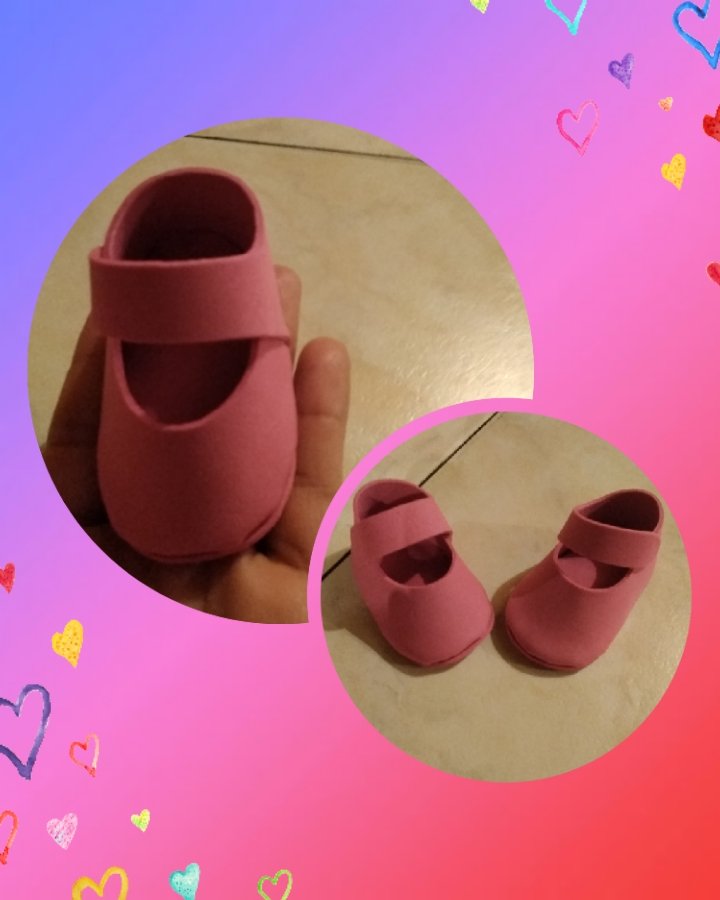
Así nos quedarán los zapatitos 🤗
This is how our shoes will look 🤗
Base del centro mesa
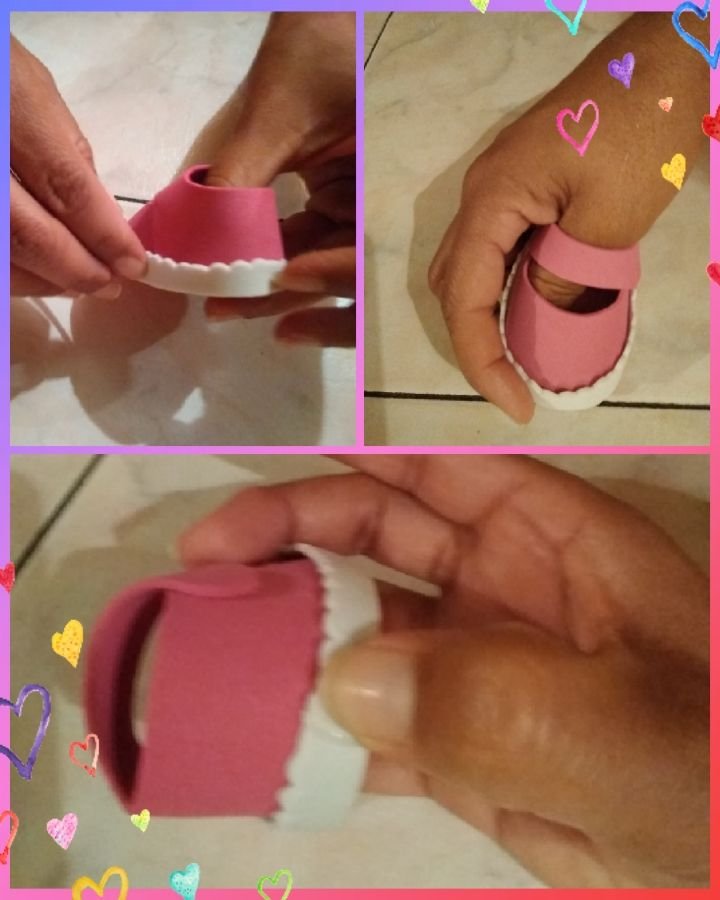
🍼 Tomaremos el papel crepe cortamos una medida con nuestros dedos 2 de ancho, a la tapa plástica se le colocará silicón y se irá pegando el papel crepe haciendo arruches alrededor de la misma y nos quedará de esta forma. 👇
🍼 Seguidamente tomaremos el círculo que marcamos en el foami/goma eva metalizado y lo pegamos justo en el centro, en mi caso esta tapa tiene el borde del círculo, para sellar tomamos la tirita de 0,50cm de ancho que nos queda y la pegamos por todo el borde para sellar y así nos queda. 👇
Center table base
🍼 We will take the crepe paper and cut a measure with our fingers 2 wide, silicone will be placed on the plastic lid and the crepe paper will be glued making curls around it and it will stay this way. 👇
🍼 Next we will take the circle that we mark on the metalized foami/eva rubber and stick it right in the center, in my case this cover has the edge of the circle, to seal we take the 0.50cm wide band-aid that we have left and stick it around the edge to seal and so we have. 👇
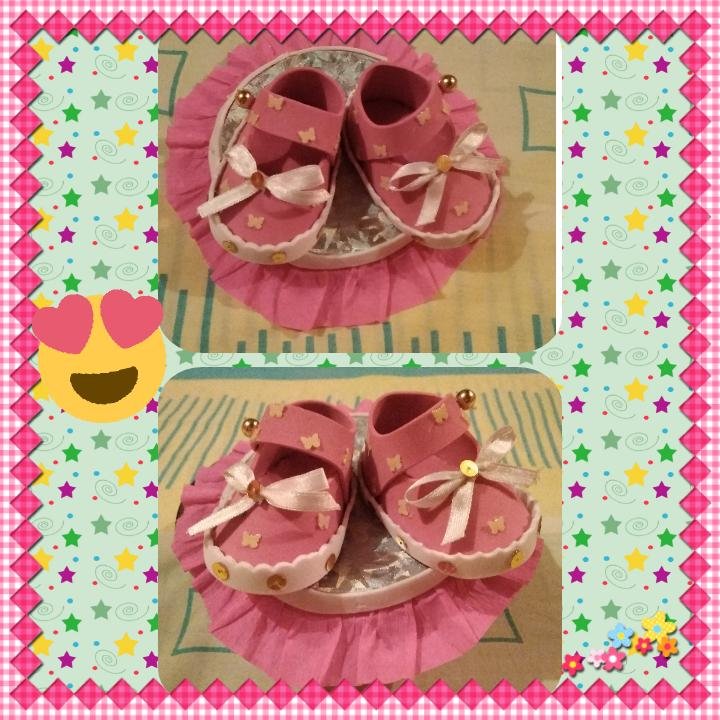
🍼 Para concluir tomamos los zapatitos le colocamos silicón por debajo y los pegamos en la base que realizamos en el paso anterior y este es nuestro resultado, un bello centro de mesa a mi me super encanto el resultado, mi amiga quedó enamorada 😍 de mi propuesta para el baby shower de su bebé, espero que a ti también te haya gustado mi proyecto del día de hoy, como siempre la invitación es a realizarlo, esta propuesta no solo es para baby shower, también lo es para una revelación del sexo del bebé y hasta para un recuerdito.
Como siempre complacida de realizar cada proyecto que les presento, este me inspiro mucha ternura y lo hice con todo mi amor 😘, porque mi deseo más grande es poder lograr el más bello sueño ser madre por segunda vez 🙏, mi primer bebecito esta en el cielo 😥 a él le dedico este precioso resultado 👼 🙏.
🍼 To conclude, we take the little shoes, we put silicone underneath and we glue them on the base that we made in the previous step and this is our result, a beautiful centerpiece. I really loved the result, my friend fell in love 😍 with my proposal for your baby's baby shower, I hope you also liked my project today, as always the invitation is to do it, this proposal is not only for a baby shower, it is also for a reveal of the baby's gender and even for a souvenir.
As always pleased to carry out each project that I present to you, this one inspired me a lot of tenderness and I did it with all my love 😘, because my greatest wish is to be able to achieve the most beautiful dream of being a mother for the second time 🙏, my first baby is in the heaven 😥 I dedicate this beautiful result to him 👼 🙏.
Las fotos fueron tomadas y editadas con mi celular
use la aplicación "Foto Collage"
La traducción la realice con el traductor de google
Hasta un Próximo Encuentro!!!
🤗😘
The photos were taken and edited with my cell phone
use the app "Photo Collage"
The translation is done with the google translator
Until a Next Meeting!!!
🤗😘
Hace mucho tiempo, cuando mi prima era una bebé, hice unos zapatitos así para regalárselos. Fueron para unas fotos pero recuerdo haber hecho unos, sin muy bonitos. Disfruté mucho el paso a paso de la publicación, la edición de las fotos en grupos le quedó genial y tiene buenas fotos.
Como recomendación, tenga cuidado con el uso de etiquetas de ballenas, no es bien visto que las use. Es recomendable usar etiquetas relacionadas con su publicación.
Enlace al Discord de la comunidad:
https://discord.gg/SGdtVRkV
Hola @gaboamc2393 gracias por tu recomendación será tomada en cuenta, y gracias por tu visita me alegra que te gusto mi trabajo🤗
Me encanta , me emociona porque estoy lista para hacerles a mi sobrina que viene en camino
Hola @jorgelissanchez, hacer cosas para bebé emociona son muy lindas, gracias por escribir 🤗
Me encantan los zapatitos de bebé, son muy adorables🥰, está muy bonito este centro de mesa amiga, es una excelente idea✨, Saludos!
Hola @beidacarolina gracias,🤗 si a mi me encanto el resultado, feliz inicio de semana gracias por visitar mi blog un abrazo
🎆🎇🎉🎊🌧️💐✨🌾🌱🌹🌙🌿🍃🥀⚡🌺☘️🍀🌈🌷⭐🪴🌵🌸🌟💮🌴🌳💫☀️💮☔🌲🌳🌍🌌🌠☄️🏵️🐝🌻🌼🍄🐞🦋💙☕💜🍍🎆🎇🎉🎊
Tienes razón es muy tierno 🥰😍
Me encantaron los detalles brillantes, le dan un toque especial. gracias por compartir tu trabajo. Feliz inicio de semana.
🎆🎇🎉🎊🌧️💐✨🌾🌱🌹🌙🌿🍃🥀⚡🌺☘️🍀🌈🌷⭐🪴🌵🌸🌟💮🌴🌳💫☀️💮☔🌲🌳🌍🌌🌠☄️🏵️🐝🌻🌼🍄🐞🦋💙☕💜🍍🎆🎇🎉🎊
Hola @chacald.dcymt si esos detalles le dan el toque por eso nunca le faltan a mis trabajos, feliz y bendecido inicio de semana gracias por visitarme 🤗
Congratulations @dayanita2! You have completed the following achievement on the Hive blockchain and have been rewarded with new badge(s):
Your next target is to reach 1500 upvotes.
You can view your badges on your board and compare yourself to others in the Ranking
If you no longer want to receive notifications, reply to this comment with the word
STOPCheck out the last post from @hivebuzz:
Support the HiveBuzz project. Vote for our proposal!
Hola! @dayanita2, muy tierno tu centro de mesa, casualmente estoy haciendo detalles para bienvenida de unos gemelitos hice zapatitos pero en forma de botas porque son niños, pero me fascinaron los tuyos , saludos.
Hola @nhaydu si!! es hermoso este tipo de trabajo a mi personalmente me encanta hacerlo, gracias me alegro que te gustaran un abrazo 🤗
Wow @dayanita2, esta genial el paso a paso y lo digo porque si cambiamos de material podemos hacer unos para que los use él bebe.

Cierto @elmundodexao espero realizar unos para cuando logre tener mi bebé Dios mediante 🙏.
Gracias por visitarme y comentar un abrazo🤗