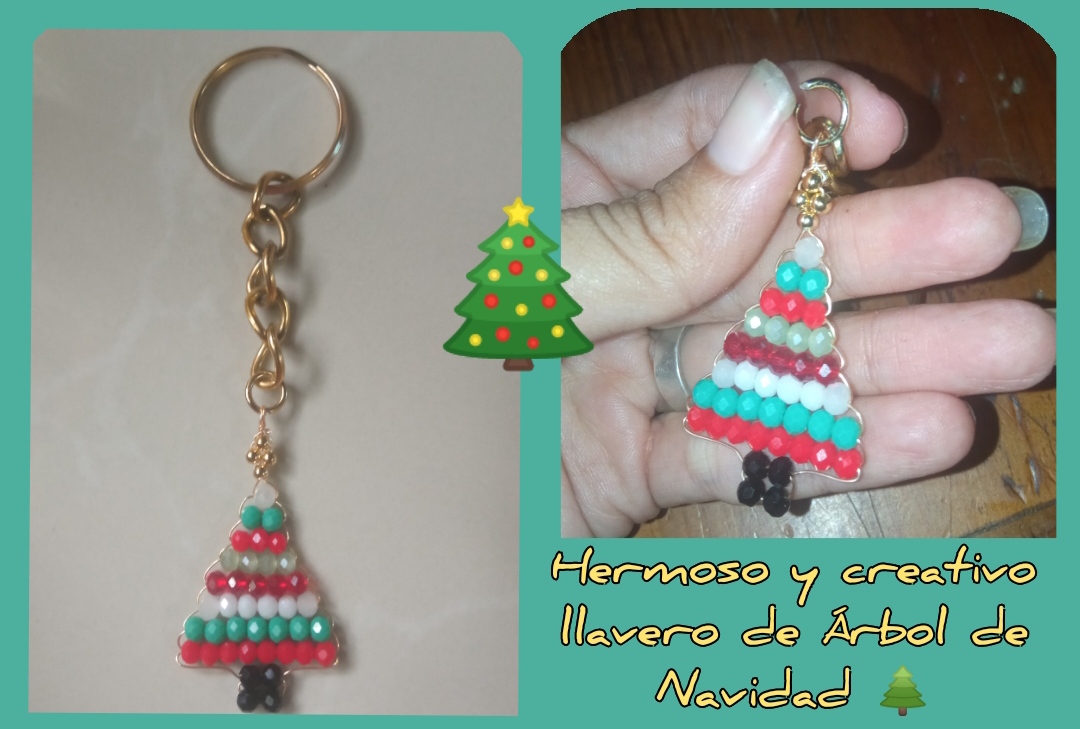
Saludos mis queridos y apreciados amigos miembros de esta talentosa y creativa comunidad, Espero todos hayan tenido un excelente inicio de semana, ya cuando estamos a punto de iniciar el mes de Diciembre un mes donde celebramos la Navidad, época de unión familiar les traigo esta idea creativa y hermoso que podemos utilizar para nuestros uso o para realizar un hermoso detalle. Se trata de un lindo llavero con un colgante de Árbol de navidad elaborado en alambre de bisutería y pedrería, totalmente sencillo y hermoso.
Greetings, my dear and appreciated friends, members of this talented and creative community, I hope everyone has had an excellent start to the week, when we are about to start the month of December, a month where we celebrate Christmas, a time for family togetherness. I bring this creative and beautiful idea that we can use for our own use or to make a beautiful detail.
It is a cute keychain with a Christmas tree pendant made of costume jewelery wire and rhinestones, totally simple and beautiful.
Este Hermoso y llamativo Arbolito es muy fácil de elaborar, y por ello para todos ustedes he elaborado un muy sencillo tutorial dónde les comparto mi proceso de elaboración paso a paso.
This beautiful and striking little tree is very easy to make, and for this reason I have prepared a very simple tutorial for all of you where I share my step-by-step preparation process.
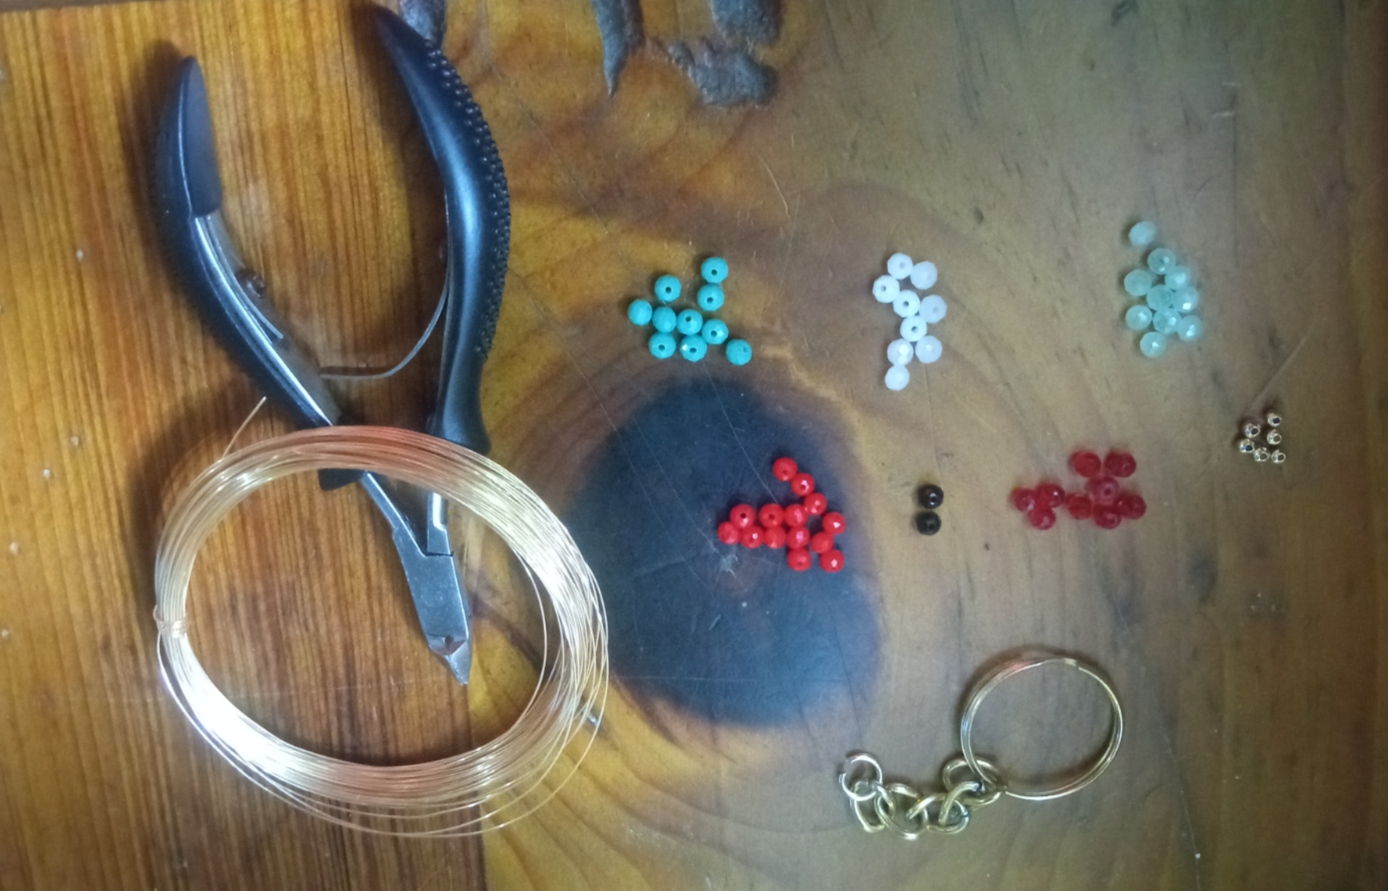
✴️ Que Materiales necesitas:
- Alambre de bisutería calibre 26.
- Pedrería de diferentes colores Navideños ( verde, rojo, blanco, dorado)
- pinza de bisutería.
- argolla para llaveros.
✴️ What Materials do you need:
- 26 gauge jewelry wire.
- Rhinestones of different Christmas colors (green, red, white, gold)
- jewelry clip.
- ring for key rings.
😊 paso a paso
😊 Step by step
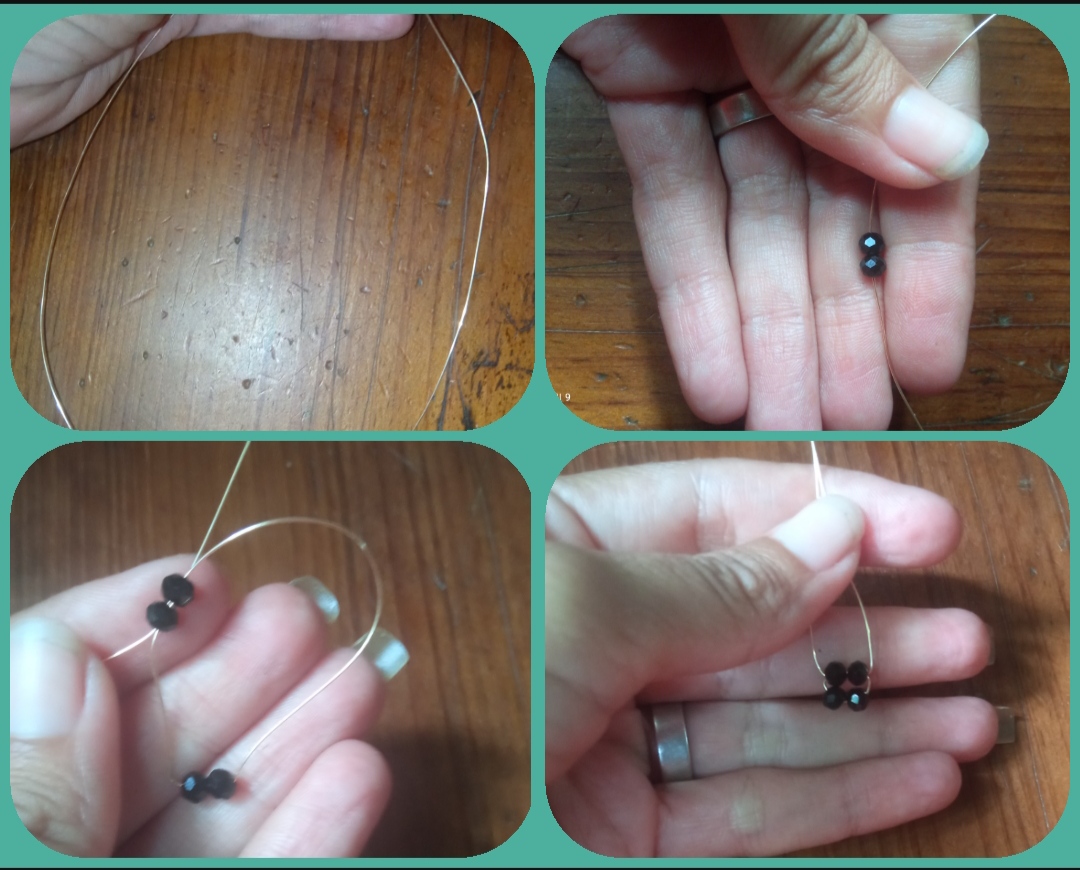
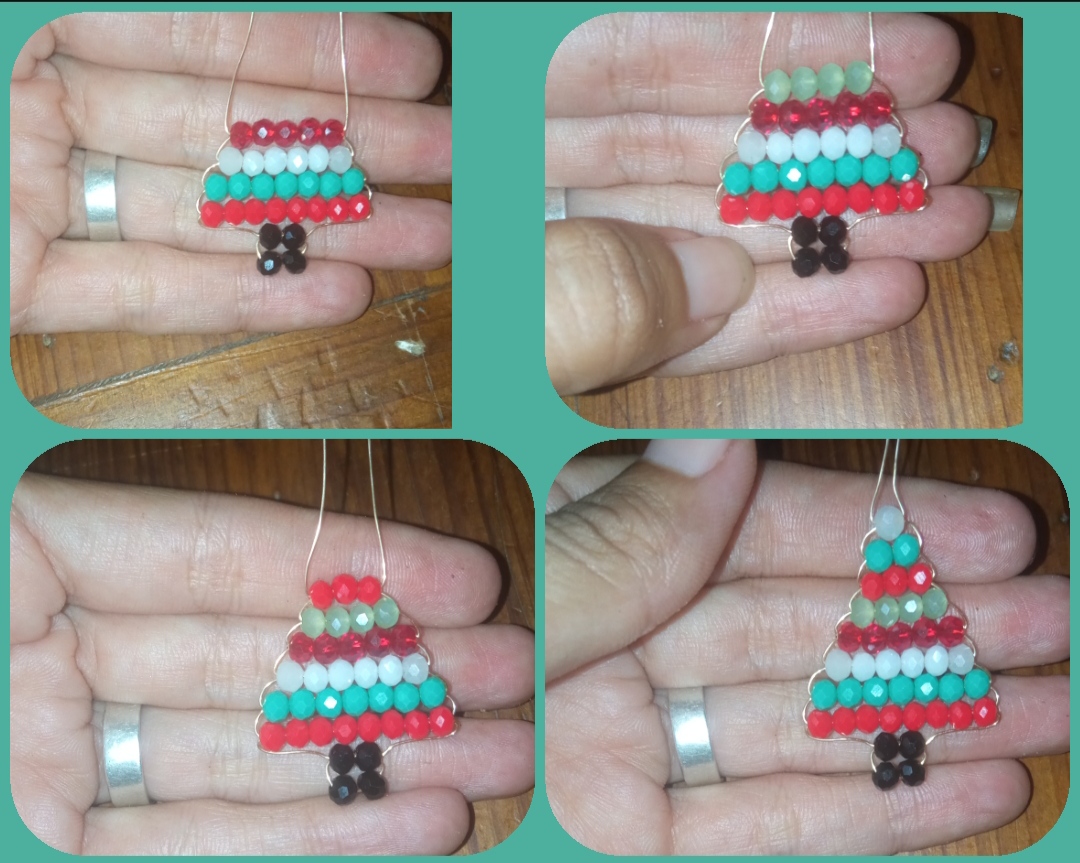
⭐ Paso 1: Para iniciar nuestro procedimiento de elaboración primeramente tomamos el alambre de bisuteria calibre 26 y cortamos un pedazo muy largo, de aproximadamente 30cm.
Ahora procedemos a introducir nuestra pedrería, primeramente realizaremos el pie o base del arbolito, Introducimos dos piedras de bisuteria color negro y las llevamos ala mitad de nuestro alambre y Seguidamente por uno de los extremos Introducimos dos piedras negras más y el otro extremo del alambre lo vamos a pasar por estás mismas piedritas pero en forma cruzada, y álamos ambos extremos del alambre y nos quedará de la siguiente forma.
⭐ Step 1: To start our preparation procedure, we first take the 26 gauge jewelry wire and cut a very long piece, approximately 30cm.
Now we proceed to introduce our rhinestones, first we will make the foot or base of the tree, we introduce two black jewelry stones and we take them to the middle of our wire and then through one of the ends we introduce two more black stones and the other end of the wire We are going to go through these same little stones but in a crossed way, and pop both ends of the wire and we will have the following way.
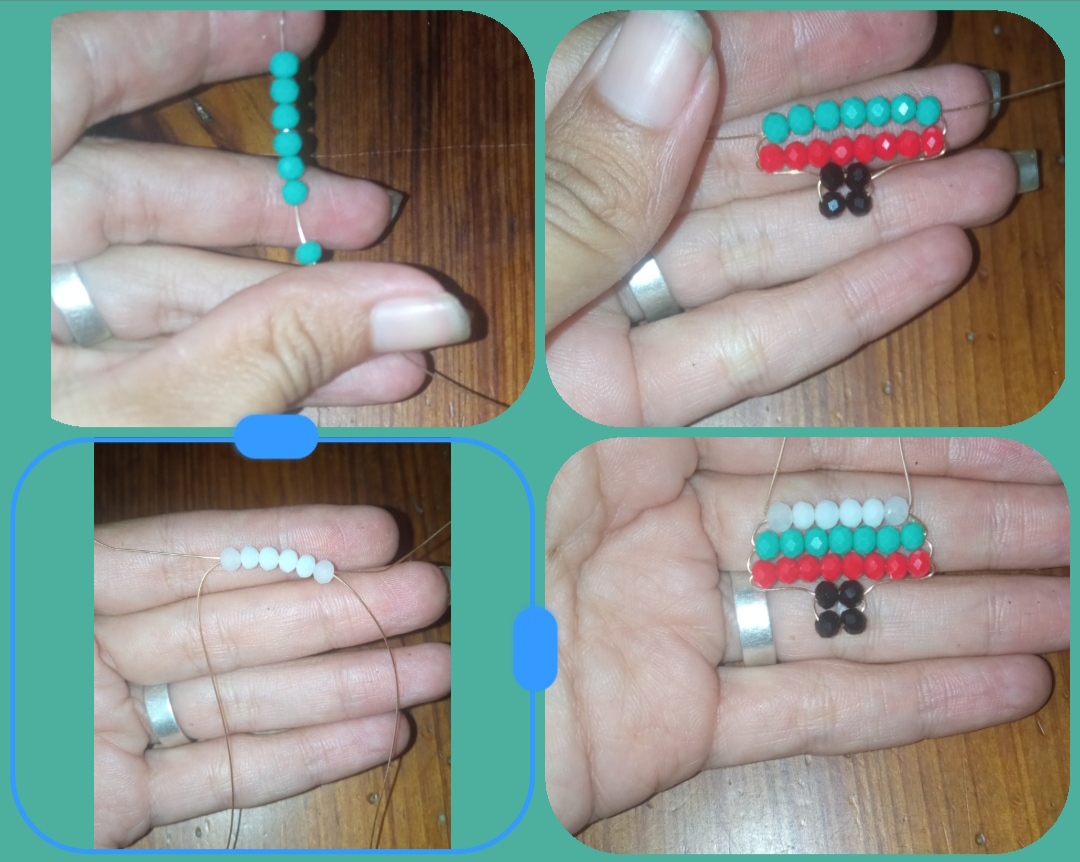
⭐ Paso 2: Seguidamente Introducimos 8 piedritas brillantinas color rojo mate, y el otro extremo lo cruzamos por estás mismas Pichitas, los alambres deben quedar en forma cruzada por el interior de las pedrería y al jalar los extremos lo llevaremos hasta la base como pueden observar.
⭐ Step 2: Next we introduce 8 matte red shiny stones, and we cross the other end through these same Pichitas, the wires must be crossed inside the rhinestones and when pulling the ends we will take it to the base as you can see .

⭐ Paso 3: Nuevamente Introducimos ahora las pedrería verde, pero ahora serán 7 piedras, por un extremo y el otro lo cruzamos y llevamos estás que queden encima de la línea roja.
Y así en forma de piramide vamos introduciendo las pedrería de los diferentes colores, siempre colocando una menos en forma de piramide hasta llegar a introducir una sola piedra.
⭐ Step 3: Once again, we now introduce the green rhinestones, but now there will be 7 stones, at one end and at the other we cross it and we carry these that remain above the red line.
And so, in the shape of a pyramid, we introduce the stones of the different colors, always placing one less in the shape of a pyramid until we introduce a single stone.
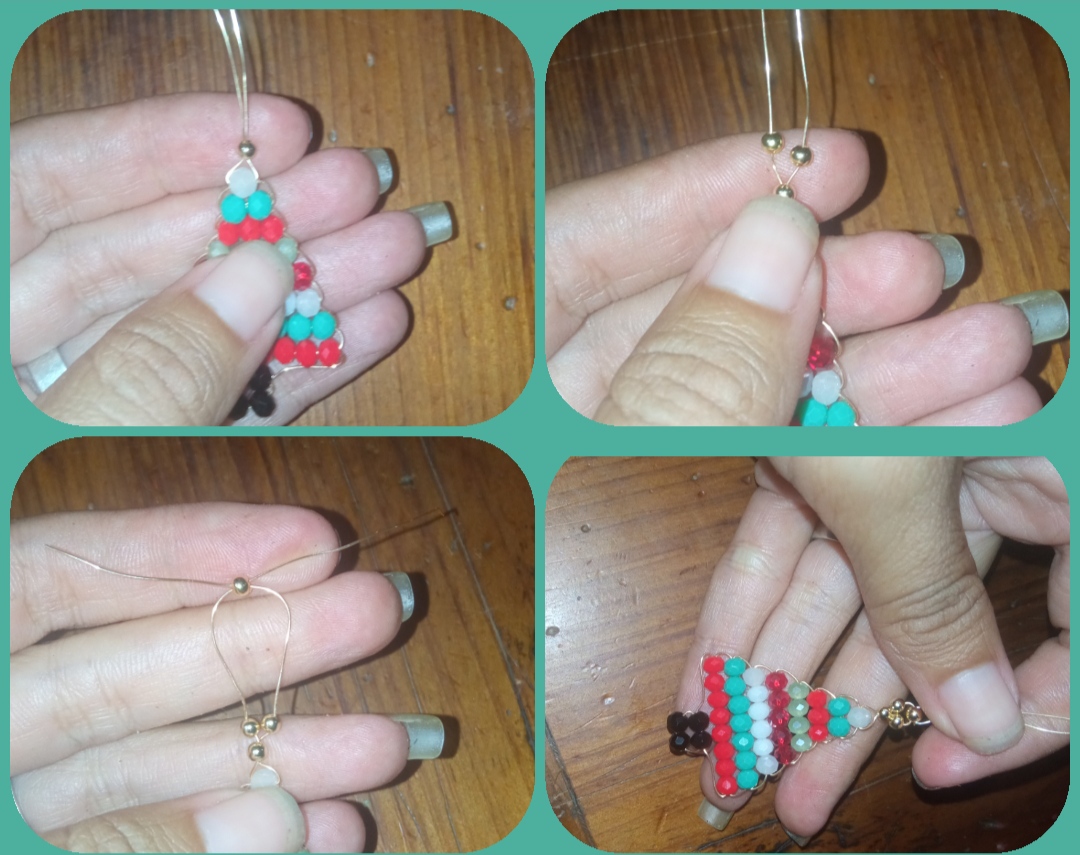
⭐ Paso 4: por último realizamos una linda estrellita dorada, introduciendo una liedrita dorada cruzada por ambos extremos del alambre, luego una por cada lado y cerramos introduciendo una última piedra dorada de forma cruzada.
Seguidamente unimos los dos lados del alambre y con la pinza realizamos una pequeña argolla en la parte superior de nuestro arbolito y finalizamos nuestra Elaboración llevando este arbolito e introduciendo lo en la cadena de la argolla principal de llavero.
⭐ Step 4: finally we make a cute little golden star, inserting a little golden stone crossed at both ends of the wire, then one on each side and we close by introducing a last golden stone crosswise.
Next we join the two sides of the wire and with the pliers we make a small ring in the upper part of our little tree and we finish our Elaboration taking this little tree and introducing it in the chain of the main keyring ring.

⭐ Hermoso y creativo llavero de Árbol de Navidad 🌲
⭐ Beautiful and creative Christmas Tree keychain 🌲
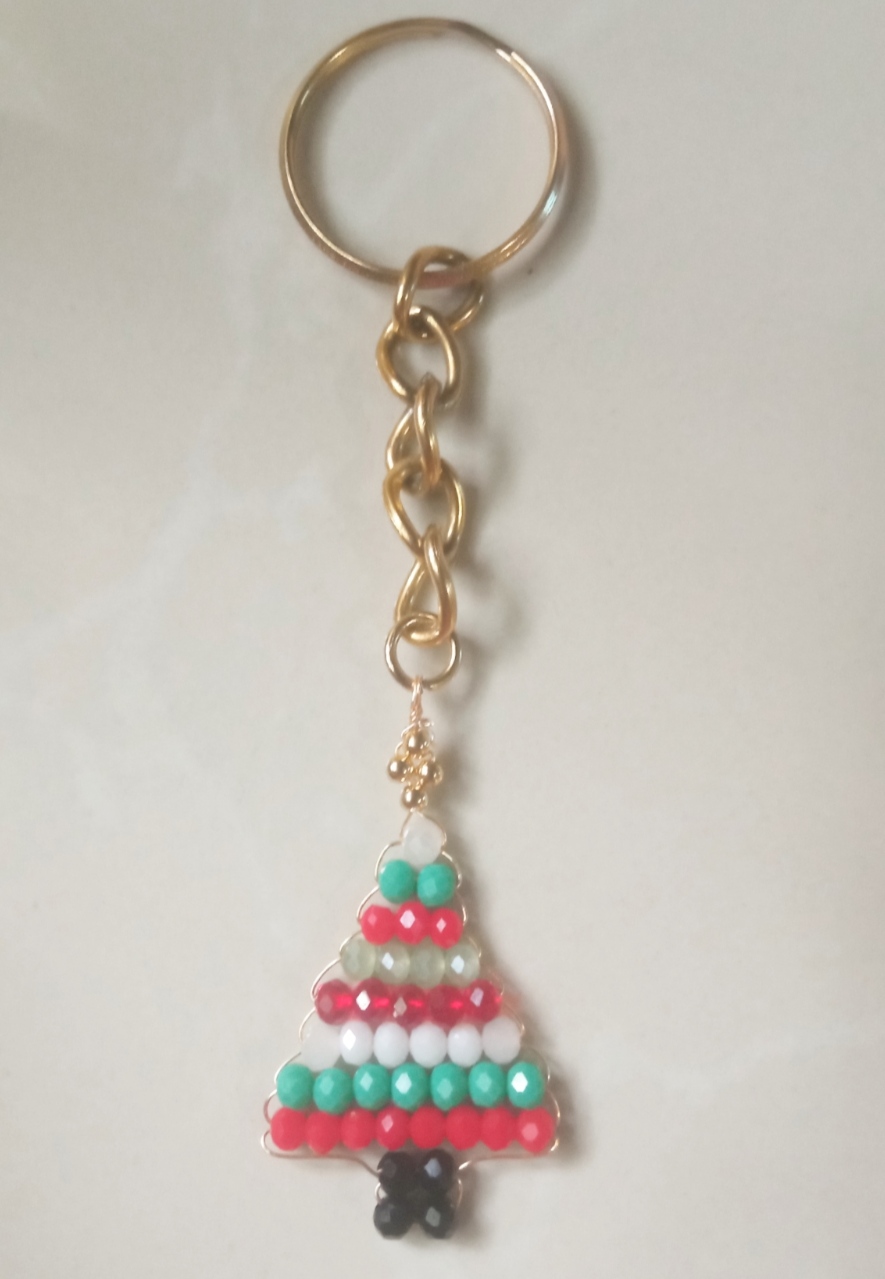
Y así mis queridos amigos logremos este estupendo resultado y realizaremos un llavero ideal para la ocasión y único en su estilo,pues cada uno de nosotros podemos colocarle una marca especial.
And so, my dear friends, let's achieve this stupendous result and we will make an ideal keychain for the occasion and unique in its style, since each of us can place a special mark on it.
Queridos Amigos este a Sido mi elaboracion del día de hoy para todos ustedes con mucho cariño y con muchas ganas de que mi trabajo sea de su total agrado y les sea de utilidad y guía para su propia elaboración.
Me despido por esta ocasión agradeciendo su apoyo y su visita, Estaré muy agradecida y anciosa de poder recibir sus comentarios y sugerencias.
Saludos y bendiciones para ustedes.
Dear Friends, this has been my elaboration today for all of you with great affection and with great desire that my work be to your liking and be useful and guide for your own elaboration.
I say goodbye on this occasion thanking you for your support and your visit. I will be very grateful and eager to receive your comments and suggestions.
Greetings and blessings to you.
las fotos fueron tomadas con mi teléfono Redmi 9, contenido exclusivo para Hive. Y la traducción fue realizada a través de Google.
photos were taken with my Redmi 9 phone, exclusive content for Hive. And the translation was done through Google.
Congratulations @emmaris! You have completed the following achievement on the Hive blockchain And have been rewarded with New badge(s)
Your next target is to reach 550 posts.
Your next target is to reach 500 upvotes.
You can view your badges on your board and compare yourself to others in the Ranking
If you no longer want to receive notifications, reply to this comment with the word
STOPCheck out the last post from @hivebuzz:
Support the HiveBuzz project. Vote for our proposal!
Es muy delicado y hermoso 💛