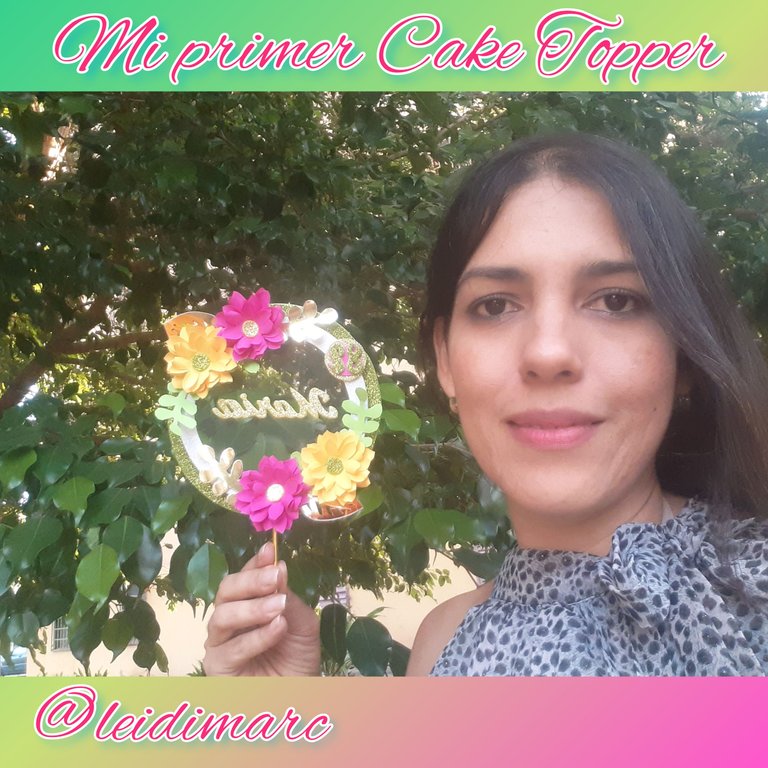

Estimados amigos creadores de DIY y todos los que me leen, les saludo con aprecio, en esta oportunidad paso por esta comunidad para mostrarles paso a paso como hice un lindo Cake Topper para mi Querida suegra la Sra. María.
Como ya lo he dicho en varias oportunidades me gustan las manualidades y también soy de las que me gusta felicitar con un detalle en mano. No siempre puede ser algo de gran valor monetario, ni de la mejor marca del mercado, porque no tengo las maneras.
Sin embargo, gracias a las manualidades que he venido aprendiendo hacer a lo largo del tiempo, algunos materiales tengo guardado, de todo un poco, para hacer esos detalles que tienen un gran valor, por el amor, esfuerzo y trabajo que le pongo, tratando que a quienes vayan dirigidos (el homenajeado) los aprecié y sea de su agrado.
Dear friends DIY creators and all those who read me, I greet you with appreciation, this time I go through this community to show you step by step how I made a nice Cake Topper for my dear mother in law Mrs. Maria.
As I have already said on several occasions I like crafts and I am also one of those who like to congratulate with a detail in hand. It can't always be something of great monetary value, nor of the best brand in the market, because I don't have the means.
However, thanks to the crafts that I have been learning to do over time, I have saved some materials, a little bit of everything, to make those details that have a great value, for the love, effort and work that I put, trying that those to whom they are addressed (the honoree) appreciate them and that they are to their liking.
Se podría decir que para hacer este Cake Topper lo hice con material reciclado, pues todo lo tenía en casa, de otros proyectos o detalles que le había hecho Arianna y a Ambar de sus Cumpleaños el año pasado.
Así como ven al fondo de la imagen, que fueron decoraciones con esos colores. Fueron unos cuadros de unas piñas, que me quedaron tan bonitos que aún están en la sala je, je, je.
You could say that I used recycled material to make this Cake Topper, because I had it all at home, from other projects or details that Arianna and Ambar had made for their birthdays last year.
As you can see at the bottom of the picture, they were decorations with those colors. They were pictures of pineapples, which were so beautiful that they are still in the living room heh, heh, heh.
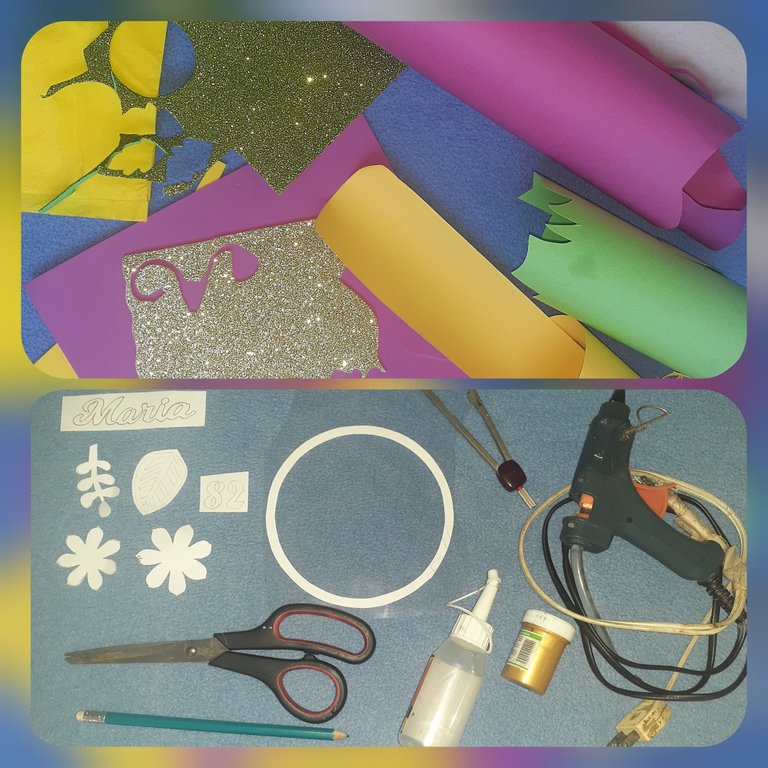
Ahora les cuento, para hacer este lindo proyecto, utilice estos materiales, que aunque se ven muchos, son cosas que podemos tener en casa o buscar algo similar.
- Cartulina de colores.
- Foami de colores escarchado.
- Cartulina blanca.
- Acetato.
- Tela sintética dorada.
- Silicona, líquida y en barra.
Moldes.
Herramientas.
- Lápiz.
- Compás.
- Tijera.
- Pistola de silicona.
Now I tell you, to make this cute project, use these materials, that although they look a lot, are things that we can have at home or look for something similar.
- Colored cardboard.
- Frosted colored Foami.
- White cardboard.
- Acetate.
- Golden synthetic fabric.
- Silicone, liquid and stick.
- Molds.
Tools.
- Pencil.
- Compass.
- Scissors.
- Silicone gun.

Una vez que tenía todos los materiales a usar, empecé a marcar los todos los moldes en sus respectivos materiales.
El nombre de María y el número 82, lo marqué en foami.
Las flores y las hojas verdes, las marqué en las cartulinas de colores.
Las hojas doradas, las marqué en una tela sintética, tipo espejo.
Una vez marcado, comencé con el proceso de recortar cada una, en este proceso Arianna me ayudó un poco, créditos para ella, además también es la camarógrafa, je, je, je. Mi ayudante estrella.
Once I had all the materials to use, I began to mark all the molds in their respective materials.
I marked Mary's name and the number 82 on foami.
The flowers and the green leaves, I marked them on the colored cardboard.
The golden leaves, I marked them on a synthetic fabric, mirror type.
Once marked, I began the process of cutting out each one, in this process Arianna helped me a little, credits to her, she is also the cameraman, heh, heh, heh. My star helper.
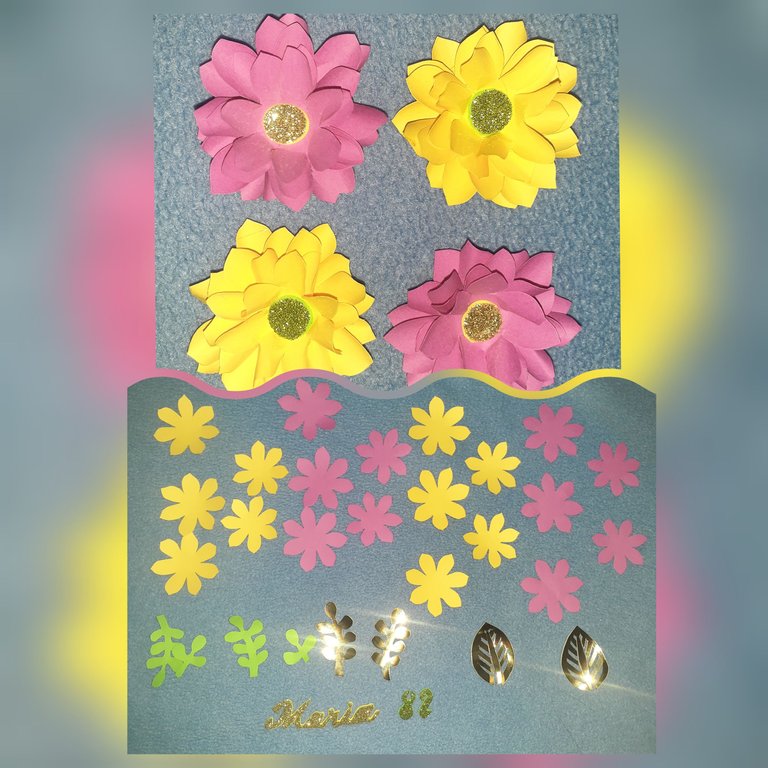
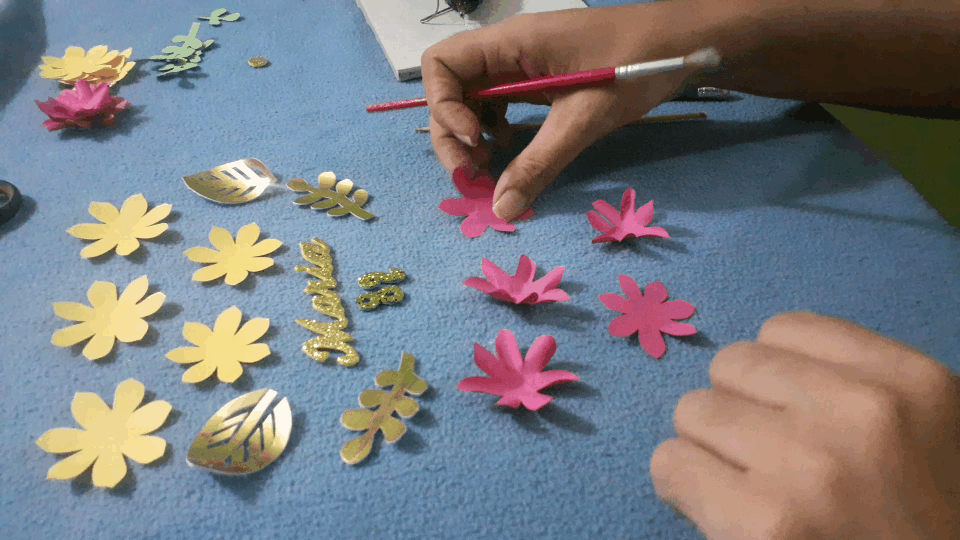
Ya cortadas todas las piezas, comencé con el armado de las flores, el cual consistía en darle forma a cada uno de los pétalos con en palo de un pincel, por su forma redondeada.
Le colocaba de forma intercalada el pincel por la parte de arriba del pétalo, dándole forma curva y en el pétalo siguiente, la forma curva se la daba hacia abajo.
Luego que los pétalos estaban ondulados, en la parte del centro se hundía un poco, para ir colocando las otras.
Una vez que tenía los 5 pétalos de una flor, 3 más grandes y dos más pequeños, se iban pegando una flor encima de otro, hasta formar estas lindas flores, a las que en el centro les coloqué un círculo hecho de foami.
Once all the pieces were cut, I began with the assembly of the flowers, which consisted of shaping each of the petals with the stick of a paintbrush, because of its rounded shape.
I placed the brush on the top of the petal, giving it a curved shape, and on the next petal, I gave the curved shape downwards.
After the petals were undulated, in the center part I would sink a little, to place the other petals.
Once I had the 5 petals of a flower, 3 larger and two smaller ones, I glued one flower on top of the other, until I formed these beautiful flowers, to which I placed a circle made of foami in the center.
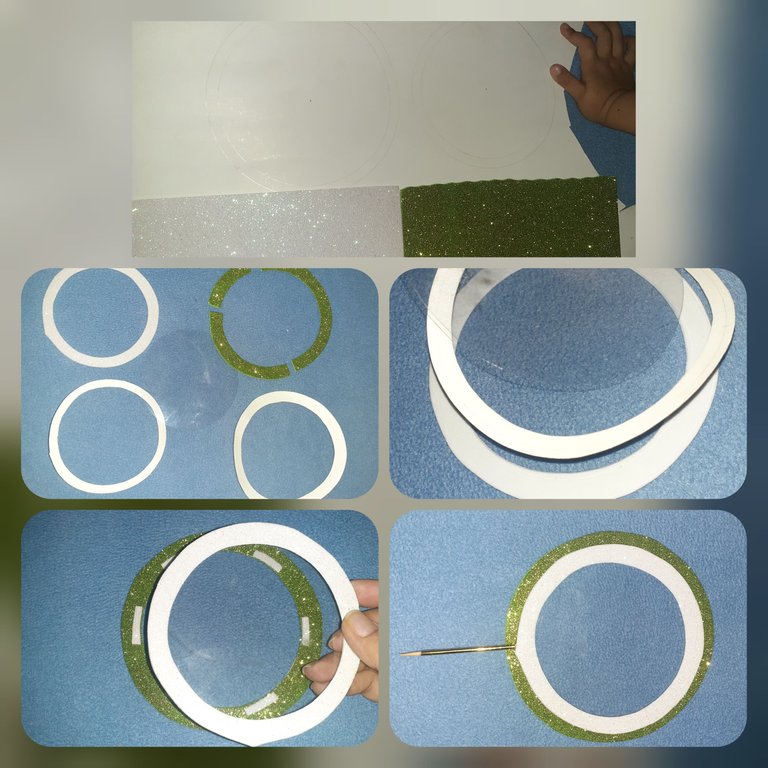
Para hacer la base del Cake Topper, en la cartulina blanca, marque dos círculos, una más grande que la otra, la más pequeña, que es el centro, es de 6,5 cm de circunferencia, para que tenga una idea del tamaño.
Esta cartulina es para que le dé más fuerza al foami, que también marque y corte, de la misma forma que la cartulina.
El foami verde escarchado tenía poco, he hice unos empates, que no se ven con el trabajo terminado.
Luego pegue la cartulina al foami, después el acetato, que por cierto era un trozo que saque de los empaques de los juguetes de mi sobrino el día del niño, dije esto me va a servir para algo y en vez de acabar en la basura, termino reciclándose en esto que les muestro.
Luego, para que los dos círculos de foami no quedaran tan pegados y se vieran superpuestos, uno del otro, le coloque esos trozo de foami, y luego pegue la capa del foami blanco escarchado.
Le coloqué un trozo de palito de altura, en cuál forre con una cinta sintética y así quedó la base, listo para armar.
To make the base of the Cake Topper, on the white cardboard, mark two circles, one larger than the other, the smaller one, which is the center, is 6.5 cm in circumference, so you have an idea of the size.
This cardboard is to give more strength to the foami, which I also mark and cut, in the same way as the cardboard.
The frosted green foami had little, and I made some ties, which are not seen with the finished work.
Then I glued the cardboard to the foami, then the acetate, which by the way was a piece that I took out of the packaging of my nephew's toys on children's day, I said this is going to serve me for something and instead of ending up in the trash, it ended up being recycled in this that I show you.
Then, so that the two circles of foami would not be so stuck together and would look superimposed, one on top of the other, I placed those pieces of foami, and then glued the layer of frosted white foami.
I placed a piece of stick height, in which I lined with a synthetic ribbon and so was the base, ready to assemble.
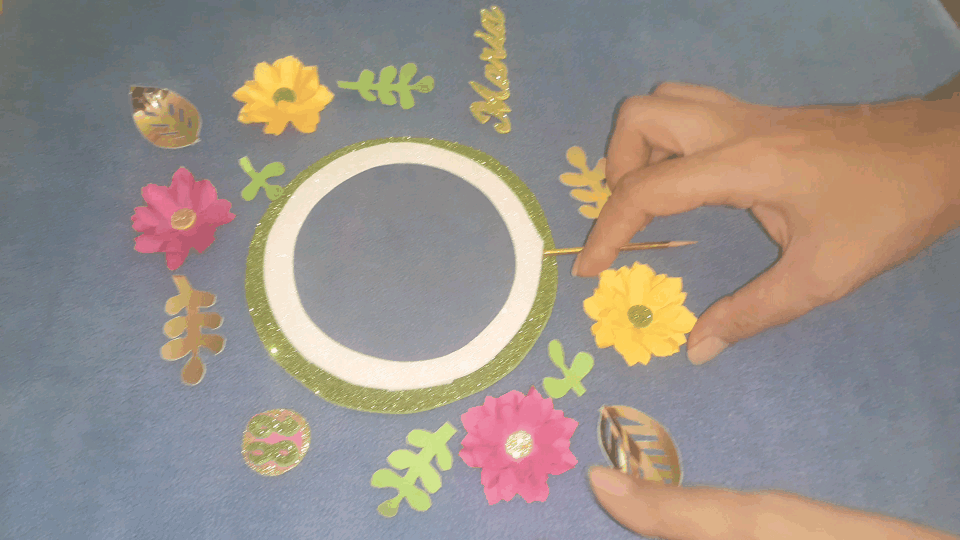
Para armar toda la decoración fui colocando las flores según el diseño que ya había pensado y colocando en papel en forma de garabato, que ahora listo se ve muy bien.
Todo lo que está puesto en el foami, lo pegue con silicona caliente, pero cuando pegue el acetato y las letras que pegue sobre él, lo hice con silicona fría, para que no se despegue con facilidad. Así quedó ya listo.
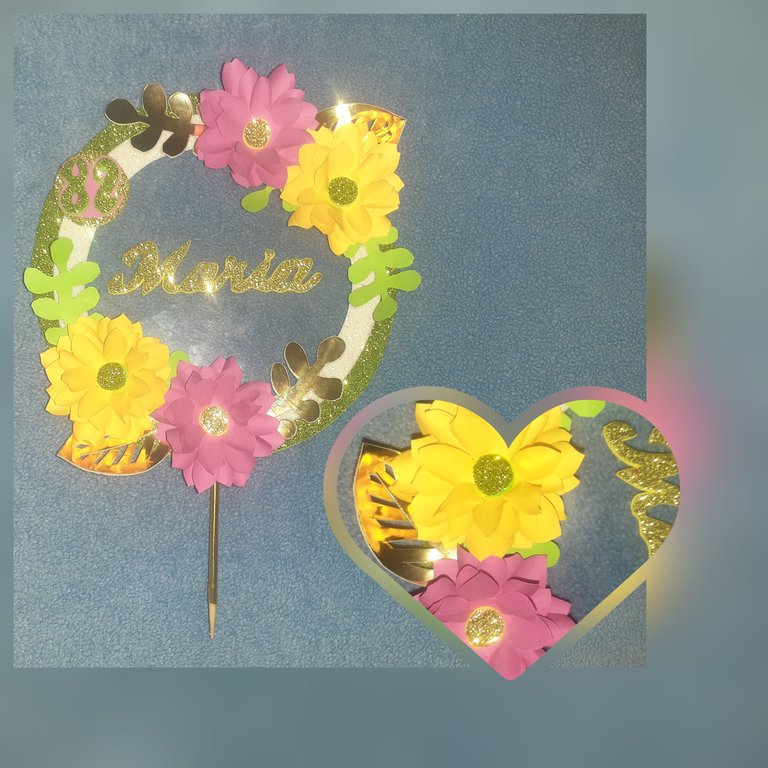
En el título les digo que es mi primer Cake Topper, porque en realidad es la primera vez que hago uno así de esta manera, incluso las flores, no las había hecho con esta técnica, quedé contenta, Feliz con este resultado.
En otras ocasiones para las tortas de mis niñas, siempre les invento algún detalle, porque aunque hay cosas bellas que se pueden comprar ya listas y hermosas, a mí me llena de alegría, hacerlo a mi estilo y con lo que tengo a la mano, para reciclar todo eso que vengo guardando. Porque si no mi esposo, me los va a tirar (poner de patitas a la calle) je, je, je.
To assemble the whole decoration I placed the flowers according to the design I had already thought of and placed them on paper in the shape of a doodle, which now looks very nice.
Everything that is placed on the foami, I glued it with hot silicone, but when I glued the acetate and the letters I glued on it, I did it with cold silicone, so that it would not come off easily. That's how it was ready.
In the title I say that this is my first Cake Topper, because it is actually the first time I do one like this, even the flowers, I had not done with this technique, I was happy with this result.
In other occasions for my girls' cakes, I always invent some detail, because although there are beautiful things that can be bought ready-made and beautiful, it fills me with joy to do it my style and with what I have at hand, to recycle all that I have been saving. Because if not, my husband will throw them away (put them out on the street) heh, heh, heh.
Muchas gracias por haber leído mi tutorial, Tú también lo puedes hacer en casa, si sigues estos pasos.
A diario en nuestro entorno hay cumpleaños por celebrar, sorprende al cumpleañero con un detalle como este, o porque no sorprendáis a ti mismo, de intentar y crear.
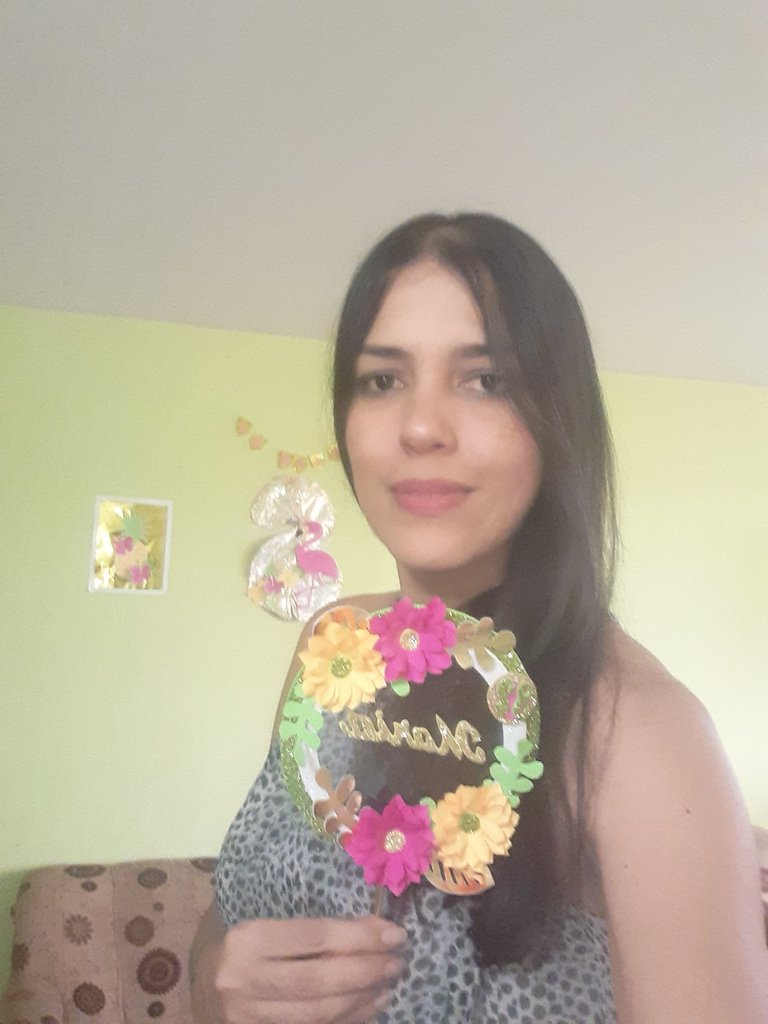
Yo quedé maravillada. No pensé que me iba a quedar tan bello, no como los que hacen las expertas en la materia, pero si quedo presentable. A ti que te pareció. Saludos y bendiciones.
Thank you very much for reading my tutorial, you can also do it at home, if you follow these steps.
Every day in our environment there are birthdays to celebrate, surprise the birthday boy with a detail like this, or why not surprise yourself, try and create.
I was amazed. I did not think it was going to be so beautiful, not like those made by experts in the field, but it was presentable. What did you think. Greetings and blessings.
Fotos tomadas por | Photos taken by @leidimarc
Dispositivo | Device | Samsung Galaxy A20
Fotos editadas en: |Photos edited in | App Gridart
Separadores hechos en | Separators made in | CC Express for Samsung
Gif creado en | Gif created in | App Video Maker
Traducción con | Translation with| DeepL
The rewards earned on this comment will go directly to the people( @leidimarc ) sharing the post on Twitter as long as they are registered with @poshtoken. Sign up at https://hiveposh.com.
Te quedó muy lindo amiga. Todos los toppers de mis tortas los hago yo y es todo un proceso bastante agotador. Por un tiempo hice para vender pero dejé de hacerlo porque e destruye la cervical. Tienes mucha creatividad la verdad.
Excelente explicación además.
Un abrazote amiga
Si he visto los tuyos y son bien lindos.
Ni te digo, cortar todo eso cansa y con Ambar brincandome encima más jejeje.
Yo había hecho unos súper sencillos, pero viendo que estos modelos se están usando mucho, me anime a realizar uno.
Lo bueno que todo el material ya lo tenía en casa.
Muchas gracias amiga por tu lindo comentario.
Congratulations @leidimarc! You have completed the following achievement on the Hive blockchain and have been rewarded with new badge(s):
Your next target is to reach 7000 upvotes.
You can view your badges on your board and compare yourself to others in the Ranking
If you no longer want to receive notifications, reply to this comment with the word
STOPCheck out the last post from @hivebuzz:
Amiga definitivamente ese talento de hacer esas manualidades a mano como lo haces, tú eres digno de mucha paciencia , mucha calma, creatividad, imaginación y alegría para los artes manuales , además de ser un gran desestrésante para tu día a día, amiga. @leidimarc
Te quedo bello, imagino que quien lo encargue debe pagar tu trabajo de hacerlo, ese es mucho tiempo, esfuerzo y dedicación.
Si amiga lleva su trabajo, pero teniendo el material, ordenando las ideas y mucha paciencia como dices, se logra este trabajo.
Muchas veces no es valorado, o uno no se da a que lo valoren, por eso tengo parado ese proyecto de hacer cosas para vender, la gente de mi entorno no aprecian el trabajo, no le gustan pagar el precio.
Y por más económico que se los de tardan mucho para pagar.
Gracias por sus palabras. Bendiciones.
Muy bonito y bien explicado el paso a paso.
Las flores se ven preciosas. 🥳
Gracias por leer mi post, lo hice con mucho cariño.
Las flores me gustó el resultado. Primera vez que las hago así.
Saludos y bendiciones @creacioneslelys
Desde que inicie en esta plataforma he visto tus creaciones y me encanta la manera en la que explicas en tus posts que amas crear.
Estoy emocionada porque mañana es el cumpleaños de mi madre e hice Polaroids de Ricardo Arjona en Illustrator para ponerlas con Topper en su torta
Saludos amiga
Gracias amiga, por seguir mis post.
Los hago con dedicación, mostrando tal cual los hago, para el que guste los haga.
Muchas Felicidades para tu mamita, que Dios le dé larga vida saludable, que la pasen en familia.
Que ese Topper se luzca en la celebración y coman rico.
Ya voy a ver como te quedo.
Saludos y bendiciones @maluescritos
Wow, yo creo que no tengo tanta paciencia para hacer esas cosas, este año quería hacer uno para el cumple de Leo, pero cuando @rlathulerie me dijo más o menos todo lo que había que hacer desistí jajaja
Admiro mucho a quienes tienen la paciencia y la habilidad para hacer estas cosas, a mi las manos me duelen después de un rato y la vista ni se diga, soy ciega, ciega. Y bueno ademas de todo te quedó bello y el tutorial muy bien explicado, me encantó el gif que agregaste.
Muchas gracias por compartir un poco más de tus cosas con nosotros ❤️
Amiga es que uno ve el trabajo terminado o hasta el procedimiento aquí explicado y piensa que es difícil o que no es capas de hacerlo, pero si te pones claro que lo haces.
Y tienes una experta que te orienta como es tu hermana.
Ese Topper yo no lo había hecho, porque los veía muy elaborado, por aquí lo venden, pero los cortes lo hacen con máquinas, aquí todo lo hago a a mano, es canson pero si sale algo bonito.
Que bueno que te gusto @adalathu
@leidimarc , que lindo , felicidades por tu creatividad. Cuando hacemos manualidades nos relajamos y deivwrtinos mucho. Por lo menos ese es mi caso
Hola amiga @angeedm a mi me encantan, aunque me cansen un poco yo sigo hasta terminar y ver el lindo resultado.
Definitivamente, tienes unas manos bendecidas. A mi me gustan las manualidades, pero no tengo la paciencia para hacerlas y entonces termino brava y botando todo.
Antes si me resultaba hasta anti estrés, pero ahora solo me dedico a verlas y tratar de que luego me la vendan o regalen.. jajaja
Amén amiga, gracias.
Botando? Después de tanto trabajo, tienes que insistir hasta que te salga bien, ya lo tienes en la sangre, por tu gusto por crear.
Ojalá todos le diéramos el valor que tiene crear proyectos, productos, cosas con las manos, aunque nos guste hacerlo, lleva su tiempo, cansa y se invierte en aprender tecnicas y comprar herramientas.
Hace un tiempo también hacía, me dediqué hacer los topper para cumpleaños de mi familia y uno que otro que me pedían, de verdad es un gran trabajo que requiere mucha creatividad, te felicito por intentarlo, nada mal, saludos
Es si amiga, no lo v listo y dice son 3 florecitas y ya pero no saben que yedi es con precisión, con pulcritud, con esmero y todo lleva su técnica.
Quedó muy lindo 🤩 tu suegra seguro se puso feliz 😊, mi mamá hace manualidades y siempre tiene material que le queda de otras que ha hecho , siempre dice eso se necesita para cualquier momento , saludos ✨
So eso es lo bueno, de guardarlas cosas que nos pueden servir más adelante como a mi que me da gusto darle una segunda oportunidad a las cosa que parecen vieja, pero se le puede dar vida otra vez.
Thank you for sharing this amazing post on HIVE!
Your content got selected by our fellow curator @rezoanulvibes & you just received a little thank you via an upvote from our non-profit curation initiative!
You will be featured in one of our recurring curation compilations and on our pinterest boards! Both are aiming to offer you a stage to widen your audience within and outside of the DIY scene of hive.
Join the official DIYHub community on HIVE and show us more of your amazing work and feel free to connect with us and other DIYers via our discord server: https://discord.gg/mY5uCfQ !
If you want to support our goal to motivate other DIY/art/music/homesteading/... creators just delegate to us and earn 100% of your curation rewards!
Stay creative & hive on!