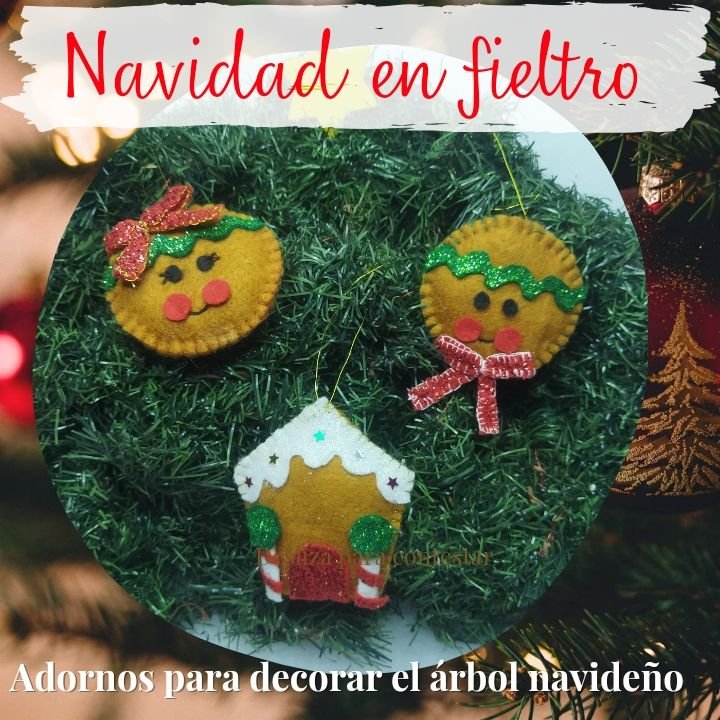
BIENVENIDOS A MI BLOG
¡Holaaaa, holaaaaa! Amigos de creativos y creadores de Hive Diy. En Venezuela, llegar a mes de noviembre es indicio de que ya tenemos las navidades encima y es momento de ponerse los patines en línea si queremos tener nuestra casa arreglada para celebrar la época más linda del año. Y no sólo me refiero a quesea linda por cómo la decoremos, no. Sino que es en esta época donde las familias se unen para compartir y darse todo el amor que durante todo el año no pudieron. Agradecer por todo lo que se logró, derramar algunas lágrimas por los que ya no están con nosotros físicamente pero que en nuestras mentes y corazones permanecerán para siempre.
Es en esta época tan emotiva del año cuando queremos tener nuestra casa hermosa y más cuando tenemos niños que se emocionan tanto con los adornos y sobre todo con los regalos que pueden recibir. Aunque ya en mi casa no hay niños pequeños y la familia se ha reducido para estas celebraciones, aún prevalece el espíritu navideño y que aunque por más vicisitudes que se presenten no debemos dejar que se apague.
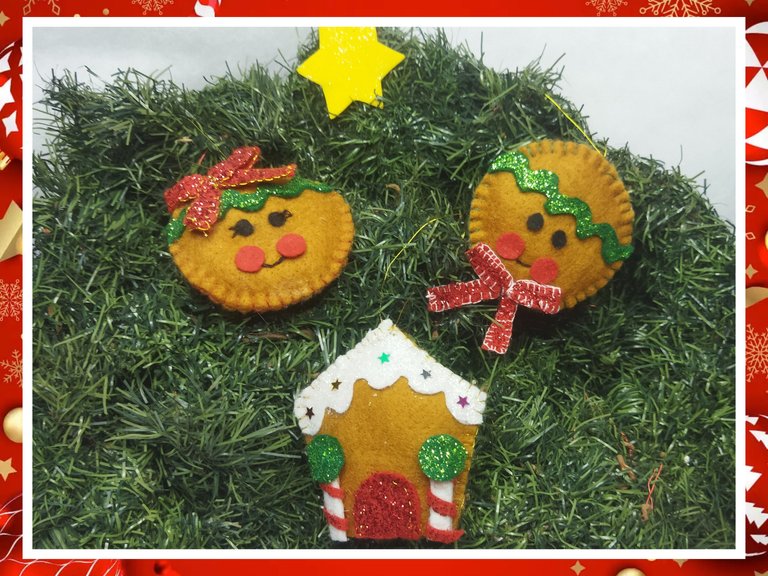
Es por esto que desde ya he puesto manos a la obra y he comenzado dar vida a esos pequeños adornos que convertirán mi espacio en un lugar acogedor para compartir con mi familia. Estos adornos que van a decorar corona navideña ero que también se pueden usar para el árbol o para lo que consideres adecuado, hechos con fieltro y con mucho amor para todos ustedes. Espero les guste.
WELCOME TO MY BLOG
Hellooooo, hellooooooo! Friends of creatives and Hive Diy creators. In Venezuela, reaching the month of November is an indication that Christmas is upon us and it is time to put on the inline skates if we want to have our house ready to celebrate the most beautiful time of the year. And I don't just mean that it's pretty because of how we decorate it, no. But it is at this time where families come together to share and give each other all the love that they couldn't all year long. Give thanks for everything that was achieved, shed some tears for those who are no longer with us physically but who will remain in our minds and hearts forever.
It is at this emotional time of year when we want to have our house beautiful and even more so when we have children who get so excited about the decorations and especially the gifts they can receive. Although there are no small children in my house and the family has been reduced for these celebrations, the Christmas spirit still prevails and no matter how many vicissitudes arise, we must not let it fade away.
This is why I have already got to work and have begun to give life to those small decorations that will turn my space into a cozy place to share with my family. These ornaments that will decorate the Christmas wreath can also be used for the tree or for whatever you consider appropriate, made with felt and with a lot of love for all of you. I hope you like it.
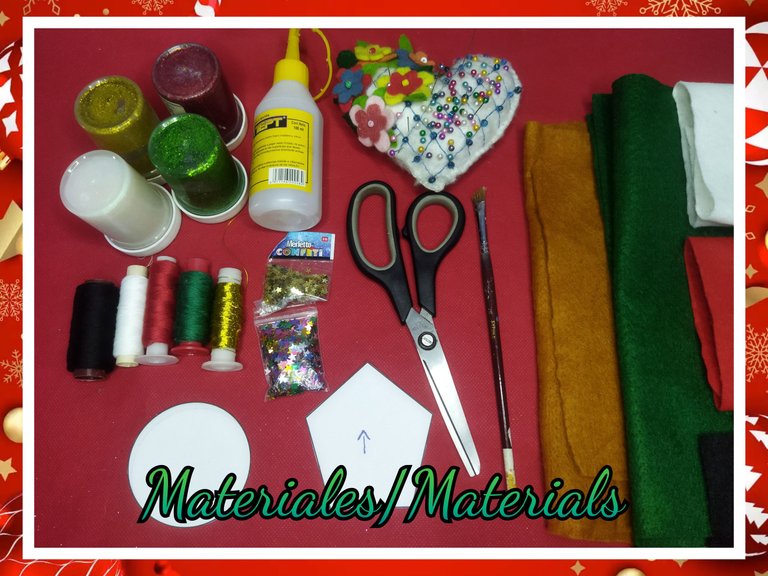
MATERIALES
- Fieltro (verde, rojo,blanco, marrón y negro)
- Relleno (guata)
- Hilos de coser (verde, rojo, blanco y negro)
- Hilo dorado
- Aguja de coser
- Alfileres
- Silicón líquido
- Gel escarchado
- Tijera
- Pincel
- Confites de estrellas
- Moldes de figuras geométricas
MATERIALS
- Felt (green, red, white, brown and black)
- Filling (wadding)
- Sewing threads (green, red, white and black)
- Golden thread
- Sewing needle
- Pins
- Liquid silicone
- Frosted gel
- Scissors
- Brush
- Star candy
- Geometric figure molds
STEP BY STEP // PASO A PASO
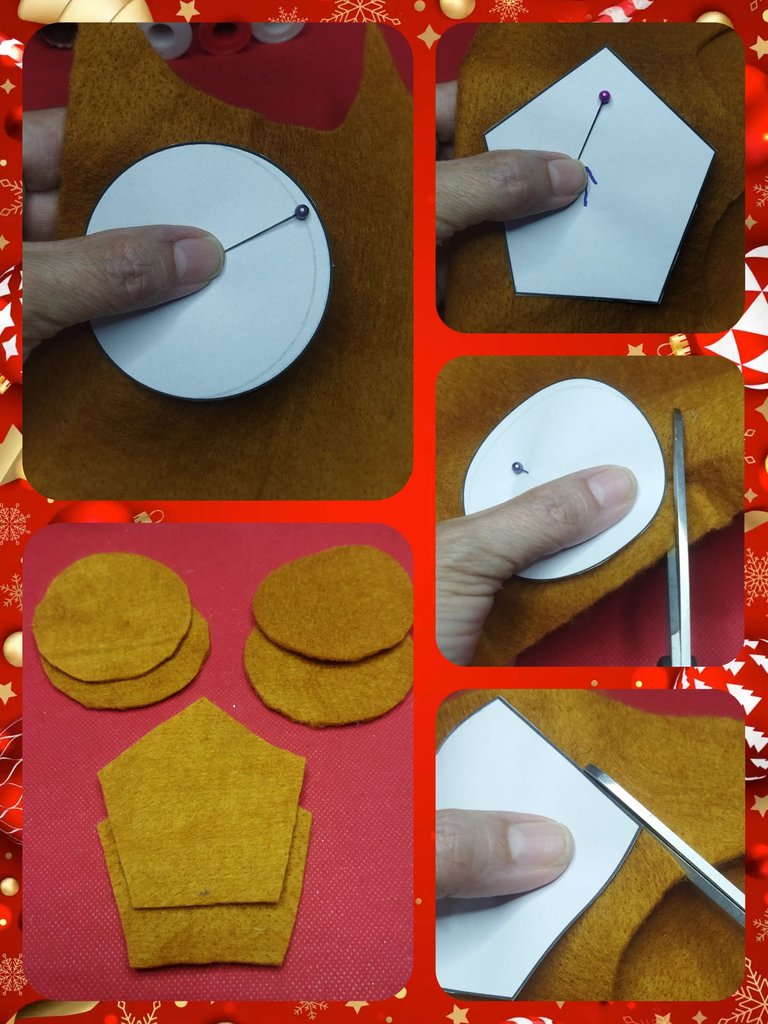
MUÑECOS DE JENGIBRE
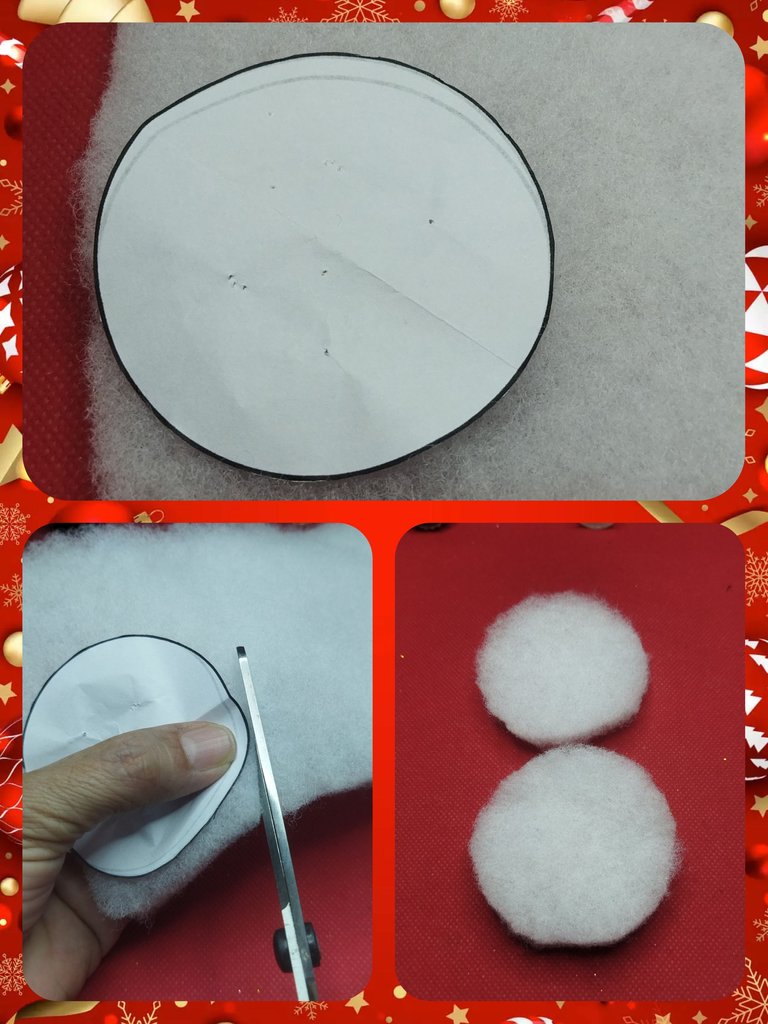
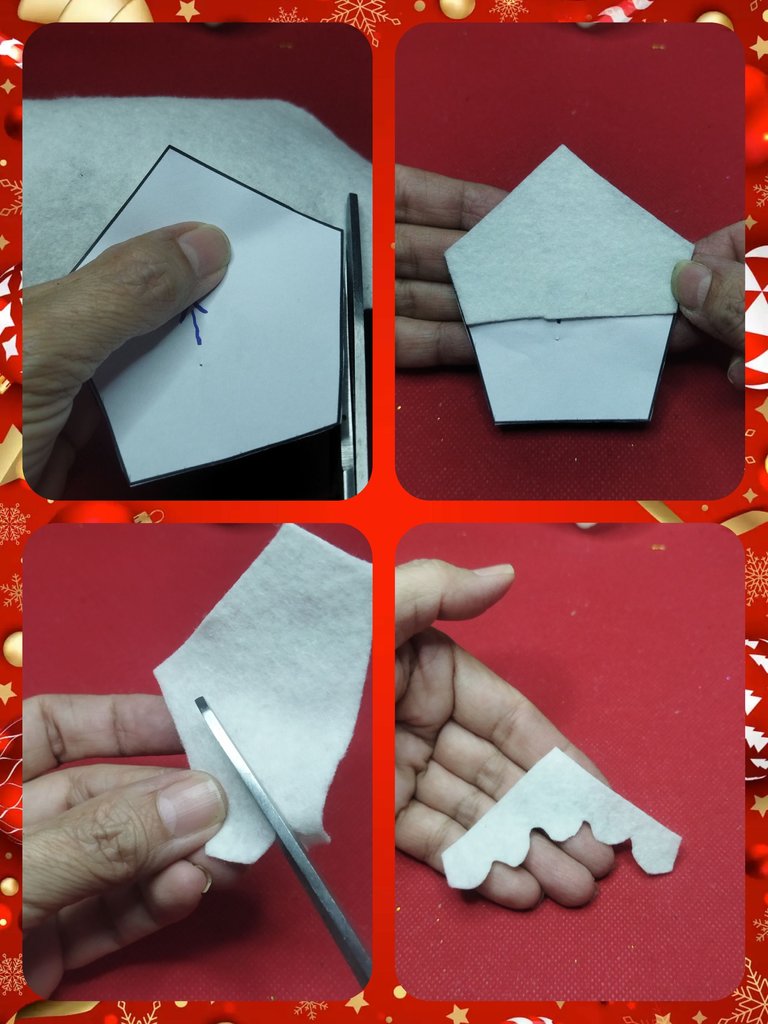
Comenzamos cortando 4 piezas circulares para los muñecos de jengibre y dos pentagonales para la casa con el fieltro marrón.
GINGER DOLLS
We started by cutting 4 circular pieces for the gingerbread men and two pentagonal pieces for the house with the brown felt.
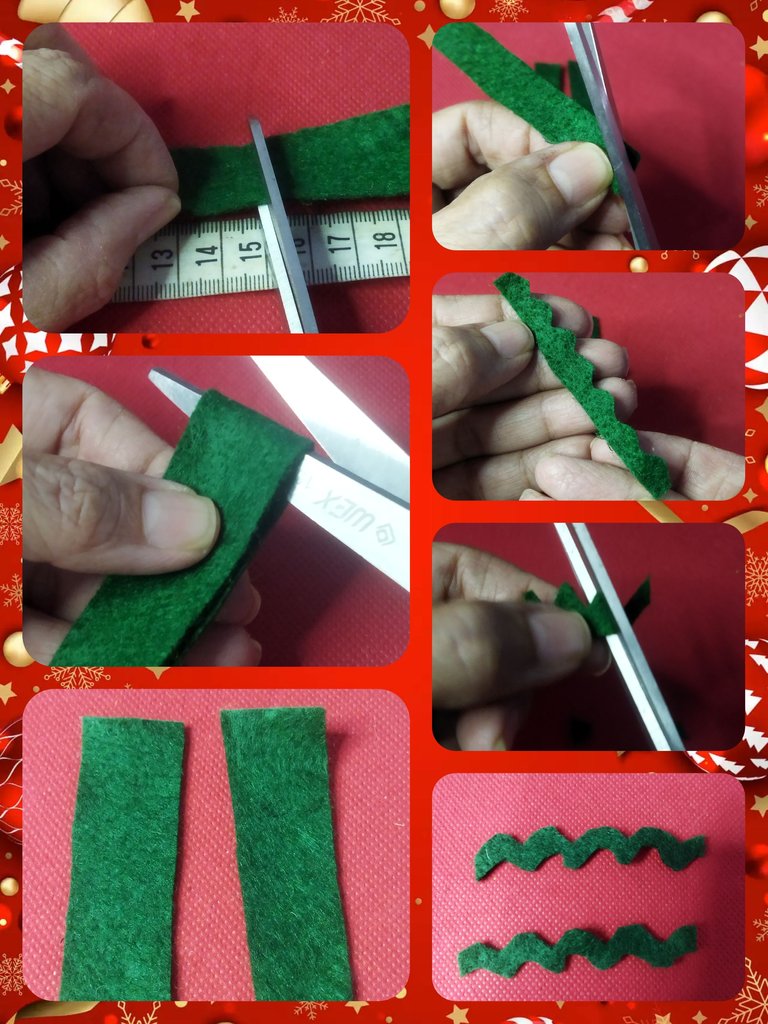
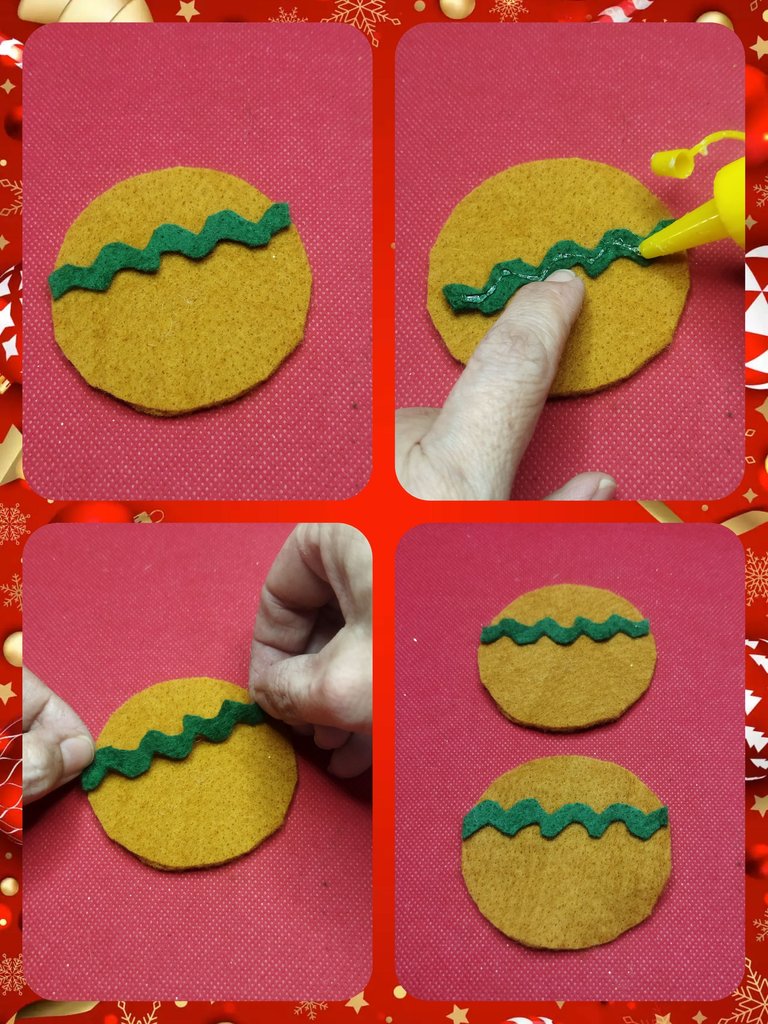
- Para hacer la cinta zigzig de los muñecos de jengibre, tomamos el fieltro verde y realizamos dos tiras de 7,5 cm de largo por 1 cm de ancho.
- Luego con la tijera hacemos cortes en forma de zigzag en ambas tiras.
- To make the zigzig ribbon for the gingerbread men, we take the green felt and make two strips 7.5 cm long by 1 cm wide.
- Then with the scissors we make zigzag cuts in both strips.
Con la pega de silicón agregamos en la tira y pegamos en dos de los circulo que cortamos anteriormente.
With the silicone glue we add to the strip and glue on two of the circles that we cut previously.
Cortamos dos formas circulares de relleno artificial (guata) de la misma medida de los muñecos de jengibre.
We cut two circular shapes of artificial filling (wadding) of the same size as the gingerbread men.
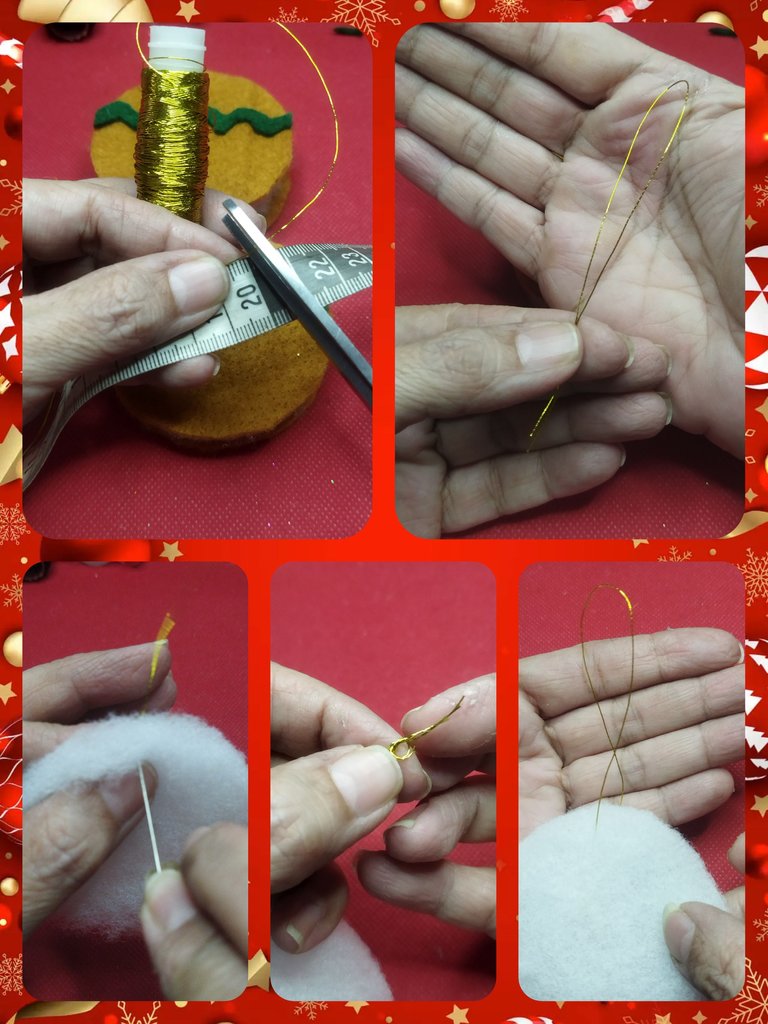
Para realizar el colgante, tomamos 20 cm de hilo dorado, ensartamos la aguja y vamos a pasar por las piezas circulares de guata. Realizamos un nudo.
To make the pendant, we take 20 cm of gold thread, thread the needle and go through the circular pieces of wadding. We make a knot.
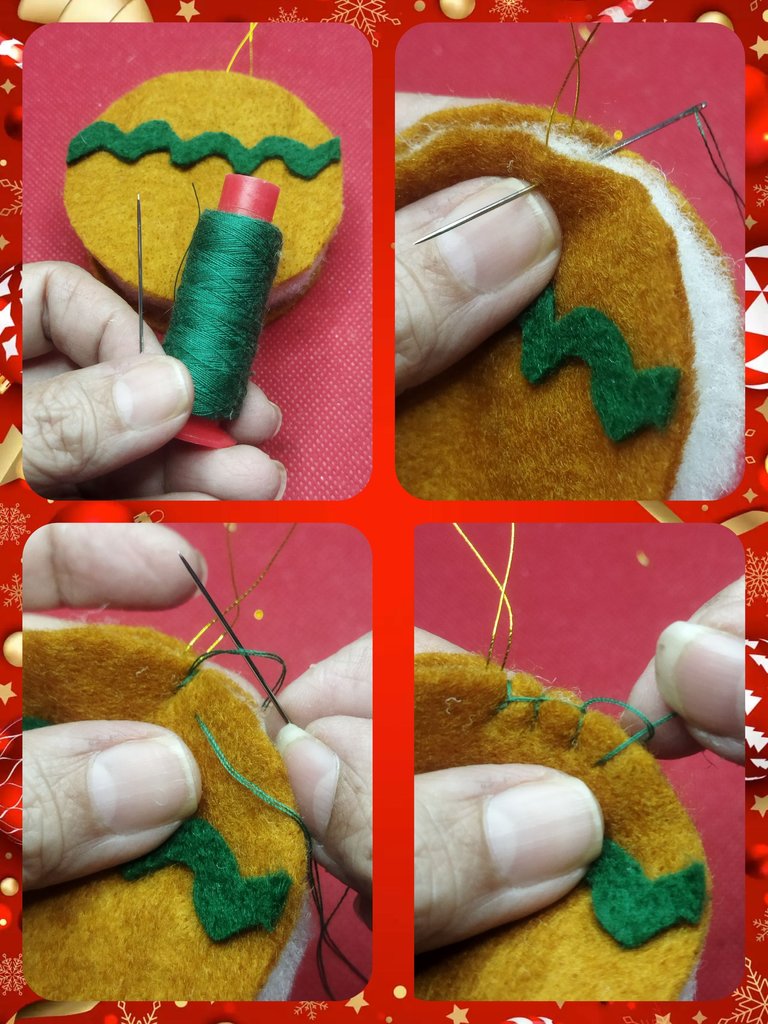
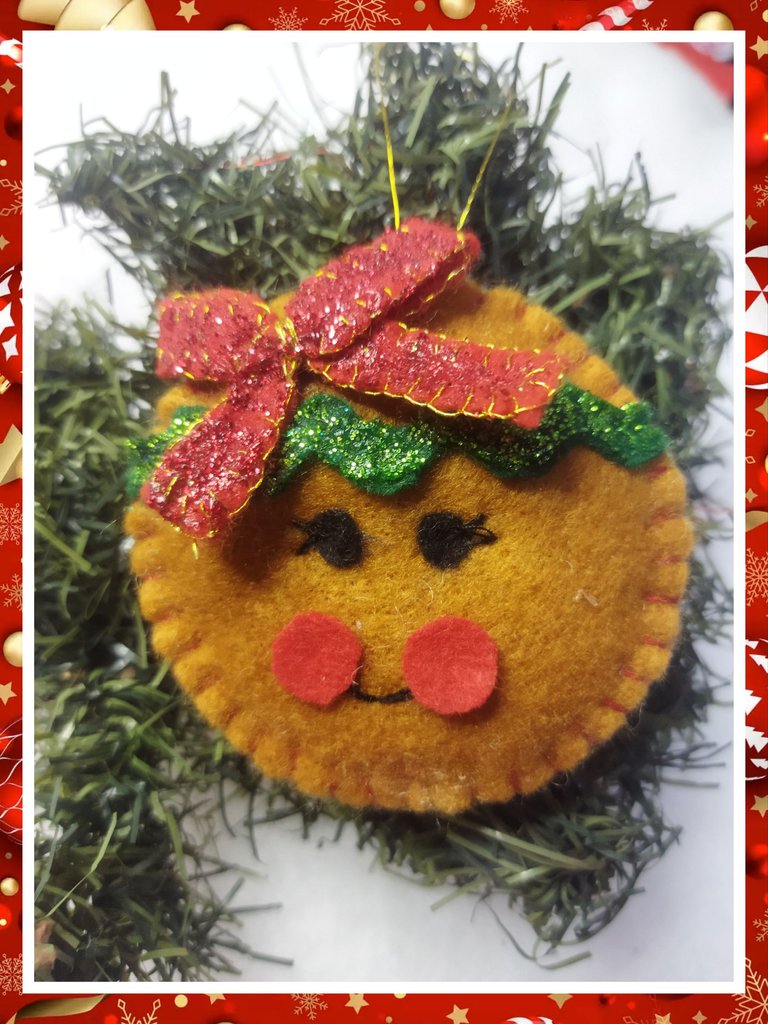
Tomamos un circulo solo, la pieza de guata con el hilo y un circulo con la cinta de zigzag. Con el hilo rojo vamos a unir las tres piezas realizando el punto de ojal alrededor. Este para el muñeco de jengibre femenino.
We take a single circle, the piece of batting with the thread and a circle with the zigzag ribbon. With the red thread we are going to join the three pieces by making the buttonhole stitch around it. This one for the female gingerbread man.

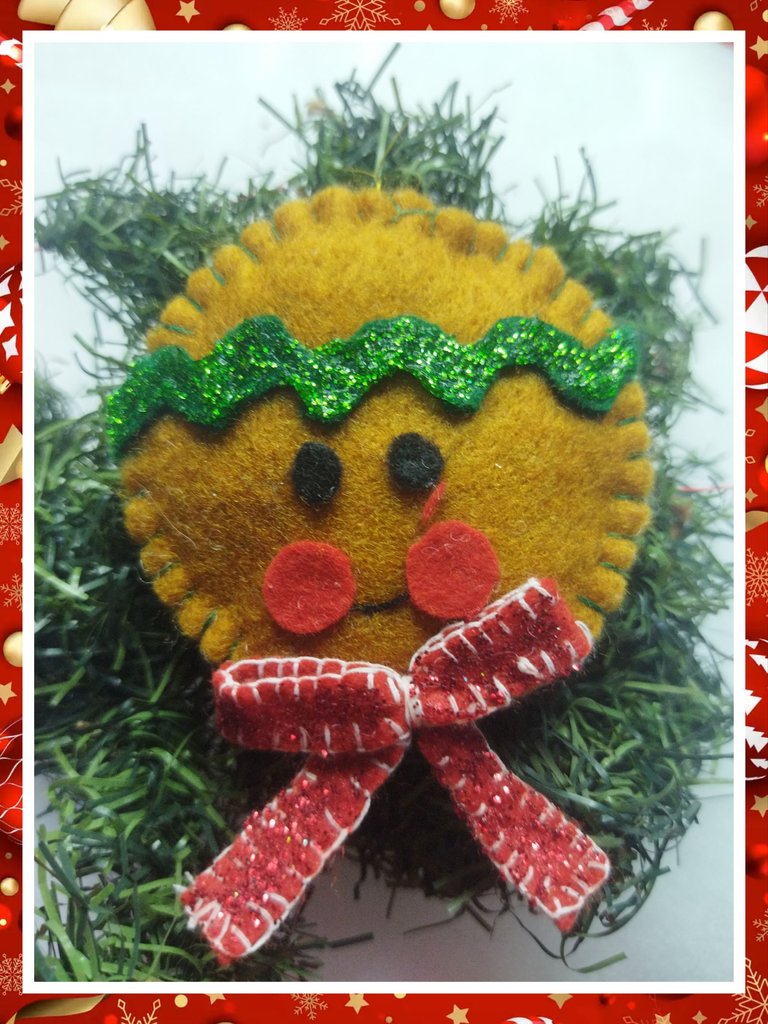
Repetimos el paso anterior con las otras tres piezas circulares para el muñeco de jengibre masculino pero vamos a utilizar el hilo verde.
We repeat the previous step with the other three circular pieces for the male gingerbread man but we are going to use the green thread.
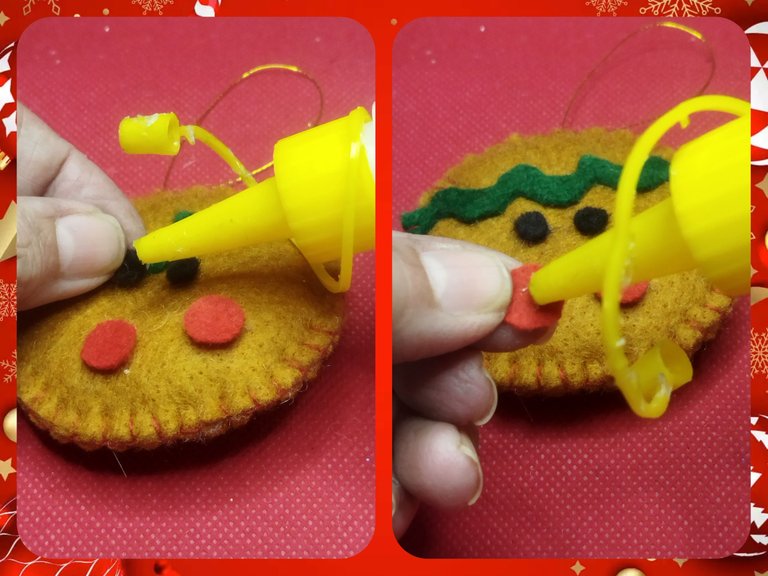
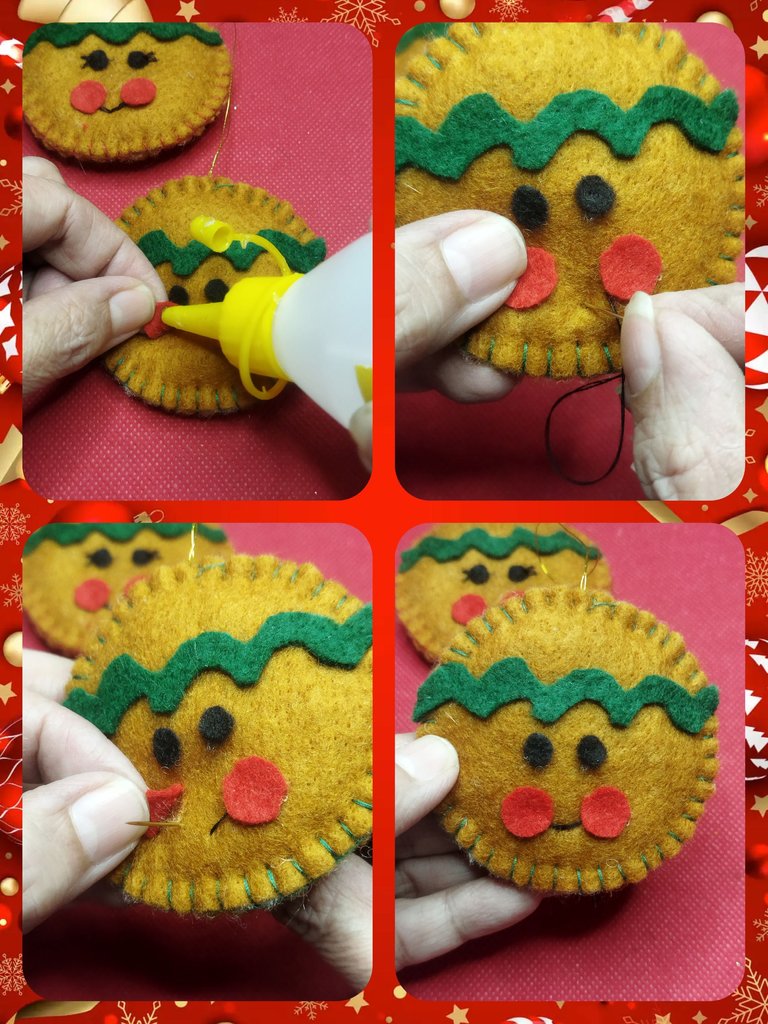
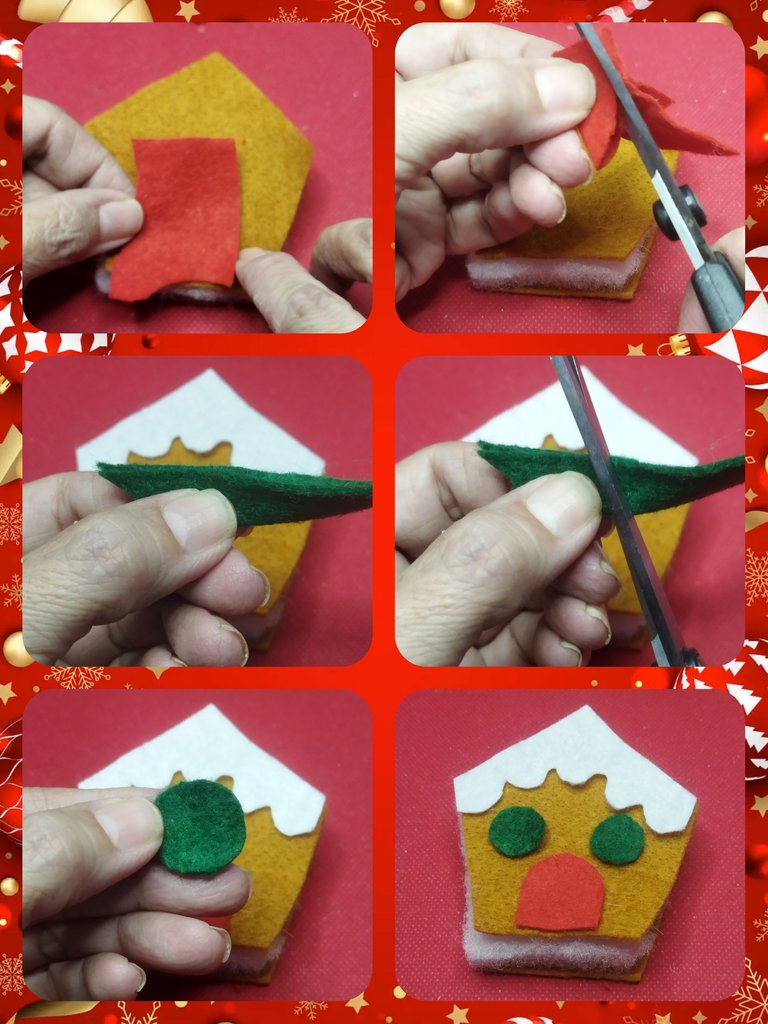
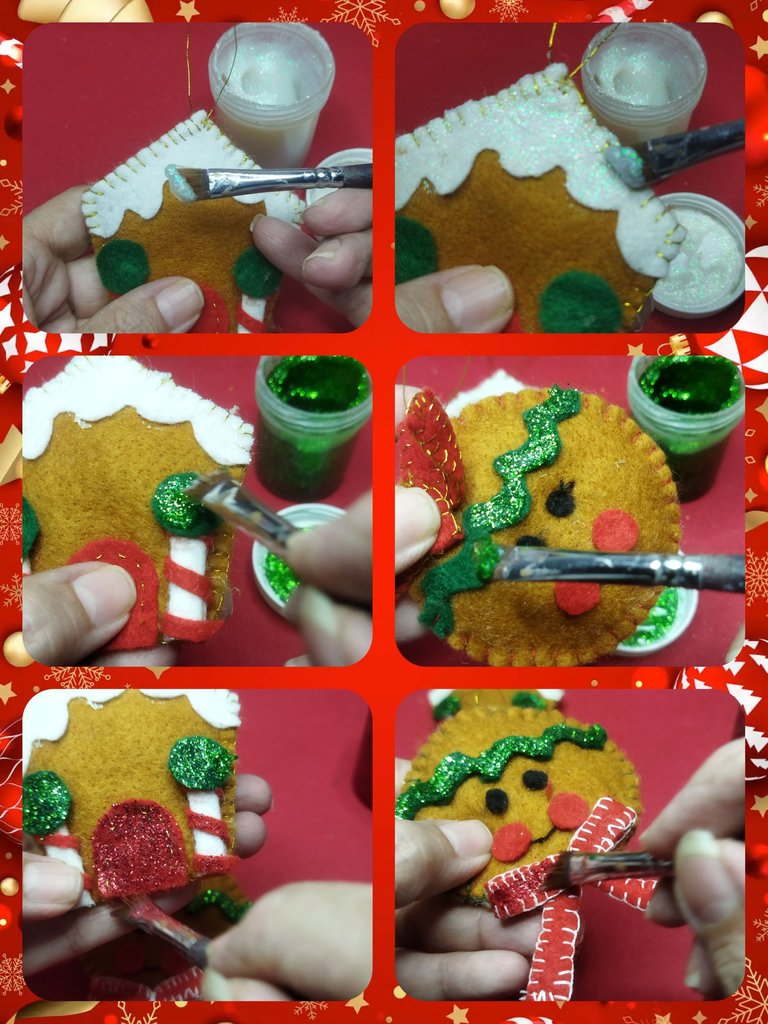
Una vez que tenemos nuestros dos muñecos armados comenzamos a realizar los detalles del rostro. Con el foami rojo realizamos 4 círculos de 0,60 cm aproximadamente para las mejillas. Dos para cada muñeco.
Y con el fieltro negro, realizamos 4 círculos de 0,30 cm para los ojitos.
Once we have our two dolls assembled, we begin to make the details of the face. With the red foam we make 4 circles of approximately 0.60 cm for the cheeks. Two for each doll.
And with the black felt, we make 4 0.30 cm circles for the eyes.
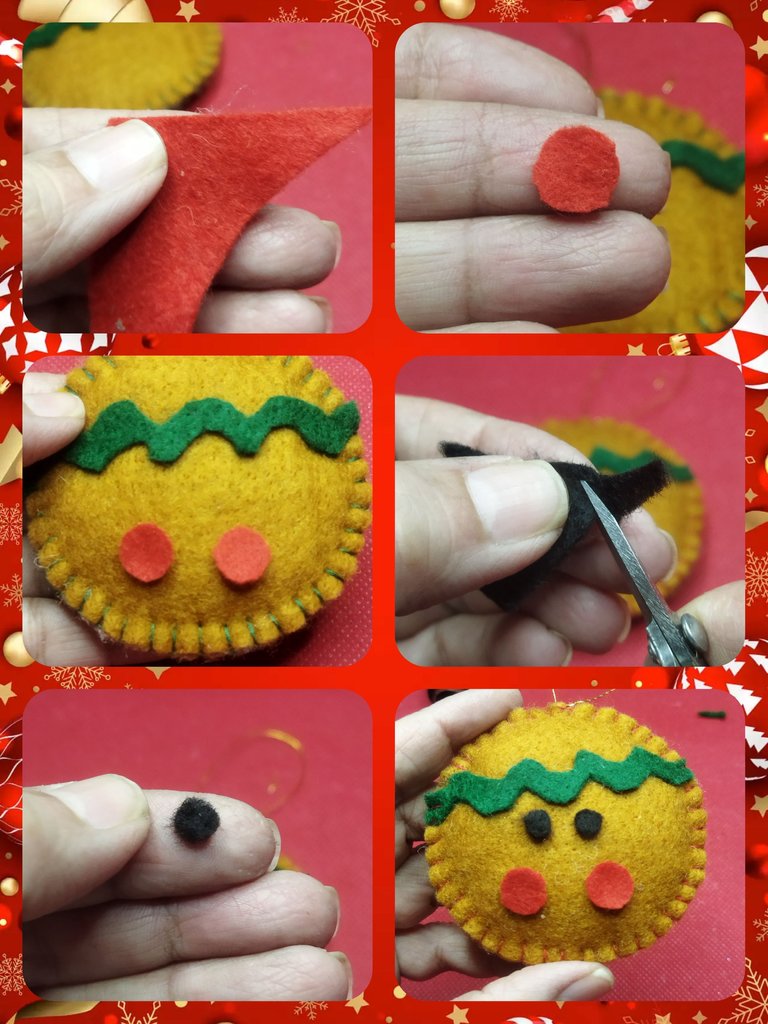
Pegamos las piezas con el silicón liquido en cada uno de los muñecos.
We glue the pieces with liquid silicone on each of the dolls.
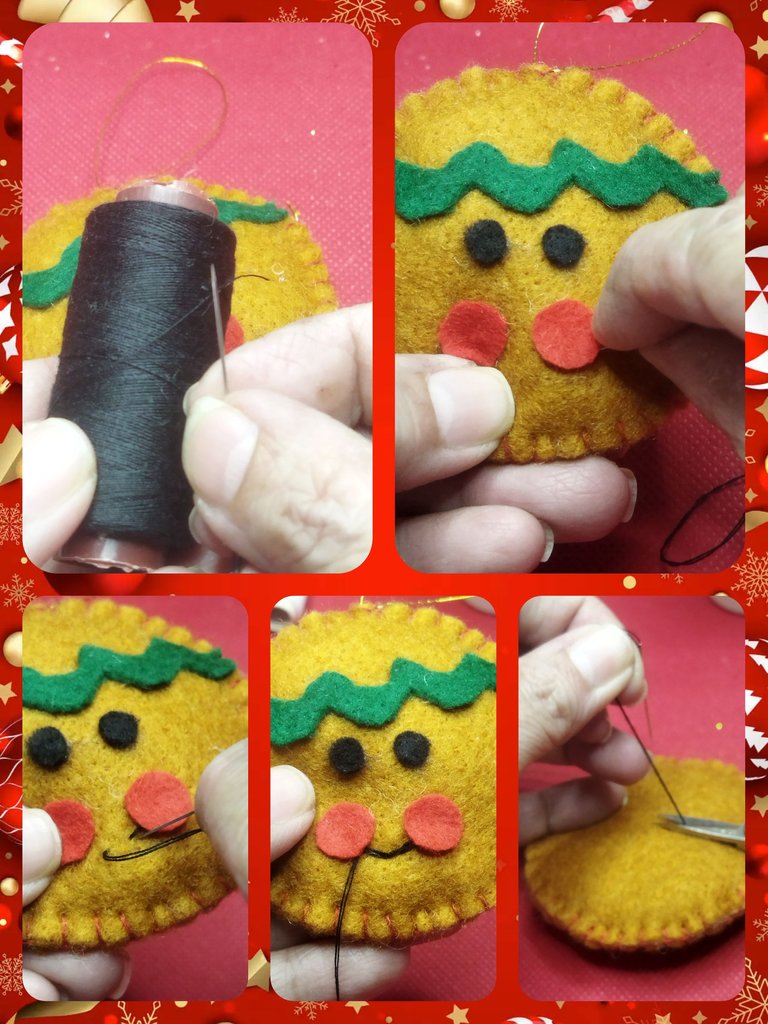
Con el hilo negro vamos a realizar la boca y las pestañas en uno de los muñecos para diferenciar cada muñeco. Para la femenina realizaremos las pestañas realizando dos puntos de hilvana a los lados de los ojos. Ya para la boca realizaremos dos puntadas en diagonal.
With the black thread we are going to make the mouth and eyelashes on one of the dolls to differentiate each doll. For the feminine one we will make the eyelashes by making two basting stitches on the sides of the eyes. For the mouth we will make two diagonal stitches.
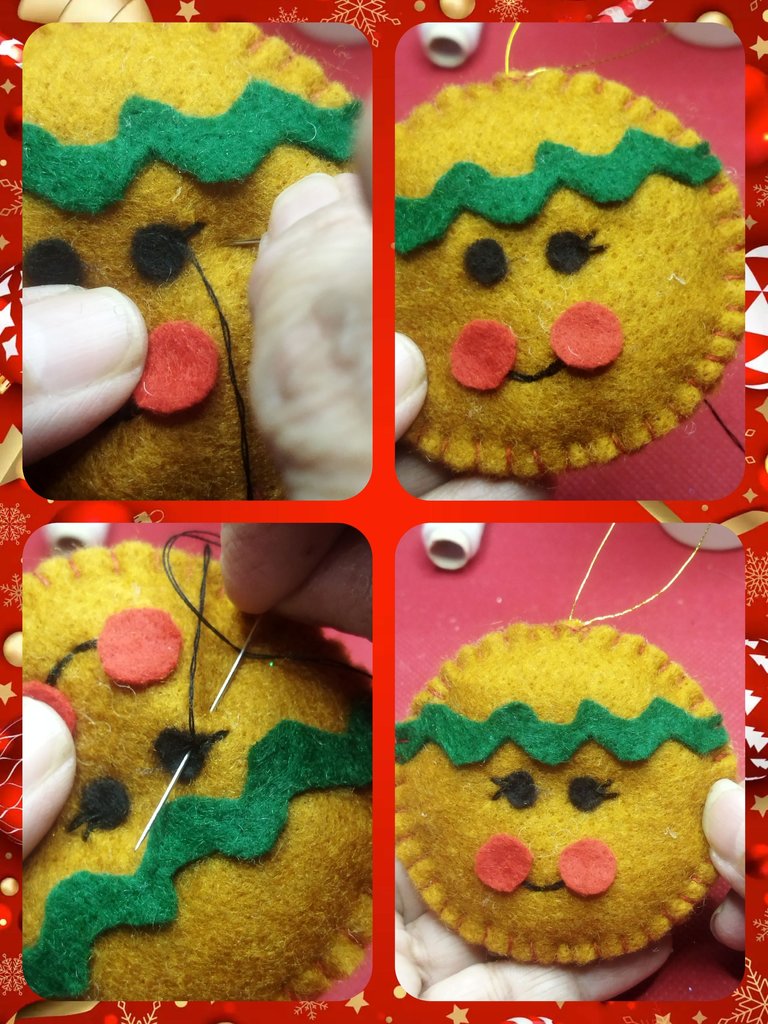
Para el masculino solo realizaremos las puntadas para la boca.
For the male we will only make the stitches for the mouth.
Para realizar el lazo vamos a cortar 2 tiras de fieltro rojo de 15 cm x 1 cm. Con el hilo blanco vamos a realizar puntadas de ojal por todo el contorno .
To make the bow we are going to cut 2 strips of red felt measuring 15 cm x 1 cm. With the white thread we are going to make buttonhole stitches all around.
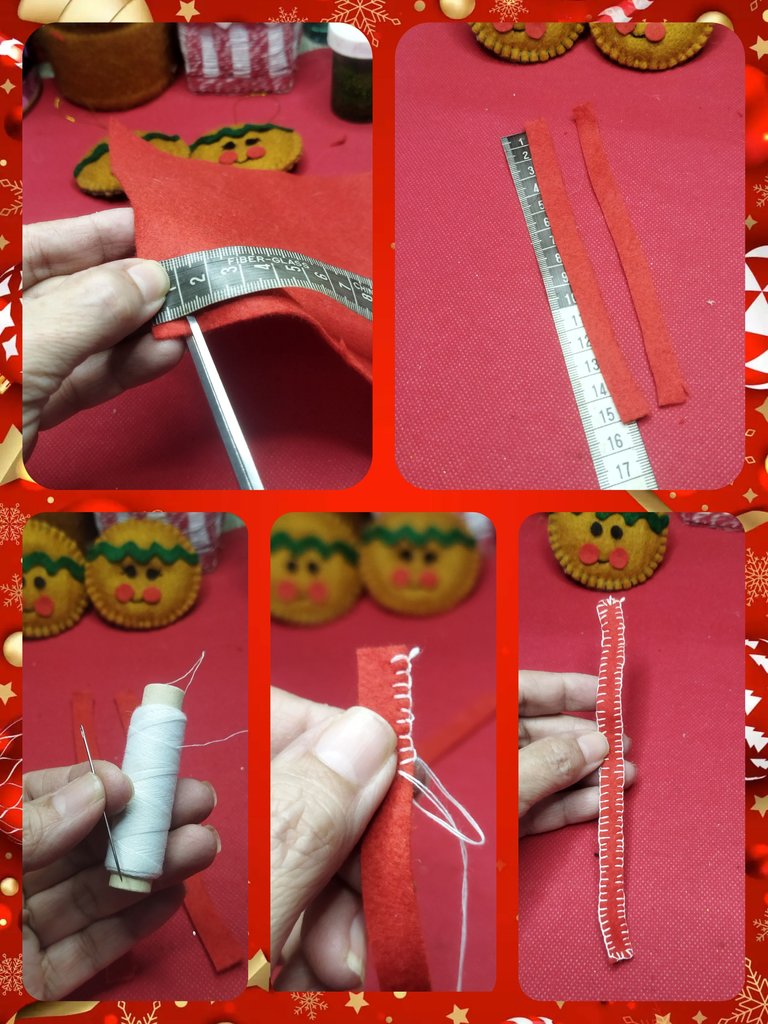
Luego le damos forma de lazo. Con la aguja y el hilo blanco vamos a unir el lazo y realizaremos varias vueltas por el centro. Luego realizamos un nudo por detrás del lazo. Este es el lazo del muñeco.
Then we shape it into a bow. With the needle and white thread we are going to join the loop and make several turns through the center. Then we tie a knot behind the bow. This is the doll's bow.

Agregamos un poco de silicón y pegamos en la parte central inferior del muñeco.
We add a little silicone and glue it to the lower central part of the doll.
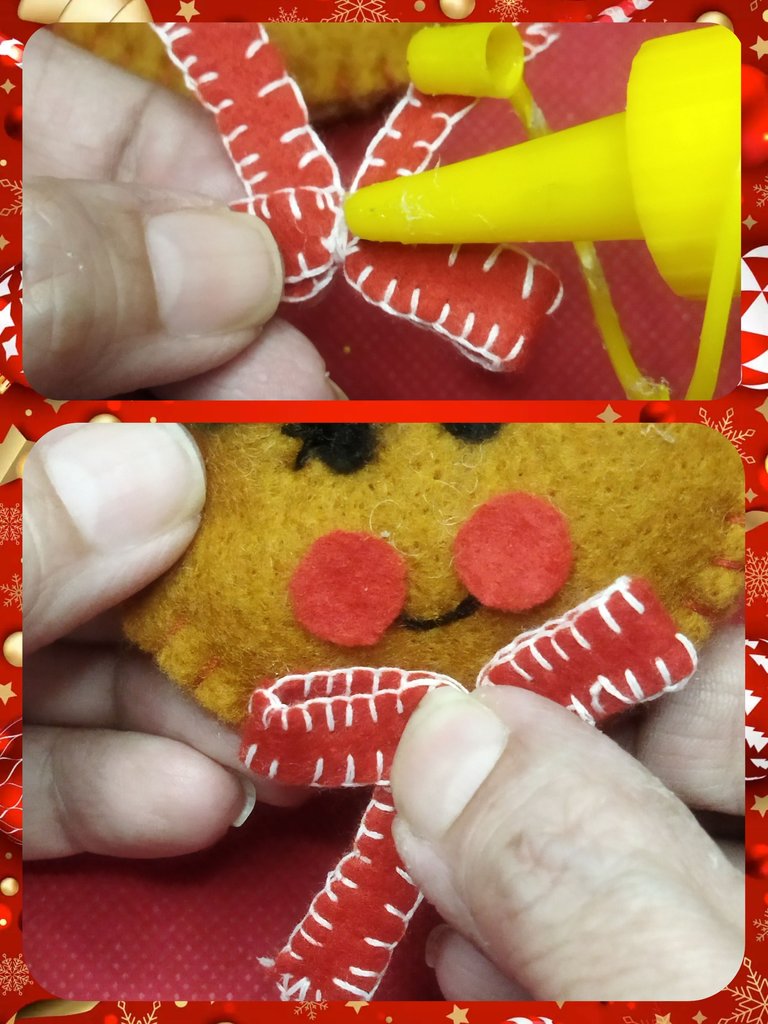
Repetimos el paso anterior pero vamos a bordar el fieltro con hilo dorado para la muñeca. Una vez listo formamos el lazo y pegamos en la parte superior izquierda de la muñeca de jengibre.
We repeat the previous step but we are going to embroider the felt with gold thread for the doll. Once ready, we form the bow and glue it to the upper left part of the gingerbread doll.
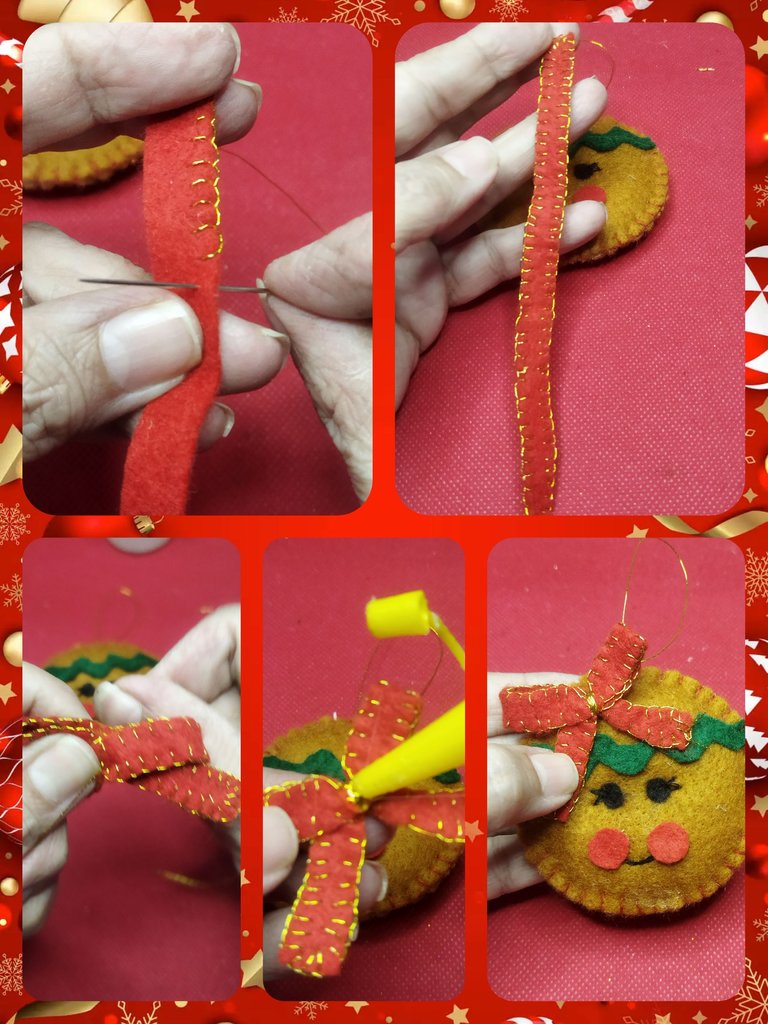
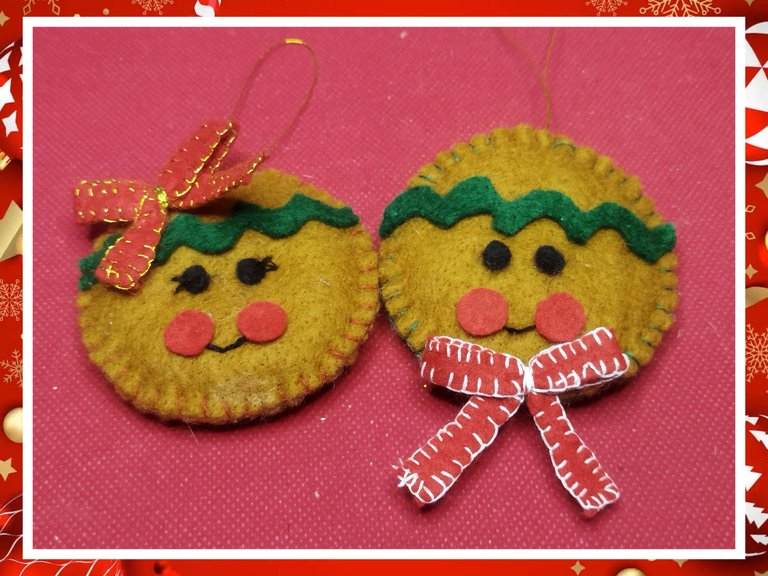
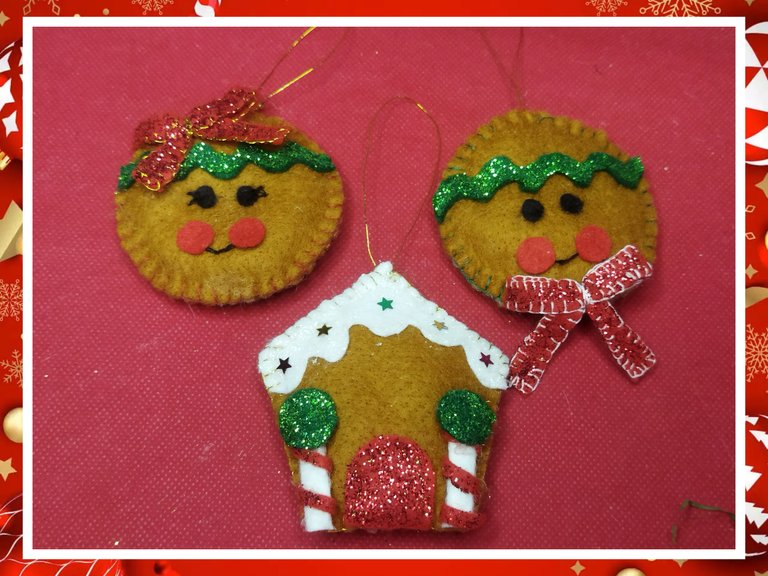
Y de esta forma tenemos nuestros dos primeros adornos. La pareja de muñecos de jengibre que son tan tiernos y adorables.
And in this way we have our first two decorations. The couple of gingerbread men who are so cute and adorable.
CASA NAVIDEÑA
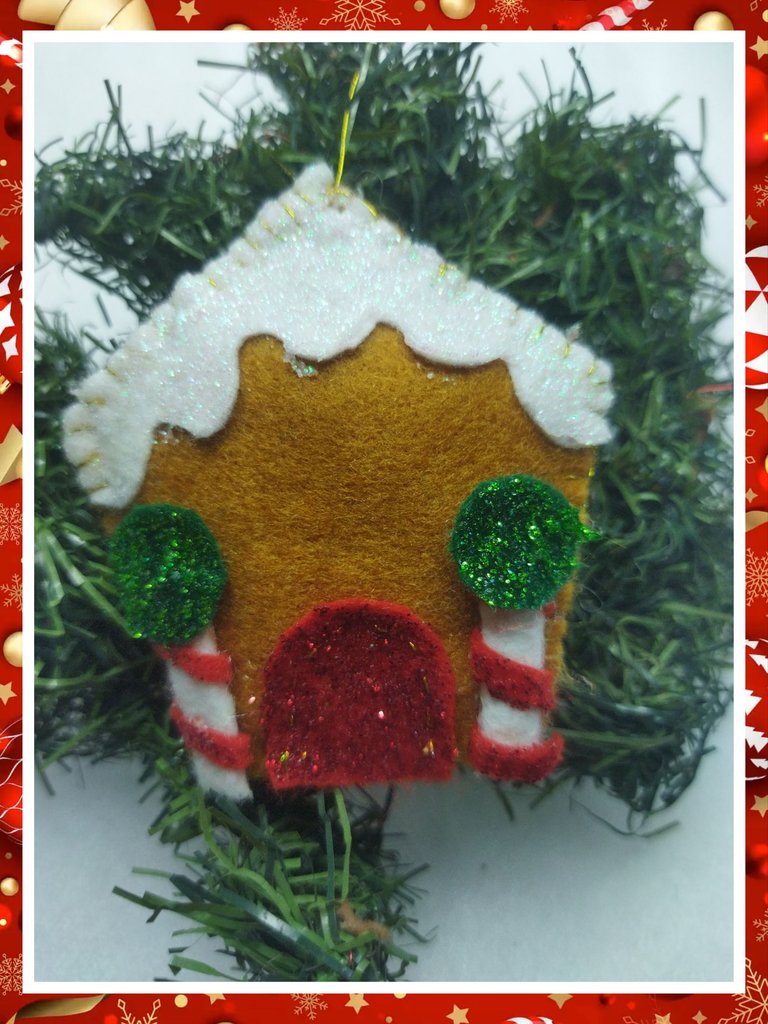
Para la casa vamos a usar la figura pentagonal y realzaremos con el fieltro blanco sólo la parte posterior para realizar el techo. Luego con la tijera le daremos forma de zigzag.
CHRISTMAS HOUSE
For the house we are going to use the pentagonal figure and we will highlight only the back part with white felt to make the roof. Then with the scissors we will give it a zigzag shape.
Con un trozo de fieltro rojo realizamos la puerta y con fieltro verde dos círculos pequeños para las ventanas.
With a piece of red felt we made the door and with green felt two small circles for the windows.
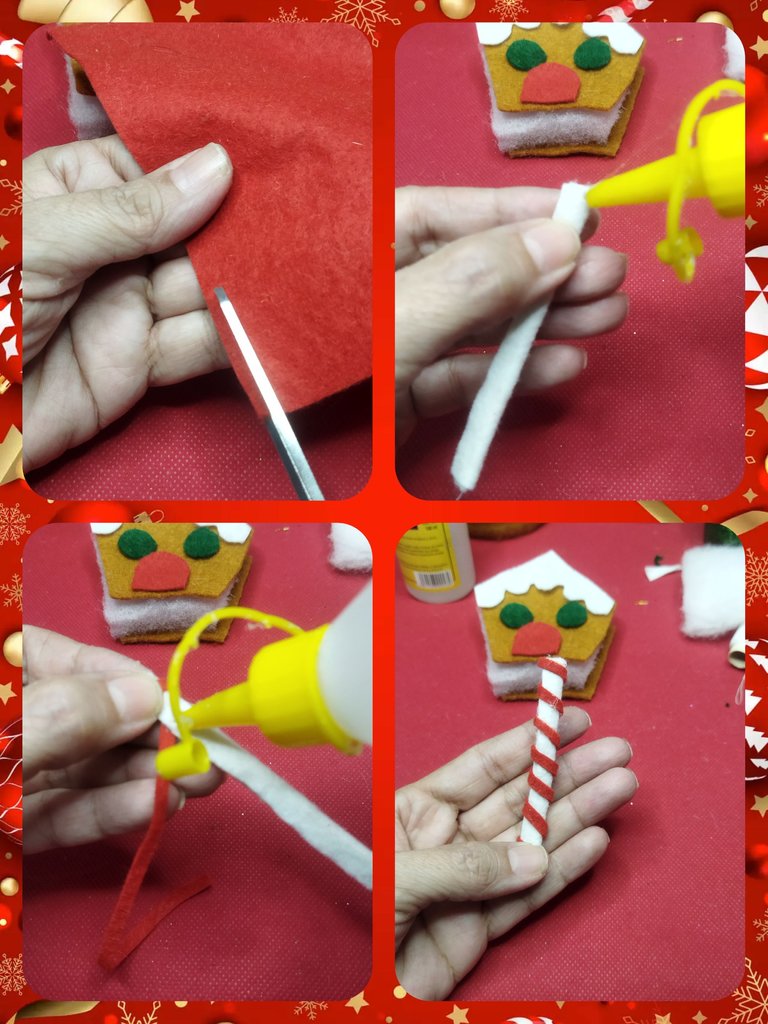
Cortamos dos tiras de fieltro blanco de 2 cm, por 6 cm y realizamos un bastón. Agregamos silicón y enrollamos.
We cut two strips of white felt measuring 2 cm by 6 cm and make a cane. We add silicone and roll.
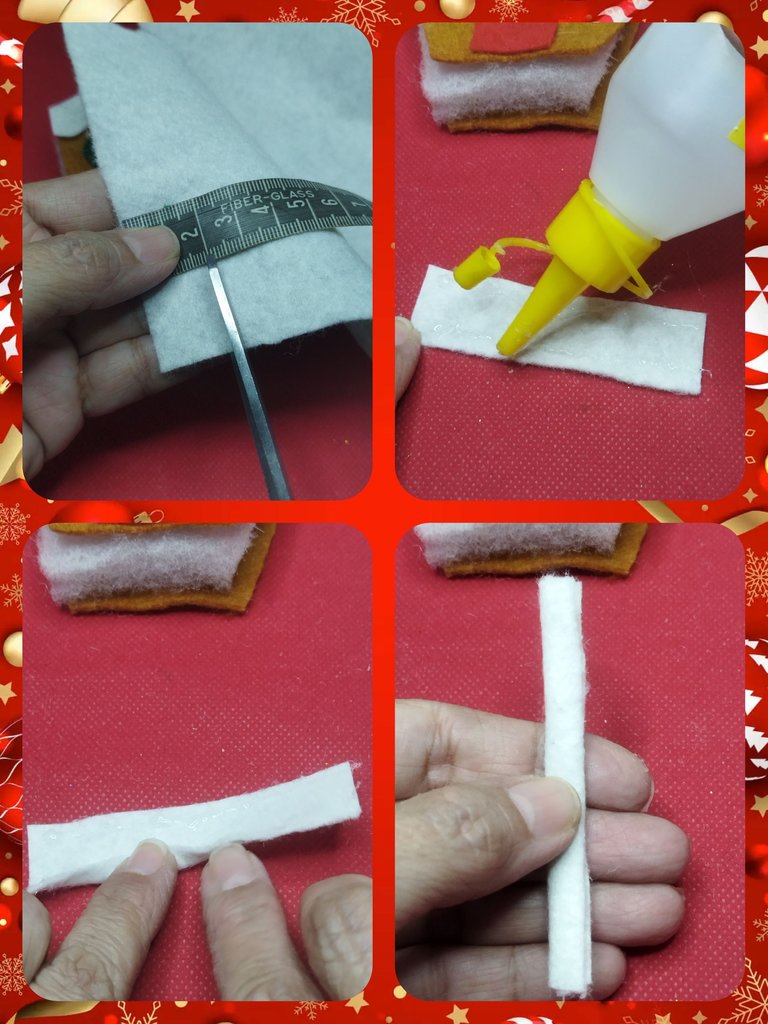
Cortamos una tira de 0,20 cm de fieltro rojo y envolvemos el bastón blanco, agregando hilos de silicón para pegar.
We cut a 0.20 cm strip of red felt and wrap it around the white cane, adding silicone threads to glue it.
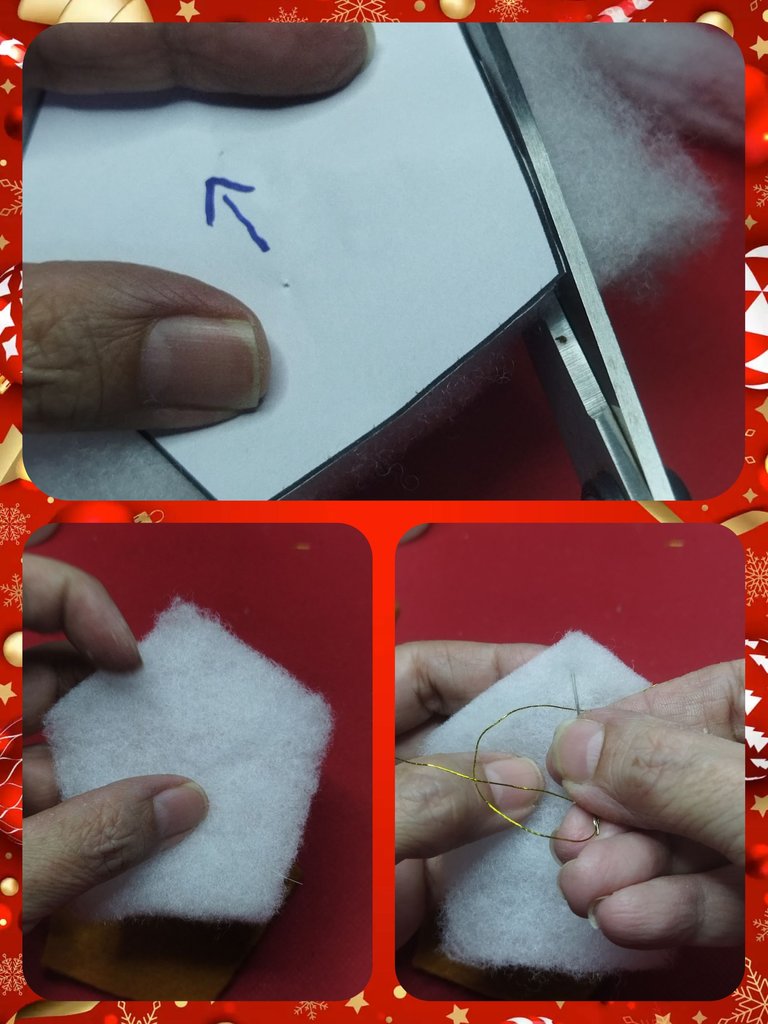
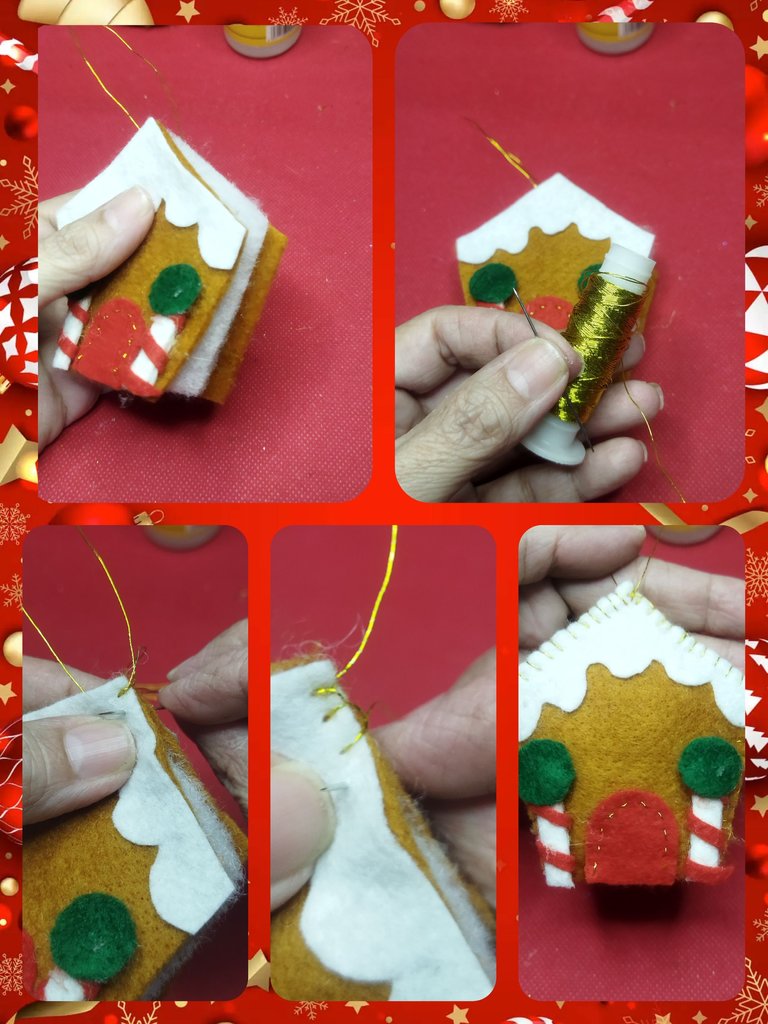
Ya listas las piezas de la casa, ahora cortamos una pieza pentagonal de relleno (guata) y con el hilo dorado realizamos el colgante de la misma forma que a los muñecos.
Once the pieces of the house are ready, now we cut a pentagonal piece of filling (wadding) and with the golden thread we make the pendant in the same way as the dolls.
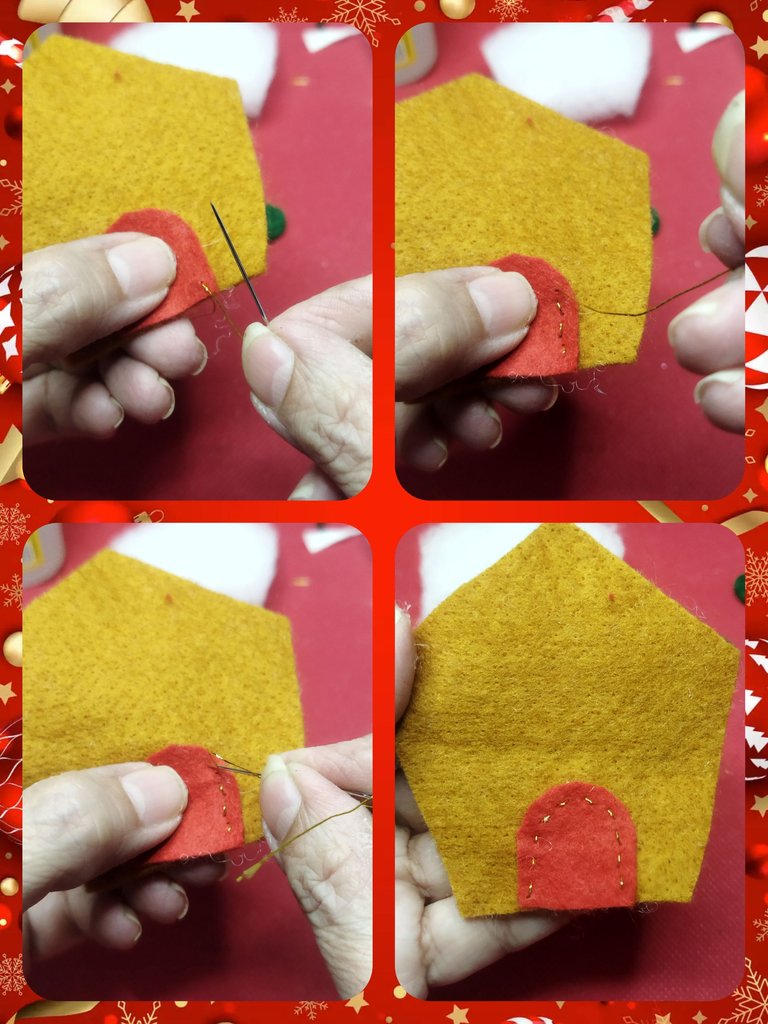
Tomamos un pieza pentagonal de fieltro marrón para la fachada y con hilo dorado cosemos la puerta con puntadas de hilvana.
We took a pentagonal piece of brown felt for the facade and with gold thread we sewed the door with basting stitches.
Luego con el silicón liquido pegamos el techo, los bastones y las ventanas.
Then with liquid silicone we glue the roof, the canes and the windows.
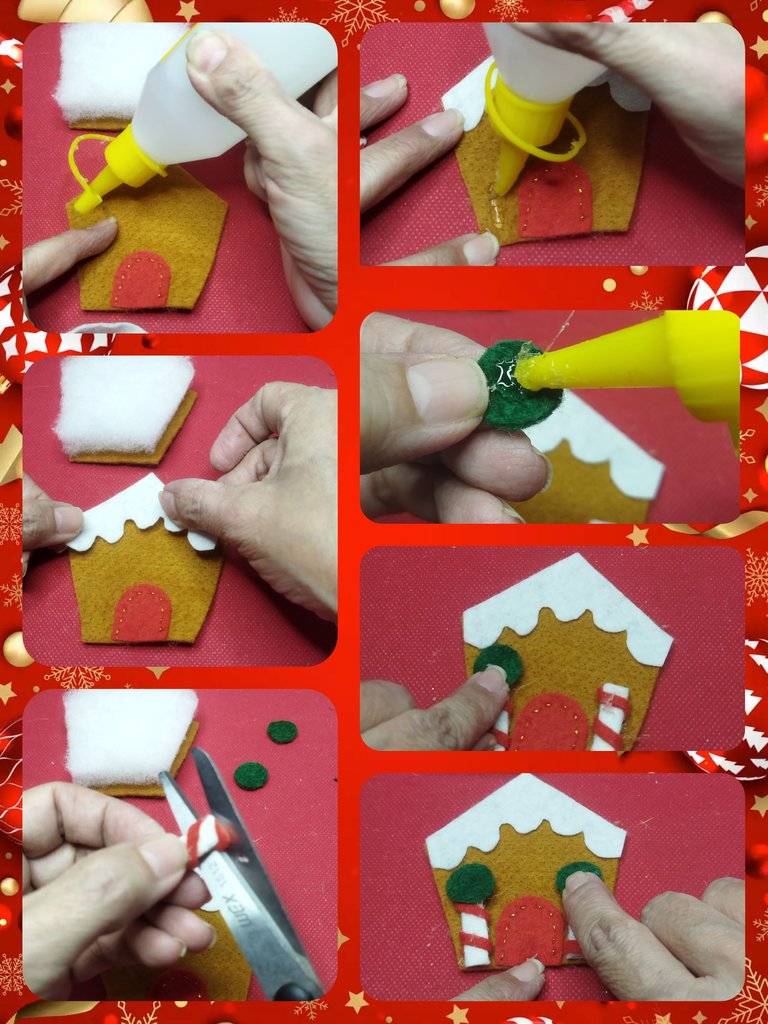
Tomamos el resto de las piezas y las unimos utilizando hilo dorado y realizando punto ojal por todo el contorno de la casita.
We take the rest of the pieces and join them using gold thread and doing buttonhole stitch all around the house.
Ahora con el gel escarchado tornasol, pincelamos el techo. Conel verde las ventanas y los zigzags de los muñecos. Y con el gel rojo, la puerta, los batones y lazos de los muñecos. Dejamos secar durante un día.
Now with the iridescent frosted gel, we brush the ceiling. With the green windows and the zigzags of the dolls. And with the red gel, the door, the dolls' batons and bows. We let it dry for a day.
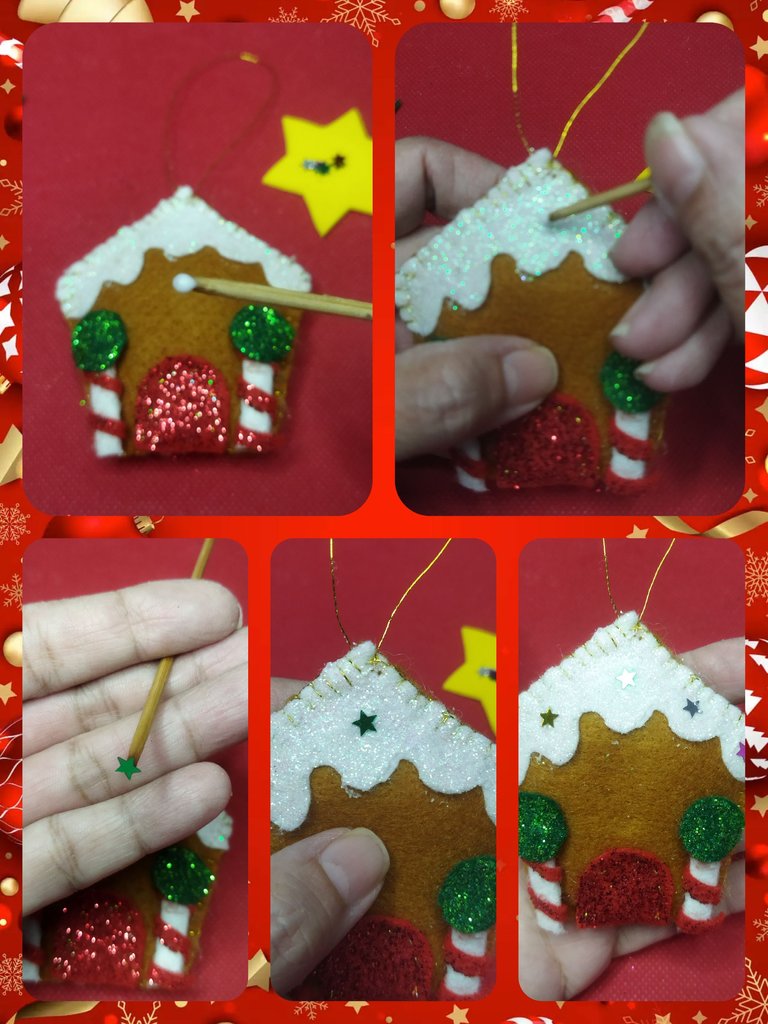
Y para finalizar y ya con el gel escarchado bien seco procedemos a colocar los confites en forma de estrellas sobre el tejado de la casita, realizando pequeños puntos con pega blanca.
And to finish, and with the frosted gel very dry, we proceed to place the candy in the shape of stars on the roof of the house, making small dots with white glue.
Y de esta forma tenemos tres pequeños adornos para decorar nuestra casa en estas navidades. Estos son los tres primeros de los que tengo en proyecto. Espero poder seguir compartiéndoles el resto de los que haré hasta completar el arreglo completo. Esto es todo por hoy. Nos vemos en la próxima.
And in this way we have three small decorations to decorate our house this Christmas. These are the first three of those I have in the pipeline. I hope to continue sharing the rest of what I will do until the complete arrangement is completed. That is all for today. See you next time.
Me encanta que ya es colectivo éste sentimiento de empezar con los adornos y el sentimiento navideño desde noviembre 🤭🤭, te hab quedado hermosos, excelente publicación 💞
Si, es muy contagioso jejejeje, cuando vemos el entusiasmo de las otras personas es inevitable no sentir emoción. Gracias por tu comentario, Me alegro que te haya gustado.
Algo que me gusta cuando se acerca la navidad es que salen muchas ideas sencillas y prácticas para realizar nuestros adornos navideños. Quedaron muy bonitos @linita 🤗
Si y es muy emocionante cuando empiezas a darles forma. Antes no tenía tiempo para las manualidades pero ahora que tengo de sobra es muy satisfactorio cuando los haces con tus propias manos. Y yo amo la navidad y todo lo referente a ella. Me alegro que te haya gustado. Saludos.
A very beautiful work for this Christmas. Thank you for giving us your creative process. Best wishes
Que trabajo tan hermoso y delicado una excelente idea para decorar el arbol, o cualquier espacio de nuestro hogar en esta navidad. Gracias por regalarnos este gran paso a paso @linita ✨
!DIY
Ay si amiga, estoy súper emocionada. Ya con la mesa preparada para los siguientes. Me alegro que te gusten. Saludos.
You can query your personal balance by
!DIYSTATSHola amiga,que bellos te quedaron estos adornos con fieltro, se ven muy cuchis, bendiciones.
Impresionante trabajo que has hecho, cada detalle y la decoracion estan fascinantes 😍 esta hermoso para colocarlo en la puerta de casa pero desde dentro para que no lo estropee la lluvia jaja muy bonito en verdad, me encanta ❤️
Me encanta te quedo super tierno me gusta esta idea para mi arbolito!
Están preciosos! Siempre me han gustado más los adornos hechos a mano!
Y son muy fáciles de hacer. Me alegro que te hayan gustado. Saludos