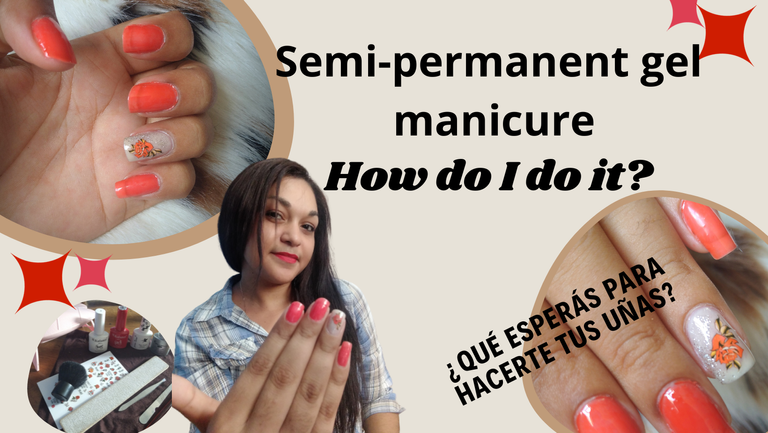
Hello dear hivers, today I want to show you how I apply semi-permanent gel on my nails, I recently started using it because it is more durable than conventional nail polish. Besides, I love to invent new designs and I save myself from booking appointments at beauty salons, because sometimes due to work or any other inconvenience I can't do it at the time they assign me and this way I can do my nails whenever I want.
Hola queridos hivers hoy les quiero mostrar cómo me aplico gel semipermanente en mis uñas, desde hace poco comencé a usarlo porque es más duradero que el esmalte convencional. Además, me encanta inventarme nuevos diseños y me ahorro estar reservando turno en los centros de belleza, pues a veces por el tema trabajo o por cualquier inconveniente no puedo en el momento que me asignan y así me puedo arreglar mis uñitas cuando yo quiera.
Little by little I was buying the tools and utensils I need and I already have the essentials, then I will buy more colored glazes.
Poco a poco fui comprando los utensilios y herramientas que necesito y ya tengo los esenciales, después iré comprando más esmaltes de colores.

Now I will explain step by step how I do it, these are the tools I am going to use today: UV/LED lamp (which is one of the cheapest and smallest since it is not to be used in a beauty salon, it is more personal, I would only use it once or twice a month), nail polish, nail polish, decals, fine grain file, tweezers and silicone spatula.
Ahora les explico paso a paso como lo hago, estos son los utensilios que voy a utilizar hoy: lámpara UV/LED (que es de las más baratas y pequeñas ya que no es para utilizar digamos en un salón de belleza, sino que es más personal, solo la utilizaría una o dos veces al mes), bledo, esmaltes, calcomanías, lima de grano fino, pinza y espátula de silicona.

First, I prepare the nail, push back the cuticles and file the entire nail until the natural shine disappears.
Primeramente, preparo la uña, empujo las cutículas para atrás y limo muy bien toda la uña hasta que desaparezca el brillo natural que trae esta.


When you finish I use the bledo or a makeup brush that you don't use anymore and remove the dust particles that come out with the filing.
Al terminar utilizo el bledo o una brocha que tengas de maquillaje que ya no uses y retiras las partículas de polvo que salen con el limado.

I take the base coat and apply it on the nail without touching the cuticles to avoid later detachments.
Tomo el pomo de base y lo aplico en la uña sin tocar las cutículas para evitar después desprendimientos.

Then I cure in the lamp, it brings preset 1 minute when touching the power button.
Luego curo en la lámpara, esta trae predefinido 1 minuto al tocar el botón de encendido.

Then apply the colored enamel and re-cure in the lamp, I only did it once because I liked the tone, but you can apply another coat of paint and re-cure in the lamp.
Después aplicar el esmalte de color y volver a curar en lámpara, yo me di una sola vez porque me gustó el tono, pero pueden aplicar otra mano de pintura y vuelven a curar en la lámpara.


When finished, I select the decal of my liking and place it where I want it and added a few drops of glitter around it to further embellish the design, I cured again on the lamp as the glitter was also gel.
Al terminar, selecciono la calcomanía de mi agrado y la ubico en el lugar que desee y le agregué unas gotas de brillo alrededor para embellecer más el diseño, curé otra vez en la lámpara ya que el brillo también era de gel.


Finally, I apply the top coat gloss, which is transparent, to give it the finishing touch and let it dry completely.
Para finalizar aplico el brillo top coat que es transparente para darle la terminación y que seque completamente.


You saw how easy it is, there are no complications, just having the tools at hand and a little creativity for the designs, I like them simple, the best thing is that you will have your nails painted for two to three weeks, it depends on the use you give to your hands, they last me three weeks, but my sister lasts two weeks because she has to wet her hands a lot at work, so it depends on each one, the important thing is that they last longer than natural paints. So, what are you waiting for to do your nails, thanks for reading, greetings to all.
Viste que fácil es, no hay complicaciones, solo tener las herramientas a mano y un poco de creatividad para los diseños, a mi me gustan así sencillos, lo mejor es que tendrás las uñas pintadas de dos a tres semanas, depende el uso que les des a tus manos, a mi me duran tres semanas, pero a mi hermana le duran dos porque ella tiene que mojarse mucho las manos en el trabajo, por eso depende de cada cual, lo importante es que si duran más que las pinturas naturales. Entonces, ¿qué esperas para hacerte tus uñas?, gracias por leer, un saludo a todos.

English is not my native language, translated by DeepL
Muy buen tutorial @yale95reyra, en cuanto pueda deseo poder comprar mis implementos para poder hacer mis uñas por mi mismo de esta manera. Es necesario tener la lámpara? Que precio aproximado tiene?
!DIY
Muchas gracias, si es necesario tener lámpara porque el esmalte al ser de gel no seca naturalmente, y en cuanto al precio varía según el país pero cuestan entre 5 a 8 dólares las grandes, esta chiquita se pueden encontrar hasta en 1 o 2 dólares
Ohhh que bien, me interesa, tratare de conseguir una de esas económicas para uso personal, un par de pinturas y listo. Gracias por responder. Éxitos linda. Que tengas un bello día @yale95reyra ✨
You can query your personal balance by
!DIYSTATSMuchas gracias 😍
Excellent post, I really liked the way it encouraged people to fix themselves.
Muchas gracias
Genial esto, me viene como anillo al dedo, gracias por el tutorial.
Gracias a ti por leer, verás que es muy fácil
Congratulations @yale95reyra! You have completed the following achievement on the Hive blockchain And have been rewarded with New badge(s)
Your next target is to reach 2250 upvotes.
You can view your badges on your board and compare yourself to others in the Ranking
If you no longer want to receive notifications, reply to this comment with the word
STOPCheck out our last posts: