Defining Objectives helps to Organize Time and Resources I feel that the time has come to set strategies... Since I am part of this wonderful digital ecosystem called Hive Blog I have had to learn many new things like writing in html, to diagram, to make presentations, to edit in different applications, etc and I still have a lot to learn to achieve Higher Quality of my Content and continue growing as Hiver In virtue of this, being that I must Organize and Plan to have time to continue studying, advancing, better manage my time, define what resources I have and which I must acquire to make my projects and create content with sense and coherence.
Definir los Objetivos ayuda a Organizar el Tiempo y los Recursos siento que ha llegado el momento de fijar estrategias... Desde que formo parte de este maravilloso ecosistema digital llamado Hive Blog he tenido que aprender muchas cosas nuevas como escribir en html, a diagramar, a hacer presentaciones, a editar en diferentes aplicaciones, etc y todavía tengo mucho que aprender para lograr Elevar la Calidad de mi Contenido y continuar creciendo como Hiver En virtud de esto, siendo que debo Organizar y Planificar para tener tiempo de seguir estudiando, avanzando, administrar mejor mi tiempo, definir que recursos tengo y cuales debo adquirir para hacer mis proyectos y crear contenido con sentido y coherencia.

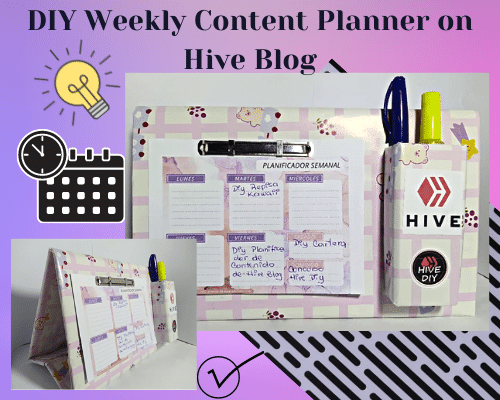
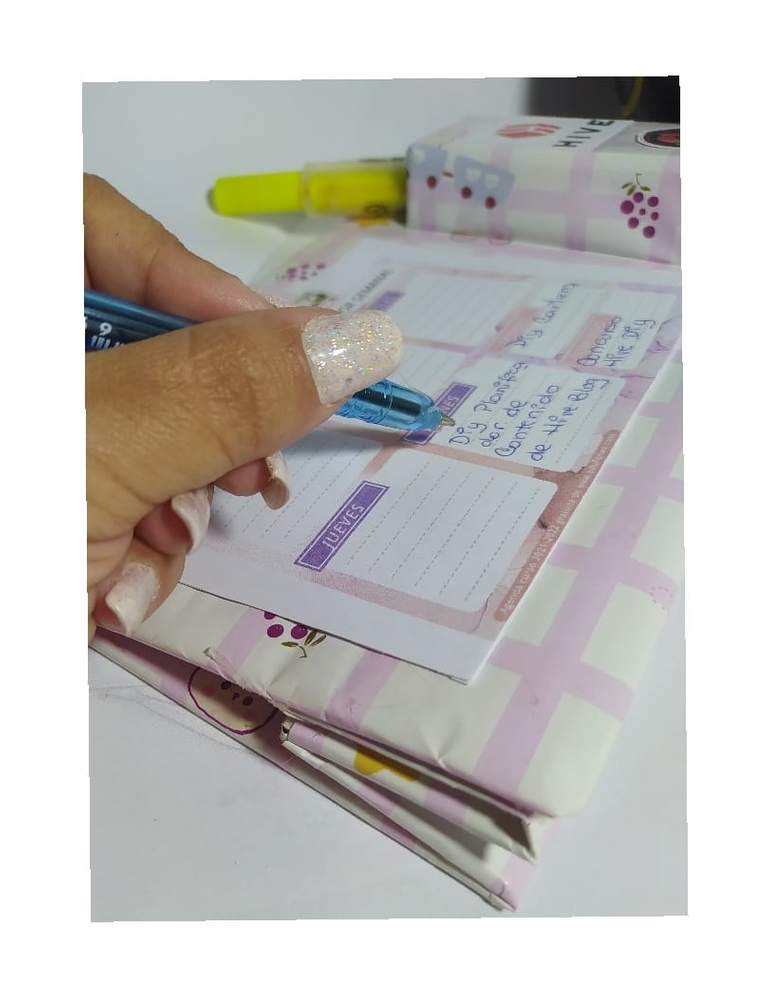
Today I present you a Diy that was born from the need to organize my ideas and goals of Creation of Content in Hive Blog . The idea is that this Weekly Planner I have it on my work desk, and I can schedule the projects for a week, to buy the materials I need to do it at once or have more or less time for it, according to how complex or easier each project is. I can also make adjustments in the planning according to the other activities I have and commit myself to be more consistent in the publications by being able to have more organization.
I invite you to read this publication...
Hoy les presento un Diy que nace de la necesidad de organizar mis ideas y metas de Creación de Contenido en Hive Blog . La idea es que este Planificador Semanal lo tenga en mi escritorio de trabajo, y pueda programar los proyectos de una semana, para comprar los materiales que necesito para hacerlo de una sola vez o disponer de más o menos tiempo para ello, de acuerdo a lo complejo o más fácil de cada proyecto. También puedo hacer ajustes en la planificación según las otras actividades que tengo y comprometerme a ser más consecuente en las publicaciones al poder tener más organización.
Te invito a leer esta publicación...

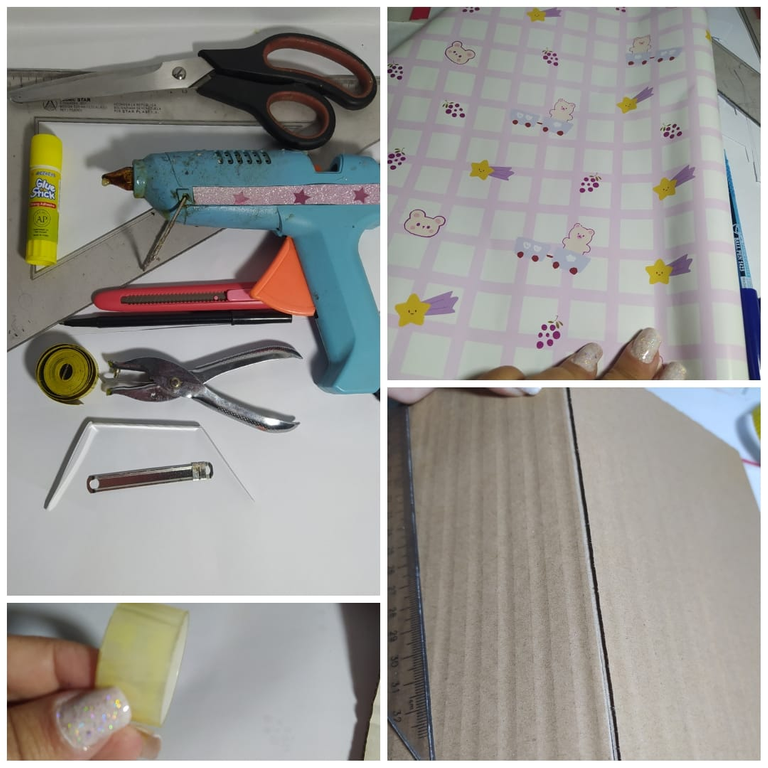
- Recycled cardboard
- Gift wrapping paper
- Scissors, cutter, pen, ruler, square and tape measure.
- Hot glue and glue stick
- A hole punch and a binder clip
- Color printer and internet connection
- Cartón reciclado
- Papel de Regalo
- Tijera, cuter, bolígrafo, regla escuadra y cinta métrica
- Pistola de silicón caliente y pega en barra
- Un perforador y un gancho de carpeta
- Impresora a color y conexión a internet

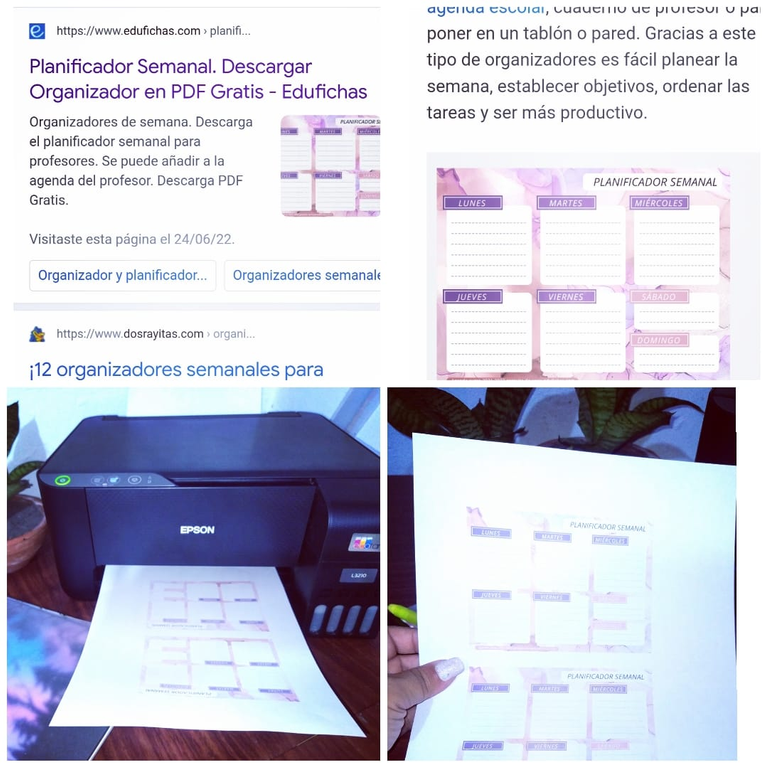
To get a Weekly Planner format, I searched the internet Free PDF Weekly Planner and the search engine gave me several options, I chose Edufichas.com Portal who have several options and models to choose from and totally free. I downloaded the one I liked and printed it two per sheet, I made several copies to have a comfortable amount to put in my Weekly Planner.
Para obtener un formato de Planificador semanal, busqué en internet Planificador Semanal en PDF Gratis y el buscador me dio varias opciones, yo elegí Portal de Edufichas.com quienes tienes varias opciones y modelos a escoger y totalmente gratis. Descargué el que me gustó y lo imprimí dos por hoja, hice varias copias para tener una cantidad cómoda para poner en mi Planificador Semanal.
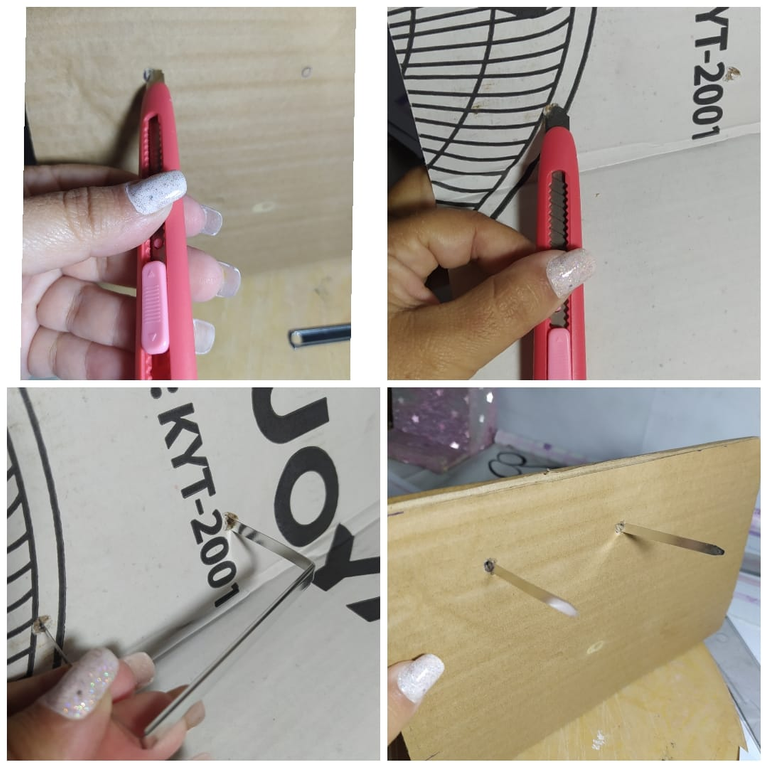
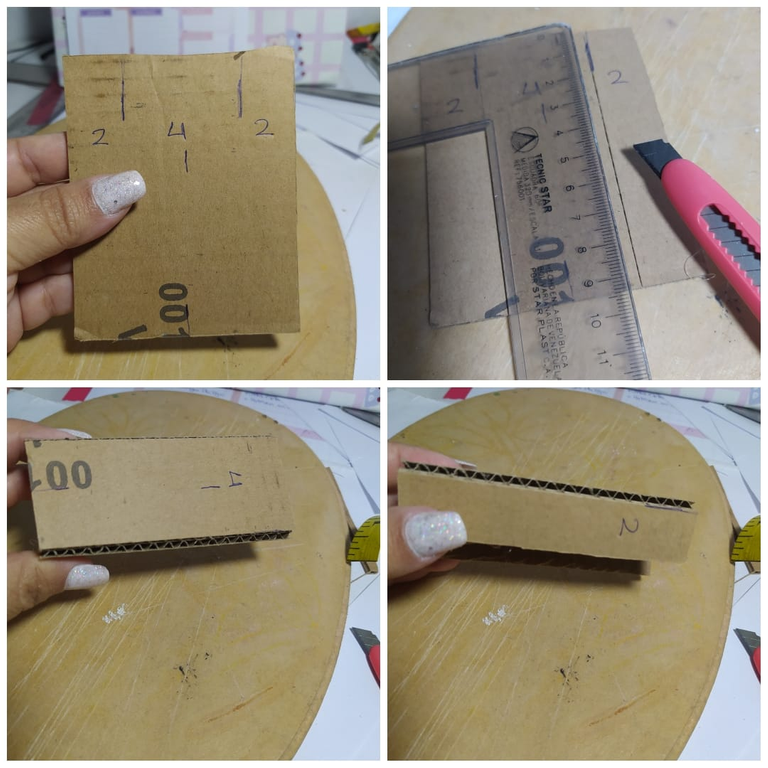
I took a piece of recycled cardboard and cut it into a rectangle measuring 25 cms by 44 cms, for this I used the cutter or exacto, and a square type ruler. The trick for clean cuts is to use a good cutter and make several cuts.
Tomé una pieza de cartón reciclado y la corté en un rectángulo que mide 25 cms por 44 cms, para ello utilicé el cuter o exacto, y una regla tipo escuadra. El truco para cortes limpios es un buen cuter y hacer varios cortes suaves sin forzar la pieza para no estropearla.
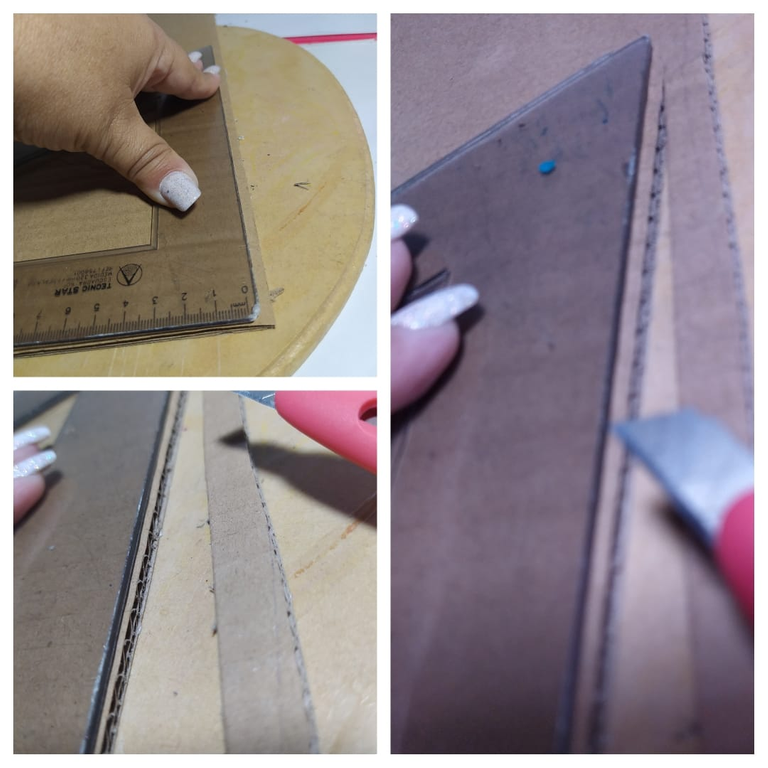
On one side of the cardboard I mark 14.5 cm and pass the cutter superficially, not to cut completely, but to cut on only one side of the cardboard, so that it folds without coming off.
En una cara del cartón marco 14,5 cms y paso el cuter de forma superficial, no para cortar totalmente, sino para cortar en un solo lado del cartón, de manera que doble sin desprenderse.
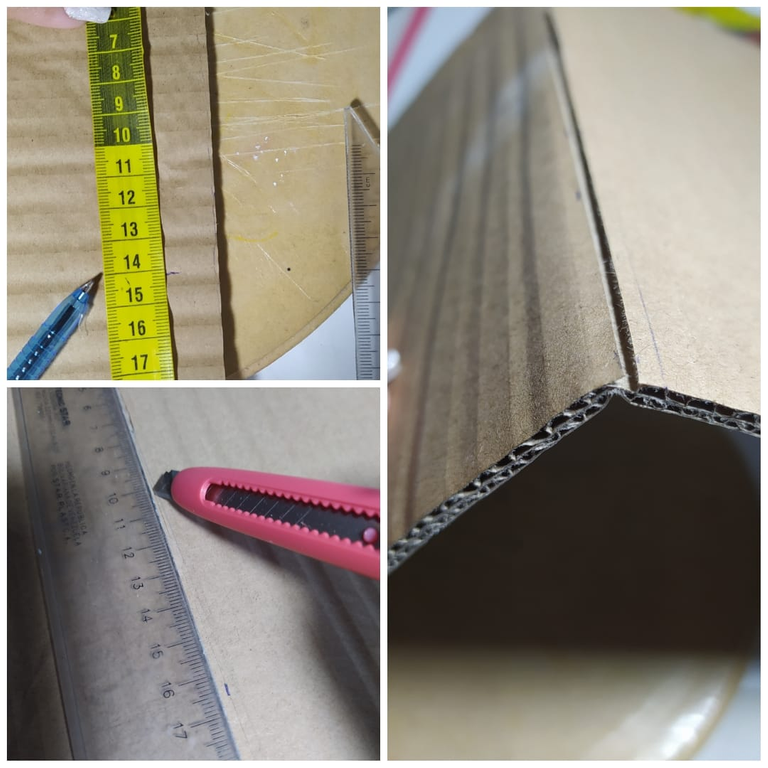
Then I repeat from the previous mark, mark again 14.5 cms and cut superficially. With these two cuts the triangle of the structure of my Planner is formed.
Luego repito a patir de la marca anterior, marco de nuevo 14,5 cms y corto superficialmente. Con estos dos cortes ya se forma el triángulo de la estructura de mi Planificador.
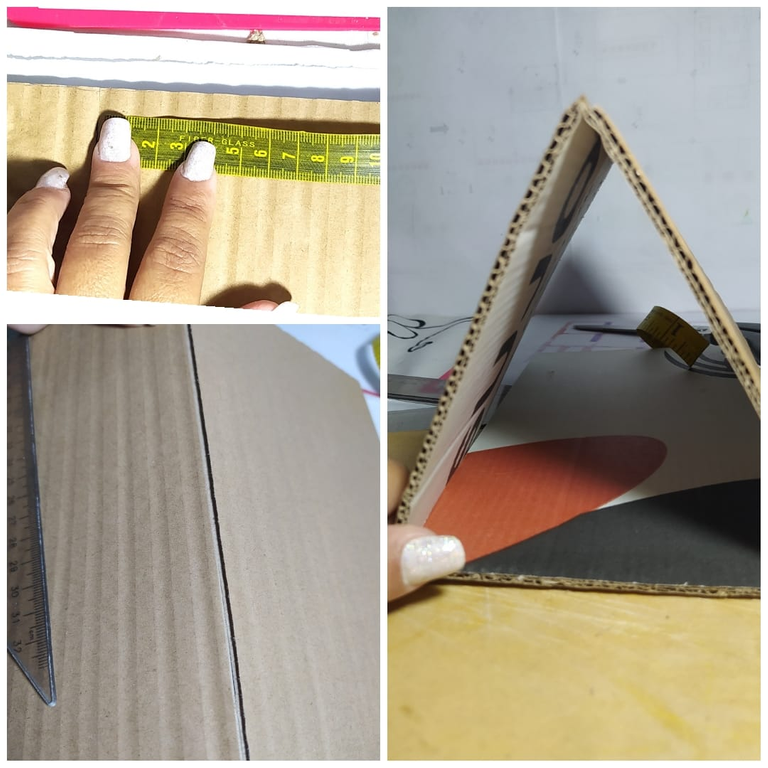
On the cardboard that follows, I mark 5 cm and another 5 cm. For the first 5 cm I will mark them on the back of the cardboard, to make the surface cut on the back, since I want the cardboard to fold on the other side.
:
En el cartón que va quedando a continuación, marco 5 cms y otro 5 cms. Para los primeros 5 cms voy a marcarlos por el reverso del cartón, para hacer el corte superficial por ese reverso, ya que deseo que el cartón doble para el otro lado.
:
And in the second mark of 5 cms, if I am going to mark and cut superficially by the face of the cardboard that I started to work first. The folds will be as follows
Y en la segunda marca de 5 cms, si voy a marcar y cortar superficialmente por la cara del cartón que empecé a trabajar primero. Quedando los doblez de la siguiente forma

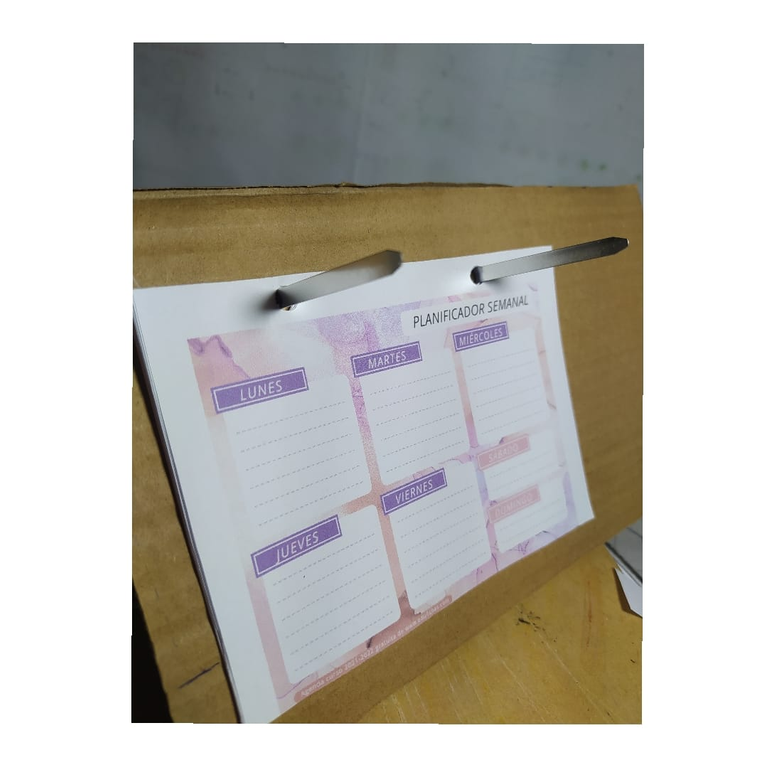
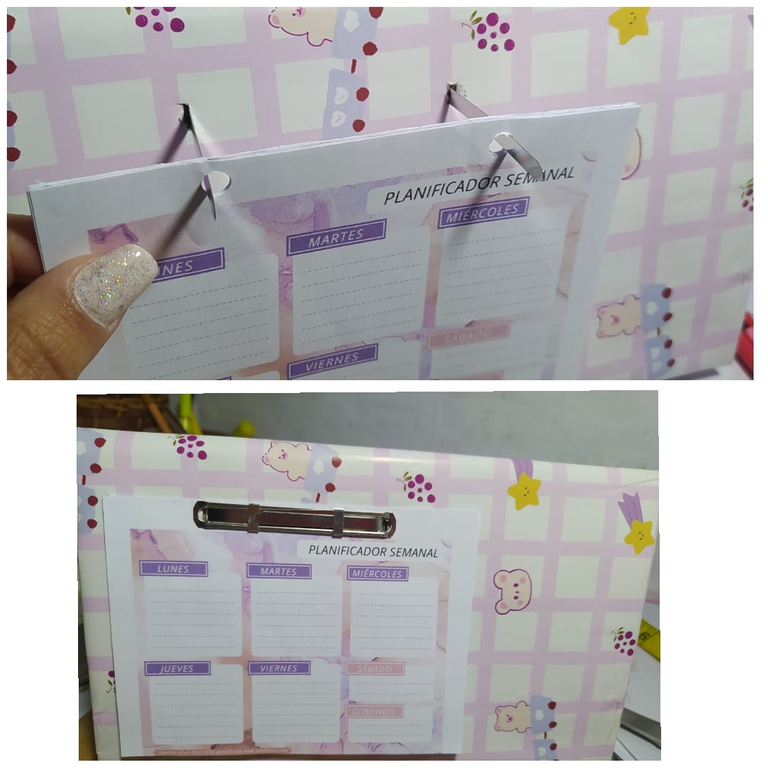
The Weekly Planner prints I made, I cut them to fit their size, so that they are all the same. In the first 14.5 cms box I am going to fix my Weekly Planner, then I mark, make the perforations to all the sheets and then I mark on the cardboard where I am going to place them.
Las impresiones del Planificador Semanal que hice, las corto para ajustar su tamaño, que queden todas iguales. En el primer recuadro de 14,5 cms voy a fijar mi Planificador Semanal , entonces marco, hago las perforaciones a todas las hojas y luego marco en el cartón donde las voy a colocar.
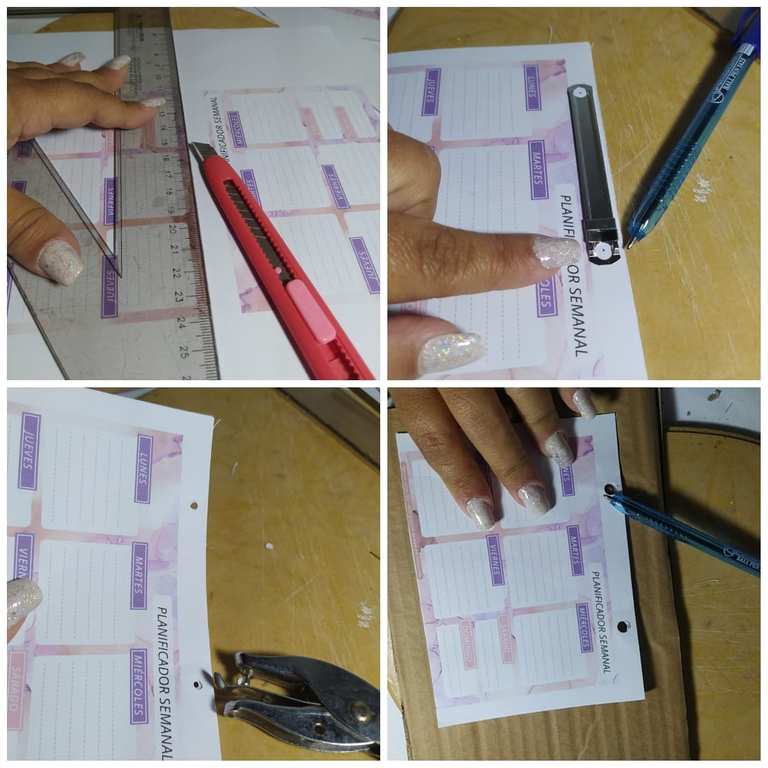
On the cardboard I won't be able to open the holes with the hole punch, so I'll use the same cutter, cutting on both sides to make sure they look good, and then I'll position the sheets to check that I'm satisfied with their placement.
En el cartón no podré abrir los huecos con el perforador, así que me ayudaré del mismo cuter, haciendo por los dos lados para que queden bien, y luego posiciono las hojas para chequear que estoy satisfecha con su ubicación.
I placed the sheets to check that I like it. But I'm taking them back to continue working on my project.
Coloqué las hojas para chequear que me gusta. Pero ya las retiro para continuar trabajando en mi proyecto.
Now it's just a matter of lining it with the wrapping paper and fixing it with adhesive tape, very simple as when lining a gift or a notebook.
Ahora es solo forrar con el papel de regalo y fijando con cinta adhesiva, muy sencillo como cuando forramos un regalo o un cuaderno.
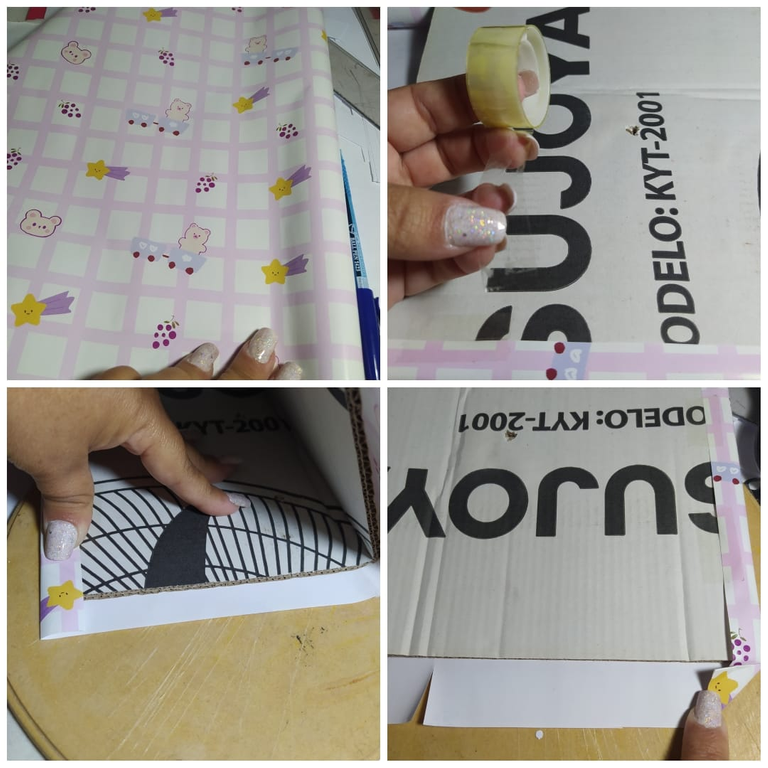
In each fold I cut before and after the fold, so that the piece folds easily. The thin piece I still glue inside, but since it is separated it will not wrinkle.
En cada doble corto antes y después del mismo, para que la pieza doble fácilmente. El pedazo delgadito igual lo pego hacia adentro, pero al estar separado no se va a arrugar.
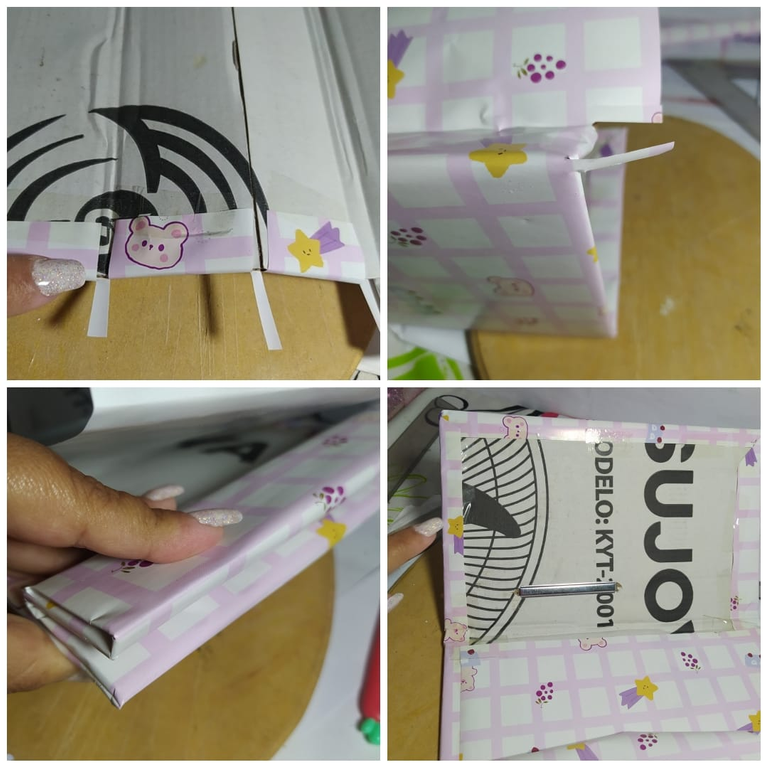
As I always tell you, our work must always be well finished inside and out, on all sides, so I continue lining the inside as well. The last piece is the only one that I glue to the initial part where I started, using hot silicone to guarantee that it won't come off.
Como siempre les digo, nuestro trabajo siempre debe estar bien acabado por dentro y por fuera, por todos lados, así que sigo forrando por dentro también. La última pieza, es la única que pego a la parte inicial donde empecé, utilizando el silicón caliente para garantizar que no se va a despegar.
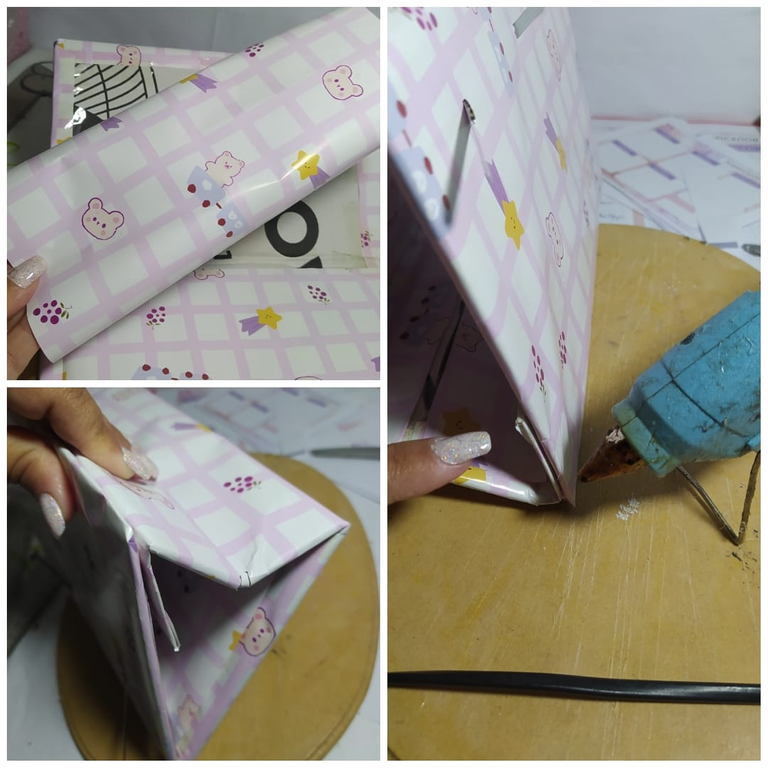
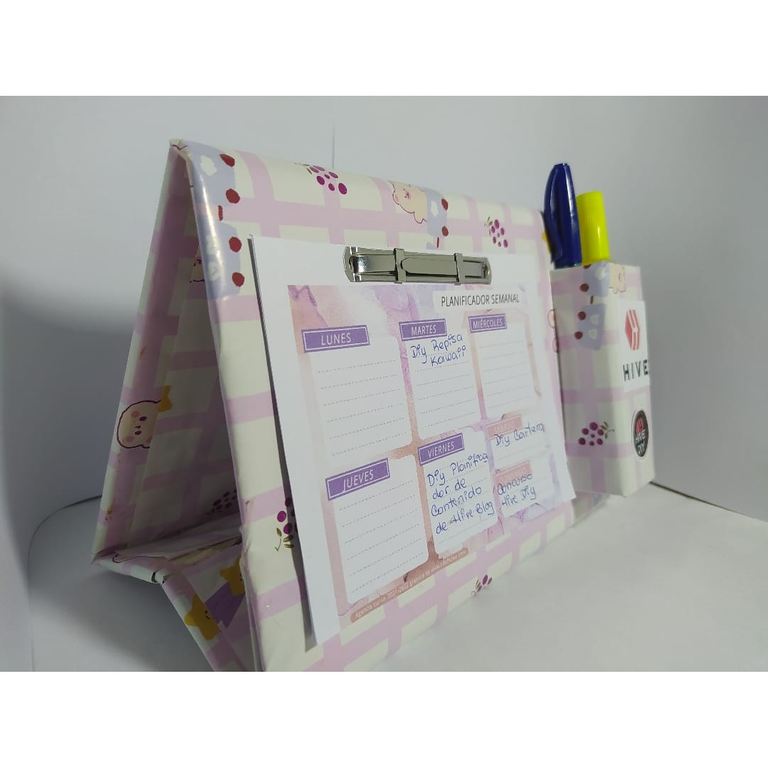
Now if I put the sheets back, they are ready, and close the binder hook.
Ahora si vuelvo a colocar las hojas, ya están listas, y cierro el gancho de carpeta.
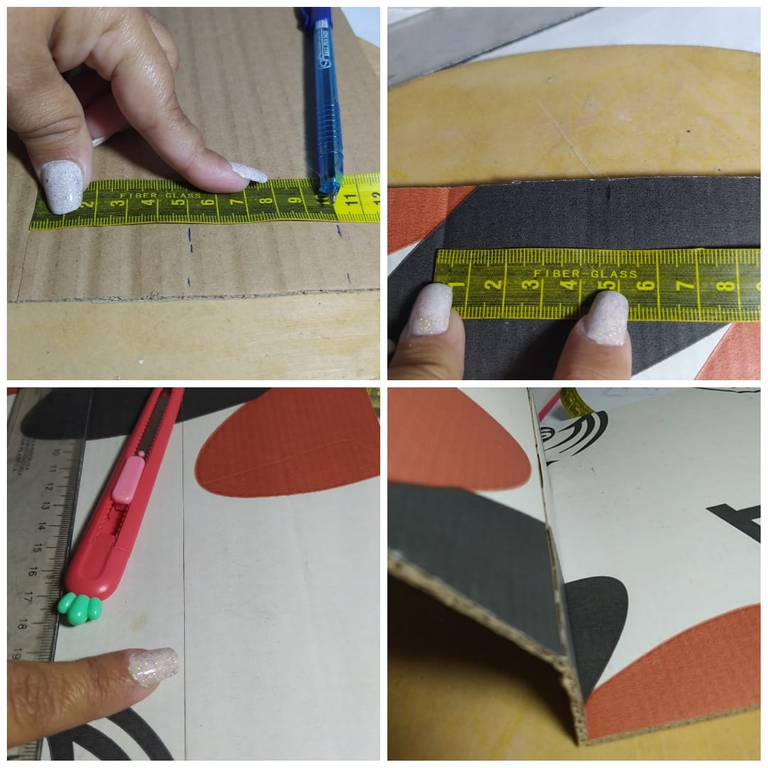
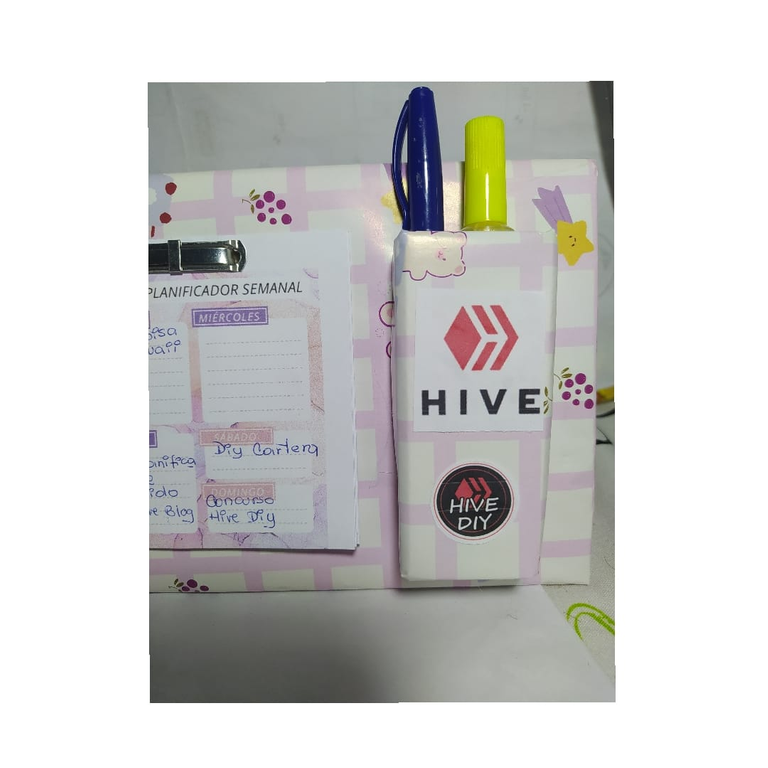
In my design, on the right side I am going to place a box for a pen and a highlighter. I cut a piece of cardboard with the measures of width shown below and length 10 cms. I make the surface cuts in the width measurements so that they can be folded.
En mi diseño, del lado derecho voy a colocar una cajita para un bolígrafo y un resaltador. Corté una pieza de cartón con las medidas de ancho que muestro a continuación y de largo 10 cms. Hago los corte superficiales en las medidas de los anchos para que puedan doblar.
I line the pencil holder box with wrapping paper, I also make a bottom with a piece of cardboard that I also lined with the paper. And with the silicone I fix it in my Weekly Planner.
Forro con papel de regalo la cajita del portalápiz, le hago igualmente un fondo con un pedacito de cartón que también forré con el papel. Y con el silicón calienet fijo en mi Planificador Semanal.
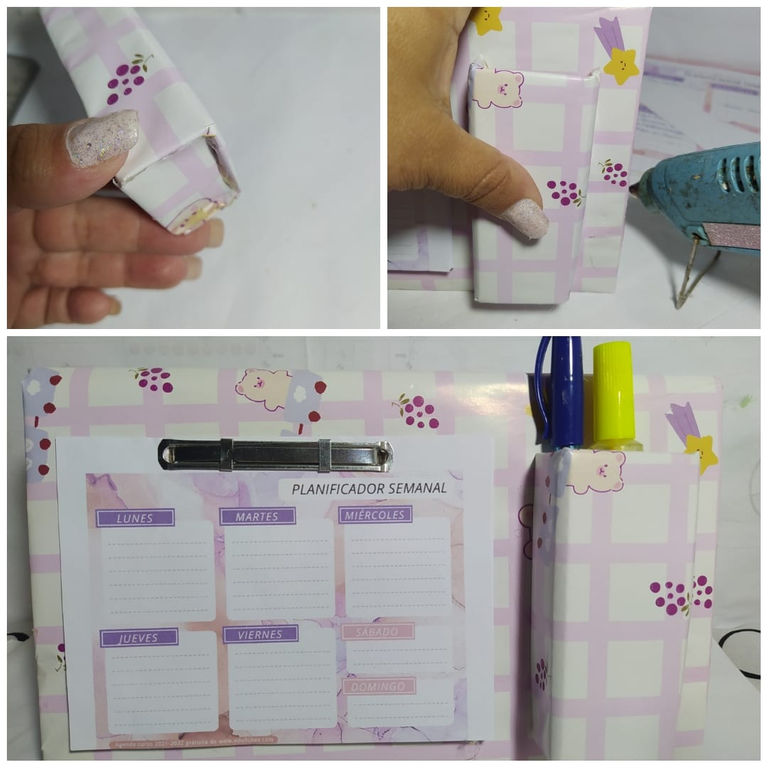
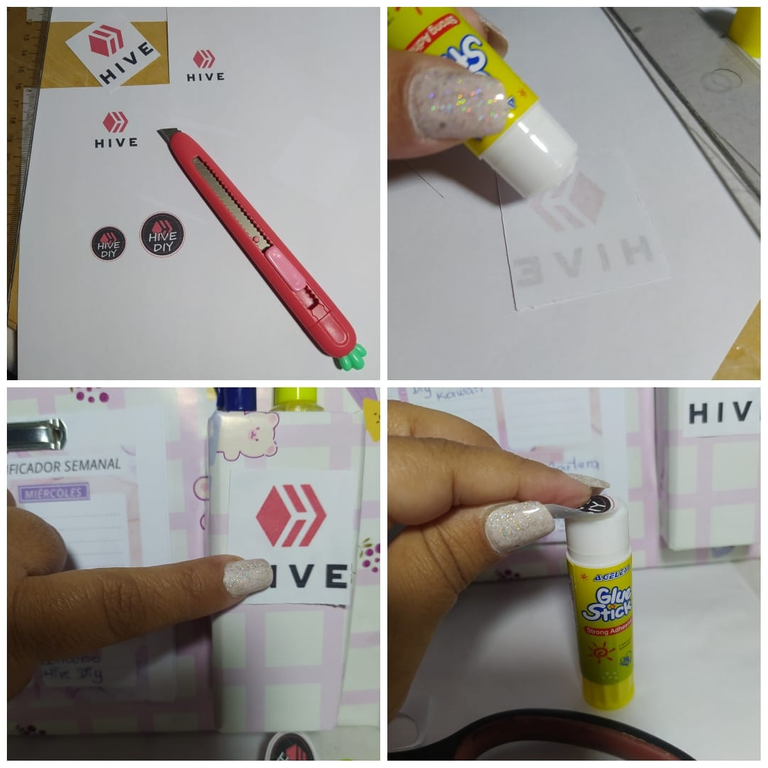
To personalize it even more I printed the logos of Hive Blog and Hive Diy which is the community where I mainly post, and stuck them on the pencil holder with the glue stick.
Para personalizarlo aún más imprimé los logos de Hive Blog y de Hive Diy que es la comunidad donde publico principalmente, y las pegué en el portalápiz con la pega en barra.
I loved it...This will definitely be a great tool.
Me encantó...Está será sin duda una gran herramienta.
According to the projects I plan for next week, I should go the Saturday before to buy the materials I need, thus saving a lot of effort and time.
De acuerdo a los Proyectos que Planifique para la próxima semana, debo ir el sábado anterior a comprar los materiales que necesite, de esta forma ahorro mucho esfuerzo y tiempo.

And the identification with the logos fascinated me.
Y la identificación con los logos me fascinaron.
For me it is important that the base folds inwards, as this allows me to flatten the Planner so that I can write my notes, and then it stops again in the month. I think this is a very important detail.
Para mi es importante que la base doble hacia adentro, ya que esto me permite que el Planificador se aplane bien para poder escribir mis notas, y luego se para de nuevo en la mes. Me parece buenísimo este detalle tan importante.
I hope you liked this Tutorial, from now on I will be more organized.
I invite you to my next publication... A hug.
Deseo que te haya gustado este Tutorial, de ahora en adelante estaré más Organizada .
Los invito a mi próxima publicación... Un abrazo.
---------- ❤️❤️❤️❤️ ----------
I took the photos with my Redmi Note 8 phone and edited them in the Collage Maker App and they are my property @yennysferm71. Please do not use them without my Authorization.
I also edited with https://www.canva.com/
I used Deepl Translate
My social networks:
Discord: YennysYaneth#0189
Twitter: @yennysferm
Instagram: @yennysyaneth
---------- ❤️❤️❤️❤️ ----------
Las fotos las tomé con mi teléfono Redmi Note 8 y las edité en la App Collage Maker y son de mi propiedad @yennysferm71. Por favor no las utilices sin mi Autorización.
También edité con https://www.canva.com/
Utilicé el Traductor Deepl
Mi redes sociales:
Discord: YennysYaneth#0189
Twitter: @yennysferm
Instagram: @yennysyaneth
Congratulations @yennysferm71! You have completed the following achievement on the Hive blockchain and have been rewarded with new badge(s):
Your next target is to reach 90 posts.
You can view your badges on your board and compare yourself to others in the Ranking
If you no longer want to receive notifications, reply to this comment with the word
STOPTo support your work, I also upvoted your post!
Support the HiveBuzz project. Vote for our proposal!
The rewards earned on this comment will go directly to the people sharing the post on Twitter as long as they are registered with @poshtoken. Sign up at https://hiveposh.com.
Hey esto quedó muy bonito. En un principio cuando lo vi dije "esto es algo impreso y ya" y no es así, realmente es impreso pero le hiciste cosas propias tuyas de ti jaja y te quedó, como dije, muy bonito. Además, es algo realmente práctico a lo que se le puede dar una utilidad.
Como ya comenté a otro usuario, cuando publicamos desde ecency se coloca debajo de nuestras imágenes una pequeña notita, en tu caso en muchas imágenes aparece la palabra "image". Esta palabra image es el texto que tiene el enlace de la propia imagen cuando la subimos desde ecency, pero es algo que se puede cambiar simplemente colocandole una notita a la imagen que luzca mejor, quizás como una leyenda de lo que se está haciendo en ese paso a paso de la imagen. Un consejo que te puede ayudar para más adelante.
A otra compañera de la comunidad le dejé el mismo comentario, puedes leerlo siguiendo este enlace:
https://peakd.com/hive-130560/@gaboamc2393/re-soyaruska-2022623t95657532z
Quiero darte una recomendación pero lo haré por privado, por favor visítanos en nuestro servidor de discord para comentarte algo al respecto. Escríbeme por favor. Saludos
Enlace al discord de la comunidad:
https://discord.gg/Aak7ccA7
Gracias @gaboamc2393 no sabía si sobre ese detalle, voy a revisar.
Te agradezco mucho q revises mi contenido, es muy valiosa tu interacción siempre. Un abrazo
great idea to make a planner specifically foe Hive posting 😃 also made me come up with how to recycle my old planner standees and "refill" them with new pages like this, thank you for sharing your work! 😄
https://d.buzz
!ALIVE
@yennysferm71! You Are Alive so I just staked 0.1 $ALIVE to your account on behalf of @ilovewintergem. (3/10)
The tip has been paid for by the We Are Alive Tribe through the earnings on @alive.chat, feel free to swing by our daily chat any time you want.
