Español
Mis queridos amigos de todas éstas comunidades de Hive reciban un caluroso Saludo y Bendecido día🤗❤👏 para que sigan expresando a través de Hive todas esas cualidades y dones que tiene cada miembro de las distintas comunidades❤🤩🤯.
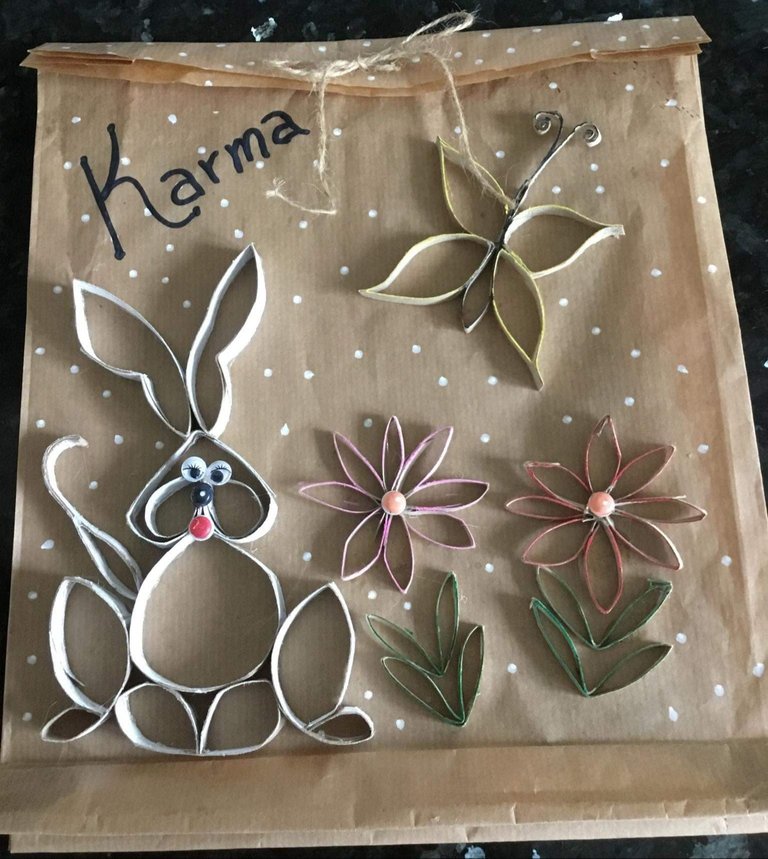
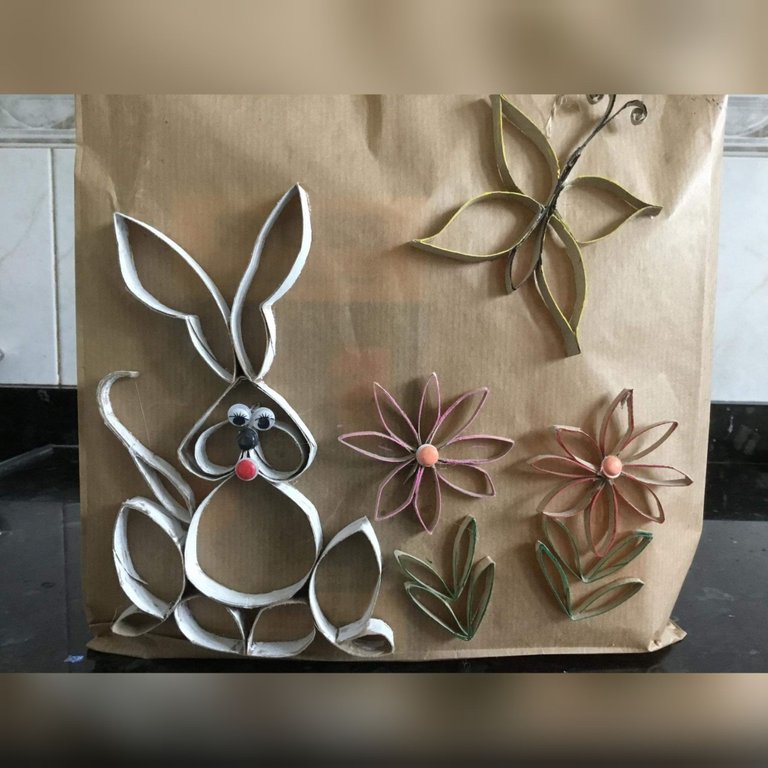
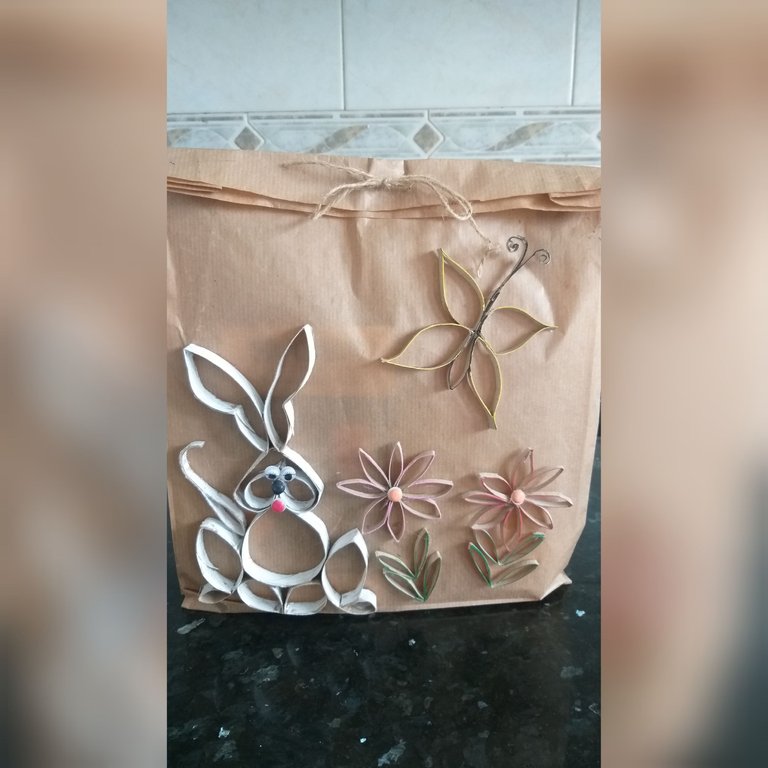
Es importante que seamos conscientes que debemos de hacer todo lo posible para reciclar los materiales que usamos en casa; como plásticos, vidrios, metal y cartón,en éste tutorial vamos a ver tres manera de cómo podemos reciclar los tubos de cartón del papel higiénico.Haremos un conejito, flores y una mariposa🐇🦋 muy fácil y divertido si lo realizamos con los pequeños de la casa🤗 y los materiales que utilizaremos la mayoría lo tenemos en casa. Así que acompañenme a hacer éstas tres lindas propuestas😍👍.
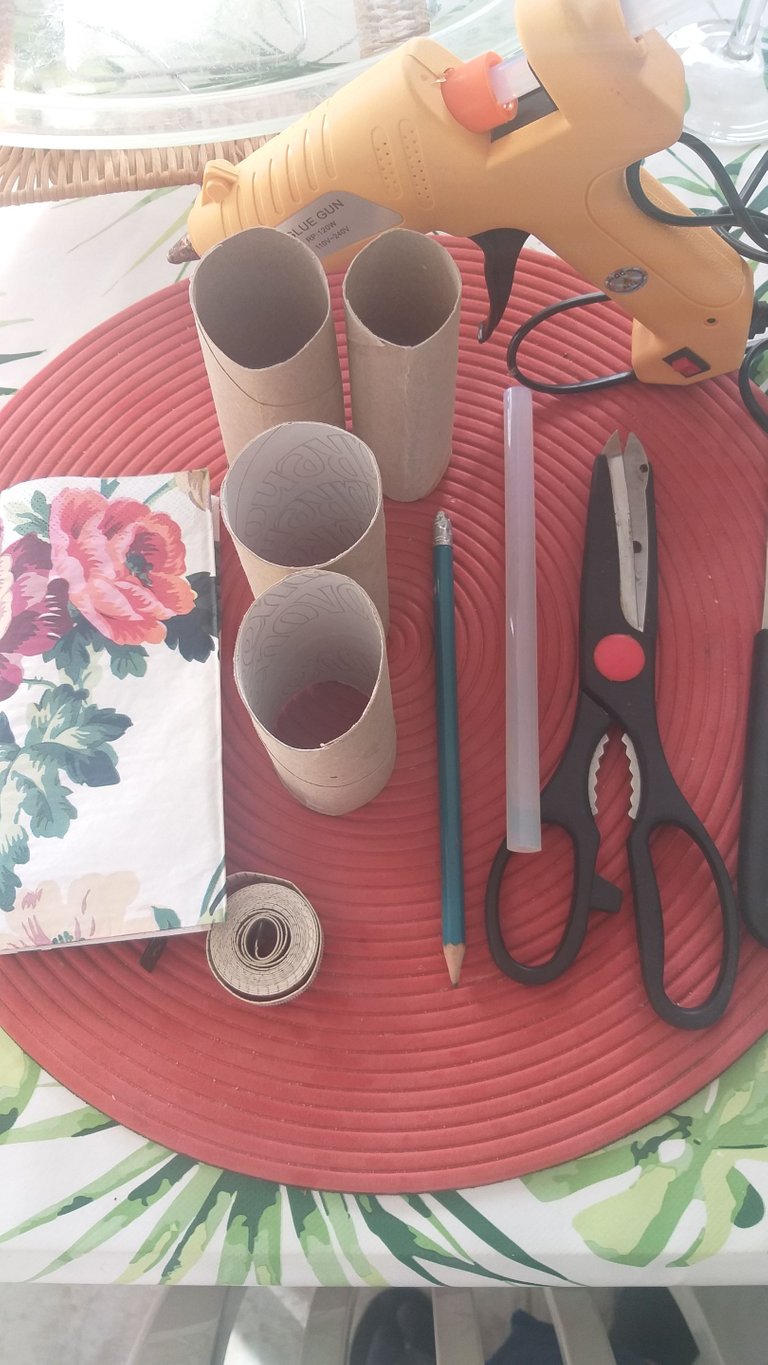
Materiales a utilizar para hacer el conejito y la mariposa son:
2 rollos de papel higiénico
Tijera
Pistola de silicona y barras de silicona o pegamento universal
*Marcadores de vários colores
Regla o cinta métrica
Lápiz o bolígrafo
Pegamento universal
Bolsa de papel kraft
Pasos a seguir:
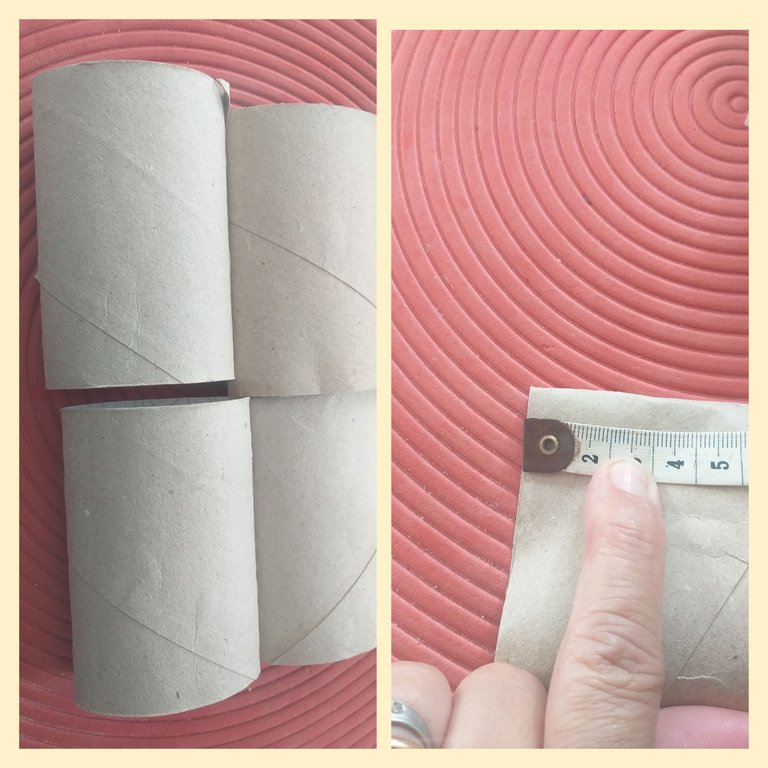
1👣. En el primer paso vamos aplastar los tubos de cartón para así poder medir con la regla o la cinta métrica. La medida va hacer de un centímetro con el lápiz o bolígrafo marcar todos los tubos con esa medida.
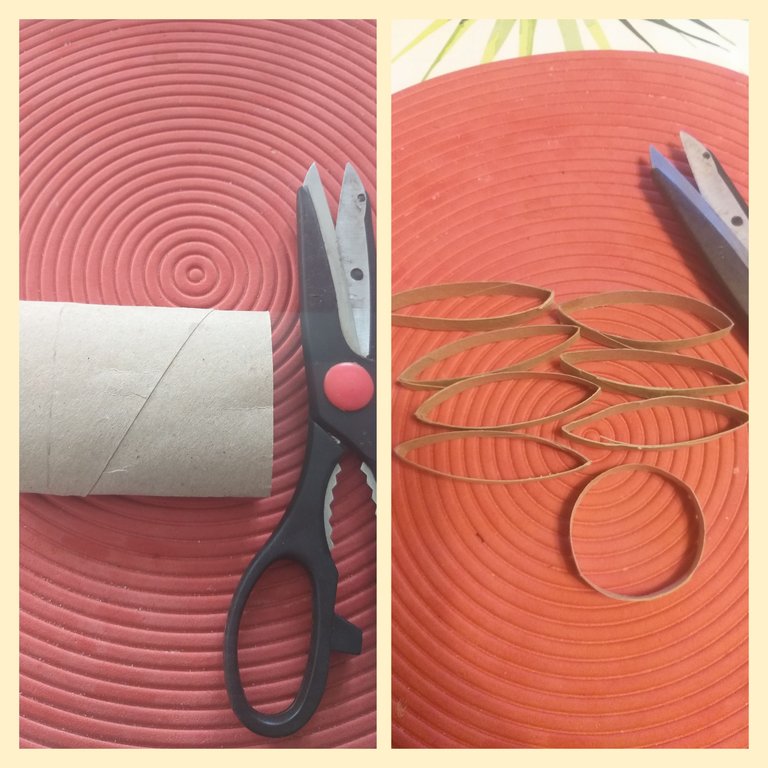
2👣. Ahora recortamos todas las lineas que marcamos en los tubos de cartón.La cantidad va a depender si quiere realizar varios conejos, mariposa o flores.
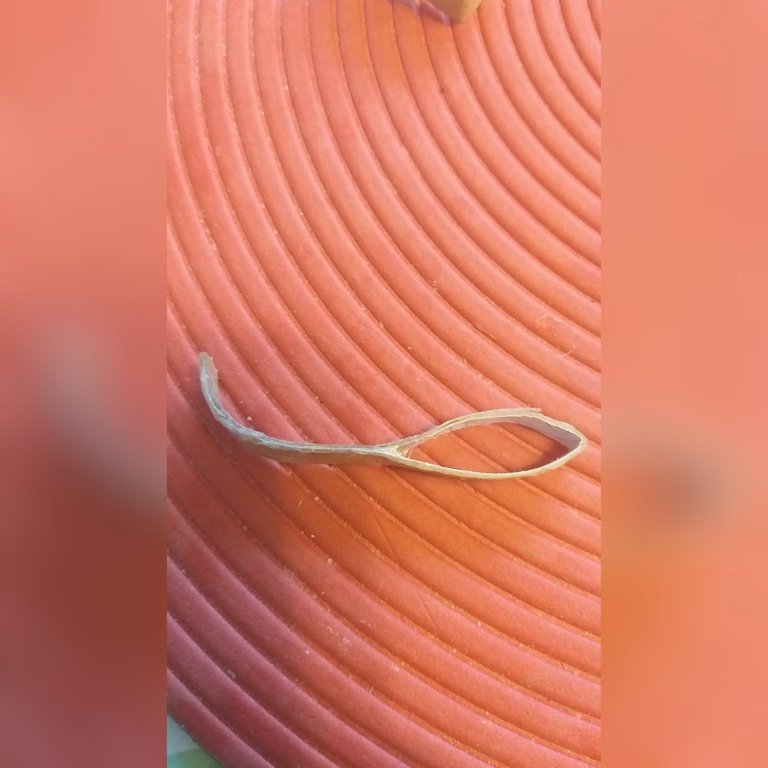
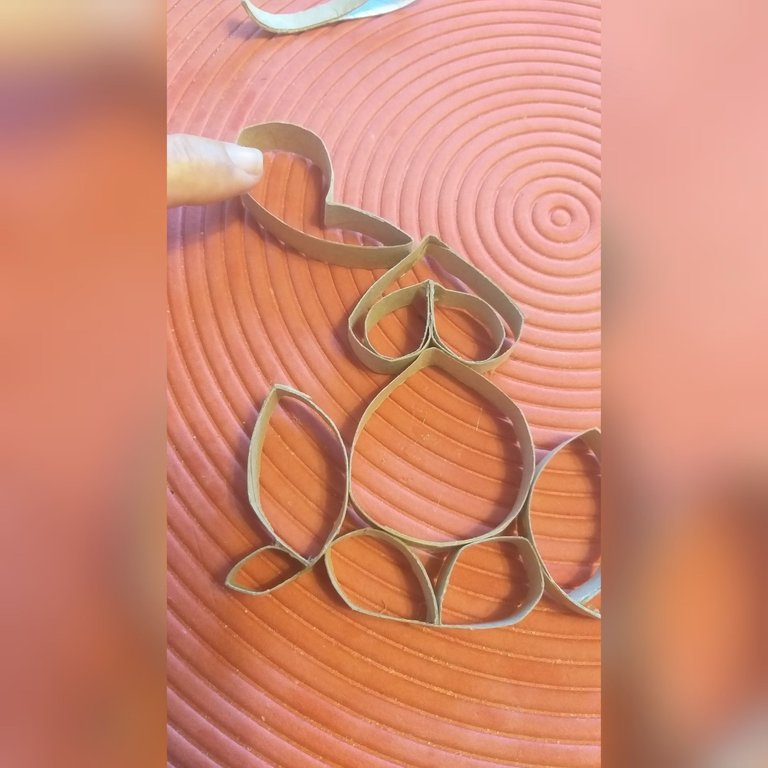
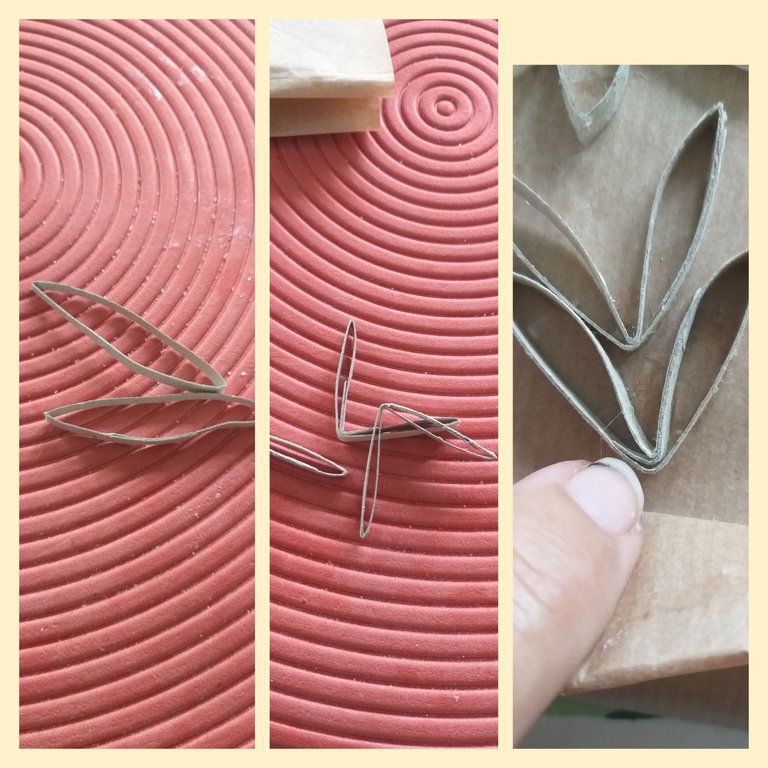
3👣. En este tercer paso haremos la primera figura que serán las dos paticas delantera del conejito; cortamos con la tijera por la mital uno de los círculos de cartón y luego pegamos las dos puntas y por último pegamos la punta la pegamos en el medio. Observe la imágenes para que le sirva de guía.
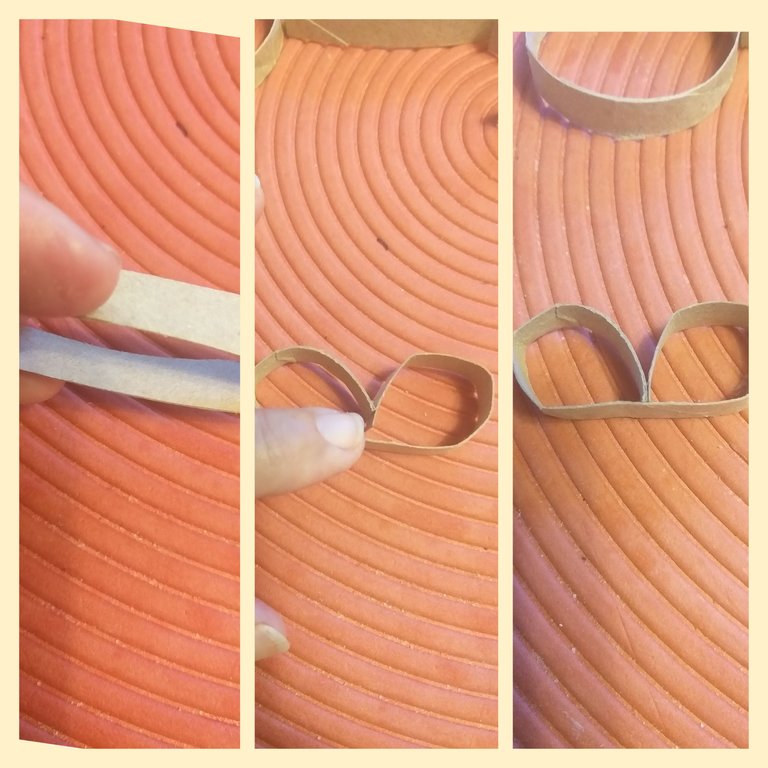
4👣. Haremos las dos patas traseras del conejito, cortamos a dos centímetros de una de las puntas del cartón y luego hacemos un doblez hacia adentro y lo pegamos como pueden ver en la imagen, deberá hacer dos paticas.

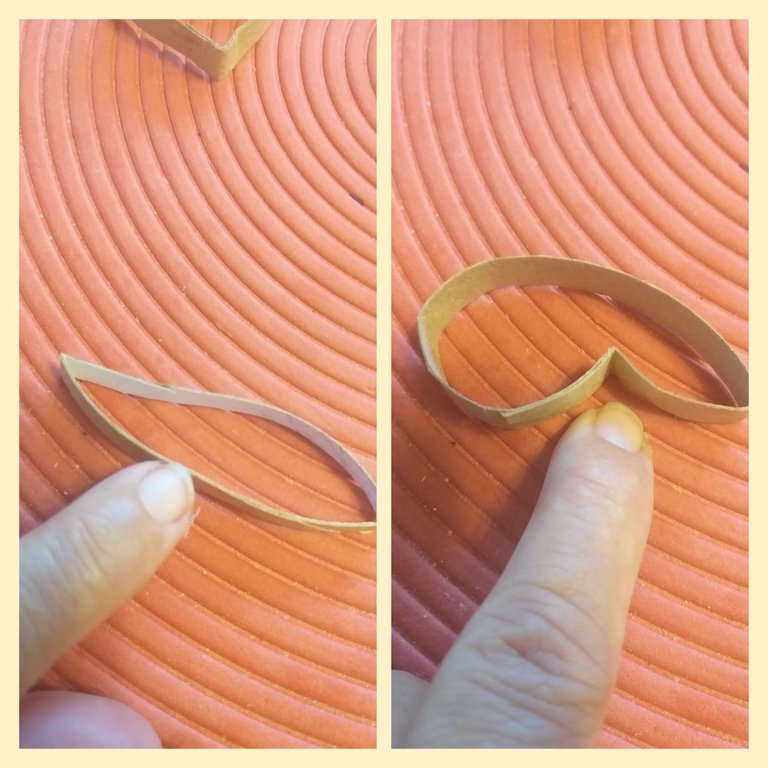
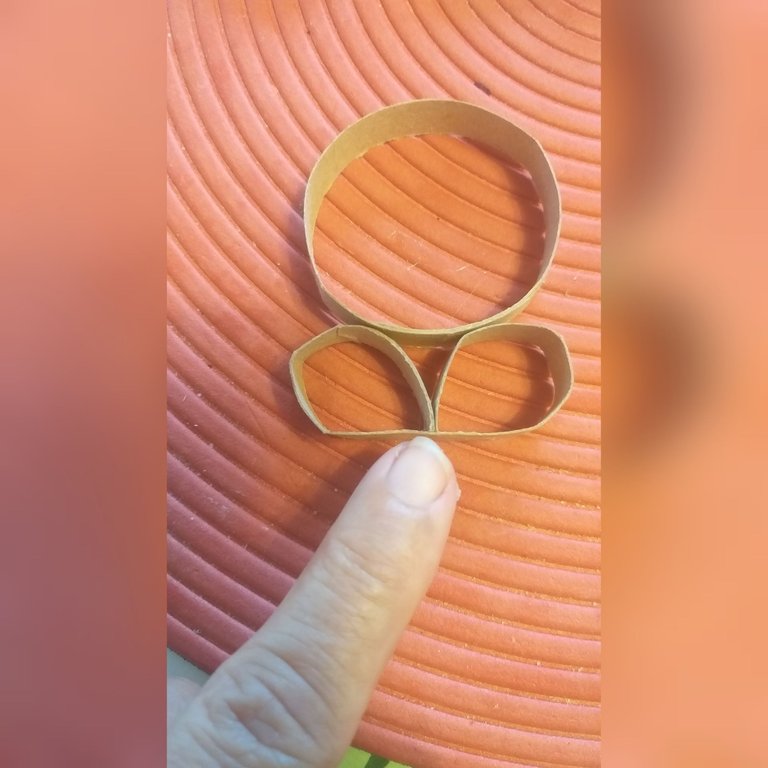
5👣.En éste paso cortamos ambos lados de uno de los círculos de cartón y pegamos ambas puntas y por último pegamos las dos figuras; estas figuras son como unas gotas de agua.
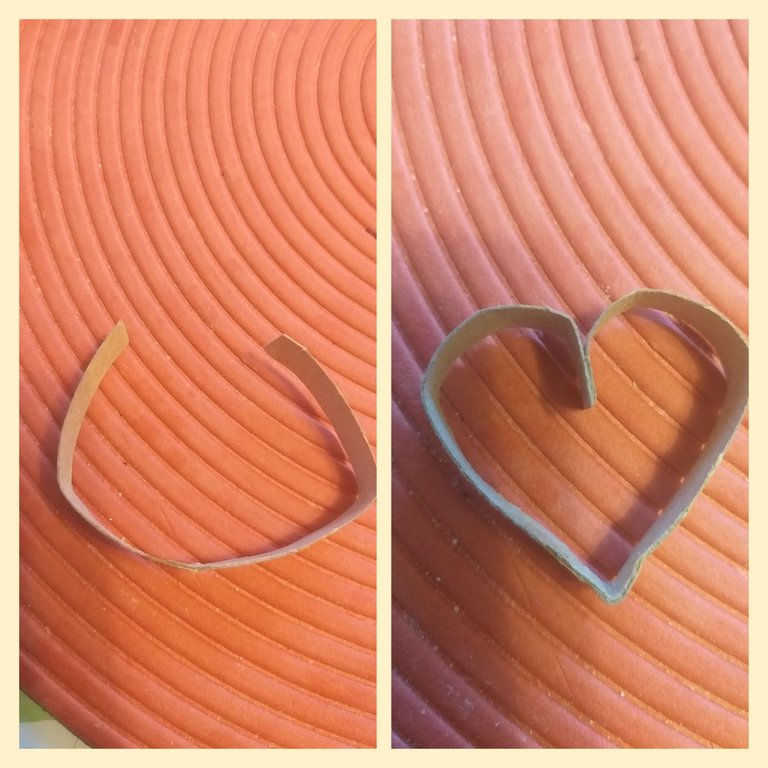
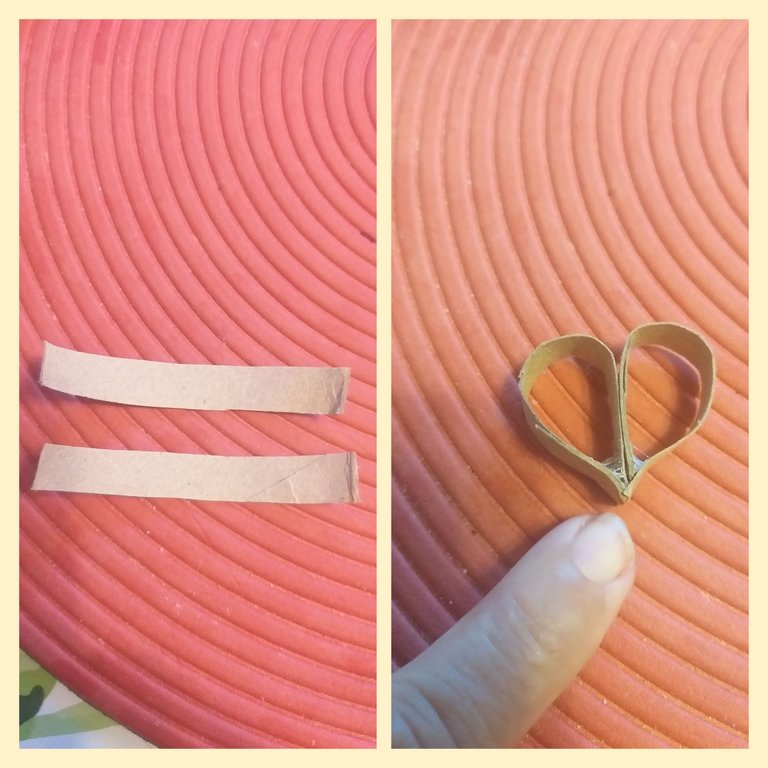
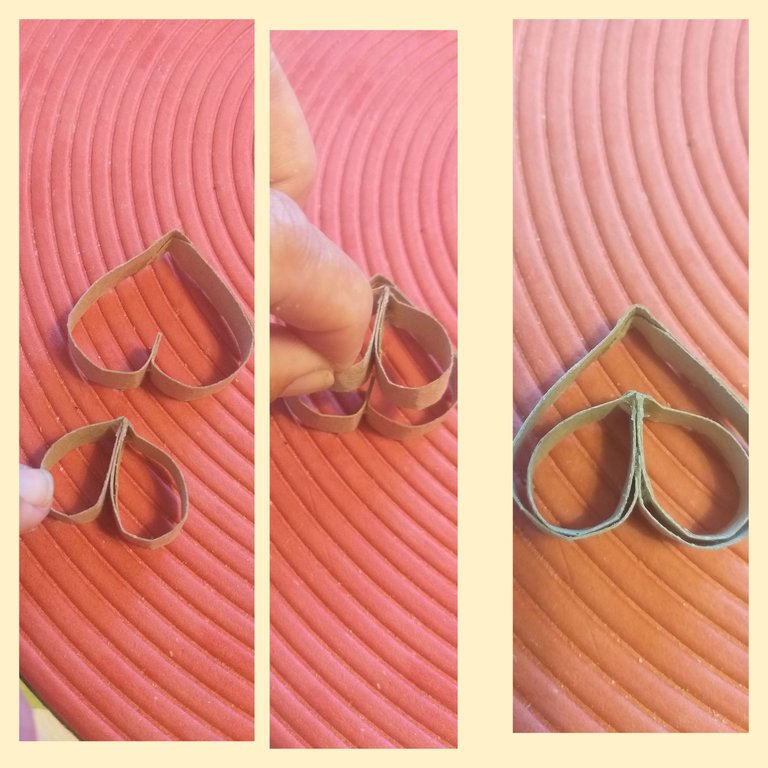
6👣. Para la cabeza del conejito cortamos por la mitad de unos de los círculos de cartón y realizando como especie de un corazón pegamos las dos puntas hacía adentro.Observe la imagen.
7👣. Vamos hacer las dos orejitas solo realizando un doblez en uno de los círculos, no necesitará de pegamento. De esta figura haremos dos.
8👣.Para el rabo sólo pegamos un poco más de la mitad uno de los círculos de cartón.
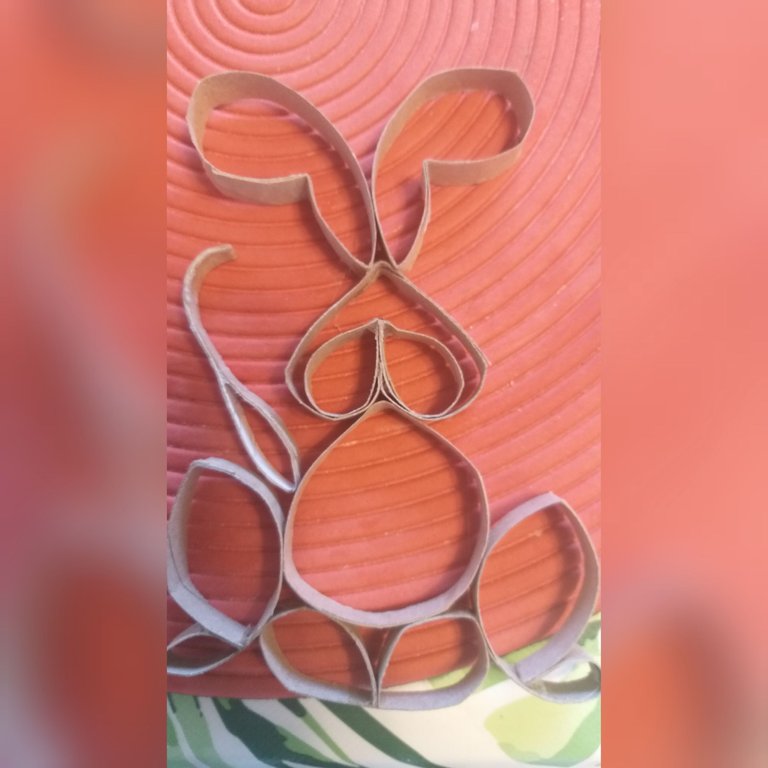
9👣. Luego que tengamos todas las figuras o piezas del conejito vamos armarlo pegando cada pieza. Primero pegamos las patas delanteras en la parte de abajo a un círculo de cartón que será el cuerpo.
10👣. Después pegamos las dos patas traseras a los lados del círculo, pueden observar la imagen para guiarse.
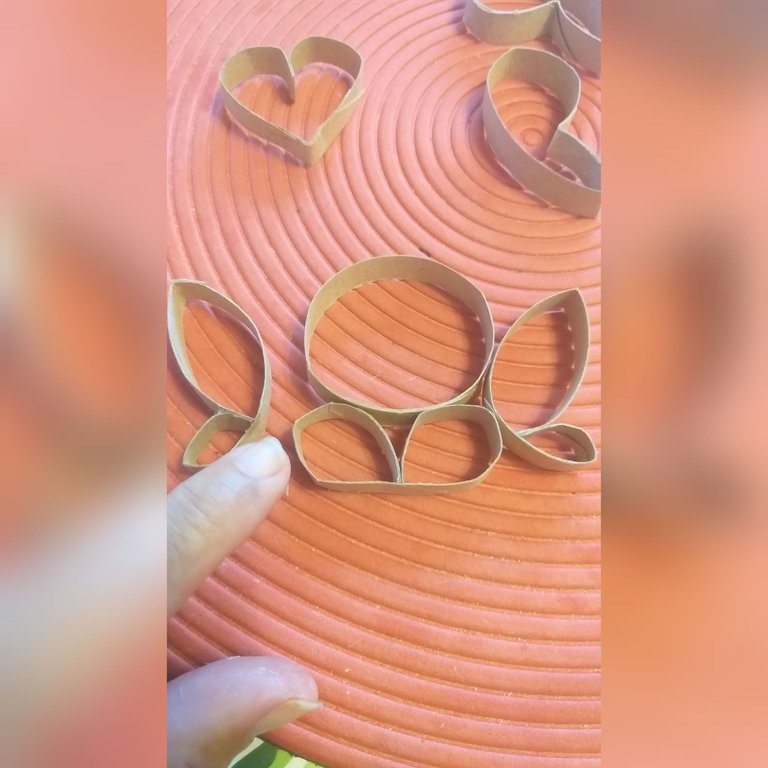
11👣. Ahora pegaremos las figura que parecen gotas de agua dentro de la figura de corazón.
12👣. Luego pegamos la cabeza con el cuerpo haciendo un pico que servirá para unir las dos piezas.

13👣. Por último pegamos ambas orejas en la cabeza una de cada lado.
14👣. Sí quieren lo dejan del color del cartón. Yo después que lo terminé todo lo pinté con marcadores permanentes en las orillas dónde resalta el color.
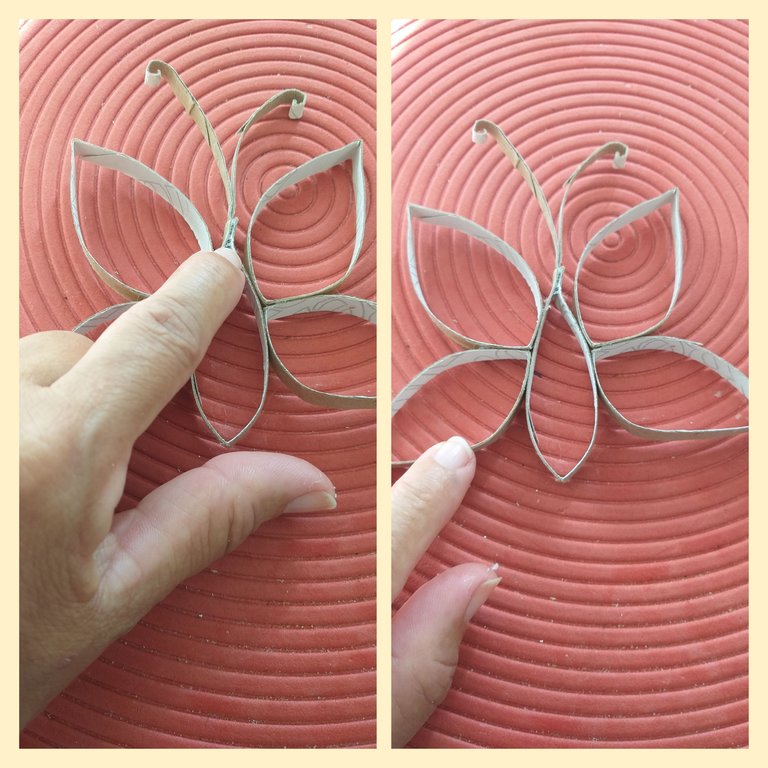
15👣. Para la mariposa recorté 5 círculos y lo primero que debemos hacer es pegar dos y dos (alas) y luego pegarlo a uno que sería el cuerpo de la mariposa y luego le coloqué las antenas con otro círculo de cartón y le enrolle las puntas.
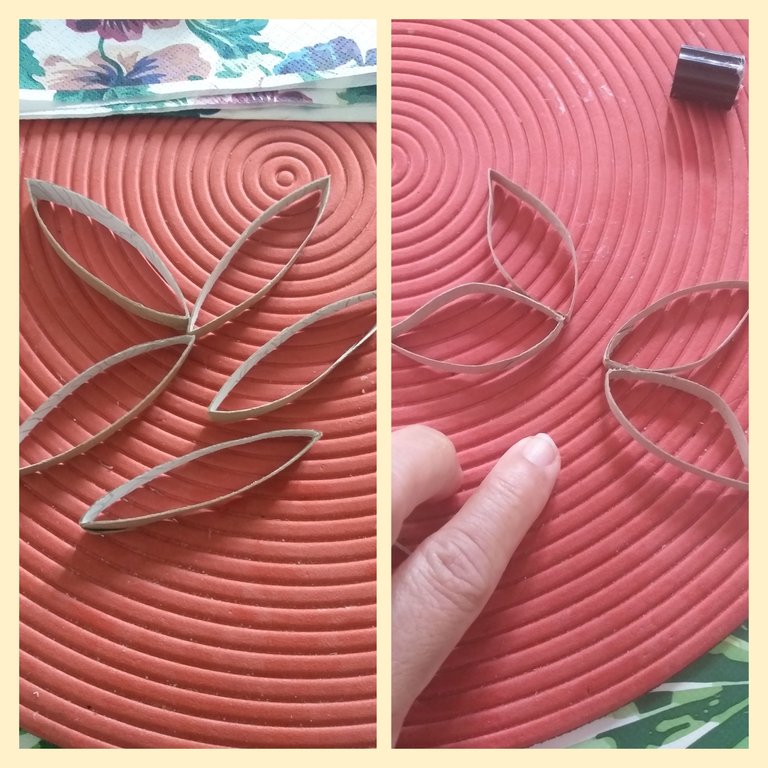
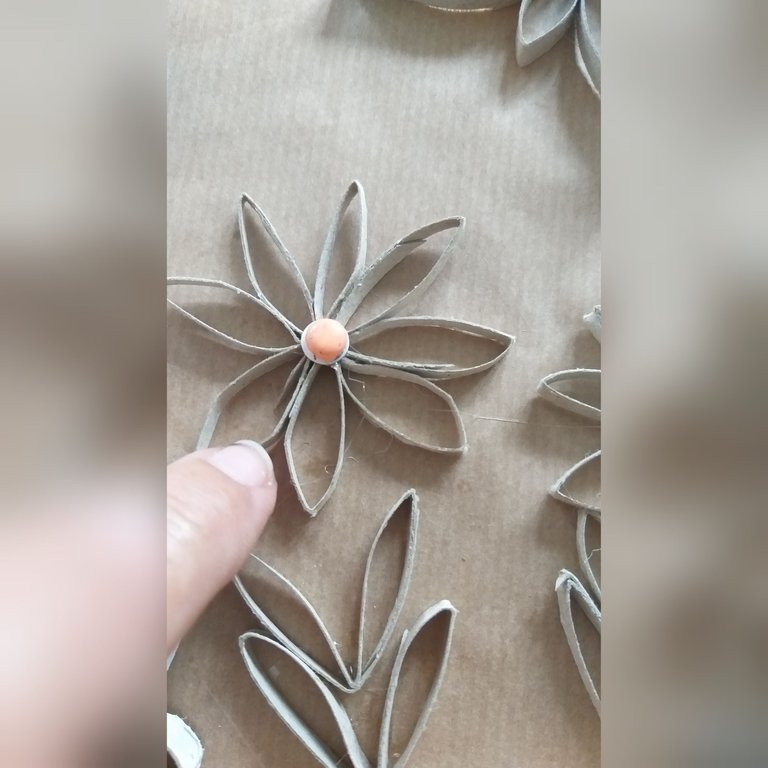
16👣. Para las flores y hojas doblamos varios círculos de cartón por la mitad y pegamos varios juntos formando una flor y otros los dejamos para que sean las hojas.
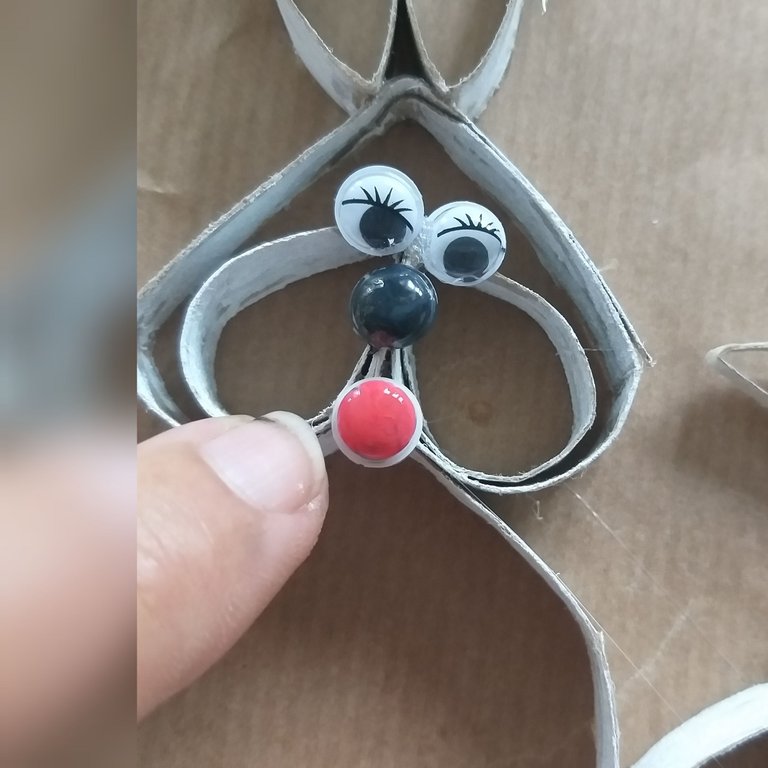
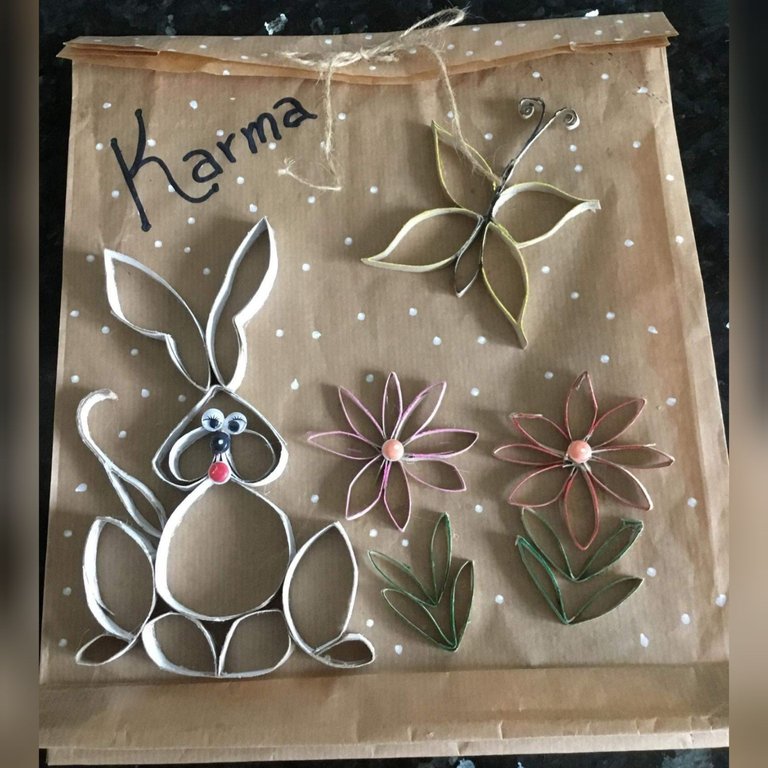
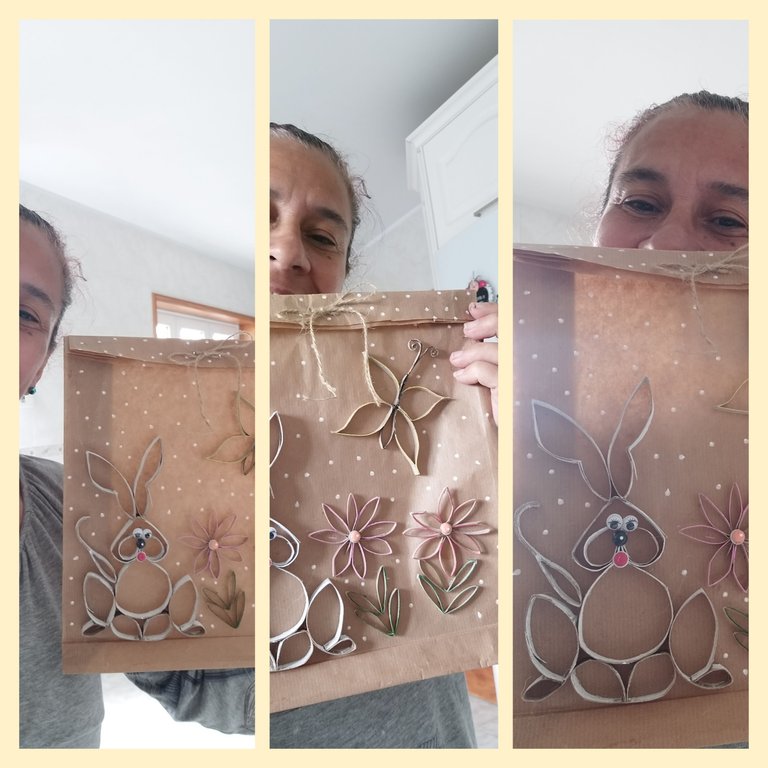
17👣. Por último pintamos con los marcadores a su gusto. Le pegué ojitos, nariz y boca al conejito y pegué todas las figuras a una bolsa de papel que realicé. Y le escribí el nombre de la mascota de mi hija que le compré unos regalitos😍🤗.
Bueno amigos espero que le haya gustado mi trabajo de manualidad de hoy y se animen a reciclar los tubos de cartón para hacer diferentes figuras decorativas. Muchas gracias por su apoyo a todos los que me dejan un hermoso comentario y apoyan mil bendiciones.
Las fotos son tomadas de mi teléfono móvil Samsung Galaxy A6 y organizadas por la aplicación GridArt

English
My dear friends from all these Hive communities receive a warm greeting and a blessed day 🤗❤👏 to continue expressing through Hive all those qualities and gifts that each member of the different communities has ❤🤩🤯.
It is important that we are aware that we must do everything possible to recycle the materials we use at home; such as plastics, glass, metal and cardboard, in this tutorial we are going to see three ways how we can recycle cardboard toilet paper tubes. We will make a bunny, flowers and a butterfly🐇🦋 very easy and fun if we do it with the little ones the house🤗 and the materials that we will use most of us have at home. So join me in making these three beautiful proposals😍👍.
Materials to use to make the bunny and the butterfly are:
2 rolls of toilet paper
Scissors
Glue gun and glue sticks or universal glue
*Multi-colored markers
Ruler or tape measure
Pencil or pen
*Universal glue
*kraft paper bag
Steps to follow:
1👣. In the first step we are going to flatten the cardboard tubes so that we can measure with the ruler or the tape measure. The measurement will make a centimeter with the pencil or pen mark all the tubes with that measurement.
2👣. Now we cut out all the lines that we mark on the cardboard tubes. The amount will depend on whether you want to make several rabbits, butterflies or flowers.
3👣. In this third step we will make the first figure that will be the two front legs of the bunny; Cut one of the cardboard circles in half with scissors and then glue the two ends and finally glue the tip in the middle. Look at the images to serve as a guide.
4👣. We will make the two rear legs of the bunny, we will cut two centimeters from one of the ends of the cardboard and then we will fold it inwards and glue it as you can see in the image, you should make two legs.
5👣.In this step we cut both sides of one of the cardboard circles and glue both ends and finally we glue the two figures; these figures are like drops of water.
6👣. For the bunny's head, we cut one of the cardboard circles in half and, making a kind of heart, glue the two ends inwards. Observe the image.
7👣. We are going to make the two little ears just by making a fold in one of the circles, you will not need glue. From this figure we will make two.
8👣.For the tail we only glued a little more than half of one of the cardboard circles.
9👣. After we have all the figures or pieces of the bunny, we will assemble it by gluing each piece. First we glue the front legs at the bottom to a cardboard circle that will be the body.
10👣. Then we glue the two hind legs to the sides of the circle, you can look at the image to guide you.
11👣. Now we will glue the shapes that look like drops of water inside the heart shape.
12👣. Then we glue the head to the body making a beak that will serve to join the two pieces.
13👣. Finally we glue both ears on the head one on each side.
14👣. If they want, they leave it the color of the cardboard. After I finished everything, I painted it with permanent markers on the edges where the color stands out.
15👣. For the butterfly I cut 5 circles and the first thing we have to do is glue two and two (wings) and then glue it to one that would be the body of the butterfly and then I placed the antennas with another cardboard circle and rolled up the ends.
16👣. For the flowers and leaves we fold several cardboard circles in half and glue several together forming a flower and leave others to be the leaves.
17👣. Finally we paint with the markers to your liking. I glued eyes, nose and mouth to the bunny and glued all the figures to a paper bag that I made. And I wrote her the name of my daughter's pet that I bought her some gifts😍🤗.
Well friends, I hope you liked my craft work today and are encouraged to recycle cardboard tubes to make different decorative figures. Thank you very much for your support to all those who leave me a beautiful comment and support a thousand blessings.
The photos are taken from my Samsung Galaxy A6 mobile phone and organized by the GridArt application
Hola amiga que lindo trabajo ☺️ tal como lo dices está genial para realizarlo con los más pequeños de la casa!! Me gustó mucho tu paso a paso, una buena forma de reciclar los rollos 🌺✨☺️