...is finally done! I just finished it today, and I just spent the last few hours editing video footage. As I'm typing this, the first video is uploading to my BitChute channel, and should become visible in a few hours. I say "should," because BitChute isn't cooperating at the moment (it keeps cancelling the upload for some reason), so I may just have to try again tomorrow. The second and third videos will get uploaded tomorrow, and I'll link to all three of them in a comment below. If all you're interested in is the final product, however, then here it is!
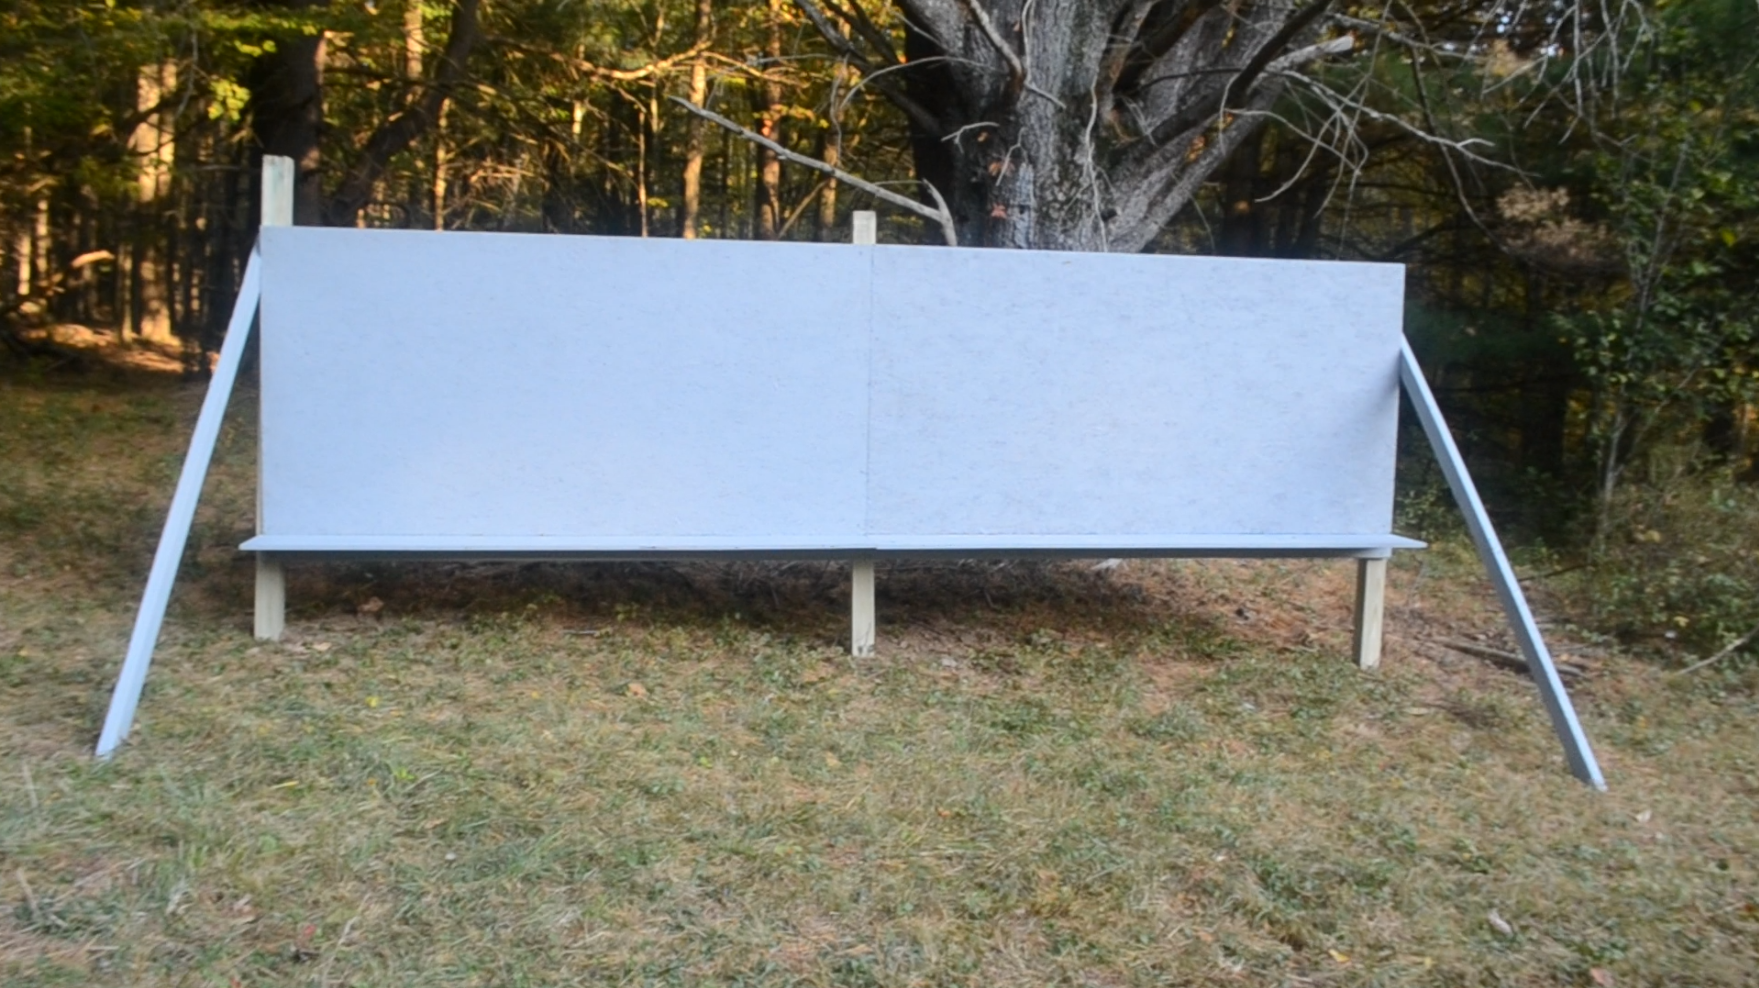
The target surface is 4 feet by 16 feet (1,25 x 5 metres), the shelf sticks out a foot, and is two feet off the ground (at the right-most post, which is flush with the top of the target board). All three posts are sunk 2 feet into the ground. The target surface is level, the ground obviously isn't. I wanted the shelf to be level, since its purpose is to hold targets such as "the block," a layered foam rubber cube that I use for crossbow practise. The shelf will also hold larger targets that I use for practising traditional archery. Of course, the main purpose of such a large target surface is hold lots of paper targets for practising with firearms, both modern and black powder (I own a flintlock rifle, which you'll get to see in the future). I need plenty of room to practise with the flintlock, since I'm not yet very skilled with it, and, well... have you ever seen what .50 calibre bullets do to wood?
Tomorrow, in addition to [hopefully] having all the videos showing the construction published, I'll fix the scope on my crossbow and then immediately get to hunting - archery season started a week ago!
I hope it's easy to replace that back board, because it's gonna get blown to smithereens right fast in a hurry with a .50!
Also, I know I probably don't need to say anything, but what's downrange beyond the target? Got a good backstop hillside, or enough empty forest for safety?
Yes, the back boards are fairly easy to replace. My design is such that they were the last components to be installed, and they are just held on with screws anyway.
As you'll get to see in the third video, there is a pile of wood immediately behind the target area (in fact, I used to have a piece of plywood nailed directly to the wood pile), as well as a very large pine tree. The forest is also dense enough that no bullet will go very far before running into a tree, and there is a stone wall marking the property line only a few metres beyond.
Look forward to seeing more. The pic shows in the preview for me, but not when I open the post, only a little of top piece shows.
That happens a lot with high-res photos; it usually fixes itself after a day or two.
Yup, it's in there now. Looks like it should be fun.
Nice work I look forward to seeing some more of the construction and, of course, to see it in use.
I like this design. I may do something similar at the new house we are moving into for bow shooting. The new house is too close to other houses for firearms, but I have an idea for a breakdown target stand, using your design as the template, that I can take with me in my truck.
Any lessons learned from the build you can share?
If you're looking to build a portable version, I would recommend making something smaller, maybe with 4'x4' back boards, this way the whole thing will lie flat in a truck bed, but also to cut down on weight. Each of the back boards is about the limit for what I can carry, and I don't even know how much they weigh, so I wouldn't attempt carrying the equivalent of one plus two 4"x4"x8' posts on my own. One other change I would make for a portable version is to add stakes to the stand: mailbox stakes for the main posts, and cables with stakes to replace the diagonal support boards that I used. It won't be as stable as digging holes in the ground and sinking the posts, but setup will be a lot quicker. Alternatively, you could add large feet to the posts and simply rest it on the ground, though this wouldn't be a viable option unless the ground is level.
Thanks for the tips. I was actually thinking (2) 4'x4'x6's with feet made from 2"x4" spreading out 4 different directions at the bottom of each post, then two old tires, one each, to weigh them down. I like 4'x4' backstop recommendation. Maybe even make it into a folding backstop and folding shelf at the bottom.
Feet like this?
Yes, and then slide the tires over the top of the post down over the feet.
Congratulations @steampunkkaja! You have completed the following achievement on the Hive blockchain and have been rewarded with new badge(s) :
You can view your badges on your board and compare yourself to others in the Ranking
If you no longer want to receive notifications, reply to this comment with the word
STOP