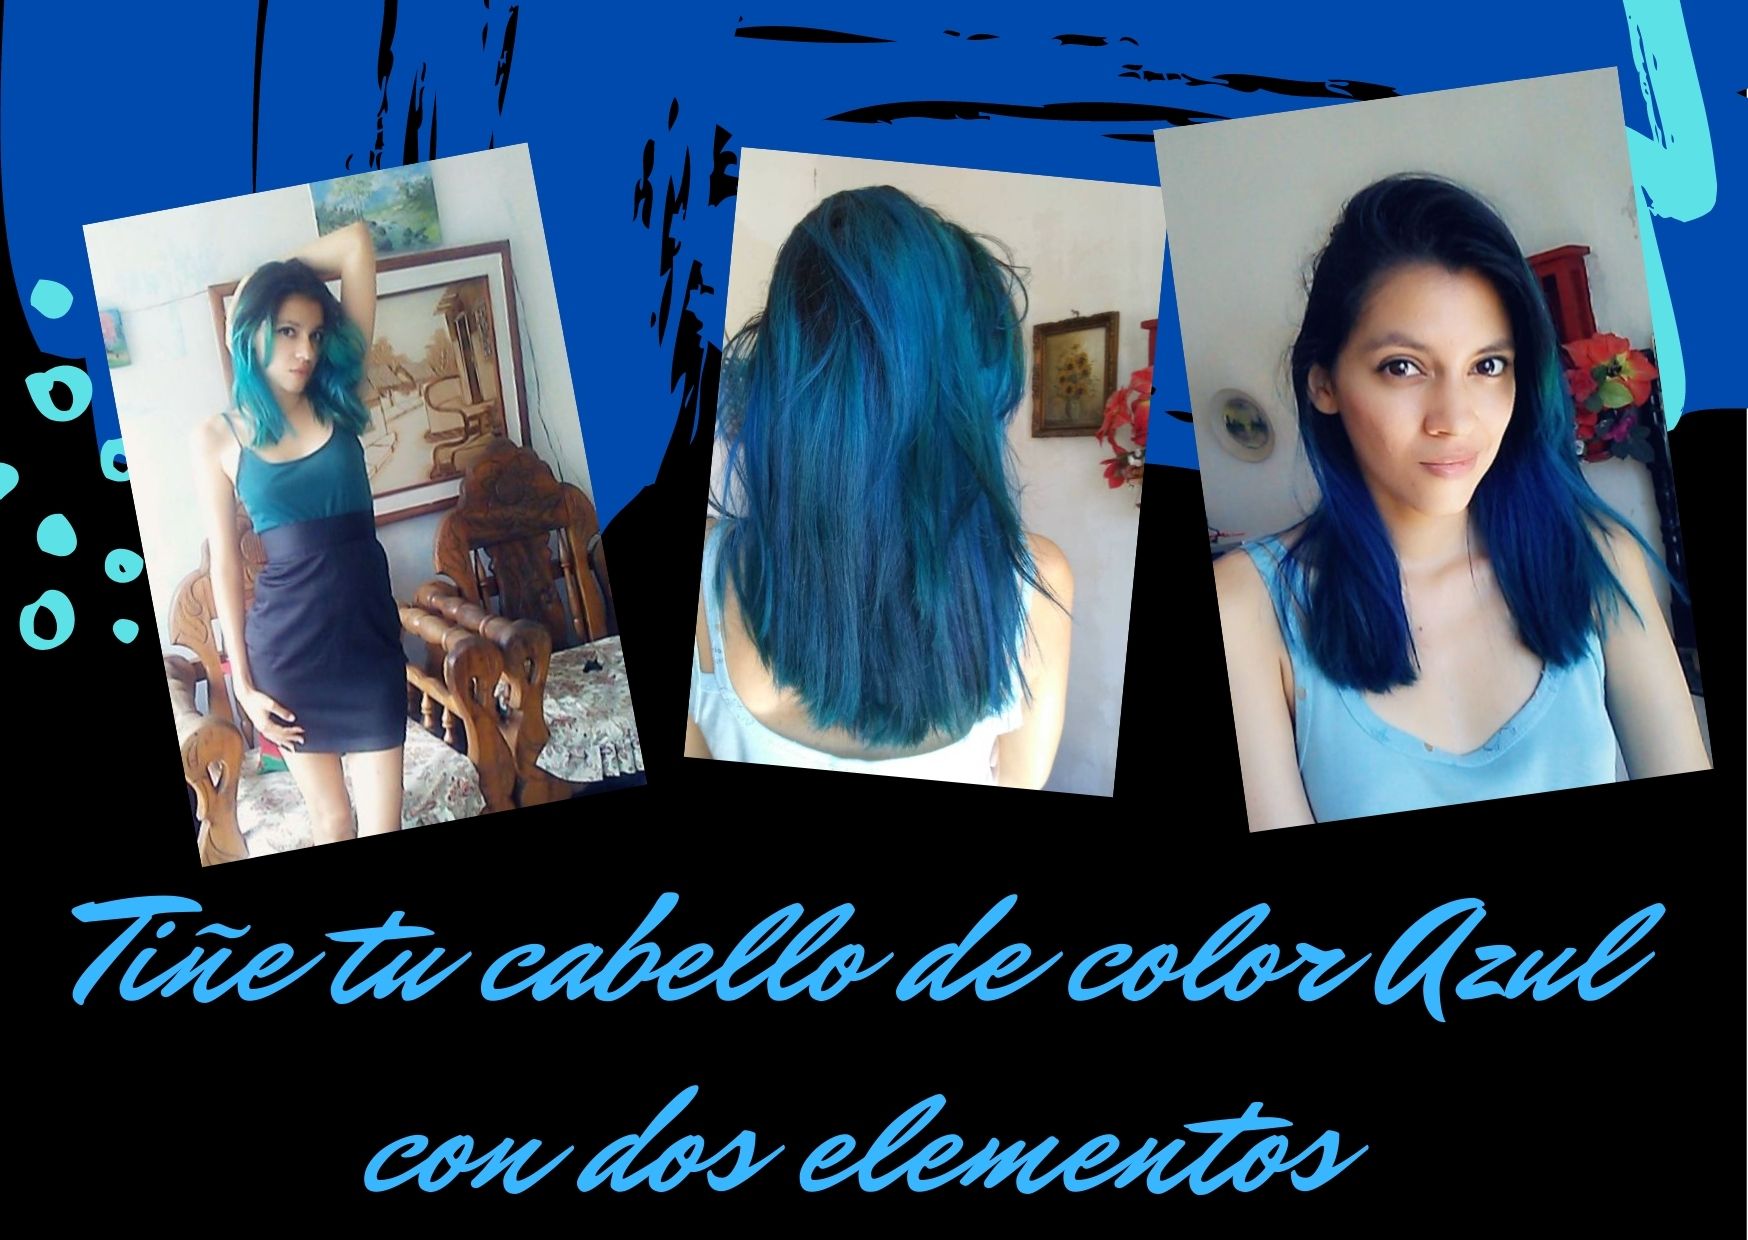
¡Hola, gente de internet! Espero que se encuentren bien. Hace unas semanas hice un post de maquillaje y a varios de ustedes les gustó el color de mi cabello (el cuál había cambiado de violeta a turquesa) asi que en esta ocasión les quiero mostrar como tiño mi cabello y como fabrico mi propio tinte.
Hello, internet people! I hope you're doing well. A few weeks ago I did a makeup post and several of you liked the color of my hair (which had changed from purple to turquoise) so this time I want to show you how I dye my hair and how I make my own dye.

Antes de empezar, hay algunas cosas que hay que tener en cuenta: La primera y la más importante es que debes tener el cabello previamente decolorado en el tono 9 o 10 para que cualquier color fantasía de tinte pueda adherirse al cabello. Si tu coloración es más dorada que platinada, probablemente el color se convierta en verde, así que, si quieres un color azul, debes tener el cabello platinado.
Before we begin, there are a few things to keep in mind: First and foremost, you must have your hair previously bleached to shade 9 or 10 so that any fantasy dye color can adhere to the hair. If your coloring is more gold than platinum, the color will probably turn green, so if you want a blue color, you must have platinum hair.
Lo siguiente es que las medidas no son exactas porque eso dependerá de que tan intenso quieras el color, es cuestión de sentido común, si quieres un color azul rey, pues intensificas el color, sino, pues se coloca menos producto. Yo tengo mi propia medida pero es la que a mí me gusta personalmente, de todas formas la comparto por si alguno quiere el mismo tono que yo. Ahora sí, ¡comencemos!
The next thing is that the measures aren't exact because it will depend on how intense you want the color, it's a matter of common sense, if you want a king blue color, then you intensify the color, if not, then you put less product. I have my own measurement but it's the one I personally like, anyway I share it in case someone wants the same tone as me. Now, let's get started!
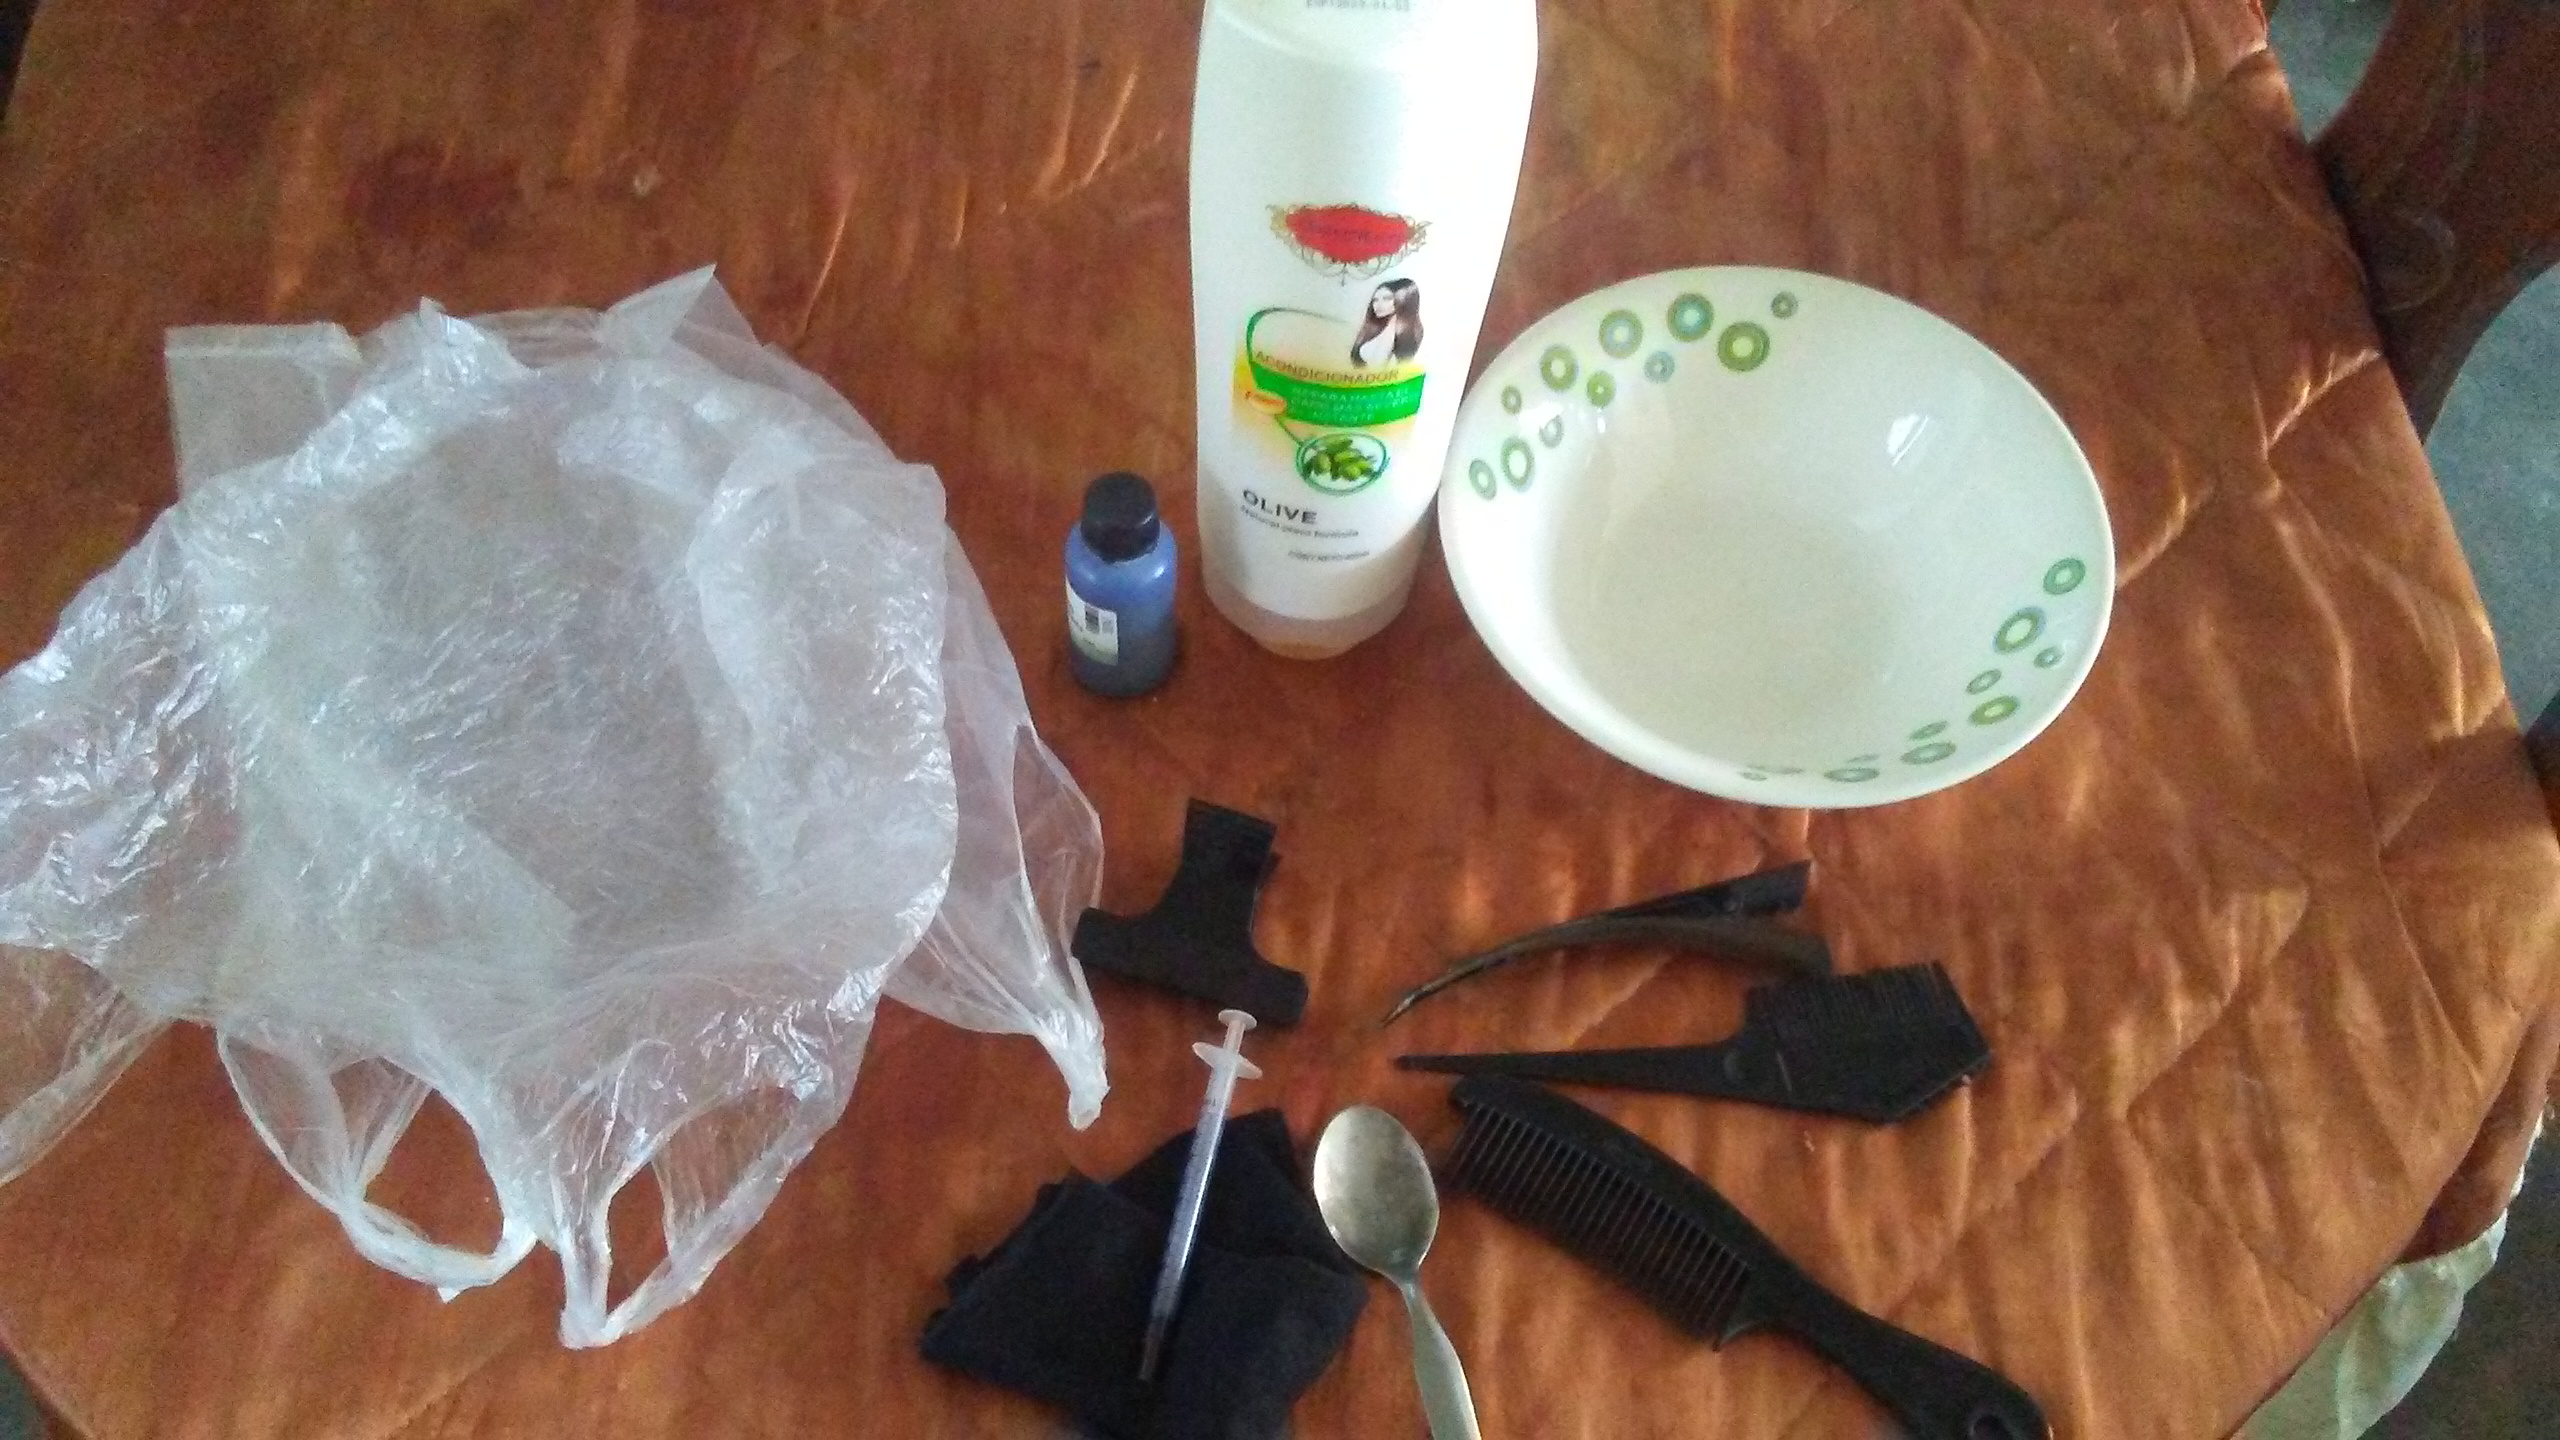
Para el tinte necesitaremos acondicionador para el cabello y azul de mitileno (así de simple) y si quieres agregarle más hidratación a tu cabello, puedes agregarle un poco de aceite de argan. Para la aplicación vamos a necesitar: un bowl (intenta que sea uno que no se utilice ya que quedará manchado), pinzas para el cabello, un peine, un aplicador con punta para separar el cabello, una jeringa pequeña (sin aguja, claro), un par de guantes (o dos bolsas plásticas, en su defecto), una cucharilla y algún pedazo de tela donde apoyaremos la jeringa.
For the hair dye we will need hair conditioner and mytilene blue (simple as that) and if you want to add more hydration to your hair, you can add some argan oil. For the application we will need: a bowl (try to use an unused one as it will be stained), hair tweezers, a comb, an applicator with a tip to separate the hair, a small syringe (without needle, of course), a pair of gloves (or two plastic bags, if not), a teaspoon and a piece of cloth to hold the syringe.
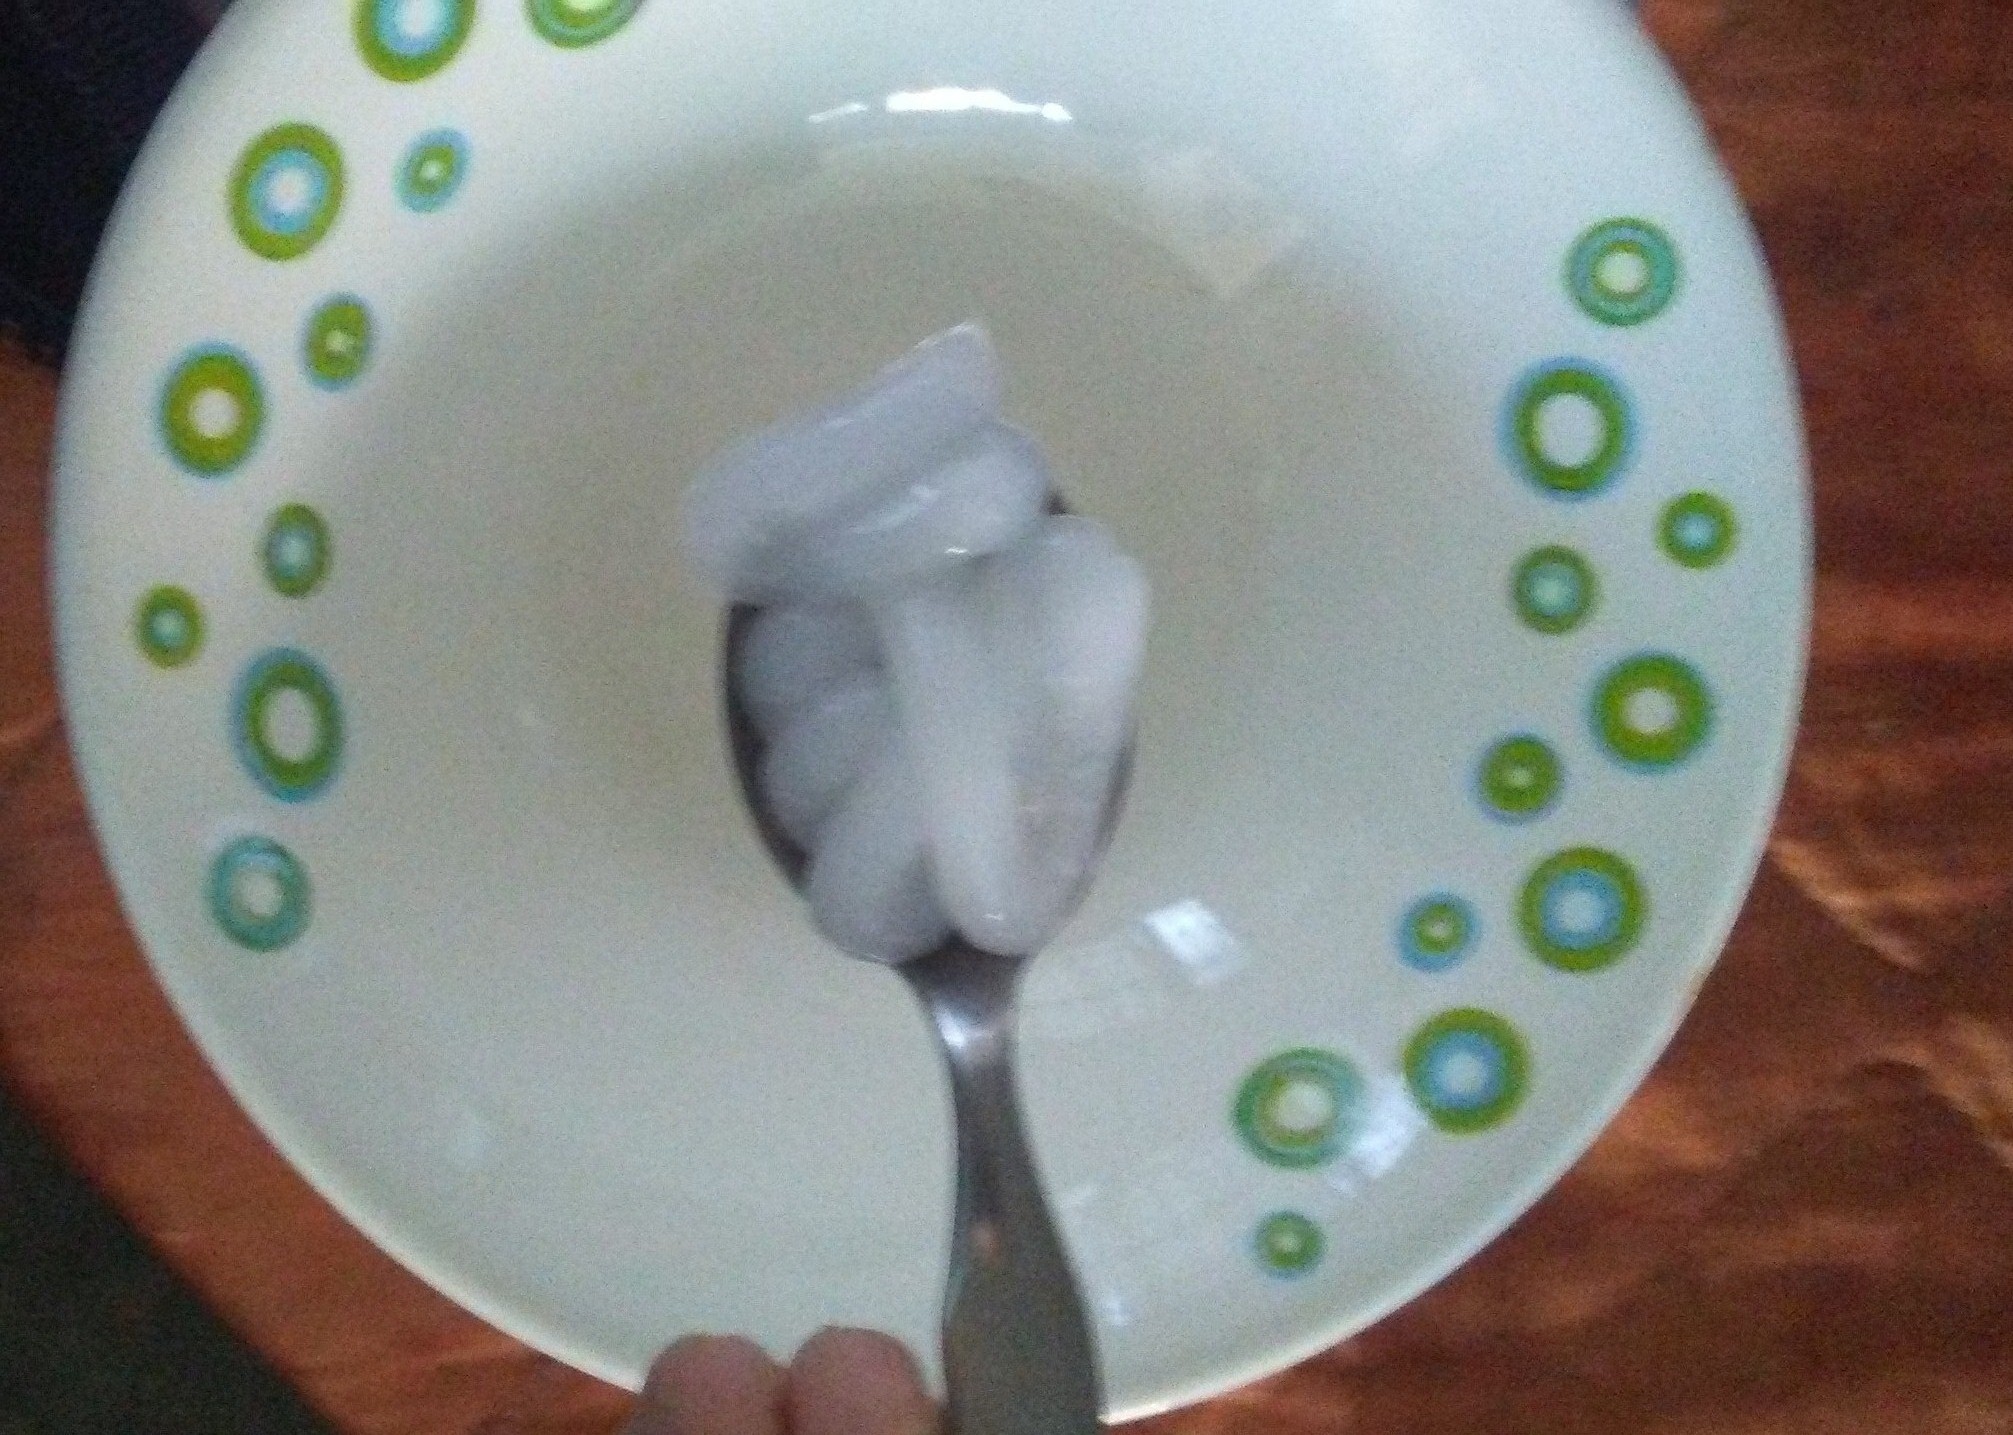
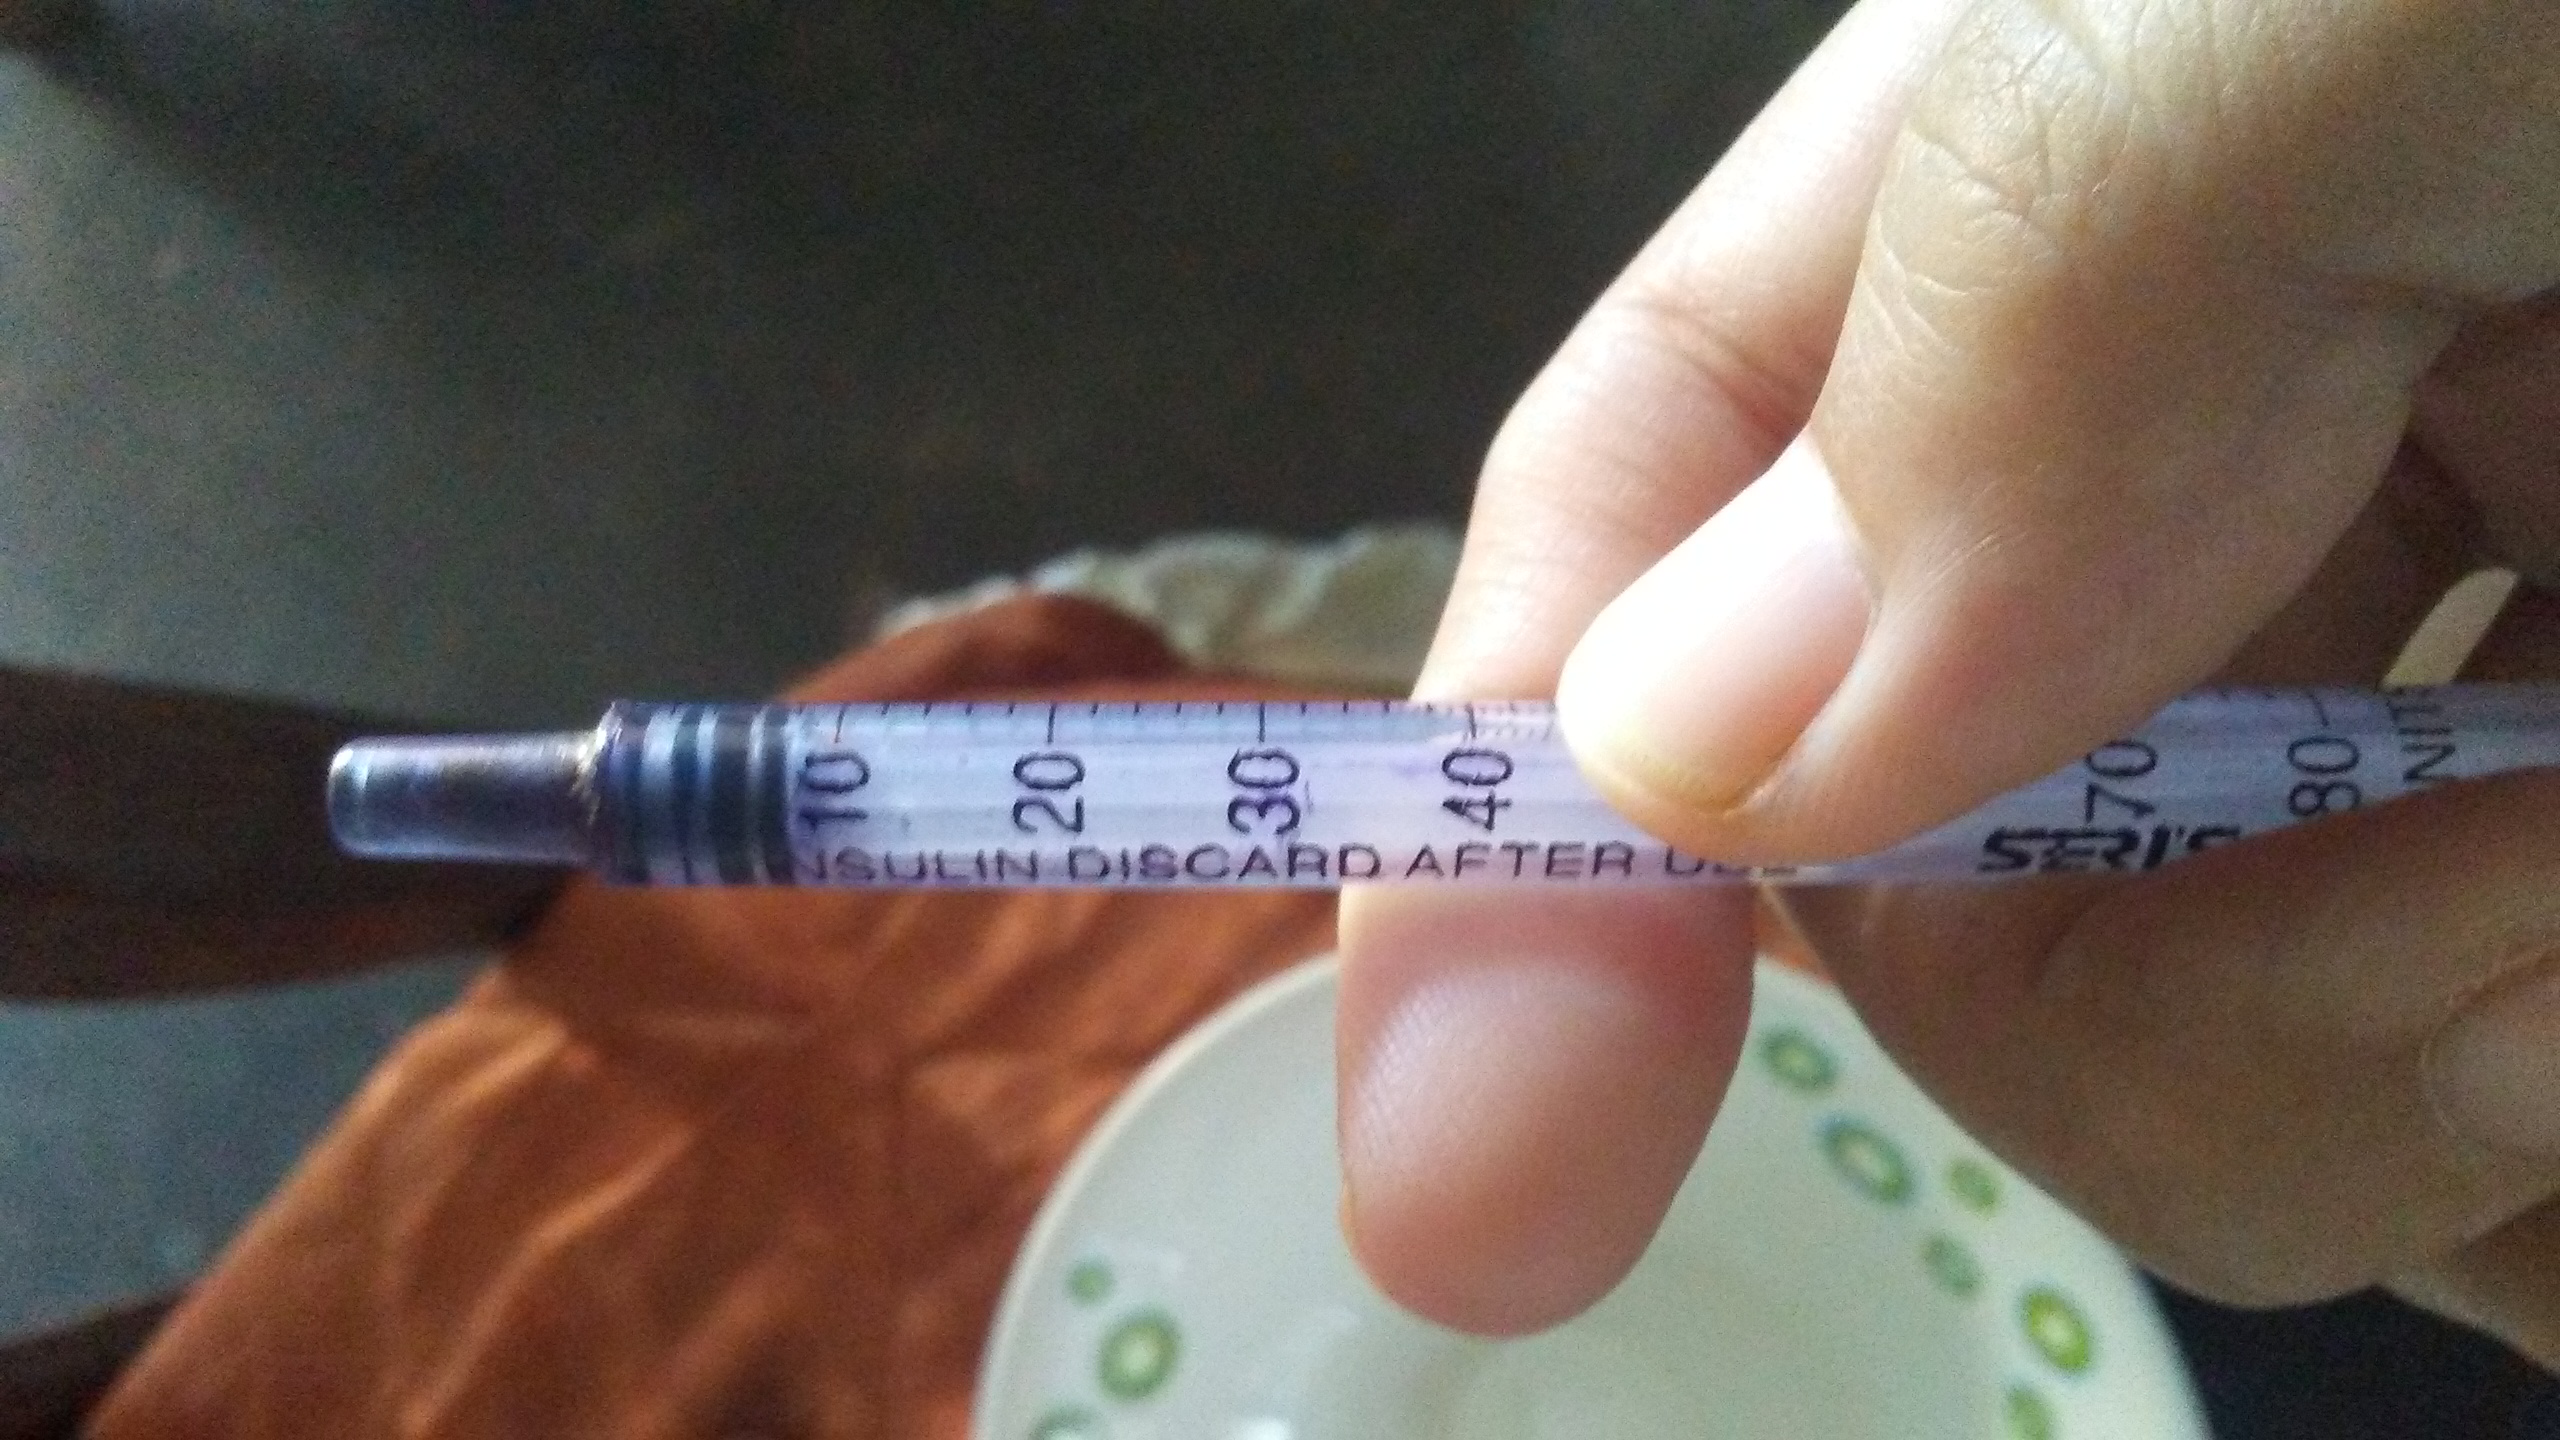
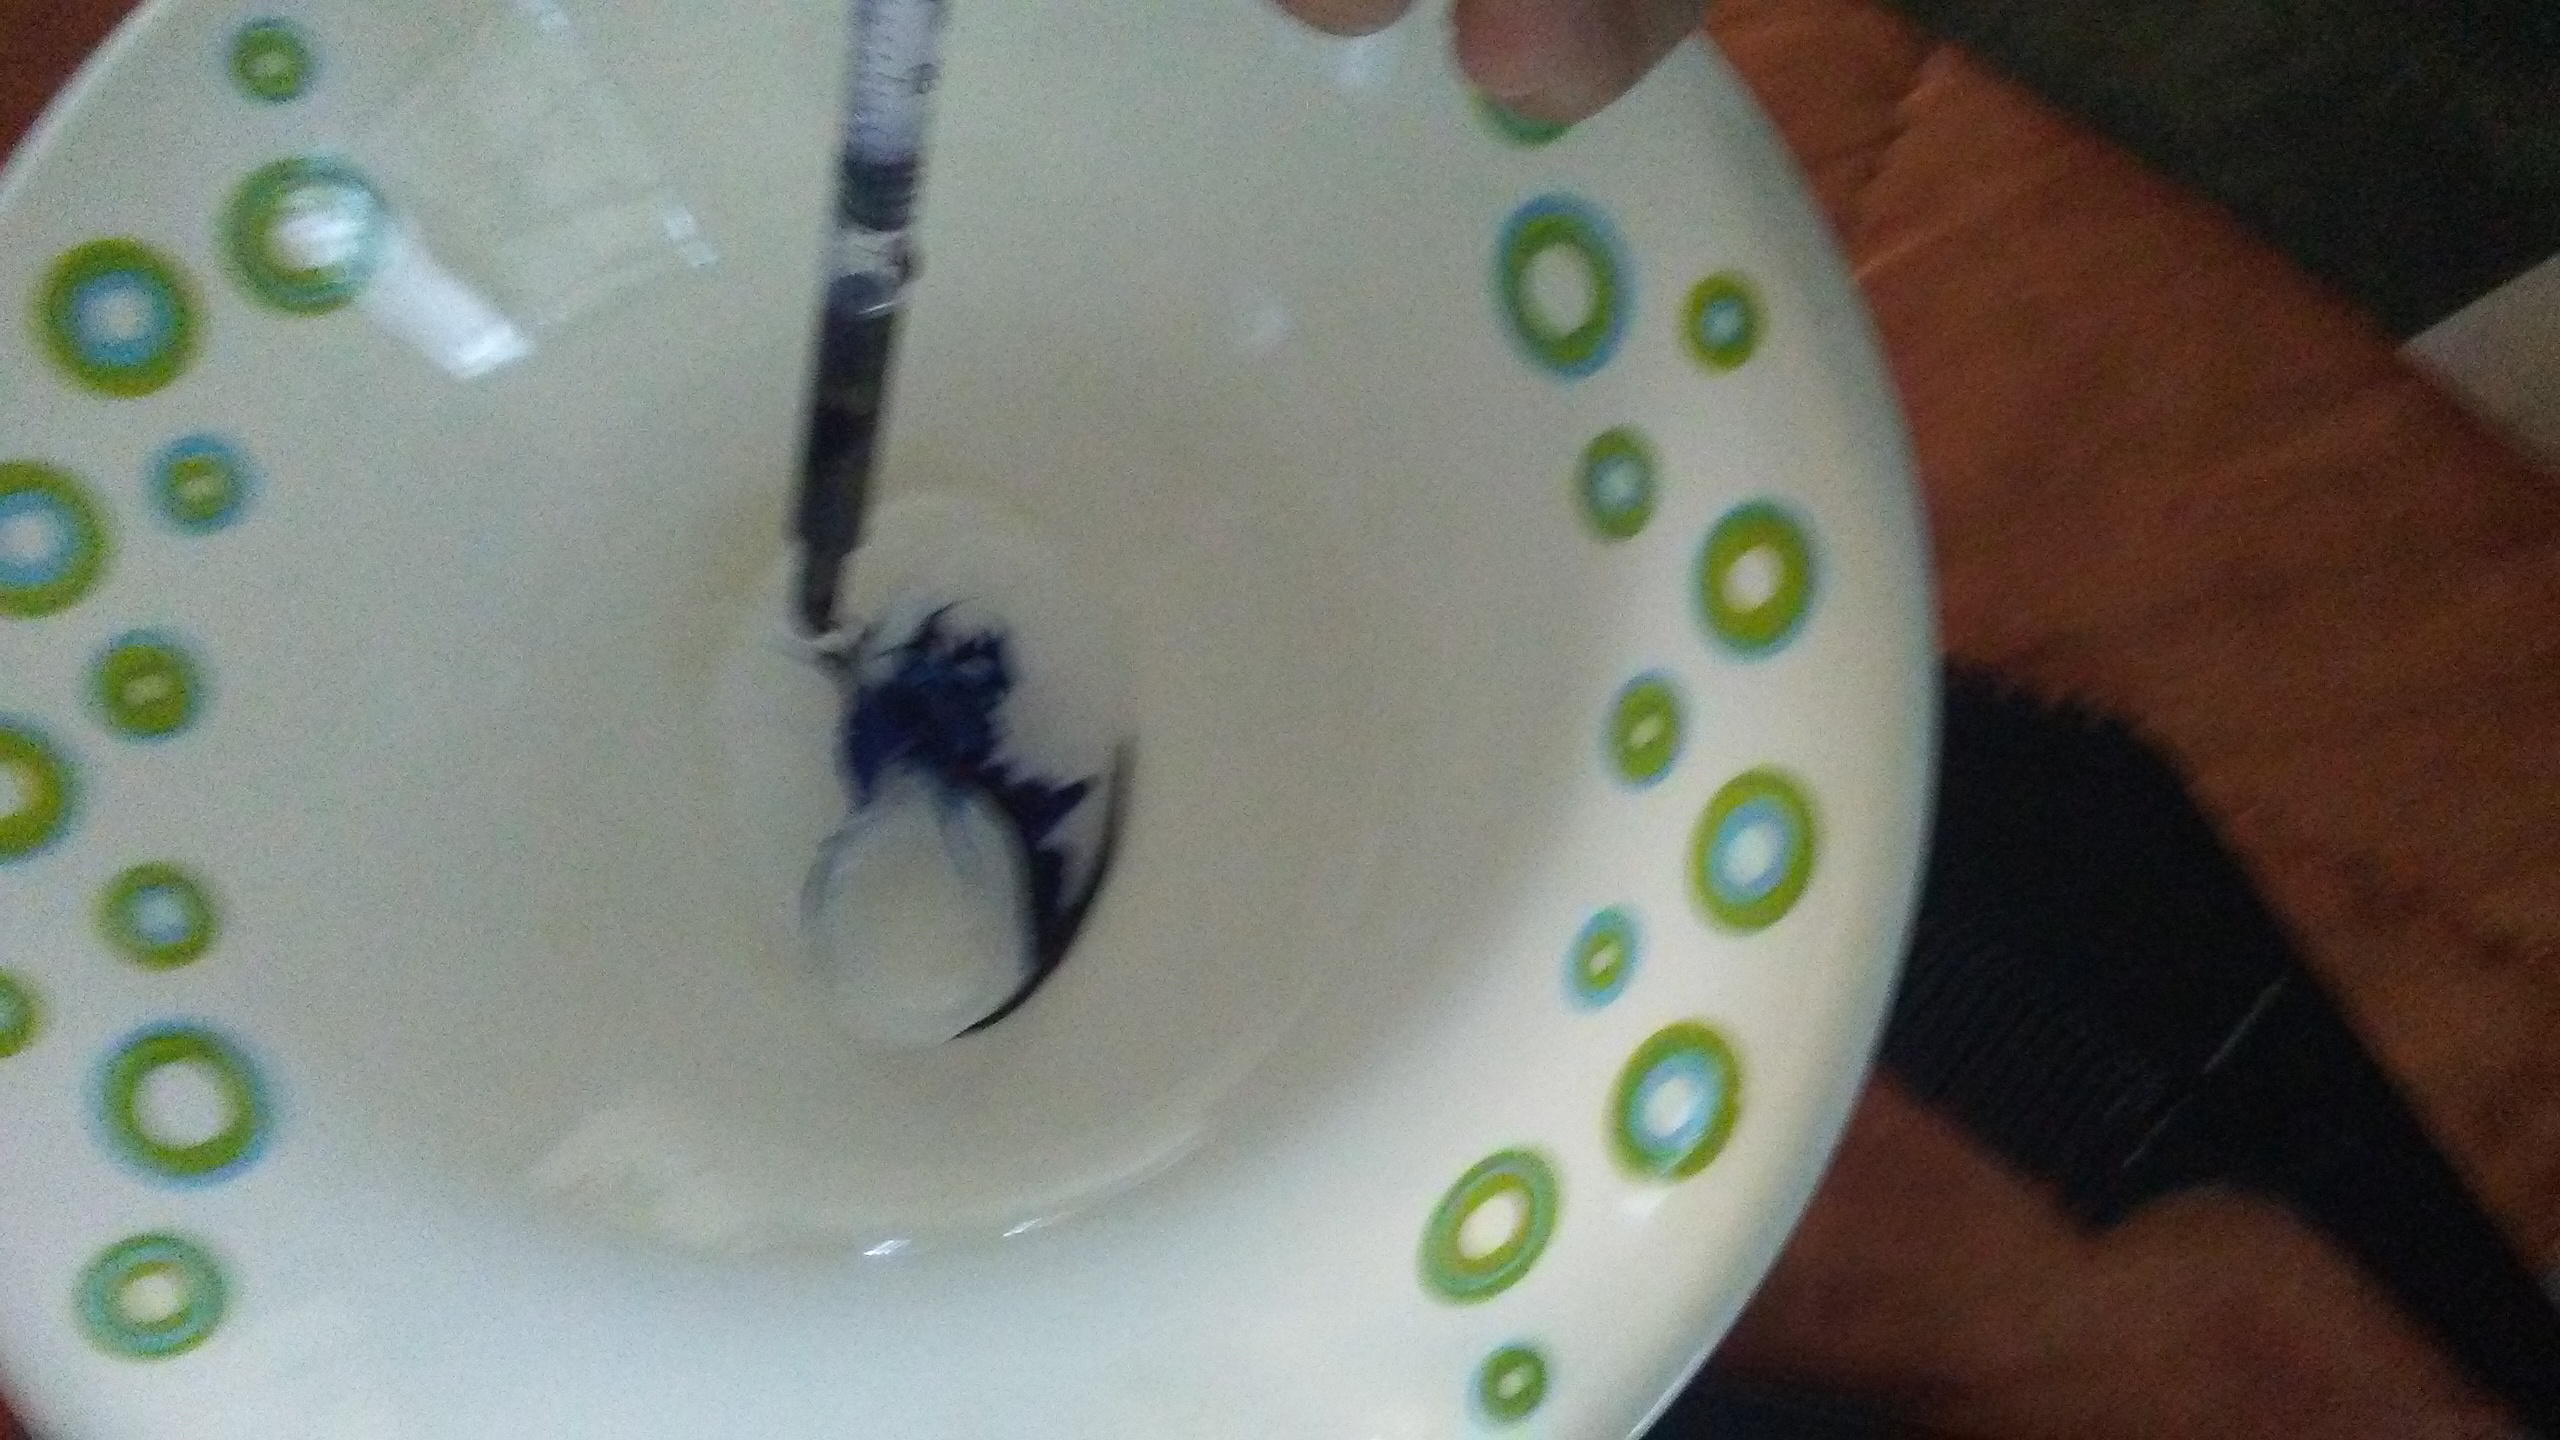
Lo primero que tienes que hacer es ir midiendo por cantidades y así tener una idea de cual es la formula que emplearás de aquí en adelante, en mi caso, por cada cucharada de acondicionador para el cabello, agrego dos medidas de 40 cc de azul de mitileno. Tu puedes iniciar así, con menos o más, a tu gusto, pero hacerlo de esta manera aunque es tedioso, te garantiza saber cuanta cantidad de cada elemento vas a usar para tener determinado tono.
The first thing you have to do is to measure by quantity to get an idea of what formula you will use from now on, in my case, for each tablespoon of hair conditioner, I add two measures of 40 cc of mytilene blue. You can start this way, with less or more, as you like, but doing it this way although it's tedious, it guarantees you know how much of each element you are going to use to get a certain shade.
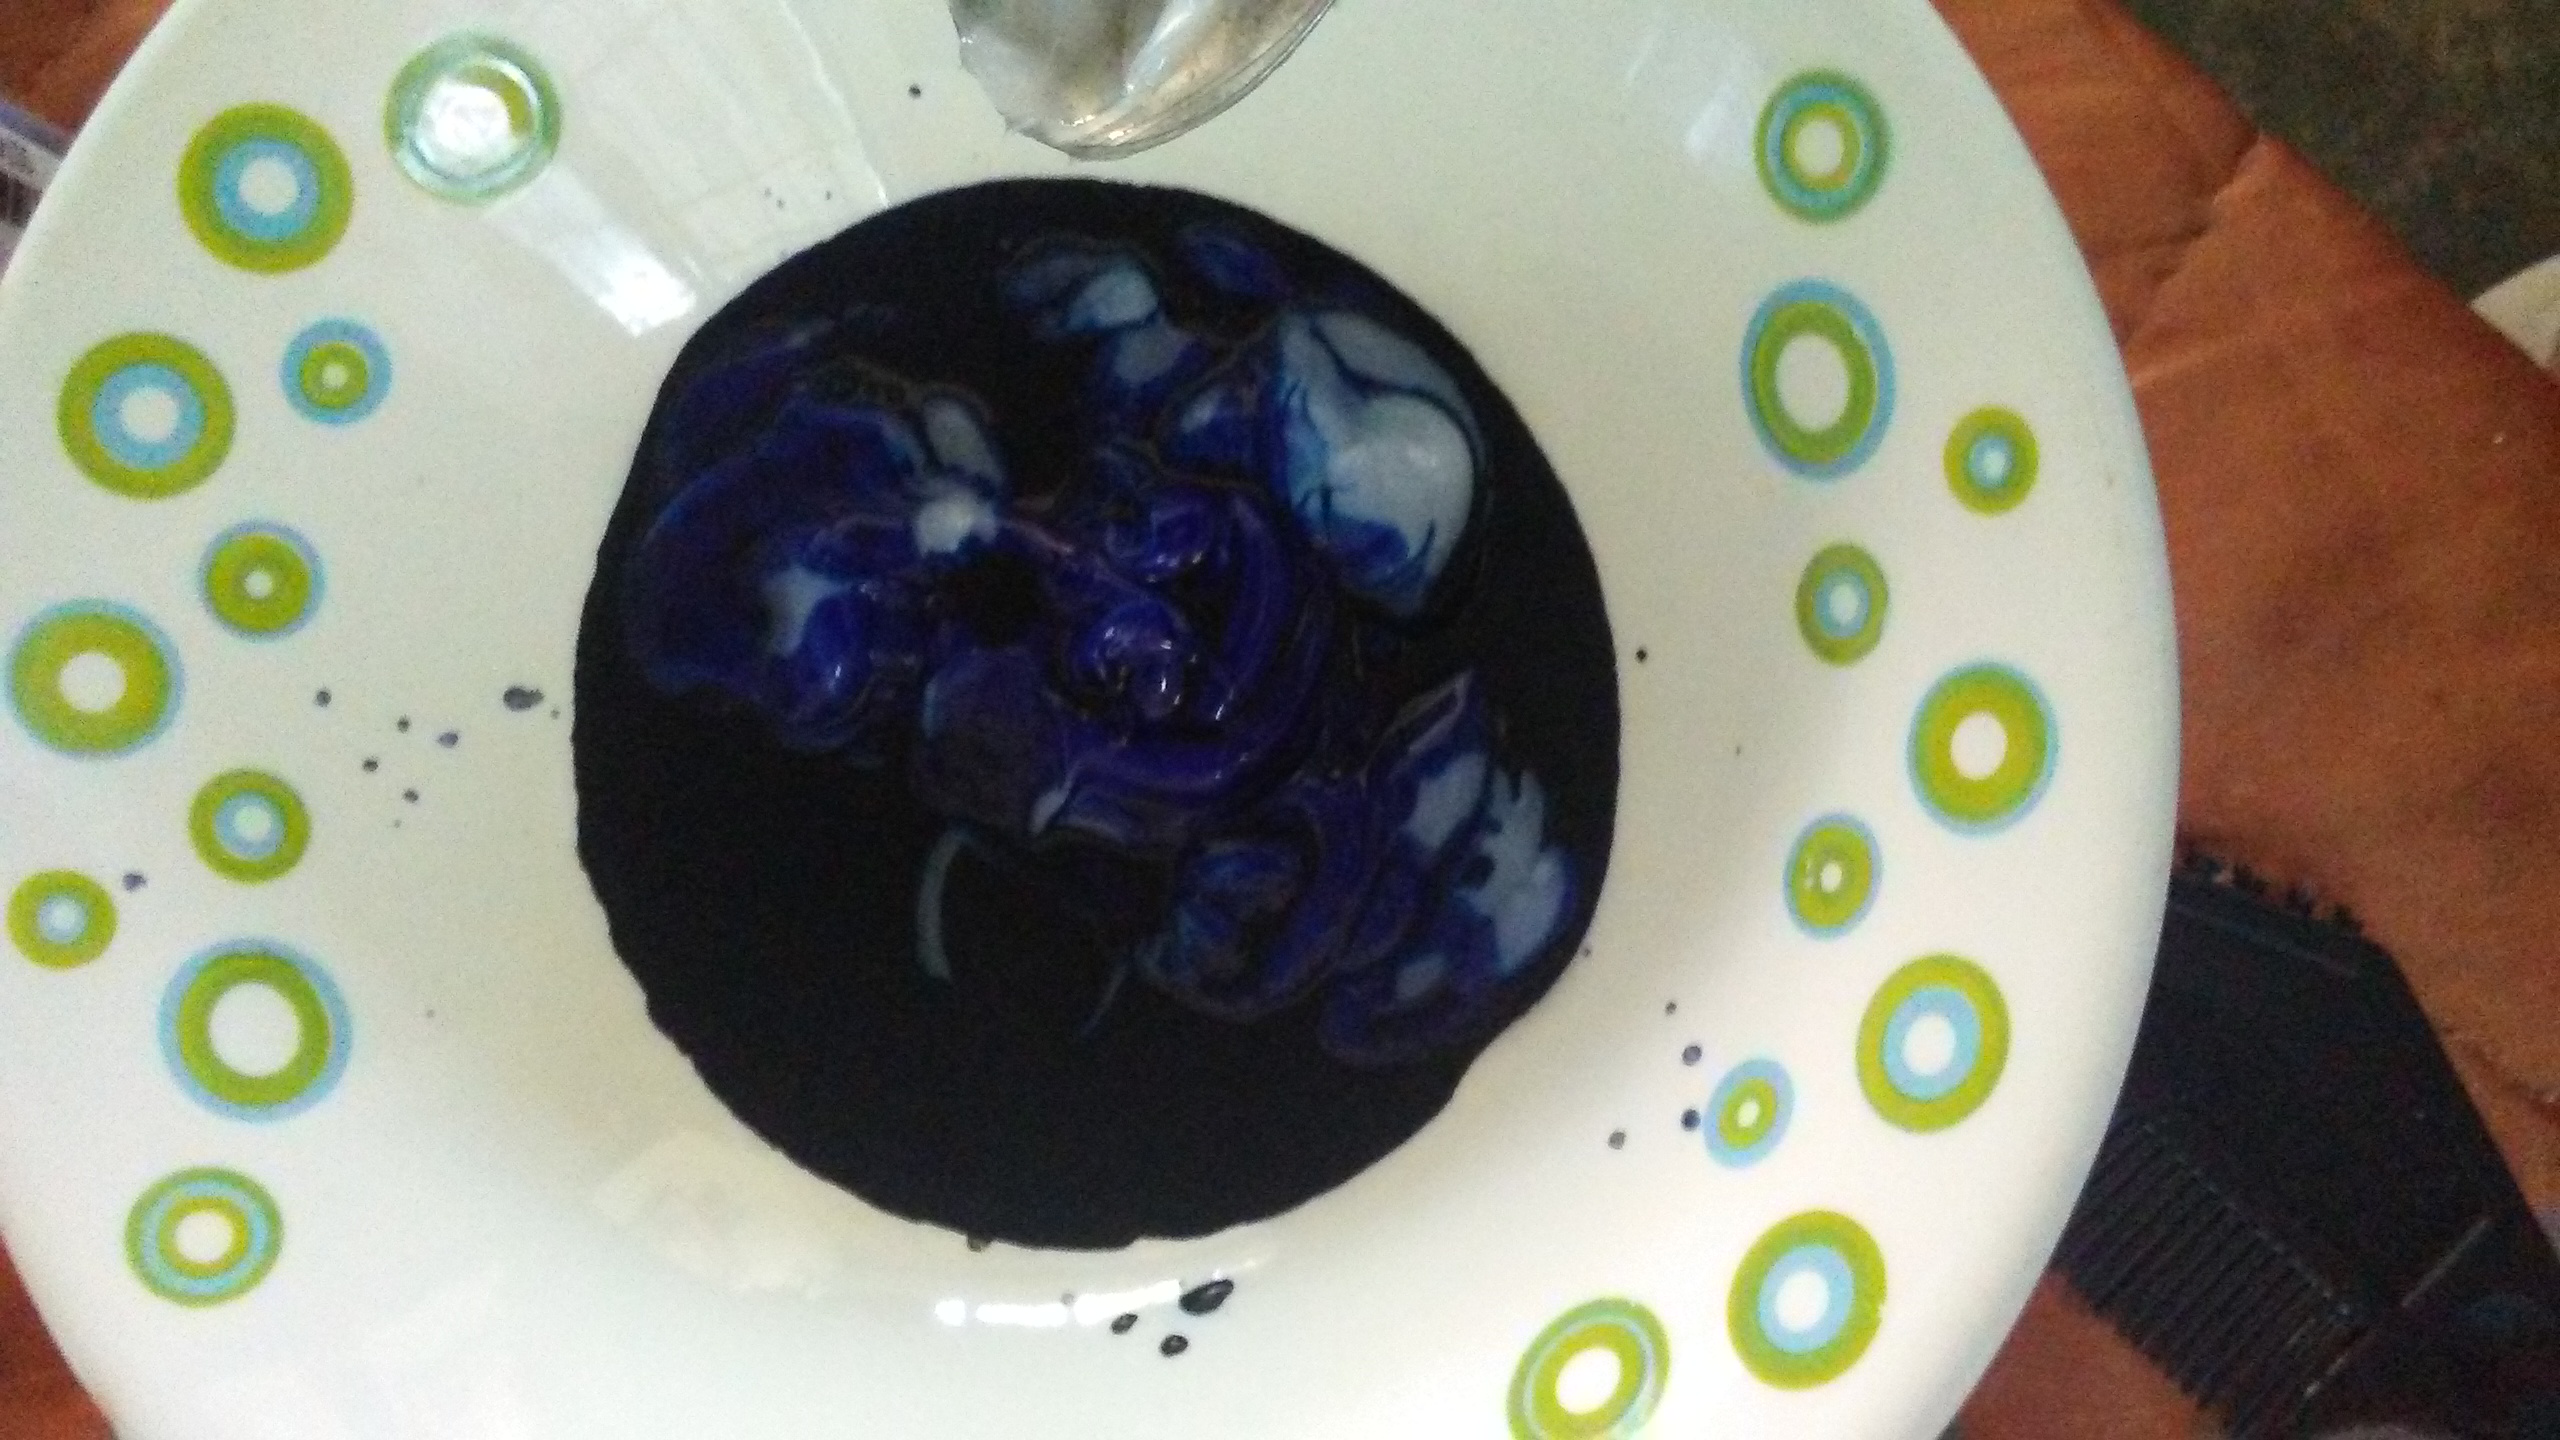
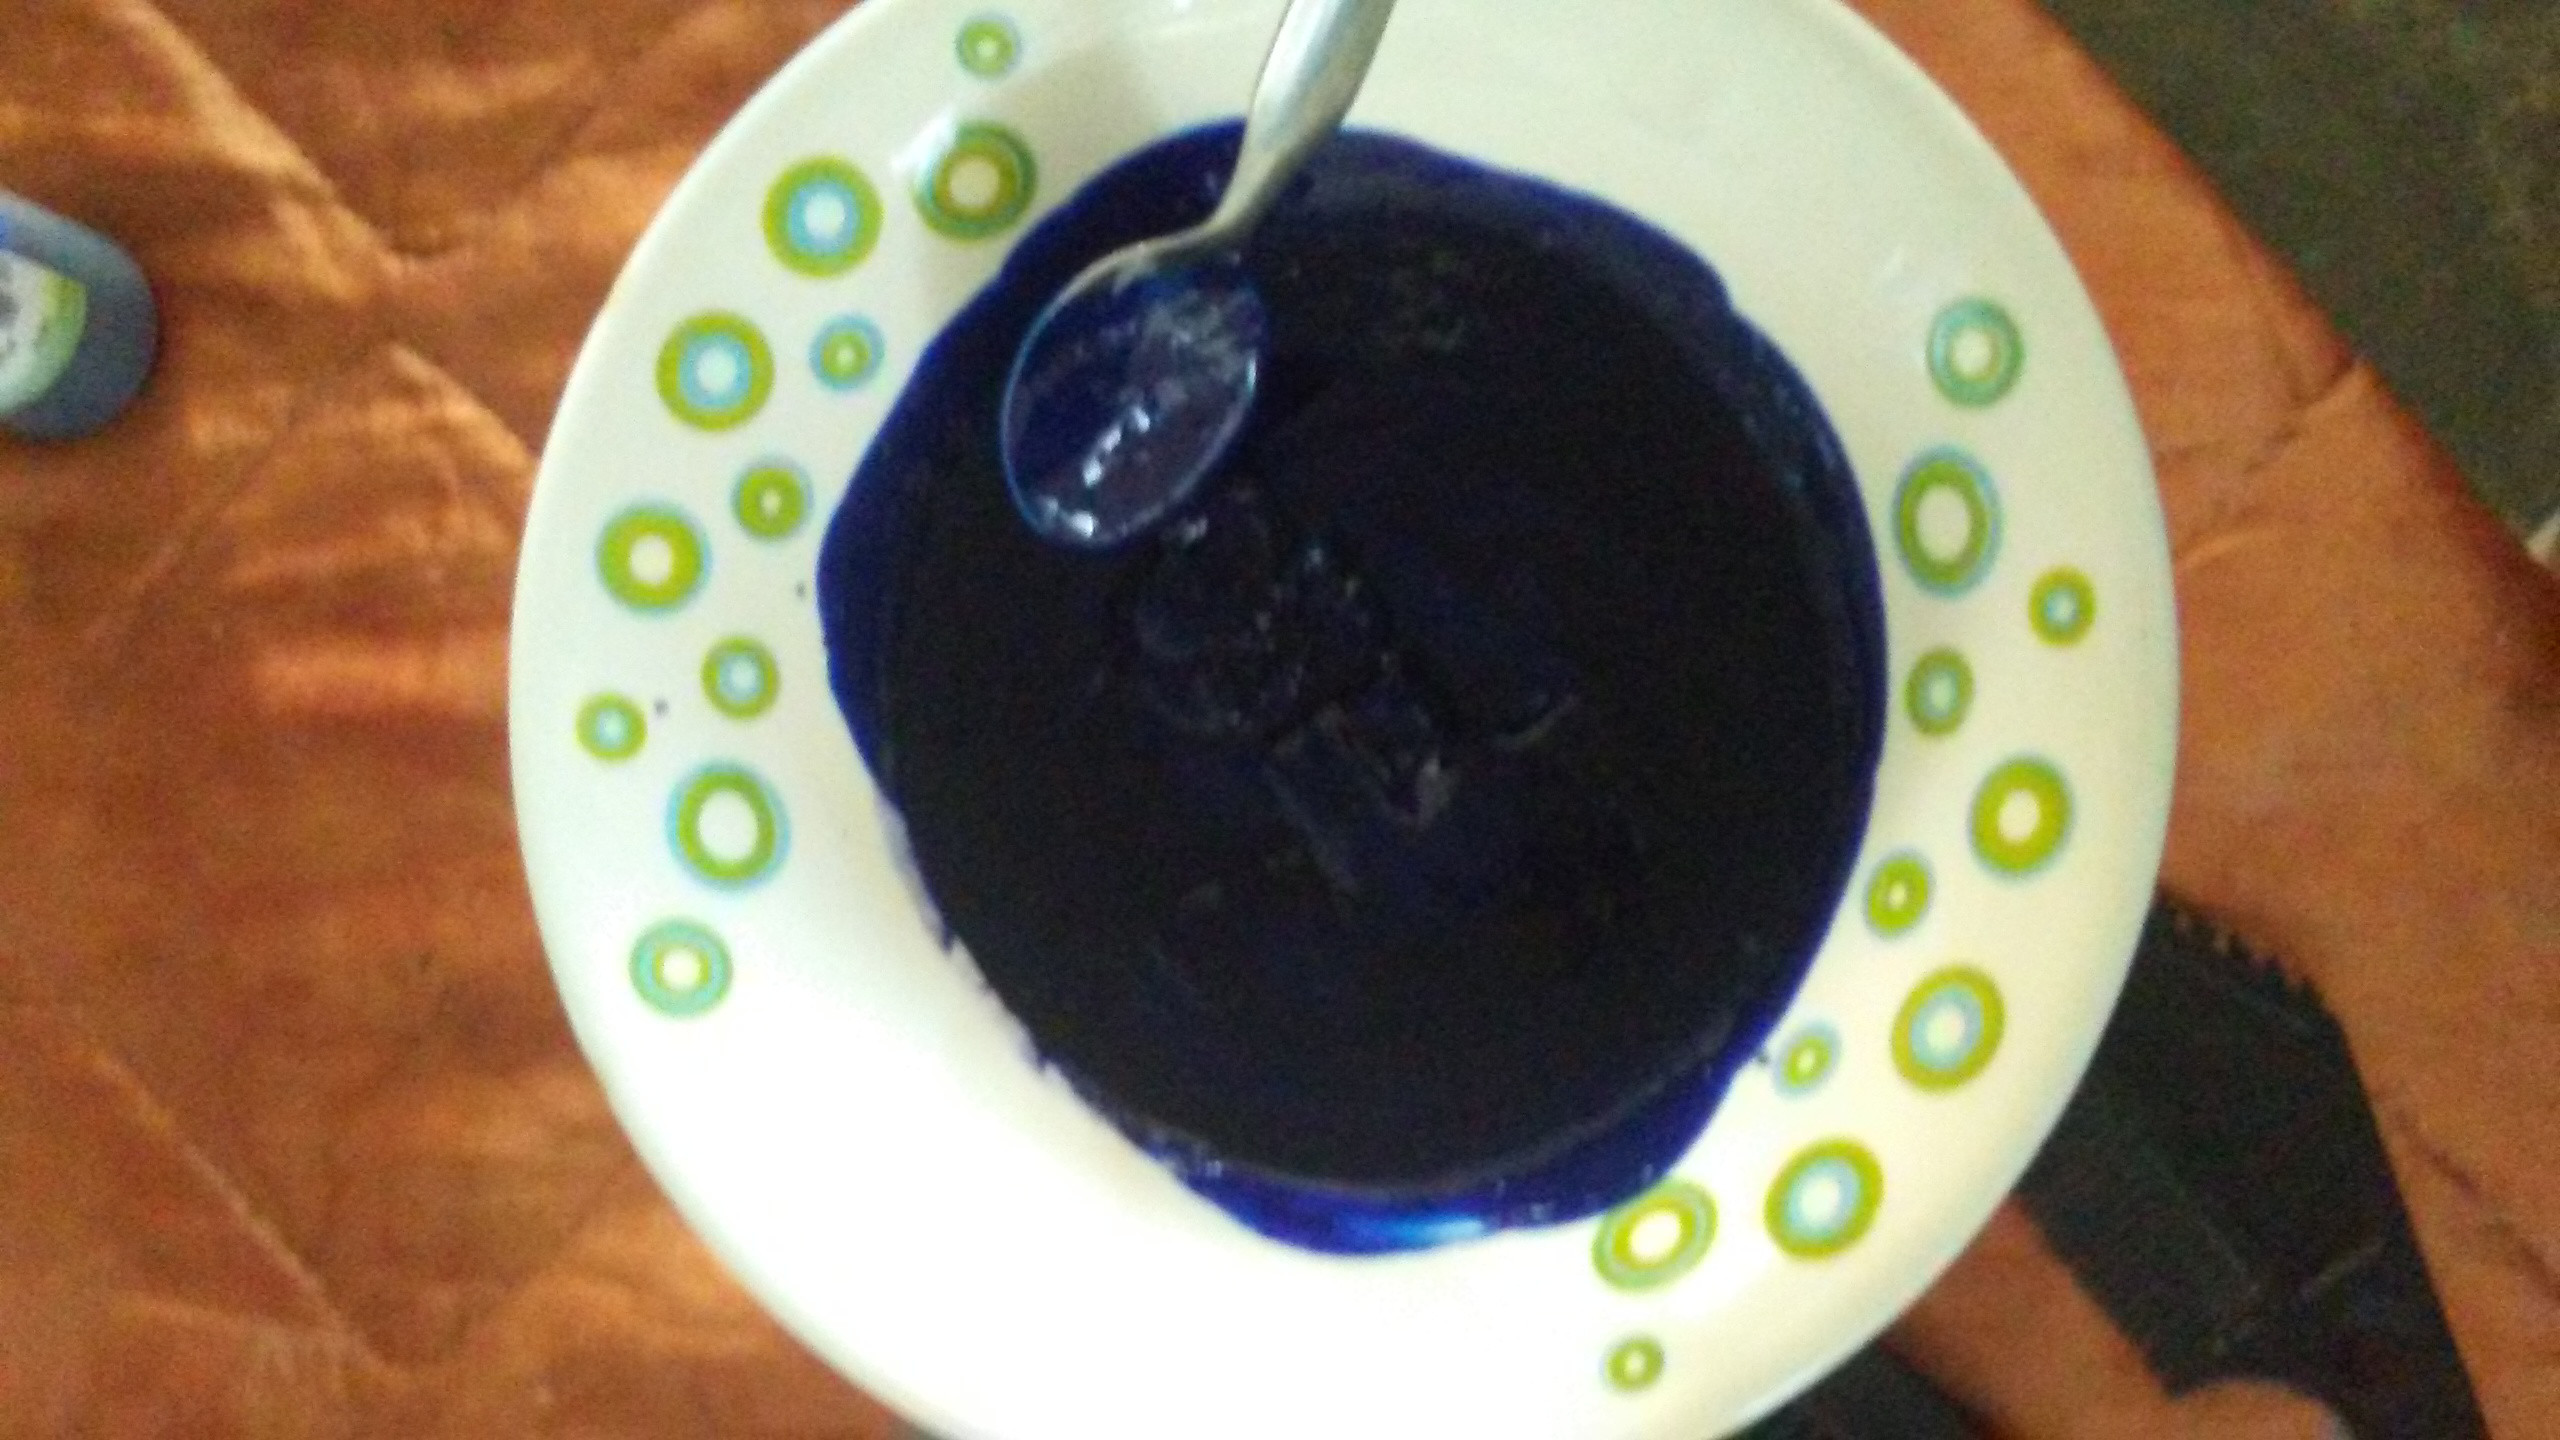
Una vez que tengamos la cantidad que consideremos adecuada para el volumen y largo de nuestro cabello, mezclamos muy bien hasta obtener una mezcla homogénea.
Once we have the amount we consider adequate for the volume and length of our hair, we mix very well until we obtain a homogeneous mixture.
.jpeg)
.jpeg)
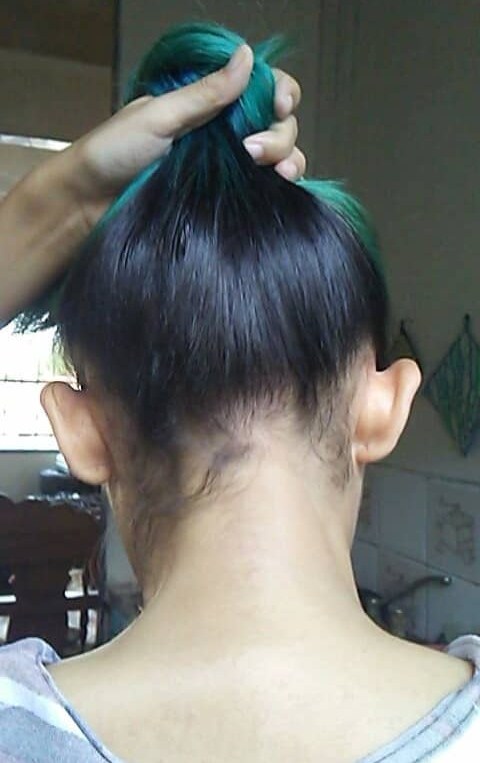
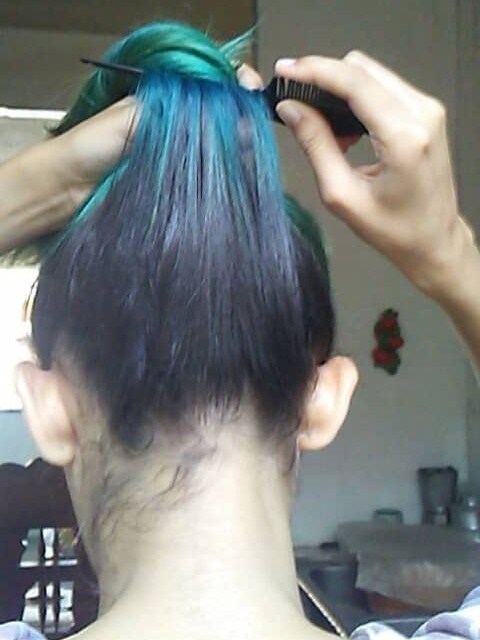
Y ya que tenemos nuestro tinte, debemos aplicarlo. Para ello vamos a aplicarlo de abajo hacia arriba, así que tomamos todo el cabello, hacemos una división y lo separamos. Debemos cuidar que sea un mechón de cabello delgado.
And now that we have our hair dye, we need to apply it. To do this we are going to apply it from the bottom up, so we take all the hair, make a division and separate it. We must take care that it's a thin strand of hair.

.jpeg)
.jpeg)
Si es tu preferencia, puedes usar un aplicador, pero a mí se me hace más facil aplicar el tinte con los dedos. Tomamos el cabello, lo dividimos en cuatro y vamos poco a poco llenando todo el mechón de cabello, haciendo ligeros masajes para que impregne. Yo no lo hago desde la raíz porque claro mi decoloración empieza desde más abajo como pueden ver.
If you prefer, you can use an applicator, but I find it easier to apply the dye with my fingers. We take the hair, divide it in four and gradually fill the whole strand of hair, massaging it lightly so that it soaks in. I don't do it from the roots because of course my bleaching starts from the bottom as you can see.

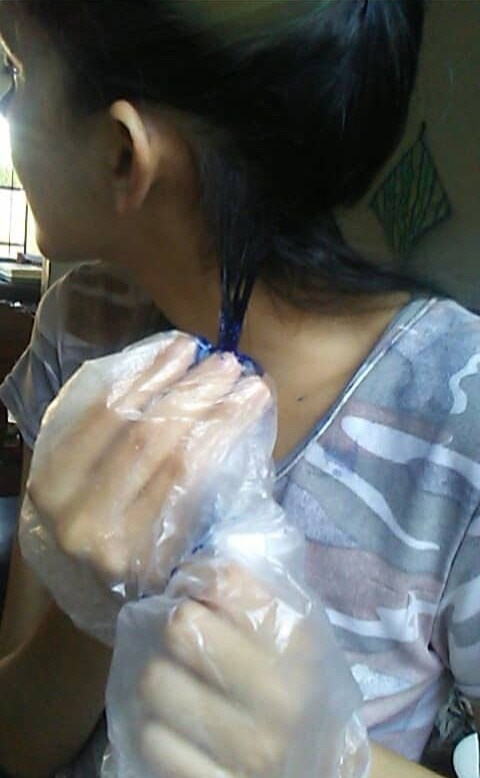
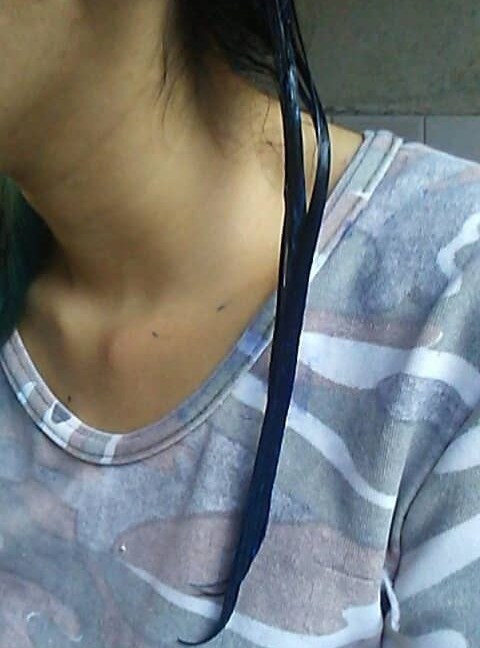
Y poco a poco vamos aplicando en el resto del cabello. Yo después de la primera aplicación, dividí el cabello por la mitad y lo fui aplicando, hasta terminar. Normalmente lo dejo de 2 a 4 horas, de eso también dependerá que tan intenso quieras el color y cuantas lavadas quieres que te dure el color. Debes aplicarlo con el cabello limpio y al retirarlo lo haces solamente con agua, debes también tener una toalla propia para el cabello ya que destiñe y debes lavar tu cabello con shampoo sin sal para que se caiga mucho menos el color.
And little by little we apply it to the rest of the hair. After the first application, I divided the hair in half and applied it until I finished. I usually leave it on for 2 to 4 hours, it will also depend on how intense you want the color to be and how many washes you want the color to last. You must apply it with clean hair and when you remove it you do it only with water, you must also have your own towel for your hair since it fades and you must wash your hair with shampoo without salt so that the color falls much less.
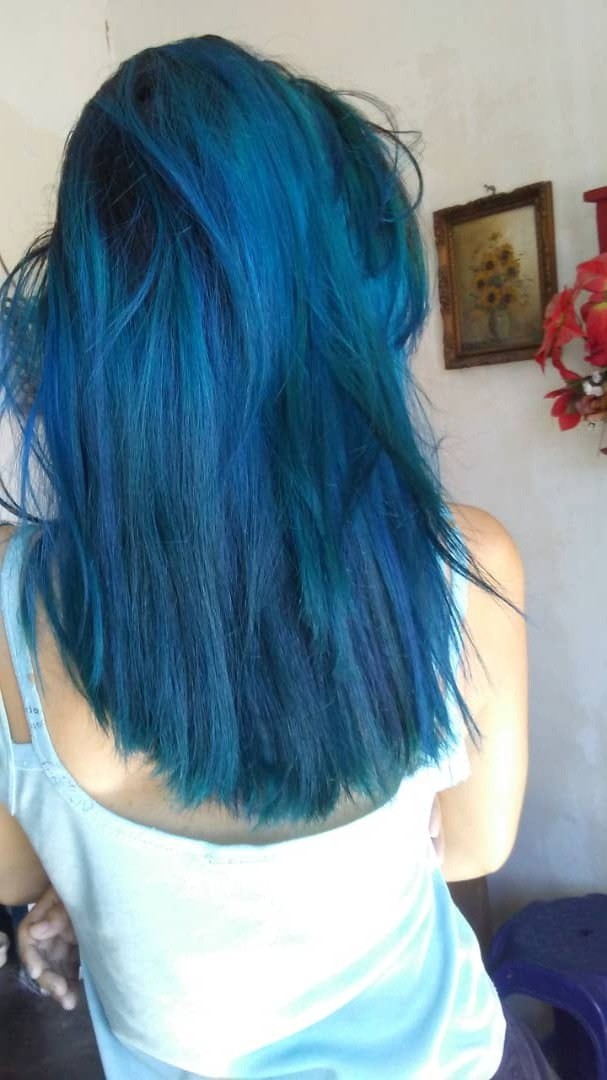
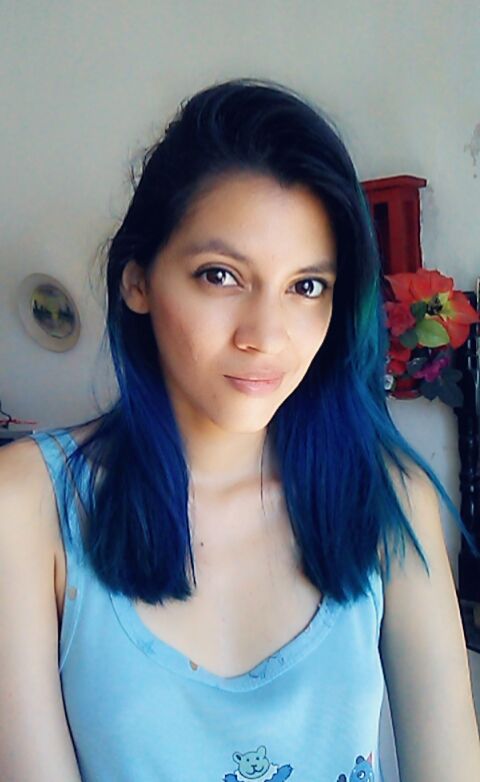
Y este fue el resultado.
And this was the result.
.jpeg)
Bueno gente, espero que les haya gustado el post de hoy, si es así no olviden por favor apoyarme con su like. Muchas gracias como de costumbre a todos los que siempre apoyan mi trabajo y darle la bienvenida a los nuevos lectores. Se les quiere y ya nos encontraremos en otro post.
Well people, I hope you liked today's post, if so please don't forget to support me with your like. Thank you very much as usual to all who always support my work and welcome new readers. I love you and we'll meet again in another post.


Las fotos de portada y despedida las realicé en canva, las demás imágenes la hice con un celular LGK4 Lite y el logo en la siguiente página:
The cover and farewell photos were made in canva, the other images were made with a LGK4 Lite cell phone and the logo on the next page:
!discovery 15
¡Muchísimas gracias por el apoyo!
This post was shared and voted inside the discord by the curators team of discovery-it
Join our community! hive-193212
Discovery-it is also a Witness, vote for us here
Delegate to us for passive income. Check our 80% fee-back Program
Thank you very much!
Hermoso resultado, amo como te quedó 😍😍😍
Muchísimas gracias y también por el apoyo. Me alegra que te haya gustado
¡Felicitaciones!
1. Invierte en el PROYECTO ENTROPÍA y recibe ganancias semanalmente. Entra aquí para más información.
3. Suscríbete a nuestra COMUNIDAD, apoya al trail de @Entropia y así podrás ganar recompensas de curación de forma automática. Entra aquí para más información sobre nuestro trail.
4. Creación de cuentas nuevas de Hive aquí.
5. Visita nuestro canal de Youtube.
Atentamente
El equipo de curación del PROYECTO ENTROPÍA