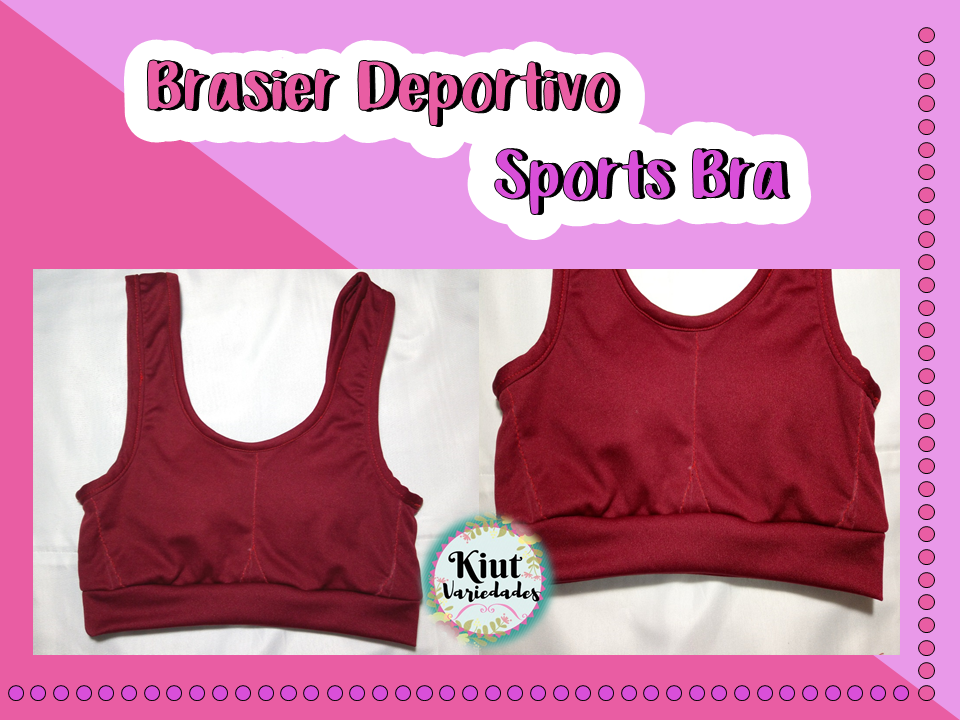
¡¡Hola usuarios de Hive ✨ ✨!!, el día de hoy haremos algo un poco más elaborado 😆 , y no porque la realización de este proyecto sea realmente difícil 😉, sino porque te estaremos enseñando a realizar un brasier deportivo desde 0, es decir desde los patrones 😮, lo que significa que será totalmente a nuestra medida 👏👏.
Hello Hive users !! ✨ ✨!!, today we will do something a little more elaborate 😆 , and not because the realization of this project is really difficult 😉, but because we will be teaching you to make a sports bra from scratch, that is, from the patterns 😮, which means that it will be totally tailored to us 👏👏.
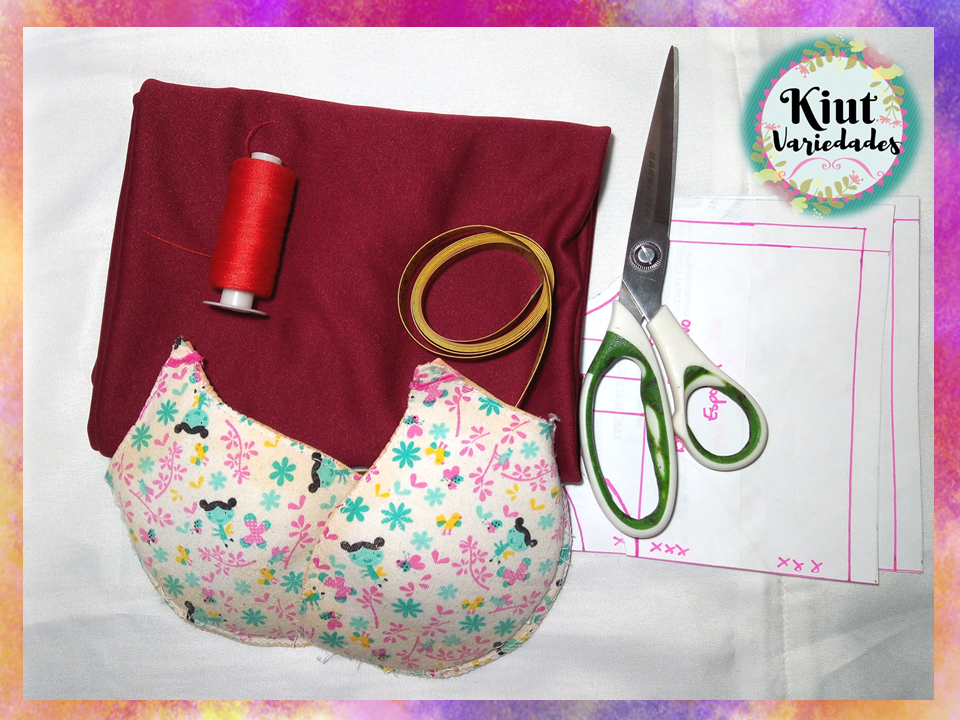
🧵 MATERIALES || MATERIALS 🧵
- Tela elástica (Cotton licra, Jersey, Licra, entre otras).
- Copas de Brasier (opcional).
- Patrones.
- Hilo.
- Cinta Métrica.
- Tijeras
- Máquina de Coser.
- Elastic fabric (Cotton lycra, Jersey, Lycra, among others).
- Bra Cups (optional).
- Patterns.
- Thread.
- Measuring tape.
- Scissors.
- Sewing machine.
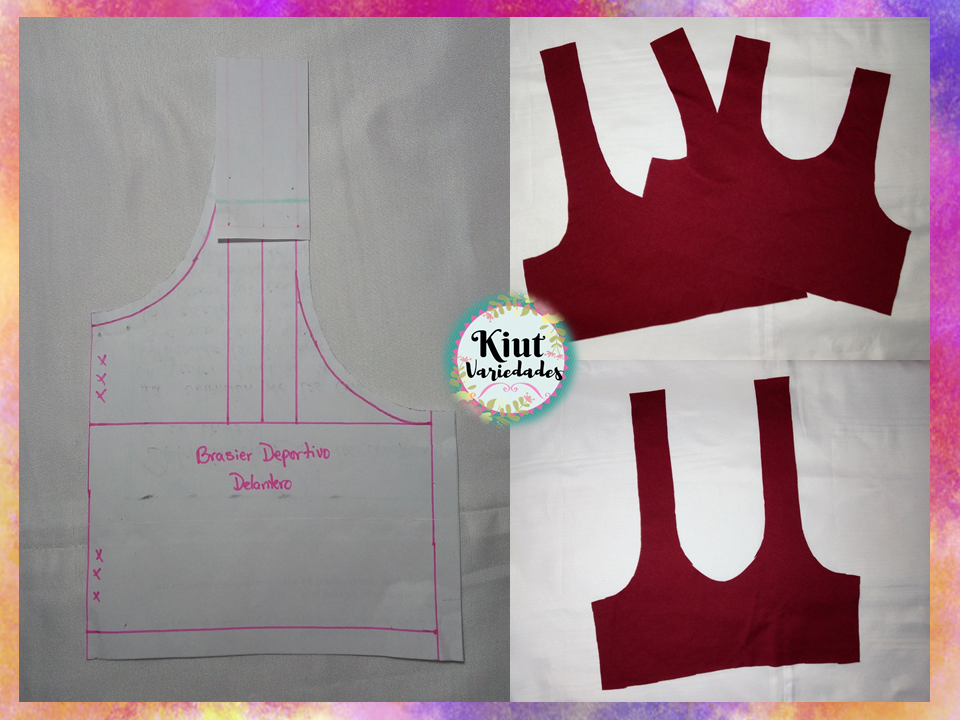
🧵 Parte I: Los Patrones | Part I: The Patterns 🧵
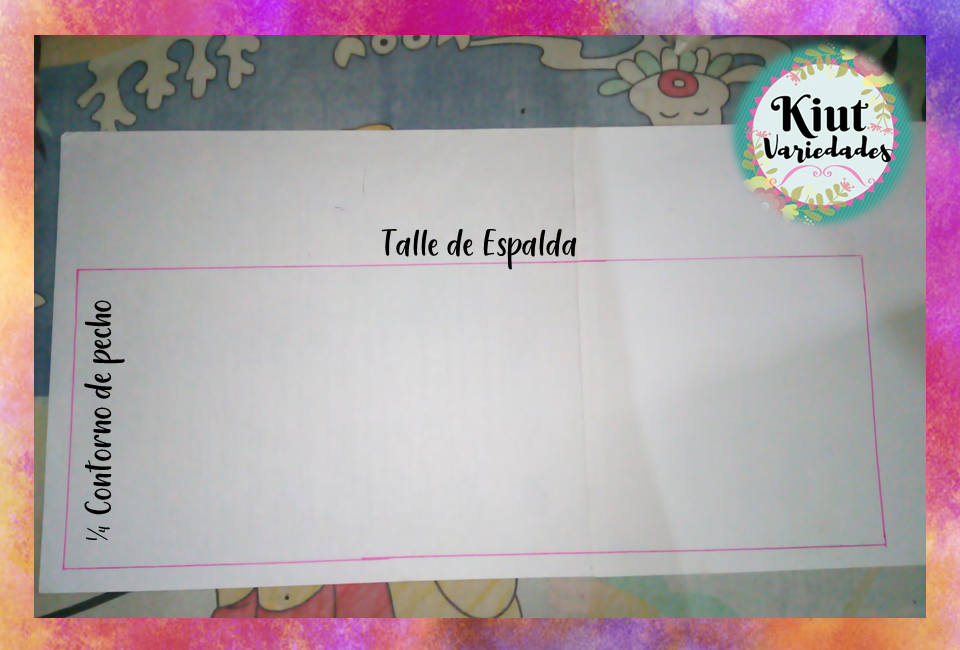
Para comenzar a realizar los patrones, lo primero que debemos hacer es tomarnos unas medidas, en este caso las medidas que necesitamos tomar son solo 3:
- Talle de Espalda: que se toma desde el punto más alto del hombro, donde el mismo se une con el cuello, hasta la cintura.
- Contorno de Pecho/Busto: que se toma rodeando todo el pecho por la parte más pronunciada del mismo. A esta medida le vamos a restar el 25%, y el resultado será con el que trabajaremos.
- Radio de Mama: que se toma desde la parte inferior del busto, hasta el pezón.
Una vez tomadas estas medidas, vamos a trazar en papel un rectángulo que tenga de ancho la cuarta parte de la medida del contorno de pecho, y de largo la medida del talle de espalda. Vamos a comenzar a realizar primero el patrón de la espalda.
To start making the patterns, the first thing we must do is take some measurements, in this case the measurements we need to take are only 3:
- Back Size: taken from the highest point of the shoulder, where it meets the neck, to the waist.
- Chest / Bust Contour: which is taken around the entire chest at the most pronounced part of it. We are going to subtract 25% from this measure, and the result will be the one we will work with.
- Breast radius: taken from the lower part of the bust to the nipple.
Once these measurements are taken, we are going to draw a rectangle on paper that is a quarter of the chest contour measurement wide, and the back waist measurement long. Let's start making the back pattern first.
Vamos a dividir la medida del talle de espalda en 2, y al resultado le vamos a sumar 1,5cm, con esto vamos a medir desde la parte superior hacia abajo y trazaremos una línea, a la cual llamaremos línea central.
We are going to divide the measurement of the back waist in 2, and to the result we are going to add 1.5cm, with this we are going to measure from the top down and we will draw a line, which we will call the central line.
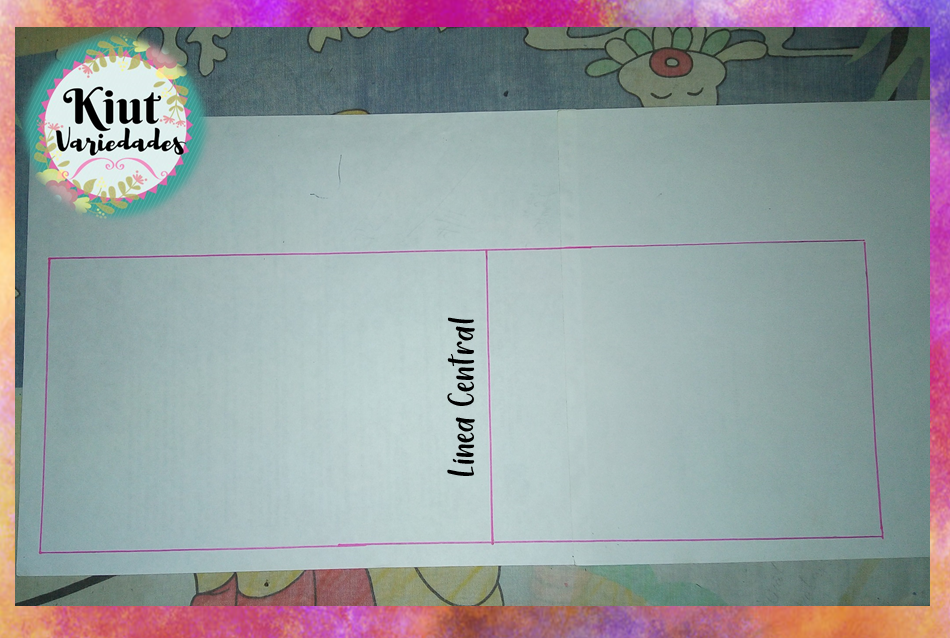
Now we have two rectangles, the first one we are going to divide into two equal parts, as shown in the image. Then we are going to measure from the center line down, which gave us our breast radius, and this will be our bottom of the bra.
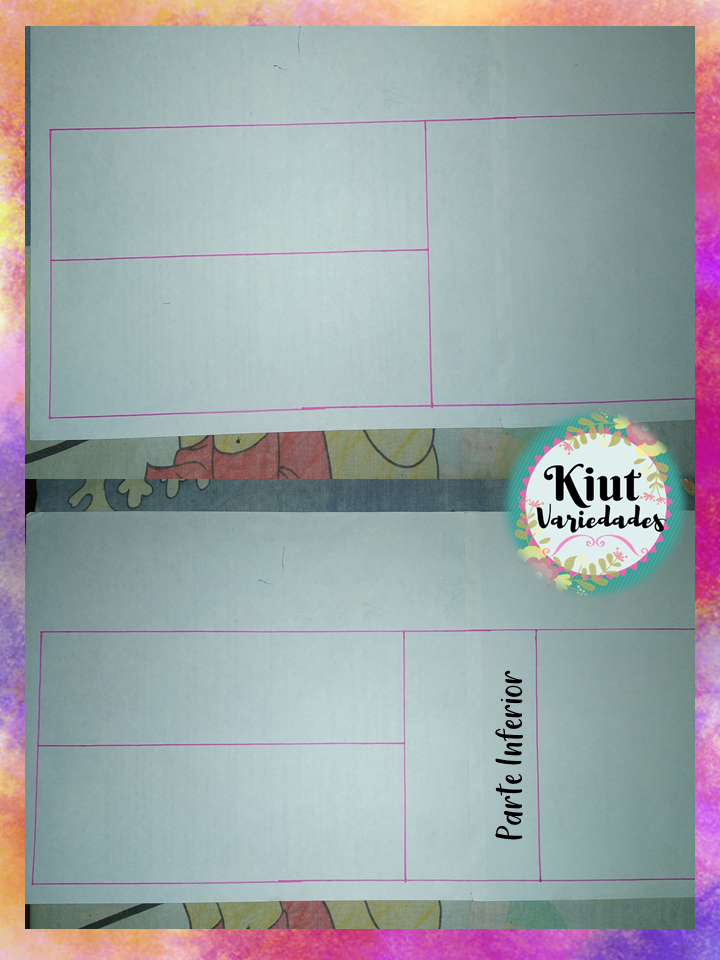
En la parte superior, vamos a medir 1,5cm a cada lado de la línea del medio, para formar las tiras del brasier. Y luego trazaremos la curva del escote de la espalda y de la sisa.
At the top, we are going to measure 1.5 cm on each side of the middle line, to form the bra straps. And then we will trace the curve of the neckline of the back and the armhole.

Añadimos 0,5cm de margen de costura en las tiras, escote y sisa del brasier, y 1cm en el costado y la parte inferior del brasier.
We add 0.5 cm of seam allowance on the straps, neckline and armhole of the bra, and 1cm on the side and bottom of the bra.
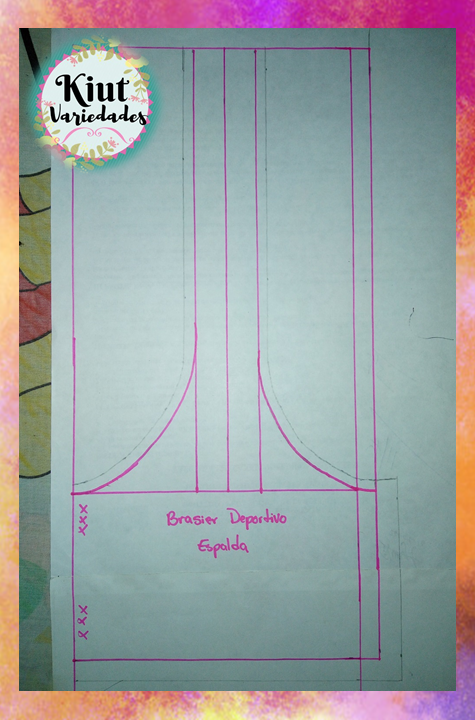
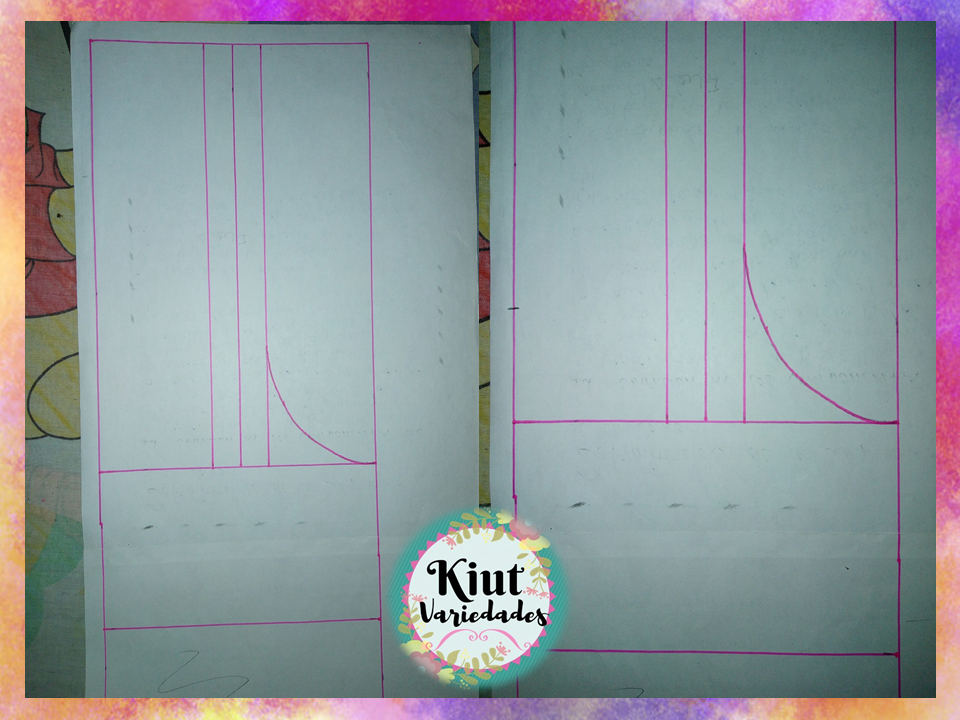
Para realizar el patrón delantero, vamos a repetir exactamente los mismos pasos que realizamos con el patrón de la espalda, aquí la única diferencia será el escote. Para formar el escote, vamos a medir desde la línea central hacia arriba, la mitad de nuestra medida de radio de mama, y desde ese punto es de donde formaremos la curva del escote.
To make the front pattern, we are going to repeat exactly the same steps that we did with the back pattern, here the only difference will be the neckline. To form the neckline, we are going to measure from the center line up, half of our breast radius measurement, and from that point is where we will form the curve of the neckline.

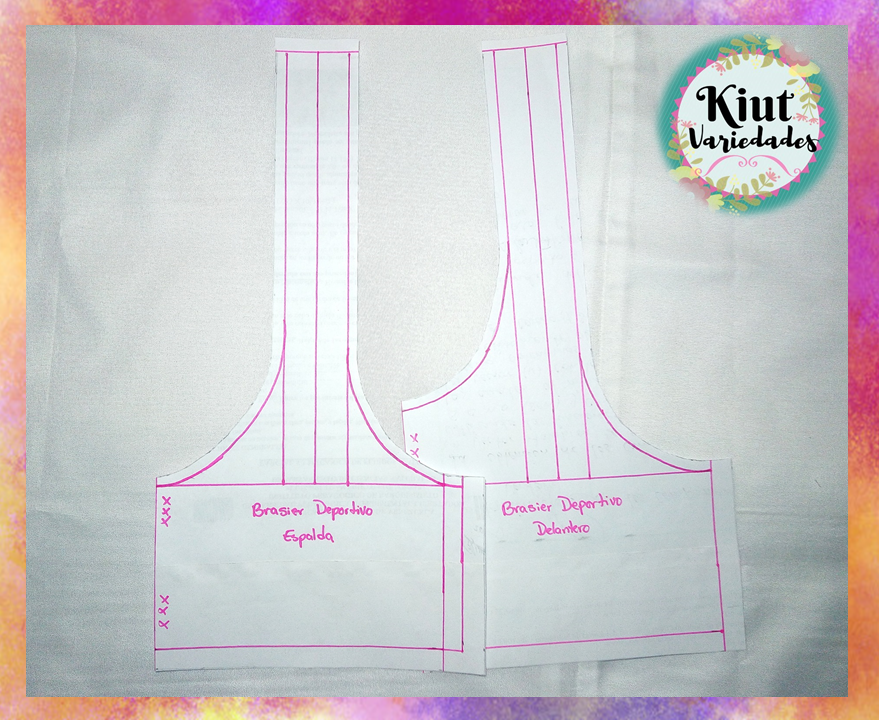
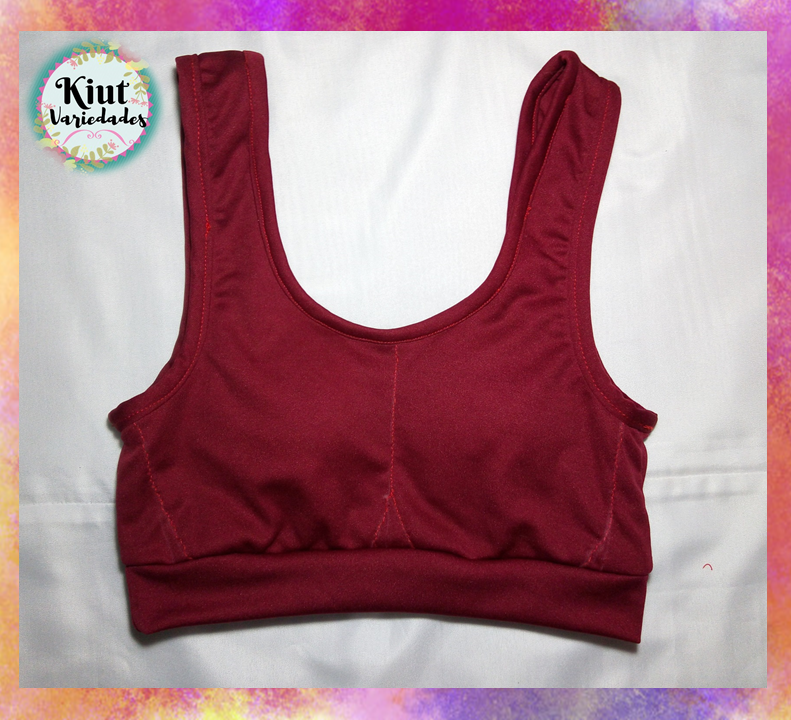
Y con nuestras dos piezas de patrón listas, comenzaremos la confección del brasier.
And with our two pattern pieces ready, we'll begin making the bra.
🧵 Parte II: Confección del Brasier | Part II: Making the Bra 🧵
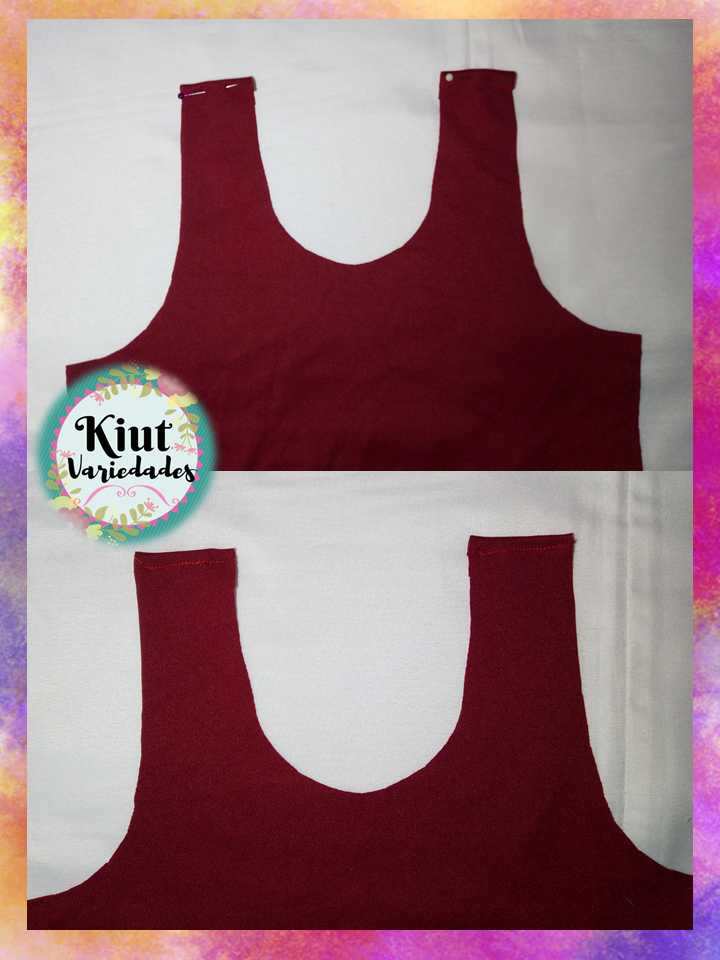
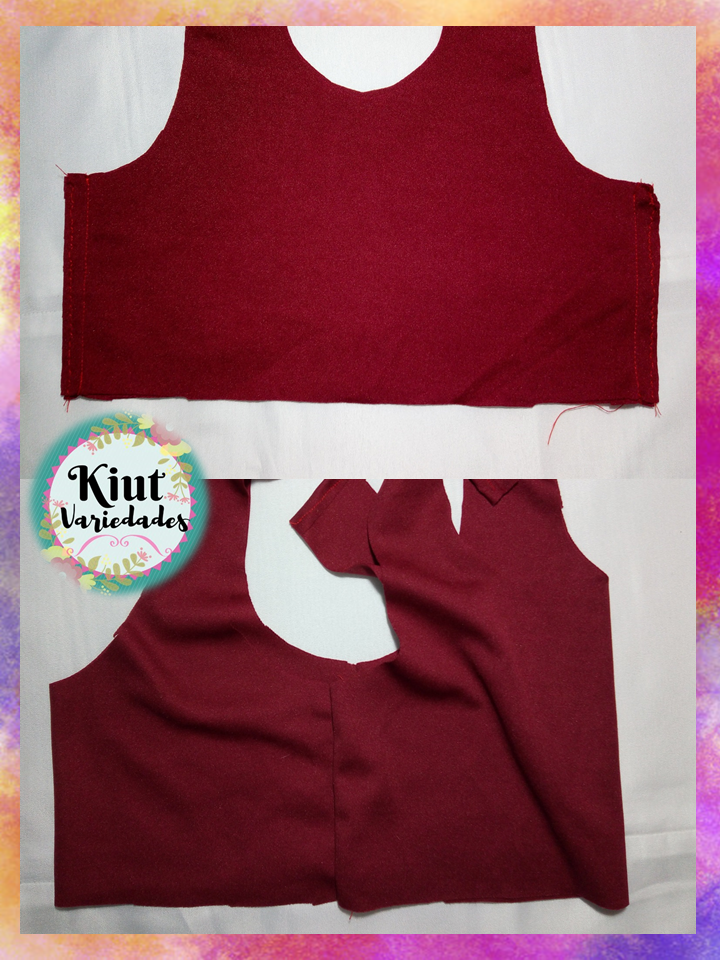
Del patrón delantero, vamos a cortar dos piezas, sin embargo para cortar una de las piezas delanteras, vamos a doblar la tira del patrón a la mitad aproximadamente, obteniendo de esta manera que una pieza delantera será más larga que la otra. Del patrón de la espalda solo cortaremos una pieza.
From the front pattern, we are going to cut two pieces, however to cut one of the front pieces, we are going to fold the pattern strip in half approximately, obtaining in this way that one front piece will be longer than the other. We will only cut one piece from the back pattern.
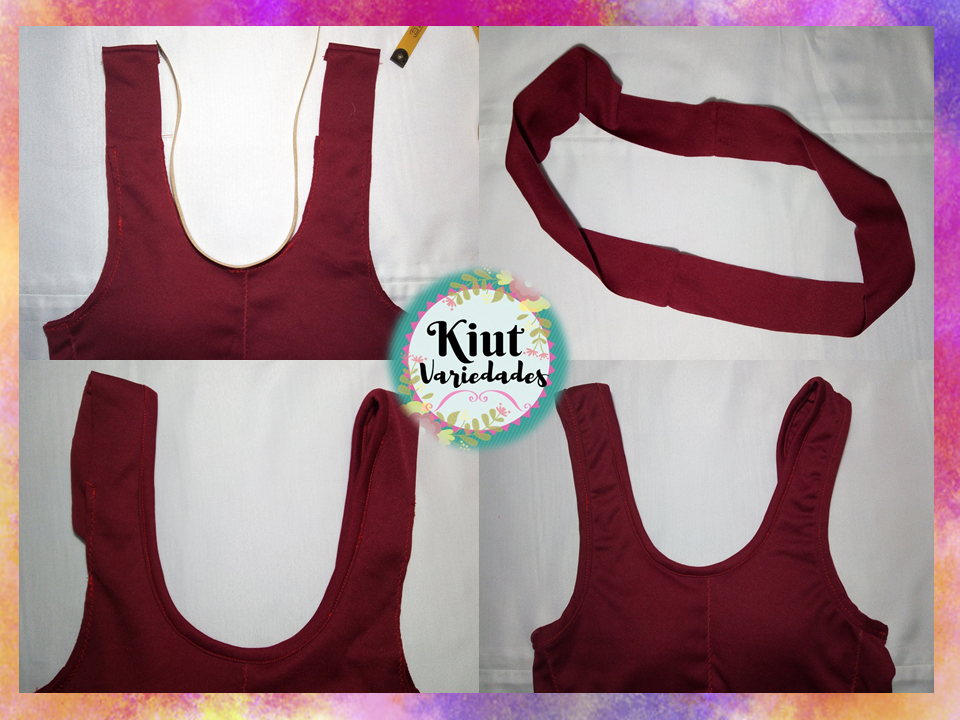
Tomamos la pieza delantera más pequeña y le haremos un pequeño ruedo en la parte de las tiras. Al mismo tiempo, vamos a unir por la parte de los hombros, la pieza delantera más grande con la pieza de la espalda, enfrentando los derechos de la tela, y haciendo una costura en zigzag si se tiene la oportunidad.
We take the smallest front piece and we will make a small hem on the part of the strips. At the same time, we are going to join the larger front piece with the back piece on the shoulders, facing the right of the fabric, and making a zigzag seam if we have the opportunity.
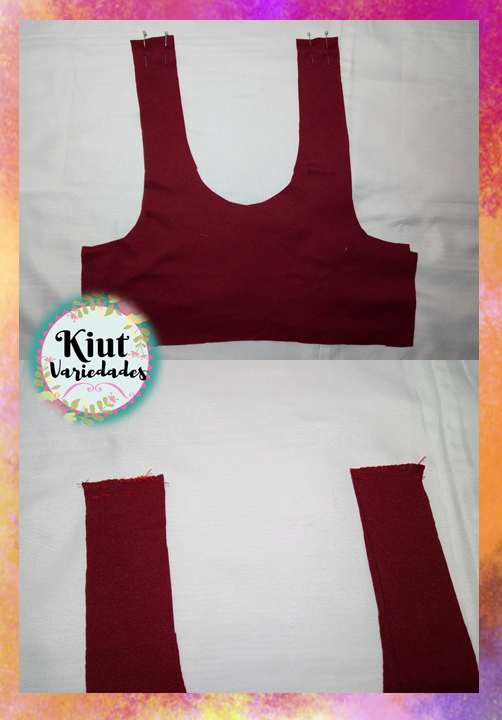
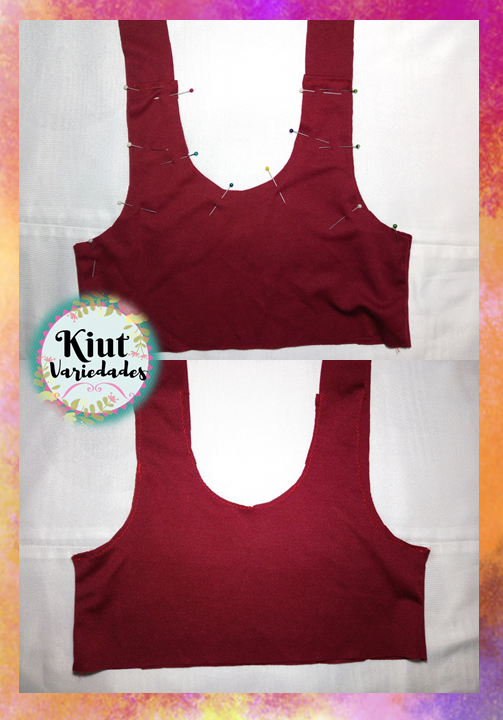
Ahora coseremos el costado de las tres piezas, para ello enfrentaremos el derecho de la pieza delantera más pequeña con el revés de la pieza de la espalda, formando una especie de sándwich entre los dos delanteros y la espalda. Al dar la vuelta, los dos delanteros quedaran juntos y la costura del costado no será visible.
Now we will sew the side of the three pieces, for this we will face the right of the smaller front piece with the wrong side of the back piece, forming a kind of sandwich between the two front pieces and the back. When turning around, the front two will be together and the side seam will not be visible.
Realizaremos una costura en zigzag, o recta, por la parte del escote y de la sisa de los dos delanteros, esto con la finalidad de facilitar los siguientes pasos.
We will make a zigzag or straight seam on the neckline and the armhole of the two front ones, this in order to facilitate the following steps.
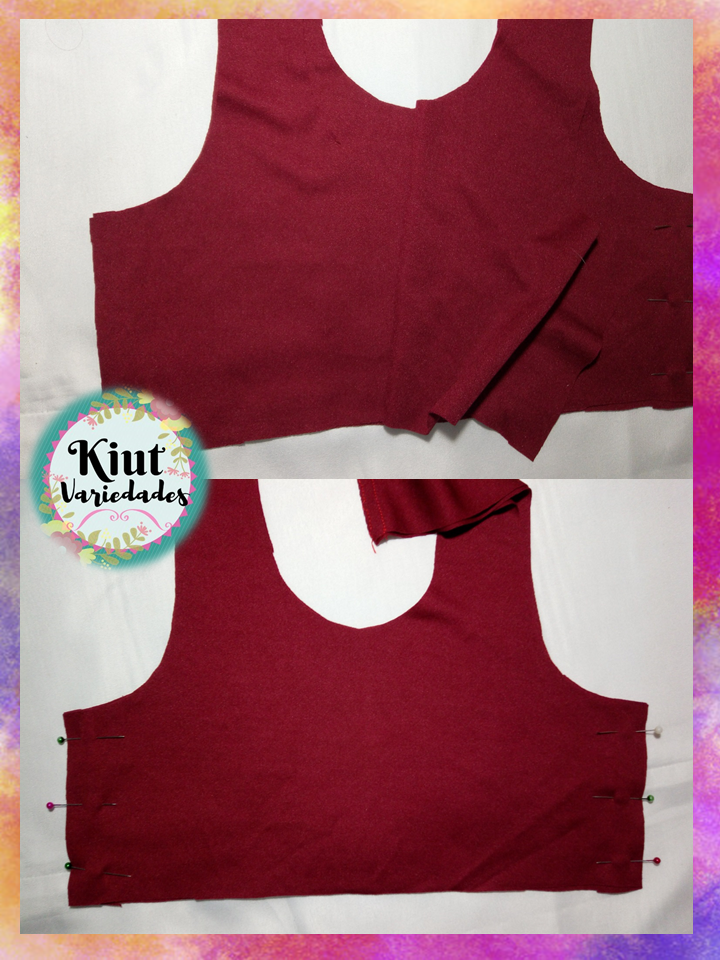
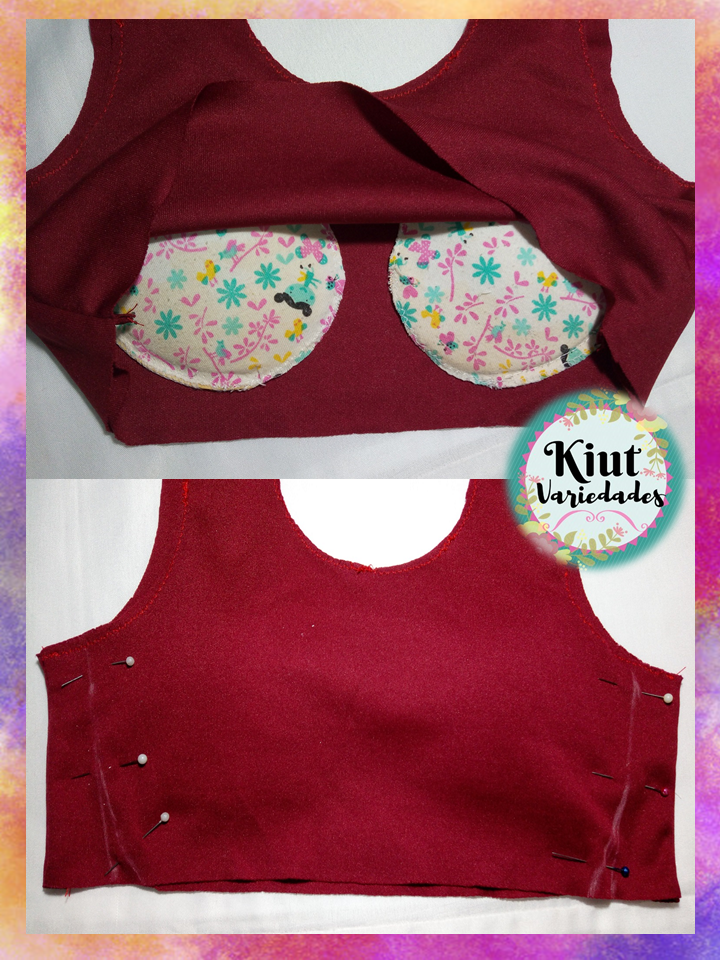
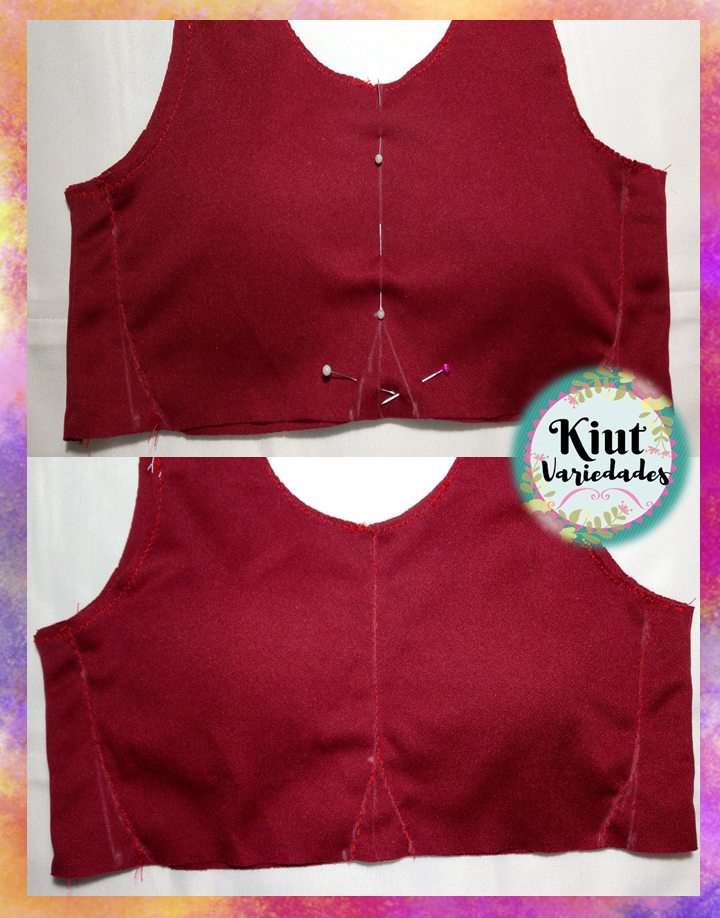
Introducimos las copas, y realizaremos unas costuras redondeadas a 2 o 3cm de los costados. Del mismo modo, realizaremos una costura por el centro del brasier, que acabe de manera triangular aproximadamente a unos 3cm antes del borde inferior del brasier. Con esto sujetaremos las copas.
We introduce the cups, and we will make some rounded seams 2 or 3cm from the sides. In the same way, we will make a seam through the center of the bra, ending in a triangular way approximately 3cm before the bottom edge of the bra. With this we will hold the glasses.
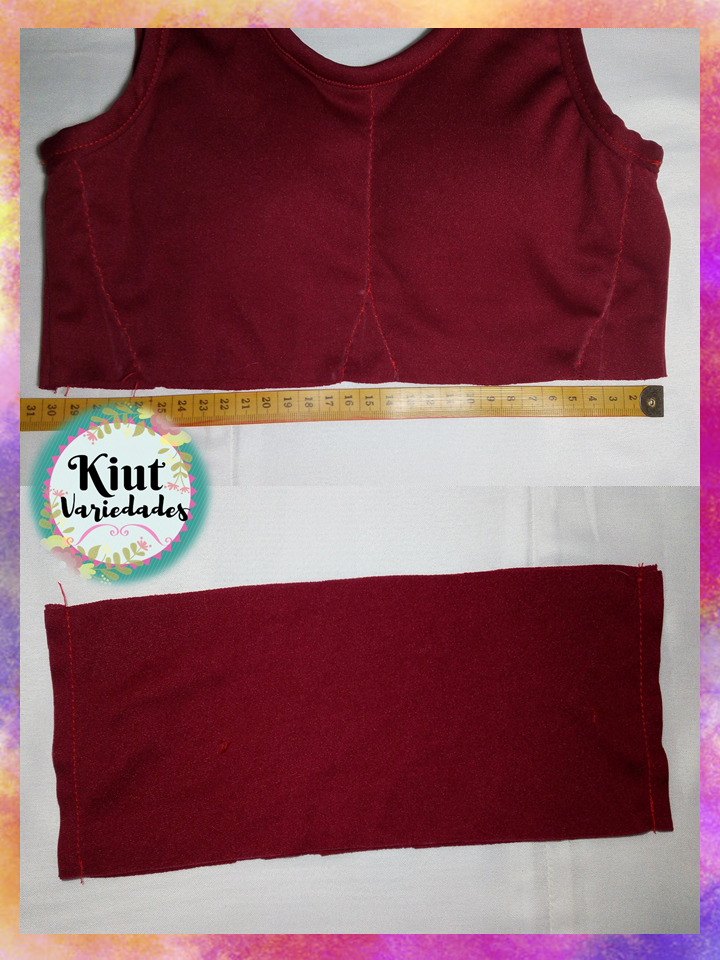
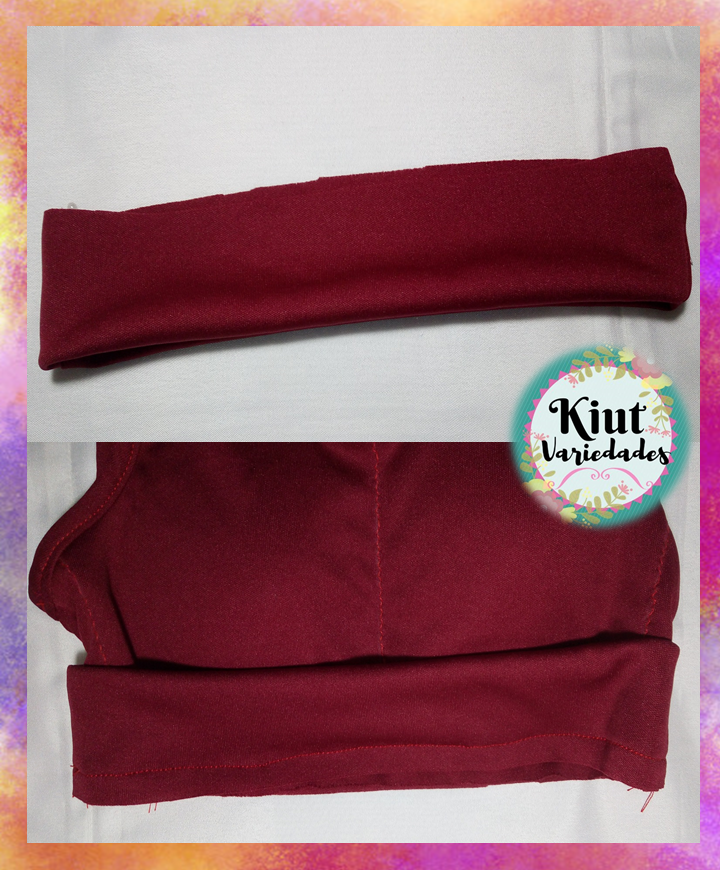
Ahora vamos a medir el escote delantero y de la espalda, y cortaremos una tira de 4cm de ancho, la cual cerraremos con una costura y la coseremos a la prenda como cosemos el sesgo. Lo mismo haremos con la parte de la sisa.
Now we are going to measure the front and back necklines, and we will cut a 4cm wide strip, which we will close with a seam and we will sew it to the garment as we sew the bias. We will do the same with the armhole part.
Para la parte inferior mediremos la prenda, a dicha medida le restaremos 5cm y cortaremos una tira con esta medida y que de ancho tenga aproximadamente de 8 a 9cm. La cerramos con costura para formar una pretina, y la cosemos a la prenda estirándola un poco. Nuevamente si tenemos la oportunidad, realizamos una costura en zigzag.
For the lower part we will measure the garment, from this measure we will subtract 5cm and cut a strip with this measurement and that is approximately 8 to 9cm wide. We close it with seam to form a waistband, and we sew it to the garment by stretching it a little. Again if we have the opportunity, we do a zigzag seam.

Te invitamos igual que siempre a que intentes este proyecto por tu cuenta y nos cuentes en los comentarios 👇 como es tu experiencia, además te exhortamos a que si lo deseas comiences a emprender tu propio negocio y este proyecto puede ser el inicio.
As always, we invite you to try this project on your own and tell us in the comments 👇 as is your experience, we also urge you to start your own business if you wish and this project can be the beginning.

Síguenos en todas nuestras redes sociales… || Follow us on all our social networks ...
Facebook:KiutVariedades
Instagram:@Kiut_variedades
Twitter:@Kiut_variedades
¡Felicidades! Esta publicación obtuvo upvote y fue compartido por @la-colmena, un proyecto de Curación Manual para la comunidad hispana de Hive que cuenta con el respaldo de @curie.
Si te gusta el trabajo que hacemos, te invitamos a darle tu voto a este comentario y a votar como testigo por Curie.
Si quieres saber más sobre nuestro proyecto, acompáñanos en Discord: La Colmena.
Gracias @la-colmena por el apoyo brindado a esta y otras publicaciones.
Congratulations @kiutvariedades! You have completed the following achievement on the Hive blockchain and have been rewarded with new badge(s) :
You can view your badges on your board And compare to others on the Ranking
If you no longer want to receive notifications, reply to this comment with the word
STOPDo not miss the last post from @hivebuzz:
Hermoso! Este tipo de prenda es muy útil además de cómoda
Hola @pcojines... Si súper comoda y no nada más se utiliza para hacer ejercicio, son ideales para trabajar.
Que bonito, me gusta el diseño y el color. A veces se me hace difícil encontrar bras deportivos que sean cómodos.
Gracias por compartir
Saludos
Gracias @angegar... Y lo mejor es que puedes utilizar las copas de brasieres que ya no uses.