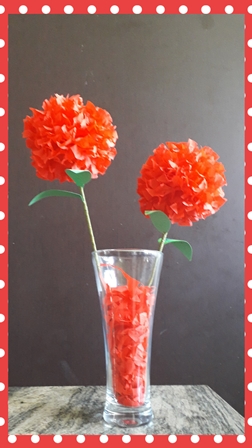
Hello to all my friends of this dear and appreciated community of @hive, it is really a pleasure for me that you are here visiting this little corner of crafts made with a lot of love, because they are made from the heart, today I bring you A very beautiful project that can be used as a centerpiece for about 15 years or to decorate the candy table or why not! decorate any corner of your house! It is extremely easy and like most of my publications very economical.

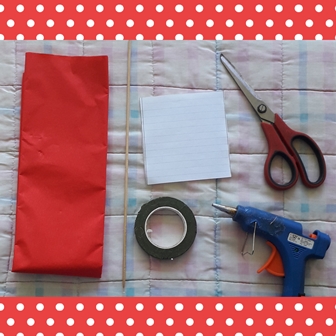
Veamos los materiales que necesitamos:
- Papel crepe
- Tijera
- Hoja blanca
- Regla
- Lápiz
- Silicom
- Floralpapel
- Base de vidrio
Let's see the materials we need:
- Crepe paper
- Scissors
- White sheet
- Rule
- Pencil
- Silicom
- Floral paper
- Glass base
Vamos con el procedimiento:
Let's go with the procedure:
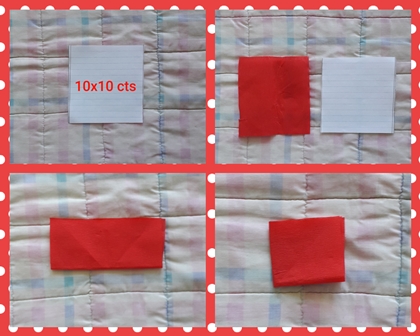
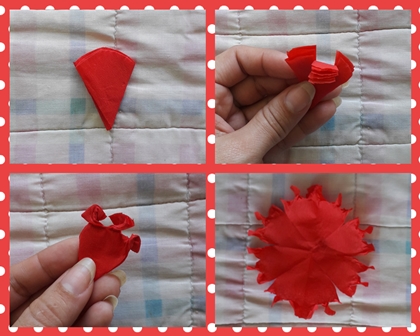
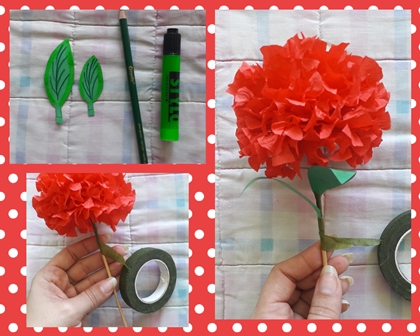
We create a 10x10 cts mold and transfer it to the crepe paper, fold it in half and then fold it again to get a square.
We fold again until we obtain a kind of triangle and cut freehand in the shape of a petal, then we open the piece and make three cuts in each petal to separate them.
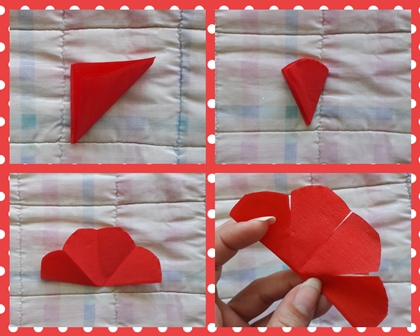
Once this is done we close the piece to the initial petal and make 3 more cuts in the tip as shown in the photo and we twist each segment to finally open our piece slowly so that it does not break.
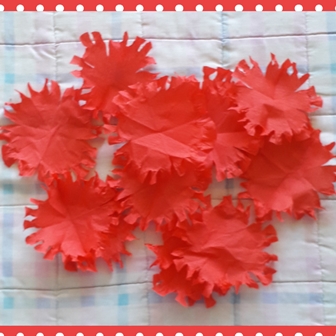
Repetimos este procedimiento 12 o 14 veces con todos los petalos que le queramos poner a nuestra flor!
We repeat this procedure 12 or 14 times with all the petals that we want to put on our flower!
Then we begin the assembly of our flower, with a tall stick we open a small hole in the center of our petal and place a point of silicom on the tip to be able to crease our first petal and so on we place all the others without placing silicom until the end when we place the last to secure the job.
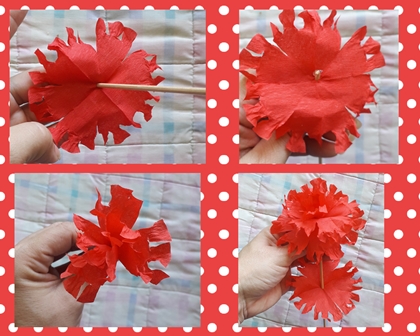
In crepe paper or any type of paper or fiamy we create two leaves which we decorate with crayon and marker to place them and decorate our flower, with the help of the floral paper we are lining our stick in height and on the way we place the leaves so that they remain subject to him until the end.
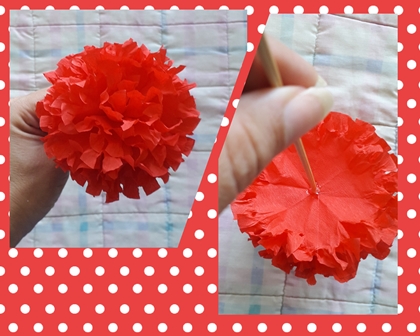
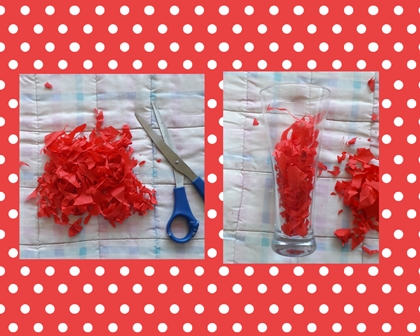
Finally, in a decorative way and taking advantage of all the material with which we work, we take the scraps of paper that were left in the elaboration of the petals and we cut them into very small pieces to place them inside our glass base.
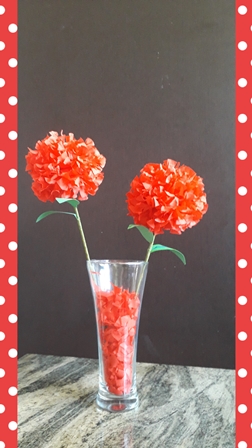
Y así queda nuestro hermoso centro de mesa de Flores! Ideal para 15 años o cualquier evento de tu preferencia.
And so is our beautiful flower centerpiece! Ideal for 15 years or any event of your preference.
.jpg)

.jpg)
Muchísimas gracias por haberme acompañado en este rinconcito de Manualidades hechas con muchísimo cariño para todos ustedes, los espero en mi próxima publicación.
It is a beautiful and very versatile project and above all inexpensive, it is ideal for any event such as birthdays, 15 years, weddings, decoration of birthday tables, mothers day, Valentine's day in short, you decide the occasion, in addition to that you can make it in the color you prefer or more that suits your needs.
Thank you very much for having accompanied me in this little corner of Crafts made with great love for all of you, I wait for you in my next publication.

Si desean conocer algunos de mis trabajos anteriores, aqui les dejo el link:
If you want to know some of my previous work, here is the link:
Como hacer Rosetas en forma de corazón para decorar una fiesta!/How to make heart shaped rosettes to decorate a party!
Como hacer una hermosa Tarjeta de regalo de Corazones!/ How to make a beautiful Hearts Gift Card!
Como hacer un Centro de Mesa decorativo de Corazón!/How to make a Decorative Heart Centerpiece!Tutoral!