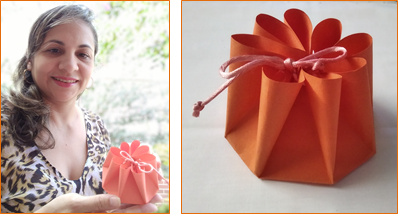
Es viernes así que les deseo un excelente fin de semana. Hoy quiero compartir con ustedes mi proyecto de Cómo hacer una caja en forma de flor. Esta caja es ideal para envolver esos pequeños detalles que compartimos con nuestros amigos y familiares, también podemos envolver bombones, caramelos u otras golosinas.
It's Friday so I wish you all a great weekend. Today I want to share with you my project How to make a box in the shape of a flower. This box is ideal to wrap those little details that we share with our friends and family, we can also wrap chocolates, candies or other goodies.

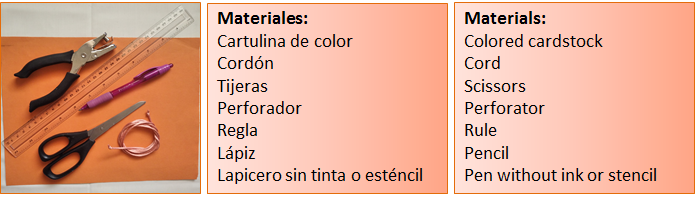
Para elaborar esta caja con forma de flor utilizaremos muy pocos materiales.
To make this flower-shaped box we will use very few materials.
Paso a paso:
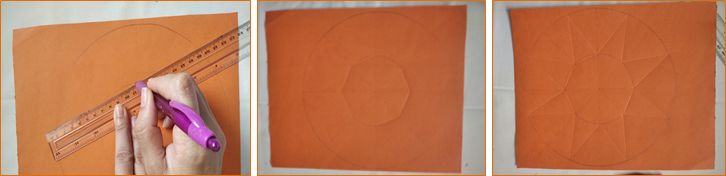
Primero elaboramos un patrón para luego trasladarlo a la cartulina de color. Para esto trazamos un círculo de 20 cm de diámetros y otro en el centro más pequeño de 9 cm de diámetro.
Step by Step:
First we make a pattern and then transfer it to the colored cardboard. For this we draw a circle of 20 cm in diameter and another in the center smaller of 9 cm in diameter.
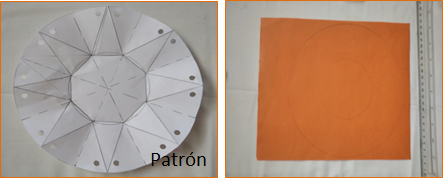
Luego dividimos el círculo en 8 partes iguales. En el círculo más pequeño trazamos una línea interna uniendo cada uno de los puntos de la división del círculo hasta formar un octágono que será la base de nuestra caja. Alrededor del círculo pequeño trazamos triángulos hasta formar una estrella de 8 puntas como se muestra el patrón.
Then we divide the circle into 8 equal parts. In the smallest circle we draw an internal line joining each of the points of the division of the circle to form an octagon that will be the base of our box. Around the small circle we draw triangles to form an 8 pointed star as shown in the pattern.
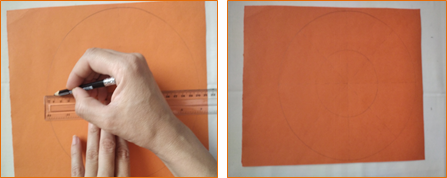
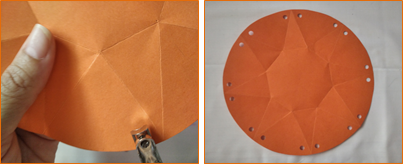
Una vez que tenemos el patrón trazado en la cartulina de color lo marcamos con el lapicero para hacer fácil el doblez de la figura.
Once we have the pattern traced on the colored cardboard we mark it with the pencil to make it easy to fold the figure.
Luego recortamos el círculo y empezamos a doblar cada una de líneas marcadas.
Then we cut out the circle and begin to fold each of the marked lines.

Una vez definida las líneas, con el perforador abrimos un orificio a cada lado de la punta de la estrella.
Once the lines are defined, with the perforator we open a hole on each side of the tip of the star.
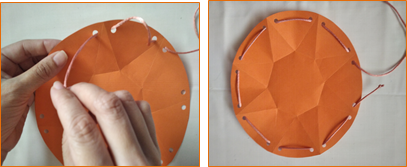
Luego vamos colocando en los orificios el cordón o cinta hasta completar el círculo.
Then we are placing the cord or ribbon in the holes until the circle is completed.
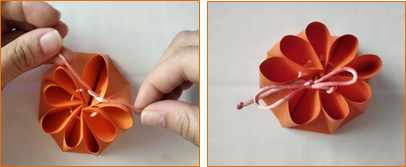
Por último fruncimos el cordón para cerrar la caja y hacemos un lazo. Como podemos ver en la figura esta caja al cerrarse queda con una linda forma de flor.
Finally we gather the cord to close the box and make a bow. As we can see in the figure, this box, when closed, has a beautiful flower shape.
Te invito a visitar mi publicación Cómo hacer una caja cilíndrica
I invite you to visit my publication How to make a cylindrical box

Excelente, muy hermosa e ideal para realizar un obsequio. Gracias por compartir @marciabon
Gracias @lorennys.