Good day, everyone.
I'd like to welcome everyone to my blog; my name is Mistural and today I'll be doing something totally different, it's a tutorial on how to apply some markdowns styles to your post.
I made series of before joining Hive, like how to write contents like a pro, the proper markdowns to use and how to apply them. This aid my growth on the chain, applying the proper markdowns makes your articles or post neat and helped attract people to your post.
I watched different YouTube video, check some old users write up about applying markdowns styles, the HTML code to use and so many more.
The current edition of the newbies initiative program started few days ago, and I noticed some of the newbies don't know much about markdowns, some of them don't even know how to apply those markdowns to their post and this makes their post or contents unattractive.
After some discussion with @starstrings01 I decided to write about markdown styles and how to apply them.
How To Apply Headers Or Headlines
Headers, headlines or sub-headlines are particularly significant aspects to consider while creating an article on Hive or other blogging platform since they display the structure of your content and help guide the reader's eye.
Follow the steps below to apply header on your text or sentence 👇 👇
To apply this markdown simple insert the symbol # at the start of the text or sentence.
Note: As the number of # symbol increases the size of the text or sentences decreases.
Check out the sample;
Header 1
Header 2
Header 3
Header 4
Header 5
You can see the sample above, simple check out the markdown used, I added the symbol # at the beginning and the more I add the # the more the decrease
# Header 1
## Header 2
### Header 3
#### Header 4
##### Header 5
How To Text-justify A Text Or Sentence
You might be asking why I termed this markdown the special one. The answer is that using this markdown will make your article or post stand out, make it easier to read, and make it look neat.
When you use text-justify markdown in your post or article, space is added between words to ensure that both margins are aligned on every line.
Follow the steps below to apply text-justify markdown on your text or sentence 👇👇
<div class="text-justify">Input the text or sentence and end it with </div>
Check out the sample;
I'll write about the aims of the newbies initiative program, I'll show how it looks before and after adding text-justify markdown
- Before adding text-justify markdown👇
The newbies initiative program aim to assist newbies understand the Hive blockchain, support them and teach them Do(s) and Don't(s) of the platform.
- After adding text-justify markdown to the 👇
Text-justify made the sentence neat and appealing to readers, as seen in the sample before and after adding the markdown.
Markdown For Table Creation
Tables are used to make similarities between two or more subjects or objects, the difference can as well be highlighted using table. Furthermore it can also be used to make columns or spreadsheet.
Follow the steps below to create table or column 👇👇
Header 1 | Header 2------ | ------Cell 1 | Cell 2Cell 3 | Cell 4Cell 5 | Cell 6The Result 👇
| Header 1 | Header 2 |
|---|---|
| Cell 1 | Cell 2 |
| Cell 3 | Cell 4 |
| Cell 5 | Cell 5 |
How To Centralized A Text Or Sentence
Centralizing your headlines or sub-headlines will give your article some beautiful touches, I preferred centralizing my sub-headlines because it makes more presentable.
- Follow the steps below to centralized a text or sentence 👇👇
<center>What Are The Aims Of The Newbies Initiative Program</center>
The Result 👇
How To Bold/Italic Text Or Sentence
As a blogger or a writer you might consider highlighting some certain or important text or sentence.
There are two ways to do this, it's either you make the text or sentences bold or Italic this will help the reader to understand the certain or important part of your write up.
Follow the steps below to make a text or sentence bold 👇👇
Making a text or sentences bold, simply add the symbol ** at the beginning and the end of the text or sentence
Check out the sample;
The **Hive Learner Community**is a great community
The Result 👇
The Hive Learner Community is a great community
Follow the steps below to make a text or sentence Italic 👇👇
Making a text or sentences bold, simply add the symbol * at the beginning and the end of the text or sentence
Check out the sample;
The *Hive Learner Community* is a great community
The Result 👇
The Hive Learner Community is a great community
How To Properly Source Image Or Reference/Link
Plagiarism is a serious offense on Hive, and those who are caught are severely punished by the @hivewatcher.
To avoid any type of plagiarism, it's always a good idea to source or mention the link to your photos, text, or quotes that were downloaded or that belong to another user.
For instance, I used Google to find and download the image below.
Although I did the proper thing by including the source link beneath the image, the post isn't particularly attractive.
Simply use the markdown format below to source the image's link source 👇
[Image source](link)The Result 👇
You can see how this one differs from the first; it contributes to the attractiveness and acceptability of my writing.
Quoting Is Another Method Used In Citing Source Or Reference
To avoid plagiarism, as a content creator who conducts research or uses other people's text or discussion, you must correctly quote the word, text, or discussion.
Follow the steps below to quote a text or sentence 👇👇
Quoting a text or sentence, simply add the symbol < at the beginning of the text or sentence
For example;
Let's say I want to quote one of the most famous statements I came upon online; I'll have to quote it to prevent plagiarizing it directly. Here's how I quoted it; simply add the symbol >to the beginning
>The journey of a thousand miles begins with one step.
The Result 👇
The journey of a thousand miles begins with one step.
In addition, you can decided to cite the author or owner by adding the the source or username of the owner underneath the quote
Example; >The greatest glory in living lies not in never falling, but in rising every time we fall.
[Lao Tzu](https://en.m.wikipedia.org/wiki/Laozi)
The Result 👇
The journey of a thousand miles begins with one step.
Lao Tzu
How To Add Subscript and Superscript
Subscript simply implies that a sentence, text or number is placed below the baseline, whereas SuperScript means that a sentence, text or number is placed above the baseline.
Follow the steps below to Subscript a text or sentence 👇👇
<sub>Text or Sentence</sub>
For instance, If I want to write down the chemical formula for water, H2O, I can simply add 2 to make it unique.
Subscript 2
<sub>2</sub>OThe Result 👇
Follow the steps below to Superscript a text or sentence 👇👇
<sup>text or number here</sup>
For instance, if I want to write down the math problem 42=16, I must SuperScript the number 2 to make it unique.
Superscript 2
<sup>2</sup> = 16The Result 👇
Adding Horizontal Ruler/Line
Horizontal ruler or line will make your content beautiful, adding ruler will give enough space between two paragraphs or headlines.
Follow the steps below to add horizontal ruler or line 👇👇
Use this symbols *** or ___ or --- to add ruler or line to your post.
How To Align Images Or Text
Aligning an image or text simply means placing it on the left or right side of the page.
You can compare or differentiate a picture or text by aligning them.
You might wish to show the before and after of a product, an object, or a craft, for example.
Let me demonstrate. A few days ago, @vickoly one of the newbies published a step-by-step tutorial on how he made a stunning shoe. With the image/text alignment markdown, I can quickly align the before and after shoe processing.
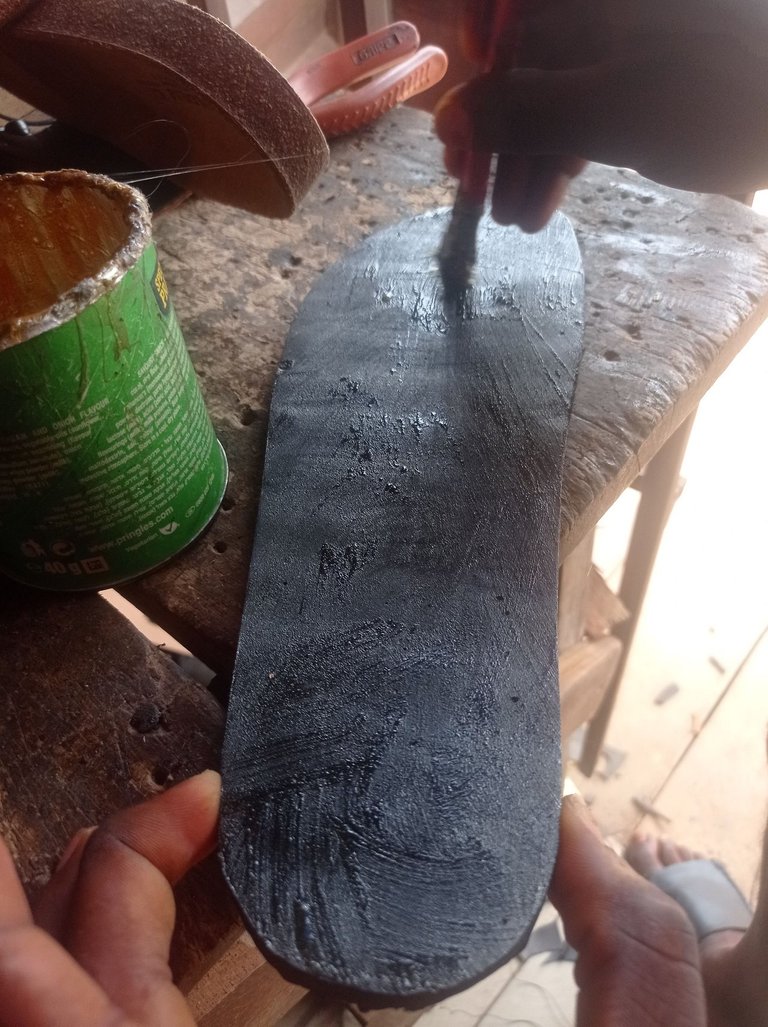

Looking at the images below, I showed the before and after making the shoe, the before process was aligned at the left hand side while the after process was aligned at the right hand side.
I used the markdown below 👇
<div class = "pull-left"> image link</div>
<div class = "pull-right"> Image Link </div>
Final Words
I'd prefer to pause right now. The aim of this post is to assist everyone, especially newbies, in becoming better content creators on Hive. These are only a few of the numerous markdown styles that may be found on this network. For markdown style examples, I recommend checking out the website listed below.

Thank you for visiting my blog, I hope you have learnt one or two things from my content today, you can follow me to for more quality contents that will learn one or two things from you can check out My Introduction Post To know More About Me and If you find my content useful or interesting, please appreciate my work by leaving a comment, upvote, and probably rehive it so that more users can see it
Bravo sis!
Although, I know some of the markdowns but did not know how to create a table, move the text to the center.
@queenstarr posts I've come across made me love the table arrangement, you sure use these markdowns well.
I was happy when I got to know how to justify my text and how to divide texts in a post, @thekittygirl has been so nice and ready to guide me through these things, she's such a lovely person.
Thank you for this tutorial @mistural
I'm going to save this post somewhere so I can easily access it whenever I need it since I may not be able to cram all of It.
Truly, these markdown makes one's article neat and attractive, that's what I want for my articles too. Thank you.
Well done!
Thank you Jessica, I appreciate the compliment Love, I only try. We keep learning💜
I must say this is really a masterpiece. Well detailed and easy to understand.
Thanks, dear @mistural for this wonderful post.
Permit me to say, It would be very lovely if the
text colormarkdown was also included.Thanks for this wonderful post.
This symbol that I've been looking for, I often see posts that use various symbols so that they make their posts very interesting, I just don't dare to ask this, a few days ago I asked @shopnilhasan and he taught me so sincerely, so there are a few I've used, Thanks for sharing this. so useful for me. I will try on my next post.
Markdowns usually make post looks neat and attractive.
I'm happy you found the post useful..
That's right, I should save all of this for his long term use
That would be great 😃
This is well detailed & excellent tutorial guide for the newcomers. There are still many members who are making contents without using markdowns, citing image/quote source etc properly. I hope this tutorial will help them to learn precisely. Thanks for sharing
Yeah, even some old member are yet to understand how to apply markdowns properly, some don't even know the code to use. I hope this tutorial can reach many people especially the newbies.
This was perfectly timed. I need to bookmark
Thank you so much..
You are welcome 🤗
Wow this is so insightful and loaded, I got value and will work and practice it.
Thanks for all you do per time.
I hope you understand how to align image to the left and right now?
great one. Thanks for it
You are welcome 🤗
Truly a awesome markdown learning post 📯
Really it will be helpful to us to make our post beautiful ❤️
I personally requesting all our friends to learn from this post and make you post beautiful 😍
Thanks dear for such a great post 🤗
I've to share it so everyone can benefit including the newbies
Yes I believe that it will be helpful for our every hive members ✨
Thank you very much for this information, I have learned a lot from it.
I'm glad you now have the basic knowledge of some markdowns style. Do well to apply it to your post or article
@mistural thank you so much for this tutorial. I never knew most of these formatting styles in hive mentioned above, I must say that I got value 👍
Thank you for this. So quickly how did you do the one in the last paragraph. The one that explains who you are with the green line
I was going to ask same thing
Wow this is very useful, i will try.
Thank you for taking time out to share these markdowns, this will come in handy. Cheers🌸
Your post help a lot other members to create an attractive post.
This post has basically almost all if not all I need, thank you so mh jdor this ans yes I've saved the post li k so that I can always visit it... You're really doing well for we the newbies ana we appreciate a lot
This is an amazing aid for newbies, didn't know these for a while when I joined.
Wow these are some of the questions I have been asking people about. And most do not know the answer to it. I now see its just like HTML codes which I had learned sometime ago. @mistural Infact, I have bookmarked this page so that I can come back to it anytime. Thanks for all you do, ma'am.
Congratulations @mistural! You have completed the following achievement on the Hive blockchain and have been rewarded with new badge(s):
Your next target is to reach 1000 comments.
You can view your badges on your board and compare yourself to others in the Ranking
If you no longer want to receive notifications, reply to this comment with the word
STOPCheck out the last post from @hivebuzz:
Support the HiveBuzz project. Vote for our proposal!
Yeah...
Good educations, now when i want to make a mark down, i can see in your post how to do it. 👍
Thanks for sharing...
Yeah.. it will definitely help you
Thank you for visiting
You're welcome Miss. 👍
very helpful post.
although I think the editor used to make the posts usually include this options in the task bar.
there is however one markdown I am yet to find.
I love to give a lot of line spacing in my writing to make for easy readability... but I noticed that no matter how much I hit the enter button and creating a very good line space, the post usually comes out with a fixed line spacing...
I am hoping you understand what I am referring to because I do not know how to show what I am saying in words... except maybe if I make a video.
Thanks for the post again @mistural
Wow!
I'm so amazed in all this steps, I can tell you that I don't know most of this markdown style.
I'm glad you took your time to explain all this to us, I have really learnt a lot today.
Thank you @mistural for taking out time to explain this to us.
This will really help a lot of newbies.
The improvements that is coming newbies way through this initiative is immeasurable. Thanks
Oh wow..
Thank you so much dear..
This is helpful
You are welcome
Woah! This is very helpful. Thank you so much
This post is so adorable you deserve my votes thanks for helping newbies....
@@ -61,20 +61,8 @@
the
-%3Cdiv class=%22
text
@@ -73,18 +73,8 @@
tify
-%22%3E, %3C/div%3E
com
Very insightful
Am sending this to my newest newbie fiends
First @petrashittu come and see this
This is great work put together. Thank you so much for this. I will save time to carefully study this piece over and over again.
Thank you very much for sharing this! I find it very useful!
!PIZZA
This post was really helpful
I really learnt a lot
Thanks for sharing
Thanks for this I haven't learnt and will want to try them out
Your aricle is indeed very heplful indeed for newbies as me. I found it thanks to @princessbusayo 💙
Silly question - is there a way to save this article for future reference, so I can check it out quick when I need it?
I'd like to thank you for this wonderful information, you are such a selfless human for sharing an important information.
This will help newbie like me to navigate around and know more about posting content.
You are amazing , continue to be spreading love
Thank you for this great write up, as a newbie I was able to gain alot
I used the markdown below 👇
Please i have been trying to use this code but i can't, its aligning as its supposed to but the link of the image keeps showing. Please i need your help @mistural