Hola!! 🙌💕Bienvenidos a todos ustedes querida comunidad, aquí, a un nuevo post que les traigo! Deseando como siempre se encuentren excelentes y felices haciendo con amor todo lo que se propongan, esperando hayan tenido un día asombroso y provechoso! 👋❤️😄🌷
Hello!! 🙌💕Welcome to all of you dear community, here, to a new post that I bring you! Wishing you are excellent and happy as always, doing everything you set your mind to with love, hoping you have had an amazing and profitable day! 👋❤️😄🌷
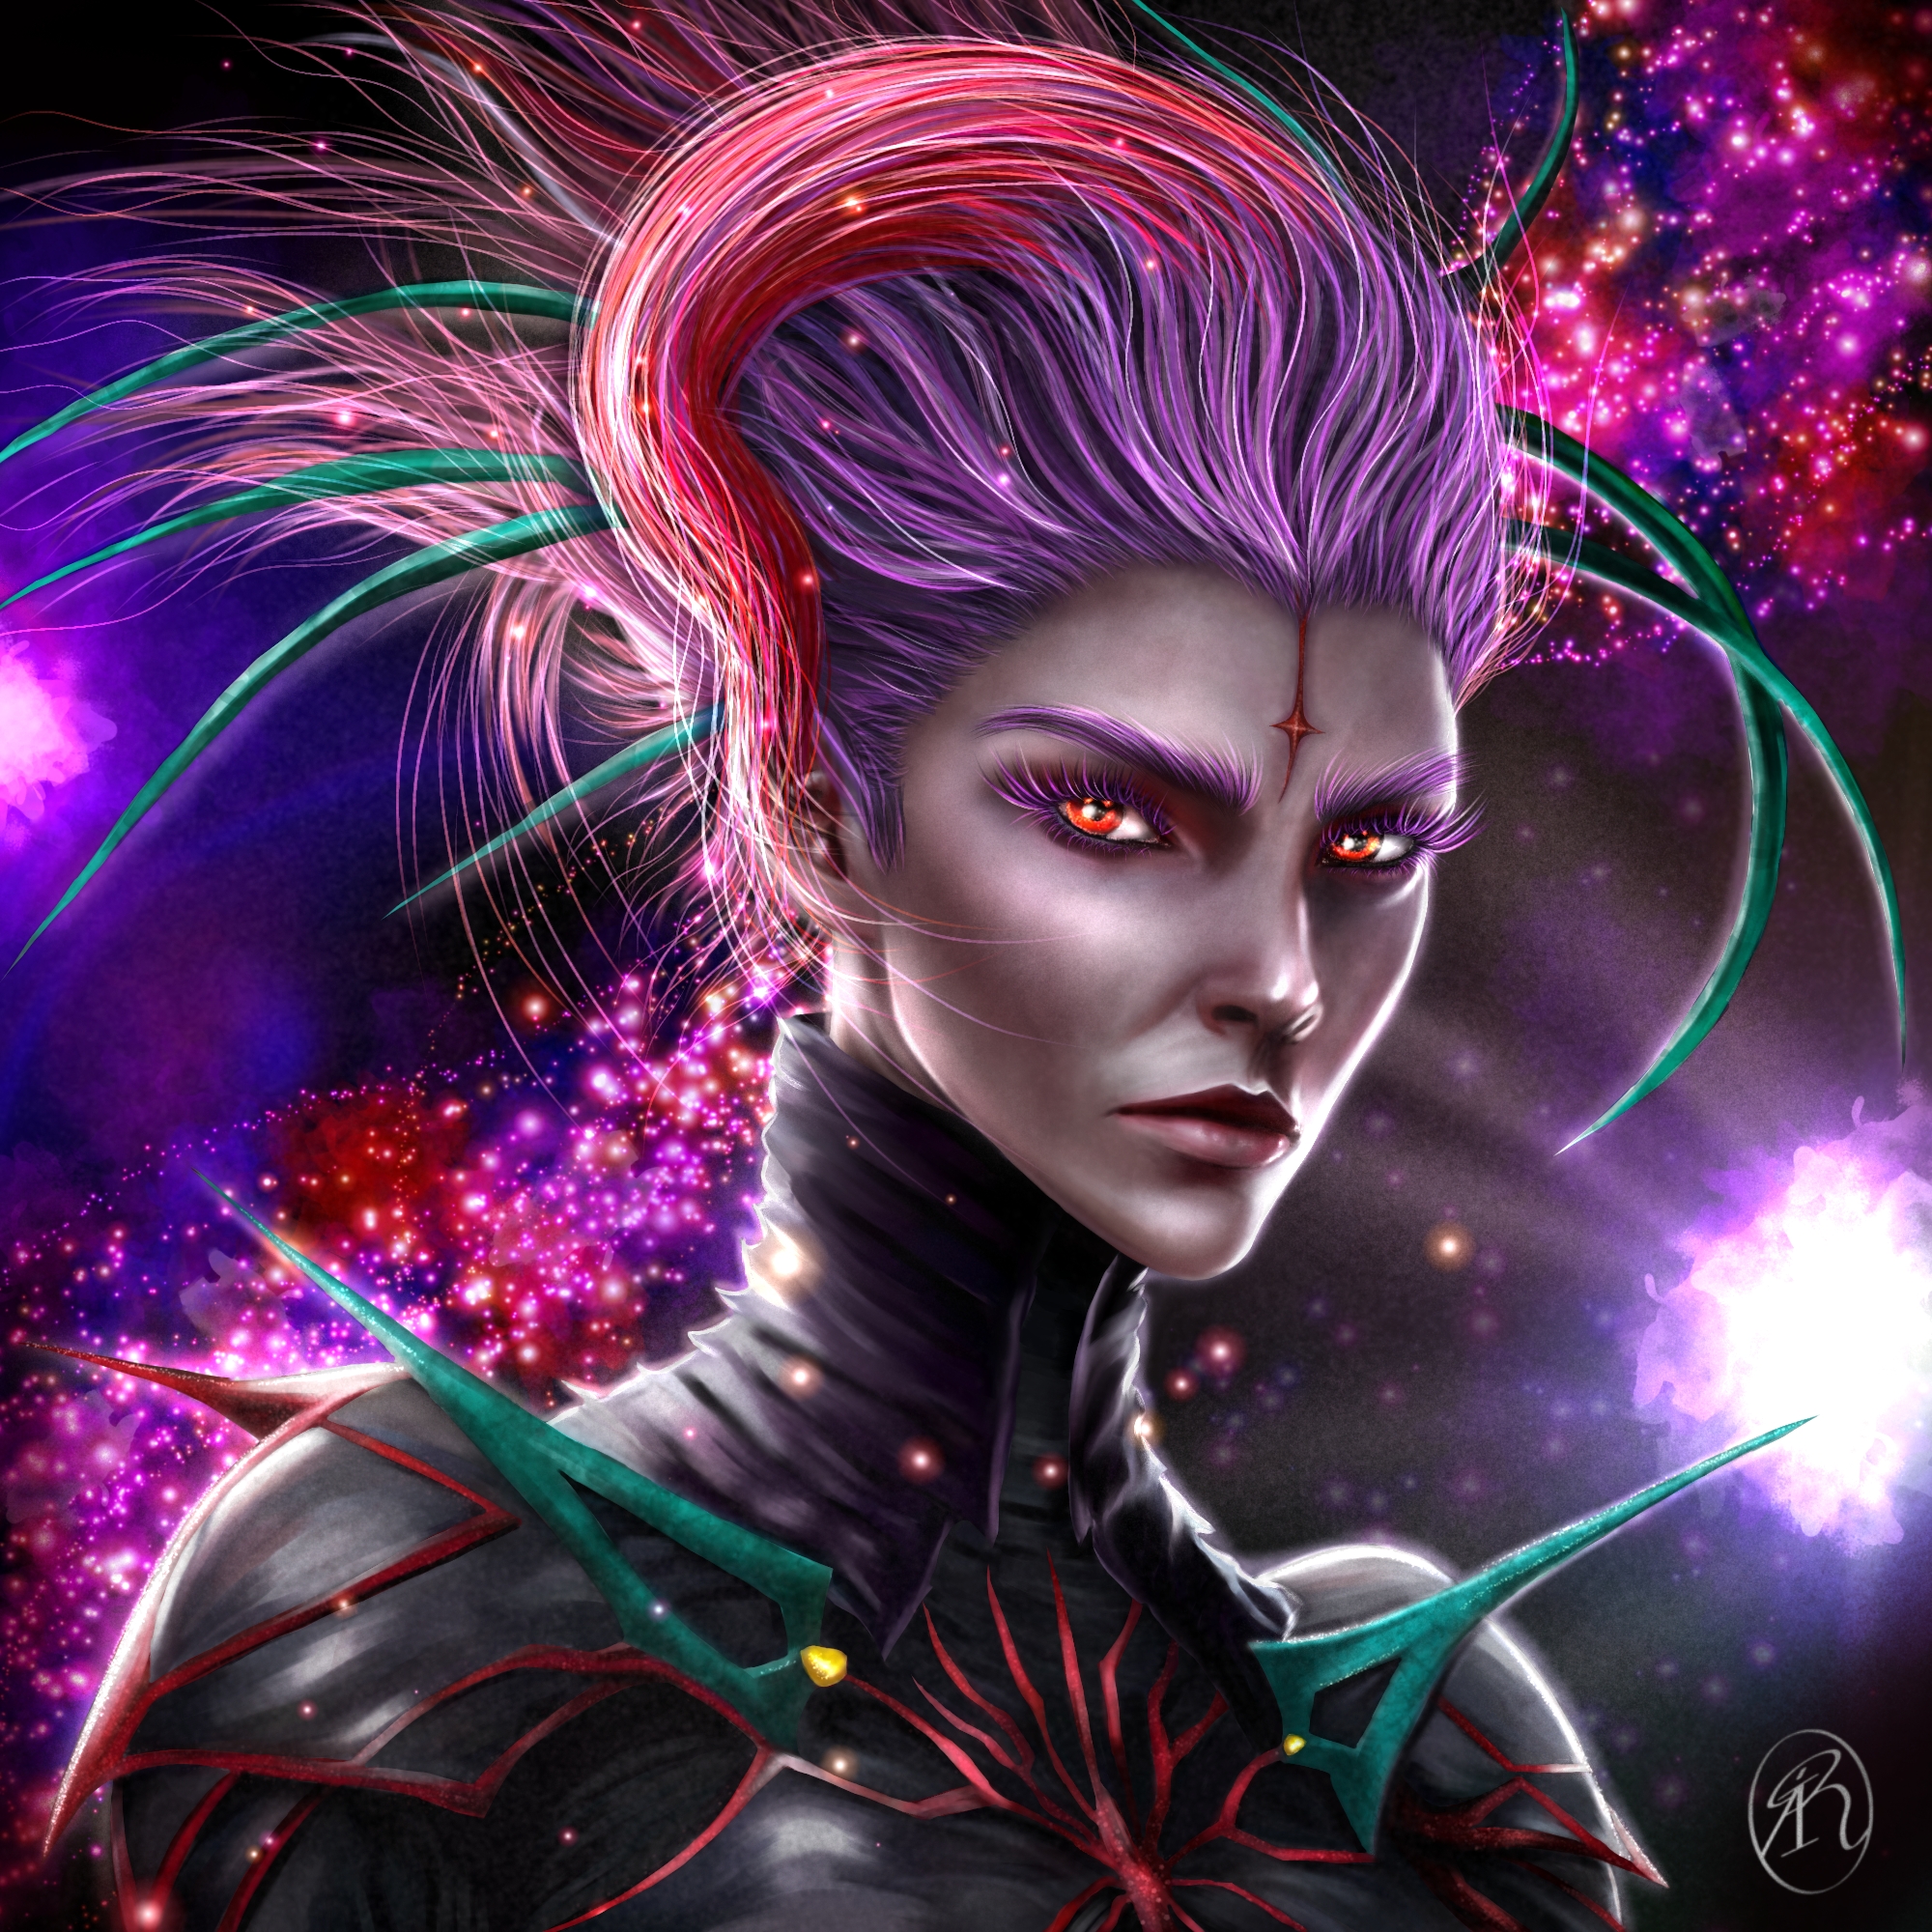
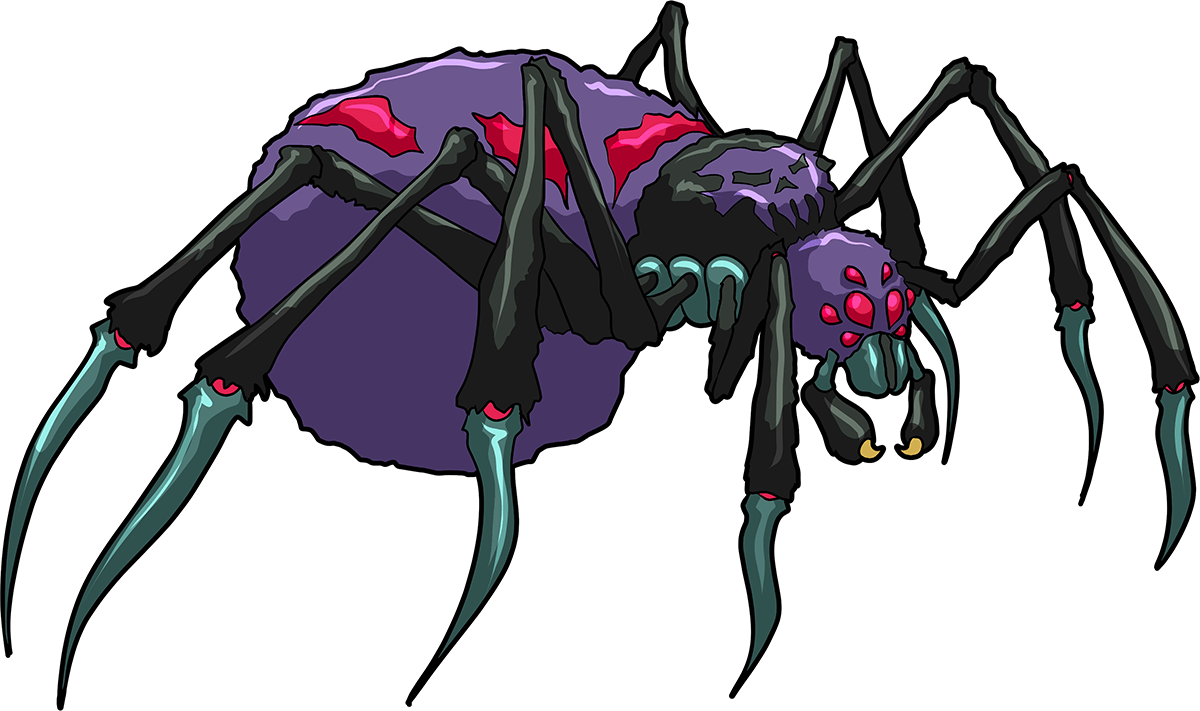
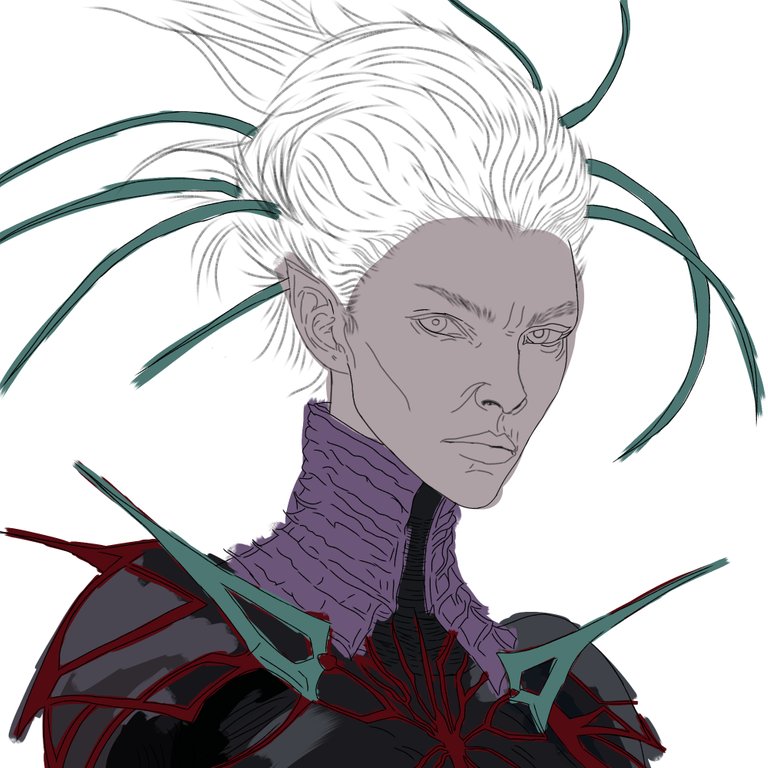
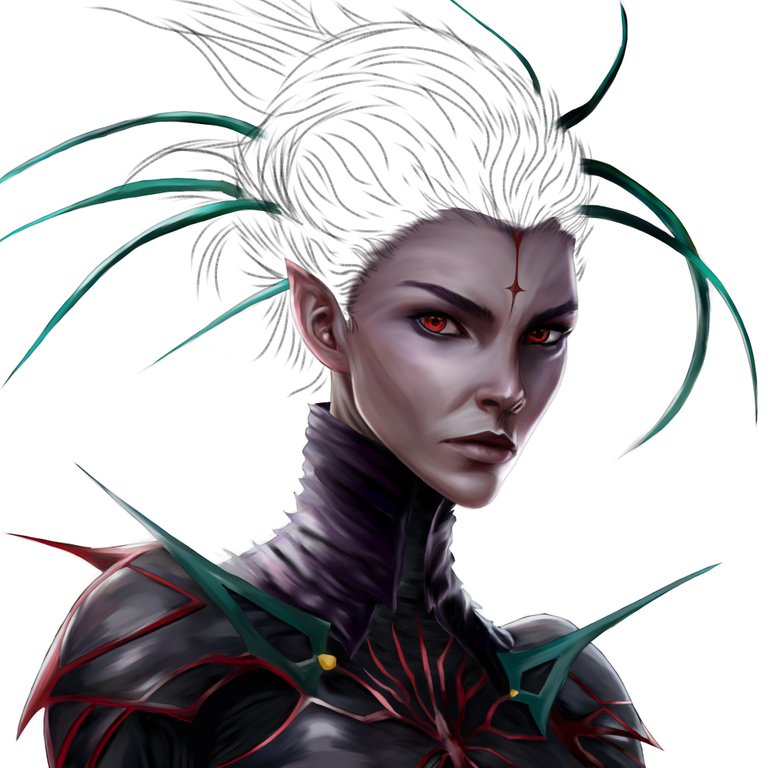
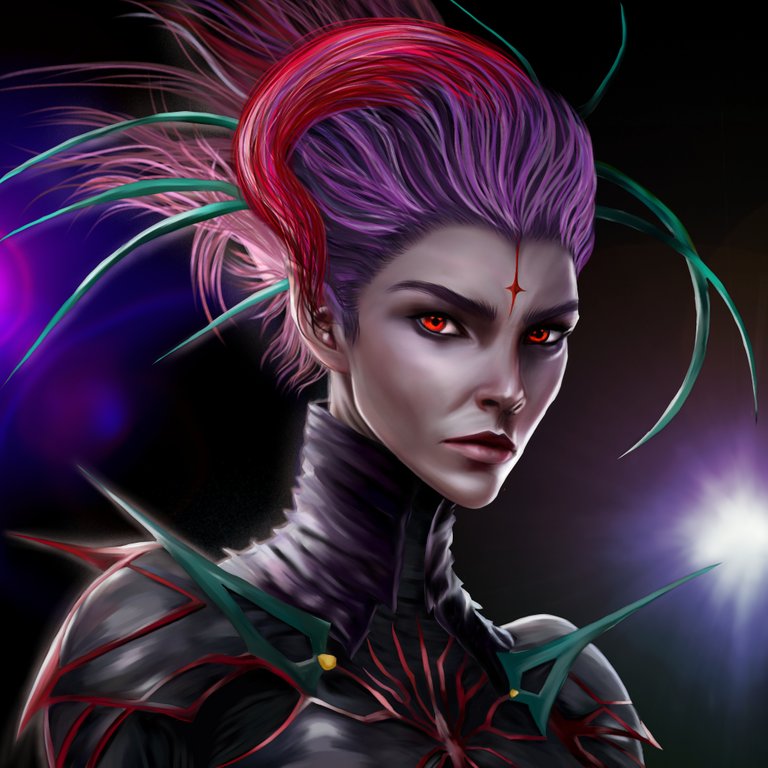
Ahora para seguir, en esta noche quiero compartirles como cada semana mi participación al concurso de Splinterlands, a estas horas acabo de terminar esta pieza, para el cual quise representar la carta HAUNTED SPIDER pero con una representación de guerrera arácnida femenina. Y para esto pase usando elementos característicos de la carta de este arácnido encantado. La represente con un traje característico de este formidable enemigo que posee un blindaje único en su cuerpo. Realmente me gustó el resultado que logré con esta carta, queriendo representar la esencia de este arácnido en esta personificación. Cuéntenme aquí que les pareció y compartanme! Espero les guste mucho y por supuesto deseo que disfruten este proceso!😉😃👋💞💖
Now to continue, tonight I want to share my participation in the Splinterlands contest like every week, at this time I just finished this piece, for which I wanted to represent the HAUNTED SPIDER card but with a representation of a female arachnid warrior. And for this pass using characteristic elements of the letter of this enchanted arachnid. I represented her with a characteristic suit of this formidable enemy that has a unique armor on her body. I really liked the result I achieved with this card, wanting to represent the essence of this arachnid in this incarnation. Tell me here what you think and share! I hope you like it a lot and of course I hope you enjoy this process!😉😃👋💞💖

Etapas del Dibujo/Drawing Stages
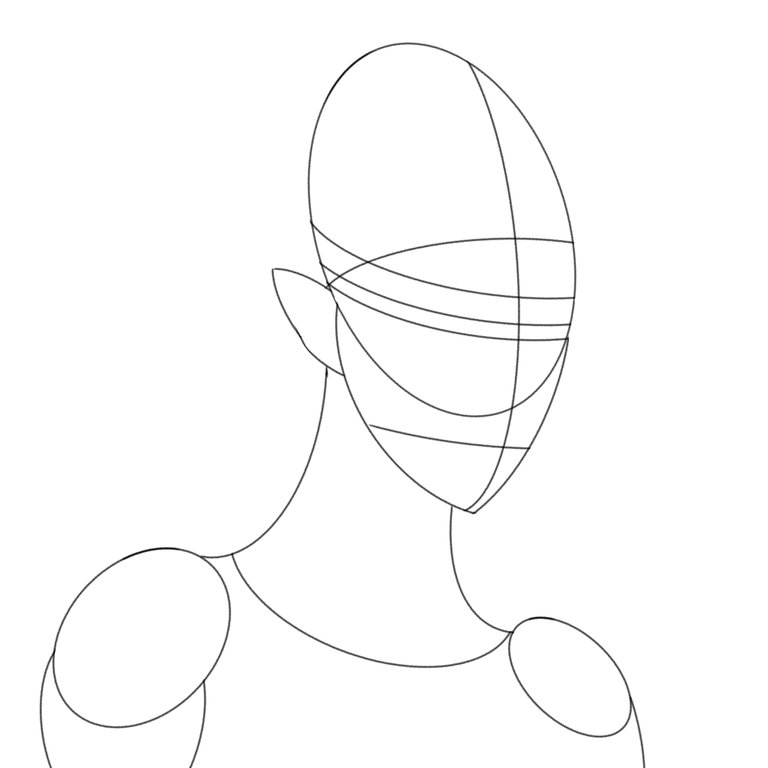
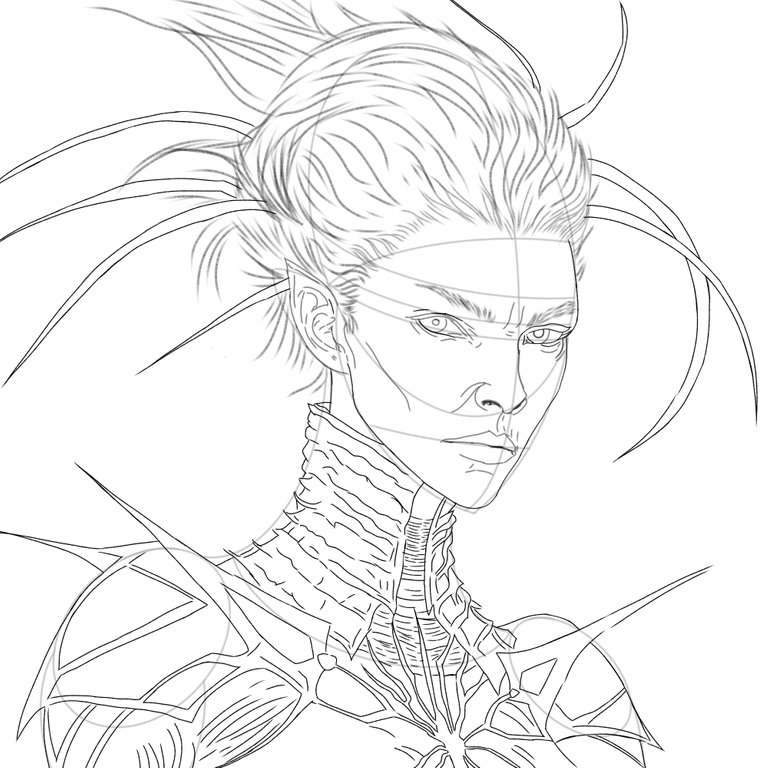
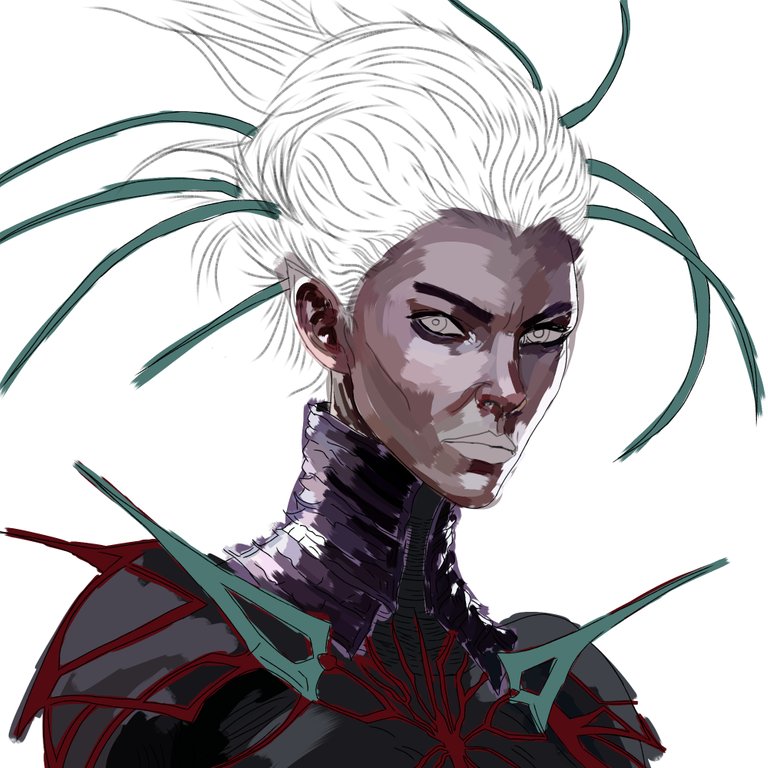
Para iniciar utilice una brocha tipo pluma falcon suave por su trazo suave y realice el boceto guía para luego en otra capa hacer el delineado usando esta misma brocha pluma falcon, y agregue muchos otros más detalles. Después, en una nueva capa abajo de la capa del delineado empecé aplicar un color base de piel y también colores bases para el traje aplicándolos con método de mezcla normal, luego empecé a matizar la piel con varios tonos luminosos y saturados acordé a la iluminación que quería que tuviera, usando para los trazos una brocha tipo brillo de cabello 2, tanto para la piel como para los trazos del traje, quería variar de brocha así que también use una brocha tipo acuarela plana mezcla que me ayudó a tener una mezcla en los trazos. De igual forma con método de mezcla normal también trabaje el traje matizando con varias tonalidades.
To start, use a soft falcon feather brush for its soft stroke and make the guide sketch and then in another layer make the outline using this same falcon feather brush, and add many other details. Then, in a new layer below the eyeliner layer, I started applying a skin base color and also base colors for the suit applying them with the normal blending method, then I started to tint the skin with various bright and saturated tones according to the lighting that I wanted it to have, using a hair gloss brush 2 for the strokes, both for the skin and the strokes of the suit, I wanted to vary the brush so I also used a flat blend watercolor brush that helped me to have a mixture in the strokes. In the same way, with the normal mixing method, also work on the suit, shading with various shades.
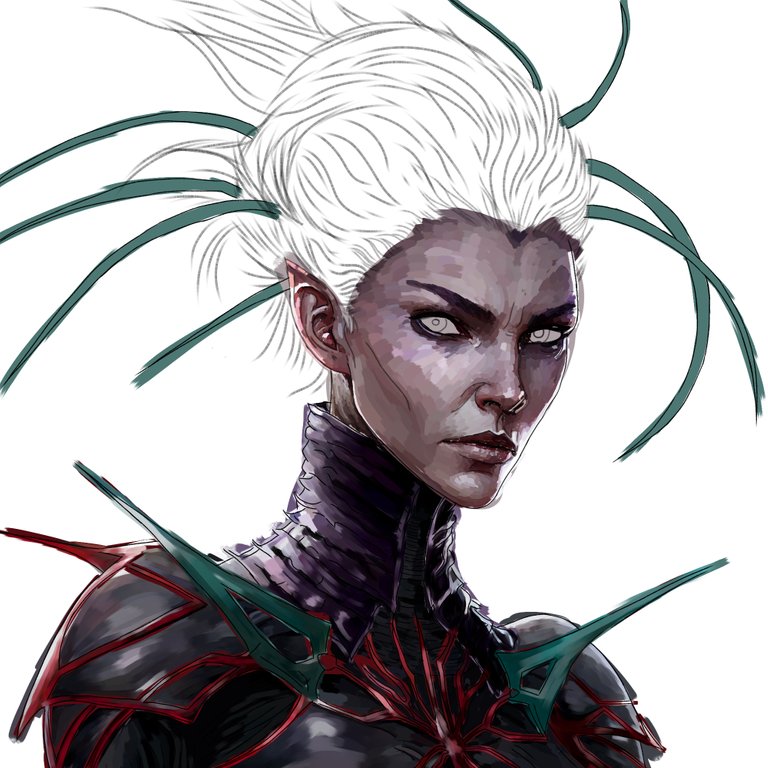
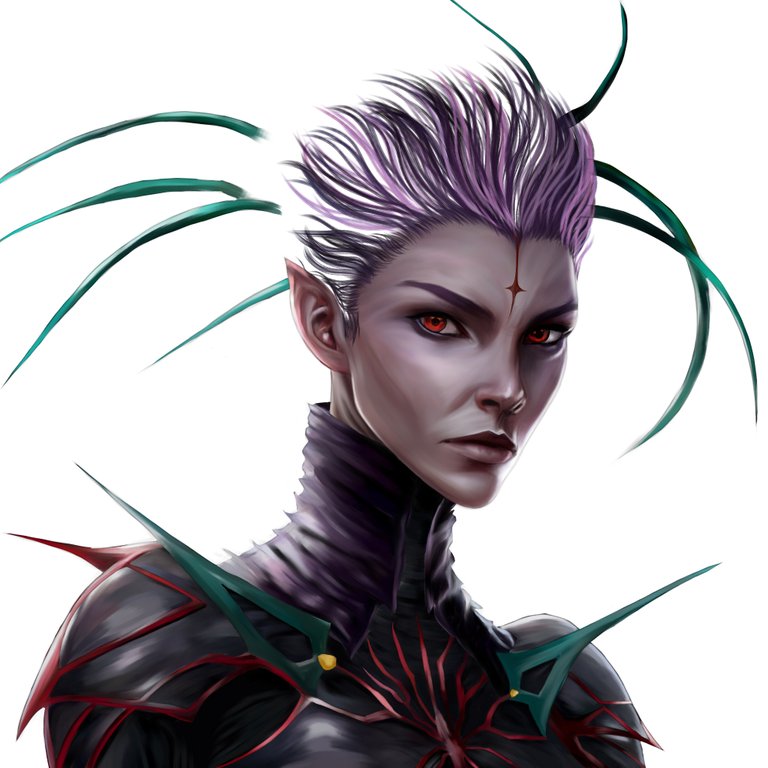
En esta segunda etapa, termine de trabajar los ojos usando la brocha tipo acuarela plana y también la brillo de cabello 2, usando el mismo método de mezcla en una nueva capa. Después, comencé con la etapa de mezclado para suavizar y armonizar los colores usando la herramienta difuminado, pase después a borrar por capa el color sobresaliente del delineado para ir definiendo. De seguido, agregue un detalle en la frente en la capa donde aplique los colores de los ojos, los cuales mezcle aparte. Ya culminado la etapa del difuminado, pase en una nueva capa a recrear el cabello usando la brocha tipo Pelo con este color morado y lila como también varios tonos de fucsia y rosado, haciendo un mechón resaltante con una variedad de tonalidades donde sobresalieron varios tonos de rojo, característico del pelaje de este arácnido. Siempre oculto el boceto del cabello para poder trabajar la capa de color para el cabello, ya que así no tengo que difuminar boceto del cabello con la capa de color del cabello, lo cual me ha resultado en manchas para la capa de color. A medida que iba trabajando el cabello cambie el color del fondo ya que me estaba cansando la vista este fondo blanco.
In this second stage, finish working on the eyes using the flat watercolor brush and also the hair shine 2, using the same blending method on a new layer. Later, I started with the mixing stage to soften and harmonize the colors using the blur tool, then I went on to erase the outstanding color of the outline by layer to define it. Next, add a brow detail on the layer where you apply the eye colors, which you mix separately. Once the blending stage is over, go to a new layer to recreate the hair using the Hair type brush with this purple and lilac color as well as various shades of fuchsia and pink, making a highlighting lock with a variety of shades where various shades of red, characteristic of the fur of this arachnid. I always hide the sketch of the hair in order to work the hair color layer, so I don't have to blend the sketch of the hair with the hair color layer, which has resulted in smudges for the color layer. As I was working on the hair, I changed the color of the background since this white background was tiring my eyes.
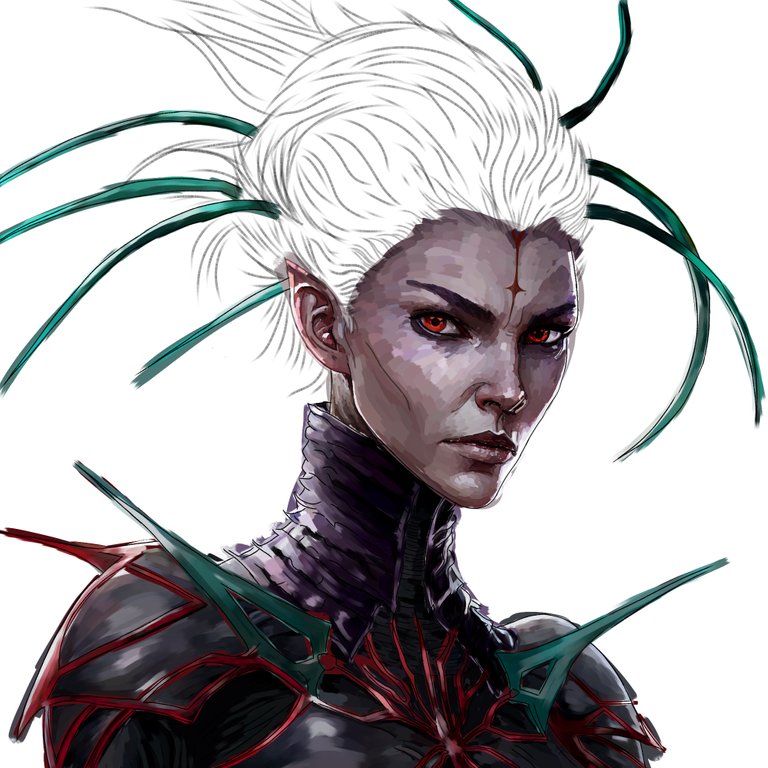
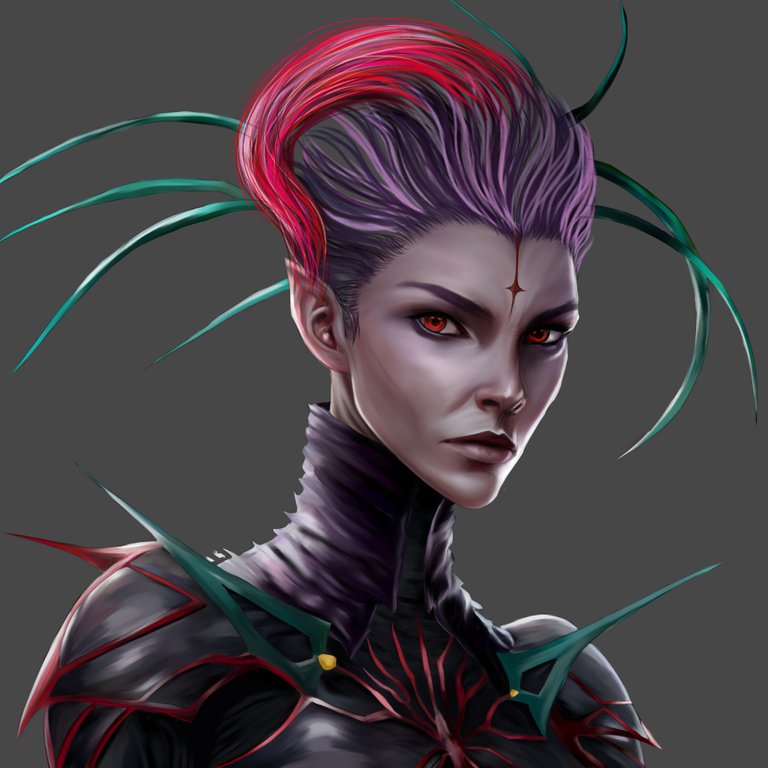
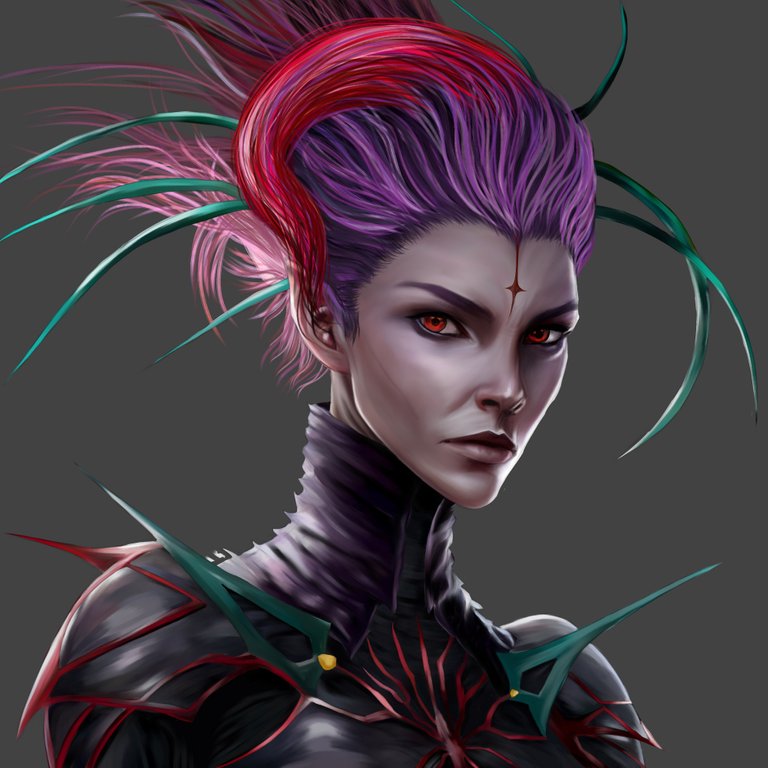
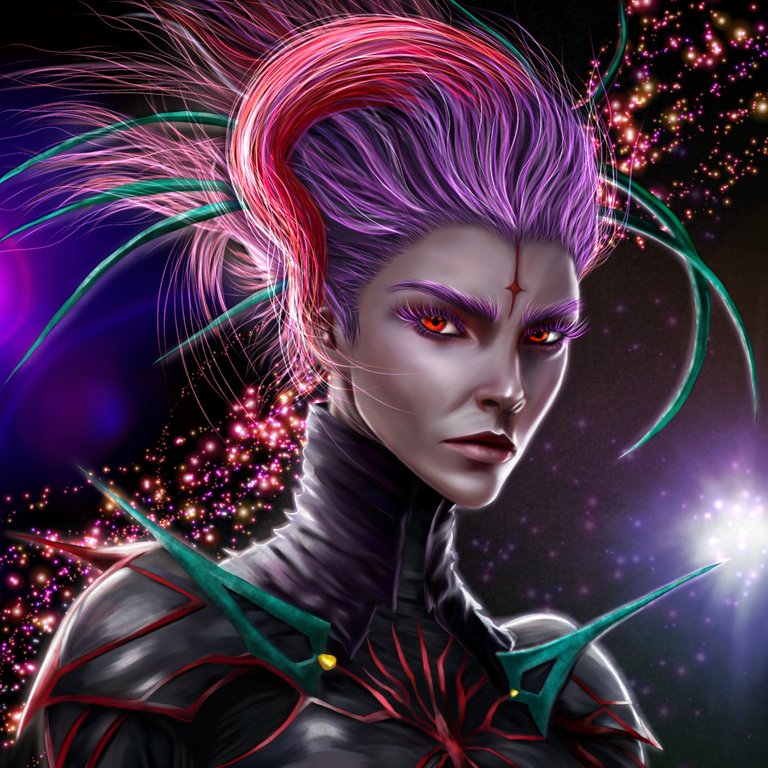
Para finalizar, teniendo ya terminado el personaje pase a recrear el fondo usando un color negro de base y luego con un aerografo normal en una capa de mezcla añadir, fui añadiendo varios tonos entre azul, lila y morado que pase a difuminar con un aerógrafo de partículas. Y en una nueva capa con superposición y con aerógrafo fui resaltando algunas zonas para darle vibración a los colores. Luego abrí una nueva capa con método de mezcla añadir y fui agregando mechones en el cabellos para darle más volumen y profundidad y por supuesta algo de soltura, usando el mismo pincel tipo Pelo. Esto también lo aplique en cejas y pestañas para darles mayor protagonismo a los ojos. Pase a texturizar algunas partes del traje en una nueva capa con método de mezcla Multiplicar usando una brocha tipo nube real. Seguí texturizado con una brocha tipo aerógrafo de particular con opacidad baja usando un método de mezcla normal. Después empecé en una nueva capa a agregar algunos brillos con la brocha tipo punto de brillo. De seguido, agregue algunos brillos a los ojos con este mismo pincel y usando un rotular fuerte, también agregué más detalles al fondo con la brocha tipo nube real con un método de mezcla añadir, y así abrí otra capa de añadir para agregar algunos brillos frontarles con el pincel punto de brillo y también use la brocha tipo nube real para texturizar la piel pero con un método de mezcla Multiplicar pero usando una opacidad mínima. Y de esta forma culmine esta pieza para esta carta esperando les haya gustado la elaboración y me cuenten qué les pareció, siempre me contenta saber qué les ha trasmitido cada post que les comparto! Así que... Gracias queridos amig@s! 😄❤️😘💞👋
To finish, having already finished the character, I went on to recreate the background using a black base color and then with a normal airbrush in a mix layer add, I added several tones between blue, lilac and purple that I blended with an airbrush of particles. And in a new layer with an overlay and with an airbrush I highlighted some areas to give the colors vibrancy. Then I opened a new layer with the blend method add and I added strands to the hair to give it more volume and depth and of course some looseness, using the same Hair brush. I also applied this to the eyebrows and eyelashes to give the eyes more prominence. Move on to texturing some parts of the suit on a new layer with the Multiply blend method using a real cloud brush. I continued to texture with a particular airbrush type brush at low opacity using a normal blending method. Then I started on a new layer to add some glitters with the glitter point brush. Next, I added some highlights to the eyes with this same brush and using a strong marker, I also added more details to the background with the real cloud brush with a blend method add, and so I opened another add layer to add some highlights to the front. with the glow point brush and also use the real cloud brush to texture the skin but with a Multiply blend method but using minimal opacity. And in this way, I finished this piece for this letter, hoping you liked the preparation and tell me what you thought, I am always happy to know what each post that I share has transmitted to you! So... Thank you dear friends! 😄❤️😘💞👋

Redes Sociales/ Social Networks
Sigueme en/ Follow me in:
👉Instagram: @catrynart
👉 Twitter: @catrynart
Herramientas Usadas/Used Tools
- Tablet Android/ Android Tablet
- Programa Ibis Paint X/ Ibis Paint X Program
- Traductor Deepl/ Deelp Translator
- Servidor de Imagenes Imgbb/ Imgbb Image Server
- Dactilopintura Digital/ Digital Fingerprint Painting
🌺¡HASTA EL PRÓXIMO POST!🌺

Detenerse es Retroceder
To Stop is to go Backwards
Los detalles son (🖤)(🖤) simplemente hermosos y el trabajo en general ✨🌿🖤
Saludos jeje ✨🌿🖤
Muchas gracias 🥰 un saludo para ti también me gusta tu estilo en acuarela😉 éxitos está semana
This is AMAZING work. You've documented your process really well, and I like the way you've made the spider a humanoid character. Great work and I hope you get many more votes on this post!
Thank you so much @holoz0r !! 🤗🥰 I really appreciate you sharing here.... thanks!
No problem! Hopefully I can see more of your work in the future!
Thank you so be it 🤗🥰! A big hello to you... thanks for being part of this new post!
The rewards earned on this comment will go directly to the people sharing the post on Twitter as long as they are registered with @poshtoken. Sign up at https://hiveposh.com.
Eso ha Sido un trabajo impresionante...
Muchas gracias @m16uellop 🤗💗
This looks awesome! Thanks for sharing!
!PGM
!PIZZA
Thank You so @torran 🤗🌷
BUY AND STAKE THE PGM TO SEND A LOT OF TOKENS!
The tokens that the command sends are: 0.1 PGM-0.1 LVL-0.1 THGAMING-0.05 DEC-15 SBT-1 STARBITS-[0.00000001 BTC (SWAP.BTC) only if you have 2500 PGM in stake or more ]
5000 PGM IN STAKE = 2x rewards!
Discord
Support the curation account @ pgm-curator with a delegation 10 HP - 50 HP - 100 HP - 500 HP - 1000 HP
Get potential votes from @ pgm-curator by paying in PGM, here is a guide
I'm a bot, if you want a hand ask @ zottone444
PIZZA Holders sent $PIZZA tips in this post's comments:
@torran(7/10) tipped @catrynart (x1)
Please vote for pizza.witness!
Eres una artista increíble, ame la armonía de los colores!
Gracias mi amor por apreciar mis trabajos! 🌷🥰
Thanks for sharing! - castleberry#6859

Thanks a lot @castleberry 🥰🤗♥️ and thanks You so much @steemmonsters 🌷🌷🌷
Congratulations @catrynart! You have completed the following achievement on the Hive blockchain And have been rewarded with New badge(s)
Your next target is to reach 600 replies.
You can view your badges on your board and compare yourself to others in the Ranking
If you no longer want to receive notifications, reply to this comment with the word
STOPCheck out our last posts:
Support the HiveBuzz project. Vote for our proposal!
Thank You 🤗💗
That's great @catrynart! We're excited to see your accomplishments on Hive! We keep cheering you on for your next goal!
Do you know you can win a Chaos Legion pack and many other things just by following some simple steps ?? Check out our Latest Daily Showcase and Participate our latest Giveaway. Thanks
Thank You so @bdvoter 🤗💗 ando @bdvoter.cur🌷💗