Hello hive amogis, what we are going to do in this tutorial is to send data from a form in php ah a MySql database, in a certain part it is a very easy practice it does not hurt practice
Hola hive amogis, lo que vamos a hacer en este tutorial será enviar datos desde un formulario en php ah una base de datos MySql, en cierta parte es una practica muy facil no está de más la practica

What do we need?:
- A local server to work with php and mysql, for practice I will use Xampp
- A text editor, which is where we are going to write all our code
- A web browser, which is where we will see the changes made
¿Que necesitamos?:
- Un servidor local para trabajar con php y mysql, para la practica utilizaré Xampp
- Un editor de texto, que es donde vamos a escribir todo nuestro codigo
- Un navegador web, que es donde vamos ver los cambios realizados
What are we going to use ?:
- Php / html - to make the form
- Boostrap - for form styles
- Php - to validate the form
- Php - PDO for connection to MySql
- Php - prepare statament to send the data
- phpmyadmin - To see the changes in the database
¿Que vamos a utilizar?:
- Php / html - para hacer el formulario
- Boostrap - para los estilos del formulario
- Php - para validar el formulario
- Php - PDO para la conección a MySql
- Php - prepare statament para enviar los datos
- phpmyadmin - Para ver los cambios en la base de datos
What are we going to do?:
- Create a form and submit it
- Validate that form
- Send it to the database
¿Que vamos a hacer?:
- Crear un formulario y enviarlo
- Validar ese formulario
- Enviarlo a la base de datos
We are going to create the following files:
- database.sql - Containing the database structure
- db.php - For connection with MySql
- Index.php - For the form logic
- index.view.php - For the form view
- Boostrap - the boostrap styles that you can have both locally and remotely
Vamos a crear los siguentes archivos:
- database.sql - Que continentrá estructura de la base de Datos
- db.php - Para la conección con MySql
- Index.php - Para la lógica del formulario
- index.view.php - Para la vista del formulario
- Boostrap - los estilos de boostrap que los puedes tener tando de forma local como remota
We start with the database.php file
Comenzamos con el archivo database.php
DROP TABLE IF EXISTS `data`;
CREATE TABLE `data` (
        `id` int(11) NULL,
        `name` varchar(255) NOT NULL,
        `password` varchar(255) NOT NULL,
        PRIMARY KEY (`id`)
) ENGINE=InnoDB DEFAULT CHARSET=latin1;
Inside the database.php file we will have the structure of the MySql data class, now in the php my admin we create the database called 'send_data', to that database we import the database.sql file and thus we will have the structure of the database finished
Dentro del archivo database.php tendremos la estructura de la dase de datos MySql, ahora en el php my admin creamos la base de datos llamada 'send_data', a esa base de datos importamos el archivo database.sql y así tendremos la estructura de la base de datos finalizada
Now we go with the file 'db.php'
Ahora vamos con el archivo 'db.php'
$DB = new PDO(
	'mysql:host=127.0.0.1;dbname=send_data',
	'root',
	''
);
This file contains the connection to MySql: and is stored in the variable '$ DB' it is a connection by the method 'PDO' that receives 3 parameters as can be denoted in the example, the important ones are the second parameter and the third that must be your data in MySql, by default the user is 'root' without password
Este archivo contine la conección a MySql: y se almacena en la variable '$DB' es una conección por el metodo 'PDO' que recive 3 parametros como se puede denotar en el ejemplo, los importante es el segundo parametro y el tercero que deben ser tus datos en MySql, por defecto el usuario es 'root' sin contraseña
Let's go with the Index.view.php: it's basically html tags and a bit of php
Vamos con el Index.view.php: es básicamente etiquetas html y un poco de php
The head should look like this, it contains the UTF-8 encoding, a meta tag that provides us with boostrap, the link tag that links the boostrap styles in my case I have it locally, and the title tag that will be the title that goes in the browser tab
El head debe quedar así, contiene la codificacion UTF-8, una etiqueta meta que nos proporcina boostrap, la etiqueta link que enlaza los estilos de boostrap en mi caso lo tengo de forma local, y la etiqueta title que será el titulo que va en la pestaña del navegador
<head>
	<meta charset="UTF-8">
	<meta name="viewport" content="width=device-width, initial-scale=1, shrink-to-fit=no">
	<link rel="stylesheet" href="bootstrap.min.css">
	<title>Registration</title>
</head>
The body would look like this, everything will be inside a card, which will have the boostrap classes, in the 'card-header' goes the title, in this case it is "to subcribe", in the card body will be the form that will have the attributes : action = "" where the form will be sent, method = "" is the sending method in this case it will be the "POST" method, inside there will be 3 inputs, the first one of type "text" with the name = "" user with placeholdes = "" Name user, the second one of type password = "" with the name = "" password with the placeholder = "" Password, the third one of type password with the name = "" r-password with the placeholder = "" Repeat Password, each input will have its class = "" that boostrap provides us, the part of the name = "" is very important because that way we will validate them with php, and finally an input of type submit with the value "SEND "and the name =" "submit also with classes provided by boostrap, and finally the card-footer, which will have some php validations that we will show after submitting the par form to show error or success messages
El body se vería así, todo estará dentro de una card, que tendrá las clases de boostrap, en el 'card-header' va el titulos es este caso es "to subcribe", en el card body estará el formulario que tendrá los atributos: action="" a donde se enviará el formulario, method="" es el metodo de envío en este caso será el metodo "POST", dentro estará 3 inputs el primero de tipo "text" con el name="" user con placeholdes="" Name user, el segundo de tipo password="" con el name="" password con el placeholder="" Password, el tercero de tipo password con el name="" r-password con el placeholder="" Repeat Password, cada input tendrá sus class="" que nos proporciona boostrap, es muy importatnte la parte de los name="" por que de esa forma los validaremos con php, y por ultimo un input de tipo submit con el value "SEND" y el name="" submit tambien con clases que nos proporcina boostrap, y por ultimo el card-footer, que tendrá unas validaciones php que las mostraremos despues de enviar el formulario para mostrar mensajes de error o de exito
<div class="card col-6 m-auto mt-5">
	<div class="card-header bg-dark text-light lead">
		to subscribe
	</div>
	<div class="card-body shadow-lg">
		<form action="index.php" method="POST" class="px-5 d-flex flex-column">
			<input type="text" class="form-control my-2 rounded-0 shadow-none" placeholder="Name user" name="user">

			<input type="password" class="form-control my-2 rounded-0 shadow-none" placeholder="Password" name="password">

			<input type="password" class="form-control my-2 rounded-0 shadow-none" placeholder="Repeat Password" name="r-password">

			<input type="submit" value="SEND" name="submit" class="btn btn-dark rounded-0">
		</form>
	</div>
	<div class="card-footer">
		<?php if(!empty($danger)): ?>
			<div class="alert alert-danger text-center">
				<?php echo $danger ?>
			</div>
		<?php elseif (!empty($success)): ?>
			<div class="alert alert-success text-center">
				<?php echo $success; ?>
			</div>
		<?php endif; ?>
	</div>
</div>

Now we go with the logic of the form, the index.php: first we include the file 'db.php' with the connection to mysql, then we validate that it receives the POST method with its value "submit" which is the name = "" that it We gave the input of type submit, then we store the variables the user, password, and r-password, which are the data that we receive from the form, now we validate that it has values if it does not have values, we show an error message, if it has value now we validate that both passwords are the same, if they are not the same it shows the error message, but if they are the same it executes the send to mysql with the prepare method that is given to the database connection, we execute the request and for Last we show a Success message and at the end of everything we include the index.view.php file
Ahora vamos con la lógica del formulario, el index.php: primero incluimos el archivo 'db.php' con la conección a mysql, luego validamos que reciva el metodo POST con su valor "submit" que es el name="" que le dimos al input de tipo submit, luego almacenamos el las variables el user, password, y r-password, que son los datos que recivimos desde el formulario, ahora validamos que tenga valos si no tiene valos, mostramos un mensaje de error, si tiene valor ahora validamos que ambas contraseñas sean iguales, si no son iguales muestra el mensaje de error, pero si son iguales ejecuta el envía a mysql con el metodo prepare que se le dá a la conección de la base de datos, ejecutamos la petición y por ultimo mostramos un mensaje de Exito y al final de todo incluimos el archivo index.view.php
include('db.php');
if (isset($_POST['submit'])) {

	$user = $_POST['user'];
	$password = $_POST['password'];
	$r_password = $_POST['r-password'];

	if (!empty($user) && !empty($password) && !empty($r_password)) {

		if ($password == $r_password) {
			$query = $DB->prepare("INSERT INTO data VALUES(
				1,
				'$user',
				'$password'
			)");

			$query->execute();
			$success = 'Subscription Successting!';
		} else{
			$danger = '< b >ERROR< /b >: the password not coincidence';
		}
	} else{
		$danger = '< b >ERROR< /b >: to owe complete all inputs';
	}
}
include('index.view.php');
And so we have everything ready we can test and see the various results:
Y así tenemos todo listo podemos probar y ver los diversos resultados:

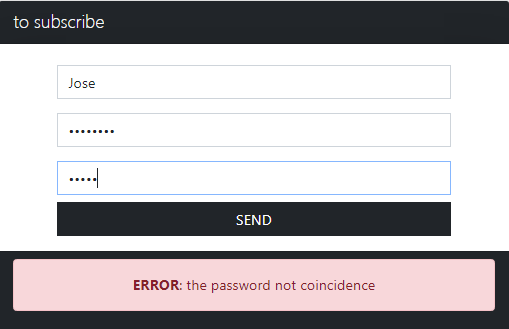

In this way we have a connection with MySql, we send data to MySql with php and we validate it, it is a very simple way to do it but it is still a good practice
De estaforma tenemos una conección con MySql, enviamos datos a MySql con php y lo validamos, es una forma muy sencilla de hacerlo pero no deja de ser una buena practica
And well that was all for now, I thank you for having read my tutorial, I hope you have understood and it has worked for you, you can see the source code on my Github, and you can follow me on instagram
Y bueno eso fue todo por ahora, les agradesco por aver leido mi tutorial, espero hayan entendido y les haya funcionado, pueden ver el codigo fuente en mi Github, y pueden seguirme en instagram

Github: code
Instagram: Instagram
Without more to say, my name is José Sojo and we will read each other in the next
Sin más que decir, mi nombre es José Sojo y nos leemos en la proxima
Congratulations @josesojo! You have completed the following achievement on the Hive blockchain and have been rewarded with new badge(s) :
Your next target is to reach 300 upvotes.
You can view your badges on your board and compare yourself to others in the Ranking
If you no longer want to receive notifications, reply to this comment with the word
STOPCheck out the last post from @hivebuzz:
Support the HiveBuzz project. Vote for our proposal!