English
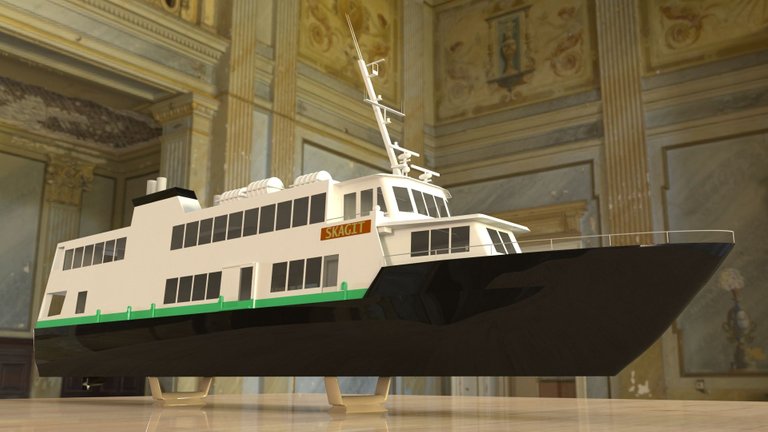
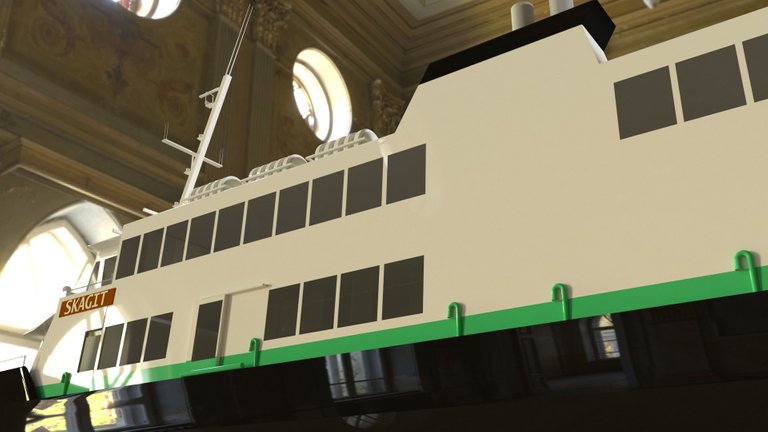
Hi everyone. In this publication I present to you the 3d model of the MV Skagit, a boat born in the USA and which rendered its last services in Tanzania, East Africa. Like the models already published, I have modeled this ship with Maya Autodesk and as a rendering engine I have used Vray. In the same way, I have implemented, as a lighting method, the light image method as it is the one that can provide the most realism to the final work, this system works with an HDRI image and this time I have chosen Sergej Majboroda's "Old Hill" which you can get for free at Poly Haven.
Español
Hola a todos. En esta publicación les presento el modelo 3d del MV Skagit, una embarcación nacida en USA y que prestó su última hoja de servicios en Tanzania, África Oriental. Al igual que las maquetas ya publicadas, he modelado esta nave con Maya Autodesk y como motor de render he utilizado Vray. De la misma manera he implementado, como método de iluminación, el de imagen de luz por ser el que mayor realismo puede proporcionar al trabajo definitivo, este sistema funciona con una imagen HDRI y en esta oportunidad he escogido la de “Old Hill” de Sergej Majboroda y que pueden conseguir de manera gratuita en Poly Haven.
However, the Skagit was a passenger ferry that, like its twin brother, the Kalama, served between Tanzania and the islands that border that country. One of the characteristics of these countries is the growth that maritime transport has had in terms of the movement of people, but, at the same time, such a boom has been accompanied by the negligence and permissibility of its authorities in complying with the maritime regulations, which has led to the presence of scourges harmful to safety on the high seas. One of the most prominent is the overload of passengers, which has contributed to the sinking of many ships and the loss of hundreds of lives.
Ahora bien, el Skagit, era un ferry de pasajeros que al igual que su hermano gemelo, el Kalama, prestaba sus servicios entre Tanzania y las islas que bordean dicho país. Una de las características de estos países es el crecimiento que ha tenido el transporte marítimo en lo que al traslado de personas se refiere, pero, al mismo tiempo, tal auge ha estado acompañado de la decidía y permisibilidad de sus autoridades en el cumplimiento de las normas marítimas lo que ha propiciado la presencia de flagelos lesivos a la seguridad en alta mar. Uno de los más destacados es la sobrecarga de pasajeros lo que ha coadyuvado en el naufragio de muchos barcos y la pérdida cientos de vidas.
In the afternoon the ship began its journey. Despite the fact that it was crowded with passengers, who occupied all the corridors, stairs and other common areas, he sailed most of the route without problem until he was greeted by a strong storm in the vicinity of Zanzibar Island.
El 18 de julio de 2012, el Skagit, una nave con una capacidad máxima de 230 pasajeros había sido abordado por un total de 290 en el puerto de Dar es Salaam. Tenía como destino la isla de Zanzibar.
En horas de la tarde el barco inició su viaje. Pese a que estaba abarrotado de pasajeros, los cuales ocupaban todos los pasillos, escaleras y demás áreas comunes, navegó sin problema la mayor parte del recorrido hasta que ya en las propias adyacencias de la isla Zanzibar fue recibido por una fuerte tormenta.
The big waves and strong winds coupled with the poor maneuverability of an overloaded ship determined the abrupt end of the trip. A few minutes later the ship ended up overturning. 104 people lost their lives in an event in which the greed of a shipping company and the lack of authority exposed the malfunction of maritime transport in Tanzania.
Las grandes olas y los fuertes vientos aunado a la escasa maniobrabilidad que presentaba un barco sobrecargado determinaron el brusco final del viaje. Pocos minutos después la nave terminaba por volcarse. 104 personas perdieron la vida en un hecho en el que la avaricia de una naviera y la falta de autoridad pusieron en evidencia el mal funcionamiento del transporte marítimo en Tanzania.
Now, returning to our 3d modeling lessons we will talk about two tools, “Parent” and “Mirror”. In one of our last lessons we talked about the “Combine” tool that is used to make Maya recognize several objects as one, something very appropriate for the case of ship modeling since these are made up of multiple components. However, this process consumes system resources and the union of all the elements takes some time depending on the complexity of the objects to be grouped and the speed of the CPU (in specific cases the materials can move and certain textures can malfunction once the combination has taken place). I must confess that it is the option that I have been implementing until recently. To avoid possible problems and not put the system to suffer, Maya gives us another option that works with results that are somewhat similar to the "grouping" functions in 3d Max or ordering the hierarchy of objects in Cinema 4d. This tool is known as “Parent” and in this case it consists of ranking one or more objects (children) in relation to one that will be the main one (father).
Ahora bien, retomando nuestras lecciones 3d hoy hablaremos de dos herramientas, “Parent” y “Mirror”. En una de nuestras lecciones pasadas hablábamos de la herramienta “Combine” que se utiliza para hacer que Maya reconozca varios objetos como uno sólo, algo muy apropiado para el caso del modelado de barcos que se conforman de múltiples componentes. No obstante, este proceso consume recursos del sistema y la unión de todos los elementos se lleva cierto tiempo dependiendo de la complejidad de los objetos a agrupar y la velocidad de la CPU (en casos puntuales los materiales pueden correrse y ciertas texturas pueden funcionar mal en el resultado final). Debo confesar que es la opción que yo he venido implementado hasta hace poco. Para evitar sus posibles problemas y no poner el sistema a sufrir, Maya nos da otra opción que trabaja con resultados algo similares a las funciones de “agrupar” en 3d Max o la de ordenar la jerarquía de los objetos en Cinema 4d. Esta herramienta se conoce como “Parent” y en este caso consiste en jerarquizar uno o varios objetos (hijos) en relación a uno que será el principal (padre).
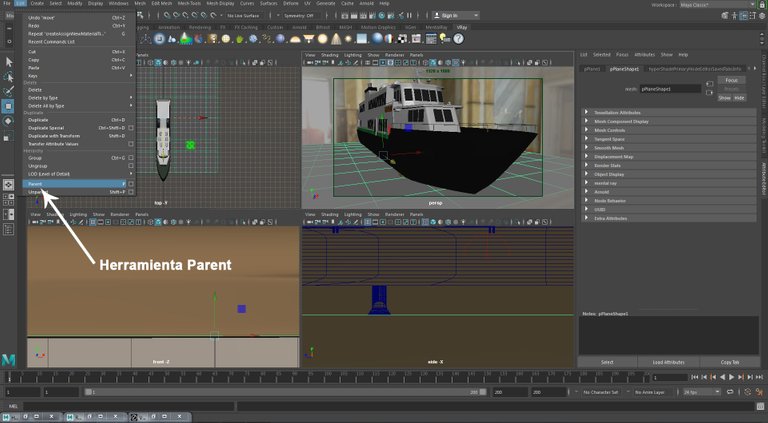
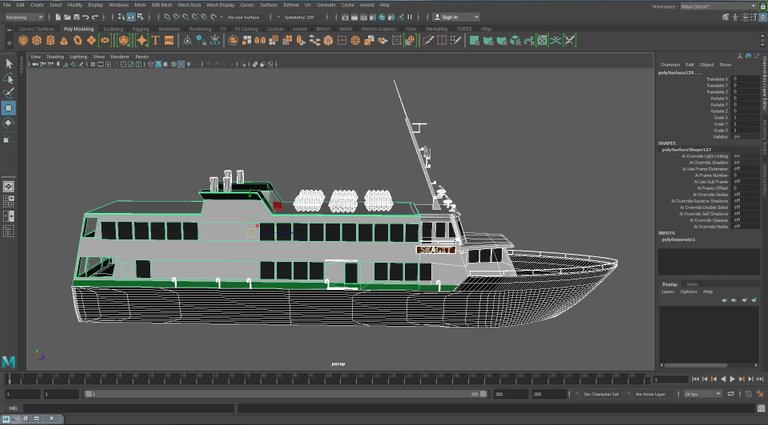
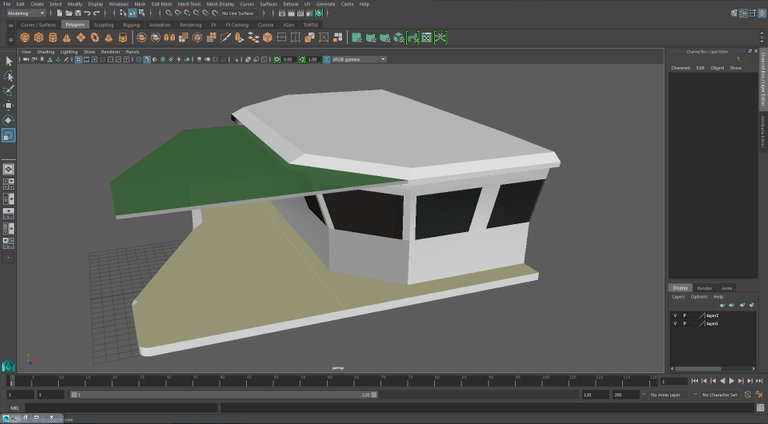
In our boat the elements that make it up are independent. In the following image you can see that only the lower part of the helmet is selected, so we will not be able to move the complete object from one place to another unless we select all the elements that make it up, which would not work if we want, for example, cheer him up.
En nuestro barco los elementos que lo conforman son independientes. En la siguiente imagen pueden ver que sólo está seleccionada la parte inferior del casco, por lo que no podremos trasladar el objeto completo de uno a otro lugar a menos que seleccionemos todos los elementos que lo conforman, lo que no funcionaría si queremos, por ejemplo, animarlo.
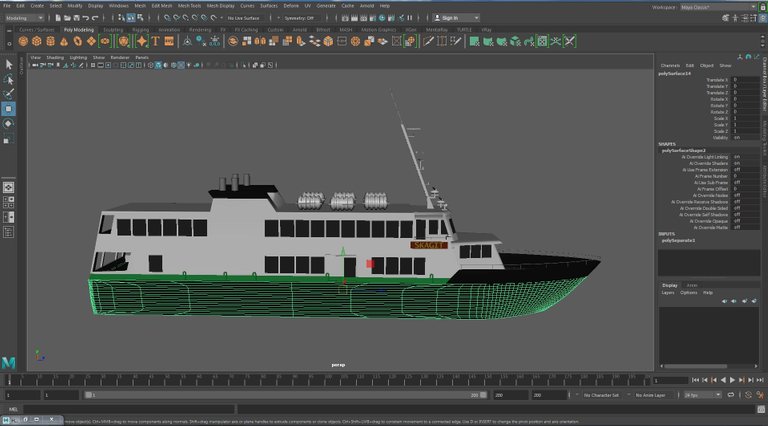
As a solution we are going to make all the elements of the ship depend on the possible movement of another that we will take as the main one. In our boat we will choose the largest white part of the hull as the main one.
Como solución vamos a hacer que todos los elementos del barco dependan del posible movimiento de otro que tomaremos como principal. En nuestro barco elegiremos como principal la parte blanca más grande del casco.
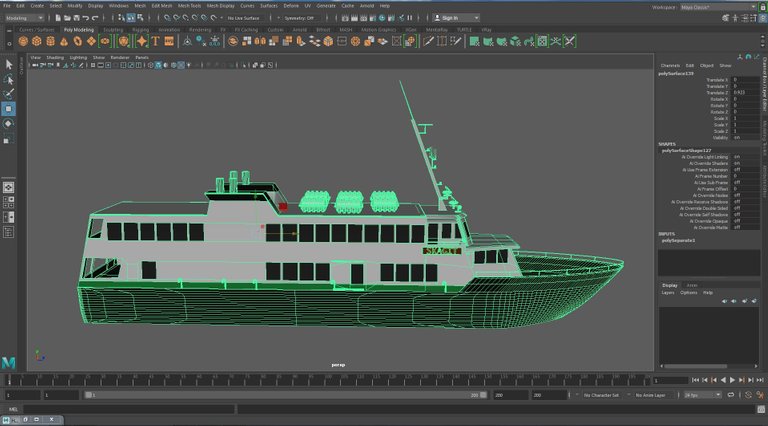
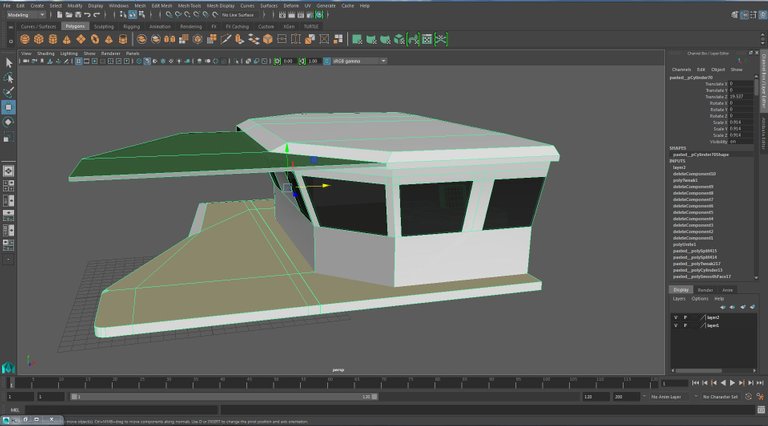
But to apply the tool we must first select all the other elements of the ship and lastly the main one. In the following image you can see the selection of the main element in green and the secondary elements in white.
Pero para aplicar la herramienta debemos seleccionar primero todos los otros elementos del barco y por último el principal. En la siguiente imagen pueden apreciar en verde la selección del elemento principal y el blanco los secundarios.
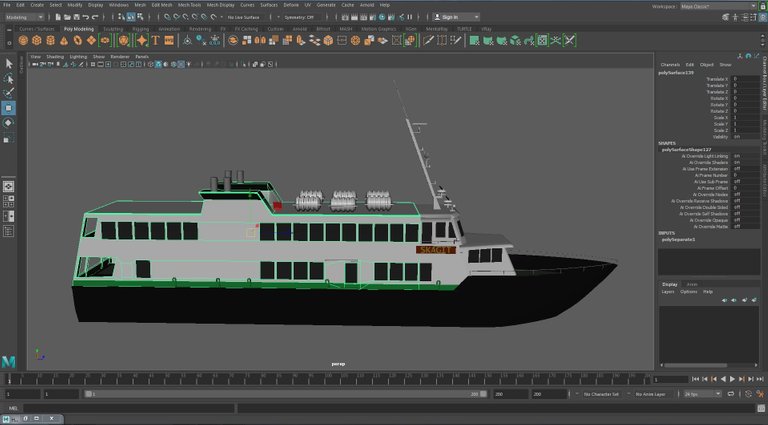
Now we are going to apply the “Parent” tool and thus we will have all the elements subject to the white hull of the ship so that by selecting the latter we will be selecting all the ship's components, and the movement we make of it will be followed by all the others.
Ahora vamos a aplicar la herramienta “Parent” y así tendremos todos los elementos supeditados al casco blanco del barco de manera que al seleccionar este último estaremos seleccionando todos los componentes de la nave, y el movimiento que hagamos de aquel será seguido por todos los demás.
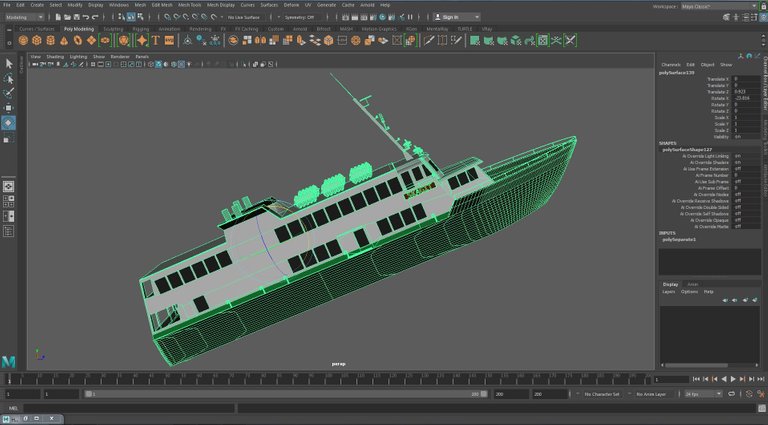
But if we select any of the other components we cannot move the ship and that element will be the only thing that will move.
Pero si seleccionamos cualquiera de los otros componentes no podremos mover el barco y ese elemento será lo único que se moverá.
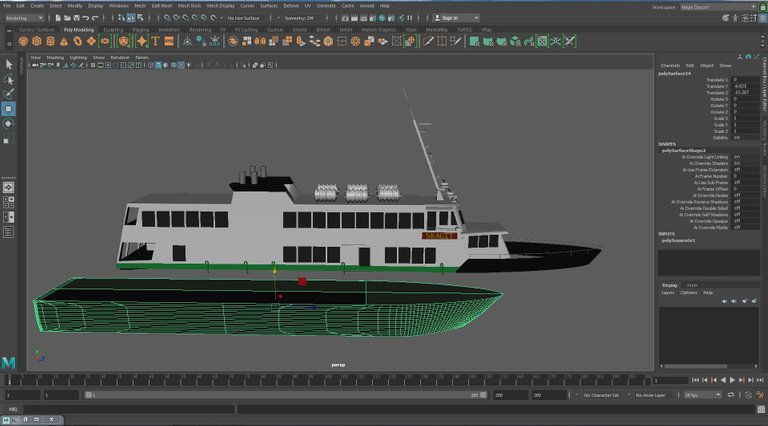
So to move the object in its entirety we must go to the component that we have chosen as the main component.
Another tool that we are going to use frequently is going to be “Mirror” and, as its name implies, it is going to create a mirror image of an object. For example, when we model a ship, we don't really do the modeling of the whole but of the half and with the mirror tool we make a geometry projection, something that we already put into practice in the post where we modeled the “Princes Of The Orient”. And it is common to use it in all objects that can be divided into two halves and which cannot be supplanted by duplicating one of them. For example, if in a modeling we require two similar rectangles, duplicating the first one will be enough. But when the modeling becomes more complex we will require a duplicate more than once, which must be a mirror mode of another object. In the following image we have the right section of the command bridge of a ship.
De manera que para mover el objeto en su totalidad debemos ir al componente que hemos escogido como principal.
Otra de las herramientas que vamos a utilizar frecuentemente va a ser la de “Mirror” y, como su nombre lo indica, va a crearnos una imagen en espejo de un objeto. Por ejemplo, cuando modelamos un barco, realmente no hacemos el modelado del todo sino de la mitad y con la herramienta mirror hacemos una proyección de geometría, algo que ya pusimos en práctica en el post donde modelábamos el “Princes Of The Orient”. Y es común utilizarla en todos los objetos que pueden dividirse en dos mitades y las cuales no pueden ser suplantadas al duplicar una de ellas. Por ejemplo, si en un modelado requerimos de dos rectángulos similares, con duplicar el primero será suficiente. Pero cuando el modelado se hace más complejo requeriremos más de una vez de un duplicado que en realidad deberá ser un modo espejo de otro objeto. En la siguiente imagen tenemos la sección derecha del puente de mando de un barco.
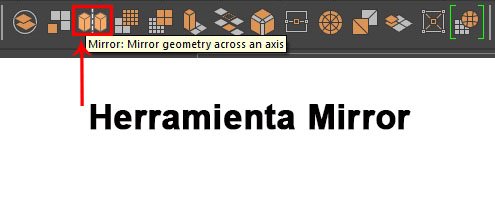
As you can see, we need another similar object, but in mirror mode to complete our work since the simple duplicate will create another right part and that is not what we need. To do this we will select what we have of our bridge and we will go to the “Mirror” tool.
Como podría apreciarse, necesitamos otro objeto similar, pero en modo de espejo para culminar nuestro trabajo puesto que el simple duplicado nos creará otra parte derecha y no es eso lo que necesitamos. Para ello seleccionaremos lo que tenemos de nuestro puente y nos iremos a la herramienta “Mirror”.
This way we will have the left part of our command bridge.
Así tendremos la parte izquierda de nuestro puente de mando.

It should be noted that to use this tool in objects with multiple components we must first convert them into a whole with the “Combine” tool whose implementation we have already explained in previous posts.
And that have been all. If you have followed my post here, I must tell you that I am deeply grateful. I invite you to see my next 3d modeling post in which we will be revealing the operation of other tools in this exciting world.
Debe resaltarse que para usar esta herramienta en objetos con múltiples componentes debemos previamente convertirlos en un todo con la herramienta “Combine” cuya implementación ya hemos explicados en post anteriores.
Y eso ha sido todo. Si han seguido mi post hasta aquí debo decirles que estoy profundamente agradecido. Les invito a ver mi próximo post de modelado 3d en el que estaremos develando el funcionamiento de otras herramientas de este apasionante mundo.

Good job.
Muchas Gracias por ver y comentar!!!!!
Congratulations @exilon! You have completed the following achievement on the Hive blockchain and have been rewarded with new badge(s):
Your next target is to reach 300 upvotes.
You can view your badges on your board and compare yourself to others in the Ranking
If you no longer want to receive notifications, reply to this comment with the word
STOPTo support your work, I also upvoted your post!
Check out the last post from @hivebuzz:
Hola, amigo @exilon
Fantástica publicación.
El crear imágenes en 3D genera un gran trabajo.
Te felicito, pues se nota tu destreza en el uso de las herramientas de este tipo de programas.
Me encantó.
Muchas Gracias por tu comentario y tu apoyo, se agradece un montón. Y es que el modelado 3d tiene mucho para dar. Y es algo que te entretiene tanto que cuando te sientas a modelar se te olvida todo lo demás y, en mi caso, tengo que estar pendiente de hacer las capturas para los post porque sinó termino el modelado sin haber hecho las fotografías, jejejeje. Gracias por tu apoyo. Saludos
Su post ha sido valorado por @goya
Muchas Gracias!!!!!!