Introduction
Hail adventurers! For those of us who love the realms of fantasy, whether it's through art, gaming, or epic tabletop adventures like Dungeons and Dragons, there's something undeniably exciting about creating our own fantasy gear💪⚔️!
In this guide, we'll take you through the thrilling process of drawing and painting a formidable shield, perfect for facing off against goblins 👹 and vermin 🐀. Let's unleash our creative powers and embark on this artistic quest together!
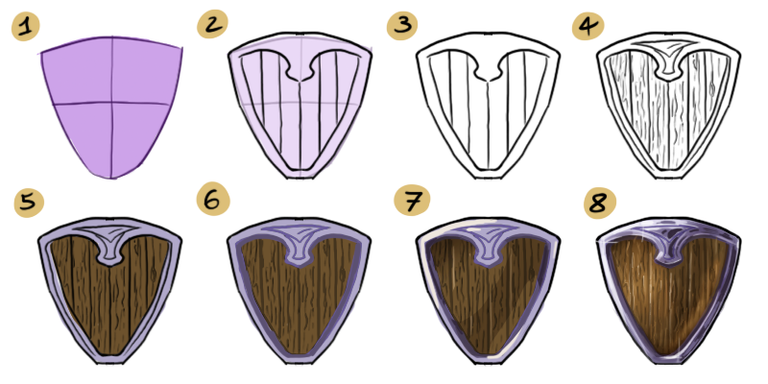
Step 1: The Pencil's First Strokes
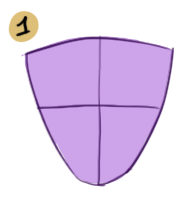
The journey begins with the simplest of steps. Grab your trusty pencil and let it glide across the paper. Don't overthink it; just let your instincts guide your hand. Create a basic shape that resembles a wooden shield. This is your canvas, and you are the adventurer seeking to forge a masterpiece.
Step 2: Reinforce with an Iron Will
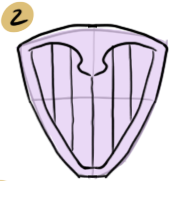
In a world filled with menacing creatures like goblins, a basic wooden or leather shield may not suffice. To fortify your shield, draw an iron frame around it. Use the initial shape as your guide, and sketch the iron frame atop it. This addition not only strengthens your shield but also gives it a rugged, battle-worn charm.
Step 3: Revealing the True Beauty
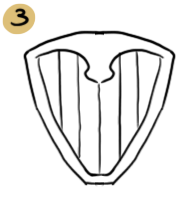
Now that you've fortified your shield, it's time to remove the basic shape. Let the true essence of your creation shine through. You're left with a robust, battle-ready canvas, eagerly awaiting your artistic touch.
Step 4: Adding Texture and Detail
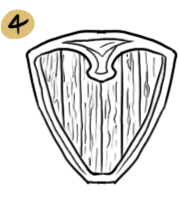
Wood has a unique texture, and iron can be adorned with carvings and patterns. To breathe life into your shield, draw thin lines on the wooden planks to simulate the grain. Carve intricate designs into the iron frame, making it more captivating. This step will serve as the foundation for your final masterpiece! We call it the lineart. It's also ready for a coloring book, folks!
Step 5: Embrace the Colors of Battle
With the lineart complete, it's time to bring your shield to life. Apply base colors that reflect the materials you've chosen. Paint the wood with a warm, rustic brown and the iron frame with a regal purple-ish silver. As the colors blend, your shield begins to take shape, ready for the battlefield.
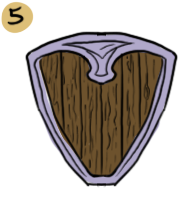
Step 6: Mastering Shadows and Outlines
While the black lines within the shield looked impressive in your lineart, it's time to refine them. Maintain the bold, thick black outline on the shield's perimeter, but for the interior lines, choose slightly darker shades than your base colors. This subtle adjustment adds depth and realism to your creation.
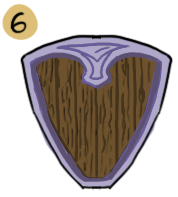
Step 7: Harnessing the Power of Light
Imagine the source of light as coming from the northwest. Highlight the parts of your shield that face this direction, adding brilliance to the iron rim and wooden surface. Conversely, cast shadows on the areas that are shielded from the light, giving your shield a three-dimensional quality. Additionally, add a touch of reflective light to the far-right edge for extra dimension.
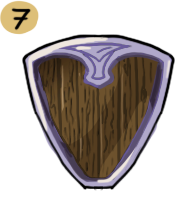
Step 8: The Final Flourish
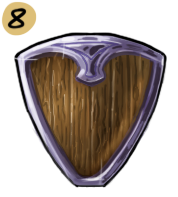
To truly make your shield pop, embellish it with finer details. Enhance the wooden grains and iron parts that catch the light with extra highlights. Darken the shadows to give depth to the areas in the shade. This meticulous attention to detail ensures that your shield is a true work of art.
And there you have it! Here's a quick summary of what we accomplished today:
Awright! 😊 I hope you managed to draw or maybe even paint your first shield!! Do share your design in the comments or tag me in your post if you decide to share it with the group! Fierce battles await and I wanna make sure you're ready to take on your foes! 😜
If you like tutorials like this, be sure to give me a thumbs up so I know this is something you wanna see.
P.S. This is an HIVE-Only Tutorial!! This means you're all signed up for some exclusive tips and tricks you can't find anywhere else! =)
Niiiiiice!!! Wanna see more of these tutorials! ⚔️🛡️🏰🐉👑
Sweet!! I'm planning on a whole series of HIVE-exclusive art tutorials! Hope folks enjoy the content! Let`s go! =)
Congratulations @lourencoalart! You have completed the following achievement on the Hive blockchain And have been rewarded with New badge(s)
Your next target is to reach 50 replies.
Your next target is to reach 50 upvotes.
You can view your badges on your board and compare yourself to others in the Ranking
If you no longer want to receive notifications, reply to this comment with the word
STOPTo support your work, I also upvoted your post!
Check out our last posts: