Realistic characters
Imagination must be cultivated and protected, it must be fed and sometimes even questioned to make it grow. Through it the very substance of the world can be at our disposal.
The most important thing is never to stop.
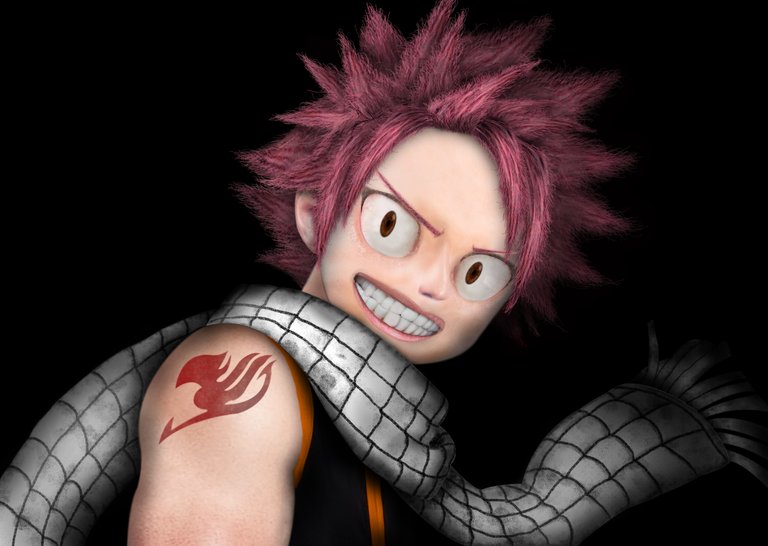
This project is part of the series of realistic reinterpretations of manga characters (comics in Japanese culture). As always, not only for a matter of personal taste but also for the intent to make the character as recognizable and iconic as possible, I chose one of the protagonists of a well-known manga/soul: Natsu Dragneel (FAIRY TAIL).
In each project I have always tried to choose starting images that were more and more complex and that showed more and more body parts, so that I could test myself with new elements and techniques.
The work has been entirely realized through the Photoshop program and has been divided into 3 different phases:
PHASE 1: Modeling
The first thing to do to produce a work of this kind is to create a "skeleton" (base) from which you can then start to enter the details.
In this case the base is formed by: face, body, clothing.
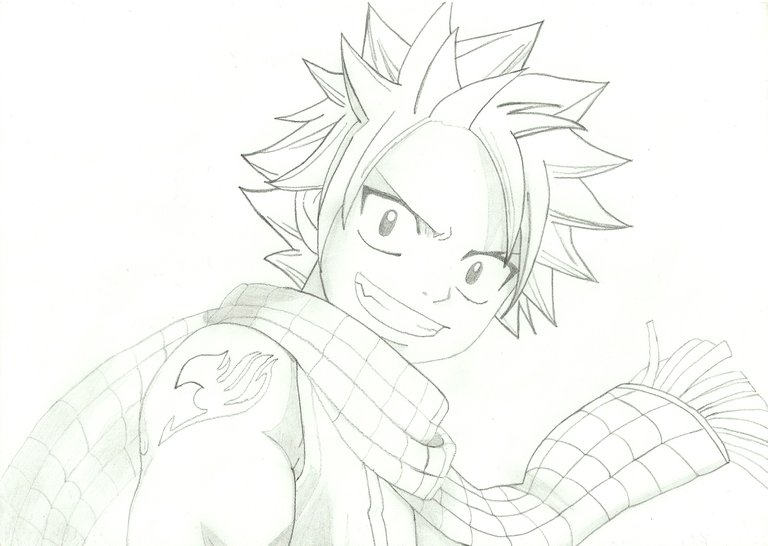
After inserting the basic image downloaded from the internet, cleaning it and making it transparent leaving only the outline visible, I started to insert the various elements.
Each element is selected from different images, cropped, modeled with the "altera" tool, post-produced and finally faded to join it as realistically as possible to the others.
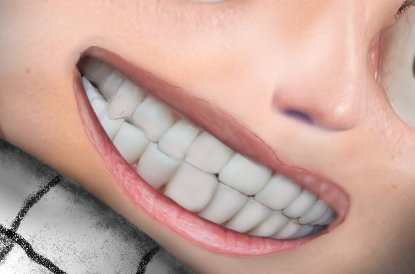
As always, the first element from which I recommend starting, immediately after the basic skin, is the mouth.
This choice is due to the fact that the mouth is not only one of the most complex elements to realize, but once finished it will give you a definite vision of the complete work right away.
The next element that I have inserted, following the logic, is the nose.
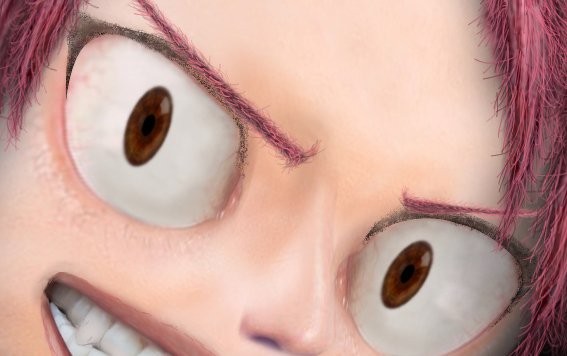
Later I realized the eyes.
For this particular work I found an extremely versatile basic photo, which allowed me to drastically increase the visual performance and details of the eyes.
PHASE 2: Details
Once I finished the modeling, I focused on the details.
Elements such as eyelashes, eyebrows, black eye markings and hair were simple but extremely satisfying to make.
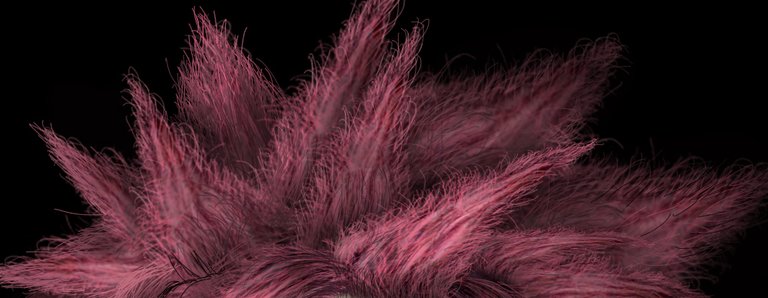
I was able to give your hair an extremely plastic rendering, through the superimposition of each strand and the processing of each one.
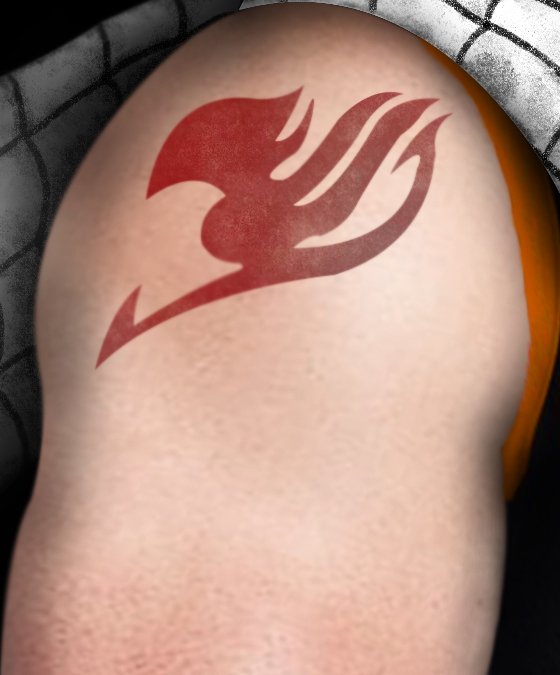
There are several methods for the tattoo making that could give a realistic rendering.
I decided to create it by duplicating a part of the arm, applying the outline of the tattoo and then inserting the color using a rough and dirty brush.
The scarf was certainly the most interesting element to realize because, due to several failed attempts to insert cut-out images, I decided to realize it entirely through the use of brushes. From close up this detail becomes very visible but at the right distance the scarf becomes extremely plastic and quite realistic.
PHASE 3: Shadows and lights
Once the details are finished the last thing to do is to insert shadows and lights, which will greatly contribute to give the character a three-dimensional and realistic look.

In this case I decided to use a black background to bring out the hair and scarf.
Personaggi realistici
La fantasia va coltivata e protetta, bisogna nutrirla e a volte anche metterla in discussione per farla crescere. Attraverso essa la sostanza stessa del mondo può essere a nostra disposizione.
La cosa più importante è non fermarsi mai.
Questo progetto fa parte della serie delle rivisitazioni realistiche dei personaggi dei manga (fumetti nella cultura giapponese). Come sempre, non solo per una questione di gusti personali ma anche per l'intento di rendere il personaggio più riconoscibile ed iconico possibile, ho scelto uno dei protagonisti di un manga/anime molto conosciuto: Natsu Dragneel (FAIRY TAIL).
In ogni progetto ho sempre cercato di scegliere immagini di partenza sempre più complesse e che mostrassero sempre più parti del corpo, così da potermi mettere alla prova con elementi e tecniche nuove.
Il lavoro è stato interamente realizzato attraverso il programma Photoshop ed è stato suddiviso in 3 fasi differenti:
FASE 1: Modellazione
La prima cosa da fare per produrre un lavoro di questo tipo è creare uno "scheletro" (base) dal quale poi partire per inserire i dettagli.
In questo caso la base è formata da: viso, corpo, abbigliamento.
Dopo aver inserito l'immagine di base scaricata da internet, averla pulita e resa trasparente lasciando visibile solo il contorno, ho iniziato ad inserire i vari elementi.
Ogni elemento viene selezionato da immagini diverse, ritagliato, modellato con lo strumento "altera", post-prodotto ed infine sfumato per unirlo nel modo più realistico possibile agli altri.
Come sempre, il primo elemento da cui consiglio di partire, subito dopo la pelle di base, è la bocca.
Questa scelta è dovuta al fatto che la bocca non solo è uno degli elementi più complessi da realizzare, ma una volta conclusa vi darà sin da subito una visione definita del lavoro completo.
L'elemento successivo che ho inserito, seguendo la logica, è il naso.
Successivamente ho realizzato gli occhi.
Per questo particolare lavoro ho trovato una foto di base estremamente versatile, che mi ha permesso di aumentare drasticamente la resa visiva e dei dettagli degli occhi.
FASE 2: Dettagli
Una volta terminata la modellazione mi sono focalizzato sui dettagli.
Elementi quali ciglia, sopracciglia, marcature nere degli occhi e capelli sono stati semplici ma estremamente soddisfacenti da realizzare.
Sono riuscito a conferire hai capelli una resa estremamente plastica, attraverso la sovrapposizione di ogni singola ciocca e alla lavorazione di ognuna di esse.
Per la realizzazione del tatuaggio vi sono svariati metodi che potrebbero dare una resa realistica.
Io ho deciso di crearlo duplicando una parte del braccio, applicandovi la sagoma del tatuaggio e poi inserendo il colore utilizzando un pennello ruvido e sporco.
La sciarpa è stata sicuramente l'elemento più interessante da realizzare poiché, dovo svariati tentativi falliti di inserimento di immagini ritagliate, ho deciso di realizzarla interamente attraverso l'utilizzo dei pennelli. Da vicino questo particolare diventa molto visibile ma alla giusta distanza la sciarpa assume una resa estremamente plastica e abbastanza realistica.
FASE 3: Ombre e luci
Terminati i dettagli l'ultima cosa da fare è l'inserimento di ombre e luci, che contribuiranno notevolmente a dare al personaggio un aspetto tridimensionale e realistico.
In questo caso ho deciso di utilizzare uno sfondo nero per far risaltare i capelli e la sciarpa.
!discovery 35
This post was shared and voted inside the discord by the curators team of discovery-it
Join our community! hive-193212
Discovery-it is also a Witness, vote for us here
Congratulations @matteus57! You have completed the following achievement on the Hive blockchain and have been rewarded with new badge(s) :
You can view your badges on your board And compare to others on the Ranking
If you no longer want to receive notifications, reply to this comment with the word
STOPDo not miss the last post from @hivebuzz:
Support the HiveBuzz project. Vote for our proposal!