Realistic characters

*The trick to getting better is: never stop. Despite the mistakes, the failed attempts, the hours spent with no good results... never stop. Because if you stop, you give up, and if you give up, you'll never improve.
This project is part of the series of realistic reinterpretations of manga characters (comics in Japanese culture). As always, not only for a matter of personal taste but also for the intent to make the character as recognizable and iconic as possible, I chose one of the protagonists of a well-known manga/soul: Edward Elric (FULL-METAL ALCHEMIST).
In each project I have always tried to choose images that were more and more complex and that showed more and more body parts, so that I could test myself with new elements and techniques.
The work has been entirely realized through the Photoshop program and has been divided into 3 different phases:
PHASE 1: Modeling
The first thing to do to produce a work of this kind is to create a "skeleton" (base) from which you can then start to enter the details.
In this case the base is formed by: face, body, clothing, real arm and mechanical.
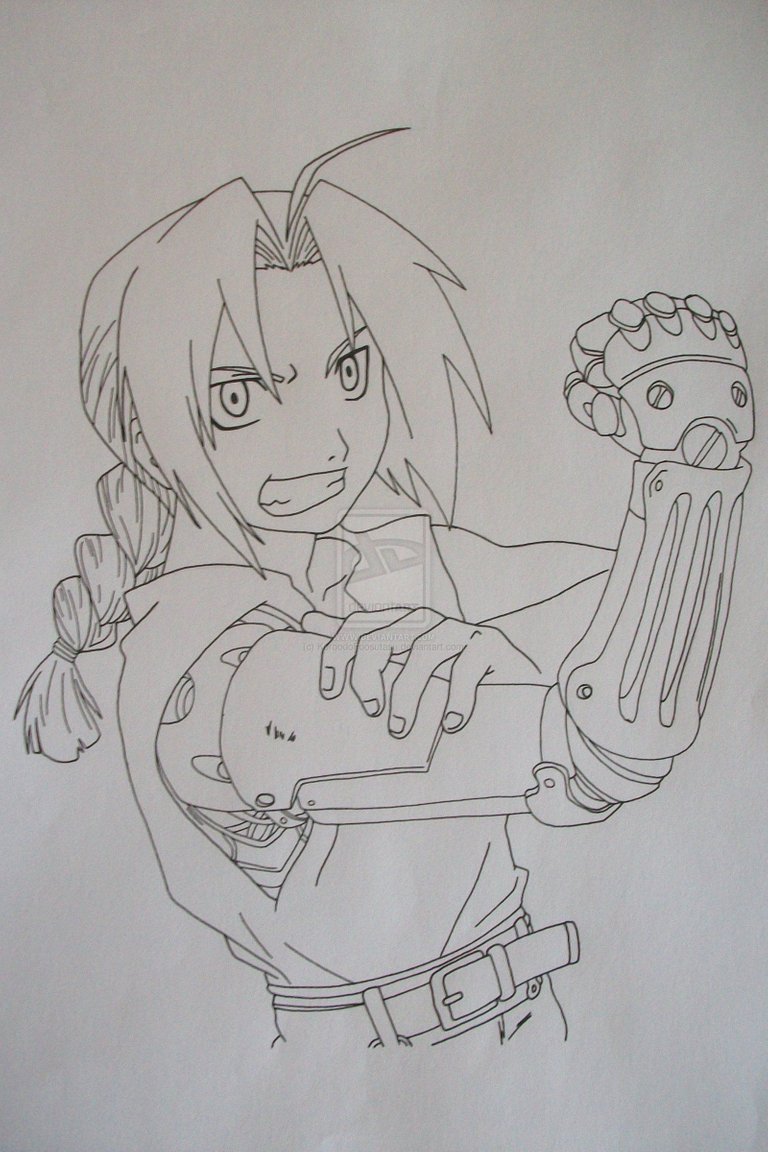
After having inserted the basic image downloaded from the internet, cleaned it and made it transparent leaving only the outline visible, I started to insert the various elements.
Each element is selected from different images, cut out, modeled with the "alter" tool, post-produced and finally faded to join it as realistically as possible to the others.
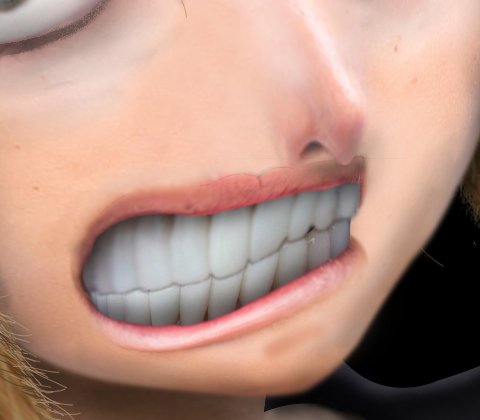
As always, the first element from which I recommend starting, immediately after the basic skin, is the mouth.
This choice is due to the fact that the mouth is not only one of the most complex elements to realize, but once finished it will give you a definite vision of the complete work right away.
The next element that I have inserted, following the logic, is the nose.
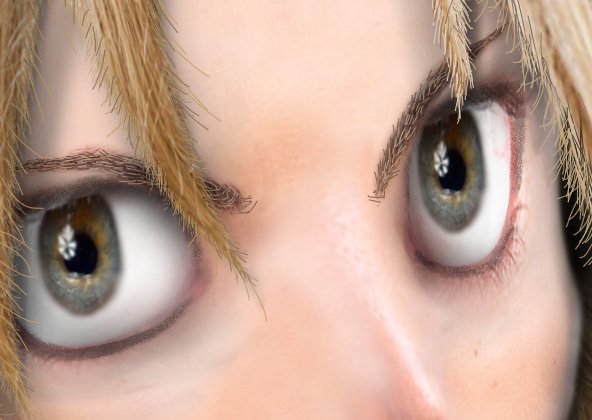
Later I realized the eyes.
For this work I used a basic image already used for previous works, this because, being very versatile and clean, it allowed me to drastically increase the visual and detail rendering of the eyes.
PHASE 2: Details
Once I finished the modeling, I focused on the details.
Elements such as eyelashes, eyebrows, black eye markings and hair were simple but extremely satisfying to make.
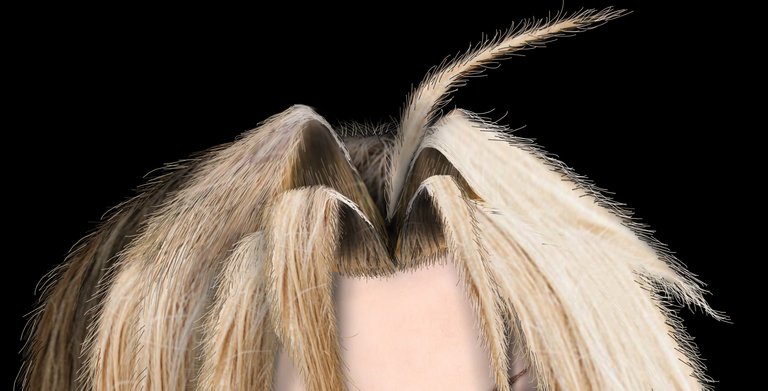
I was able to give your hair an extremely plastic rendering, through the superimposition of each strand and the processing of each one.
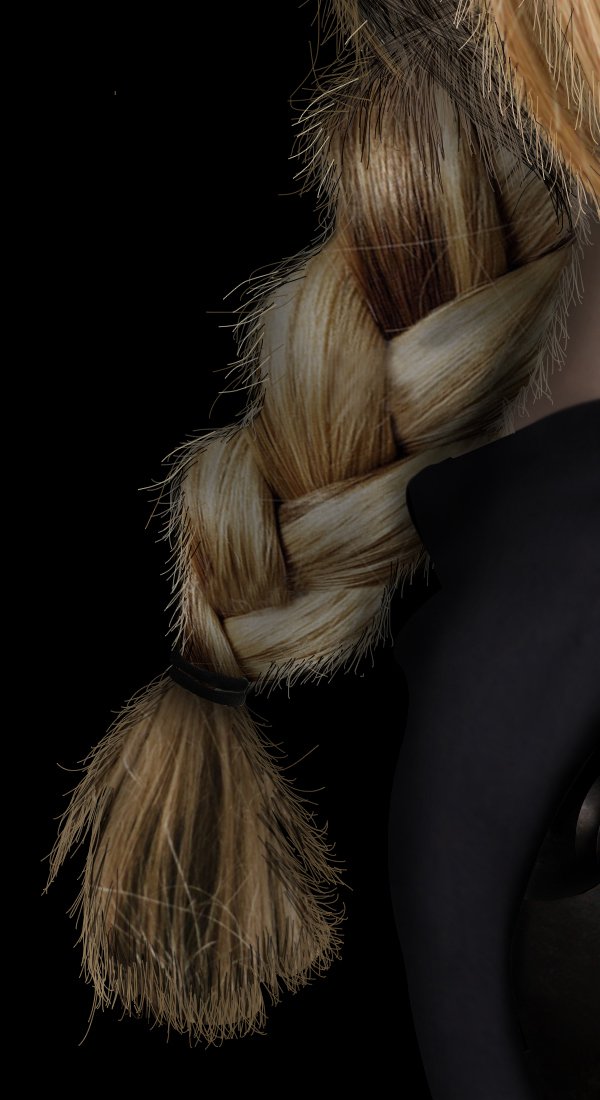
The tail was an interesting element to make, because being connected to the hair but placed in the background, it allowed me to experiment with shadows and blurs that could give the impression of greater depth.
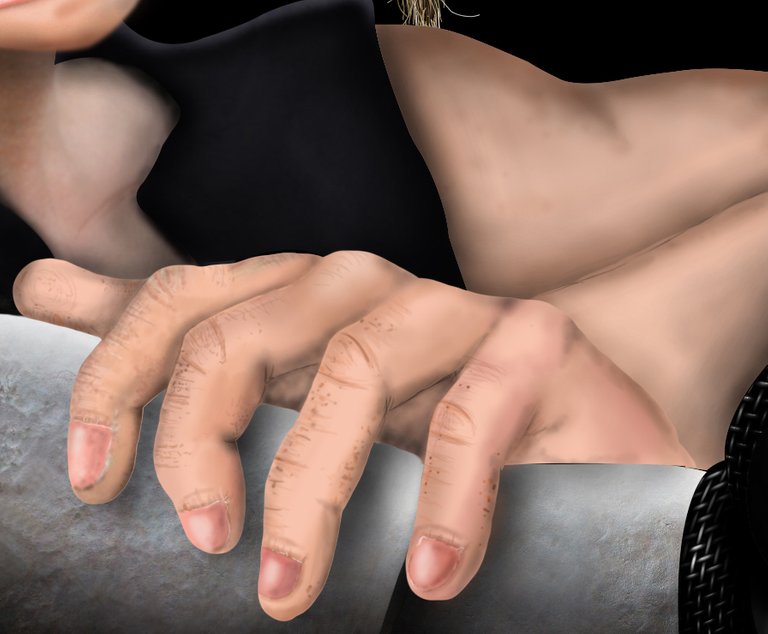
The left arm was a real feat: After several (failed) attempts to insert hands and arm parts created through photos taken from the internet, I decided to experiment a different method, that is the complete realization of this element through illustration or the use of brushes.
The final result is quite inaccurate and sketchy, but seen as a whole it acquires a yield that does not contrast at all with the rest of the project.
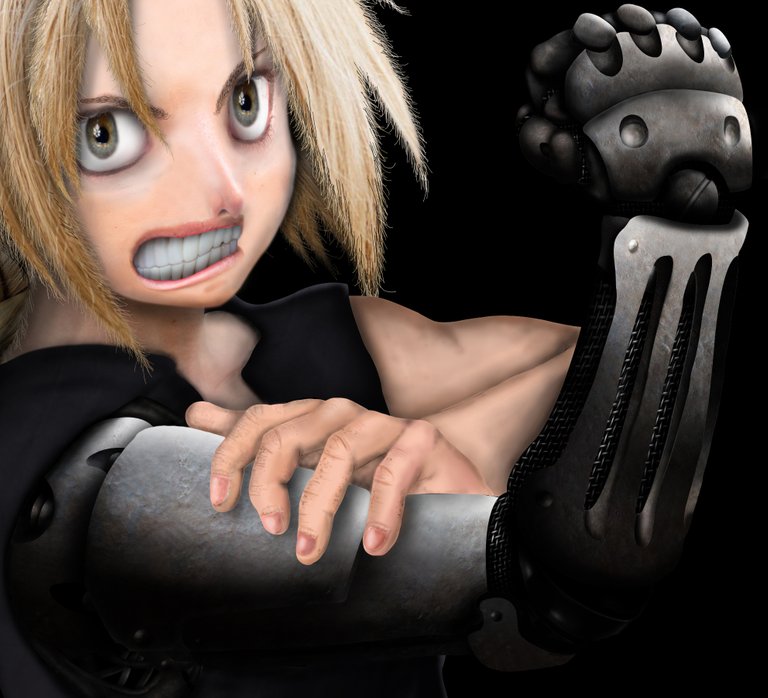
Surely the most challenging and interesting element to realize was the right arm: For the creation of this "mechanical limb" I used some flat textures taken from the internet, I cut them out, modeled them and made them realistic and three-dimensional through the use of light and shadow. To create this effect I duplicated each element 3 times, so to have an underexposed, overexposed and correctly exposed version, then through the use of masks I deleted and blurred the elements to create the areas in shadow and those exposed to light.
STEP 3: Shadows and lights
Once the details are finished the last thing to do is to insert shadows and lights, which will greatly contribute to give the character a three-dimensional and realistic look.
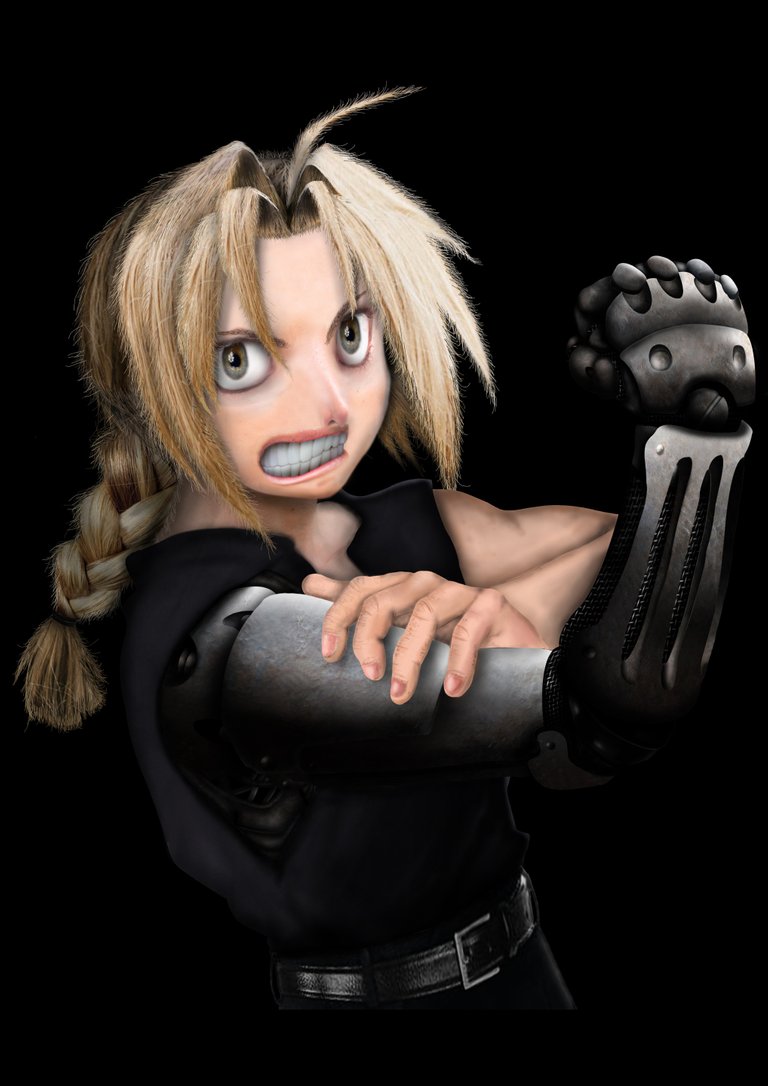
In this case I decided to use a black background to bring out the hair and the mechanical arm.
Personaggi realistici
Il trucco per riuscire a migliorare è: mai fermarsi. Malgrado gli errori, i tentativi falliti, le ore spese senza nessun buon risultato.. mai fermarsi. Perchè se ci si ferma ci si arrende, e se ci si arrende non si potrà mai migliorare
Questo progetto fa parte della serie delle rivisitazioni realistiche dei personaggi dei manga (fumetti nella cultura giapponese). Come sempre, non solo per una questione di gusti personali ma anche per l'intento di rendere il personaggio più riconoscibile ed iconico possibile, ho scelto uno dei protagonisti di un manga/anime molto conosciuto: Edward Elric (FULL-METAL ALCHEMIST).
In ogni progetto ho sempre cercato di scegliere immagini di partenza sempre più complesse e che mostrassero sempre più parti del corpo, così da potermi mettere alla prova con elementi e tecniche nuove.
Il lavoro è stato interamente realizzato attraverso il programma Photoshop ed è stato suddiviso in 3 fasi differenti:
FASE 1: Modellazione
La prima cosa da fare per produrre un lavoro di questo tipo è creare uno "scheletro" (base) dal quale poi partire per inserire i dettagli.
In questo caso la base è formata da: viso, corpo, abbigliamento, braccio reale e meccanico.
Dopo aver inserito l'immagine di base scaricata da internet, averla pulita e resa trasparente lasciando visibile solo il contorno, ho iniziato ad inserire i vari elementi.
Ogni elemento viene selezionato da immagini diverse, ritagliato, modellato con lo strumento "altera", post-prodotto ed infine sfumato per unirlo nel modo più realistico possibile agli altri.
Come sempre, il primo elemento da cui consiglio di partire, subito dopo la pelle di base, è la bocca.
Questa scelta è dovuta al fatto che la bocca non solo è uno degli elementi più complessi da realizzare, ma una volta conclusa vi darà sin da subito una visione definita del lavoro completo.
L'elemento successivo che ho inserito, seguendo la logica, è il naso.
Successivamente ho realizzato gli occhi.
Per questo lavoro ho utilizzato un immagine di base già utilizzata per lavori precedenti, questo perchè, essendo molto versatile e pulita, mi ha permesso di aumentare drasticamente la resa visiva e dei dettagli degli occhi.
FASE 2: Dettagli
Una volta terminata la modellazione mi sono focalizzato sui dettagli.
Elementi quali ciglia, sopracciglia, marcature nere degli occhi e capelli sono stati semplici ma estremamente soddisfacenti da realizzare.
Sono riuscito a conferire hai capelli una resa estremamente plastica, attraverso la sovrapposizione di ogni singola ciocca e alla lavorazione di ognuna di esse.
La coda è stata un elemento interessante da realizzare, poichè essendo collegata con i capelli ma posizionata in secondo piano, mi ha permesso di sperimentare ombre e sfocature che potessero dare l'impressione di una maggiore profondità.
Il braccio sinistro è stata una vera impresa: Dopo svariati tentativi (falliti) di inserimento di mani e parti del braccio create attraverso foto prese da internet, ho deciso di sperimentare un metodo diverso, ovvero la realizzazione completa di tale elemento attraverso l'illustrazione ovvero l'utilizzo dei pennelli.
Il risultato finale visto da vicino risulta abbastanza impreciso ed abbozzato, ma visto nel complesso acquista una resa che non entra minimamente in contrasto con il resto del progetto.
Sicuramente l'elemento più impegnativo ed interessante da realizzare è stato il braccio destro: Per la creazione di questo "arto meccanico" ho utilizzato alcune texture piatte prese da internet, le ho ritagliate, modellate e rese realistiche e tridimensionali attraverso l'utilizzo di luci e ombre. Per creare tale effetto ho duplicato ogni elemento 3 volte, così da avere una versione sottoesposta, una sovraesposta ed una esposta correttamente, poi attraverso l'utilizzo di maschere ho cancellato e sfumato gli elementi per andare a creare le zone in ombra e quelle esposte alla luce.
FASE 3: Ombre e luci
Terminati i dettagli l'ultima cosa da fare è l'inserimento di ombre e luci, che contribuiranno notevolmente a dare al personaggio un aspetto tridimensionale e realistico.
In questo caso ho deciso di utilizzare uno sfondo nero per far risaltare i capelli e il braccio meccanico.
!discovery 30
This post was shared and voted inside the discord by the curators team of discovery-it
Join our community! hive-193212
Discovery-it is also a Witness, vote for us here
Congratulations @matteus57! You have completed the following achievement on the Hive blockchain and have been rewarded with new badge(s) :
You can view your badges on your board And compare to others on the Ranking
If you no longer want to receive notifications, reply to this comment with the word
STOPDo not miss the last post from @hivebuzz:
Support the HiveBuzz project. Vote for our proposal!
Manually curated by the Qurator Team in partnership with @discovery-blog.
Keep up the good work!