LMAC School - How to work with masks
Masks, or layer masks, are a very important functions in GIMP when working with layers. Creating a mask for a layer is a bit like creating a mask for you for Carnival. With the mask you determine what is visible from a layer and what is not. Unlike the carnival mask, however, the layer mask itself cannot be seen in the picture.
GIMP professionals like to use the mask functions and often prefer them to other methods, for example for cutting out or erasing parts of an image. But also for blending two or more layers on specific locations in the image.
The reasons are as follows. Image masks are created with conventional painting tools such as Pencil and Paintbrush. A certain color in the mask stands for transparency and another color stands for non-transparency. Color tones can stand for nuances of transparency. With a simple brushstroke you can determine what should be visible from the layer and even how much. And if you made a mistake while painting the mask, you can easily correct the mistake with another brushstroke and a different color.
In this tutorial, I will show you how you can use and create the masks using simple examples.
Requirements
You may need the GIMP software to understand this tutorial. GIMP is a free, open source tool for image processing of all kinds. Lots of people say GIMP is the open source Photoshop. I agree with this statement at least for the functionality I personally need.
You can download GIMP here: Click
I created this tutorial for GIMP version 2.10.20 (and higher).
We will work with layers in this tutorial. If you do not know how to work with layers, just take a look into the LMAC School - How to work with layers post.
1. Basics
1.1. Adding a mask to a layer
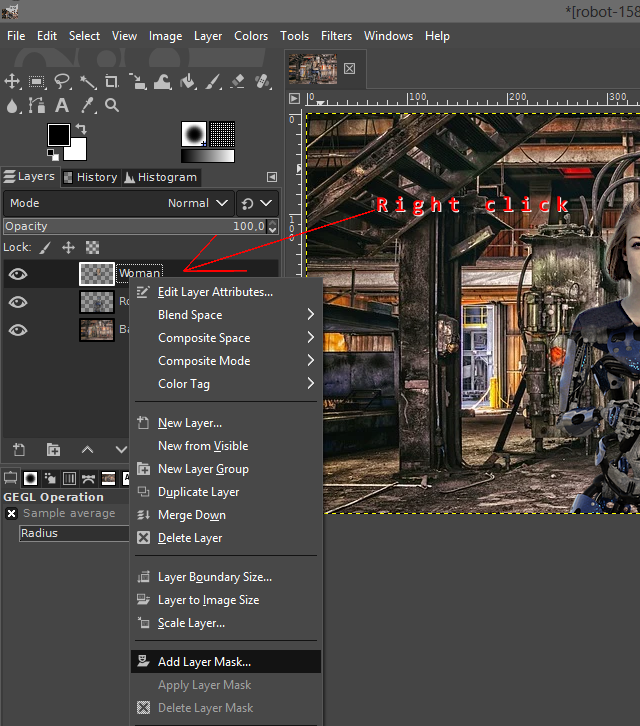
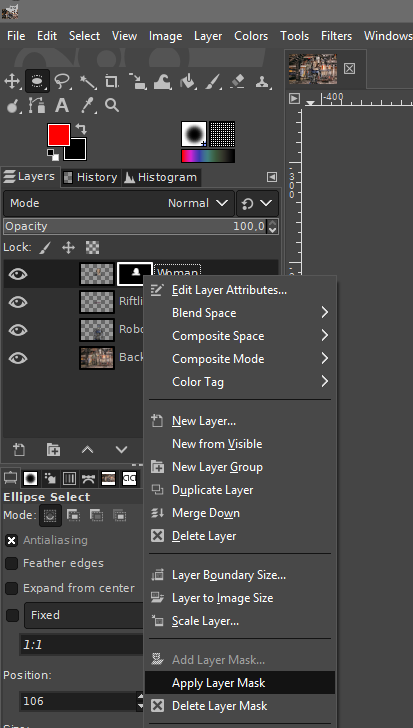
To add a mask to a layer, there are two options in GIMP by-default. Either via the context menu in the layer list, which you can open by right-clicking on a layer. The other option can be found in the main menu under "Layers / Masks".
In both cases, the corresponding submenu item is labeled with "Add Layer Mask".
After you have clicked on the menu item, a dialog window opens.
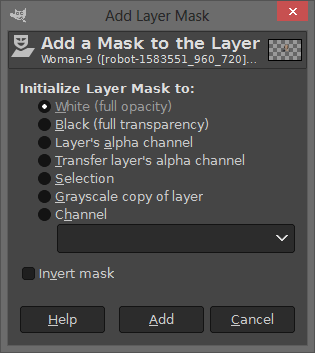
You will see a lot of options in there for creating layer masks. But I will only cover both of those options that you will probably need more often when working on collages so that this tutorial doesn't get too big and too complicated. If you are interested in the other options, I would be happy to answer your questions in the comment section.
1.1.1. Option - White (full opacity)
This is the first option in the dialog window. It is to set the entire new mask to white, which results in a fully visible layer. Wherever you draw with black in this mask, the respective image area in the layer becomes invisible. Use a lighter color to make it transparent or white to make an area opaque again.
It is a good option if you want to cut out image parts. You simply have to paint away everything in the picture that you don't need.
1.1.2. Option - Black (full transparency)
This option is to set the entire new mask to black. In result the layer will become invisible (fully transparent).
This option is exactly the opposite of the first option. If you paint with a white color in the mask, the corresponding image area of the layer will become opaque. Black paint allows you to make corrections if you made a mistake.
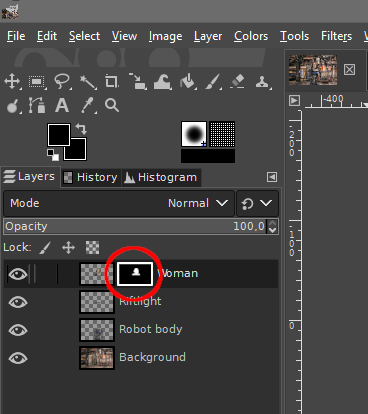
1.2. Switching between mask and image layer
After you have given a layer a mask, another preview image appears in the layer list to the right of the preview image of the respective layer. This shows the mask. If you want to work in the mask, simply click on the mask preview image to activate the mask for editing. It is activated by-default after adding a new mask. And if you want to work in the image layer again, you have to first click on the preview image of the layer to activate the layer.
1.3. Applying a mask to a layer
It is very practical to leave the mask on the layer because so you can make changes to it at any time. If you though want to apply the mask statically to the layer, you can do this via the submenu item "Apply Layer Mask" in the layer context menu or in the main menu in the "Layers" submenu.
This affects in What-you-see-is-what-you-get for the respective layer.
2. Examples
If you'd like to experience the lessons of the examples below for yourself, you can download the images I used in them.
Lara Draft :-D
Cracks
Robot
2.1 Bionic body for Lara Draft
In this example I like to show you how you can use the layer mask option "White (full opacity)" to cut out an image part.
2.1.1. Steps
- Add a layer mask to the layer. Use the "White (full opacity)" option.
- Select black as foreground color.
- Activate the Paintbrush tool by clicking on it or by hitting P on your keyboard.
- Set the "Hardness" for the brush to 75 and choose a size that will allow you to draw between obstacles in the plane.
- Erase the outline of the area you want to keep in the picture by drawing on it.
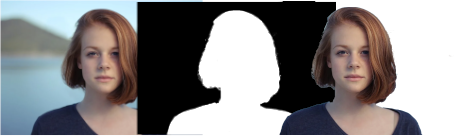
2.1.2. Example
2.2. Cracks in Lara Drafts face
You already know about how practical the "White (full opactity)" option for creating new mask is. In this example I like to show you how you can use the second option "Black (full transparency)".
2.2.1. Steps
- Use the "Exposure" tool in the "Colors" menu to set exposure and black level of the cracks image to very high. We need a high contrast to succeed. Then align brightness and contrast of the cracks image to the face of Lara Draft.
- Set the layer mode of the cracks image to "Grain merge". The "Lara Draft" image has to be below this layer.
- Add a mask to this layer. Use "Black (full transparency)" as initial option.
- Select white as foreground color.
- Set the "Hardness" for the brush to 50 or lower and choose a size that fits well on the face of Lara Draft.
- Draw carefully in the area of Lara Drafts face. See what wonderfuly happens! :-)
2.2.2 Example
Best regards
QuantumG
PS: 33% of the rewards for this post go to LMAC as beneficiary ( #supportlmac ).
You will have noticed that I am not a native English speaker. Therefore, there are probably a few linguistic bumps in my texts. If there are any passages that could trigger accidently a world war or something similar, please let me know so I can change it. :-)
Of course, I am also interested in making the text easier to understand if it is partially necessary.
Like all of the above, it is a wonderful class. With your posts I've learned what I know about Gimp, and I greatly appreciate that possibility.
I will put it, next to your other classes, among my valuable files.
Thank you again very much.
I'll study this tomorrow while my Thanksgiving dinner is cooking. Thank you for all the work you put in!
Ah, nice that you celebrate Thanksgiving. In my area hardly anyone celebrates it anymore (Erntedankfest in Germany). Although it is even a cross-religious celebration.
Many may no longer know that they are living in Wheels-of-the-Year.
I wish you a happy Thanksgiving and bon appetite! :-)
Thank you very much for the Tip! (-:
Hello,
I was not aware of this holiday. How much we are all alike, how the rhythm of the seasons, and life, influence what we celebrate.
Also new to me. It really pays to talk with @quantumg :) art and so much more.
This year my family is meeting in the backyard around a fire pit, tomorrow. I supply the food. My husband and I will not eat because we will not take our masks off, despite the outdoors and social distancing. We are there for family, for tradition.
I wish for you and your loved ones (dogs too) a happy harvest season, a rewarding Erntedankfest, and I'm not sure what to say about Wheels-of-the-Year :)).
Be well and peaceful @quantumg.
It was a great lesson today, the short clip makes the lesson more comprehensive. I don't know if it works perfectly on phone too, I don't have a computer to use on collages
Herrlich.
Zufriedene, glückliche Schüler und ein liebenswerter wie gescheiter Lehrer und Künstler.
Finde so etwas mal im realen Leben!?
Wunderbar. 🤓
Nach dieser Stunde maskierten Unterrichts, hast du dir aber wirklich ein !BEER verdient. 😎🍻
!invest_vote
Ich bin fasziniert, ihr arbeitet mit Gimp. Das habe ich schon ewig heruntergeladen, installiert und kaum in Verwendung. Vielleicht sollte ich mal nach Anfängertutorials schauen.
Oh, die paar Gehversuche in der LMAC waren auch mit Gimp, das war aber einfach nur Effekthascherei.
This is so cool but i use an iPad Pro and all is different but i am always having and sometimes do win hahahahah, thanks for being a sponsor to the lmac its appreciated
Congratulations @quantumg! You have completed the following achievement on the Hive blockchain and have been rewarded with new badge(s) :
You can view your badges on your board and compare yourself to others in the Ranking
If you no longer want to receive notifications, reply to this comment with the word
STOPWonderful explanation. Gimp is a software that even without deepening you can do spectacular things.
@muelli denkt du hast ein Vote durch @investinthefutur verdient!
@muelli thinks you have earned a vote of @investinthefutur !
View or trade
BEER.Hey @quantumg, here is a little bit of
BEERfrom @muelli for you. Enjoy it!Learn how to earn FREE BEER each day by staking your
BEER.