
Saludos queridos amigos creativos y talentosos miembros de esta hermosa comunidad, es para mí un placer poder compartir mis sencillas creaciones junto a ustedes, el día de hoy les traigo unos hermosos zarcillos con forma de Trébol realizados con la técnica de Alambrismo. Es un diseño diferente, elegante, llamativo pero muy fácil de elaborar por personas principiantes en esta técnica, para todos ustedes elabore un sencillo tutorial dónde paso a paso podrán observar y guiarse para la elaboración de sus propios acsesorios.
Greetings dear creative friends and talented members of this beautiful community, it is a pleasure for me to be able to share my simple creations with you, today I bring you some beautiful clover-shaped tendrils made with the technique of wire mesh.
It is a different design, elegant, striking but very easy to make by beginners in this technique, for all of you I made a simple tutorial where step by step you can observe and be guided to make your own accessories.
No es necesario gastar comprando hermosos pendientes a alto costo cuando de forma sencilla y económica puedes elaborarlos tu misma en casa.
Solo necesitamos un poco de práctica y muchas ganas de elaborarlos.
It is not necessary to spend buying beautiful earrings at a high cost when you can easily and economically make them yourself at home.
We just need a little practice and a lot of desire to make them.
✴️ Que Materiales Necesitas:
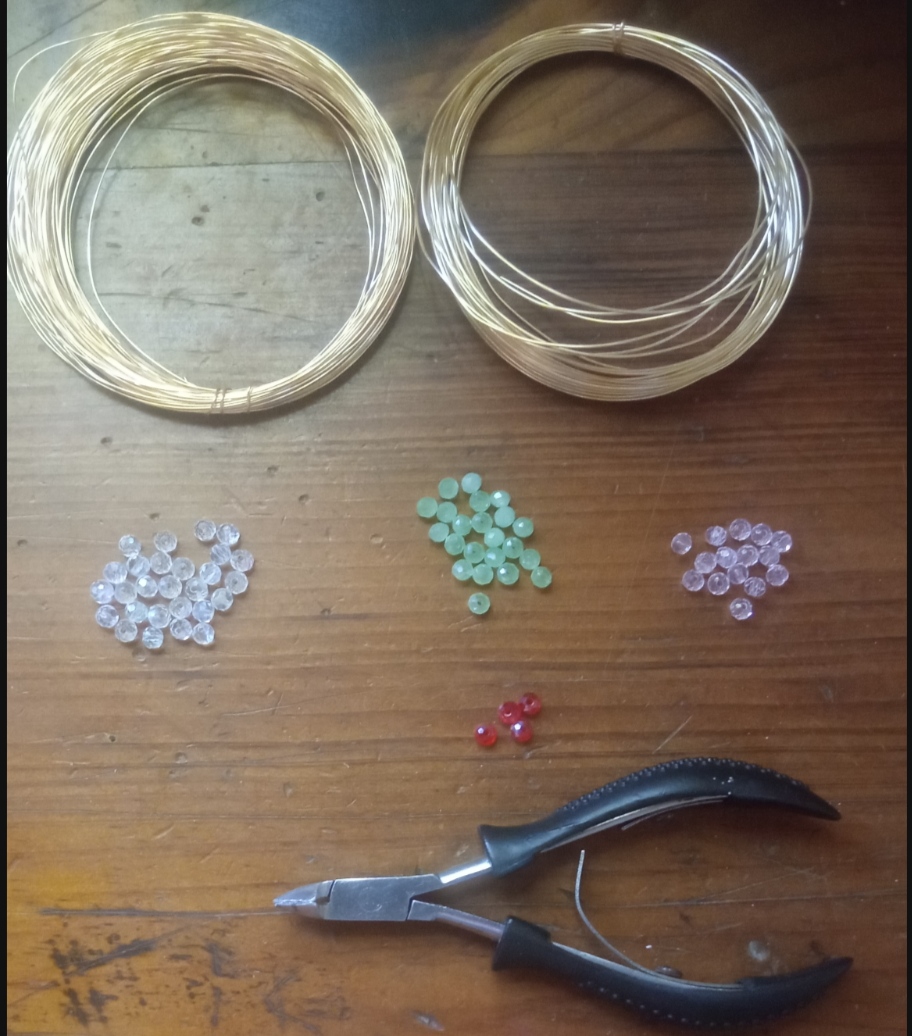
- Alambre de bisutería calibre 22.
- Alambre de bisutería calibre 26.
- piedras brillantinas tornasol.
- Piedras brillantinas verde claro.
- Piedras brillantinas Rojo.
- pinza de bisutería.
- Marcador.
✴️ What Materials Do You Need:
- 22 gauge jewelry wire.
- 26 gauge jewelry wire.
- litmus glitter stones.
- Light green glitter stones.
- Red glitter stones.
- jewelery clamp.
- Marker.
😊 paso a paso
😊 Step by step
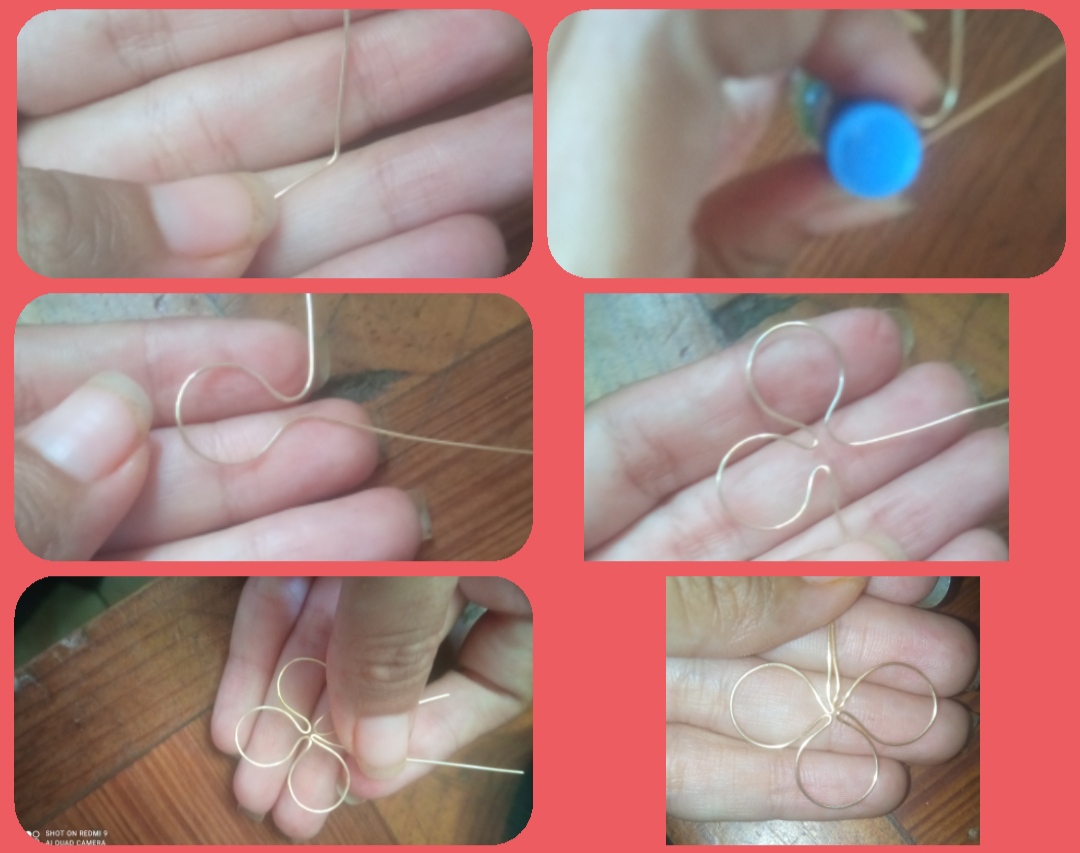
⭐ Paso 1: Para iniciar nuestra creación del día de hoy cortaremos un pedazo de alambre calibre 22 de 20 cm aproximadamente, se preguntarán porque tan largo pero es preferible perder un poco que nos sobre a quedarnos corta en el proceso.
Tomaremos el alambre,meditemos un espacio de 3 cm y allí doblamos el alambre y con ayuda de un marcador, tubo u objeto circular y le damos forma circular al alambre, usted puede seleccionar el tamaño de los círculos, no debemos cerrar la forma del circulo simplemente doblamos el alambre y realizamos otro círculo y así realizaremos tres formas circulares que sean los pétalos del trébol.
El alambre sobrante lo unimos con el alambre que nos quedó al principio.
⭐ Step 1: To start our creation for today we will cut a piece of 22 gauge wire of approximately 20 cm, you will wonder why it is so long but it is preferable to lose a little that is left over than to fall short in the process.
We will take the wire, measure a space of 3 cm and there we bend the wire and with the help of a marker, tube or circular object and give the wire a circular shape, you can select the size of the circles, we must not close the shape of the circle we simply bend the wire and make another circle and thus we will make three circular shapes that are the petals of the clover.
We join the remaining wire with the wire that was left at the beginning.
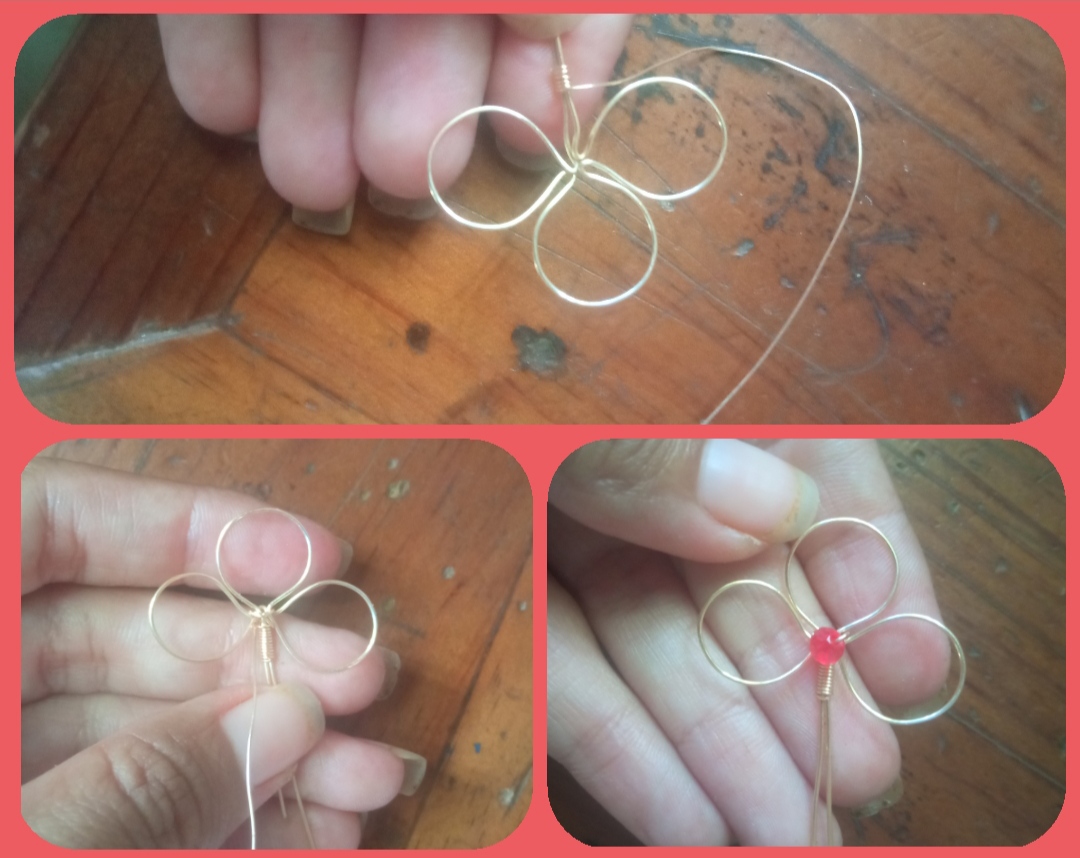
⭐ Paso 2: ahora tomaremos el alambre calibre 26 y cortaremos un pedazo largo de aproximadamente 20 cm e iniciamos enrrollandolo en las dos partes lisas en la parte superior del trébol, realizamos varias vueltas y luego realizamos varios cruces para sostener las uniones de los pétalos y sostener mejor la forma en del trébol, para tapar los empates Introducimos una piedra Brillante rola y la colocamos en el centro de los tres pétalos.
⭐ Step 2: now we will take the 26 gauge wire and cut a long piece of approximately 20 cm and start rolling it in the two smooth parts at the top of the clover, we make several turns and then we make several crosses to hold the joints of the petals and better support the shape of the clover, to cover the draws We introduce a brilliant rola stone and place it in the center of the three petals.
⭐ Paso 3: después con el mismo alambre delgado calibre 26 comenzamos a rellenar los pétalos con brillantinas, para ello amarramos el alambre fino en la base del pry pétalo e Introducimos dos Pichitas brillantinas tornasol y amarramos del otro lado del pétalo con dos vueltas en la base, luego Introducimos tres piedritas más y volvemos a sujetar está tira en el otro lado del pétalo y por último colocamos tres piedritas más y terminamos de rellenar este pétalo.
Realizamos un amarre y cortamos el exceso del alambre de tejer.
⭐ Step 3: then with the same 26 caliber fine wire we begin to fill the petals with glitter, to do this we tie the fine wire at the base of the pry petal and introduce two Litmus Glitter Pichitas and tie the other side of the petal with two turns on the base, then we introduce three more pebbles and we return to hold this strip on the other side of the petal and finally we place three more pebbles and we finish filling this petal.
We make a tie and cut off the excess weaving wire.
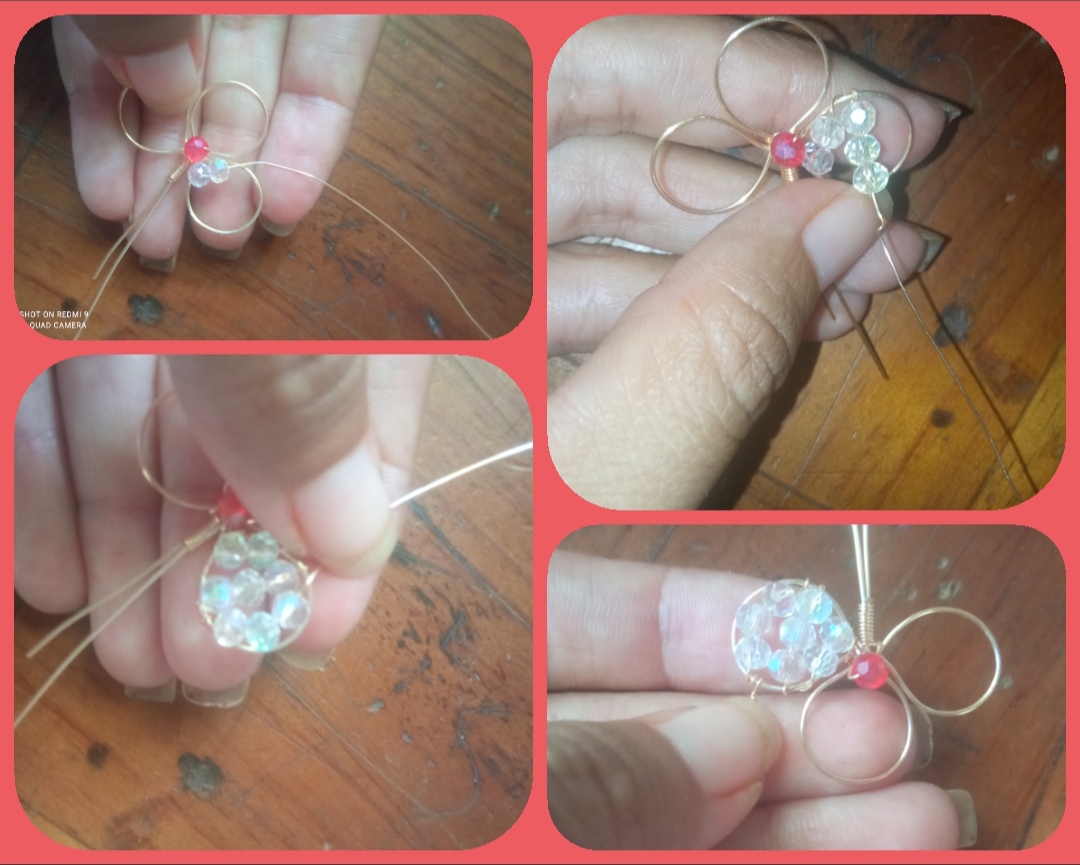
⭐ Paso 4: el paso anterior lo vamos a repetir en los siguientes dos pétalos, el segundo pétalos, el del medio lo realizaremos con piedras brillantinas verde y el tercero al igual que el próximo será con piedras tornasol.
Y así formamos un hermoso trébol.
⭐ Step 4: We will repeat the previous step in the next two petals, the second petal, the middle one will be done with green glitter stones and the third, as well as the next, will be with litmus stones.
And so we form a beautiful clover.
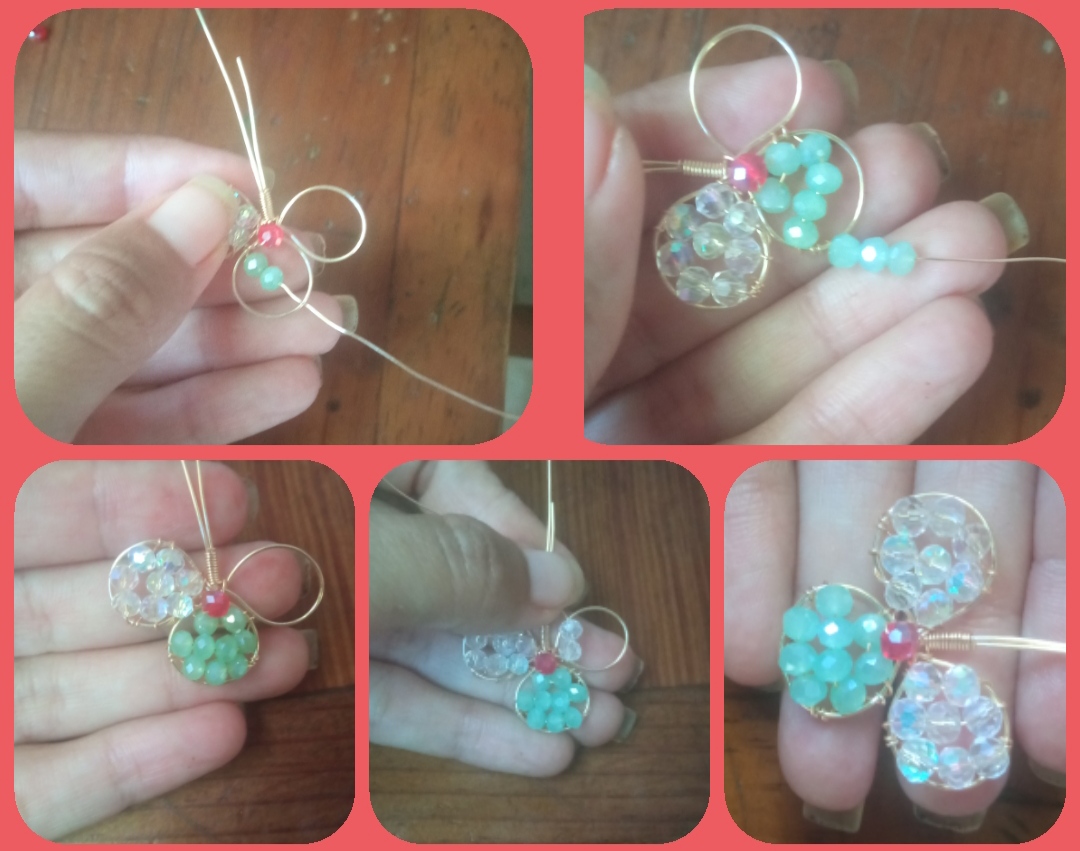
⭐ Paso 5: para culminar separamos los dos alambres que nos quedaron en la parte superior de nuestro bello trébol y uno lo cortamos por dónde realizamos la vuelta del alambre fino, intentemos que no se note mucho y con el pedazo que aún nos queda realizaremos el anzuelo para nuestros zarcillos.
Lo moldearemos y daremos forma con nuestras manos y las pinzas y cortaremos el exceso.
⭐ Step 5: to finish, we separate the two wires that were left at the top of our beautiful clover and we cut one where we made the turn of the fine wire, let's try not to notice it too much and with the piece that we still have left we will make the hook for our tendrils.
We will mold and shape it with our hands and tweezers and cut off the excess.
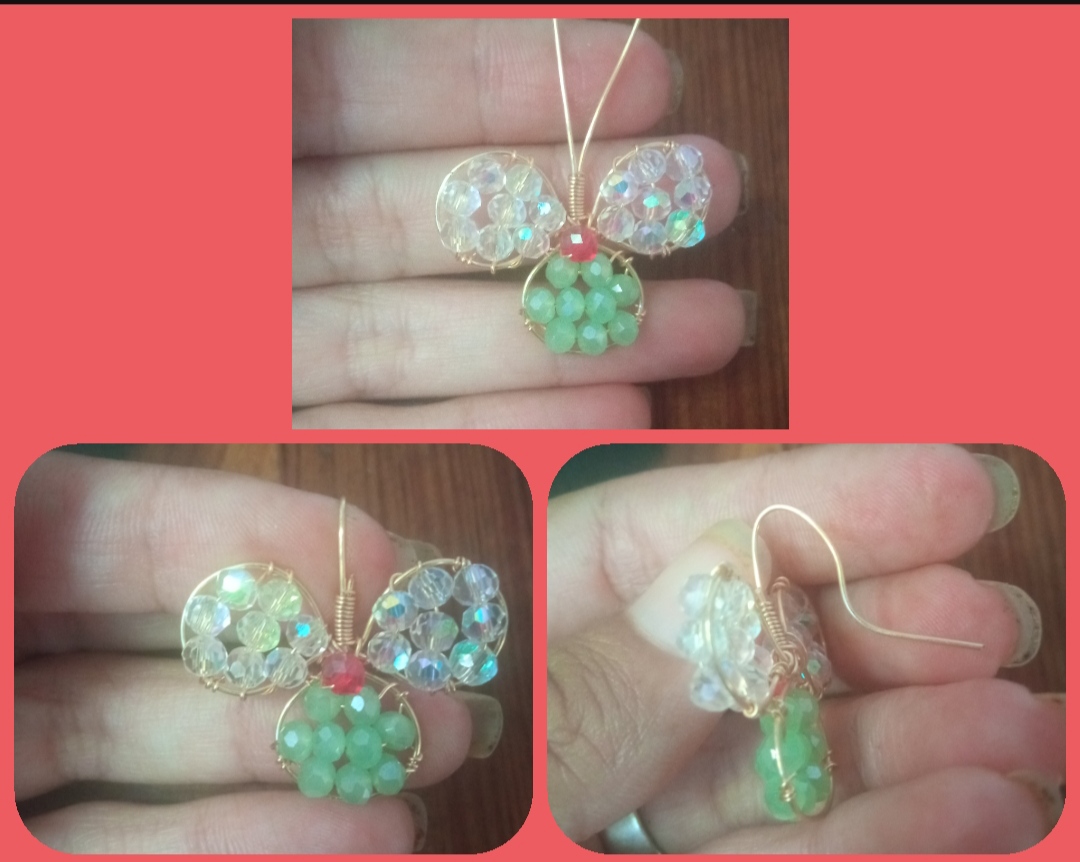
⭐ Zarcillos con forma de Trébol ☘️ ⭐
⭐ Clover-shaped tendrils ☘️ ⭐
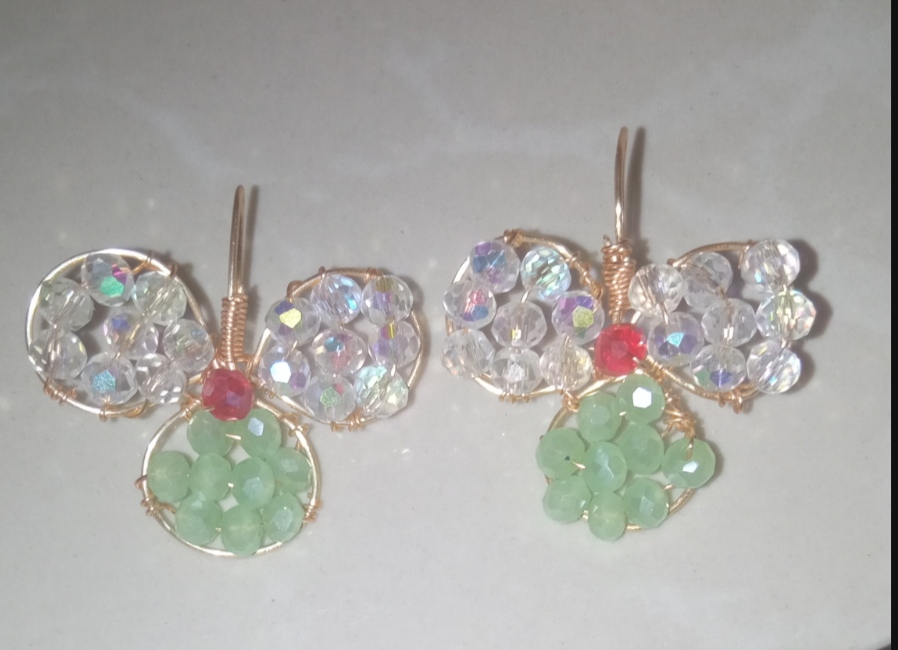
Y así de fácil, rápido y muy sencillo podemos nosotros mismos en casa ser los creadores de nuestros bellos zarcillos, este diseño les servirá tanto para tu día día como para una ocasión especial, el color lo seleccionas tu a tu preferencia.
And that easy, fast and very simple we can ourselves at home be the creators of our beautiful earrings, this design will serve you both for your day and for a special occasion, the color you select to your preference.
Queridos Amigos espero que este sencillo diseño sea del agrado de ustedes, les agradezco por su visita.
Saludos y bendiciones para ustedes.
Dear Friends, I hope that this simple design is to your liking, I thank you for your visit.
Greetings and blessings to you.
las fotos fueron tomadas con mi teléfono Redmi 9, contenido exclusivo para Hive. Y la traducción fue realizada a través de Google.
photos were taken with my Redmi 9 phone, exclusive content for Hive. And the translation was done through Google.
Te ha quedado muy bonito el diseño con alambre, un trébol de tres hojas muy hermoso, has realizado una técnica de alambrismo muy bien, felicidades
Gracias me alegra su comentario.
Muy lindo te quedó con esos colores muy bien combinado
Me alegra que le guste el diseño amiga ☺️
Que bonito. Me gustó mucho. El color verde es mi favorito y combinado con los cristales traslúcidos se ve precioso. Felicidades.
Gracias amiga, me alegra saber que son de su agrado.
Hola, te quedaron muy lindos, gracias por compartir, un tutorial para dedicarnos a realizar nuestras propias prendas. Saludos
Gracias por su visita, me alegra mucho saber que le gustó.
Saludos.
@emmaris Te Quedaron hermosos amiga. Saludos 😊 Un Abrazote 🤗
hola, amiga, que fácil se ve el paso a paso de esta linda elaboración me encantaron estos zarcillos gracias por compartir.
Me alegra que sea de su agrado amiga. Saludos.