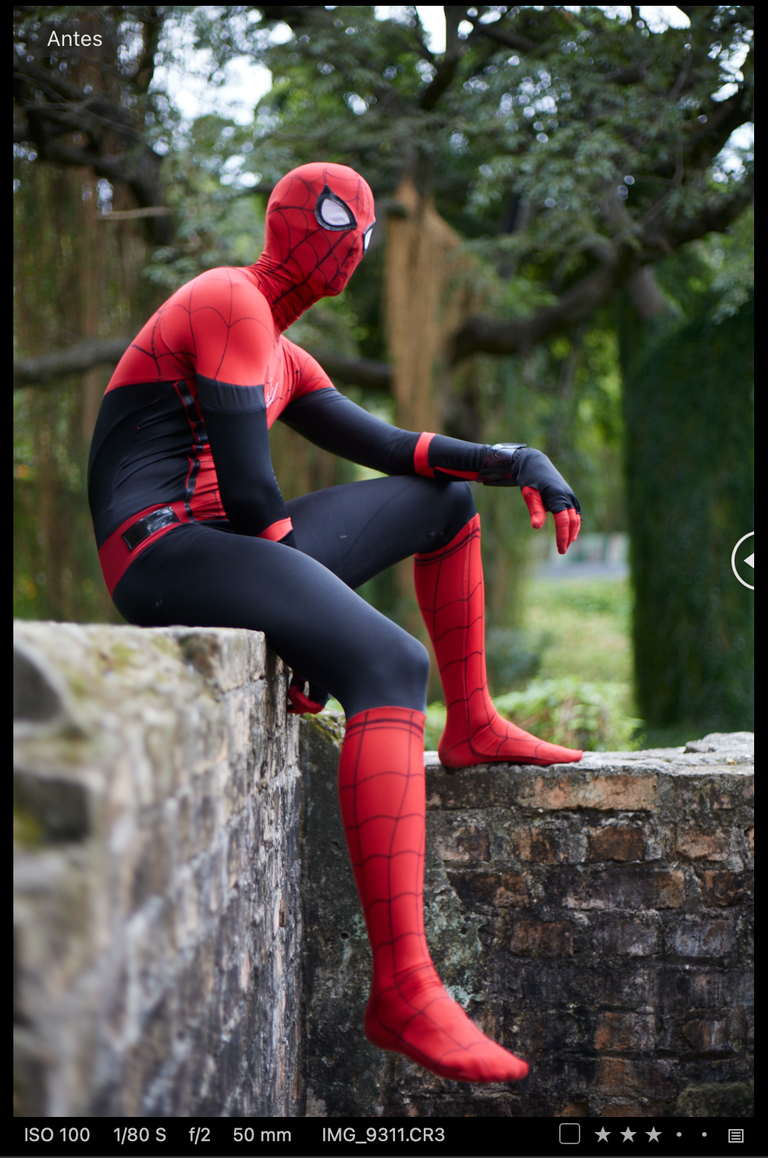
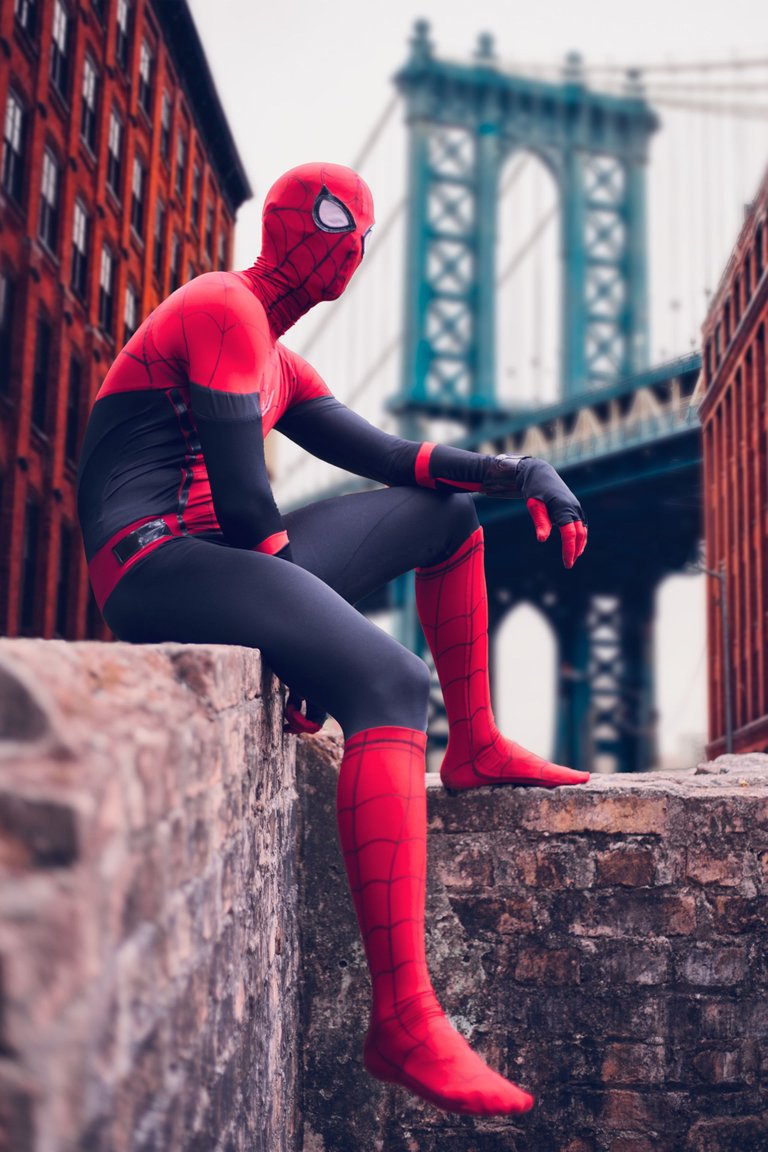
Hello everyone, today I want to tell you a little about the editing process that I carry out in order to achieve the result that you see in the previous photo. It is a photo that I had already shown in previous publications, such as this compilation of the best of the year, but I had told them about teaching them the editing process that is behind it.
I plan to talk to you in greater depth about the editing programs that I use in future publications, for today I will only tell you that I use Capture One 21 for the organization of the photo sessions and the development of each image, by which I mean the lighting, color and other details. If I need to retouch the skin or facial details such as a person's eyes or perform a layered edit, I export the changes to Photoshop. Below I show you roughly the steps I take:
- So let's start with the tutorial by showing you the before and after development that I do in the Capture One program before entering Photoshop as we all want. Here I just touch up the areas that were burned out in highlights, contrast, and colors. I don't go too deep into it because the way it all works doesn't vary much from Lightroom and other programs that many already use, and even mobile editing apps.
Hola a todos, hoy quiero hablarles un poco sobre el proceso de edición que realice para poder alcanzar el resultado que ven en la foto anterior. Es una foto que ya había mostrado en publicaciones anteriores, como esta recopilación de las mejores del año, pero les había hablado de enseñarles el proceso de edición que esta detrás de ella.
Pienso hablarles en mayor profundidad sobre los programas de edición que utilizo en próximas publicaciones, por hoy solo les diré que utilizo Capture One 21 para la organización de las sesiones de fotos y el revelado de cada imagen, con ello me refiero a la iluminación, color y otros detalles. Si necesito retocar la piel o detalles faciales como los ojos de una persona o realizar una edición por capas exporto los cambios a Photoshop. A continuación les muetsro a grandes rasgos los pasos que realice:
- Entonces comencemos con el tutorial enseñándoles el antes y después del revelado que realice en el programa de Capture One antes de entrar en Photoshop como todos queremos. Aqui solo retoque las zonas que estaban quemadas en las altas luces, el contraste y los colores. No profundizo mucho en ello porque la forma en que funciona todo no varía mucho de Lightroom y otros programas que muchos ya usan, e incluso aplicaciones móviles de edición.

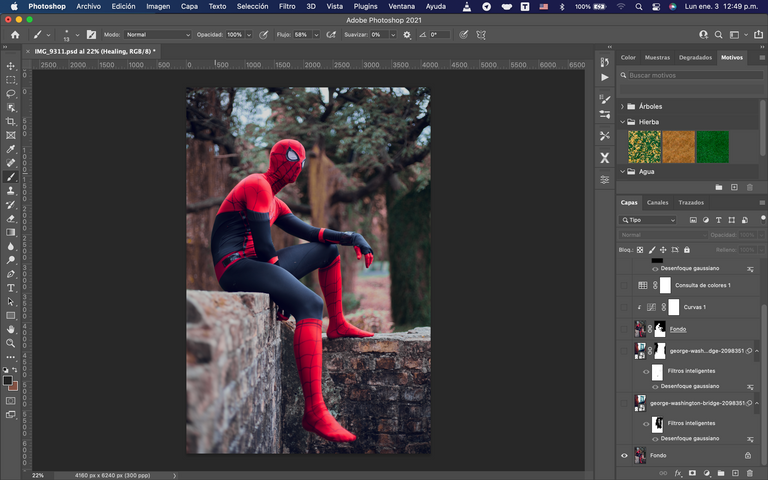
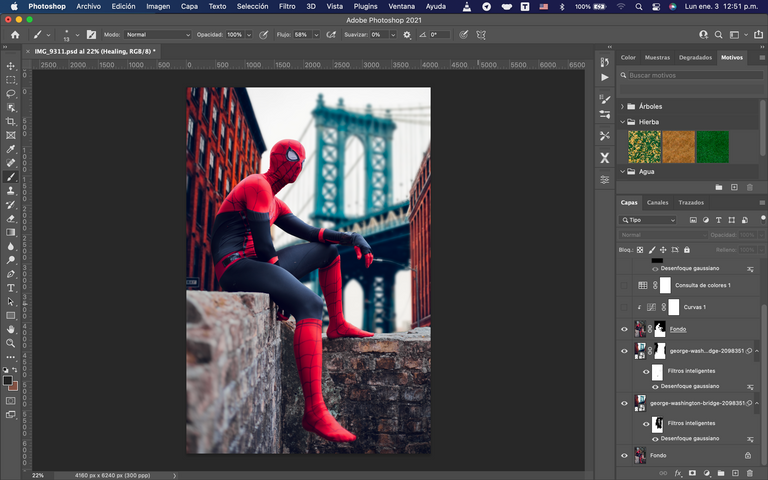
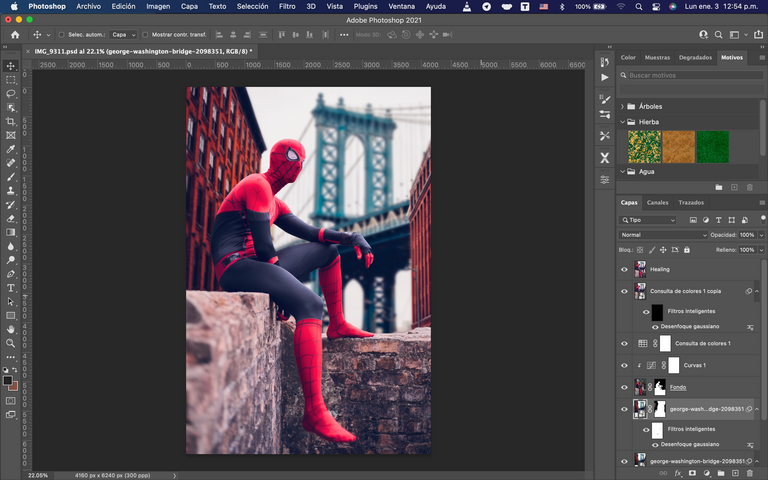
- After finishing every possible detail in Capture One, we exported to Photoshop and started working. As you can see in the image I am going to show you the purpose and result of each layer, if at any time you have any questions, do not hesitate to contact me either in comments or from the link in my profile.
- Luego de terminar cada detalle posible en Capture One, exportamos a Photoshop y comenzamos a trabajar. Como pueden ver en la imagen les voy a mostrar el propósito y resultado de cada capa, si en algún momento les queda alguna duda no duden en contactarme ya sea en comentarios o desde el enlace de mi perfil.
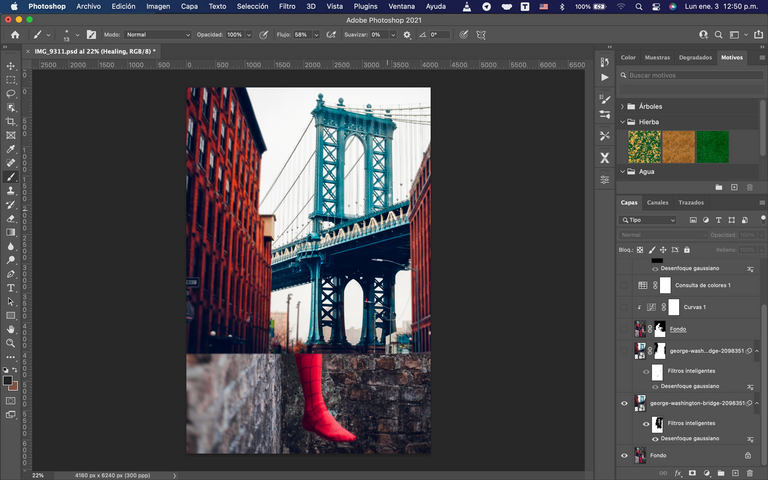
- For this edition the idea was to change the background to include this Cuban Spiderman in a more New York environment, the habitat of the character as almost all of us know. Download the image you use for the background from Pixabay for free. As you can see I added a blur filter so that the red buildings are in the background with respect to the main image.
- Para esta edición la idea era cambiar el fondo para incluir a este Spiderman cubano en un ambiente mas neoyorquino, el habitat del personaje como casi todos conocemos. La imagen que utilice para el fondo la descargue desde Pixabay de manera gratuita. Como pueden ver le agregue un filtro de desenfoque para los que los edificios rojos queden en un segundo plano con respecto a la imagen principal.
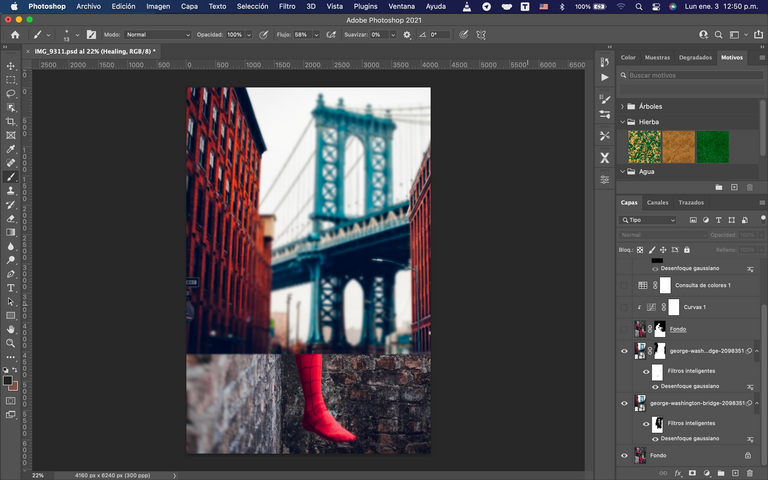
- Then I duplicated the layer of the background image to focus on applying a blur filter but with greater power in the area of the bridge only, to place it in a third plane
- Luego duplique la capa de la imagen de fondo para enfocarme en aplicar un filtro de desenfoque pero con mayor potencia en el area del puente solamente, para ubicarlo en un tercer plano
- Next, we duplicate the base layer and apply a layer mask. Using the selection tool, we keep the wall and the subject visible, ignoring the background and thus reveal the buildings and the bridge from the previous steps.
- A continuación duplicamos la capa base y aplicamos una mascara de capa, mediante la herramienta de selección mantenemos visible el muro y el sujeto, obviando el fondo y asi se revelara los edificios y el puente de los pasos anteriores.
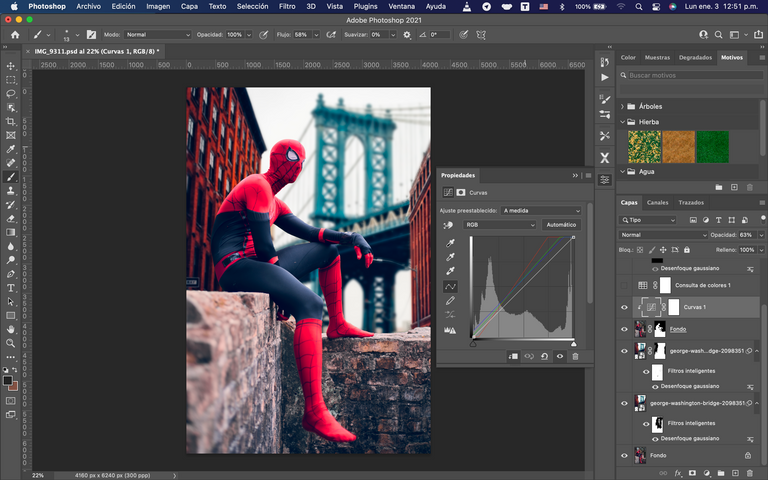
- We add a layer of curves that only apply to the previous layer to mix the colors and lighting of the background with the subject. Notice the change in lighting that occurs on the subject without the background changing.
- Agregamos una capa de curvas que solo apliquen a la capa anterior para mezclar los colores e iluminación del fondo con el sujeto. Notese el cambio de iluminación que ocurre en el sujeto sin que el fondo cambie.
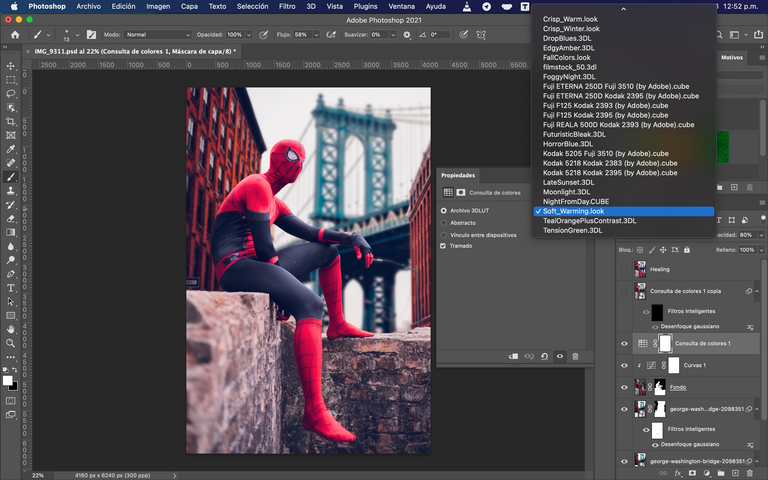
- We add a color query layer where you select the color profile ¨Soft_Warming.look¨ as you can see, this helps to smooth out those details in the color theme that have not yet finished blending.
- Agregamos una capa de consulta de colores donde seleccione el perfil de color ¨Soft_Warming.look¨ como se puede apreciar, esto ayuda a limar esos detalles en tema de color que aun no terminan de mezclarse.
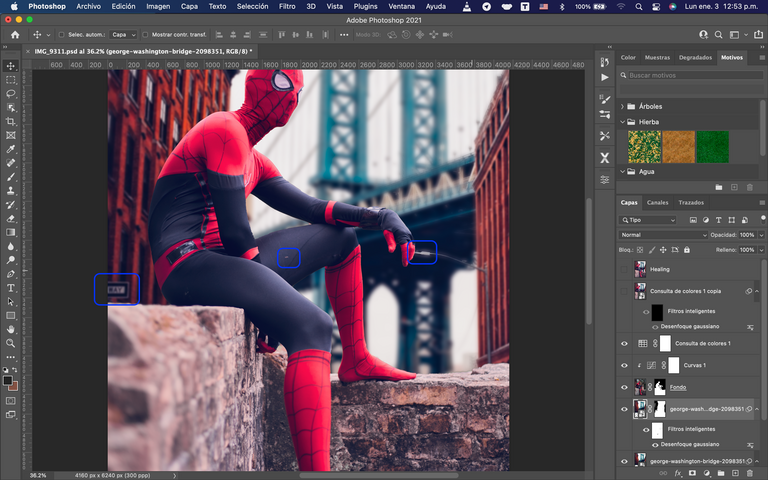
- Now we only have to clean those details of the moment such as tears in the suit, dirt or unnecessary posters, some of those examples are pointed out in the following image. For this we only select all the active layers so far, we duplicate them and we mix them. Then we use the Clone Tool or whatever you prefer to work on the new layer in those details.
- Ya solo nos queda limpiar esos detalles propios del momento como roturas en el traje, suciedades o carteles innecesarios, algunos de esos ejemplos se los señalo en la siguiente imagen. Para ello solo selecionamos todas las capas activas hasta el momento, las duplicamos y las mezclamos. Luego usamos la Herramienta de clonar o la que sea de tu preferencia para trabajar sobre la nueva capa en esos detalles.
And here is this little tutorial that I hope will be to your liking. If so, let me know or any questions or suggestions you have for future tutorials. Here is the result.
Y hasta aqui este pequeño tutorial que espero sea de su agrado. Si fue así, déjame saberlo o cualquier duda o sugerencia que tengas para próximos tutoriales. Aqui les dejo el resultado.
The rewards earned on this comment will go directly to the person sharing the post on Twitter as long as they are registered with @poshtoken. Sign up at https://hiveposh.com.
Interesting to see the process… 😎
Thanks, i will try to show more about it
You are welcome. Looking forward to it 😊
Muy bueno. Tienes buen dominio del Photoshop. Es una herramienta más que necesaria en estos días. Me gustaría ver a Spiderman con el Capitolio de fondo jaja. Saludos y seguimos a puro #hive
Jeje estaría bueno ese fondo, gracias bro
Your content has been voted as a part of Encouragement program. Keep up the good work!
Use Ecency daily to boost your growth on platform!
Support Ecency
Vote for new Proposal
Delegate HP and earn more
Congratulations @manuphotos! You have completed the following achievement on the Hive blockchain and have been rewarded with new badge(s):
Your next target is to reach 2000 upvotes.
You can view your badges on your board and compare yourself to others in the Ranking
If you no longer want to receive notifications, reply to this comment with the word
STOPCheck out the last post from @hivebuzz: