I saw this magnificence at a thrift store and realized that I needed to have it. I have the start of an Asian subject in my lounge area and needed a costly Asian credenza. I couldn't bear the cost of one so I chose to make my own. It took three days a long end of the week yet I did it and the outcomes are astounding!
Time: 3 Days Cost: $125 Difficulty: Medium

I requested the material that would coordinate my vision off of Amazon.com. I chose to get the wealthiest look conceivable that I would utilize splash paint. I picked the hues gold and dark. The material was to cover the drawers since they had existing watermarks from what resembled water harm.

Evacuated the drawersRemoved the drawers
I had my tying spouse and children move it to the patio so I could shower paint it. This thing was overwhelming! I utilized lustrous for the rich sparkle I needed.

Shower painted the handlesSpray painted the handles
Evacuated the handles to splash paint them and dry while I take a shot at the body of the authority.

The complete is perfectThe complete is great.
I utilized paper plates to splash the handles. This will dry inside 15 minutes. At the 5 minute check, take a stab at evacuating them winding them so they don't dry to the plate
I concluded that I didn't need the center drawers texture so I painted them a matte dark. Sorry the photo is hazy however you will see the outcome soon

These are the items utilized for projectThese are the items utilized for venture
I dealt with the body and drawers for two days.

Gleaming brilliance going onShiny radiance going on!
I splash painted the body of the authority precisely to maintain a strategic distance from dribbles and splatter as it drys.

Preparatory lookPreliminary look
Attempted the handles against the drawer. It was dazzling. I couldn't hold up to complete whatever is left of it
GoldenGolden!!
I began to splash the highest point of the department and the spout began to incidentally splatter paint. At first I was vexed. At that point I understood that I loved the splatter the more I took a gander at it. I let it dry. What's more, included another coat. All together this is around 5 coats altogether dry and it looks astounding.

Presently the time had come to begin on the 6 side drawers that was cleared out. I slice the material to fit with a little cover and utilized glue shower super hold to at cling the material to the drawers. I utilized craft glue to hold fast the sides to the drawers and trimmed when dry.

Completed drawersFinished drawers!
I was so pleased at how the drawers turned out. I could hold up to see the completed result of the paint on the body.

Completed bodyFinished body
I was charmed at the outcome. Since the authority is especially an old style with no mechanical sprinter for the drawers, I needed to sand within edge so the drawers could coast better with opening and shutting them.

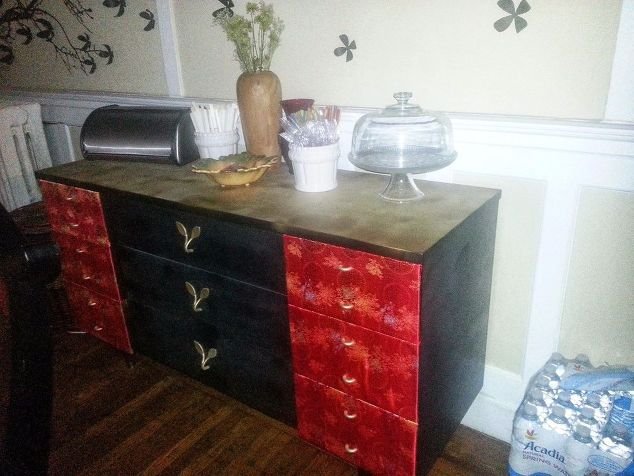
Completed productFinished item!!
I am not a novice DIYer but rather this was my first significant piece. I couldn't be more joyful. Here's a couple of more pics


In favor of my lounge area that I wantedOn the side of my lounge area that I needed!

Inverse angleOpposite point!
I used a reasonable sealant to bond the paint and complete the look. It was justified, despite all the trouble .

@home-talk Excellent, follow up . Thank you very much
This is really nice, and a wonderful idea .
This is really nice.
Thumbs uppppppp
This is so lovely! I would love to make a like this
beautiful!