ESPAÑOL
Hola!
Finalmente he decidido retomar la escritura del contenido en mi perfil, y decidí compartirles hoy una breve apertura de la zona pectoral.
Esta secuencia es muy sencilla y haciendola todos los días, si eres practicante de yoga o no, puede ayudarte mucho en múltiples aspectos.
En el caso de ser practicante de Yoga, mi recomendación es que la realices en tus prácticas, justo antes de empezar a hacer las posturas del puente (Urdvha Danurasana o Chakrasana). Pero si no haces una practica de Yoga regular, te convendrá hacerla luego de 10 saludos al sol.
Si no tienes idea de cómo hacer los saludos al Sol, acá te dejo un link con un post que puede servirte mucho:
En cuanto a los beneficios que aporta realizar esta secuencia de apertura de pecho, podemos nombrar los siguientes:
La progresiva conquista de la apertura de pecho nos permite flexibilizar la musculatura alrededor de los pulmones, lo cual nos ayuda a respirar con mayor amplitud.
Libera las tensiones acumuladas en el area del esternon y la caja torácica, donde hay un cúmulo de nudos productos de vivencias y experiencias pasadas.
Flexibiliza la articulación y musculatura alrededor de hombros y cuello, evitando que nos lesionemos por el esfuerzo generado ahi y por las tensiones acumuladas.
Ayuda a erguir nuestra columna, mejorando nuestra postura física.
Alivia dolores relacionados con todas las zonas mencionadas antes.
Permite el equilibrio o armonización de los chakras del plexo solar y el centro del pecho (Manipura y Anahata Chakra). Esto permite una apertura mental y emocional, de manera equilibrada en la persona.
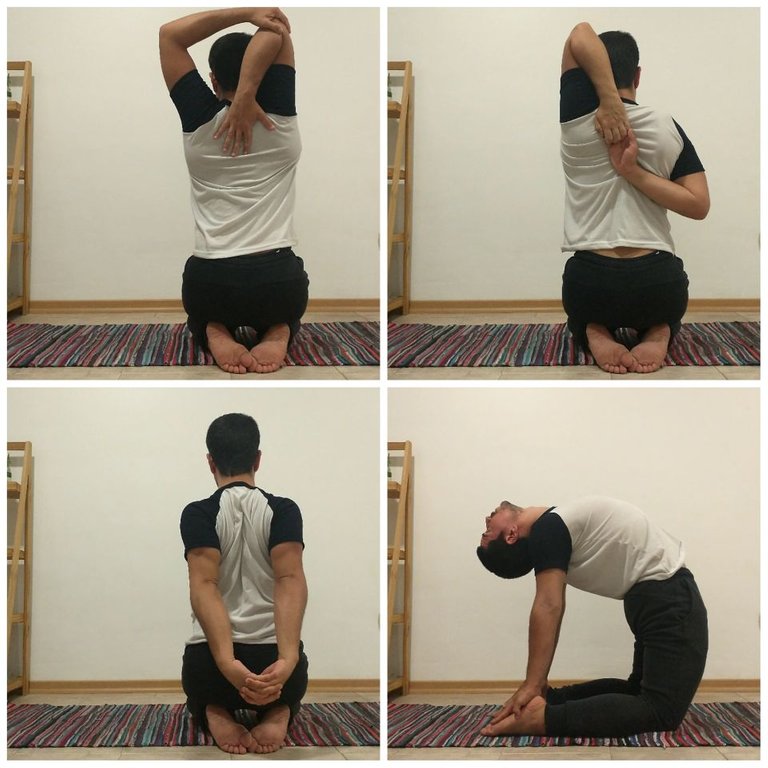
Ahora bien, la secuencia consta de varias posturas, que ire mostrando en las imagenes junto con algunas variaciones más sencillas para quienes hacen esto por primera vez.
Secuencia de apertura de pecho
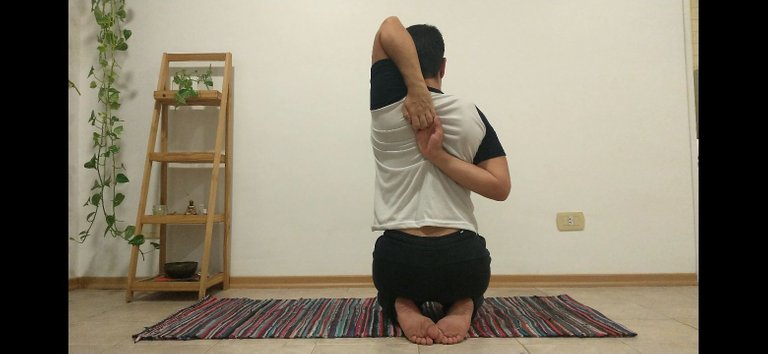
PRIMERA POSTURA
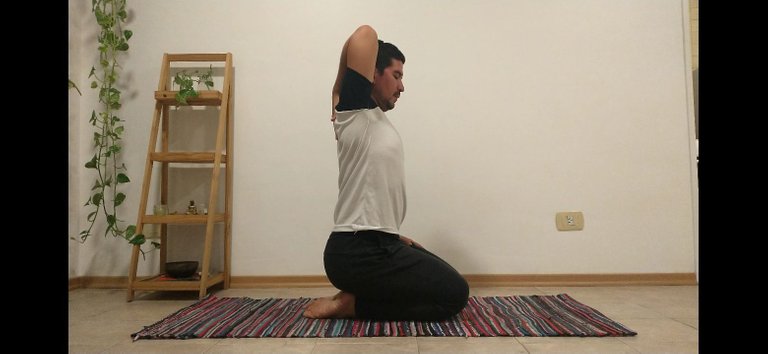
Comienzas colocando el brazo derecho por encima de la cabeza durante la inhalación. Abriendo el pecho, y con la mano izquierda sujetas el codo, con la intención de acercar la mano derecha al centro de la espalda. Siempre debe hacerse suavemente y con respiraciones profundas y por la nariz.
Esta postura recomiendo que la hagas durante 10 respiraciones de cada lado siguiente la indicación.
NOTA: Si se dificulta realizar la postura sentada sobre talones, puedes subir la cadera y estar de rodillas mientras se realiza.
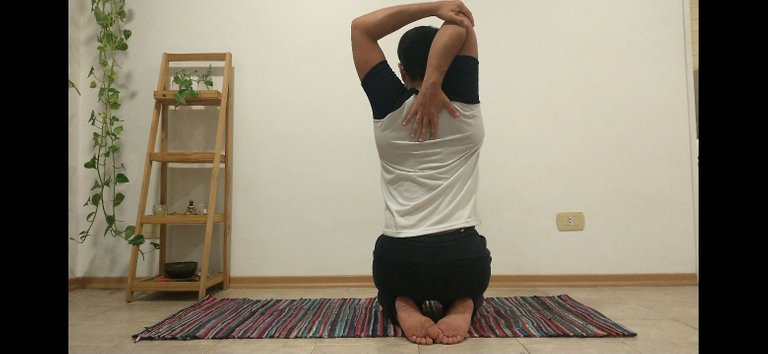
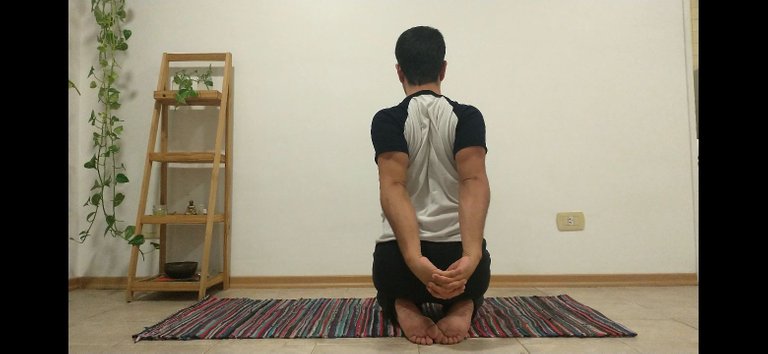
SEGUNDA POSTURA
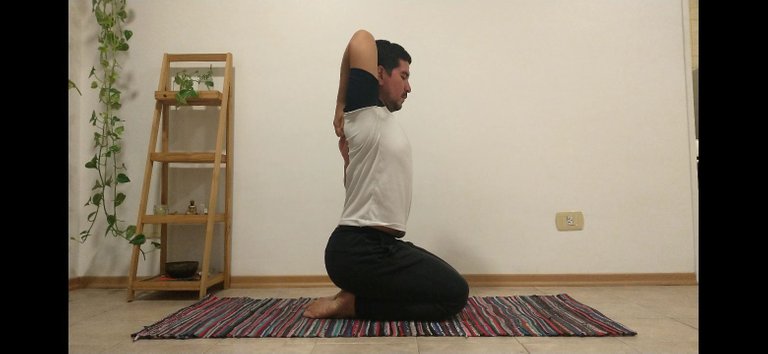
Básicamente, esta sería la postura completa. El brazo de arriba se mantiene en la misma posición, pero el opuesto pasa por debajo hacia arriba y se agarran ambas manos en el centro de la espalda.
De no ser fácil tomarse ambas manos, puede usarse una toalla para poder unir ambos brazos y descargar la tensión a través de la misma.
Igual que en la postura anterior, se hace de ambos lados, la misma cantidad de respiraciones. Y si es necesario, se puede hacer de rodillas.
TERCERA POSTURA
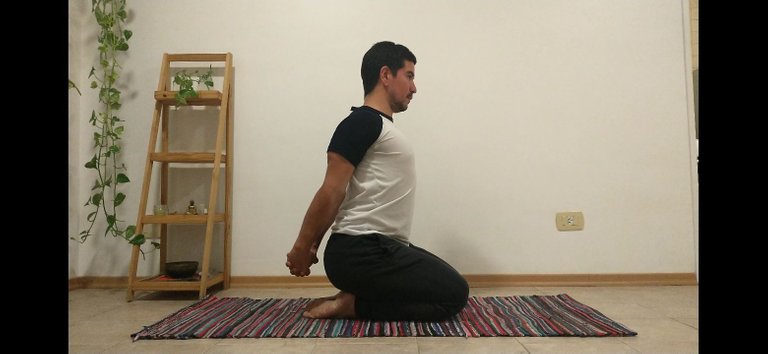
Esta postura es mucho más sencilla, simplemente se entrecruzan los dedos de las manos, con las palmas frente a frente, y durante las diez respiraciones se abre el pecho queriendo juntar los omóplatos.
También se debe estar atento de que el cuello quede recto, al igual que la columna, para que no sobreesforcemos la zona cervical.
CUARTA POSTURA
Finalmente en la cuarta postura hacemos Ustrasana o la postura del camello. Y se plantean distintas variaciones en esta segun el nivel del practicante.
Las imagenes estarán ordenadas de menor a mayor dificultad.
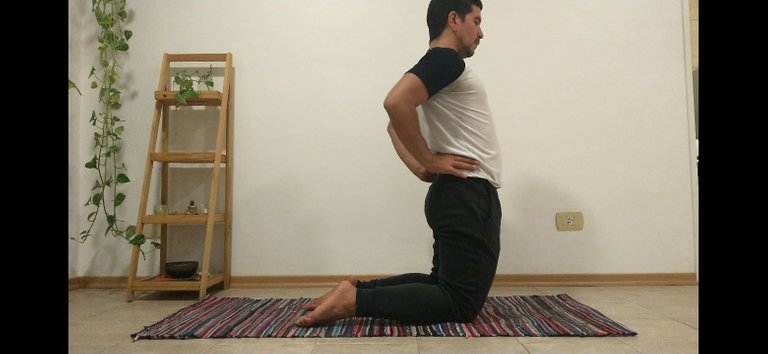
Aquí, simplemente posicionamos las manos detras de la cintura, a nivel de riñones, y empujamos suavemente hacia adelante la cadera, proyectando los hombros hacia atrás, de esa manera el pecho se abre.
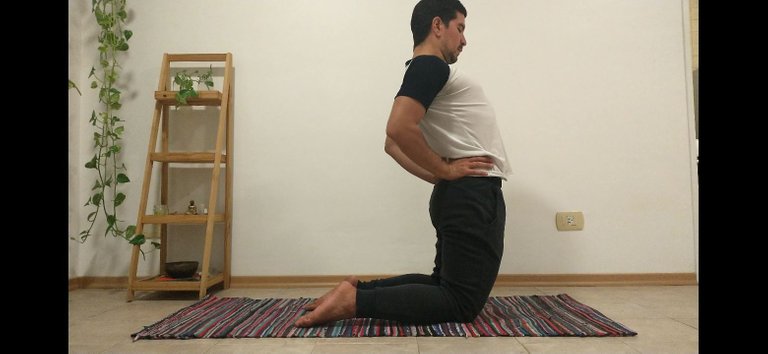
Es también de gran importancia ahuecar el abdomen, con la intención de proteger la zona lumbar mientras realizamos la postura. De esa manera evitamos dolencias posteriores.
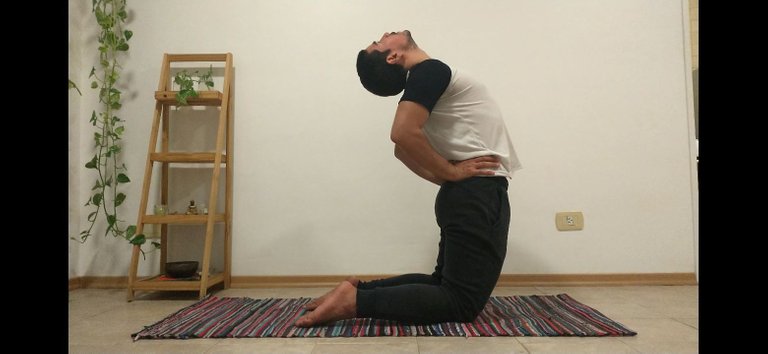
Si no percibimos dolor en la zona cervical, podemos dejar caer la cabeza hacia atrás, como en la imagen de arriba, permitiendo una mayor apertura del pecho.
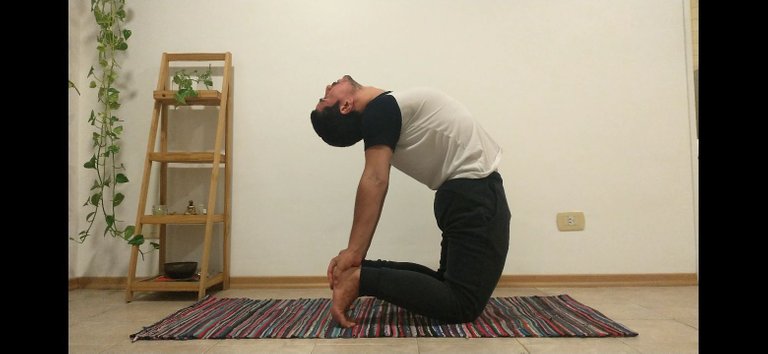
Si hasta ese punto, la postura se ha sentido cómoda y no hay dolencias en la zona lumbar ni cervical, procedemos a llevar ambas manos a los talones (apoyando la punta de los pies en el suelo para elevar en nivel de los talones). Siempre con el pecho abierto y empujando la cadera hacia adelante. Igualmente, ahuecando el abdomen y solo si es posible, dejando caer la cabeza hacia atrás, de lo contrario, repetimos la posición de la cabeza hacia adelante (vease las imagenes de arriba).
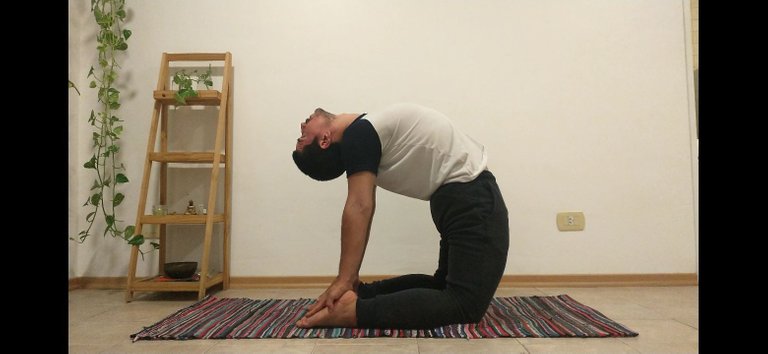
Y finalmente, la postura seria la misma Ustrasana, pero con los empeines apoyados en el suelo y el nivel de los talones más bajo.
Todas las demas consideraciones serían exactamente igual que en la imagen anterior.
Espero que esta secuencia para apertura de pechos sea de mucho provecho para ti, y que puedas realizarla constantemente y así poder notar los resultados y beneficios que te aporta al cuerpo, respiración y mente.

ENGLISH
Hello!
I have finally decided to resume writing content on my profile, and I decided to share with you today a brief opening of the pectoral area.
This sequence is very simple and doing it every day, whether you are a yoga practitioner or not, can help you a lot in multiple aspects.
If you are a Yoga practitioner, my recommendation is that you do it in your practices, just before starting to do the bridge postures (Urdvha Danurasana or Chakrasana). But if you don't do a regular Yoga practice, you will want to do it after 10 sun salutations.
If you have no idea how to do the sun salutations, here is a link to a post that can help you a lot:
As for the benefits of performing this chest opening sequence, we can name the following:
The progressive conquest of the chest opening allows us to make the musculature around the lungs more flexible, which helps us to breathe with greater amplitude.
It releases the accumulated tensions in the area of the sternum and rib cage, where there is an accumulation of knots from past experiences.
It makes the articulation and musculature around the shoulders and neck more flexible, preventing us from getting injured by the effort generated there and by the accumulated tensions.
It helps to erect our spine, improving our physical posture.
Relieves pain related to all the areas mentioned above.
Allows the balance or harmonization of the chakras of the solar plexus and chest center (Manipura and Anahata Chakra). This allows a mental and emotional opening, in a balanced way in the person.
Now, the sequence consists of several postures, which I will be showing in the images along with some simpler variations for those doing this for the first time.
Chest opening sequence.
FIRST POSTURE.
You begin by placing your right arm above your head during the inhalation. Opening the chest, and with the left hand you hold the elbow, with the intention of bringing the right hand to the center of the back. This should always be done gently and with deep breaths and through the nose.
This posture I recommend that you do for 10 breaths on each side following the indication.
NOTE: If it becomes difficult to perform the pose sitting on heels, you can raise your hips and be on your knees while performing it.
SECOND POSTURE
Basically, this would be the complete posture. The top arm stays in the same position, but the opposite one goes underneath upwards and both hands are clasped in the middle of the back.
If it is not easy to hold both hands, a towel can be used to join both arms and release the tension through the towel.
As in the previous posture, it is done on both sides, the same amount of breaths. And if necessary, it can be done on your knees.
THIRD POSTURE.
This posture is much simpler, simply intertwine the fingers of the hands, palms facing each other, and during the ten breaths open the chest wanting to bring the shoulder blades together.
You should also make sure that the neck is straight, as well as the spine, so that we do not overstress the cervical area.
FOURTH POSTURE
Finally in the fourth posture we do Ustrasana or camel posture. And there are different variations in this posture according to the level of the practitioner.
The images will be ordered from least to most difficult.
Here, we simply position the hands behind the waist, at the level of the kidneys, and gently push forward at the hips, projecting the shoulders backwards, thus opening the chest.
It is also of great importance to hollow the abdomen, with the intention of protecting the lumbar area while we perform the posture. In that way we avoid later ailments.
If we do not perceive pain in the cervical area, we can drop the head backwards, as in the image above, allowing a greater opening of the chest.
If up to this point, the posture has felt comfortable and there is no pain in the lumbar or cervical area, we proceed to bring both hands to the heels (resting the tip of the feet on the floor to raise the level of the heels). Always with the chest open and pushing the hips forward. Likewise, hollowing the abdomen and only if possible, dropping the head back, otherwise, we repeat the position of the head forward (see images above).
And finally, the posture would be the same Ustrasana, but with the insteps resting on the floor and the level of the heels lower.
All other considerations would be exactly the same as in the previous image.
I hope this sequence for breast opening is of much benefit to you, and that you can perform it constantly and thus be able to notice the results and benefits it brings to the body, breath and mind.

Soy Julio Cesar Arvelo, practicante y profesor de Ashtanga Yoga y Meditación.
- Si te gustó este post y quieres seguir leyéndome, bienvenido a seguirme.
-Todas las imagenes han sido creada por mi através de Canva.com
I am Julio Cesar Arvelo, practitioner and teacher of Ashtanga Yoga and Meditation.
- If you liked this post and want to keep reading me, welcome to follow me.
- All images have been created by me through Canva.com.
Mi redes sociales:

Your content has been voted as a part of Encouragement program. Keep up the good work!
Use Ecency daily to boost your growth on platform!
Support Ecency
Vote for Proposal
Delegate HP and earn more
Thank you so much for your support!