There are quite a few apps that have been built on and for the Steem blockchain over the past year and more and more great ideas are being produced all the time. I use several of the tools on a regular basis like steem.cool, and steemd to keep up with my Voting Power, Bandwidth, Reputation, etc.
Today I decided to create my own version of one of the existing apps I like and try my chops at using the steem.js script and prepare myself for some much larger applications I have in mind to build. Here is the outcome and the step-by-step of how I did it, so that you too can build your own and learn how to create your own custom apps with all the great ideas I'm sure so many of you have.
Libraries/Frameworks Used
While not all of these are necessary, it made building this much faster. If you'd like to follow along then here are the 3rd-party packages I used.
- Bootstrap 4
- jQuery
- Bluebird
- Lodash
- Vue
- Steem.js
- Google Fonts
Additional Files
I also created my own CSS and JS files and included them in the main HTML document, just to help keep things clean and organized. Those are named in my files as follows:
- app.css
- app.js
Writing the Code - Base HTML
Create a new html file, I have named mine index.html. First include the necessary css and meta-data in the <head> of the document.
<!DOCTYPE html>
<html lang="en">
    <head>
        <meta charset="utf-8">
        <meta name="viewport" content="width=device-width, initial-scale=1, shrink-to-fit=no">
        <title>Example Demo</title>
        <link rel="stylesheet" href="https://maxcdn.bootstrapcdn.com/bootstrap/4.0.0-beta/css/bootstrap.min.css" integrity="sha384-/Y6pD6FV/Vv2HJnA6t+vslU6fwYXjCFtcEpHbNJ0lyAFsXTsjBbfaDjzALeQsN6M" crossorigin="anonymous">
        <link href="https://fonts.googleapis.com/css?family=Lora:400,400i,700,700i" rel="stylesheet">
        <link href="https://fonts.googleapis.com/css?family=Montserrat:400,600,700,900" rel="stylesheet">
        <link rel="stylesheet" href="/includes/css/app.css">
    </head>
As you can see from the above code, I created a folder inside of my publicly accessible directory called includes. Inside of that folder i have 3 additional folders:
- css
- js
- imgs
Where i have included the respective files. If you would like to follow this to the letter, make sure you create these folders as well and put them in the right location, this is usually the public_html or content folder within your web-server if you are using managed hosting. If you're not, you likely know how your server is constructed already and thus I have no need to tell you.
Create your opening and closing body tags, and make sure to include the necessary script files at the bottom of your document.
    <body>


        <script src="https://code.jquery.com/jquery-3.2.1.slim.min.js" integrity="sha384-KJ3o2DKtIkvYIK3UENzmM7KCkRr/rE9/Qpg6aAZGJwFDMVNA/GpGFF93hXpG5KkN" crossorigin="anonymous"></script>
        <script src="https://cdnjs.cloudflare.com/ajax/libs/popper.js/1.11.0/umd/popper.min.js" integrity="sha384-b/U6ypiBEHpOf/4+1nzFpr53nxSS+GLCkfwBdFNTxtclqqenISfwAzpKaMNFNmj4" crossorigin="anonymous"></script>
        <script src="https://maxcdn.bootstrapcdn.com/bootstrap/4.0.0-beta/js/bootstrap.min.js" integrity="sha384-h0AbiXch4ZDo7tp9hKZ4TsHbi047NrKGLO3SEJAg45jXxnGIfYzk4Si90RDIqNm1" crossorigin="anonymous"></script>
        <script src="https://cdnjs.cloudflare.com/ajax/libs/bluebird/3.5.0/bluebird.min.js"></script>
        <script src="https://cdnjs.cloudflare.com/ajax/libs/lodash.js/4.17.4/lodash.min.js"></script>
        <script src="https://cdnjs.cloudflare.com/ajax/libs/vue/2.4.2/vue.min.js"></script>
        <script src="https://cdn.steemjs.com/lib/latest/steem.min.js"></script>
        <script type="text/javascript" src="/includes/js/app.js"></script>
    </body>
</html>
Now you have all of the necessary scripts and files included in your document and you can start to build out the structure in your file based on how you would like your content displayed.
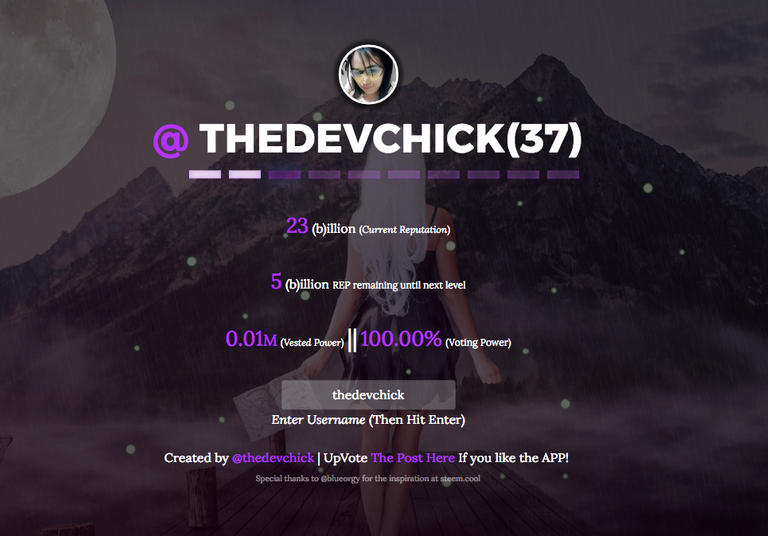
Inside the body tags, create your wrappers, containers, rows, and columns for the base structure of your app. Based on the image above, we can see that there are approximately 8 rows each with a single column.
We'll create a wrapper for the entire app, which is really only necessary because of my lack of wanting to edit the image used and instead simply darken it with an overlay. If you wanted to edit the image yourself before using and set the brightness of it in an image editor, the wrapper is not even necessary. I prefer modifying things programmatically though, thus I've added this little bit of additional code.
The Bootstrap Portion
If you are familiar with bootstrap you can skip this section it just explains the basics of the grid system and some helper classes that are in use for this particular app.
Inside of the wrapper I've included a container which is part of the bootstrap framework and helps constrain the content within desired proportions. We have applied the class text-center which will center all text within this div as you'd expect.
For each row we have simply included a row which is also part of the bootstrap framework and creates rows within our app as you might expect.
Inside each row there is only 1 column. Bootstrap works on a 12 column grid system and has responsive-breakpoints included. Due to that, we can set the # of columns we want our column to occupy for which breakpoint.
For this particular app, I wanted the same width ratio for every breakpoint above extra-small. So i've only set one break-point and given it's mobile-first, the larger sizes automatically inherit their settings.
Something like col-sm-6 would set the column to be 50% width from the small breakpoint and up. Similarly col-sm-8 would set the column to be 2/3rds width. If we wanted to set a different ratio for say medium we could simply also add col-md-2 for instance, which would reduce the # of columns the column occupied on medium size devices. We don't to this at all for this particular app, but it's still nice to know that we easily could.
Furthermore, you will notice on all of our columns that we have included some helper classes such as ml-auto and mr-auto which sets Margin Left Auto, and Margin Right Auto respectively and automatically centers our columns within their rows. Later on we'll also add another helper class* mb-0 which stands for Margin Bottom 0, and will remove automatic margins from the rows that Bootstrap automatically applies.
        <div class="wrapper">
            <div id="container" class="container text-center">
                <div class="row">
                    <div class="col-sm-8 ml-auto mr-auto">

                    </div>
                </div>
                <div class="row">
                    <div class="col-sm-8 ml-auto mr-auto">

                    </div>
                </div>
                <div class="row">
                    <div class="col-sm-6 ml-auto mr-auto">

                    </div>
                </div>
                <div class="row">
                    <div class="col-sm-8 ml-auto mr-auto">

                    </div>
                </div>
                <div class="row">
                    <div class="col-sm-8 ml-auto mr-auto">

                    </div>
                </div>
                <div class="row">
                    <div class="col-sm-8 ml-auto mr-auto">

                    </div>
                </div>
                <div class="row">
                    <div class="col-sm-8 ml-auto mr-auto">

                    </div>
                </div>
                <div class="row">
                    <div class="col-sm-8 ml-auto mr-auto">

                    </div>
                </div>
            </div>
        </div>
All of the structure has now been applied
Lets now move on and start writing our app.js file to interact with the Steem Blockchain and get all the information we want to output!
The Javascript Portion
The javascript portion is easily the most difficult of the entire app, at least for me. In the Javascript file we'll connect to the steem blockchain, compute math, change formats, set variables, and even add/remove some classes as a helper for our CSS.
Lets go piece by piece and break it all down into easily digestible chunks to make sure you actually understand what our app is doing so that you may take all that you learn here and create another awesome app of your own later!
First open up the document and prepare it for your code, we'll be using a bit of Vue, bluebird and lodash to make our lives simpler.
{
     All our code goes here.
}
Setup Our View Modal and watch another function we'll write later
Lets setup our view modal and tell it to watch a function we'll write later so it knows to update the data appropriately on change.
The following code sets a view modal scope inside of #containerand lists out the variables we'll later use to output the data to our page such as level, power, reputation, remaining, vested, profile_image, percent, all the data we visually display in our app. It then tells the code to watch the refreshAccountData function for changes and update accordingly.
As you can see we've set some initial base data such as the default user upon loading the page, etc.
    let vm = new Vue({
        el: '#container',
        data: {
            user: 'thedevchick',
            userData: {
                level: 0,
                power: 0,
                reputation: 0,
                remaining: 0,
                vested: 0,
                profile_image: "",
                percent: 0
            }
        },
        watch: {
            user: function (u) {
                refreshAccountData(u)
            }
        }
    })
Write the Log10 function
Next we'll write the log10 function to help us do some math for converting the raw reputation into the reputation level, for instance, from 23,139,682,385 to 37.
The following code does this:
- Sets the variable $str to be equal to the value sent to it, converted from a number, into a string "text not numerical".
- Creates the leadingDigits constant, restricts the string to only 4 characters in length, starting from the first, and only including the following 4. For instance 1234567890 would become 1234, and then turns the result back into a whole number.
- Creates the log constant, performs the mathematical function
logon the previously set constant leadingDigits and then divides the result by the mathematical functionlog(10). - Creates the n constant which is set by getting the value of the first set variable $str, calculating how many characters it is, and then subtracting that value by 1. For instance 1234567890 would output 9 because that is 10 characters long.
- Converts the constant log into a whole number, subtracts the constant log by the whole number version of log, for instance: 12345.12345 - 12345 = .12345. It then adds that value to the value of the constant n.
The math can be a bit overwhelming at first but once you break it down into the little pieces as we've done, it all seems pretty basic.
    function log10(str) {
        let $str = str.toString()
        const leadingDigits = parseInt($str.substring(0, 4))
        const log = Math.log(leadingDigits) / Math.log(10)
        const n = $str.length - 1
        return n + (log - parseInt(log))
    }
Write a Reputation Calculation function
Having completed that function, we'll write a function to calculate the reputation using the log10 function we just created.
The following code does this:
- Checks if the value sent equals "null" or 0, and if so returns 0 without doing the math below it.
- Sets the variable neg for any value sent to it that is less than 0.
- Sets the variable reputation_level to be equal to the value sent it, having had the previous log10 function we wrote processed on it, and then subtracts 9 from the result.
- Checks if reputation_level is less than 0 and if so, set it to = 0.
- Checks if neg was set, and if so it multiplies the reputation_level by negative 1 (to make it negative again given the previous math would have made it positive), so this just rectifies that again in case.
- Multiplies the reputation_level by 9, adds 25, and then returns that value.
Again, the math can be a bit overwhelming at first but breaking it down like this should make you feel pretty comfortable with it, even if math wasn't your favorite subject in school.
    function calcReputation(value) {
        if (value == null || value == 0) return 0;
        let neg = value < 0
        let reputation_level = log10(value) - 9;
        if (reputation_level < 0) reputation_level = 0;
        if (neg) reputation_level *= -1;
        return reputation_level * 9 + 25;
    }
Write a Level Calculation function
This function is pretty simple, it's meant to output the level based on the reputation value sent to it.
The following code does this:
- Takes the value sent to it and runs the previous calcReputation function we set on it, and then rounds it down to a nice even integer.
    function calcLevel(v) {
        return Math.floor(calcReputation(v))
    }
Write a XP Calculation function
The XP is essentially the % of reputation that a user has received at their current Level before reaching the next Level. We use this for the progress bar in the app.
The following code does this:
- Sets r to be equal to the value sent to it, having had the calcReputation function we previously wrote run on it.
- Subtracts the value of r having been rounded down from r, for instance 123456.4321 - 123456 = 0.4321, multiplies it by 100, and returns that value.
    function calcXP(v) {
        let r = calcReputation(v);
        return 100 * (r - Math.floor(r))
    }
Write a function to format any number into billions.
This is used for the Current Reputation and Rep Remaining that is output on our app as we wanted to keep it simple and round the reputation to billions to be more readable.
The following code does this:
- Checks if the value sent to it is greater than or = to 1 billion.
- If it is, divides it by the value of 1.0e+9 or in layman's terms, 1 billion.
- Returns the value having run the math function
    function repFormat(billions) {
        return Math.abs(Number(billions)) >= 1.0e+9
            ? Math.abs(Number(billions)) / 1.0e+9
            : Math.abs(Number(billions));
    }
Write a function to set a Default Profile Picture.
In case a user has not set a profile picture on steemit, this will set the standard default profile image from Gravatar to fill the empty space where we output the profile image in our app.
The following code does this:
- Sets the vue view modal variable profile_image inside of userData to the default gravatar profile image.
    function setDefaultUserProfilePic() {
        vm.$set(vm.userData, 'profile_image', 'https://www.gravatar.com/avatar/000000000000000000000000000000000?d=mm&f=y')
    }
Write a function to add commas should a number need it.
To make sure that the output is easily readable, we want to add commas to the numbers should they need it. This function simply runs a regEx process that will add commas to any number that requires it, at the correct location. For instance 1000 becomes 1,000 and 1000000 becomes 1,000,000
    function addCommas(x) {
        var parts = x.toString().split(".");
        parts[0] = parts[0].replace(/\B(?=(\d{3})+(?!\d))/g, ",");
        return parts.join(".");
    }
Write a function to calculate vests into a nice readable format
We want to output the amount of vests a user has in a nice readable format, this function does that.
The following code does this:
- Sets the variable q to be equal to the value sent to it, removes the last 6 characters returned which is ** VESTS** including the space, and turns the value into an integer.
- Sets the variable qmil to be equal to the variable q divided by 1 Million and truncated to the 2nd decimal point.
- Returns the value of qmil
    function vestCalc(vests){
        var q = parseInt(vests.slice(0, -6));
        var qmil = (q / 1000000).toFixed(2);
        return qmil;
    }
Write the GrandDaddy function, refreshAccountData which does a LOT.
This is the GrandDaddy of all of the functions we've written so far. As you recall I'm sure, we referenced this function at the very start. This is what runs anytime a user changes the accountName in the input field we'll place in the app to allow users to check the statistic for any account they please.
The following code does this:
- Connects to the steem blockchain via steem.js with the getAccounts function of the API, and sets the value as an array with the only value being the account name entered in the text-field by the user and returns the JSON data based on that user.
- Creates a new action after JSON data has been returned and runs the rest of the computations.
- Sets secondsago as the time since the last vote a user has, to make sure it is completely accurate.
- Sets vpow as a variable that equals 10000 times secondsago and divided by 432000 plus the users returned Voting Power.
- Checks if the result returned any results and if not explicitly sets the values of the variables and then returns it.
- This one is a bit long, I got a bit lazy as i started to wrap this all up and instead of writing functions just did the equations inline. I'm sorry for that, but Hey, At least now you know another way you can write similar code!
- Takes the Json output for the reputation and runs the previous function we wrote calcLevel.
- Adds 1 to the result
- Subtracts 25 (yes i know, but this keeps it easier to understand for you, using the same numbers so it's easier to follow)
- Divides by 9
- Adds 9
- Runs the mathematical function pow
- Sets nextLevel to equal the result of the previous equations and functions.
- Subtracts the Json output for the reputuation from the variable nextLevel and sets remaining to be equal to that.
- Sets up a conditional with an error fallback
- Sets profile within the aforementioned conditional to equal the Json data returned inside profile which was inside json_metadata
- Checks of profile.profile_image which is a value inside of profile is null or not, if not then...
- Sets the View Modal for profile_image inside of userData to be equal to profile.profile_image or in other words: it looks inside the Json returned results, then looks inside the tag json_metadata, then looks inside profile, then looks inside profile_image, and sets that. Nesting within nesting, within nesting. This is how we get that type of information.
- Checks if there is an error with the above and if so...
- Sets profile_image within userData to the default gravatar based on the function we wrote earlier.
- Removes the class "active" from all list items.
- Runs the function calcXP we wrote earlier on the Json returned value of reputation, rounds it down, divides it by 10, turns it into a whole number, and then sets that as the value of the variable whichone.
- Adds the class "active" to the nth-child list item, nth determined by the variable whichone within the parent class prog-bar.
- Runs the vestCalc function on the Json returned value of vesting_shares and sets it as the value of vested within the view modal userData.
- Runs the repFormat function on the variable remaining we set earlier, rounds it, and then runs the addCommas function to it, then sets the output as the value of remaining in the view modal userData.
- Runs the repFormaton the Json returned value of reputation, rounds it down, runs the addCommas function, and then sets the output as the value of reputation in the view modal userData.
- Runs the calcLevel function on the Json returned value of reputation.
- Runs the mathematical min function with the variable vpow divided by 100, and 100, and cut off at the 2nd decimal point.
- Outputs any errors in the above to the console.
- Runs the function refreshAccountData with the input of the user set in the view modal.
Again, especially because i wrote some short-hand here I know it can be a bit hard to follow, but as long as you go line-by-line to understand what each thing does, you'll pick it up and understand it pretty easily.
    function refreshAccountData(accountName) {
        return steem.api.getAccountsAsync([accountName])
            .then(function (result) {
                let secondsago = (new Date - new Date(result[0].last_vote_time + "Z")) / 1000
                    let vpow = result[0].voting_power + (10000 * secondsago / 432000)
                if (result.length == 0) {
                    vm.userData = {
                        level: 0,
                        power: 0,
                        reputation: 0,
                        remaining: 0,
                        vested: 0,
                        profile_image: "",
                        percent: 0

                    }
                    return
                }

                nextLevel= Math.pow(10, (((calcLevel(result[0].reputation)+1)-25)/9)+9);
                remaining = nextLevel - result[0].reputation;

                try {
                    let profile = JSON.parse(result[0].json_metadata).profile

                    if (profile.profile_image != null) {
                        vm.$set(vm.userData, 'profile_image', profile.profile_image)
                    }
                }
                catch (err) {
                    do_setDefaultUserProfilePic()
                }

                $( "li" ).removeClass( "active" )
                var whichone = parseInt(Math.floor(calcXP(result[0].reputation))/10);
                $(".prog-bar li:nth-child("+whichone+")").addClass('active');

                vm.$set(vm.userData, 'vested', vestCalc(result[0].vesting_shares))
                vm.$set(vm.userData, 'remaining', addCommas(Math.round(repFormat(remaining))))
                vm.$set(vm.userData, 'reputation', addCommas(Math.floor(repFormat(result[0].reputation))))
                vm.$set(vm.userData, 'level', calcLevel(result[0].reputation))
                vm.$set(vm.userData, 'power', Math.min(vpow / 100, 100).toFixed(2))
            })
            .catch(console.error)

    }
Well that is all there is to it for the Javascript. We referenced a few classes and set some variables, so lets go back to our HTML file and drop our variables in there so that our Javascript can connect to it!
Back to the HTML with our newly set Javascript
Remember long ago before the rabbit hole of our Javascript file when we set the structure of the HTML for our app? Lets now fill in the blanks with our newly set variables, add some classes here and there to help us with styling, and flesh it all out.
I feel it's unnecessary to go line by line for the HTML, so we'll hit the highlights. If anybody has confusion with anything and would like clarification I can either answer in the comments or update the post to go further line-by-line if necessary.
The following code does this:
- v-cloak set on containers paired with css will hide the content within this container until values are rendered. This prevents variables outputting before they are parsed, nobody wants to see code on the front-end.
- We output our variables sent in our javascript with
{{ }}and scope. level for instance is output as{{ userData.level }} - We set a few other special classes and helpers to make our app beautiful.
        <div class="wrapper">
            <div id="container" class="container text-center">
                <div class="row mb-0" v-cloak>
                    <div class="col-sm-8 ml-auto mr-auto"  v-cloak>
                                                 Add the proper img open carrot and closing carrot here, it had to be removed due to the editor being bugging and attempting to render the image even though it is inside code formatting.
                        img :src="`${ userData.profile_image }`"
                    </div>
                </div>
                <div class="row mb-0" v-cloak>
                    <div class="col-sm-8 ml-auto mr-auto">
                        <h1>
                            <a :href="`https://steemit.com/@${user}`">
                                @
                            </a>
                            {{ user }}({{ userData.level }})
                        </h1>
                    </div>
                </div>
                <div class="row">
                    <div class="col-sm-6 ml-auto mr-auto">
                        <ul class="prog-bar">
                            <li></li>
                            <li></li>
                            <li></li>
                            <li></li>
                            <li></li>
                            <li></li>
                            <li></li>
                            <li></li>
                            <li></li>
                            <li></li>
                        </ul>
                    </div>
                </div>
                <div class="row" v-cloak>
                    <div class="col-sm-8 ml-auto mr-auto">
                        <p>
                            <span class="colored">{{ userData.reputation }}</span> (b)illion <span class="small">(<em>Current Reputation</em>)</span>
                        </p>
                    </div>
                </div>
                <div class="row" v-cloak>
                    <div class="col-sm-8 ml-auto mr-auto">
                        <p>
                            <span class="colored">{{ userData.remaining }}</span> (b)illion <span class="small">REP remaining until next level</span>
                        </p>
                    </div>
                </div>
                <div class="row" v-cloak>
                    <div class="col-sm-8 ml-auto mr-auto">
                        <p>
                            <span class="colored">{{ userData.vested }}<span class="small">M</span></span> <span class="small">(<em>Vested Power</em>)</span> <span class="large">||</span> <span class="colored">{{ userData.power }}%</span> <span class="small">(Voting Power)</span>
                        </p>
                    </div>
                </div>
                <div class="row mb-0">
                    <div class="col-sm-8 ml-auto mr-auto">
                        <div class="form-group">
                            <input class="form-control" name="username" type="text" v-model.lazy="user">
                            <label for="username">
                                <em>Enter Username</em> <span>(Then Hit Enter)</span>
                            </label>
                        </div>
                    </div>
                </div>
                <div class="row mb-0">
                    <div class="col-sm-8 ml-auto mr-auto">
                        <p class="mb-0">
                            Created by <a href="https://steemit.com/@thedevchick">@thedevchick</a> | UpVote <a href="">The Post Here</a> If you like the APP!
                            <br>
                            <span class="thanks mb-0">Special thanks to @blueorgy for the inspiration at steem.cool</span>
                        </p>
                    </div>
                </div>
            </div>
        </div>
The CSS
CSS makes everything pretty. After all, what is function and structure if it still looks like a donkey's rear? An appealing appearance is important, and we do that here.
The following code does this:
- The body element is targeted and the following properties are applied:
- Sets a beautiful background image to the specified source, the position to centered horizontally and vertically, and not to repeat.
- Sets the background size to take up the entire area.
- Sets the width to the entirety of the viewport's available width.
- Sets the height to the entirety of the viewport's available height.
- Sets the default color for the page to be white.
- Sets the default font for the page to the Google Font included in the HTML to Lora.
- Sets the default font size to 1em
- The wrapper class is targeted and the following properties are applied:
- Background is set to a 60% opacity of black.
- Sets the width to the entirety of the viewport's available width.
- Sets the height to the entirety of the viewport's available height.
- The container class is targeted and the following properties are applied:
- It utilizes a combination of the 3 properties to center it's contents vertically.
- The row class is targeted and the following properties are applied:
*A margin of 15px is set to the bottom of each row. - The h1 element is targeted and the following properties are applied:
- The font is set to use the Google Font imported in the HTML Montserrat*.
- The weight of the font is set to bold.
- We make all the text output to be uppercase.
- The font size is set to 50px.
- The spacing between individual letters is set to 1px
- The colored class and all a elements or "links" are targeted and the following properties are applied:
- The color is set
- The colored class is targeted and the following properties are applied:
- The font size is set to 26px.
- The colored class is targeted and the following properties are applied:
- The v-cloak attribute is targeted and the following properties are applied:
- The browser is told to hide anything with this attribute
- The small class is targeted and the following properties are applied:
- The font size is set to .75em.
- The large class is targeted and the following properties are applied:
- The font size is set to 1.75em.
- The thanks class is targeted and the following properties are applied:
- The font size is set to 10px.
- The opacity of the text is reduced to 50%.
- The form-control class is targeted and the following properties are applied:
- The text is centered.
- The width of the element within the available area is set to 30%.
- The margin is set to 0 pixels at the top and bottom and automatic for left to right to center the element.
- The background of the element is set to white at 25% opacity.
- The color of the text is set to white.
- The cursor color As Explained In My Previous Article is set to a unique color.
- The form-control class is targeted if focused upon, and the following properties are applied:
- The outline is set to none, we don't want the browser defaults showing stuff we did not specify.
- The background maintains at white at 25% opacity, overriding any browser behaviors.
- A box-shadow is set inside the element with a horizontal position of 0, vertical position of 0, blur of 10px, spread of 2px, and color of black at 50% opacity.
- The color of text is maintained at white.
- The border is set to be none.
- The img element is targeted and the following properties are applied:
- The height is set to 75px.
- The width is set to 75px.
- The box-shadow is set to 0px horizontal position, 0px vertical position, 5px blur, 6px spread, and a color of black at 50% opacity.
- The border is set to 3px, solid, and color of white.
- The margin below it is set to be 15px.
- The ul element is targeted and the following properties are applied:
- The margin below is set to 20px.
- The width of it is set to 100% of the available space.
- The element is floated to the left.
- The li element is targeted and the following properties are applied:
- Elements are floated to the left.
- The list style is set to none.
- The width is set to 8% of the available area.
- The margin of the elements is set to 1% on the left and right.
- The elements are set to have a height of 10.
- The background is set to white at 90% opacity.
- The elements receive 2 separate box-shadow properties for the "glow".
- All li after the class active are targeted and the following properties are applied:
- The background is set to white, and the opacity is set to only 10%.
- The li immediately after the active class is targeted and the following properties are applied:
- Invoke the css animation blink at a 1 second duration, alternating, forever.
- Do the same for other browers that may need pre-fixes to work.
- Set the background to white at 90% opacity.
- The css animation blink is created and configured and the following properties are applied:
- The background at 0% of 1 second is set to be 100% opacity color white.
- A box-shadow is applied at 0% of 1 second.
- The background at 100% is set to be 0% opacity color white.
- A box-shadow is applied at 100% of 1 second.
body{
    background: url('/includes/imgs/bg.jpg') center center no-repeat;
    background-size: cover;
    width: 100vw;
    height: 100vh;
    color: #fff;
    font-family: 'Lora', serif;
    font-size: 1em;
}
.wrapper{
    background: rgba(0, 0, 0, .6);
    width: 100vw;
    height: 100vh;
}
.container{
    top: 50%;
    transform: translateY(-50%);
    position: relative;
}
.row{
    margin-bottom: 15px;
}
h1{
    font-family: 'Montserrat', sans-serif;
    font-weight: bold;
    text-transform: uppercase;
    font-size: 50px;
    letter-spacing: 1px;
}
a, .colored{
    color: #B533FF;
}
.colored{
    font-size: 26px;
}
[v-cloak] {
    display: none;
}
.small{
    font-size: .75em;
}
.large{
    font-size: 1.75em;
}
.thanks{
    font-size: 10px;
    opacity: .5;
}
.form-control{
    text-align: center;
    width: 30%;
    margin: 0 auto;
    background: rgba(255, 255, 255, .25);
    color: #fff;
    caret-color: #B533FF;
}
.form-control:focus{
    outline: none;
    background: rgba(255, 255, 255, .25);
    box-shadow: inset 0 0 1110px 2px rgba(0, 0, 0, .5);
    color: #fff;
    border: none;
}
img{
    height: 75px;
    width: 75px;
    border-radius: 100%;
    box-shadow: 0px 0px 5px 6px rgba(0, 0, 0, .5);
    border: 3px solid #fff;
    margin-bottom: 15px;
}
ul{
    margin-bottom: 20px;
    width: 100%;
    float: left;
}
li{
    float: left;
    list-style: none;
    width: 8%;
    margin: 1%;
    height: 10px;
    background: rgba(255, 255, 255, .9);
    box-shadow: inset 0px 0px 10px 1px rgba(181, 51, 255, .4), 0px 0px 20px rgba(181, 51, 255, .1);
}
.active ~ li{
    background: rgba(255, 255, 255, .1)
}
.active + li {
    -webkit-animation: blink 1s alternate infinite;
    -moz-animation: blink 1s alternate infinite;
    animation: blink 1s alternate infinite;
    background: rgba(255,255,255,0.9)
}
@-webkit-keyframes blink {
  0% {
    background: rgba(255,255,255,1);
    box-shadow: inset 0px 0px 10px 2px rgba(181, 51, 255,0.5),
                      0px 0px 40px 2px rgba(105,135,255,1);
  }
  100% {
    background: rgba(255,255,255,0);
    box-shadow: inset 0px 0px 10px 2px rgba(181, 51, 255,0.5),
                      0px 0px 30px 2px rgba(105,135,255,0.3);
  }
}
@-moz-keyframes blink {
  0% {
    background: rgba(255,255,255,1);
    box-shadow: inset 0px 0px 10px 2px rgba(181, 51, 255,0.5),
                      0px 0px 40px 2px rgba(105,135,255,1);
  }
  100% {
    background: rgba(255,255,255,0);
    box-shadow: inset 0px 0px 10px 2px rgba(181, 51, 255,0.5),
                      0px 0px 30px 2px rgba(105,135,255,0.3);
  }
}
@keyframes blink {
  0% {
    background: rgba(255,255,255,1);
    box-shadow: inset 0px 0px 10px 2px rgba(181, 51, 255,0.5),
                      0px 0px 40px 2px rgba(105,135,255,1);
  }
  100% {
    background: rgba(255,255,255,0);
    box-shadow: inset 0px 0px 10px 2px rgba(181, 51, 255,0.5),
                      0px 0px 30px 2px rgba(105,135,255,0.3);
  }
}
That's a wrap!
That concludes the official how-to for building the app. Please feel free to play with the demo here, all the code was done on the front-end so you can easily view the source and cheat into making edits yourself.
There is much that can be enhance and improved upon, but the point of this was to teach you how to interact and build something pretty cool, fairly quickly and easily, and allow you to build upon that.
I hope that this tutorial helped you not only learn how to build this app on the steem blockchain but how to build anything. It's really not overly difficult to build applications on steem. We can truly do some amazing things.
This post received a 1.5% upvote from @randowhale thanks to @craftech! For more information, click here!
Nice one, though I don't know what things like reputation mean. I never was one of the popular people though. ;) You might consider putting the code on Github as well.
Reputation on Steemit is essentially a gauge of quality of an individual's posts and an indicator of how long they've been around. Someone with high reputation is typically more respected and usually has more followers than someone with a low reputation. Also when it comes to flags, if someone with a higher reputation than you flags you, your reputation goes down. If someone with a lower reputation than you flags you, your reputation is untouched. In short it's just a metric to keep an eye on quality. Spammers, people that plagiarize, and mean people usually have low reps. Community leaders, those that post great content, and those that are trusted and respected usually have high reps.
Nice Tutorial !
Great job on the tutorial!
Very in-depth and well presented.
Very nice tutorial! I may have missed it, but what do Bluebird and Lodash do, and where are they used? Thanks!
Hey thanks for the great question @kenny-crane
BlueBird lets us use Promises which basically just makes our code much cleaner and easier to write, It could have been used more extensively in the tutorial but near the end I just wanted to pump it out as quickly as I could.
Lodash also just makes things easier to work with, it has some helpers for arrays, numbers, objects, strings, etc.
You have done well with this tutorial, and weldone with the job. I tried it out and it is cool.
Thank you, I'm glad you liked it! :)
Great tutorial. As a novice dev, posts like this are very helpful to learn new concepts and get exposed to new tools. I'm following you now!
That's great @gadgetchaser I'm glad you liked the post that was the point of it to help others that may be a bit intimidated and unsure of where to start with steem dev get a bit of a leg up and feel more comfortable diving in.
Very useful! It helped me finally get some results querying the API... One issue seems to be that the @ Link on the page goes to the URL without the @ symbol, causing a 404... An awesome and informative tutorial.
One question: I can't see to find a list of the variables that are returned by each function, even in the Github docs. eg. results.reputation results.name, etc. I was wondering if you know if such a list exists? Upvoted and Following, you seem like a powerful Techie ally indeed :)
Thanks for mentioning that bug for me. I've fixed it now.
You can get anything that is returned from the query in the JSON. You could setup a simple
console.log()during development to see all of the available information you can pull from. Different queries obviously return different information but the one used in this app returns a TON of information for you to use.Nice one, I'll give that a try... Thanks again.
Glad to help !
Hi @thedevchick, I see you have mentioned me.
This is automatic response so that I may respond to your mention later.
Thanks for sharing... Love it.
Congratulations @thedevchick! You have completed some achievement on Steemit and have been rewarded with new badge(s) :
Click on any badge to view your own Board of Honor on SteemitBoard.
For more information about SteemitBoard, click here
If you no longer want to receive notifications, reply to this comment with the word
STOPCongratulations @thedevchick! You have completed some achievement on Steemit and have been rewarded with new badge(s) :
Click on any badge to view your own Board of Honor on SteemitBoard.
For more information about SteemitBoard, click here
If you no longer want to receive notifications, reply to this comment with the word
STOPMay I request that sometime in future, you make an example tutorial showing functions like taking a Steem payment from a user, and then perhaps paying the user... Maybe like the dice thing that's out there... Just a thought :)
Sure I could put something like that together for you. :)
yeah that would be really nice!
@thedevchick got you a $8.03 @minnowbooster upgoat, nice! (Image: pixabay.com)
Want a boost? Click here to read more!
Thanks for the knowledge! Highly appreciated... Looking to put something on the Steemit platform in the very near future...
If anyone is looking for a mobile applications for steemit or any steem based application, please follow my tutorial here. https://steemit.com/dev/@aneilpatel/steem-for-developers-2-create-your-own-steemit-mobile-app-within-5-minutes