Being new to Steemit, I didn’t realize I couldn’t edit or delete posts after 7 days has passed. This made me see the need for having a self-hosted link cloaking service hosting my links, as urls some times change on the massive, ever-evolving interwebs.

Photo by Kaique Rocha from Pexels
And since writing articles on Steemit is a “permanent” thing, stored on the blockchain, all of the links from my posts will be my assets in the long run. Then it’s nice to at least be able to update links if they become invalid at some point in the future.
I already have the domain kryptokindmusic.com, and decided to install the open source software called “Yourls” on my own domain, in a separate folder.
What are the benefits of hosting your own link redirects?
Several. I did it this time to be able to change my links on Steemit in the future. Since I have been linking to Choon in several uneditable articles, it would have been wise to cloak them like this from the start as they just launched a referral program. I would then be able to change the previous direct link to Choon, to be my referral link.
The other massive benefit, is knowing how many times people click on your links. This is extremely important when you are trying out new marketing tactics, experimenting, and looking for ways to improve - to discover what is actually working. Then you can also track the same link using different names, and effectively see the amount of clicks you are getting from for example Instagram, Twitter and Soundcloud.
I had no idea how many people actually click links in Steemit posts. Let alone how many people actually read them. Something I am really missing on Steemit currently. Setting up tracking of my links allows me to at least see how many times my links get clicked, which I can then compare against streaming numbers on Choon if it’s music I am promoting.
And it doesn’t take long to set up at all, especially if you are slightly technical.
How to set up Yourls on a server using shared hosting
This is the method I used for myself. Most people with self-hosted websites use some form of shared hosting. But if you don’t, then you will most likely be more than capable of following their own guide for installation 😉
First, download the files from Github. Then unzip it on your computer.
Then proceed to making a database, a database user, and adding the user to the database. This can usually be achieved from within your hosts' cpanel. Write down both the full name of the database, the full name of the user, and the password. (if you are confused by this, Google is your friend. "How to make a database at *hosting provider name*" should help)
Then, open a code or text editor and insert this info in the file named config-sample.php file, located in the “/user” folder of your unzipped Yourls package. After doing so, save it, and rename it to config.php.
You also set up your Yourls user in this file, so make a suitable username and password, and proceed. Here is how it will look: (I'm using a freemium coding software called Sublime Text to edit code, very useful)

I tried adding helpful examples here as well. I recommend setting "unique urls" to false, as this will allow you to have different links going to the same destination for tracking purposes.
For instance mylink.com/yourls/choon-sc, mylink.com/yourls/choon-twitter, mylink.com/yourls/choon-insta can all lead to my artist profile on Choon, while allowing me to track how much traffic I'm getting from them separately. Notice the url above. I now track the effectiveness of "native" links within my article, and footerlinks on Steemit, as I am using a different link below this article.
---
After having setup the config file completely, you are ready to upload everything to your server. This can be achieved by either using the file manager from your host, or by using FTP. If you don’t know how to do this, there are plenty of free guides to be found in Google about this too.
Once all the files are uploaded, go to "http://yourdomain.com/installation-folder/admin/install.php" in your browser. Obviously replacing yourdomain with your domain, and installation-folder with where you installed Yourls. I like to keep it separate from my top-level domain, and use a dedicated folder on my server for this. Make it short if you decide to do so yourself, like domain.com/out domain.com/link domain.com/o or similar, as all your cloaked links will have this in their url.
After going to the link on your server mentioned above, click install. A .htaccess file will be created for you, and you’re ready! You can now proceed to yourdomain.com/folder/admin, log in, and see your dashboard. Everything is done from here. This is how it looks for me at the moment:

I decided to just cloak pretty much all my links in this manner going forward. Partly because it shows me the performance of my activities. And partly because it allows me to edit the link destination of my URL's in the future.
Plugins
Even though it’s nice right out of the box, I decided to get some plugins to extend the functionality. It really bothered me that I wasn’t able to use hyphens in my links, so I activated the "Allow Hyphens in Short urls" plugin to be able to do so. This can be achieved by clicking "Manage plugins" within your admin dashboard. Like this:
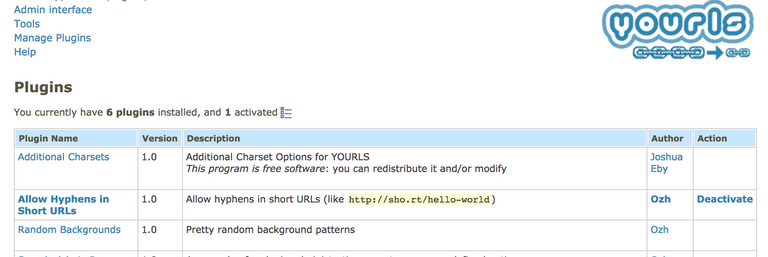
I personally think it’s important to be able to format your links to a readable format, and giving it a proper title can make it slightly more enticing for readers to click on. domain.com/choonskipwaitlist doesn’t look as inviting as domain.com/choon-skip-waitlist in my opinion. And you will often want your url's to be easy to read.
Other useful plugins:
- Don't log bots (thanks to @theatreofdelays)
If you're still lost, let me know where in the comments, or check out their own, more in-depth guide here.
-------
Found this useful? Then consider upvoting and following me =)
You can also support me by listening to my music for free on Choon.
You can find my profile here: Kryptokind on Choon ( #melodictechno +#minimaltechno,#progressivehouse + #deephouse, and more. Some with inspirations from#italo and #psytrance )
I also have set the playlist split to 50% for all my tracks, allowing you to get 50% of the royalties from any of my songs streamed through your playlist. This rate may change in the future.
New to Choon? Skip the waiting list here.
use this to filter out bots: https://github.com/YOURLS/dont-log-bots
Thanks! Will add to the article as well =)
Congratulations @cryptoprebz! You have completed the following achievement on Steemit and have been rewarded with new badge(s) :
Click on the badge to view your Board of Honor.
If you no longer want to receive notifications, reply to this comment with the word
STOPDo not miss the last post from @steemitboard:
SteemitBoard and the Veterans on Steemit - The First Community Badge.