If you're reading this, you're probably concerned about privacy and security, or at the very least want to have full control over what runs on your computer. If so, you're in the right place.
This guide covers your average computer with the following specs or greater:
- 64-Bit Intel, AMD, or VIA CPU
- 4GiB¹ of RAM
- AMD, Intel, or NVIDIA² Graphics
- 32GB of storage space
1: 8GiB or more recommended, optimisations are needed for less
2: Further action is required for NVIDIA if you intend to use 3D software
If you don't meet the specs or need additional protection, such as drive encryption, this guide isn't for you, feel free to request a guide via comment if I haven't already written one. I plan on creating one for those who need encryption next.
Preparation
Make sure you have a backup of all your data somewhere else, this is a clean install and will delete everything on the machine.
Firstly, before you can install, you need an installation medium, this is how to create one.
You'll need one of the following:
- A 4GB or larger USB stick which you are ok with erasing/formatting
- A blank DVD, if you don't have the above and your computer has a DVD drive
After you've got this, go ahead and download the latest Manjaro KDE ISO from https://manjaro.org/downloads/official/kde/
Creating a boot USB
First, Download Etcher from https://www.balena.io/etcher/ for your current operating system and install it.
Once installed, open Etcher and you'll be greeted with a screen like this
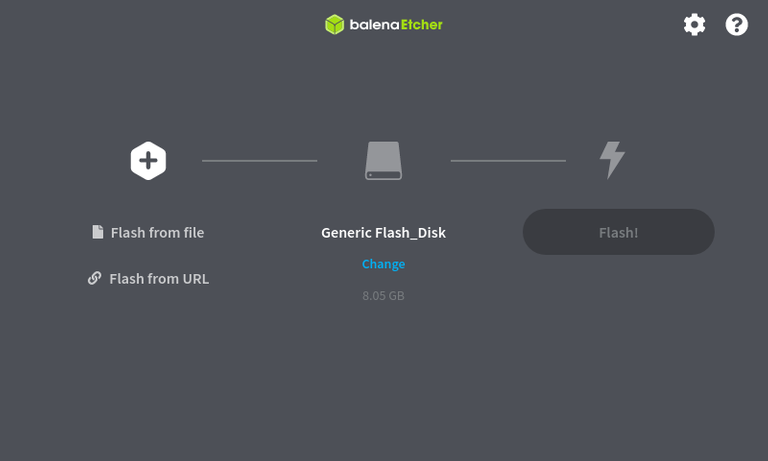
Select Flash from file and pick the Manjaro ISO you downloaded earlier.
Then make sure the correct USB stick is selected, if you only have one plugged in you should only have one option.
After that, click Flash, then wait for it to complete.
Creating a boot DVD
Insert your blank DVD
If you're on Windows 8.1 or 10, right click on the Manjaro ISO and click "Burn disc image", ensure your DVD drive is selected then click Burn
If you're on Windows 7 or below, you can use software such as ImgBurn to create a DVD
If you're on macOS, select the Manjaro ISO in Finder, open the File menu, and select Burn Disk Image to Disc
Booting and Manjaro Installation
Booting the media you just created is the trickiest part, as every brand of computer has a slightly different way of doing this.
Firstly, if your computer came with Windows 8 or Windows 10, you'll need to make sure "Secure Boot" is disabled in your computer's firmware.
Despite the name, "Secure Boot" in practice only serves to prevent booting any OS other than Windows, which is fine if you only intend to use Windows, but introduces a problem
Depending on model, you can access the firmware by pressing ESC, F1, F2, F12, or Home on the very first screen you see while your computer turns on.
If you currently have Windows 8 or 10, you can alternatively hold shift while clicking reboot, and continuing to hold shift until you see this screen or similar:
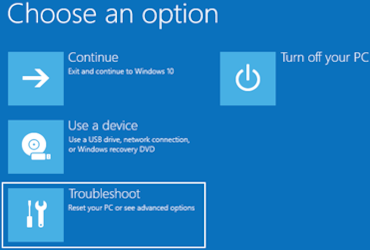
Select Troubleshoot, then "UEFI Firmware Settings", if this option does not exist, your installation is likely not in UEFI mode, so you'll need to go into your computer's firmware settings manually and then find and enable UEFI Boot, if no such option is available, check to see if i've put tother a legacy install guide alrady.
You'll need to look around until you find "Secure Boot", once you locate it, disable it, then find the "Save and Exit" setting and select it
After that, return to the above menu and select "Use a device", alternatively, press the Boot Device key while turning your system on, you may have discovered it earlier, but it's typically one of: Esc, F1, F2, F8, F9, F11, F12, or Delete. It'll likely take you a few tries to get it, some systems will tell you what each key does when powered on.
If you're on a Mac, hold Option while turning your machine on until you are presented with a boot selection screen.
After that, select your USB stick or DVD drive from the options, depending on what you used for an installation medium.
After a moment, you should see this screen:
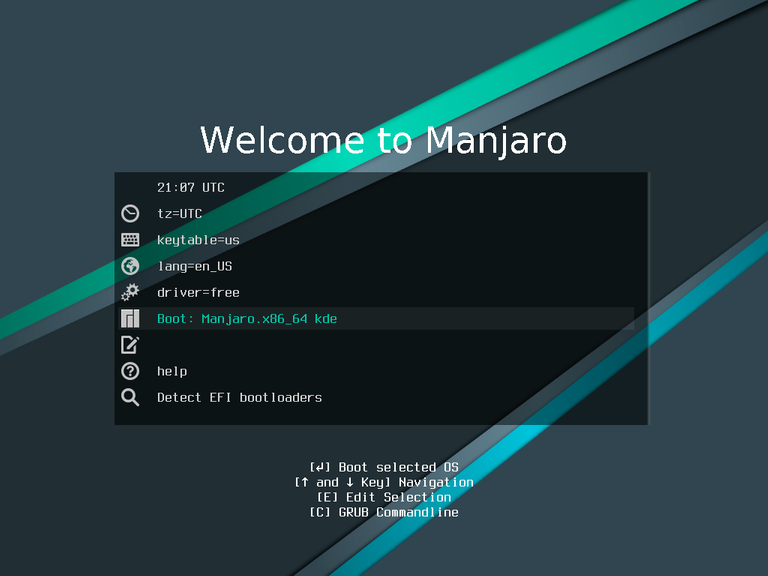
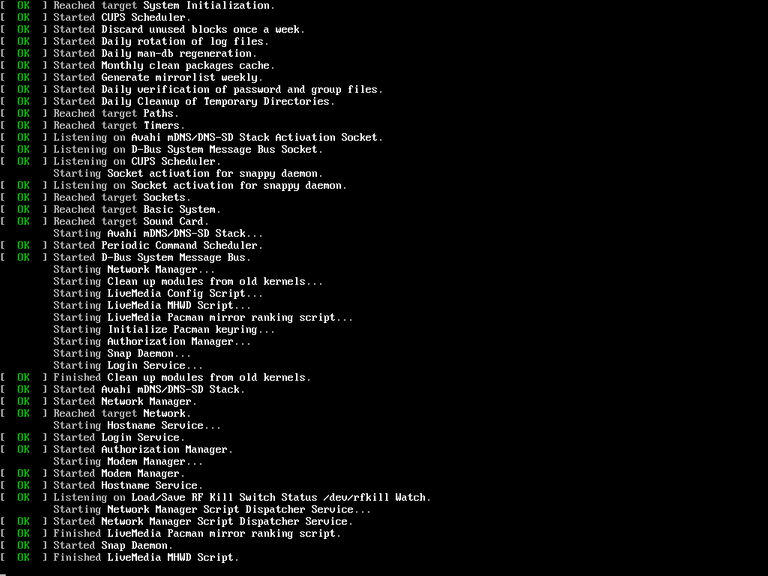
Go ahead and press enter to continue booting, you'll see this while it loads:
After it finishes loading, you'll be greeted with this screen
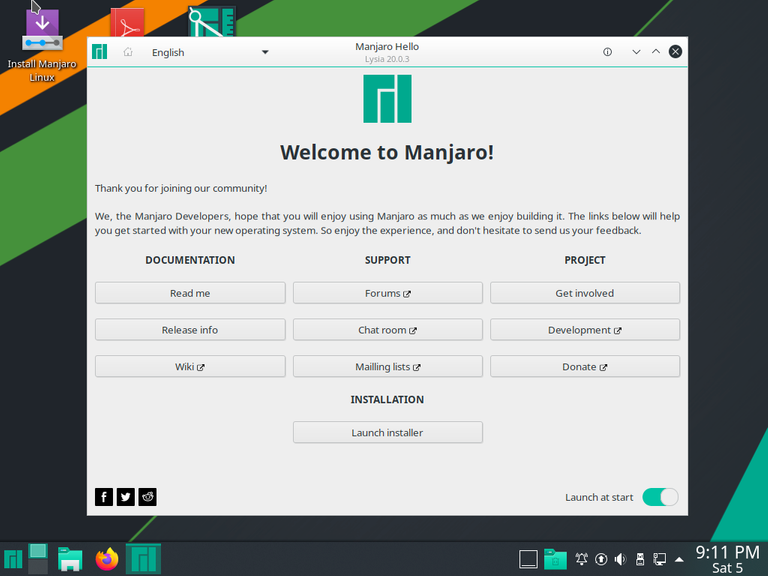
Close the welcome screen and connect to wifi if necessary, you'll find the wifi option in the bottom right near the time. We'll be using the advanced installer for this as the easy installer lacks some options.
Open Manjaro Architect from the desktop and maximise the window that opens up, you'll see this:
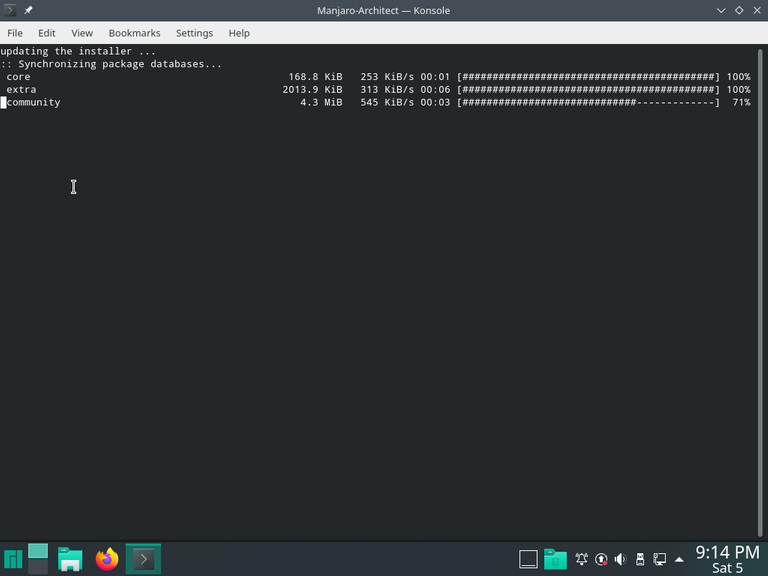
Wait for it to finish updating the installer.
You'll be greeted with this screen:
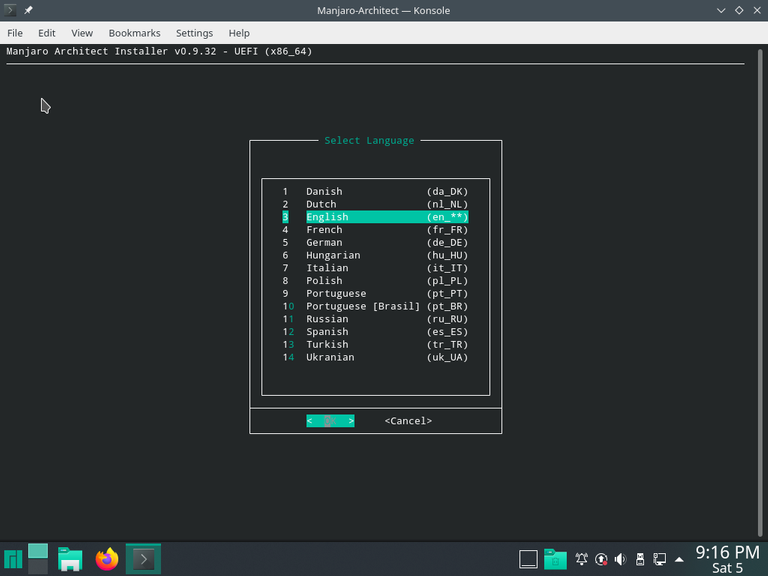
Go ahead and pick your language, then hit enter and you should be presented with this
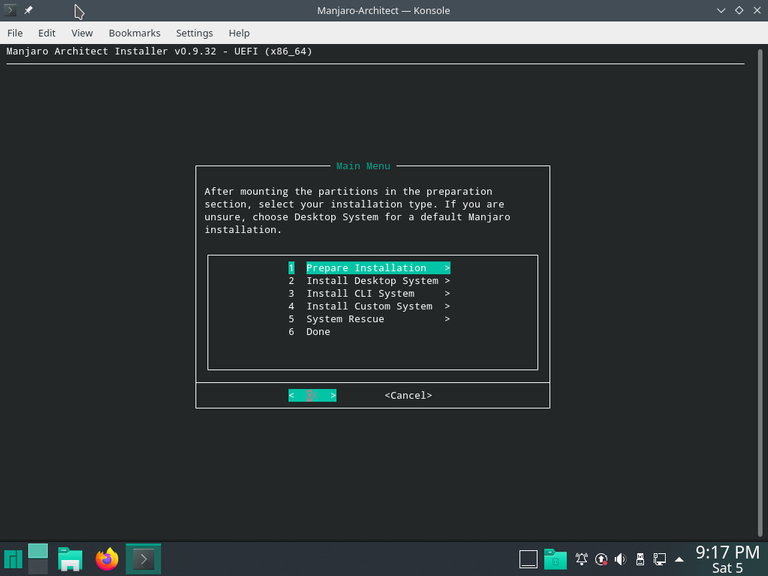
You'll then see this menu
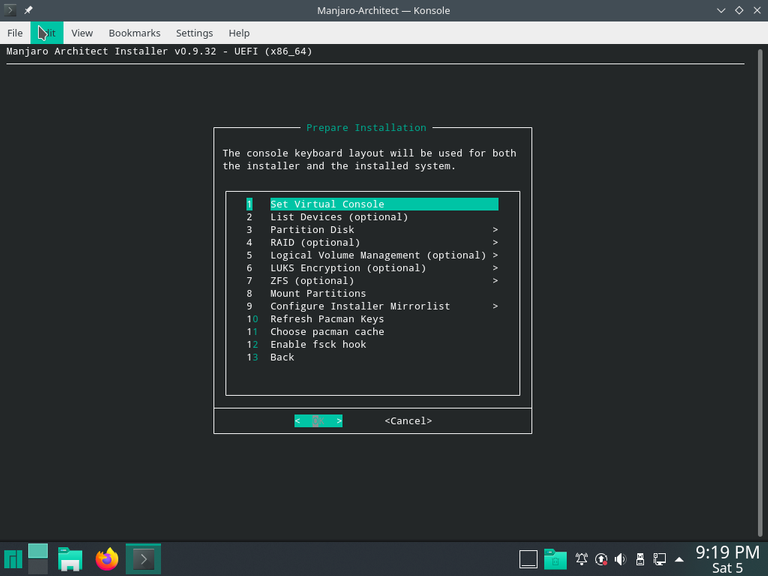
Select Set Virtual Console, then confirm your keymap setting. This is asking what type of keyboard you have, for most users this will either be uk, for a QWERTY ISO layout keyboard, or us, for a QWERTY ANSI layout keyboard. ANSI keyboards will have Z next to left shift while ISO keyboards will have \ next to left shift instead.
Afterwards, select List Devices and press enter, you'll be shown a list of storage devices in your system and their sizes, like so
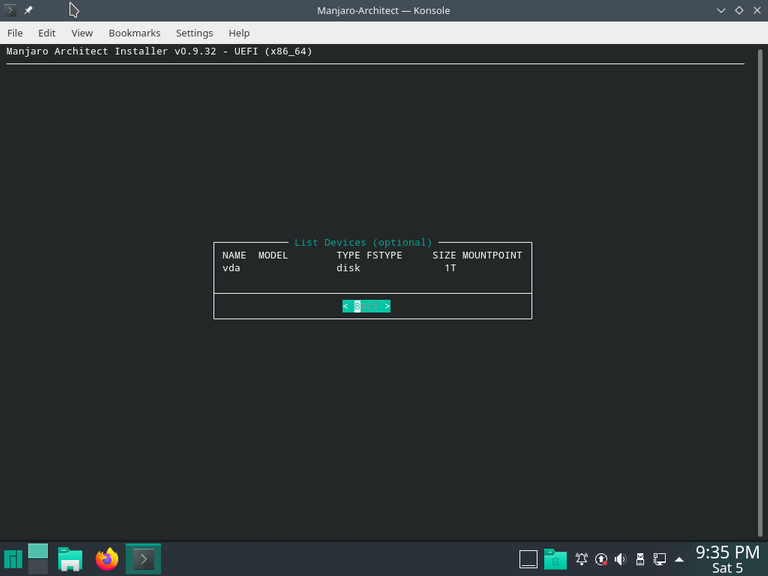
Note which device is your hard drive and press enter, in this case there's only one drive available and that's vda
Ensure Partition Disk is selected then press enter again, you'll be asked to select what drive you wish to use
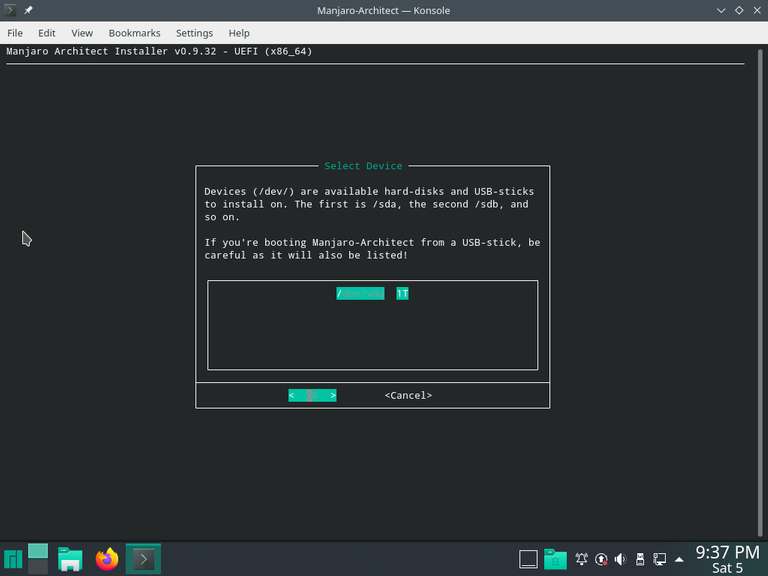
Select your main drive and press enter, you'll then see this
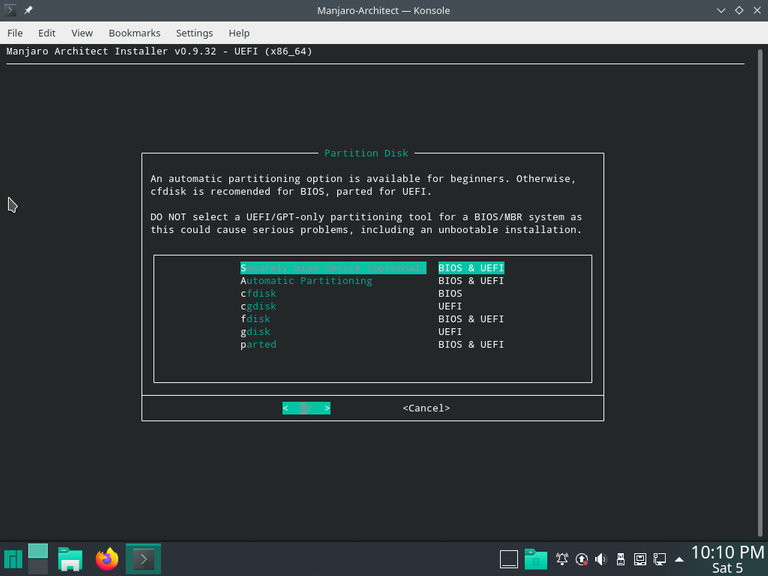
Go ahead and select cgdisk and press enter, if you get a warning just press enter again.
You may see something like this

Select each partition and press d until all that remains is this
Select New and press enter, you'll see this
Press enter again, then you'll see this:
Type in 100M then press enter and then you'll see this
Enter in EF00 then press enter again.
It'll ask you for a name next, name it EFI
You'll then see this
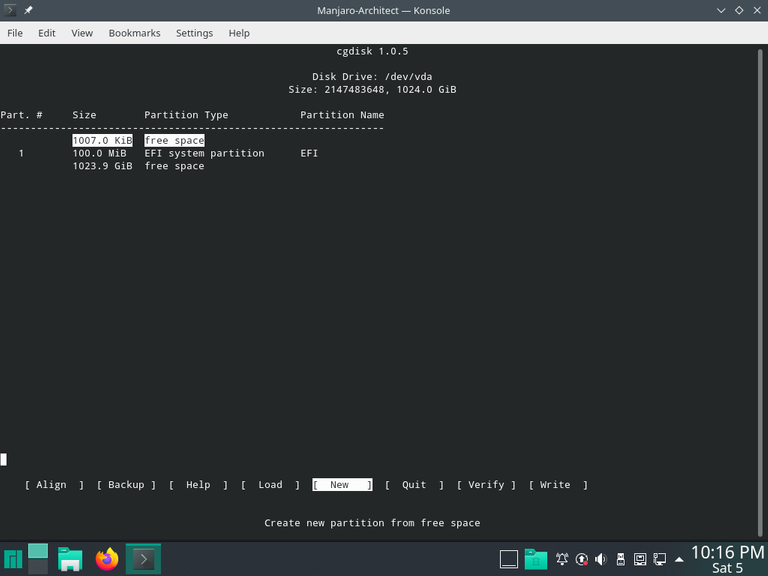
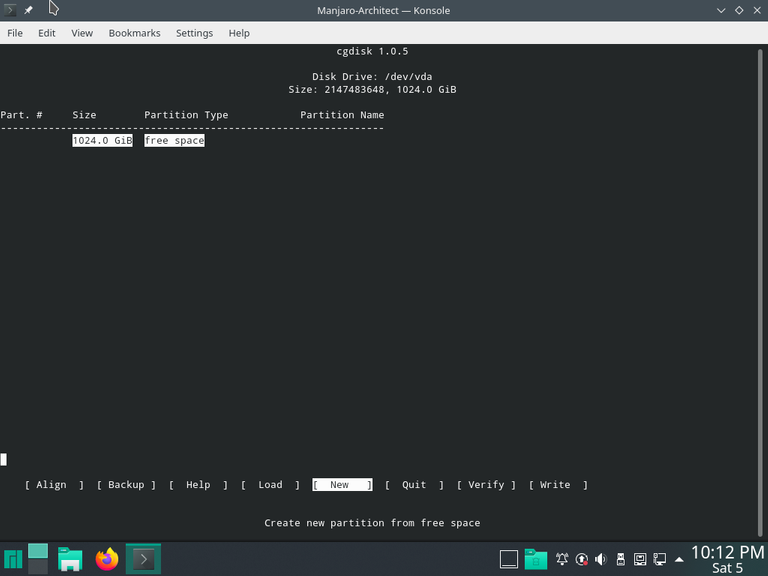
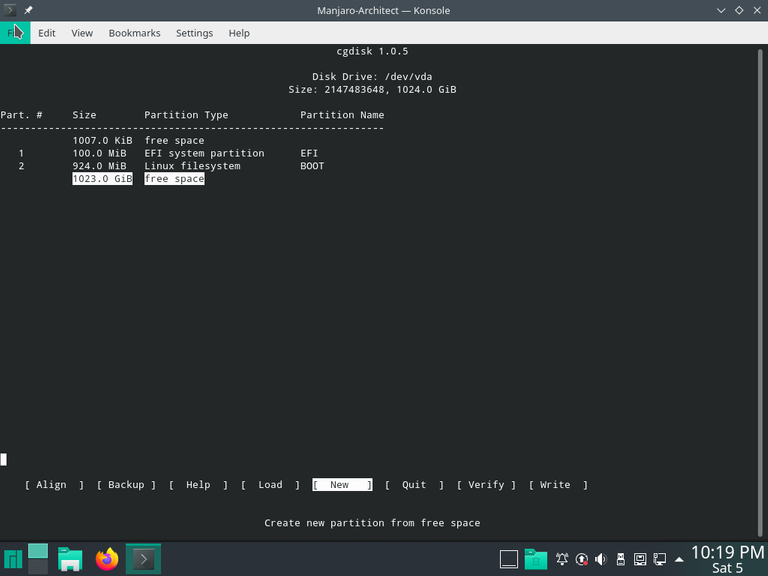
Select the largest free space, the one at the bottom, and presss enter with New selected again.
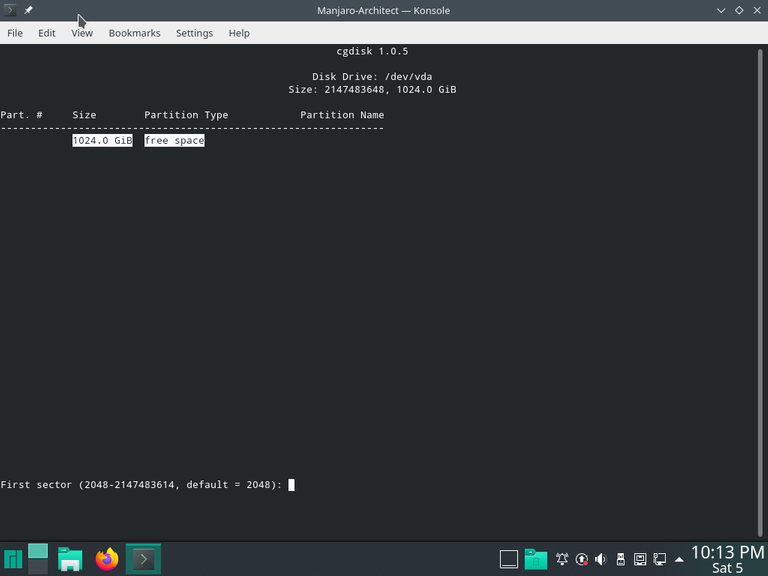
As above, press enter for the first option
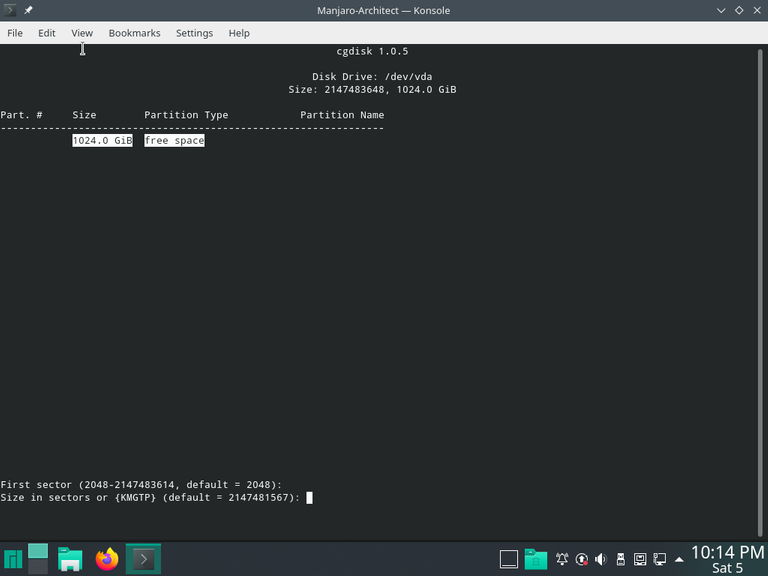
For the section option, enter 924M
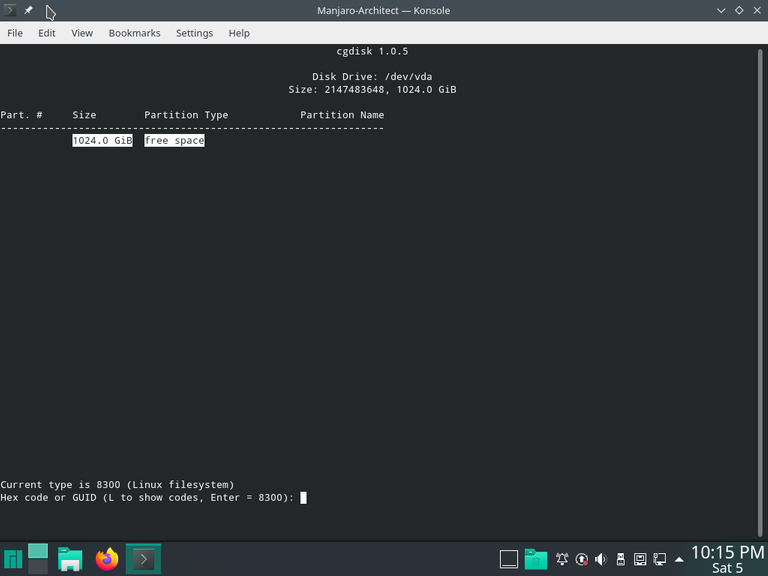
For the third, enter 8300
And for the name, enter BOOT
Things should look roughly like this:
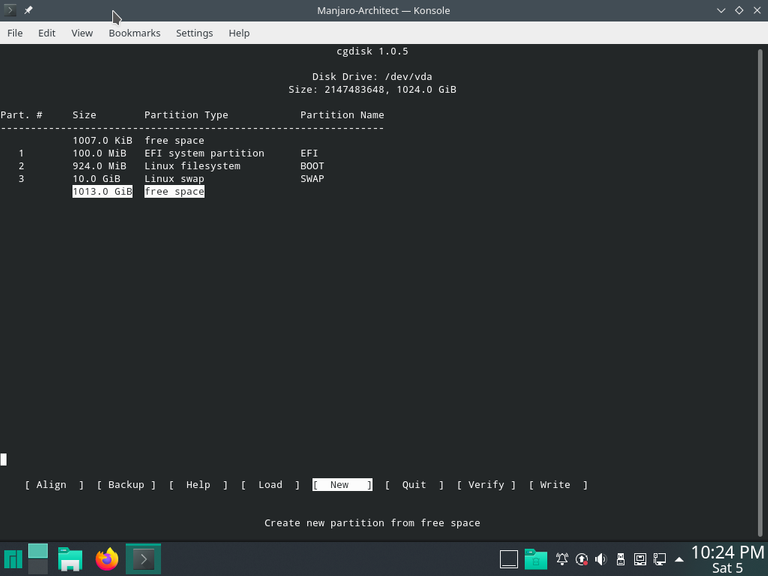
Now, go down again and create yet another new partition.
This time you'll want to set the size based on how much RAM your system has, 1.5x more if your system has over 16GiB of ram, 2x more if your system has 8-16GiB of ram, and 2.5x more if less
This system has 4GiB of ram, so the size should be 10GiB, or 10G
Press enter on the first option
Enter 10G on the second option
Enter 8200 for the third option
and finally, SWAP as the name
Things should now look something like this
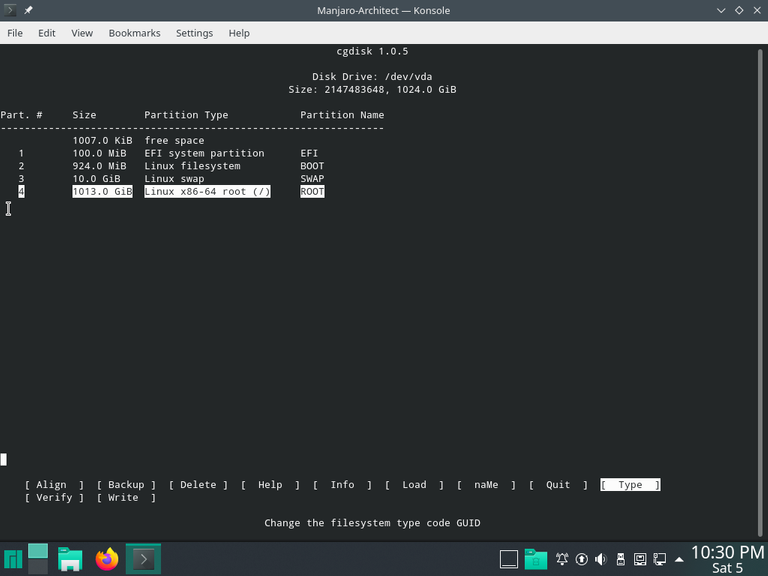
Now, one more partition, press enter again.
Press enter for the first and second options
Enter 8304 for the third option
Name the partition ROOT
You should now have something close to this
Now, select Write on the bottom, press enter, type yes then press enter again, then select Quit and press enter again.
You'll now see this screen
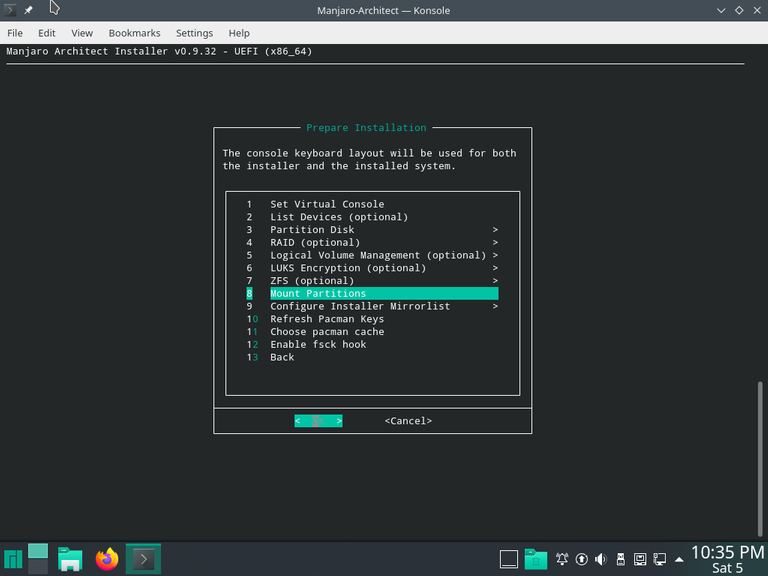
Select Mount Partitions and press enter.
You'll now see something close to this
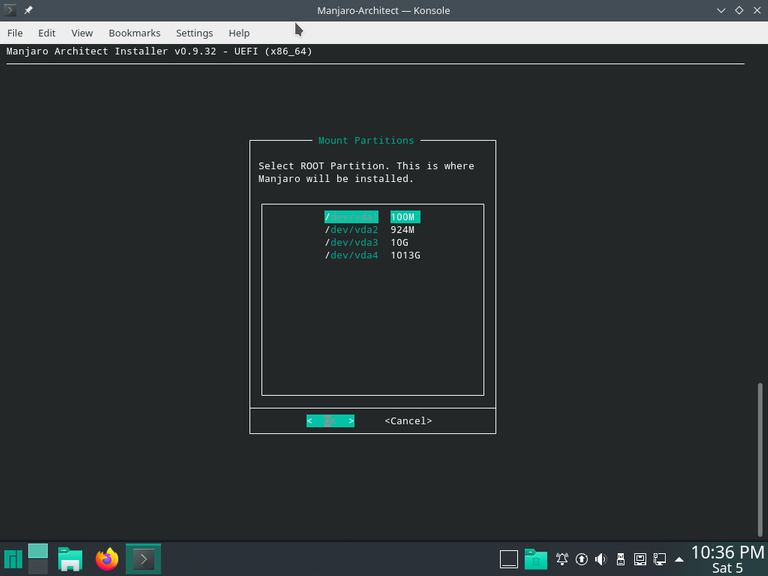
As you can see, the four partitions we just created are shown here, you want to select the fourth one as the ROOT partition as it's where the system is installed to as well as where your data is stored.
You'll then be asked this
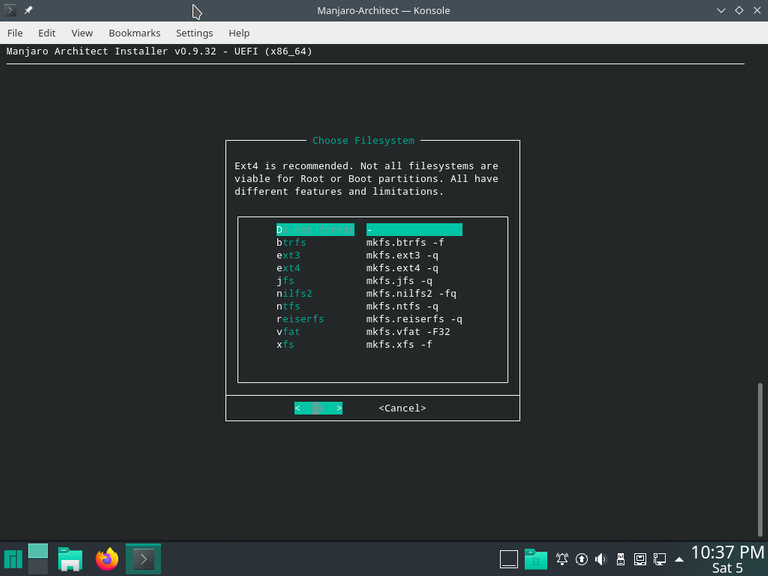
Select btrfs and press enter, you'll be asked if you're sure, press enter again.
You'll then see this
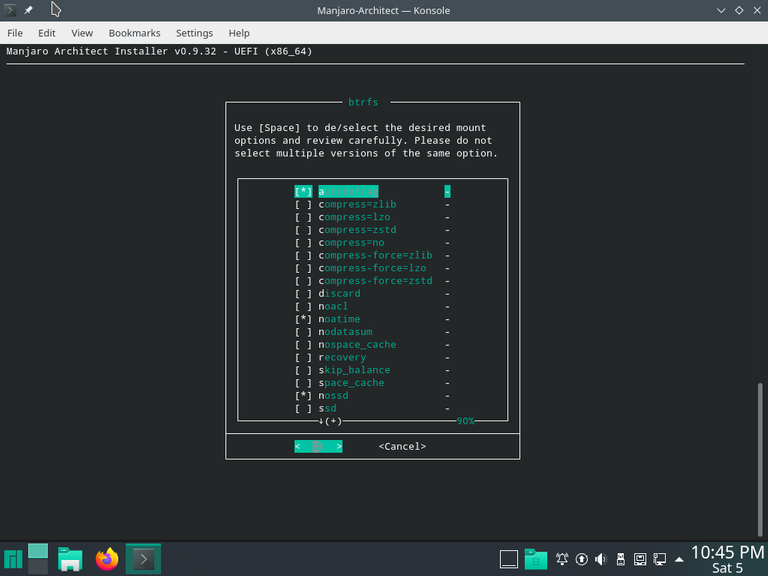
Using space to enable or disable options, you'll want to select the following...
If you have a solid state drive:
autodefrag, compress-force=zstd, discard, noatime, ssd
If you have a mechanical drive:
autodefrag, compress-force=zstd, noatime, nossd
If you are unsure what hardware you have, leave the other options as is and make sure to enable autodefrag and compress-force=zstd
This system has a solid state drive, so these options are selected
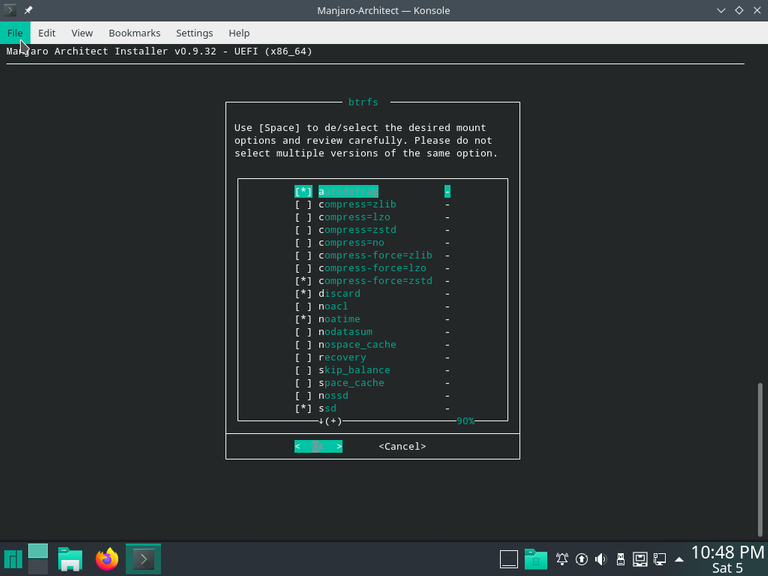
Afterwards, press enter and you'll be asked to confirm, make sure the settings are correct then press enter again.
You'll be asked if you want to create subvolumes, answer yes, then select automatic, then answer yes again
Afterwards, you'll be asked for the SWAP partition, this is partition number three that we created, select it and press enter
You'll then be asked for any additional partitions, select the second partition and press enter
Format it as ext4
Mount it as /boot
Enable discard if you have a solid state, if discard was enabled early automatically than enable it here too.
Confirm settings, press enter again
Select Done
You'll then be asked to select your UEFI partition, this is partition 1, select it and press enter again
Select /boot/efi as the mount point, then press enter again
You're now done configuring the hard drive, now we can install the OS to it.
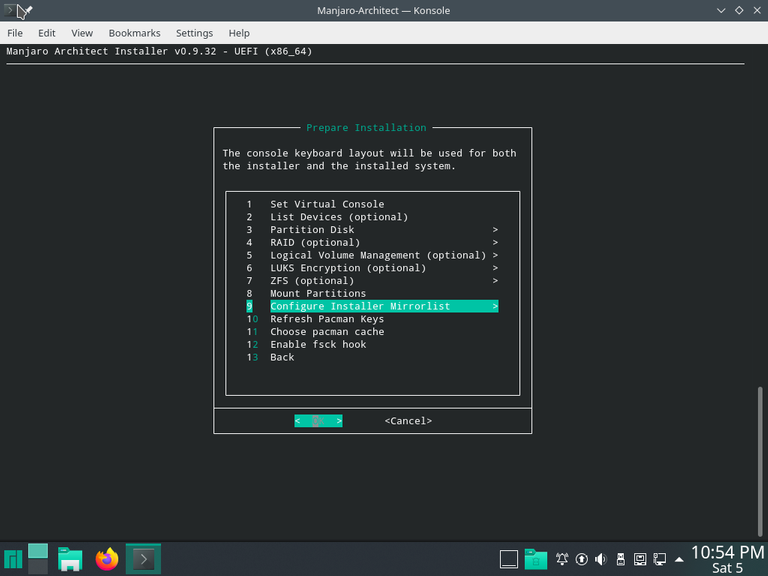
Press enter, select Rank Mirrors by Speed, press enter again, select stable, press enter again then press enter again
If it asks you which mirrors to use, select the top 10 in the list, then confirm.
Now press enter on Refresh Pacman Keys and wait for it to update.
Now select Choose pacman cache and answer no
Presss enter again, enable the fsck hook, and press enter once again and you'll be here
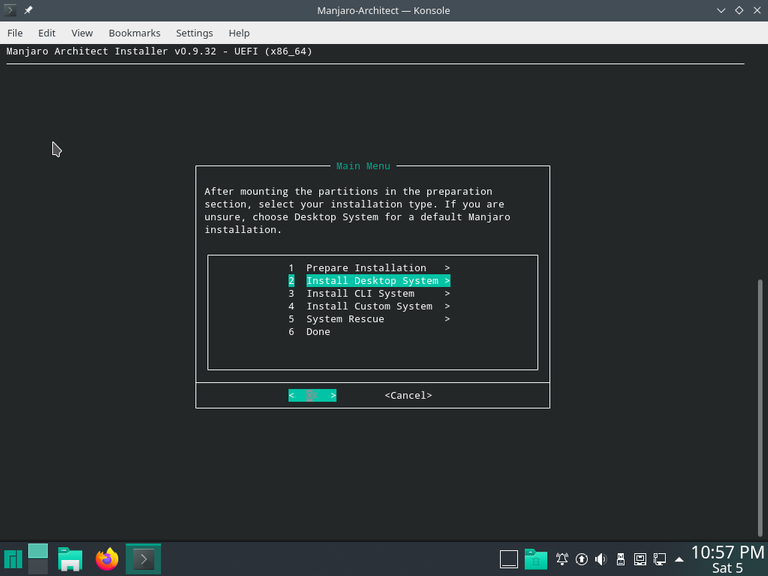
Press enter again, select Install Manjaro Desktop and press enter once more and you'll see this screen
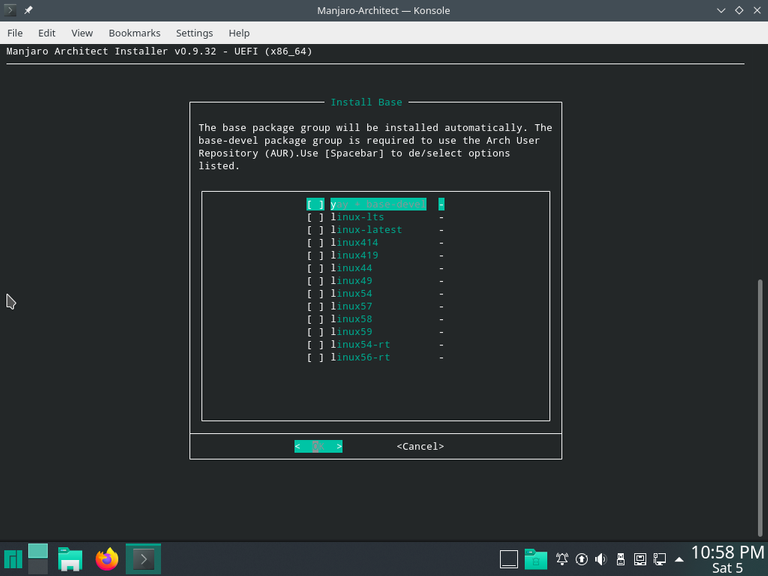
Use spacebar to select linux-latest and linux-lts then press enter
Now you'll see this
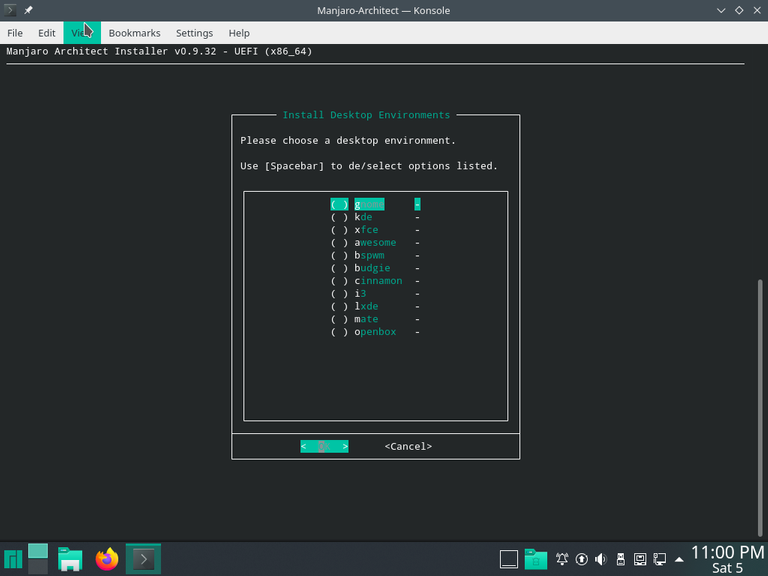
Select kde with the spacebar, then press enter
Answer no if it asks if you would like additional packages
Answer full when it asks what version you'd like
It will then procede to download and install the latest version of Manjaro
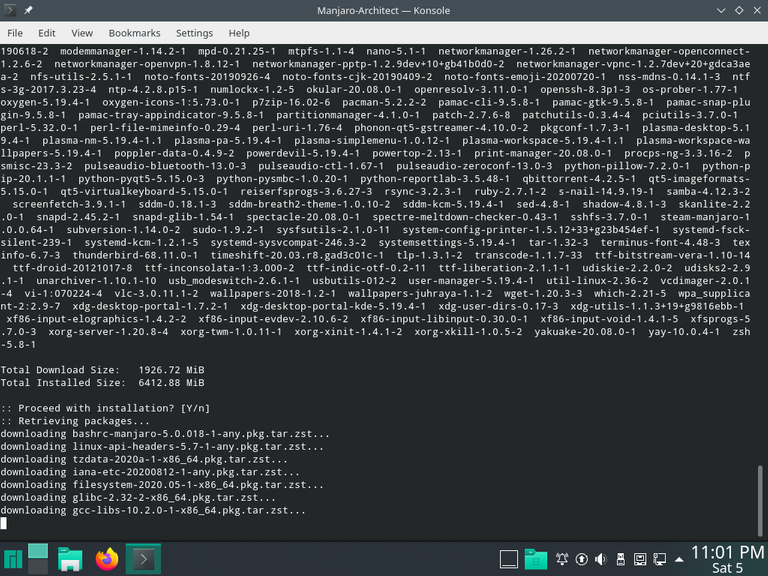
This will take quite some time depending on your internet speed, so feel free to do something else for a while. You can even browse the internet using Firefox while it installs, just make sure not to close the terminal and make sure you don't remove the installation medium, be it a DVD or USB stick.
If you get asked about graphics drivers, select auto install free drivers.
Now that you've ate a tea and drank some biscuits, and it's done installing the base system, we can wrap it up and boot into your new install.
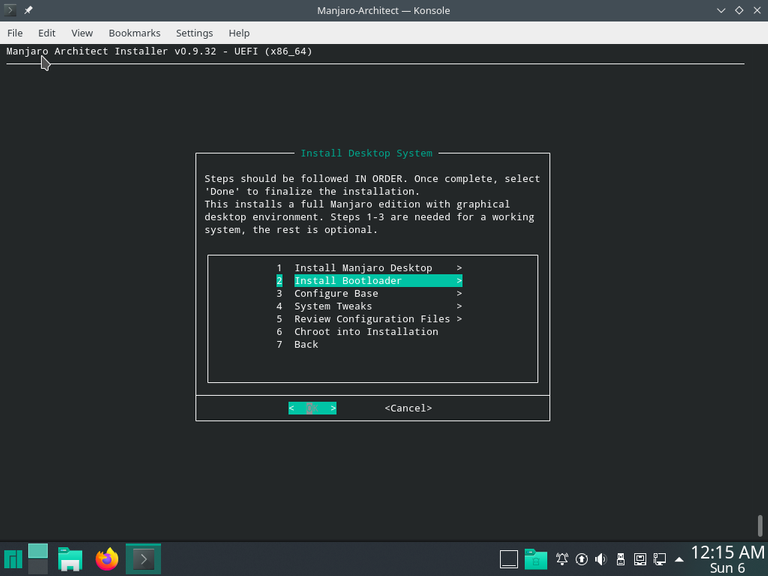
Select Install Bootloader and press enter
Select grub, press enter
Answer yes to setting bootloader as default
Now go to Configure Base
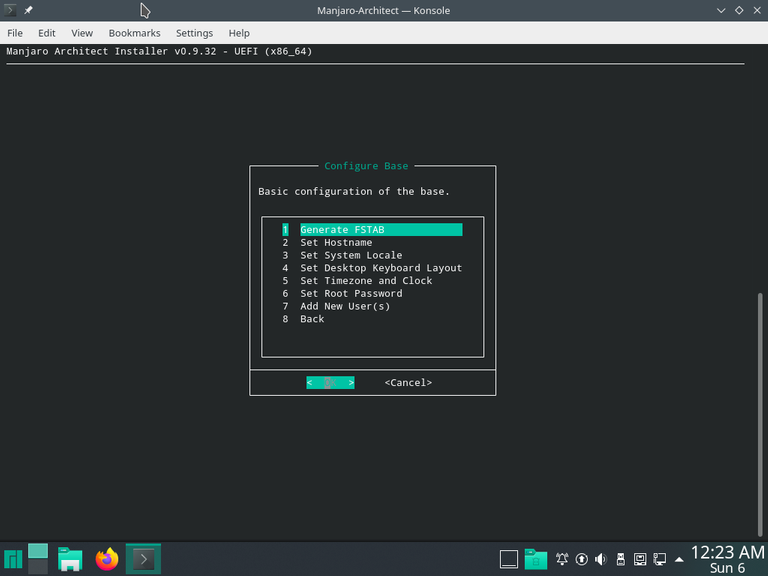
Select Generate FSTAB, select by UUID
Select Set Hostname and name your machine
Now do Set System Locale, and set your language again, for example en_GB.UTF-8 for British English or ja_JP.UTF-8 for Japanese
Now set your keyboard layout, for most QWERTY users this is going to be us
Now set your time zone, this should be pretty straight forward
Set your Root password, this is your adminsitration or maintenance password
Now add your main user, leave shell as zsh, set password
Now back to the main menu, go to System Tweeks
Enable automatic login if you want it and enable hibernation.
Go to Performance, I/O Schedulers and set it to appear as such, you can use cursor/arrow keys to move around the text editor.
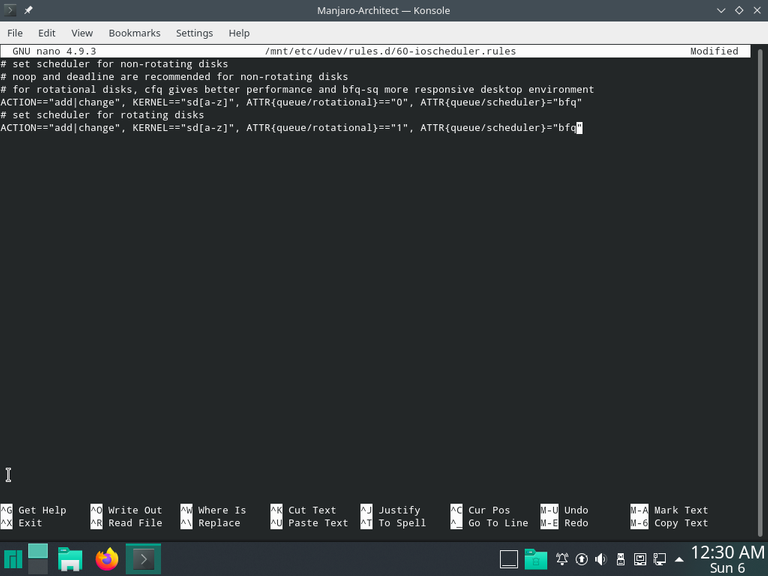
Press ctrl+x, press y, then press enter to save
Enable preload if you have 8gb of ram or more
For good measure to ensure a bootable system, chroot into the installation and run the following command
mkdir /boot/grub; grub-mkconfig > /boot/grub/grub.cfg
Once that finishes, you may now close the terminal.
Congratuations, you've installed Manjaro KDE
You can now shut down, remove the USB or DVD, and boot back up
Good tutorial but it seems a little bit overcomplicated. For example: you can use KDE partition manager to manage the partitions.
Congratulations @death-and-taxes! You have completed the following achievement on the Hive blockchain and have been rewarded with new badge(s) :
You can view your badges on your board and compare yourself to others in the Ranking
If you no longer want to receive notifications, reply to this comment with the word
STOPDo not miss the last post from @hivebuzz: