HTTP vs HTTPS
HTTPS is a secure version of HTTP which is enabled through SSL certificates and, in this tutorial, additionally secured through DH parameters.
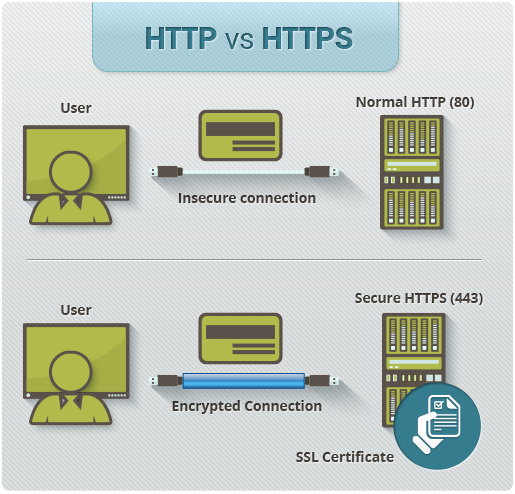
It looks quite fancy and secures the connection between your server and your users, which shows through a green padlock on the left of the adress bar of almost any browser.

There are certain Certificate Authorities that are accepted by a broad field of browsers, we will use a free service called Let’s Encrypt.
Required
Some sort of coding skills
A webserver and OS which is included here: https://certbot.eff.org
Used Setup
Sidenotes
- I'm assuming you are
root, otherwise you might have to usesudo - If a command like
opensslgives you-bash: openssl: command not foundyou might have to install it first withapt-get opensslor whatever fits your OS. - If you have a complete different setup, take a closer look at https://certbot.eff.org
- Don't switch between users during this process
Generate DH parameters
This key is per server for extra security and "A+" rating on Qualys SSL Labs Server Test.
openssl dhparam -out /etc/ssl/certs/dhparam.pem 4096
WARNING: THIS COULD TAKE A WHILE depending on your server performance
You could screen it in the background as a daemon with:
screen -dmS whatever openssl dhparam -out /dhparam.pem 2048
nginx config
In file /etc/nginx/nginx.conf you replace the SSL settings:
##
# SSL Settings
##

ssl_protocols TLSv1.2;
ssl_prefer_server_ciphers on;
ssl_dhparam /etc/ssl/certs/dhparam.pem;
ssl_ciphers AES256+EECDH:AES256+EDH:!aNULL;
ssl_session_timeout 1d;
ssl_session_cache shared:SSL:50m;
ssl_stapling on;
ssl_stapling_verify on;

add_header Strict-Transport-Security "max-age=31536000; includeSubdomains";
add_header X-Frame-Options DENY;
add_header X-Content-Type-Options nosniff;
You temporarily need a static directory hosted on port 80 to verify your domain & server with the Let’s Encrypt Certificate Authority. To do that, you make a new file in /etc/nginx/sites-enabled/, you can call it whatever you want.
server {
    server_name domain.name your.domain.names;
    listen 80;
    root /html;
}
Remove the "default" symlink with rm -rf /etc/nginx/sites-enabled/default
The "/html" directory could be any of your choosing, in this case you would make this new directory with mkdir /html.
Now its time to restart nginx: service nginx restart
Certificate Verification
This step takes place per domain.name, and you have some limits considering subdomains.
In short (excerpt from version: August 10, 2016):
- 20 Certificates per registered domain per week
- 100 Names per certificate
- Duplicate Certificate limit of 5 certificates per week
letsencrypt certonly --webroot -w "/html" -d domain.name -d your.domain.name
After a few seconds you should get this message when you have received the certificate files:
IMPORTANT NOTES:
- Congratulations! Your certificate and chain have been saved at
/etc/letsencrypt/live/domain.name/fullchain.pem. Your cert will
expire on xxxx-xx-xx. To obtain a new version of the certificate in
the future, simply run Let's Encrypt again.
Setup SSL site on nginx
Go back to the file you made in /etc/nginx/sites-enabled/ and overwrite it with
server {
    listen 443 ssl;

    gzip off;

    ssl_certificate /etc/letsencrypt/live/domain.name/fullchain.pem;
    ssl_certificate_key /etc/letsencrypt/live/domain.name/privkey.pem;

    server_name domain.name your.domain.name;

    root /html;
}
if you just want to host static content with nginx's internal functionality, or
server {
    listen 443 ssl;

    gzip off;

    ssl_certificate /etc/letsencrypt/live/domain.name/fullchain.pem;
    ssl_certificate_key /etc/letsencrypt/live/domain.name/privkey.pem;

    server_name domain.name your.domain.name;

    location / {
        proxy_pass http://localhost:$port;
    }
}
if you already were hosting an app internally on a certain $port.
If you need a redirect for all www.* requests for this domain.name add this on the bottom of your SSL site file:
server {
    listen 443 ssl;
    server_name "~^www\.(.*)$";
    return 301 $scheme://$1$request_uri;
}
Sidenote: Node.js users must have a WebSocket proxy:
location / {
    proxy_pass http://localhost:PORT;
    proxy_http_version 1.1;
    proxy_set_header Upgrade $http_upgrade;
    proxy_set_header Connection "upgrade";
}
Make another new file in /etc/nginx/sites-enabled/ to automatically redirect all traffic from www.* & http:// to https://
server {
    listen 80 default deferred;
    server_name _;
    return 301 https://$host$request_uri;
}

server {
    listen 80;
    server_name "~^www\.(.*)$";
    return 301 $scheme://$1$request_uri;
}
Again time to restart nginx: service nginx restart
If everything went smooth you should be running your first SSL secure website.
Congratulations & welcome to the club! ;]
Certificate maintenance
To automize the certificate renewal with systemd you have to make 2 new files in /etc/systemd/system/:
certbot-nginx.service
[Unit]
Description=Renew Certbot certificate (nginx)
After=network-online.target

[Service]
Type=oneshot

ExecStartPre=/bin/systemctl stop nginx
ExecStart=/usr/bin/letsencrypt renew
ExecStartPost=/bin/systemctl --no-block start nginx
& certbot-nginx.timer
[Unit]
Description=Renew Certbot certificate (nginx)

[Timer]
OnCalendar=daily
Persistent=true

[Install]
WantedBy=multi-user.target
To activate this daemon/service:
systemctl daemon-reload
systemctl start certbot-nginx.service
systemctl enable --now certbot-nginx.timer
To manually renew, simply: letsencrypt renew
Image Credit
- image 1
- image 2
- both from What is HTTPS?
Hi! I am a content-detection robot. I found similar content by the same author:
https://steemit.com/technology/@notu/setup-https-for-free-on-your-linux-unix-webserver
Could you please acknowledge the changes I've made to invalidate your comment? Thank you.
Soooo.... aren't these installed by default?
Try:
systemctl status certbot.timer
systemctl status certbot.service
Located in
/lib/systemd/system/Congratulations @notu! You have received a personal award!
Click on the badge to view your own Board of Honor on SteemitBoard.
For more information about this award, click here
Congratulations @notu! You received a personal award!
You can view your badges on your Steem Board and compare to others on the Steem Ranking
Vote for @Steemitboard as a witness to get one more award and increased upvotes!