->
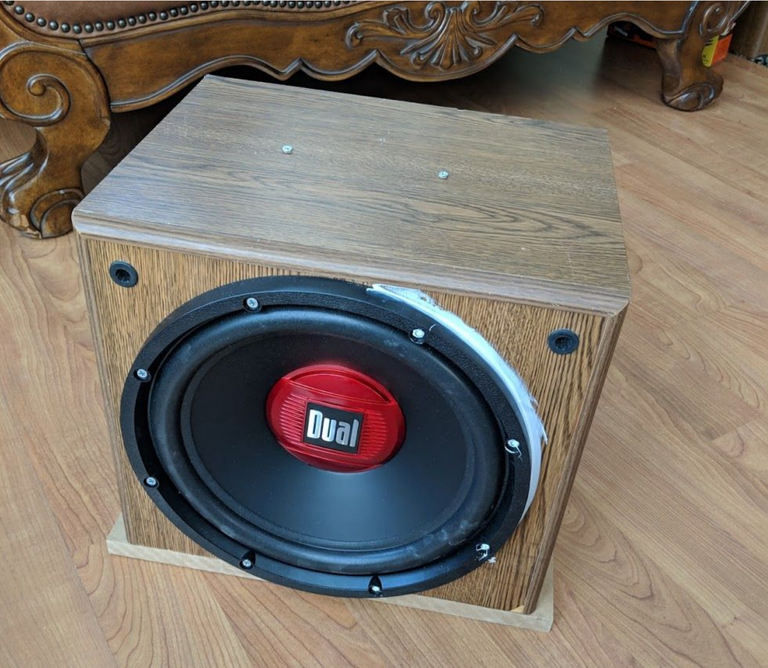
This is a sealed subwoofer with a 12” woofer from walmart purchased for $30.
The cabinet is made from the top half of a vintage JVC speaker.
There’s no built-in amp. No crossover. Just a box with woofer, and polyfill from a really old pillow.
How does it sound? Not bad! (After a bit of EQ).
This is my first build.
Background
I own more speakers than I need. Recently I’ve been wanting to get rid of these JVCs that I picked up at a garage sale a while ago.
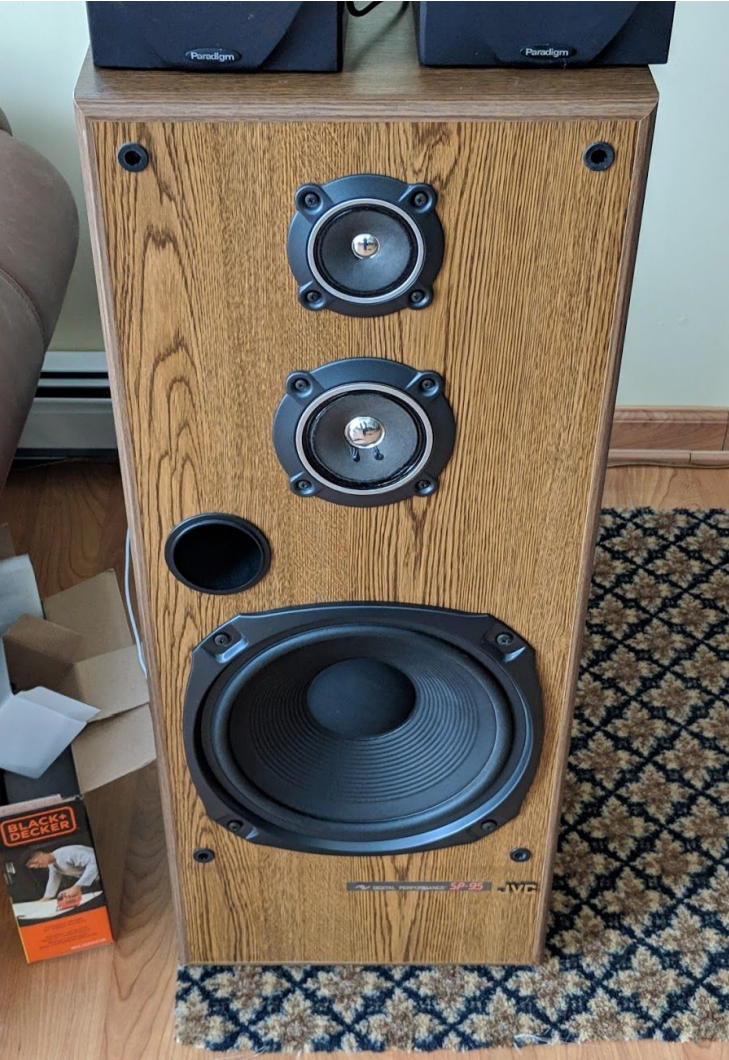
JVC SP-95. Made of ½” particle board. The speaker is surprisingly enjoyable to listen to, though doesn’t compare to modern speakers or even good vintage ones. Bought a pair at a garage sale for a mere $25 dollars. Now I’ve got Advent Maestros and they kick butt. No need for these.
At the same time, I’ve been itching to build speakers, and my den is lacking in bass and is a very large room which is hard to fill with bass. So instead of re-selling or throwing these JVCs out, they’re far better served by turning them into subwoofers. Also, subwoofers are supposed to be the easiest DIY speaker and a good place to start on the path to building full-range loudspeakers.
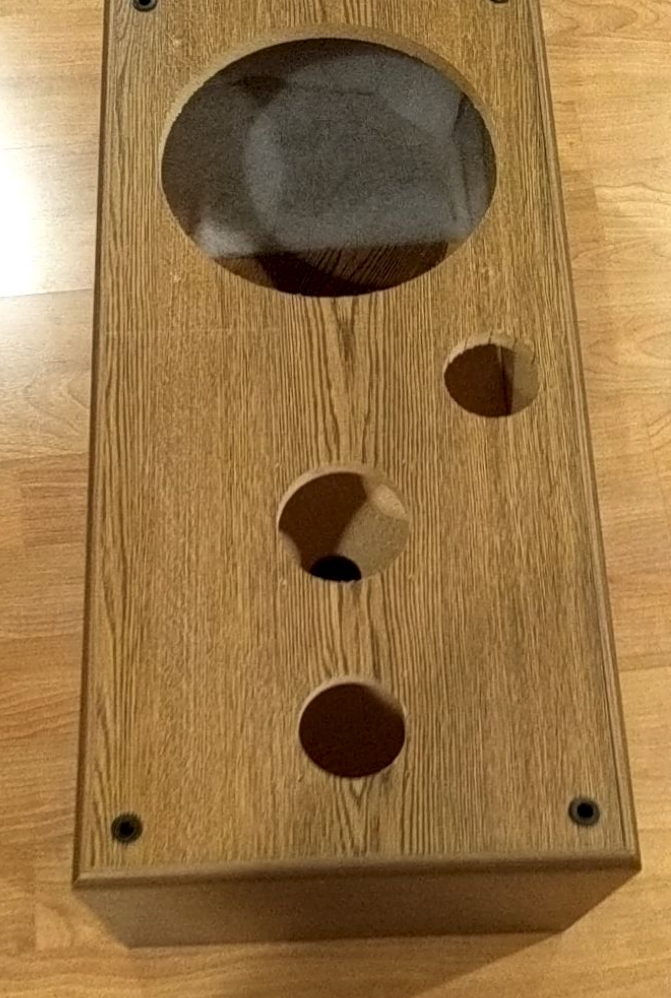
Cabinet with all drivers removed. It’s a simple hollow box. No internal bracing. A few holes I’ll have to work around, but nbd.
Choosing a woofer
Since the JVC cabinet is large, I planned to chop it in half to get two subwoofer cabinets out of it. First thing I did was go to partsexpress.com to find a woofer where the sealed cabinet size was 1-2 cubic feet. I spent hours looking for the perfect budget driver and narrowed it down to the Dayton Audio classic 12” subwoofer. At $73, this would be perfect! I placed an order for two (was planning on having dual subs). Estimated shipping time: 5-7 days.
That same night I stumbled upon this youtube video:

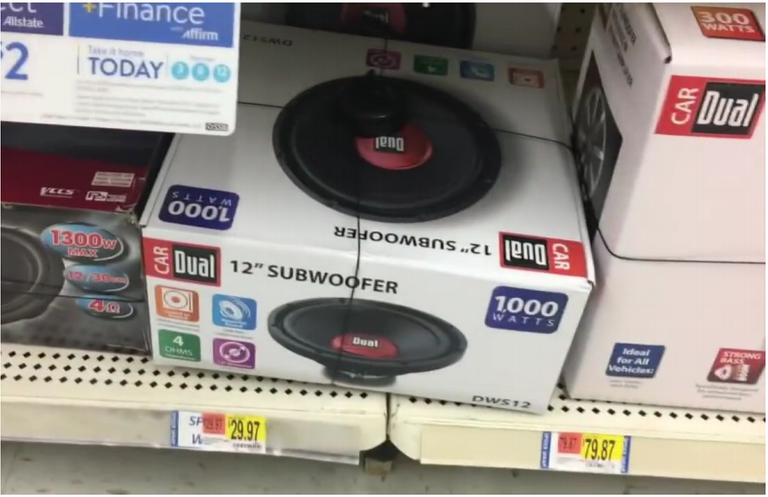
$30 for a subwoofer driver! Available at the local walmart! For $30 I could not say no. I canceled my partsexpress order and drove straight to walmart.

Shopping at walmart. Two $30 subwoofers, a cheap consumer-grade jigsaw, silicone, clamps, plastic level. All you really need, right?
A theme for the build was starting to emerge. I wanted to build a sub using as little resources as possible. I wanted the cheapest sub, cheapest tools, cheapest box. And just see how far that would get me.
Woofer T/S parameters
Ha ha. I didn’t have a measurement rig to measure T/S parameters, and it just seemed like too much work. Plus I have a box size already chosen: half a JVC cabinet. If it sounded bad, I could always make it smaller (or larger by adding stuffing). Nevertheless, I was curious what the T/S parameters of this walmart woofer would be, so I put in an order for the DATS V2 t/s parameter measurement device. I considered building something myself to measure the parameters instead but I don’t have a computer with a suitable sound card for the task. The DATS V2 would arrive later.
Online, Dual claims that this woofer has a resonant frequency (Fs) of 24hz and Qts of 0.45. I liked the low Fs, and the Qts closely matched that of the dayton sub so I figured I’d be fine. Later when DATS arrived, I realized these figures were way off, but more on that later. :)
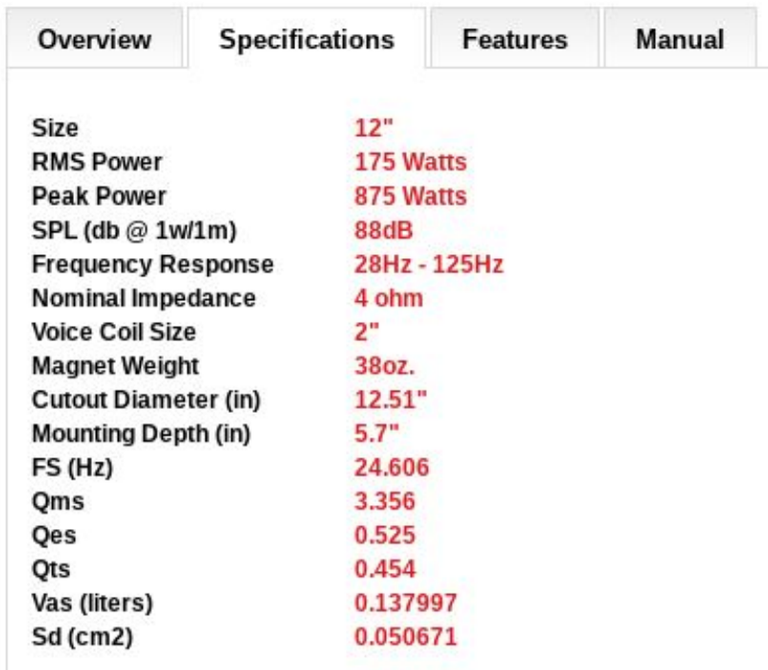
Screen-capture from Dual’s site for proof that it says Fs is 24Hz. Unrelated, their Vas and Sd are obviously incorrect. Perhaps a copy-paste error. I emailed them to let them know. No response.
Chopping the JVC cabinet
It took many, many, MANY attempts to get the chopped edges to all be flush so that a flat piece of MDF could seal the bottom of the box.
- Using a jigsaw and eyeballing a straight line
- Using a piece of MDF as a guide for the jigsaw
- Building a straight-line jig for the jigsaw
- Buying a circular saw and eyeing a straight line
- Using a piece of MDF as a guide for the circular saw
- Using a piece of MDF with another piece of MDF at 90 degrees to square up the guide and place it consistently on all 4 sides of the box, using a circular saw
- Screwing a piece of MDF to the top of the cabinet as a guide for the MDF guide placed on each face of the box. Jigsaw
- Same as above but with a circular saw
After attempt 8, I figured it was the closest that I was going to get, without a full out table saw. I bought some 60 grit sanding paper, a sanding block, and sanding the edges till they were all (mostly) flush. What a PITA.
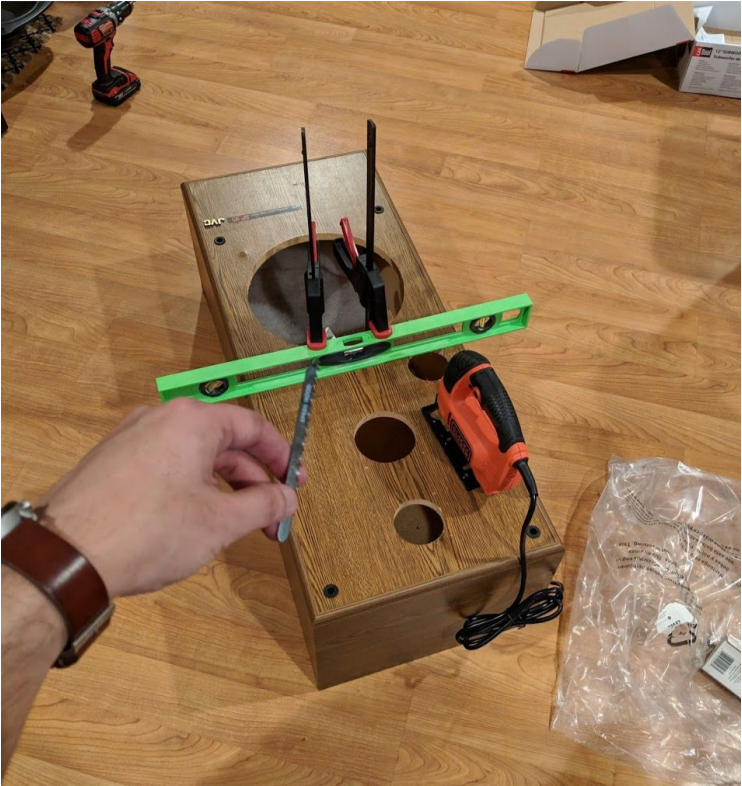
Attempt 1: jigsaw. I had the ruler clamped nicely here, so the first cut was straight, but there were no good clamping points for the other 4 sides of the box. Also if you look closely you’ll notice the jigsaw cord hasn’t even been unwrapped yet. Virgin jigsaw.
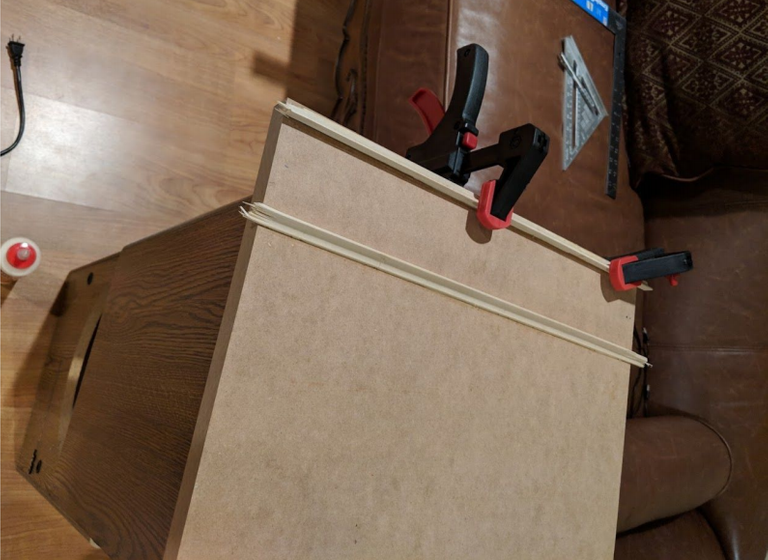
Attempt 3: building a jig. I cheaped out and got super thin wood moulding as the rails for the jigsaw shoe. Since it was so thin, I couldn’t nail it into the MDF. I only used glue. The wood glue either didn’t dry fully or the bond wasn’t strong because the MDF has a layer of paper on the surface, and the rails came off the MDF within the first cut. Many good lessons learned here.
It was hard to take pictures during this stage since I was busy moving wood around and making sure I was safe while working with power tools. The circular saw is 7 lbs, draws 13 amps and is scary to use. Cutting ¾ inch MDF with a circular saw expels a huge dust cloud and will get all over your surroundings. Was coughing a few hours after. Bought dusk masks for future use.
Finally, I got the cabinet chopped although with the number of attempts it took, the final box was much smaller than I wanted it to be. More on the effect this had later.
Cutting out the circular hole and mounting the woofer
By this point I was so eager to finish the project. I had spent so many tiring hours just trying to chop the box in half properly. So, I kind of rushed this.
I put the woofer on the box, drew the outline of the outer diameter, then used a ruler to outline a circle within that circle that left ½ inch for the subwoofer holes / steel frame to rest on the MDF. Then I forgot that the ½ inch slack was for the subwoofer holes, and incorrectly thought that it would be OK to cut into that a little bit. So I got lazy and cut into it quite a bit.
When it came to mounting the sub, I realized the hole was actually a bit too big. Screws would not have any box to bite into. So I pushed the woofer all the way to one side of the hole, screwed that side in, and the other side I just filled with silicone and crossed my fingers.
This mistake could be the straw that broke the camel’s back. If the subwoofer is not properly mounted, it can rattle, and if the box is not sealed air-tight, it will sound bad. But I had to try and see.
Wiring the woofer
I don’t have a soldering iron, and I wasn’t sure if this subwoofer would even work after my mistake above. So I just twisted 14 gauge wire on the woofer terminals. Good enough for an initial test.
I drilled a hole for the wires to come out of the box, shoved the wires through, and sealed with silicone.
While I had the silicone out, I attempted to seal the woofer on the unscrewed side from the inside of the box.
Closing the box
I placed ¾ mdf over the open bottom of the sub, and put a screw every couple of inches. No wood glue as I might want to open the box again.
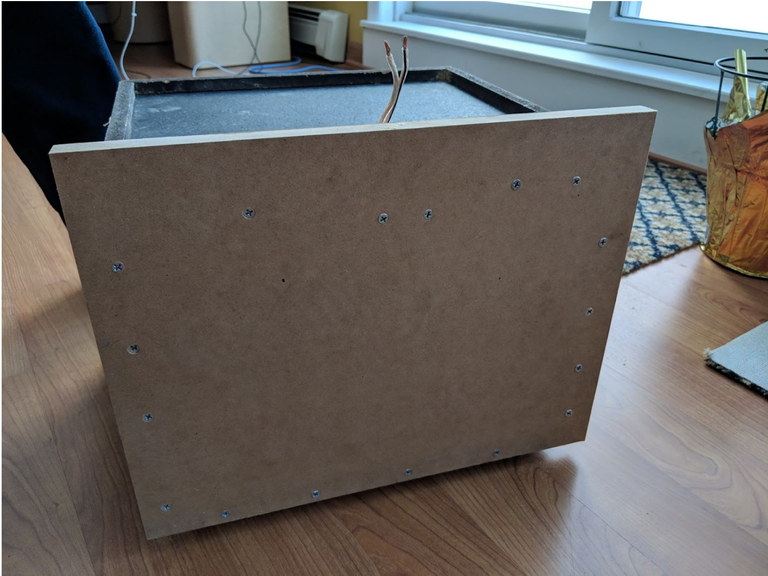
I was hoping that the screws would make the MDF flex sufficiently to make a solid contact with the box edges and seal the box. Only one way to find out.
First test
I hooked it up to a Crown amplifier, set a low-pass filter, played some music, and it worked!
I turned the volume up. And I heard this weird whistling noise. As I moved my hand to the speaker, I felt air going in and out of the speaker box around the seam of the unscrewed part of the speaker. Also at higher volumes, some air-leakage at the bottom of the box where I screwed the MDF on. My screw strategy had not worked perfectly.
Secondly, there was no deep bass. I did a frequency sweep and I could hardly hear bass below 50hz. Very disappointing.
Measuring the T/S parameters for real
DATS V2 arrived!
Got it set up, and it was super easy to get most of the free-air T/S parameters.
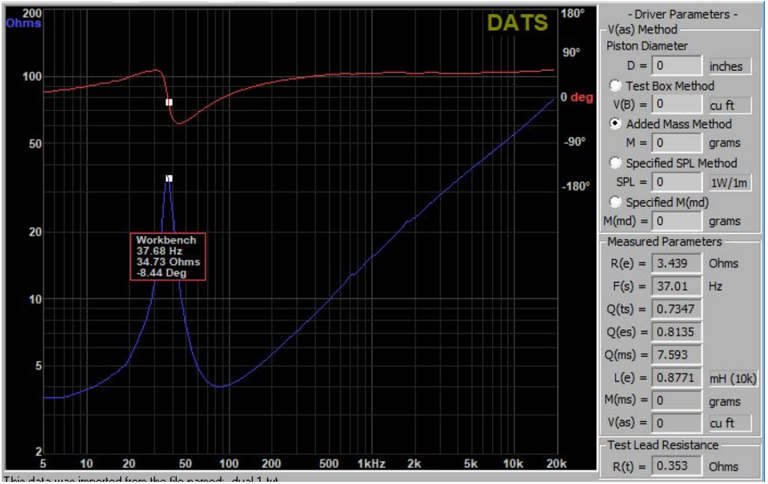
Fs = 37hz, Qts = 0.738, way off the advertised 24hz.
I’m both shocked at how off it is from the specs, but also not shocked because this is a $30 woofer. I got a Vas number using the added mass method, plugged these parameters into an online calculator, and the result is that the internal volume (Vb) of the subwoofer box should ideally be 1.84 cu ft.
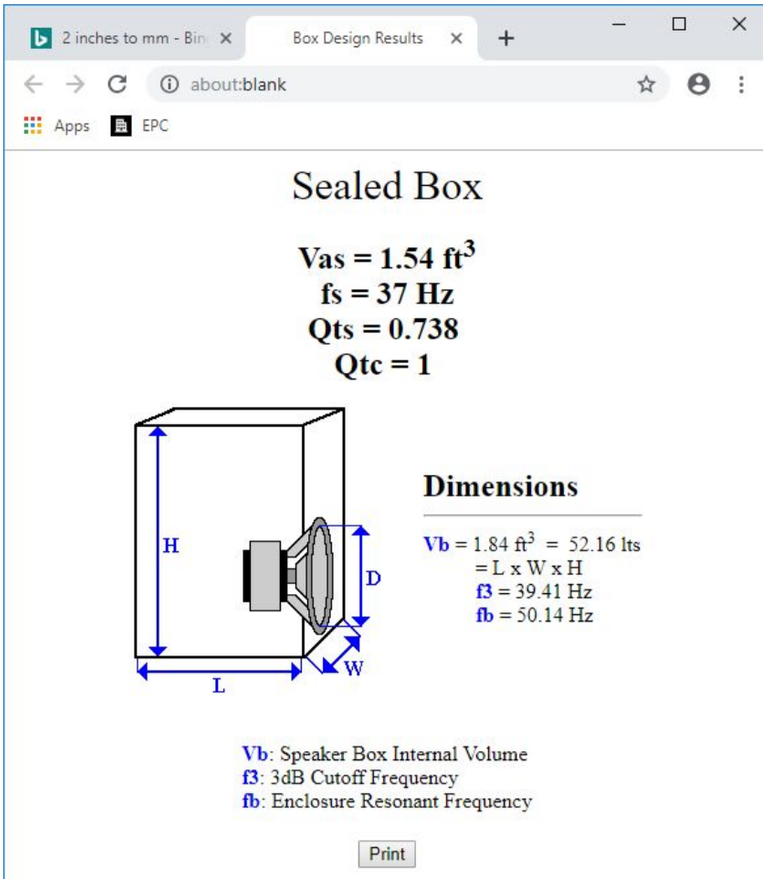
Result of the online speaker calculator.
Sadly, I think my box is ~ 1 cu ft after all the chopping mistakes. :(
I took an impedance sweep with my woofer in the box:
With the woofer inside the box, the resonance frequency was 64hz. Not good.
I read online that you can add stuffing to the box to make it appear larger.
I also needed to seal the box better, so time to open the box up again.
Adding stuffing, sealing the box part 2
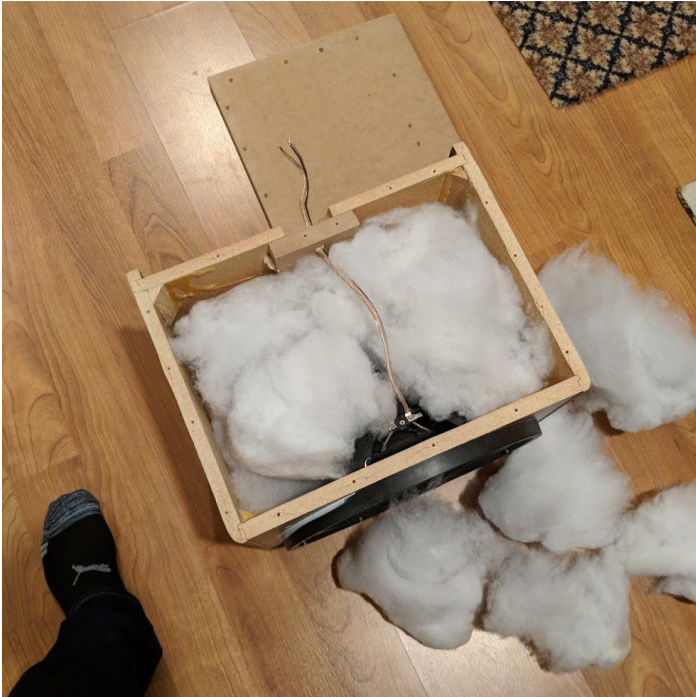
I happened to have an old pillow that is so flat that it should be in the trash. Better to put it in a subwoofer! I ripped it open with a box knife. That was fun.
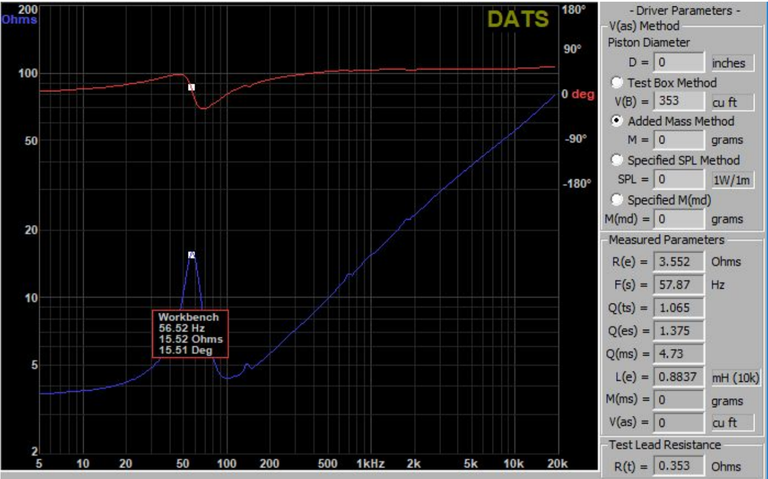
Resonance frequency is down to 58hz after adding stuffing and sealing the box. Down ~10%!
With the stuffing in the box, I was ready to seal the box permanently. The thing I did differently this time was to use a mix of sawdust and glue as a filler for the spots where the air was leaking out of the box before. Hopefully this would fill any air gaps.
After it dried, I pushed the volume up - it’s airtight! Sigh of relief.
Enter MiniDSP
To alleviate the high Fs and lack of deep bass, I decided to try to fix it with EQ using my MiniDSP HD.
I measured the sub using REW, and used the built-in filter tool to suggest filter parameters to flatten out the curve. It suggested dips of 10 db at 64hz and 90hz, which was a good start to flatten out the peaky response - but I still wasn’t getting deep bass I wanted. I re-measured and saw that below 46hz, there was a 24 dB per octave roll-off. So I decided to try to do the naive thing, and add gain to counter it. And it worked!
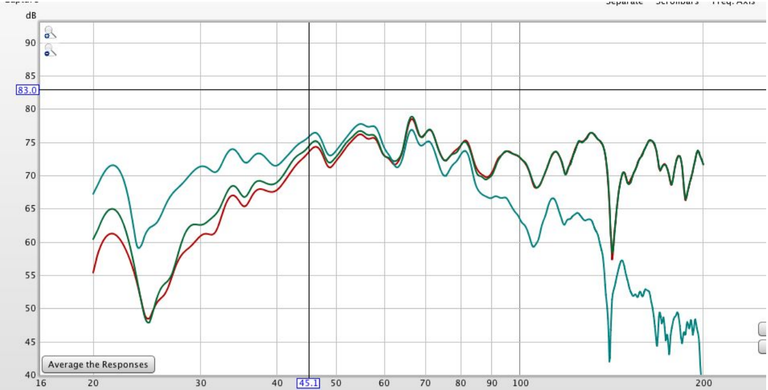
Teal curve is the final one with bass-boost. Roll-off towards the right is due to crossover.
Finally, the sub started sounding like a real sub you would buy on the market. I really enjoy listening to this sub now - I’m really surprised that this was possible to do.
Here’s the final MiniDSP config.

Amplifier
I’m powering this using the Micca Origain A250 ($80 new or $60 open box), which can supply up to 50W per channel at 4 Ohms. It’s good enough for listening to music at very loud volume. I haven’t pushed it to full volume, as I’d be afraid of my silicone-sealed woofer/cabinet developing leaks if I did, and also worried I might hit the woofer’s excursion limits at low frequencies. Update: i have pushed it to full gain. Louder than I can comfortably listen to. For now this is Good Enough.
Final thoughts
This was an epic first speaker build. I learned so much in the process, and the end-result is way better than I was expecting. I made tons of mistakes but all of them are good lessons to help me with future builds.
Next time I would take more care in cutting out the circle for the woofer and I would use a rasp or a plane to ensure the edges of the box are perfectly flat.
The most surprising thing about this build was that EQ really transformed the sub from not being able to play below 50Hz, to having an almost flat FR down to 30Hz. Of course this came at a cost of lower efficiency and headroom, but amplifier power is relatively cheap nowadays. Even using a 50W amp, I don’t feel I need more power.
I'm glad this post was resteemed by helpiecake, I probably wouldn't have seen it otherwise.
It sounds like this turned out to be a good first project! Subwoofers can be a bit tricky to build, you never know quite how they're going to react in the box, even when you build it to "optimum" size, because the speaker parameters aren't always what they're advertised to be.
P.S. I didn't realize this is only your second post on the blockchain, you should consider posting more often.
I recently put together a set of horn tweeters for my sound system due to a lack of upper frequency response. I made temporary boxes for them until I can work outside to make better boxes. I wrote a couple of posts about them, in case you're interested in checking them out.
I think I need to get one of those DATS speaker measuring device for building woofer cabinets for a couple of 12 inch speakers that I have no boxes for right now.
DATS is really great I'd highly recommend it. One click of a button and you get most T/S parameters for free. No messing around with building a jig and hooking it up to your sound card. It doesn't get easier than DATS. The only tricky thing is getting Vas and Mms. You either need to attach a precise mass to the woofer, or use a test box with known Vb. But well worth it for the predictable results.
Will post more - I bought two walmart subs, just built a ported sub using the other one. It's hilarious. Has two port tubes and they stick out the top of the sub. Will test it, write a post. Although it'll be much smaller since fewer mistakes were made :D
I'll definitely check out your posts! Always been curious about horns.
The ported subwoofer box should be quite interesting!
I don't think it matters if the port length is in the box or outside the box, as long as it's the right length.
Hi and welcome here! When I started on steemit, my biggest problem was to find interesting people to interact with. So, to help newcomers getting started I created a directory with other interesting and or talented steemians to follow or interact with. Feel free to check it out at https://www.steemiandir.com I am sure it will help you find like-minded people. Enjoy your stay here and do not hesitate to contact me if you have any questions!
Welcome to Steem ksikka! Partiko is officially the fastest and most popular mobile app for Steem. Unlike other Steem apps, we take 0% cut of your earnings! You can also be rewarded with Partiko Points while using Partiko and exchange Partiko Points for upvotes!
Partiko for Android can be downloaded here on Google Play and the iOS version is available here on the App Store.
If you have more questions, feel free to join our Discord channel and ask @crypto.talk, we're always here to help!
Thank you so much for your interest!
Hi, welcome to steemit. I upvoted your post.
(These are the most interesting applications/services to use as a cryptocurrency enthousiast.)
This post was shared in the Curation Collective Discord community for curators, and upvoted and resteemed by the @c-squared community account after manual review.
@c-squared runs a community witness. Please consider using one of your witness votes on us here
Wow, for a supposedly easy task that looks still way too complicated for me. Then again I just don't like using hardware tools in general. And nice work on reclaiming parts of an old pillow haha. From putting you to sleep to helping wake things up. Yeah....
Awesome way to think about it :)
Congratulations @ksikka! You have completed the following achievement on the Steem blockchain and have been rewarded with new badge(s) :
Click here to view your Board
If you no longer want to receive notifications, reply to this comment with the word
STOPVote for @Steemitboard as a witness and get one more award and increased upvotes!
Hello @ksikka
Currently, We're supporting for the Planktons by our small upvote. If you follow @haccolong you will get free upvote of 20 users. You may like it, Check statement here.
To get more 15SP delegate + 3000points and receive additional rewards from your activities on Steemit, you can use Partiko app for your phone.
Welcome to Steemit & Wish you luck - success with Steemit!
Please ignore this reply if you do not need the above.
Posted using Partiko Android
Hello!
This post has been manually curated, resteemed
and gifted with some virtually delicious cake
from the @helpiecake curation team!
Much love to you from all of us at @helpie!
Keep up the great work!
This post has been resteemed from MSP3K courtesy of @juliakponsford from the Minnow Support Project ( @minnowsupport ).
Bots Information:
Join the P.A.L. Discord | Check out MSPSteem | Listen to MSP-Waves
Pretty cool. Nice DIY project
Posted using Partiko iOS
Congratulations @ksikka! You received a personal award!
You can view your badges on your Steem Board and compare to others on the Steem Ranking
Do not miss the last post from @steemitboard:
Vote for @Steemitboard as a witness to get one more award and increased upvotes!