Good day fellow Steemians, it's Rabbe here. I promised you more of my projects, so here we go. Today's project is something I'm very proud of, since it was something I hadn't done before but had been thinking for a long while. It also turned out pretty sweet.
I've always loved skateboarding and recently got myself a longboard for transportation. However, it's quite large which is not always a good thing. I looked for something more appropriate for daily use, but didn't really find anything nice. So I made my own.
To kick off the project, I first got my hands on something to make my board from. I got lucky and found some nice birch veneer sheets from my old school. My old teacher was happy to donate them to me since they were going to the trash anywhere. So:
- Materials ✓
Next up I needed to design the shape and size of my board, so I did a few Google searches for inspiration and started scribbling. Eventually I ended up with a size of something between a normal skateboard and a full size longboard. I also came up with a few nice shape ideas. Later on you'll see what kinda shape I chose. So:
- Materials ✓
- Shape & size ✓
Now that I had a rough idea of what I wanted to do, it was time to get to work. And just like in the last post, this one also needed to start with some mold work.
Most of us know that a skateboard is usually curved in one way or the other, most times in two different directions. This kind of 3D-shape is not the easiest one to make, since wood easily bends in only one direction at a time. So in order to achieve the right shape, you will need a mold with a male and a female part and enough pressure. The mold parts would have been fairly easy to make with a CNC router since I already had a program made for it, but unfortunately our router was temporarily out of order. This meant I had to go old school and make the mold with hand tools. After a few hours of sawing, planing and a lot of sanding, this is what I came up with: 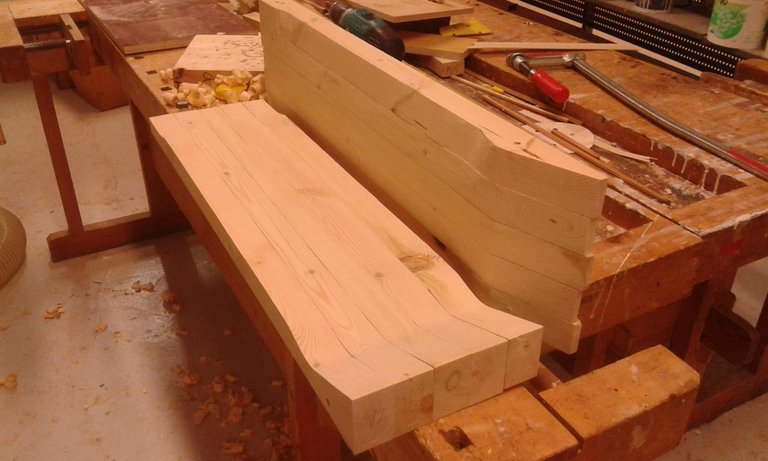
 I know, doesn't look like much but it was a real pain in the ass. Making things that are supposed to be accurate with just hand tools is always quite a challenge.
So, now that I had the mold ready it was time to glue the blank for the board right? Not exactly. Before any of that I had to decide what kind of properties I want my board to have in terms of how it bends during use and how "snappy" it is. The adjustment of flexibility is done by using the wood's grain directions. Usually, most layers in the board have their grain direction going from the tip towards the tail. By turning some layers in such way that the grain goes from side to side gives the board more flexibility. If someone is interested to hear more about this, I'm happy to tell more. But I will skip the details for now or the post will be way too long for anyone to read.
Next step was pre-bending the veneers. A skateboard's shape has quite tight curves, which means that the veneer sheets can break when you try to force them into their new shape. To prevent this, I soaked the sheets in hot water and left them in a plastic bag with some more water so they would soften up a bit. Applying water makes the fibers in the wood more pliable and "stretchy", while heat softens the lignin (which keeps the fibers together) in the wood. When I was sure the sheets were thoroughly wet, I put them in the mold and left them to dry inside the mold overnight.
 The point of pre-bending is to remove already existing tension from the wood and give it time to "get used to" the new shape.
Once the veneers had dried, it was time to put my mold to the ultimate test. So, some glue between the sheets and back into the mold.
 I was going to use a hydraulic press for the gluing process, but I wasn't sure if my mold would be able to take the pressure so I ended up using clamps. A lot of them.
There are a few opinions on what kind of glue should be used when making boards. I ended up using regular PVA glue (the basic white wood glue) since I wanted some flexibility for mine. It should be fine as long as you remember to choose the one that withstands moisture.
So, this came out of the mold when I opened it:  All the layers had stuck together, the curves looked good and the top and bottom veneers were still free of any major cracks and splits so all good.
Now that I had my blank glued, it was time to start shaping it towards a real board. I had my desired shape drawn on paper in a certain scale so I was able to transfer it onto the board with some measuring. After that it was time to make the cuts.
 The lines...
 Rough cuts...
 And some tweaks and sanding. Kinda starts to look like a real board eh?
The board was starting to look quite nice, but what is a skateboard without some cool graphics? Well, less cool for sure. So, I had to come up with something.
Now I'm not much of an artist, so I wanted to stick with something simple but weird enough to make it interesting. So I did a few sketches on paper with a pencil, chose the best and transformed them into a digital form using Gimp to give them a final touch.
But how the heck I was gonna transfer the picture from my computer onto the board? Well, a few google searches helped and I found something interesting. Turns out, if you print a picture with a laser printer and apply heat to it, the picture will be transferred to the surface directly under the picture. I was quite skeptical, but it did work afterall.  Yes, there is a penquin and a bear. Yes, the penquin is wearing a sombrero. And yes, the bear has "Deal with it"-glasses. I also added my logo to the board afterwards since I liked it so much.
After I had given the board a good sanding and was happy with the bottom picture, it was time to give it a few coats of lacquer. I used a polyurethane-based lacquer to achieve some moisture resistance, but also because it can be polished after it has dried. This way I got a nice semi-glossy surface.
Once the surface finishing was done, I drilled some holes and attached the trucks and wheels to the board.

Last but not least, I needed a griptape on my board so my feet won't slip while cruising. Since the board had been a special project, I wanted to end it with style. So instead of a plain black sheet of griptape, this is what I did:


Now my board was complete and I had the chance to take it for a ride. And oh boy it felt good riding something I had made myself, and more importantly that it actually worked.
If you had the patience to read this far, I salute you. It was a long post, but I hope it was an entertaining one. This was an important project for me, since it's one of my life-long dreams to make custom skateboards for a living. However, it's one of those things that might be a bit out of reach. Who knows, maybe some day...
Please let me know what you think. Until next time. Peace.
-R
very impressive work, and your skills are definitely praiseworthy :)
Awesome job on the board and this post, keep up the good work!
Very cool post man! Nice work, you got skills. I like longboarding my self. I upvoted resteemed and gave you follow. Cheers!
That's a dope ass board as I can truly appreciate the craftsmanship behind it. Thanks for sharing your journey with the community. I've got two projects I want to take on one day myself. One is to make a wristwatch and the other is an acoustic guitar.
This gem of a post was discovered by the OCD Team!
Reply to this comment if you accept, and are willing to let us share your gem of a post! By accepting this, you have a chance to receive extra rewards and one of your photos in this article will be used on our compilation post!
You can follow @ocd – learn more about the project and see other Gems! We strive for transparency.
Thank you for the kind words, it really was a nice one. And those projects of yours sound very interesting as well! I've been thinking of building a guitar too, maybe some day.
And of course you can share, it would be an honor.
Rabbe,
Just wanted to congratulate you on having been selected for today's compilation post. Have a great weekend.
https://steemit.com/ocd/@ocd/ocd-daily-issue-10
O weeee this is epic. Casey Neistat would be so proud :)
Haha thanks man :D
You're welcome buddy :)