How To Make Homemade Mozzarella Cheese in 30 Minutes Or Less!
I always thought that cheese making was a mystery.
I imagined people working in caves with hair nets, stooping over barrels of brine and cheese...
OK I fully admit that I had no idea of what this cheese-making process entailed, but...the supermarket has "Cave-Ripened Cheese", right?

Which is how I found myself at a cheese making workshop on a dairy goat farm.

I saw the ins and outs of how to make all sorts of cheese, and scribbled dutifully on my cheese-making manual...
But honestly, I didn't think that I would ever get around to making any of the cheese (mainly because of the patience required).
But when they said that I could learn how to make Homemade Mozzarella in 30 Minutes or Less
Well, I was hooked!

Hey, why not be that hit of the summer parties?
Right when fresh basil is in season, and cherry tomatoes are ripe for the picking...

The trick was, I found, was to make sure that you have the correct type of milk.
Either whole milk or 2%, or even raw milk. (I use "Cream on Top" from our local dairy).
Whole milk produces a rich, soft mozzarella, while 1 or 2% produces a harder string cheese-like cheese.
Pasteurized milk is okay.

Just make sure that you DON'T USE ULTRA-PASTEURIZED MILK.
It's a deal-breaker, and is the difference between jumping with glee at your newly made mozzarella cheese, or staring sullenly at a soppy mess on the stove that refuses to coagulate into any form of respectable looking cheese.
And went through a few gallons because I didn't believe it the first (or second) time around...
I ended up making a very sorry looking ricotta cheese instead of silky smooth mozzarella cheese.
(By the way, photo credit to Brina Blum on Unsplashed for the awesome top photo)

Ingredients:
- 1 gallon whole milk (NOT ULTRA-PASTEURIZED)
- 1/3 cup Lemon Juice or Vinegar (I prefer lemon - it gives the mozzarella cheese a tiny bit of lemony taste)
- 1/4 teaspoon liquid rennet in 1/4 cup water (or 1/2 tablet of Rennet, dissolved in 1/4 cup room temperature water)
(I use liquid vegetable rennet)
(If you can only find junket rennet, use 1-2 tablets) - Sea Salt or Kosher Salt
Equipment:
- Large Pot
- Thermometer
- Wooden spoon or spatula (non reactive)
- Slotted Spoon or Perforated Spoon (to scoop up the curds)
- Spatula or 8" knife or similar instrument to cut the curds
- Bowl (microwaveable)
- Rubber Gloves (it gets hot) - use if needed
- Microwave (to stretch the mozzarella). Alternatively, you can simply use hot water to stretch it.
Instructions:
- Measure out 1/3 cup of either the lemon juice or vinegar. Measure out 1/4 cup of water and dissolve the rennet.

Pour milk into the pot. Heat to 55F and stir in the lemon juice or vinegar. (Usually I can add in the lemon juice straight away without much heating).
Gently heat the milk to 90F, stirring the milk gently with wooden spoon / spatula.
Remove the pot from the heat and slowly stir in the rennet solution with an up/down motion for 30 seconds.
Stop stirring, cover the pot, and let it sit undisturbed for 5 minutes. (Usually during that 30 second period, I will see it start to solidify right in front of my eyes. Amazing. And then I cover the pot and walk away for 5 minutes to let the magic happen.)
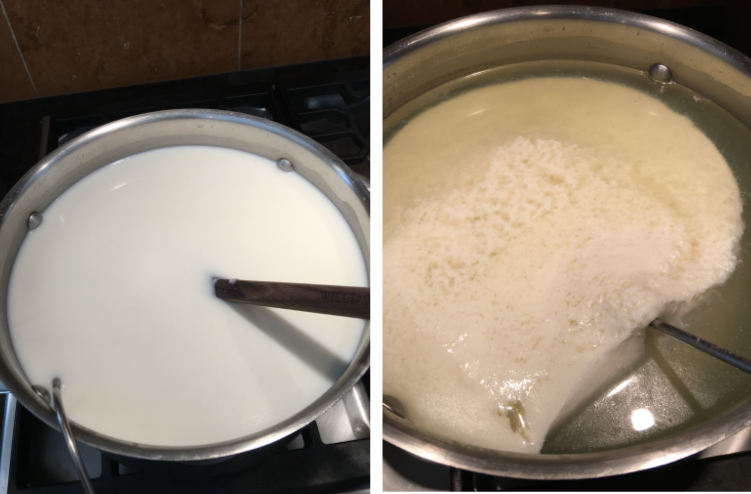
Check the curd. It should look like custard (or like soft silky tofu), with a clear separation between the curd and the whey. If the curd is too soft or liquidy, re-cover the pot and let it sit for another 5 minutes.
Cut the curds - making several parallel cuts vertically and horizontally, making sure your spatula / knife cuts all the way to the bottom of the pan.
Place the pot back on the stove and start warming the curds to 105F.
- If you are stretching your curds in the microwave, heat your curds to 105F.
- If you are stretching the mozzarella in hot water, heat your curds to 110F.
Stir the curds slowly as they warm up. Eventually they will start to clump together and separate from the whey.
Remove the pan from the heat and continue stirring gently for another 2-5 minutes.
Scoop out the curds with a slotted spoon and put into a microwaveable bowl. Press the curds gently with your hands, pouring as much whey as possible.
Microwave the curds on HIGH for 1 minute. Drain off the whey. Put on your rubber gloves and fold the curds over on themselves a few times (as in kneading bread). (Careful! This will get hot!) (This distributes the heat evenly throughout the cheese. At this point, the curds are still loose and look like cottage-cheese.
Microwave two more times for 30 seconds and check the internal temperature. (Don't forget to continue kneading in between times to distribute the heat!).
Once it reaches 135F you will notice it start to stretch like taffy...
Sprinkle salt over the cheese. Using both hands, stretch and fold the curds repeatedly. The cheese will start to become smooth and elastic. (You may need to add additional salt. Continue to taste test.) If the curds break instead of stretch, they are too cool and need to be reheated.
When the cheese is smooth and shiny, roll it into small balls. You can eat them while warm, (they're best fresh), although they can keep for about 1 week in the refrigerator (mix 1 tsp of salt with the whey and pour over the mozzarella).
Additional Notes:
To make the mozzarella without the microwave, you can heat a pot of water to 190F (below boiling). Pour the curds into the strainer and nestle the strainer into the pot so the curds are submerged. Let the curds sit for about 5 minutes.
Fold the curds over (Rubber gloves if needed! It's hot!) Check the internal temperature. If it hasn't reached 135F, let the curds sit for another few minutes until it does. Once the curds have reached 135F, lift them from the water and stretch as above.
Honestly, I never use the microwave. Instead of heating another pot of water, I merely heat the whey to 190F, and nestle the curd inside my slotted scoop. I usually don't check the internal temperature, and start stretching the curds when the water hits 170F or so._
You do have to keep an eye on what's happening. Last time my attention wandered, the cheese started melting out of the holes in my scoop!). Be warned!

- Remember, if your curds turn into ricotta cheese (ahem, like my first 3 or 4 times) - CHANGE THE BRAND OF MILK!! It's likely ultra-pasteurized and won't work to make mozzarella cheese.

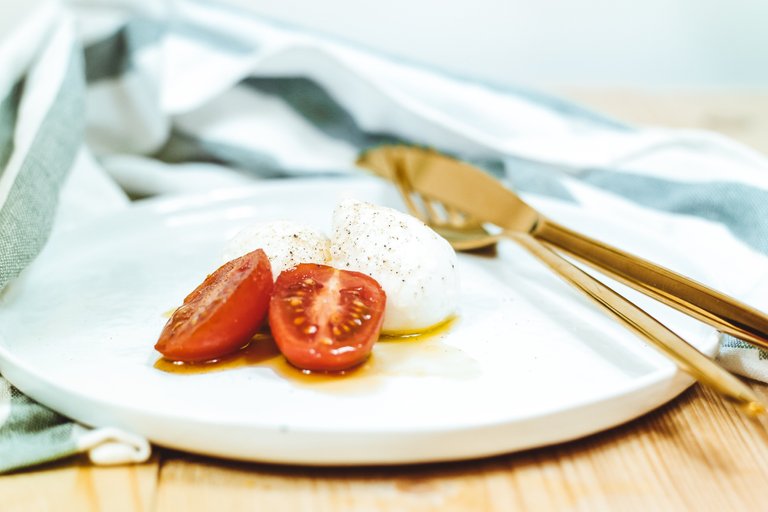
So What Do You Do With Your Mozzarella Once You Make It?
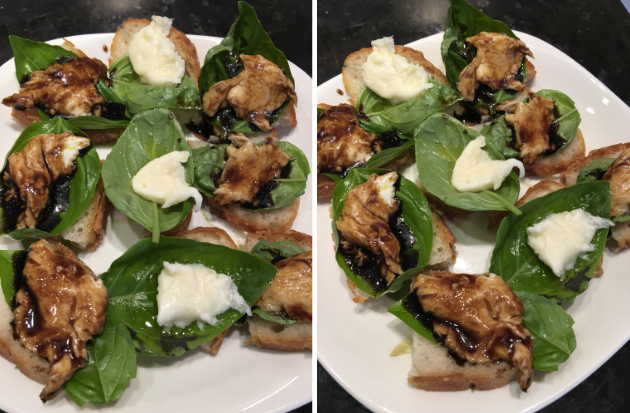
I usually have different types of olive oil and balsamic vinegars on hand. Dunk your mozzarella pieces in that, and you're golden.
This past time I went to the garden and picked some basil, and topped the mozzarella cheese on top of some slices of bread.
Let me know what you think if you try this! (Or, if you would even try it!)
Have you made other cheeses? I'd love to hear about your experiences!
Comment below!
Thanks for reading!

Great job.
Hey thanks for your vote of confidence! I appreciate it! :)
You are welcome.
wow

Love your giphy!! (I know, seriously - that dinosaur...it's me!)
thank you
Wow!!!!! This is an AWESOME post :) How excited am I about this recipe :) Lets just say I am SSSSUUUUUUPPPPPPPEEEEEERRRRR ready to try this!! Thank you very much - Happy Wednesday my Steemit Friend :) SUNSHINE247
Thanks so much!! Although the mozzarella cheese only took 30 minutes to make, it took WAY longer to write this post!!
I'd love to see a picture of it when you do make it!!
Thanks again!!

When I make this, I will post a pic for you - by the way, love that GIF, crackin me up! Happy Wednesday my Steemit Friend
You too, @sunshine247! :) (sorry I couldn't resist another GIF!) (I may have a wee bit of an addiction!!
looks amazing, nothing like homemade Mozzarella, fresh basil from the garden, tomatoes from the vine and some blueberry balsamic vinegar (yes its a thing!) heaven!!
Guess what @nickoskitchen? I totally have blueberry balsamic vinegar in my cupboard!! Can you believe it!! I didn't think anybody else had that!
Oh my gosh, I'm salivating...homemade mozzarella, fresh basil, tomatoes, blueberry balsamic and olive oil!! I have to make this again!!
Great article. I love cheese! 🧀
Thanks so much!!
Me too!!
Cheers!!
Finally someone gave me this information!) i love cheese so much... now i'll do it!)
Love it, @travelmuse! Let me know how it turns out for you! (Just get the right kind of milk!)
I make cheese according to Chef John's recipe, it's sort of cottage cheese and great on toast! unfortunately, the melting properties is not so good, but it's cottage cheese, so you wouldn't expect it to melt like mozarella.
Did you try to melt your mozarella? if so, does it melt like those on italian pizza (rubbery cheese goodness)?
Hey @astriela! Yep, this mozzarella cheese melts great! Just had some of my leftover mozzarella - and it melted GREAT!! (I was giggling to myself because it melted much better for my leftovers, than when I made it!)
great
Awww. thanks @gunsmasterrock!
Wow, you did a great job with this post and the recipe! :) Thanks for sharing.
Oh, thank you!! I do so appreciate it!!
Hi. We are Korean coffee-media "BlackWaterIssue(http://bwissue.com)" and this is our steemit account.
Thank you for posting for steemit's content diversification.
We hope steemit will be filled with various contents and especially, we’re fully supporting via upvote in the article with "coffee" tag!
You also got a full vote of us!
Please follow us and cheer us up. We’ll also support you.
Remember tag “Coffee”.
May the caffeine be with you. ;)
Why thank you @blackwaterissue!!
Thank you for sharing and posting well and helpful to all of us, and I will try it at home with this recipe.@terasachang
Thank you @arjunmartavela! I appreciate your kind words!!
amazing.... this post is so awesome.
Thanks @missjijing!! I'm so glad you enjoyed!!
cant wait for your next post
Interestingly, some months back I read a couple of post here about making cheese. I think it wasn't mozerella but was sure one was from @meesterboom.
Thanks @ace108! I found @meesterboom's post! It was how to make paneer cheese! I'll have to give it a go!
Thanks for the heads up!!
You are welcome. Too bad i cannot remember the other one but you are smart enough to find this, you should ne able to find the other 😎
very nice :)
Thanks! Gosh, I have to say I absolutely love your name, @hungrypanda!!
Great post. Thank you for this, I must try it. X
Thanks @allaboutpastries! I'm loving your bread starter too! Never tried anything like that before!!
Why thank you. Much appreciated. Where do you get the clips from, they are great. I WAANT TO STEEL THEM! :) X
This is an excellent and detailed tutorial, @teresachang, thanks!
My pleasure @nataliejohnson! I'm so glad you enjoyed it! I'd love to hear if you make it!!
Hi. We are Korean coffee-media "BlackWaterIssue(http://bwissue.com)" and this is our steemit account.
Thank you for posting for steemit's content diversification.
We hope steemit will be filled with various contents and especially, we’re fully supporting via upvote in the article with "coffee" tag!
You also got a full vote of us!
Please follow us and cheer us up. We’ll also support you.
Remember tag “Coffee”.
May the caffeine be with you. ;)
Hmmm...is this a duplicate post? Tell me where I'm wrong, but this post looks exactly like the above post from blackwaterissue...
Sorry for this, this is caused by network's lag . Sorry for this, again.
oh, it's okay. Glad you caught it!
Ooh fresh mozzarella cheese with herbs sounds yummy. Once I get the kitchen done we are going to have to try making it.
Good luck with the kitchen remodel!! I went through it a few years ago! A bit hard going through it, but well worth it when it's done!!
I'd love to see a post about it!!
(uh, no, this is not my kitchen!!) :)