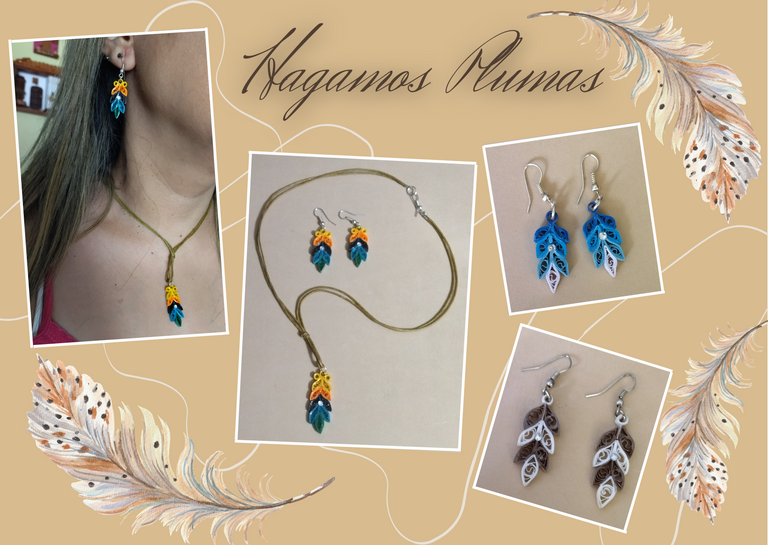
Hola a todos... 🐱🐾💕
Hola a mi gente bella de HIVE, y a toda mi comunidad de artistas de #Hivediy. Primeramente, deseándoles un mundo de bendiciones, amor, prosperidad, salud y vida a todos.
Siempre me es muy grato poder compartir con todos ustedes un nuevo trabajo hecho con mucho cariño.
Para hoy les traigo unas plumas realizadas en la técnica de quilling, pero quise enfocarlas en un conjunto de collar y zarcillos, que pueden hacer en la combinación de colores de su preferencia para utilizarlas en cualquier ocasión.
Hacer esta pluma me inspiro mucho ya que me gustan bastante las plumas, de echo tengo tatuado en mi brazo derecho una pluma con el tricolor de mi bello país y 7 estrellas, ese tatuaje lo plasmé en mi piel en el año 2017, fue un regalo de una amiguita que se marchaba del país, y lo hice en conmemoración de los momentos que afrontábamos y honrando a todos aquellos que perdieron la vida luchando por nuestra libertad.
He realizado con anterioridad algunas plumas parecidas a las que les traigo hoy con mi hermoso tricolor, me gusta mucho trabajar con él, pero en esta ocasión quise traerle una combinación diferente, creo que para el próximo trabajo me volveré a enfocar en mi bandera, y les traeré algo combinado con amarillo, azul y rojo. 💛💙❤️
Espero sea de su gusto… ✨
Si quieres disipar alguna duda con respecto a la técnica o paso a paso, que va a ser usado en este post, puedes visitar el siguiente link, por acá abajo te lo dejo:
Comencemos:😃
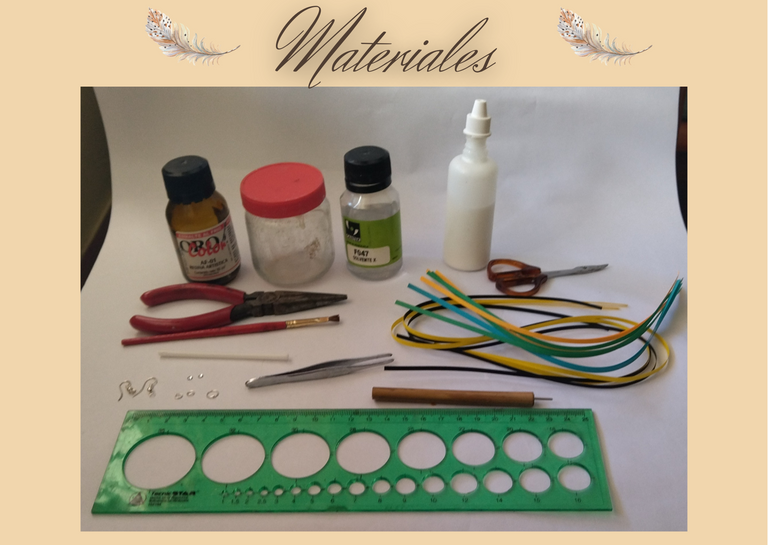
Materiales:📏✏️✂️
• Cinta de quilling de color verde, aguamarina, negra, naranja, y amarilla, de 3mm de ancho, (o del color de su preferencia).
• Aguja para quilling.
• Regla de diferentes medidas de circunferencias.
• Tijera.
• Pega blanca.
• Palito de altura o palillo de madera o de chupeta.
• Base para zarcillos colgante (anzuelos).
• Argolla de bisutería pequeña.
• Alicate punta fina.
• Cristales de bisutería.
• Pinza punta fina.
• Resina artística.
• Solvente x.
• Frasco de vidrio.
• Pincel.

Hello everyone... 🐱🐾💕
Hello to my beautiful people of HIVE, and to my entire community of #Hivediy artists. First of all, wishing you all a world of blessings, love, prosperity, health and life.
It is always a great pleasure for me to share with you all a new work made with much love.Today I bring you some feathers made in the quilling technique, but I wanted to focus on a set of necklace and tendrils, which can be made in the color combination of your choice to use them in any occasion.
Making this feather inspired me a lot since I really like feathers, in fact I have a tattoo on my right arm with the tricolor of my beautiful country and 7 stars, this tattoo was a gift from a friend who was leaving the country, and I did it in commemoration of the times we were facing and honoring all those who lost their lives fighting for our freedom.
I have previously made some feathers similar to the ones I bring you today with my beautiful tricolor, I really like working with it, but this time I wanted to bring you a different combination, I think that for the next work I will focus on my flag again, and I will bring you something combined with yellow, blue and red. 💛💙❤️
I hope you like it... ✨
If you want to dispel any doubts regarding the technique or step by step, which will be used in this post, you can visit the following link, here below I leave you:
Let's get started:😃.
Materials:📏✏️✂️✂️.
- Green, aquamarine, black, orange, orange, and yellow quilling ribbon, 3mm wide, (or color of your choice).
- Quilling needle.
- Ruler of different circumference measures.
- Scissors.
- White glue.
- Height stick or wooden stick or lollipop stick.
- Base for hanging tendrils (hooks).
- Small jewelry ring.
- Fine-nosed pliers.
- Costume jewelry crystals.
- Fine tip tweezers.
- Artistic resin.
- Solvent x.
- Glass bottle.
- Brush.
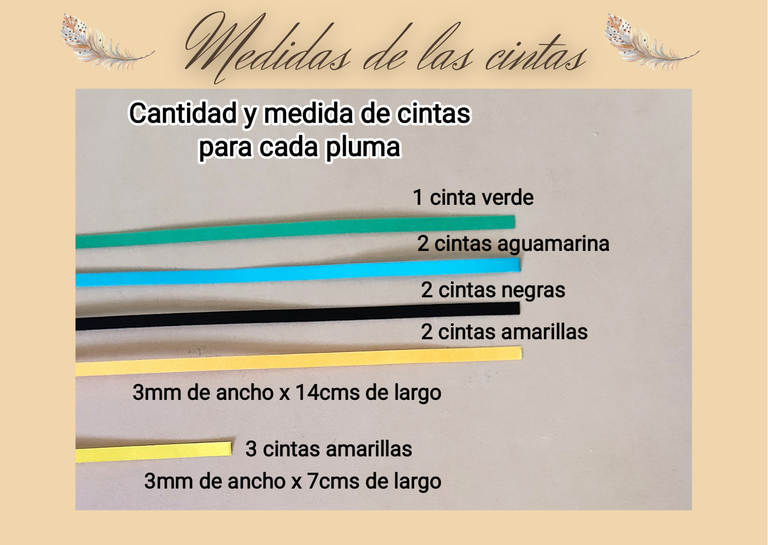
Medidas de las cintas.🌈
• Como muestro en la imagen para cada pluma, vamos a necesitar 1 cinta de quilling verde, 2 aguamarina, 2 negras y 2 naranjas de 3mm de ancho x 14cms de largo, y tres trozos de cinta de quilling amarillas de 3mm de ancho x 7cms de largo. Por cada pieza que quieran realizar deben tener a disposición esta cantidad de cintas con las medidas mencionadas. Por supuesto que según su gusto pueden realizar las plumas de la combinación de colores de su preferencia, al igual que las pueden realizar de diversas medidas, pueden ser más grandes o más pequeñas.

Measurements of the ribbons🌈.
- As I show in the image for each feather, we will need 1 green, 2 aquamarine, 2 black and 2 orange quilling ribbon of 3mm wide x 14cms long, and three pieces of yellow quilling ribbon of 3mm wide x 7cms long. For each piece you want to make, you must have this quantity of ribbons with the mentioned measures. Of course, according to your taste you can make the feathers in the combination of colors of your preference, as well as you can make them in different sizes, they can be bigger or smaller.
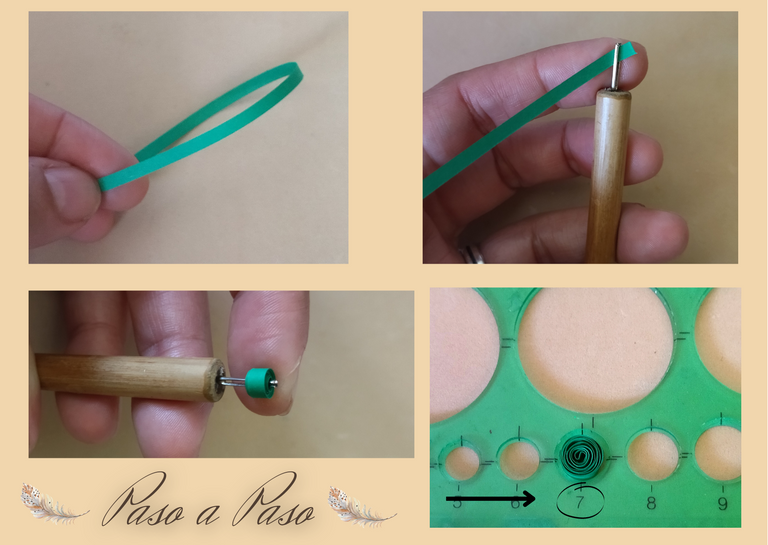
Paso a paso:💖
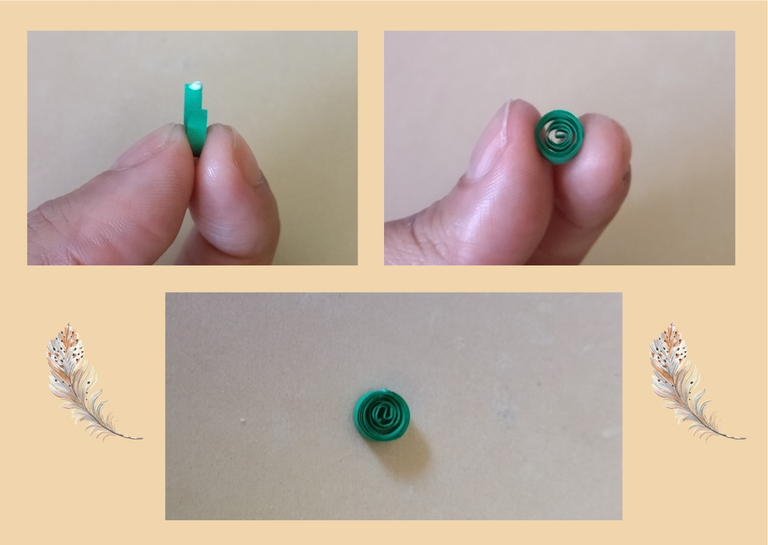
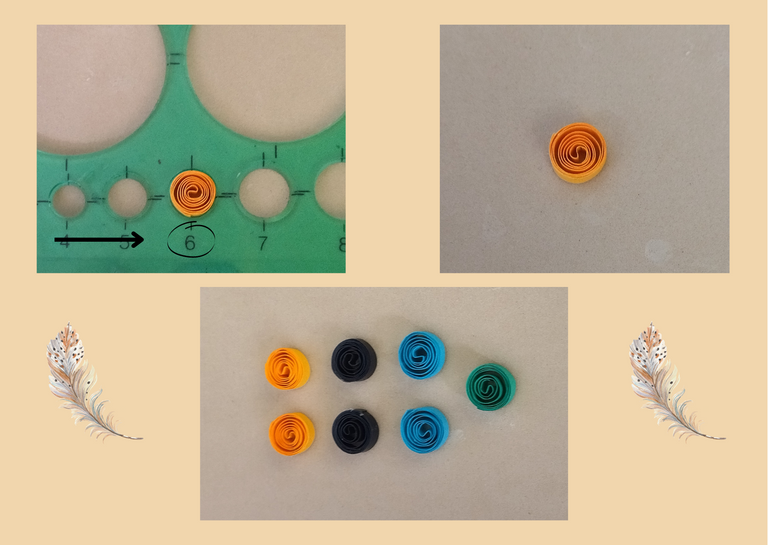
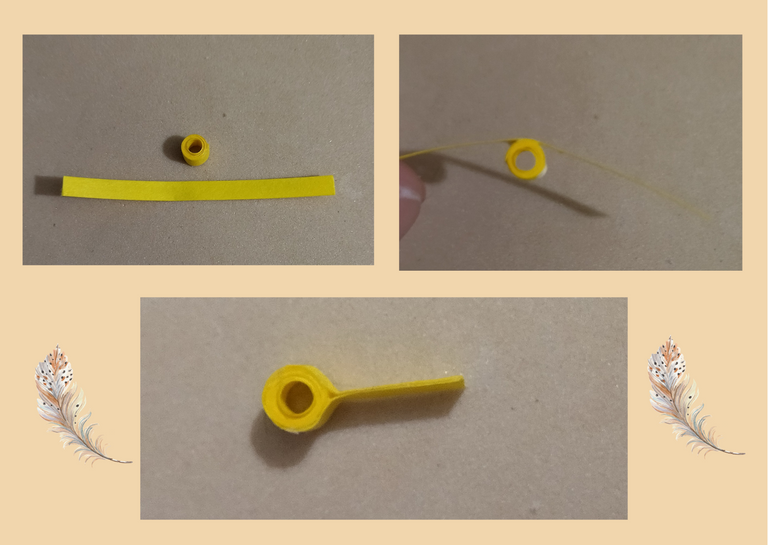
• Vamos a comenzar tomando la cinta verde de 3mm de ancho x 14cms de largo, y con la ayuda de nuestra aguja para quilling enrollaremos para formar un circulo abierto, nuestro circulo lo haremos en el círculo de la regla de circunferencia número 7, sacamos de la regla y sellamos con pega. Vamos a repetir el procedimiento con las cintas restantes aguamarinas y negras, con las naranjas realizaremos el mismo proceso con la única diferencia que mediremos en la regla de circunferencia en el círculo número 6. Como deseo realizar un par de zarcillos colgantes, y otra pieza para un dije de collar triplicaremos la cantidad de cintas a utilizar. De igual manera explicare la realización de una pluma, para que sea más fácil su comprensión.

Step by step:💖
- We are going to start by taking the green ribbon 3mm wide x 14cms long, and with the help of our quilling needle we will roll it to form an open circle, our circle we will make it in the circle of the circumference ruler number 7, we take it out of the ruler and seal it with glue. We will repeat the procedure with the remaining aquamarine and black ribbons, with the oranges we will do the same process with the only difference that we will measure on the circumference ruler in the circle number 6. As I want to make a pair of hanging tendrils, and another piece for a necklace charm, we will triple the amount of ribbons to be used. I will also explain how to make a feather, to make it easier to understand.
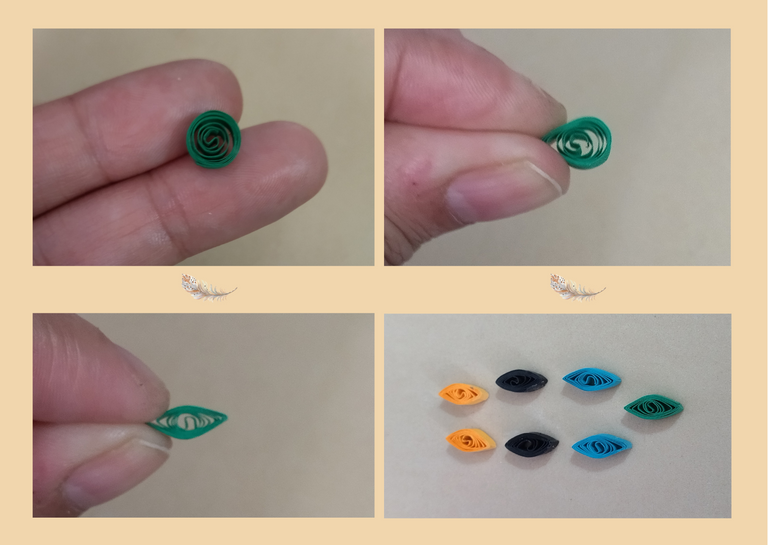
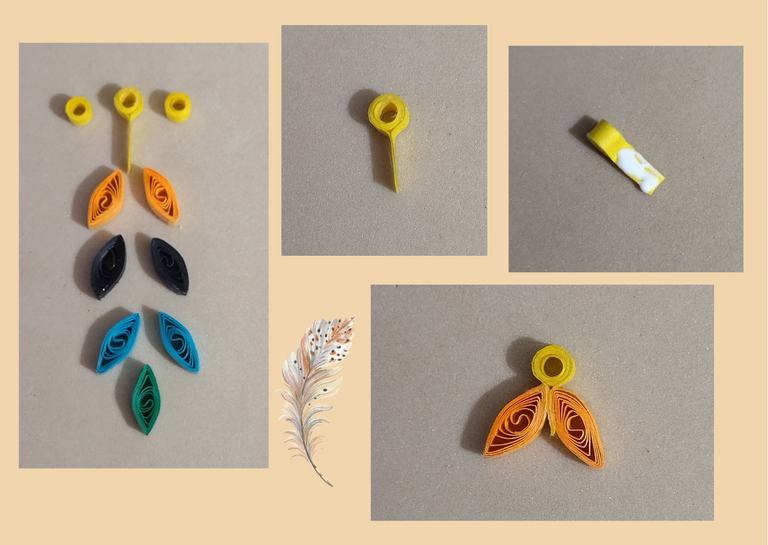
• Vamos a darle forma a todos nuestros círculos abiertos para formar las piezas de nuestra pluma, para esto vamos a darle forma de rombo a cada una, con la ayuda de nuestros dedos pellizcaremos ambos extremos, y así conseguiremos la forma que necesitamos.

- We are going to give shape to all our open circles to form the pieces of our pen, for this we are going to give shape of rhombus to each one, with the help of our fingers we will pinch both ends, and this way we will get the shape we need.
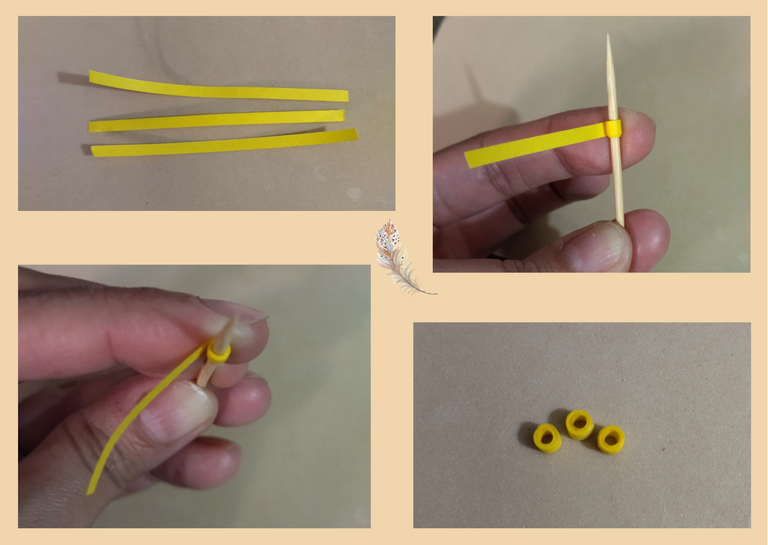
• Vamos con las cintas restantes que nos quedan de 3mm de ancho x 7cms de largo, con ellas vamos a formar unos círculos que servirán de adornos de la pieza, tomaremos un palito de altura, palillo o cualquier objeto con el cual podamos darle una forma circular nuestra cinta, tomaremos la cinta y la pasaremos alrededor del palito, al terminar de enrollar sellaremos con pega.

- Let's go with the remaining ribbons that are 3mm wide x 7cms long, with them we will form circles that will serve as ornaments of the piece, take a stick of height, toothpick or any object with which we can give a circular shape our tape, take the tape and pass it around the stick, at the end of winding seal with glue.
• Tomemos uno de los círculos que acabamos de realizar y alrededor vamos a pegar un trozo de cinta amarilla alrededor dejando un poco de cinta sobrante, esto lo haremos para que cuando peguemos nuestras piezas el circulo quede más consistente en la pieza, y no se salga al colocarle la argolla y la base para zarcillo.

- Let's take one of the circles that we have just made and around it we will stick a piece of yellow ribbon around it, leaving a little bit of tape left over. We will do this so that when we glue our pieces the circle will be more consistent in the piece, and it will not come off when we place the ring and the base for the tendril.
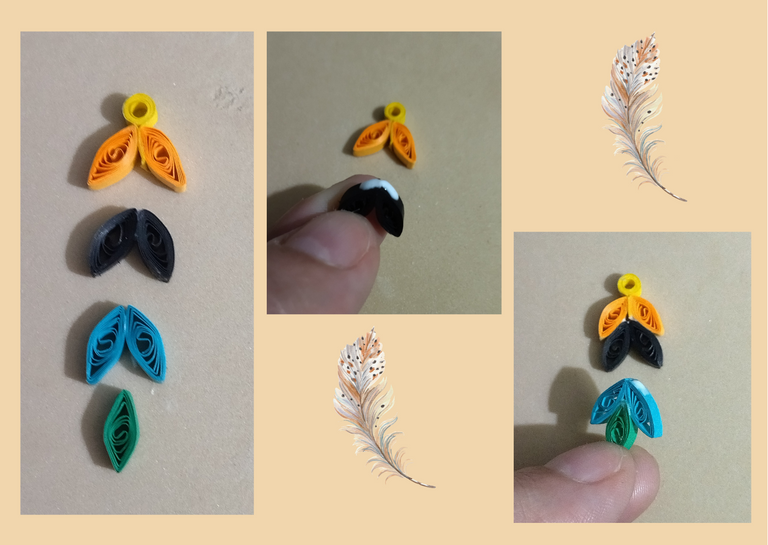
• Vamos a unir nuestras piezas para formar la pluma, comenzaremos con el circulo al que le dejamos el trozo de cinta sobrante, le agregamos un poco de pega y colocaremos los rombos naranjas, las demás piezas las podemos ir uniendo de dos en dos y vamos pegando progresivamente a las demás, para que queden con completa armonía. Al estar toda la pieza sellada, terminaremos pegando los otros dos círculos decorativos.

- We are going to join our pieces to form the feather, we will start with the circle to which we leave the piece of tape left over, we add a little glue and we will place the orange diamonds, the other pieces can be joining them in pairs and we will glue them progressively to the others, so that they are in complete harmony. Once the whole piece is sealed, we will finish by gluing the other two decorative circles.
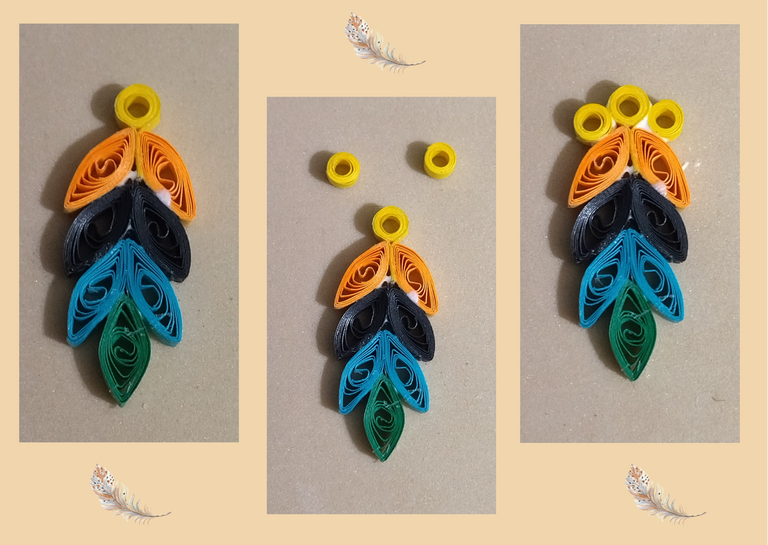
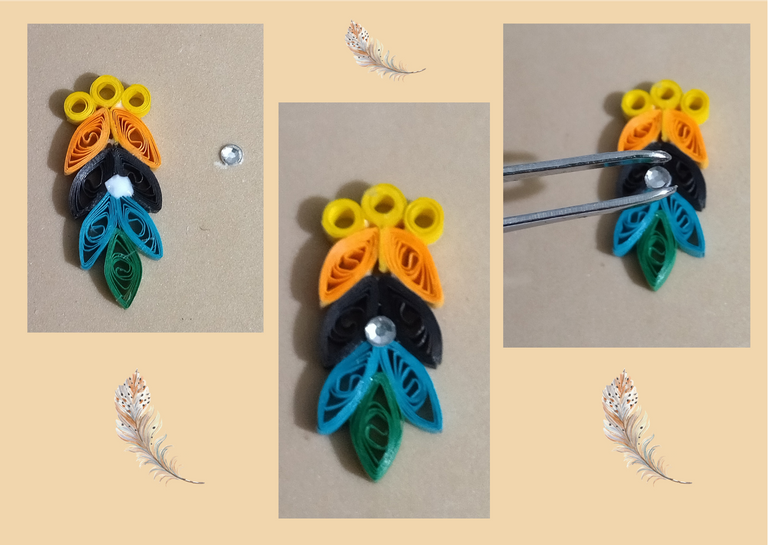
• Ya tenemos las plumas listas, coloquemos un cristal de bisutería en medio de la pieza para darle un toque de brillo y delicadez.

- Now that we have the feathers ready, let's place a costume jewelry crystal in the middle of the piece to give it a touch of shine and delicacy.
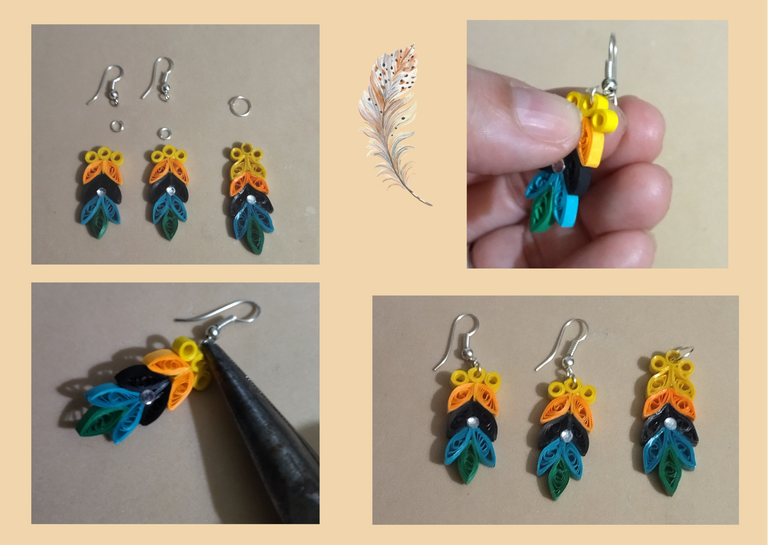
• Como les dije anteriormente las instrucciones que les di fue para la elaboración de una pieza, como yo realicé varias para poder completar un conjunto, vamos a colocarle a las piezas sus argollas y bases colgantes para obtener nuestros zarcillos, y a otra pluma adicional que hice como dije para collar le colocaremos una argolla, el dije que realice para collar lo hice un poco más grande colocándole adicionalmente dos piezas amarillas al principio, como siempre les he dicho pueden jugar con las combinaciones y tamaños para realizar las piezas, solo deja volar tu imaginación.

- As I told you before the instructions I gave you were for the elaboration of one piece, as I made several to complete a set, we are going to place to the pieces their rings and hanging bases to obtain our tendrils, and to another additional feather that I made as I said for necklace we will place a ring, the pendant that I made for necklace I made it a little bigger placing it additionally two yellow pieces at the beginning, as I have always said you can play with the combinations and sizes to make the pieces, just let your imagination fly.
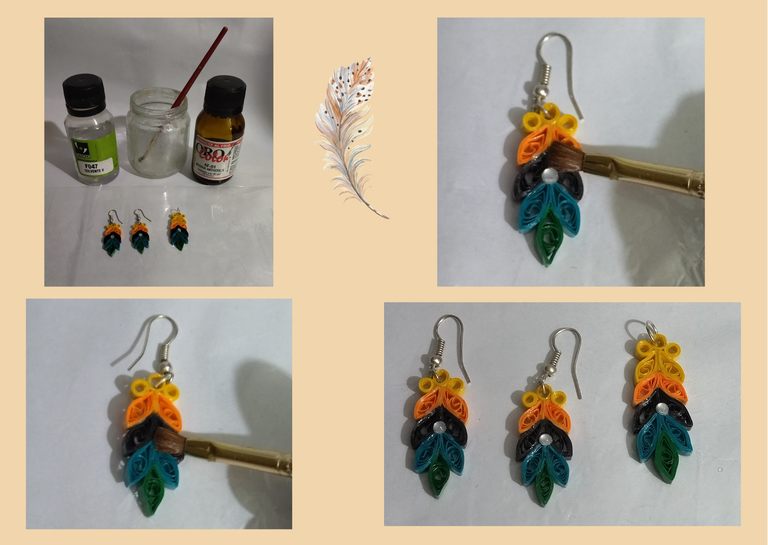
• Para finalizar vamos a colocarle su protección liquida (plastificado) a nuestras plumas, tomamos el frasco de vidrio colocamos una parte de solvente x, y otra parte de resina artística, revolvemos y aplicamos a nuestras piezas por todos sus lados, esperamos que seque, repetimos para darle mayor protección y dejamos secar de un día para otro. De esta manera ya tenemos nuestros zarcillos y dije de plumas listos para su uso.
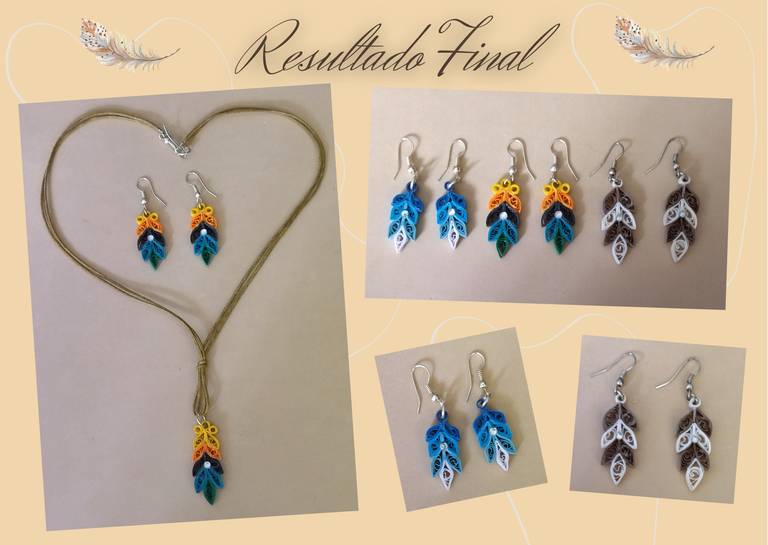
El dije para el cuello lo coloque en un sencillo collar de yute fino marrón, para que haga contraste con los colores de las piezas.
Adicional a esto les muestro otros dos pares de zarcillos con otras combinaciones para que vean como lucen.💕

- To finish we are going to put its liquid protection (plasticized) to our feathers, we take the glass bottle, we put a part of solvent x, and another part of artistic resin, we stir and apply to our pieces on all sides, we wait for it to dry, we repeat to give it more protection and we let it dry from one day to another. This way we have our tendrils and feather pendant ready for use.
I placed the neck pendant on a simple brown jute necklace, to contrast with the colors of the pieces.
In addition to this I show you two other pairs of earrings with other combinations so you can see how they look.💕
Resultado Final:💕

Final Result:💕
¿Que les pareció, les gustó?
Espero que sí, que les haya gustado mi explicación, procedimiento y fotos, los hice con mucho cariño por y para ustedes.
"Deja salir esa musa que te inspira, y deja volar tu imaginación".
Gracias a todos, nos vemos en la próxima. 🐾🐱💕

What did you think, did you like it?
I hope you did, I hope you liked my explanation, procedure and photos, I made them with love for you.
"Let out that muse that inspires you, and let your imagination fly".
Thank you all, see you next time. 🐾🐱💕

All photos used in this post are of my authorship and have been taken on my personal cell phone a Redmi 9T and edited in Canva Banner made by me in Paint Tool Sai Translated with the help of DeepL

Has sido curado por @visualblock / You've been curated by @visualblock
Bienvenidas delegaciones / Delegations welcome
Encuentra nuestra comunidad aquí / Find our community here
Trail de Curación / Curation Trail
Mil gracias por el apoyo @visualblock. Me alegra mucho que se haya tomado el tiempo pese al cansancio, a revisar mi post, De verdad muy agradecida.
Muchas bendiciones.. ✨
The rewards earned on this comment will go directly to the people(@dayadam) sharing the post on Twitter as long as they are registered with @poshtoken. Sign up at https://hiveposh.com.
Thanks @poshtoken ✨
Congratulations @dayadam! You have completed the following achievement on the Hive blockchain and have been rewarded with new badge(s):
Your next target is to reach 50 posts.
You can view your badges on your board and compare yourself to others in the Ranking
If you no longer want to receive notifications, reply to this comment with the word
STOPTo support your work, I also upvoted your post!
Support the HiveBuzz project. Vote for our proposal!
Thanks @hivebuzz ✨
You're welcome @dayadam.
BTW, we need your help!
May we ask you to support our proposal so our team can continue its work?
You can do it on Peakd, ecency,
https://peakd.com/me/proposals/199
Your support would be very helpful.
Thank you!
¡Felicidades! Esta publicación obtuvo upvote y fue compartido por @la-colmena, un proyecto de Curación Manual para la comunidad hispana de Hive que cuenta con el respaldo de @curie.
Si te gusta el trabajo que hacemos, te invitamos a darle tu voto a este comentario y a votar como testigo por Curie.
Si quieres saber más sobre nuestro proyecto, acompáñanos en Discord: La Colmena.
Muchísimas gracias por el apoyo @la-colmena y @curie, muy honrada de que hayan valorado mi trabajo.✨
Muchísimas gracias por el apoyo @don.quijote y @cervantes. Muy honrada de haber sido valorada por ustedes. Felicidades por su labor. Éxitos...✨
El resultado final es verdaderamente hermoso, me han gustado mucho las diferentes combinaciones de colores, la publicación tiene un gran maquetado y explicas el paso a paso con detalle.
Gracias por compartir tus obras.
Saludos.
Hola amiga @eugelys muy agradecida que hayas pasado por acá, y por tu comentario de gran valor. Me alegra mucho que te haya gustado mi publicación, y maquetado. Estas invitada a mi humilde blog las veces que lo desees, y ante cualquier duda por aquí estamos a la orden.
Saludos y bendiciones...✨
Hola amiga, te han quedado muy hermosas cada una de las plumas, la combinación de colores son perfectas. Muy claro tu paso a paso. Felicidades 🎊 saludos.
Gracias amiga @janettbrito76 muy feliz con tu comentario, tiene mucho valor para mí viniendo de una gran artista como tú.
Me alegra que te gustarán. Bendiciones 🥰🤗🧚🌈💐
This is as cool as ever, in your execution! You know what thought came to mind? Try doing it in the colors of some flag). The Ukrainian one is popular now, maybe that one). But these are just my thoughts. I like very much the blue and white of the ones you have. Maybe because blue is my favorite color. 😜
!ALIVE
!CTP
@dayadam! You Are Alive so I just staked 0.1 $ALIVE to your account on behalf of @stdd. (3/10)
The tip has been paid for by the We Are Alive Tribe through the earnings on @alive.chat, feel free to swing by our daily chat any time you want.

Thanks❤️
Thank you so much for your beautiful comment my friend @stdd 😍. I am so glad you liked it. I have already made them with the flag of my country Venezuela 💛💙❤️.
But good idea that you give me. Soon I will make a piece dedicated to Ukraine with the colors of their flag 💙💛.
Thank you for your support, and always being there....
Many blessings. 🌈
🙏🙌🧡💙❤️💜💚🌈
Mi querida amiga @dayadam que maravilla de post,asombrada siempre con todo lo que creas.
Que hermosura 😍😍😍😍
Gracias mi corazón por tus bellas palabras, me costo pero lo logre, montar el post claro jajajaja, cada foto se carga en mil horas, la edición mil horas, pero adelante. Esto es lo gratificante del trabajo, que sea valorado, y tener bellos comentarios como el tuyo. Bendiciones cariño... 💕
🤗🌹 ♥️Hola @dayadam amiga realmente preciosos,muy bien explicado te felicito Dios te bendiga infinitamente ♥️🤗🌹
💯👏💯👏💯👏💯👏👏👏💯💫⭐🌟🎇🎆🎊🌸🌷🌺🥀💐💐☘️☘️🌌🎇🎆💮🏵️🌻✨😜😁😁😁😚😚😚😗😉🥳🤩😍🥰🥰😘😚😚😙😙😉😜😜💛💚💙💜💜🤎🖤🤍♥️🤍💝💖💖💗💓💓💞💕💌🫂🫂🫂👏👏👏👏👏👍👍👍👍🌻🏵️💮🌸🌷🌺🌺🥀🌹💐
Holaaaa @yraimadiaz. Muchísimas gracias por tu bello comentario, me alegra que te haya gustado mi trabajo. Por aquí a la orden cuando lo desees.
Muchísimas bendiciones hoy, mañana, y siempre para ti también... ✨
Hola amiga @dayadam hiciste un buen trabajo, gracias por compartir tu técnica, felicidades.
Muchísimas gracias por tu comentario @brahiam15. Muy gratificante para mi tus palabras, y que te hayas gustado mi trabajo.
Saludos y bendiciones... ✨
Thank you for sharing this amazing post on HIVE!
Your content got selected by our fellow curator @hafizullah & you just received a little thank you via an upvote from our non-profit curation initiative!
You will be featured in one of our recurring curation compilations and on our pinterest boards! Both are aiming to offer you a stage to widen your audience within and outside of the DIY scene of hive.
Join the official DIYHub community on HIVE and show us more of your amazing work and feel free to connect with us and other DIYers via our discord server: https://discord.gg/mY5uCfQ !
If you want to support our goal to motivate other DIY/art/music/homesteading/... creators just delegate to us and earn 100% of your curation rewards!
Stay creative & hive on!
Thank you for your support @diyhub ✨
This is super creative. I love the colors. Quite attractive.
I'm glad you liked it. Thank you very much for your comment.
Regards @joydukeson 💖
Una vez más un trabajo precioso que merece un aplauso 👏🏼👏🏼👏🏼...
Mis respetos a este bello arte delicado que elaboras....
🎆🎇🎉🎊🌧️💐✨🌾🌱🌹🌙🌿🍃🥀⚡🌺☘️🍀🌈🌷⭐🪴🌵🌸🌟💮🌴🌳💫☀️💮☔🌲🌳🌍🌌🌠☄️🏵️🐝🌻🌼🍄🐞🦋💙☕💜🍍🎆🎇🎉🎊
Gracias amiga hermosa @chacald.dcymt. Besotes para ti.💕
Quedan preciosos esos juegos de zarcillos y collar🤩Excelente trabajo amiga y Bendecido día
Gracias amiga bella @zullyarte 💖
Abrazos y bendiciones...
Desconocía esta técnica, algo que me gusta es lo versátil que es no solo se pueden hacer accesorios, apuesto que un cuadro con formas hechas usando esta técnica debe quedar asombroso, gracias por compartir.
Hola gracias por pasar por acá. Si cariño, con esta técnica se pueden hacer cosas hermosas, todo lo que te puedas imaginar, yo porque me inclino por la parte de bisutería y decoración, pero hay infinidad de cosas para hacer.
De hecho hay una chica que hizo unos cuadros aquí en la comunidad, en estos días no ha publicado, voy a buscar su nombre para que la busques, y veas.
Me alegra mucho que te gustará.
Abrazos @jennyzer.🤗🥰😘🌹❤️