Bienvenidos Queridos Amantes de la Artes Manuales
Welcome Dear Manual Arts Lovers
Salud y bendiciones para todos los manualistas y amantes de las artes manuales que integran esta maravillosa comunidad #HiveDiy. Como lo prometido es deuda, y yo siempre pago mis deudas, hoy les vengo a mostrar, el como realice un gorro de chef para mi pequeña princesa. Contextualizando un poco, hace una semana más o menos, les estuve contando que, para una actividad del colegio de mi hija menor, me toco caracterizarla de chef.
Cheers and blessings to all the crafters and craft lovers that make up this wonderful community #HiveDiy. As a promise is a promise, and I always pay my debts, today I come to show you how I made a chef hat for my little princess. Contextualizing a little, a week or so ago, I was telling you that, for an activity of my youngest daughter's school, I had to characterize her as a chef.
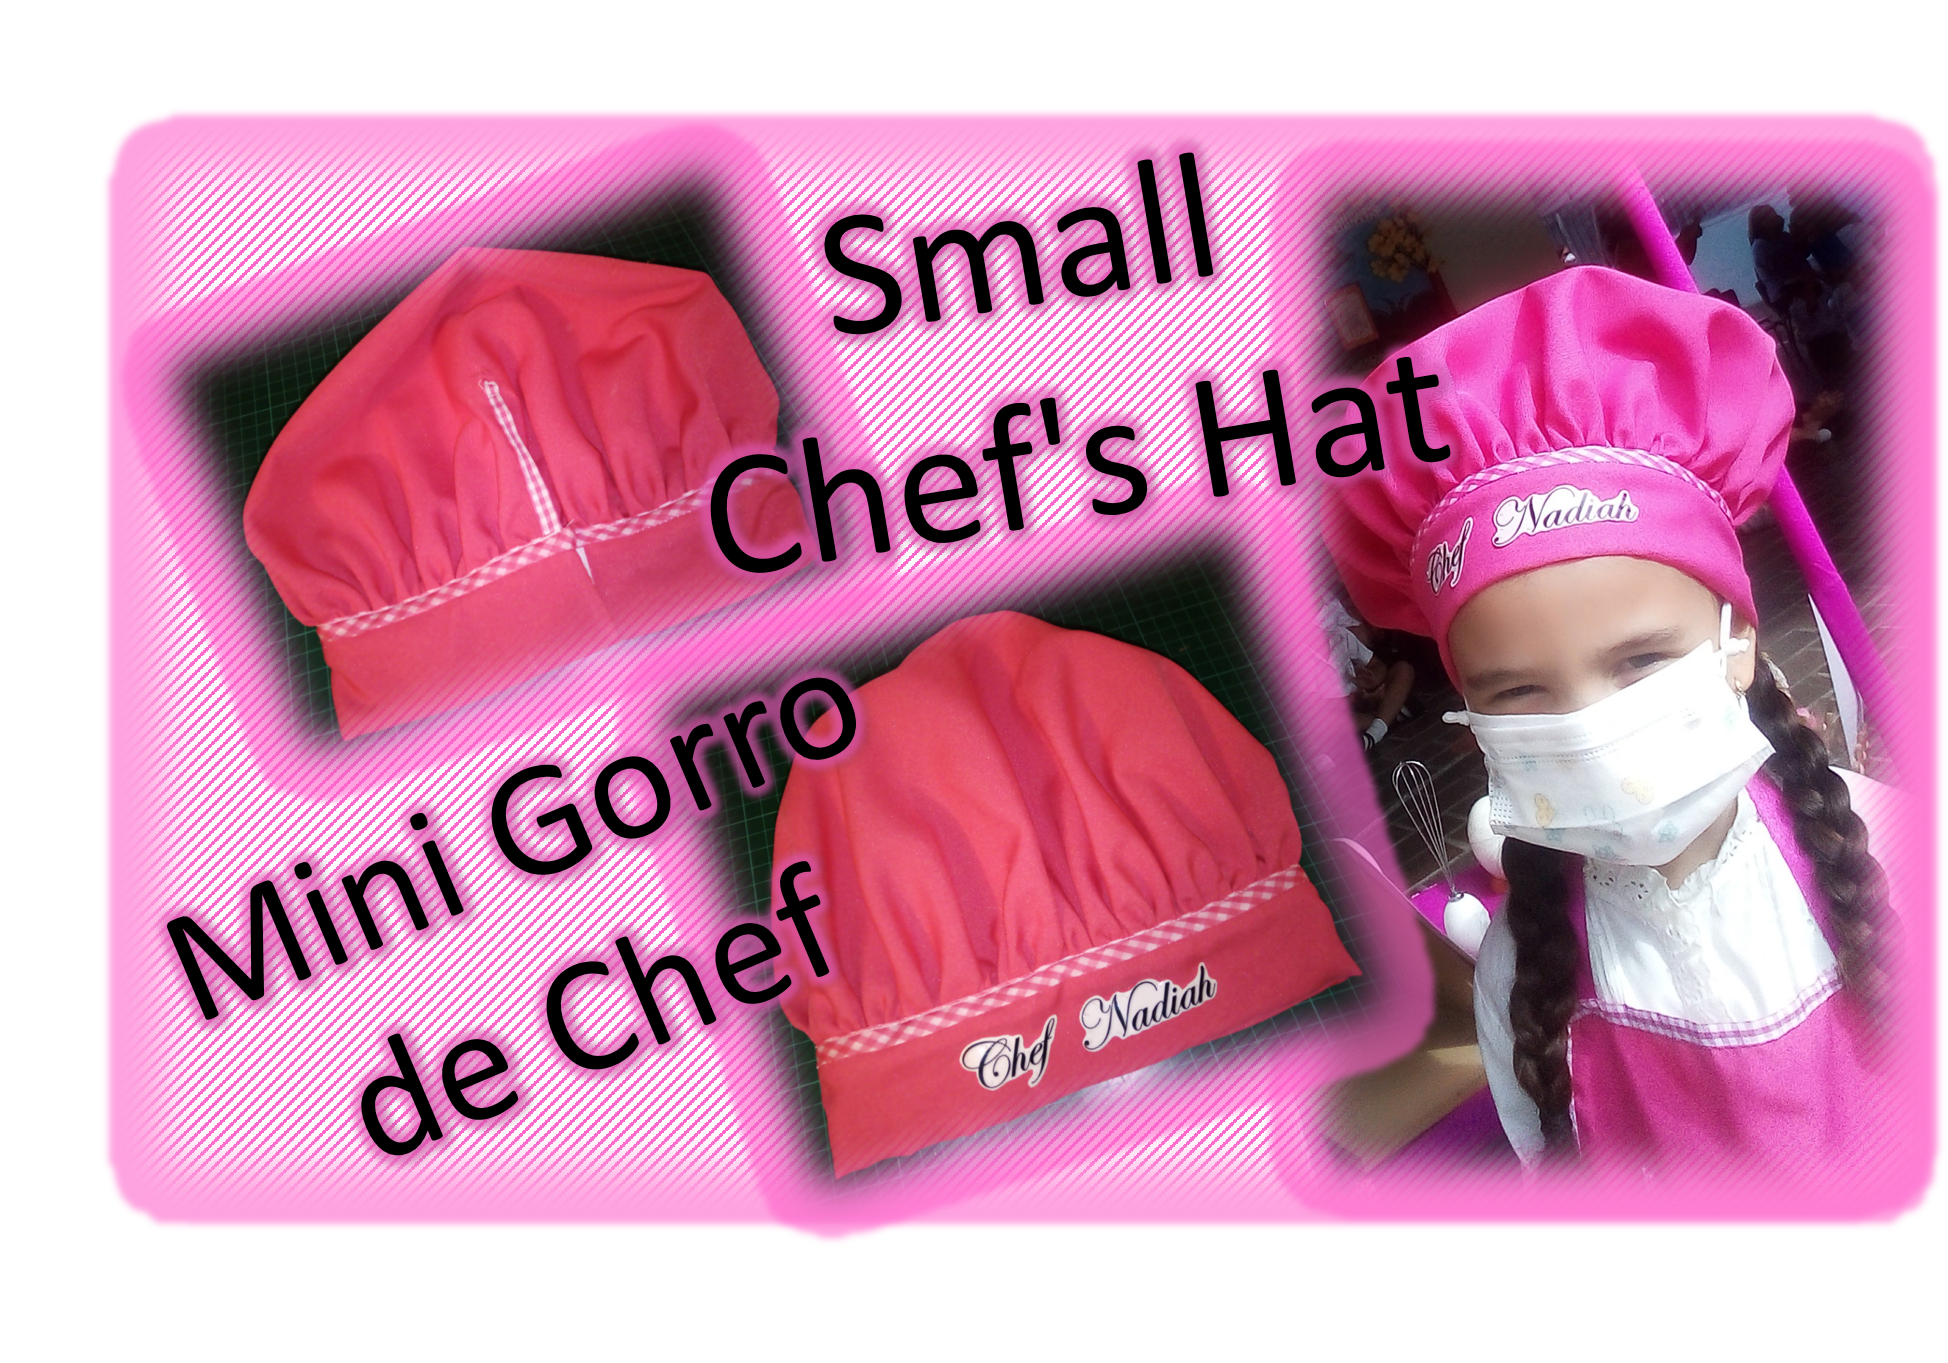

Esa vez les conté, que ella junto a otros niños, representarían a su clase en un concurso de comida saludable, para la ocasión le realicé un delantal y un gorro de chef. En la publicación anterior, les explique cómo elaborar el delantal, aquí les dejo el link, por si lo necesitan, pero hoy, les vengo a mostrar como elaborar el gorro, espero que disfruten mi explicación.
That time I told them that she, along with other children, would represent her class in a healthy eating contest, for the occasion I made her an apron and a chef's hat. In the previous post, I explained how to make the apron, here is the link, in case you need it, but today, I am going to show you how to make the hat, I hope you enjoy my explanation.
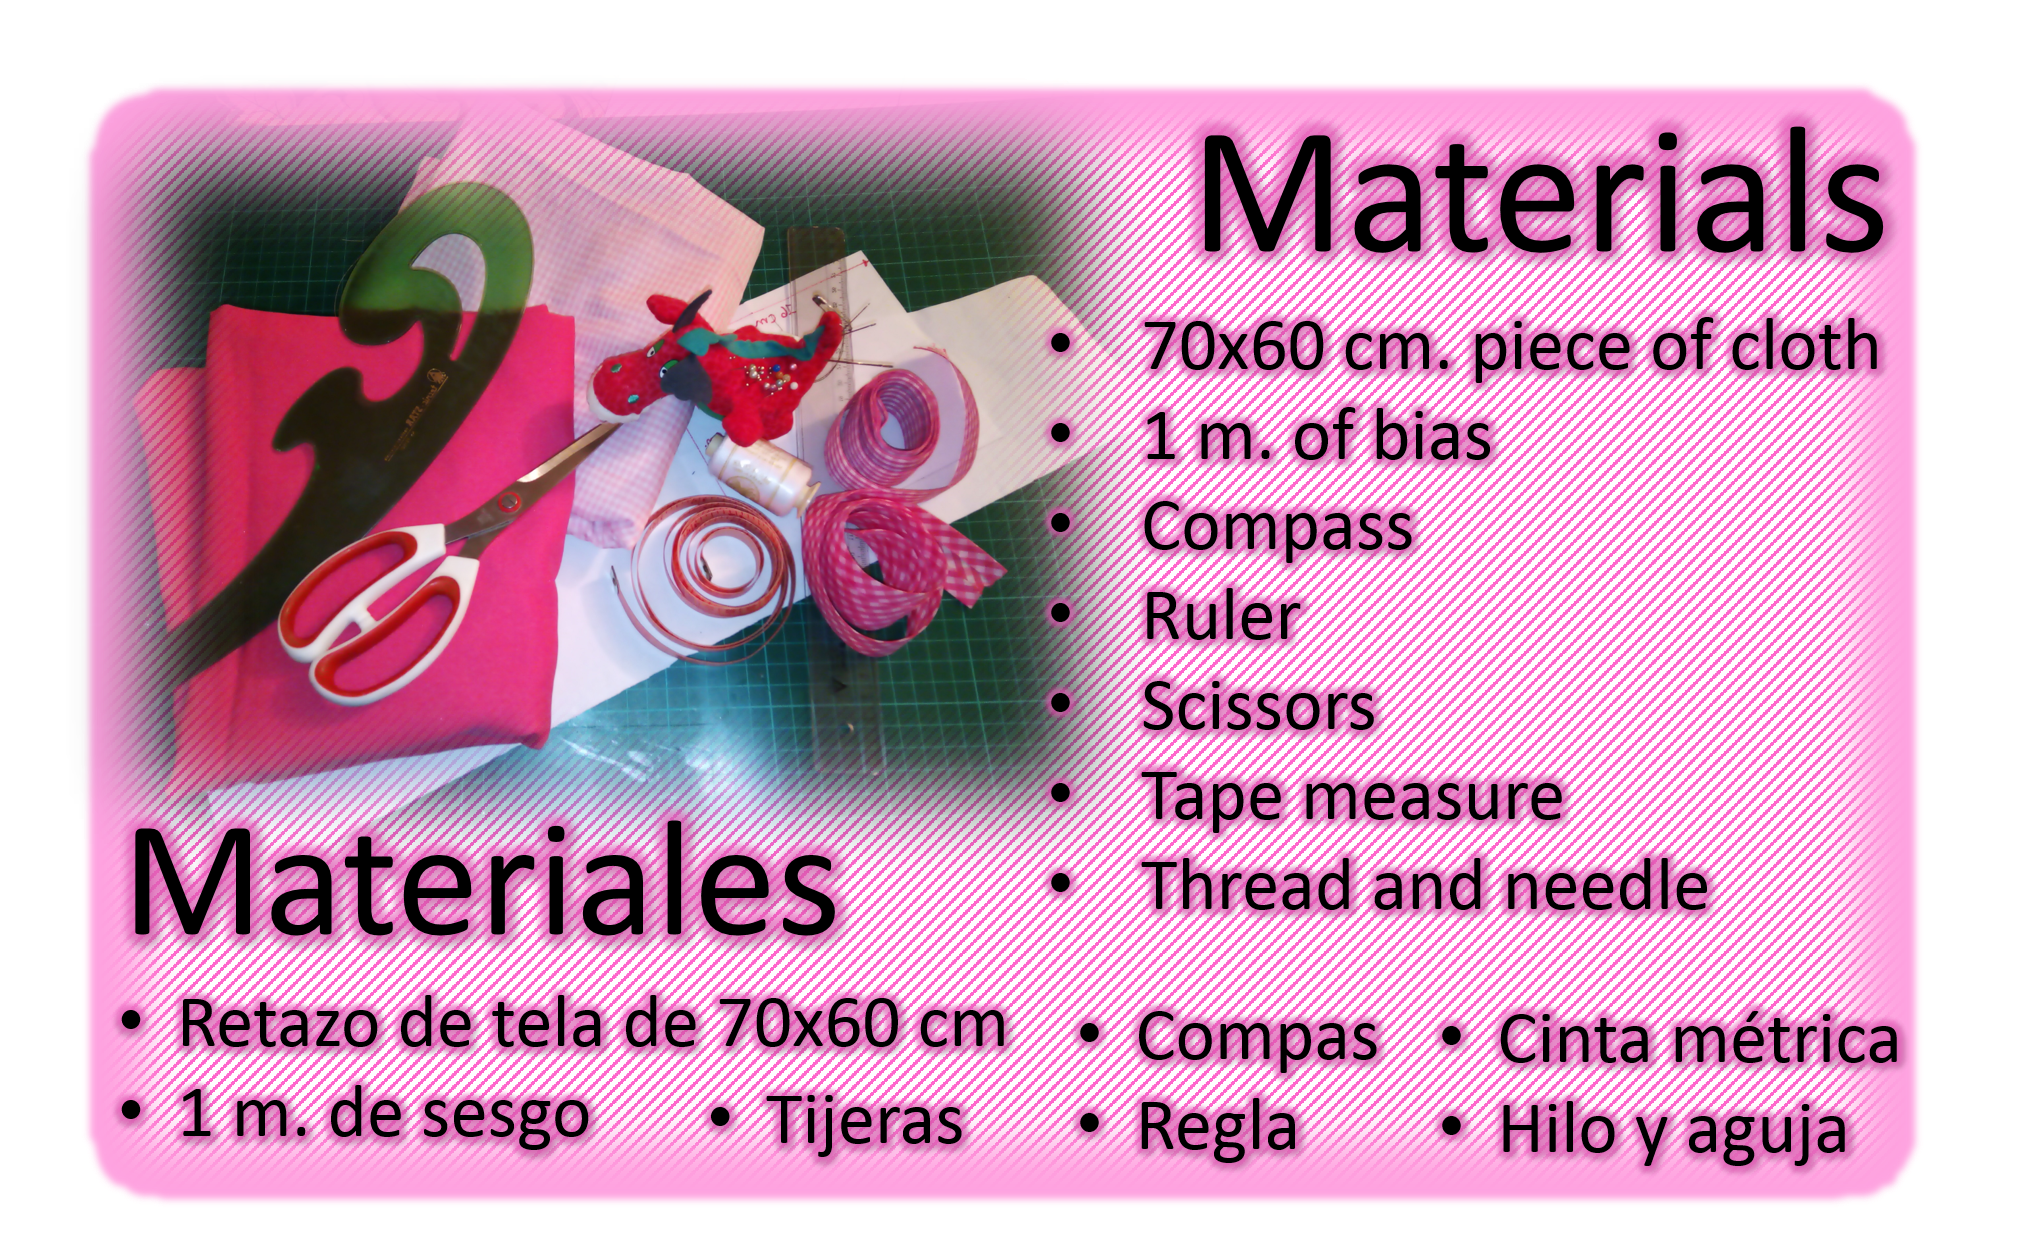
I will start by showing you the materials I used, which you can see in the image, with their respective quantities. I used a fabric called Drill, because it was the one, I had available at home, but you can use whatever you have, you can even recycle clothes that you no longer use. Remember that you cannot use a very thin or thin fabric, remember that the hat will be used for cooking and it must be resistant. Finally, about the materials, excuse me for forgetting to include in the image, that you will also need a small piece of magic zipper.
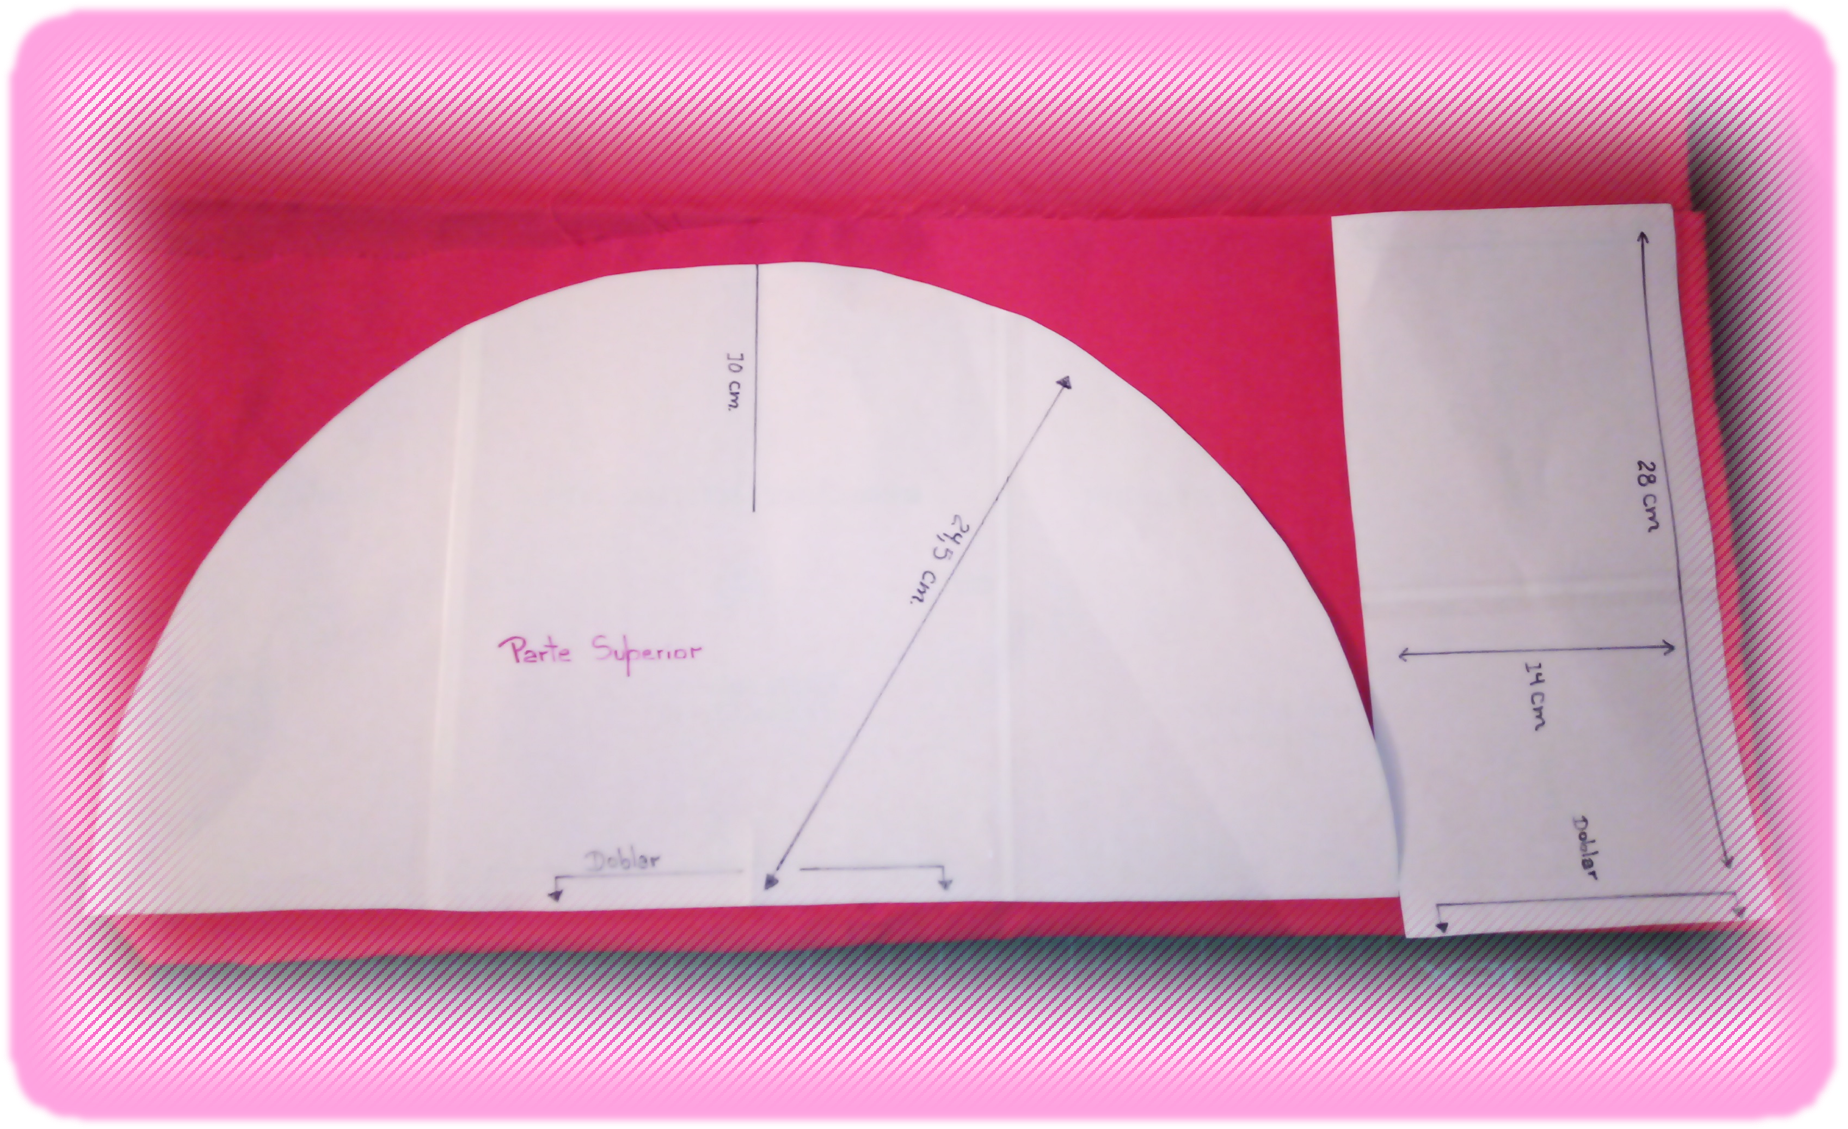
Having clarified the subject of the necessary materials, the first thing to do is to make the pattern. Now, as this was the first hat I had to make, I didn't have any pattern, so I did a quick search on the internet. I immediately found many options, from which I selected the one I liked the most and which, in addition, gave me a version for children. So, the measures that you can see in the image, are valid only for children, in case of adults must make the necessary adjustments.
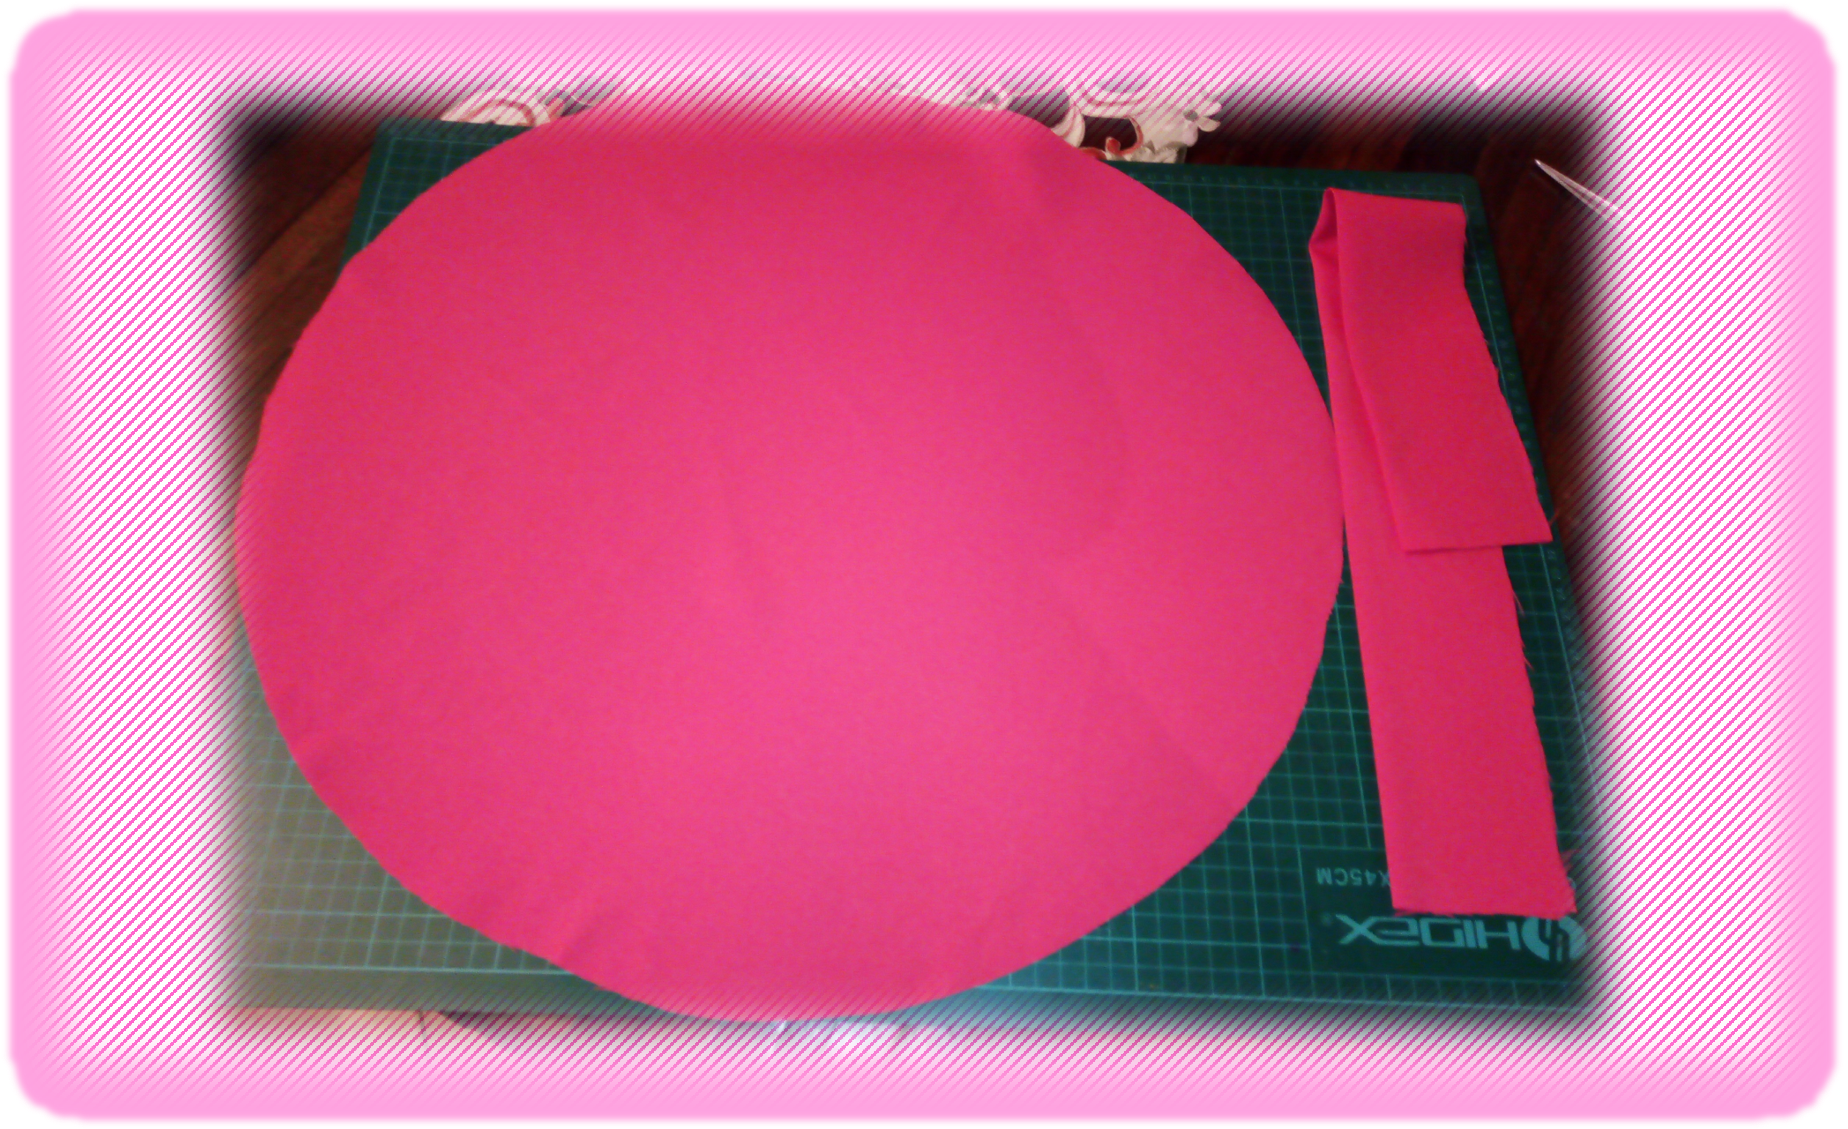
Once the pattern was ready, the next step was to trace it on the fabric, using a white pencil. Once I traced the two pieces, as you can see in the image, I simply cut them.
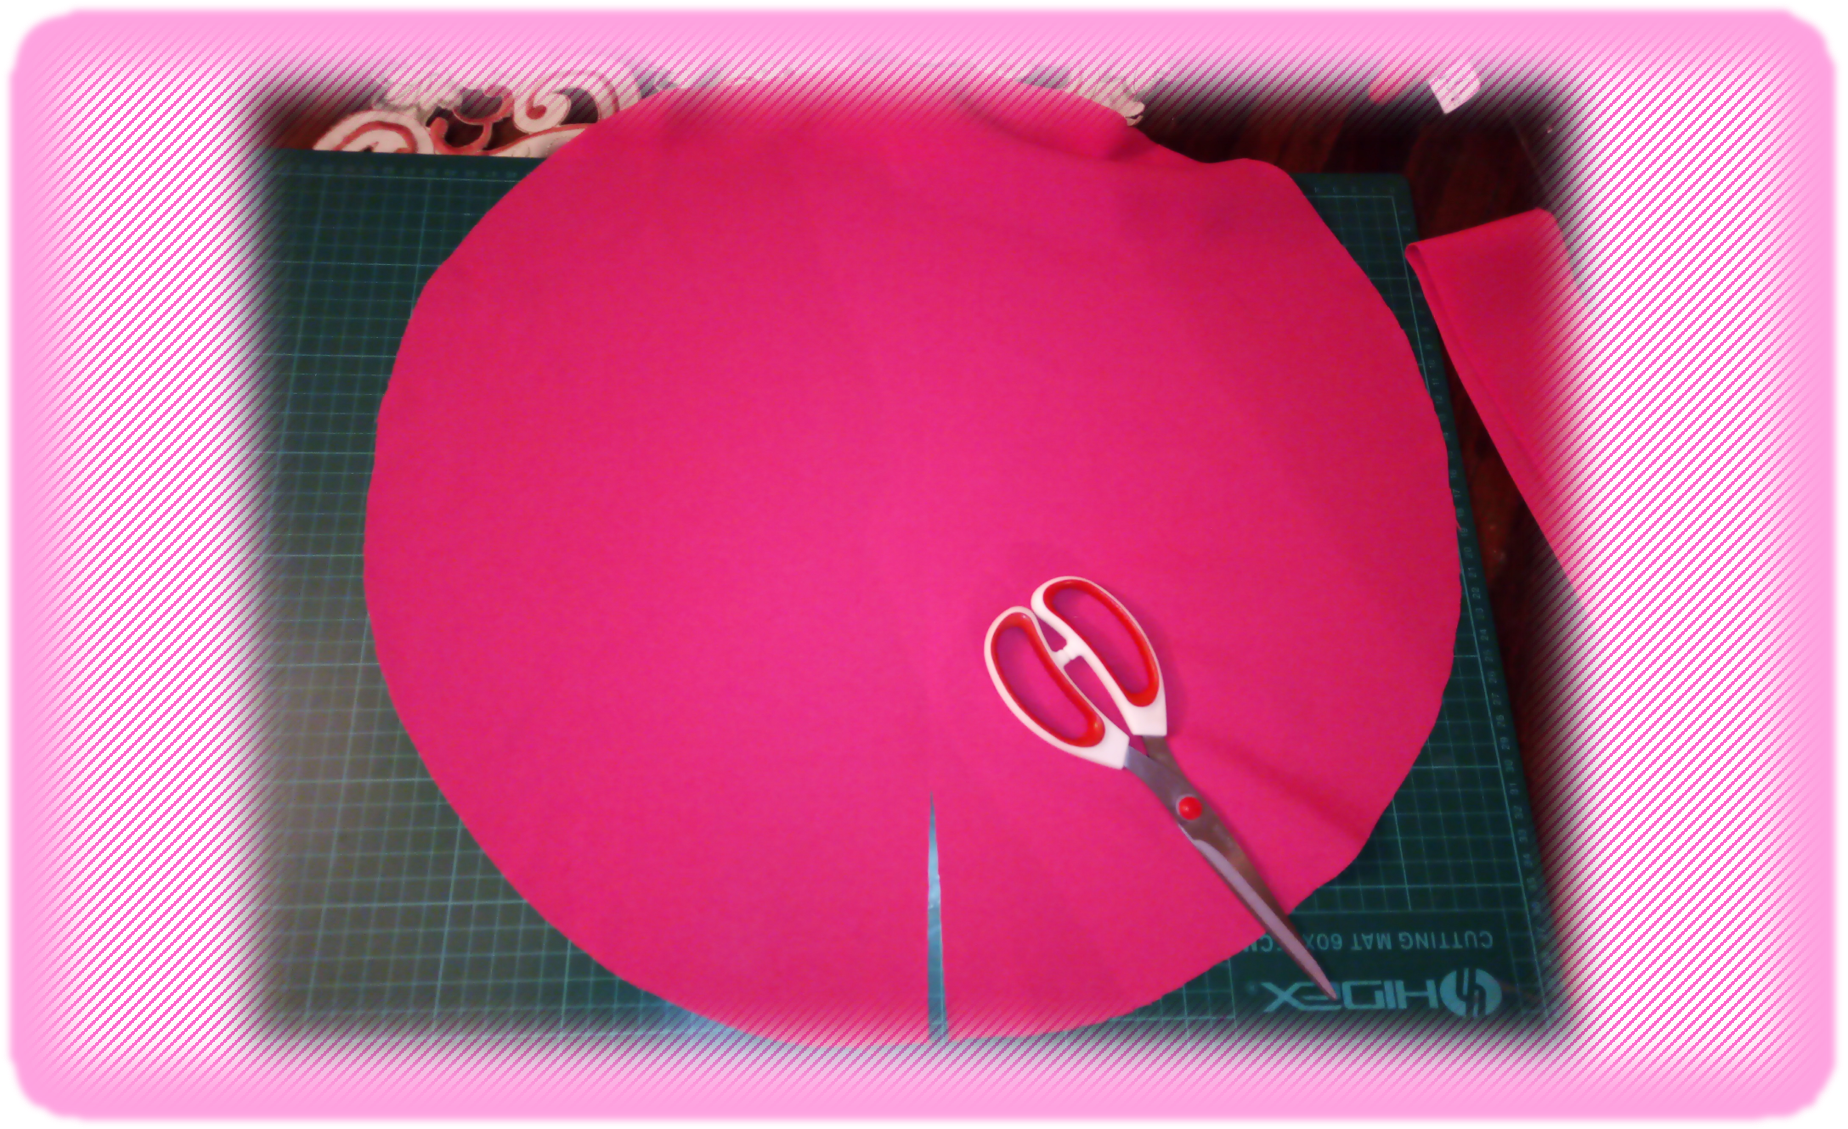
Next, draw a 10cm straight line around the circumference, starting from the edge, and after you have drawn the line, cut the slit. You may wonder what it is for, well, that groove, which is located at the back of the hat, will allow the hat to fit better to the head. But, you will see later how it will look like.
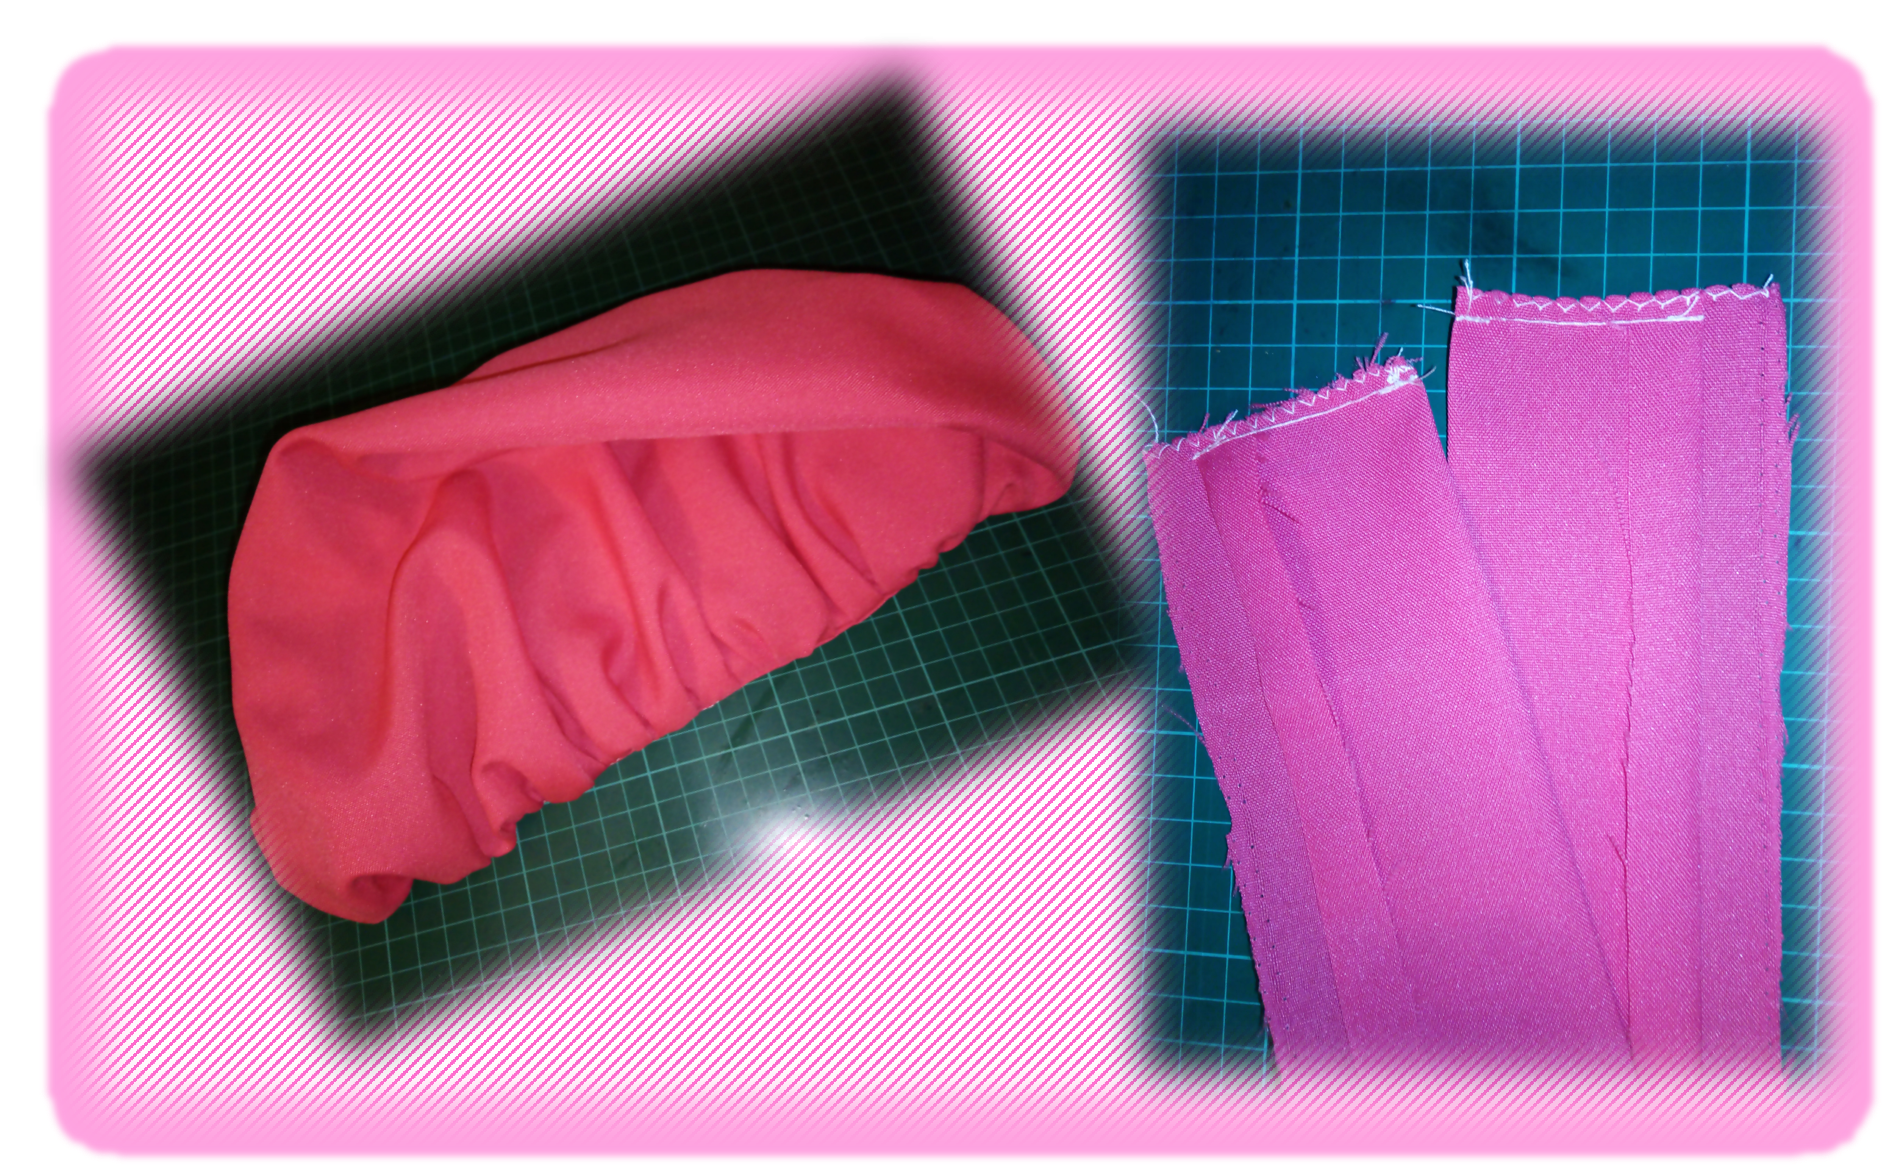
Next, I took the strip I cut, and as you can see in the picture, along the entire length, I folded it in half and ironed it. Then, on one of the two sides I made a fold of one centimeter and I also ironed it to mark it and then it would be easier to sew it. Now it was time to finish off the edges of the pieces, where necessary, so that the fabric would not fray. First, I zic zac stitched all around the edge of the circumference to finish off the edge, then I finished off the two ends of the other piece of the hat. Then, I set my sewing machine to a straight stitch, as loose as possible, and sewed a seam, one centimeter from the edge of the circumference. This type of stitch allows you to pull one of the strands of thread and thus the fabric will pucker. We will continue to ruffle until the edge of the circumference coincides with the length of the other piece that we had previously cut and that will be the one that fits my little girl's head.
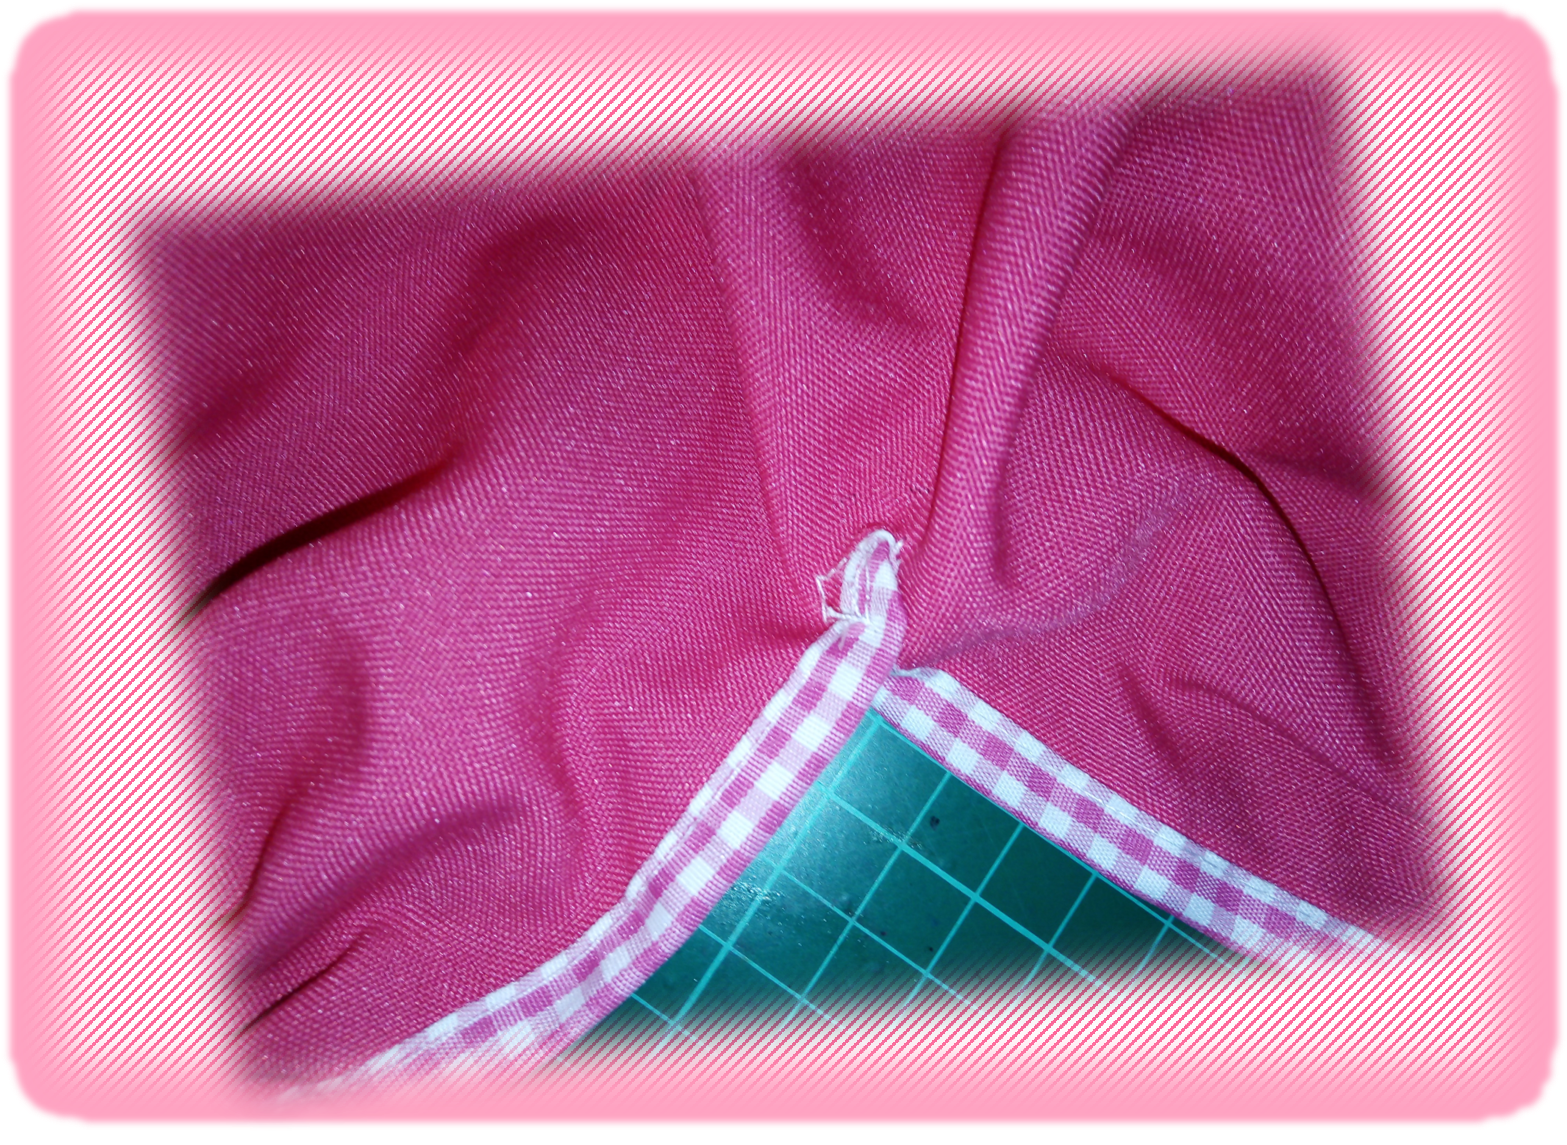
Before going on, you remember that I had made a 10 cm slit in the circumference, so we have to put bias binding on the edge of the slit. As you can see in the picture, I used a bias with a checkered pattern in light pink, dark pink and white tones, the same one I used for the apron.
Now it's time to join the two pieces very carefully, first we join the edge of the strip that we did not fold to the edge of the circumference. We do this facing the right side of the fabric of the strip, with what will correspond to the inner part of the cap on the circumference, so the seam will be on the inside of the strip. Then, along the edge where we had made the fold we also glue bias binding, and then, we simply pass a seam and with this we finish joining both pieces and our seam is hidden.
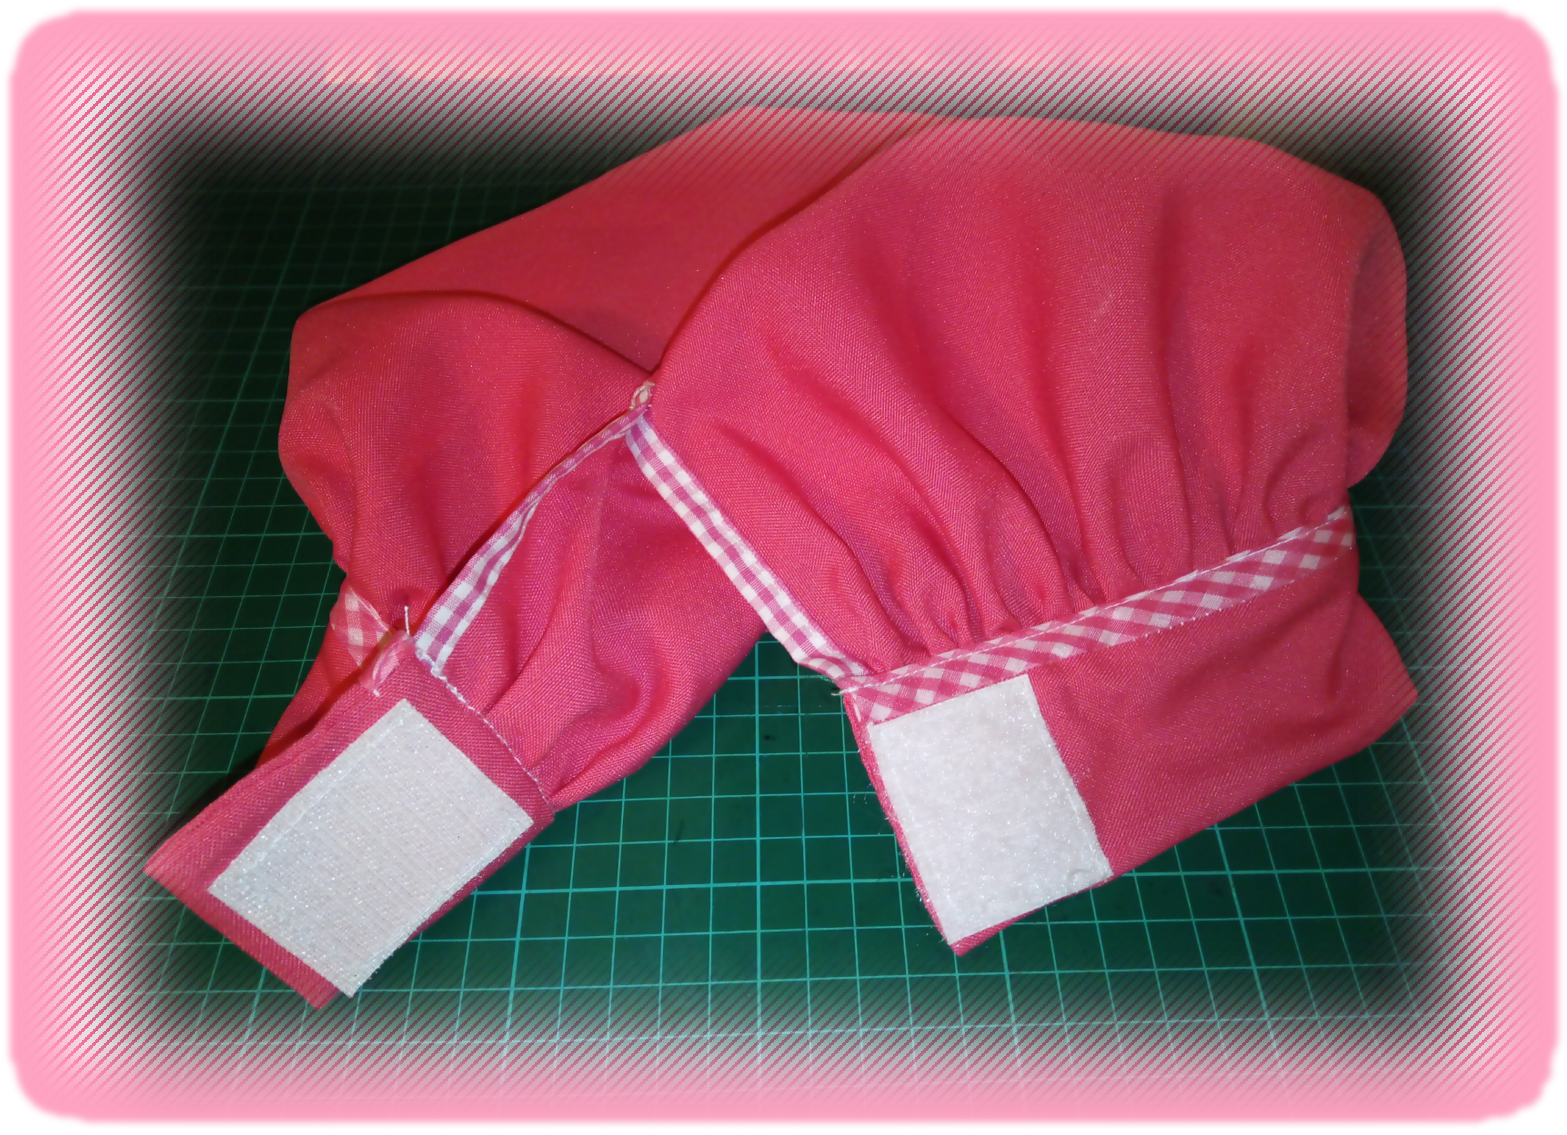
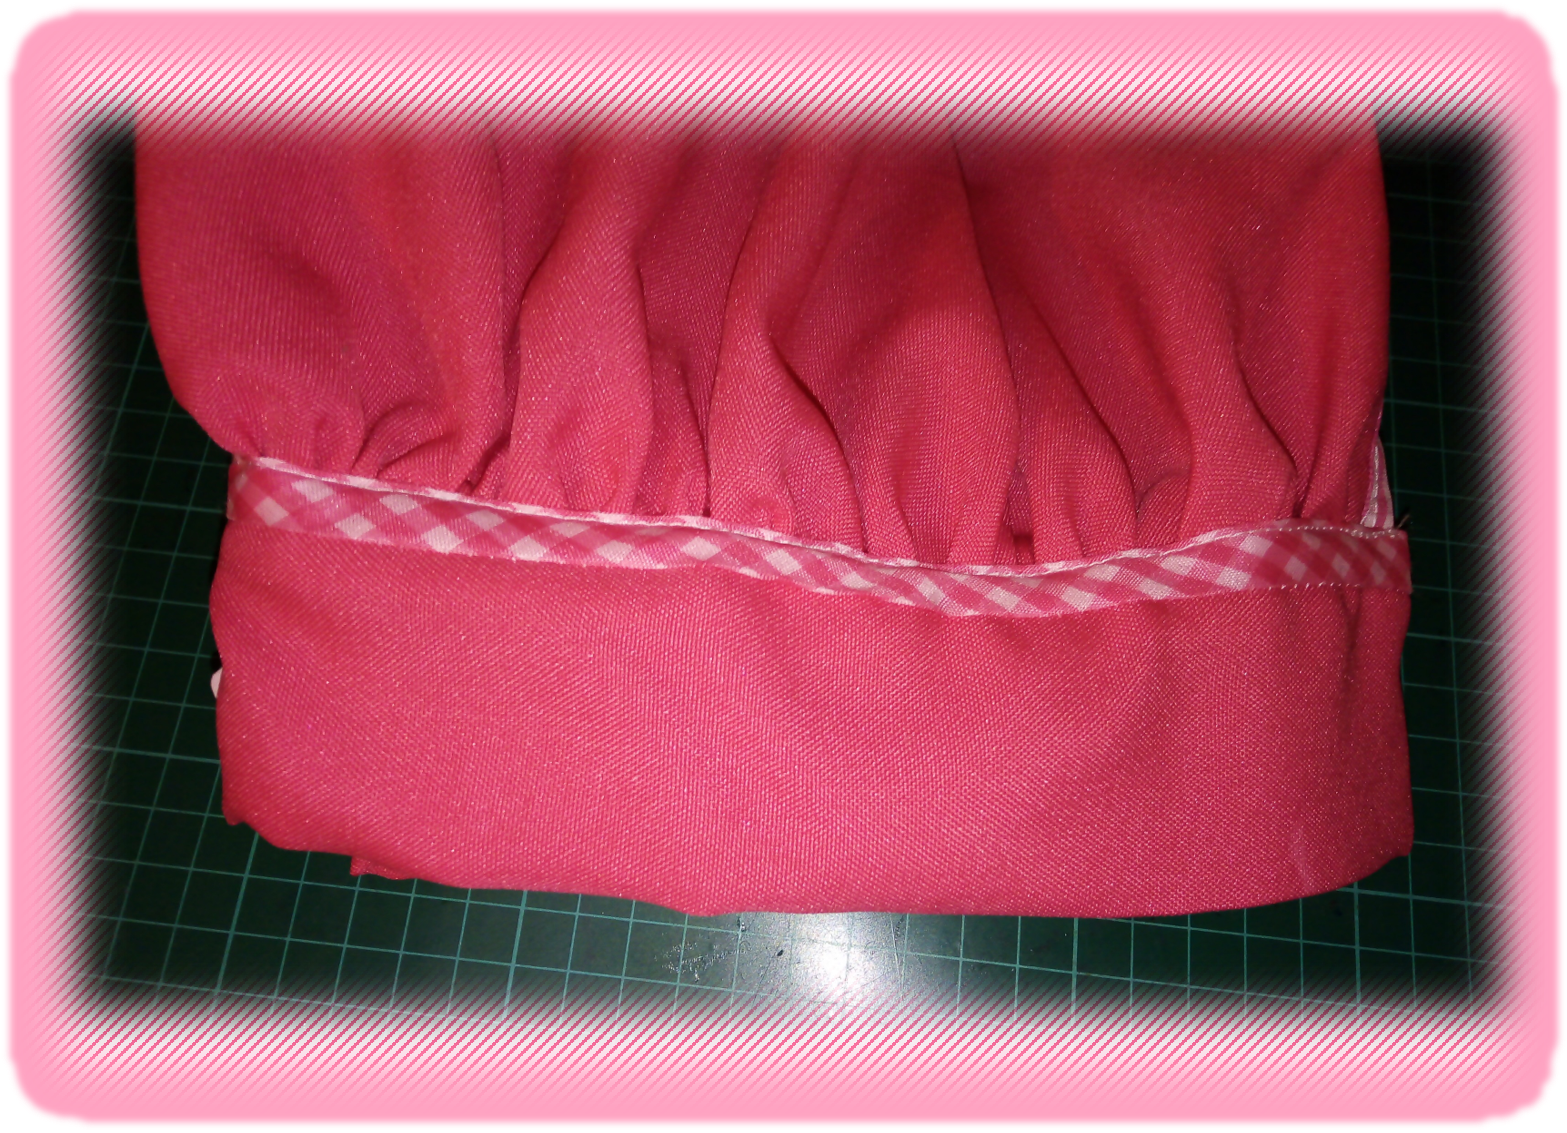
As a final step, I simply attached a piece of magic clasp to the opening of the hat, which will allow me to adjust the hat to the exact size of my little daughter's head. This is also a great option, because as she gets older, I can adjust it and it will last longer.
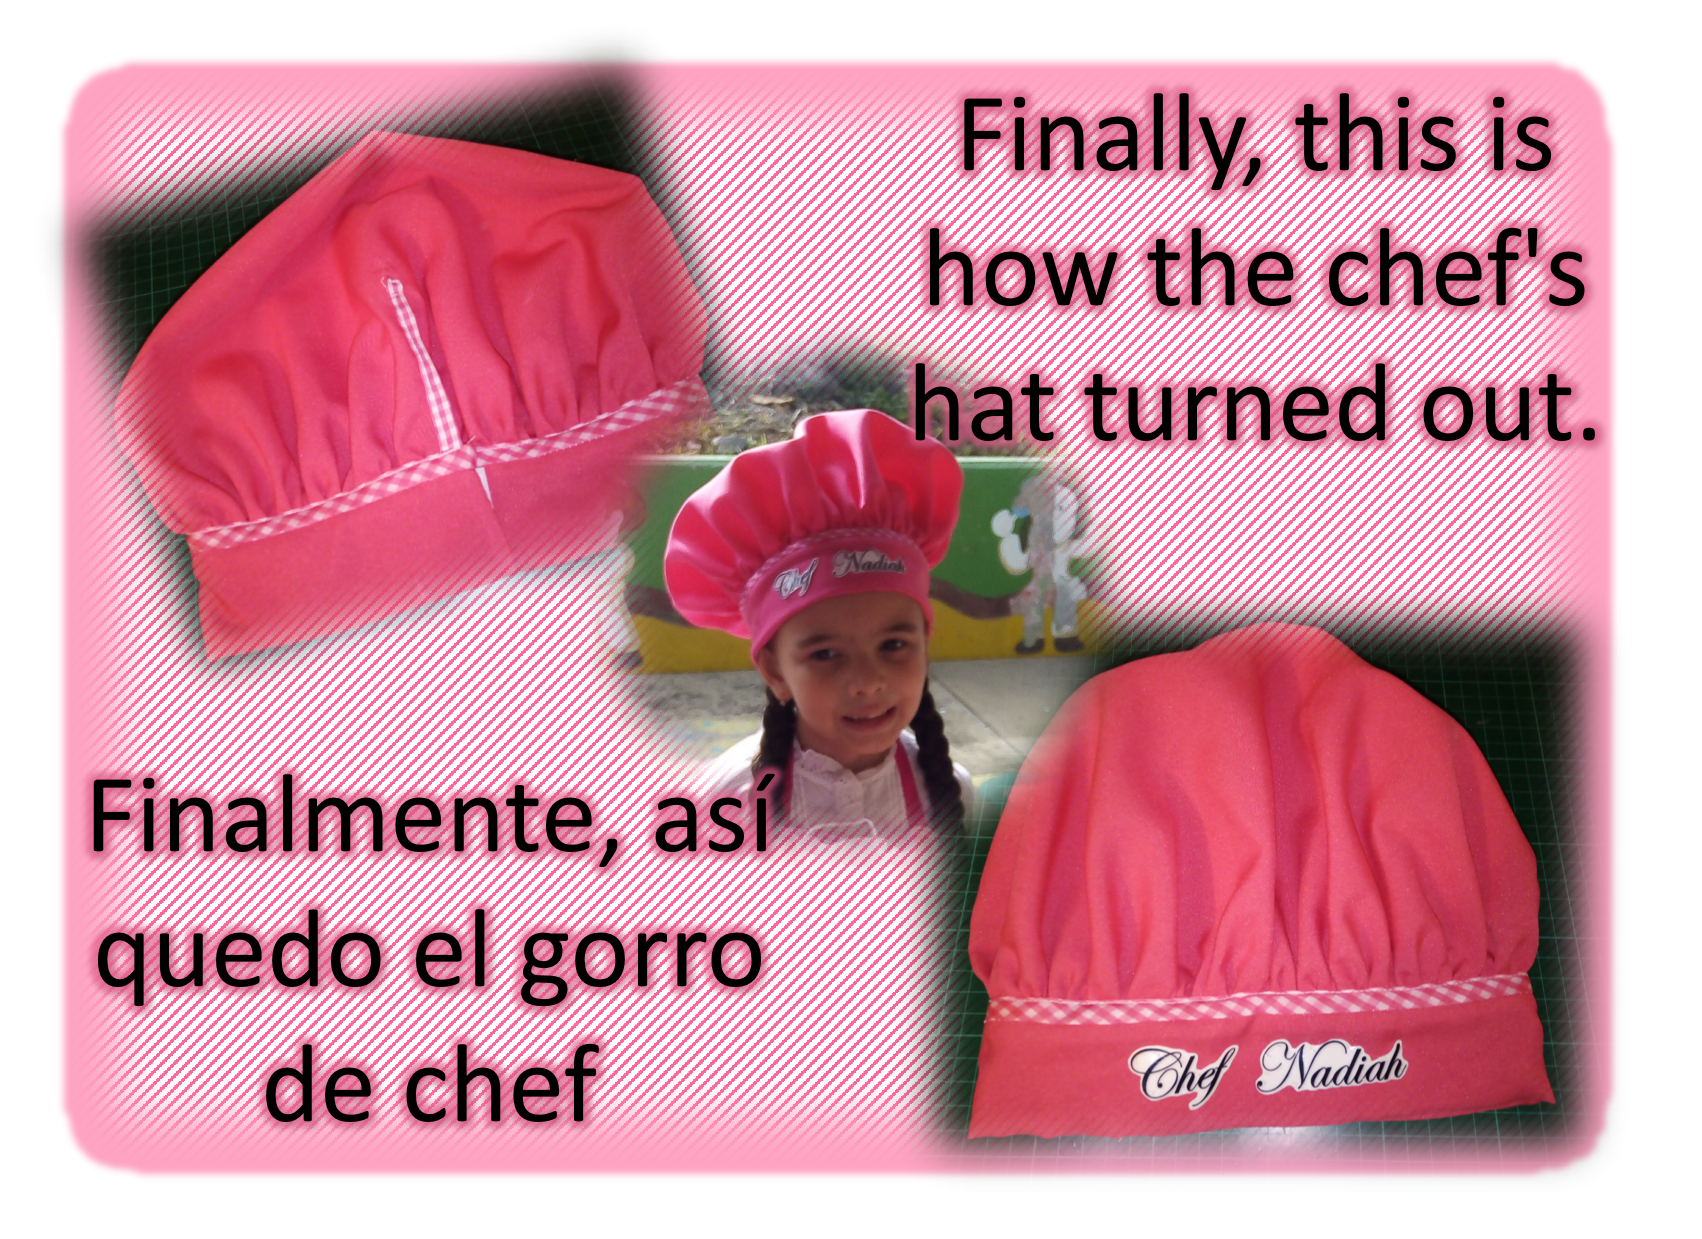
Well, as you can see in the picture, the hat is finished and as you could see, it was a very simple and economical project, since it does not require many materials, so I hope you are encouraged to do it. I assure you that your little one will be delighted with his or her chef hat. I just have to say goodbye, wishing you health and blessings for all of you. See you next time!
Contenido y fotografías de mi propiedad intelectual
Información Técnica
| Cámara | Pentax * istDL |
|---|---|
| Lente | * Pentax 18-55 |
| Iluminación | Luz Natural |
| Locación | Barcelona, Estado Anzoátegui, Venezuela |
Content and photographs of my intellectual property
Technical information
| Camera | Pentax * istDL |
|---|---|
| Lens | * Pentax 18-55 |
| Lighting | Natural Light |
| Location | Barcelona, Anzoátegui State, Venezuela |


The rewards earned on this comment will go directly to the people( @francyrios75 ) sharing the post on Twitter as long as they are registered with @poshtoken. Sign up at https://hiveposh.com.
Siempre agradecida de recibir su apoyo.
Buenas tardes querida @francyrios75 !!
Que lindo te quedó el gorro! Que suerte la de tus niñas tener una madre tan dedicada.
Se nota todo el amor que pones en tus trabajos y ellas seguramente así lo sentirán.
Seguramente con ese lindo equipo de cocina que le confeccionaste, prepararán exquisitas recetas.
Te felicito querida amiga!
Gran abrazo a la familia!!
Gracias por tus hermosas palabras querido amigo. Te envío muchas bendiciones para ti y tu hermosa familia. Un abrazo desde la distancia.
¡Felicidades! Esta publicación obtuvo upvote y fue compartido por @la-colmena, un proyecto de Curación Manual para la comunidad hispana de Hive que cuenta con el respaldo de @curie.
Si te gusta el trabajo que hacemos, te invitamos a darle tu voto a este comentario y a votar como testigo por Curie.
Si quieres saber más sobre nuestro proyecto, acompáñanos en Discord: La Colmena.
Muy agradecida por el apoyo recibido, salud y bendiciones para todo el equipo de trabajo.
Quedó precioso 😍💞... Gracias por compartir he buscado un modelo bonito para hacerle uno a mi hija, tu diseño tiene mi aprobación y me lo llevo 🤗👍🏼 muchas gracias.
🎆🎇🎉🎊🌧️💐✨🌾🌱🌹🌙🌿🍃🥀⚡🌺☘️🍀🌈🌷⭐🪴🌵🌸🌟💮🌴🌳💫☀️💮☔🌲🌳🌍🌌🌠☄️🏵️🐝🌻🌼🍄🐞🦋💙☕💜🍍🎆🎇🎉🎊
Hola, gracias por tu visita, me alegra que te gustara. Claro amiga, es todo tuyo, espero que te quede muy lindo y tu niña lo disfrute mucho. Salud y bendiciones para ti y niña.
Thank you for sharing this amazing post on HIVE!
Your content got selected by our fellow curator @rezoanulvibes & you just received a little thank you via an upvote from our non-profit curation initiative!
You will be featured in one of our recurring curation compilations and on our pinterest boards! Both are aiming to offer you a stage to widen your audience within and outside of the DIY scene of hive.
Join the official DIYHub community on HIVE and show us more of your amazing work and feel free to connect with us and other DIYers via our discord server: https://discord.gg/mY5uCfQ !
If you want to support our goal to motivate other DIY/art/music/homesteading/... creators just delegate to us and earn 100% of your curation rewards!
Stay creative & hive on!
🇻🇪💮🌸💐🌷🥀🌻🌼🌺🌹🏵️🥀🌼🌺🌹🏵️
Muy agradecida de recibir su apoyo, salud y bendiciones para todo el equipo de trabajo. 🇻🇪💮🌸💐🌷🥀🌻🌼🌺🌹🏵️🥀🌼🌺🌹🏵️
Hola @francyrios75, feliz y bendecido día. Wuao, que hermosura de gorro para esa bella chef. Me encanto tu post, Dios siga bendiciendo tus manos y creatividad.
🇻🇪💮🌸💐🏵️🌹🌷🌺🌼🥀🌻
Muchísimas gracias por tu visita, me alegra mucho que te gustara. Salud y bendiciones para ti y los tuyos.
🇻🇪💮🌸💐🏵️🌹🌺🌼🥀🌻
Yay! 🤗
Your content has been boosted with Ecency Points, by @francyrios75.
Use Ecency daily to boost your growth on platform!
Support Ecency
Vote for new Proposal
Delegate HP and earn more
Simplemente un trabajo genial y hermoso. Que lindo tener una mamá que hace trabajos tan espectaculares seguro les encantó. Muchísimo éxito y un abrazote @francyrios75
Hola Sra. @sacra97 que gusto tenerla de visita y que le gustara el gorrito. Salud y bendiciones para usted y su familia. Gracias por su visita 😊🤗♥️🌹😘😍♥️🥀
Congratulations @francyrios75! You have completed the following achievement on the Hive blockchain and have been rewarded with new badge(s):
Your next target is to reach 38000 upvotes.
You can view your badges on your board and compare yourself to others in the Ranking
If you no longer want to receive notifications, reply to this comment with the word
STOPCheck out the last post from @hivebuzz:
Support the HiveBuzz project. Vote for our proposal!