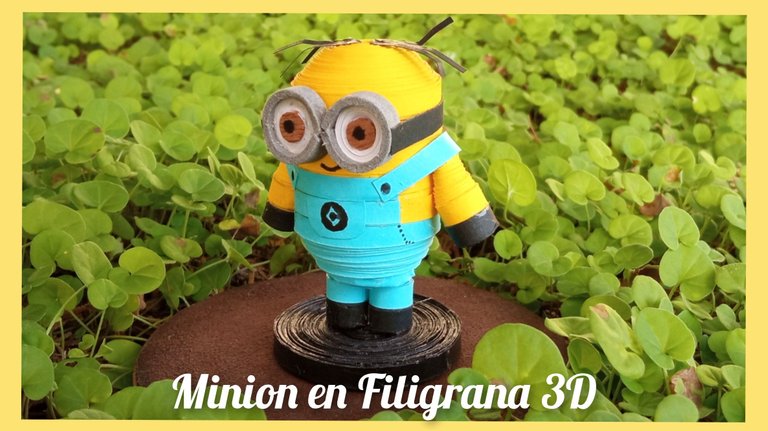
Hola queridos amigos de #Hivediy, espero que todos se encuentren bien al lado de sus seres queridos, hoy vengo a mostrarles un tutorial de filigrana, pero en esta oportunidad quise realizar una figura en 3D así que decidí hacer un lindo Minion, es un adorno lindo para cualquier sitio de tú casa, habitaciones, o hasta para obsequiar, éstos pequeños amiguitos amarillos han cautivado a todos por su gran simpatía y alegría y en mi casa a todos nos gustan, cada vez que pasan las películas las vemos, en realidad nos encantan.
Hello dear friends of #Hivediy, I hope you are all well with your loved ones, today I come to show you a filigree tutorial, but this time I wanted to make a 3D figure so I decided to make a cute Minion, it is a nice decoration for anywhere in your home, rooms, or even to give as a gift, these little yellow friends have captivated everyone for their great sympathy and joy and in my house we all like them, every time we watch the movies, we really love them.
Los materiales usados son muy económicos y los conseguimos fácilmente en cualquier librería, bueno en mi caso tengo siempre sobrantes de otros trabajos realizados y trato de aprovechar cada pedacito de papel, este Minion ya tiene dueña mi hija se enamoró de él y me dijo que se lo regalará para colocarlo en su cuarto. Bueno amigos ahora sí vamos al paso a paso.
The materials used are very inexpensive and we can get them easily in any bookstore, well in my case I always have leftovers from other works done and I try to take advantage of every bit of paper, this Minion already has an owner, my daughter fell in love with it and told me to give it to her to place it in her room. Well friends, now let's go to the step by step.
Bello Minion en Filigrana 3D
Beautiful Minion in Filigree 3D
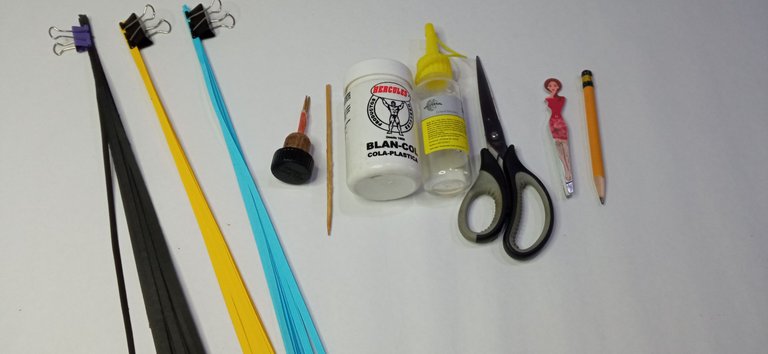
Materiales
Materials
Pasos para la elaboración
Processing steps
.
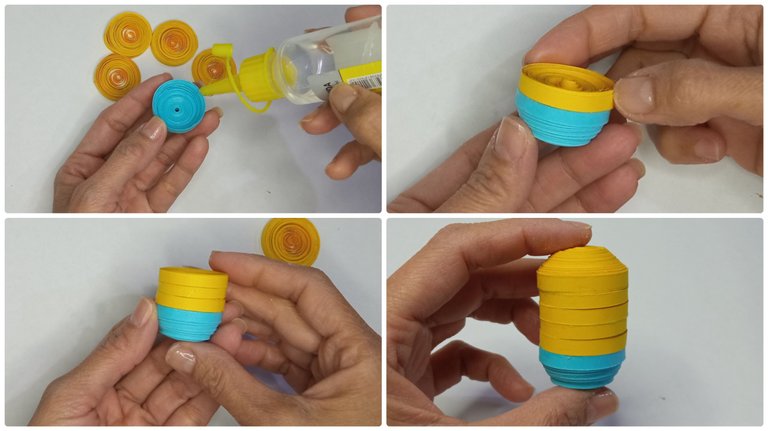
Paso 1
Lo primero que haremos es la base del pantalón del Minion, para esto tomaremos 10 tiras de 43 cm por 0,5 cm y las pegamos todas formando una tira larga, luego hacemos un círculo cerrado comenzando por introducir la tira dentro del enrrollador y damos vueltas sobre ella misma hasta el final, luego colocamos un poquito de pega blanca en la punta y ya tendremos un círculo cerrado, necesitamos 5 círculos amarillos y uno azul y los haremos de la misma manera.Step 1
The first thing we will do is the base of the Minion's pants, for this we will take 10 strips of 43 cm by 0.5 cm and glue them all together forming a long strip, then we make a closed circle starting by inserting the strip inside the roller and turn over itself until the end, then we put a little white glue on the tip and we will have a closed circle, we need 5 yellow circles and one blue and we will do them in the same way.

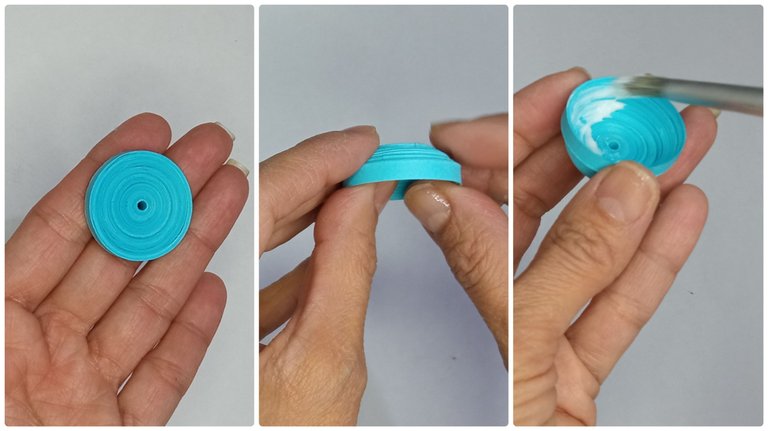
Paso 2
Luego tomamos el círculo azul y con los dedos pulgares vamos empujando con cuidado para darle forma cóncava y después colocamos una capa de pega blanca para fijar y evitar que se mueva.Step 2
Then we take the blue circle and with our thumbs we push it carefully to give it a concave shape and then we put a layer of white glue to fix it and prevent it from moving.
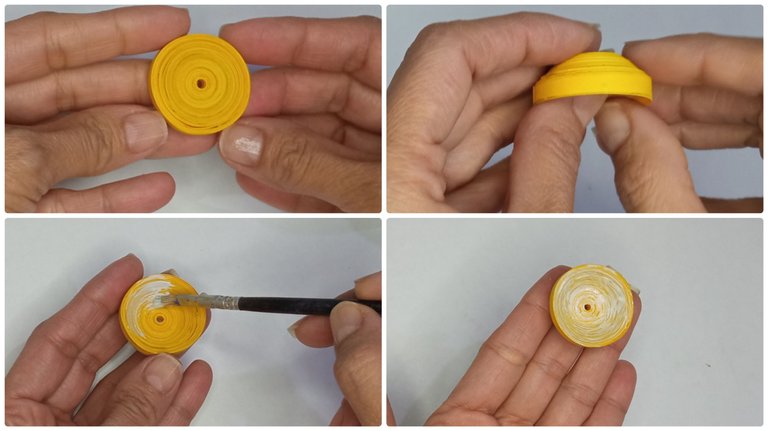
Paso 3
Tomamos un círculo amarillo y hacemos el mismo procedimiento del paso 2, está parte amarilla será la parte de arriba de la cabeza de nuestro Minion.Step 3
Take a yellow circle and do the same procedure of step 2, this yellow part will be the top of our Minion's head.
Paso 4
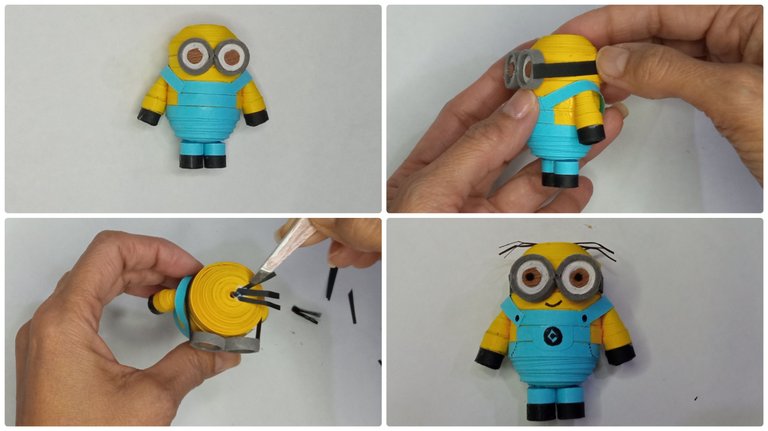
Ahora tomamos la base azul y vamos pegando círculos cerrados que serán parte del cuerpo del Minion, luego pegamos la base amarilla que será parte de la cabeza.Step 4
Now we take the blue base and glue closed circles that will be part of the Minion's body, then we glue the yellow base that will be part of the head.
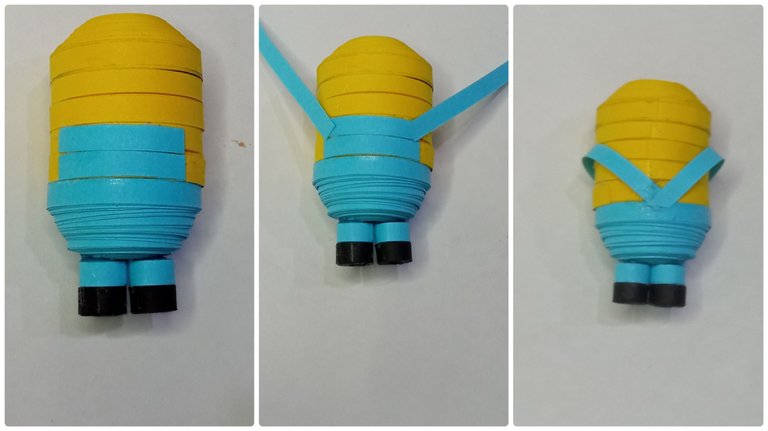
Paso 5
Seguidamente tomamos 4 tiras (2 azules y 2 negras de 47 cm por 0,5 cm cada una y formamos un círculo cerrados para las piernas y los zapatos y procedemos a pegarlos al cuerpo.Step 5
Then we take 4 strips (2 blue and 2 black of 47 cm by 0.5 cm each) and form a closed circle for the legs and shoes and proceed to glue them to the body.

Paso 6
Ahora pegamos 2 tiras azules pequeñas en la panza del Minions para asemejar el frente de la braga y 2 a los lados que serán las tiras de la misma.Step 6
Now we glue 2 small blue strips on the belly of the Minions to resemble the front of the panty and 2 on the sides that will be the straps of the panty.
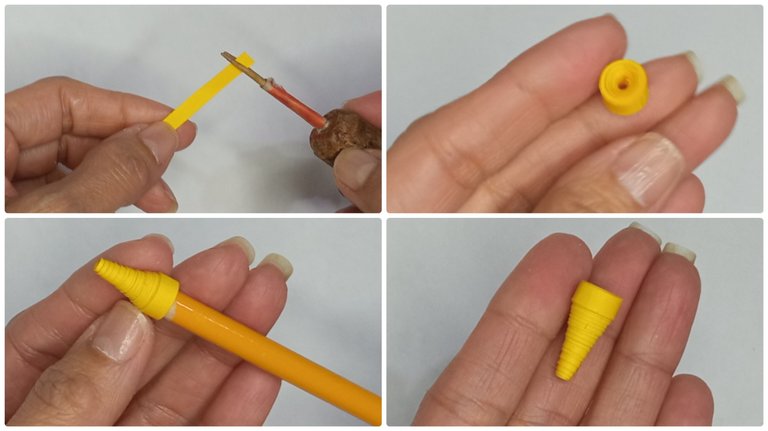
Paso 7
Para los brazos, usaremos una tira de de 43 cm por 0,5 cm y hacemos un círculo cerrado, luego colocamos el círculo en la punta del lápiz y lo vamos deslizando hacia abajo con mucho cuidado para que no se desarme formando así un cono.Step 7
For the arms, we will use a strip of 43 cm by 0.5 cm and make a closed circle, then place the circle on the tip of the pencil and slide it down carefully so that it does not fall apart forming a cone.
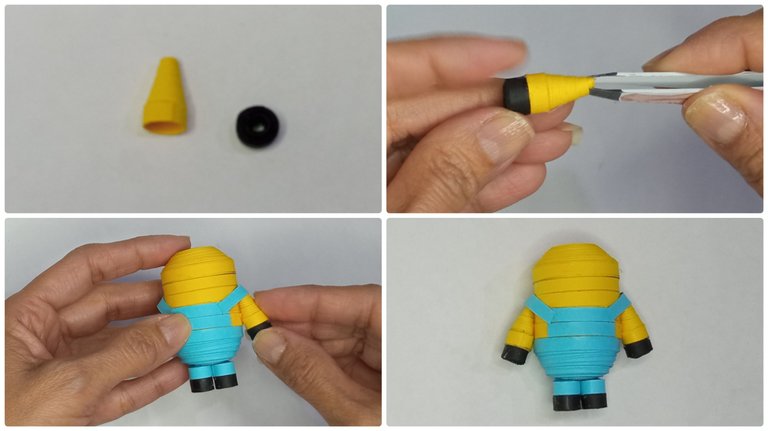
Paso 8
Hacemos dos círculos cerrados negros para las manos y los pegamos a los brazos, con ayuda de una pinza aplastamos el brazo en la parte superior y pegamos al cuerpo del Minion.Step 8
Make two black closed circles for the hands and glue them to the arms, with the help of a tweezers we flatten the arm at the top and glue it to the body of the Minion.
Paso 9
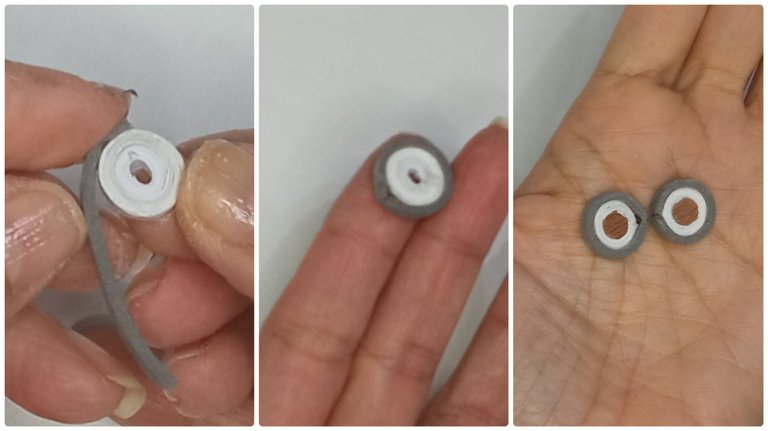
Para los ojos hacemos 2 círculos cerrados blancos con tiras de 25 cm por 0,3 cm y luego bordeamos con foami gris para simular lentes.Step 9
For the eyes we make 2 white closed circles with strips of 25 cm by 0.3 cm and then we border them with gray foami to simulate lenses.
Paso 10
Pegamos los ojos y con una tirita negra terminamos de armar la cinta que sostiene los lentes, para el cabello picamos con la tijera pedacitos finitos de tira negra.Step 10
Paste the eyes and with a black strip we finish assembling the ribbon that holds the glasses, for the hair we cut with the scissors small pieces of black strip.
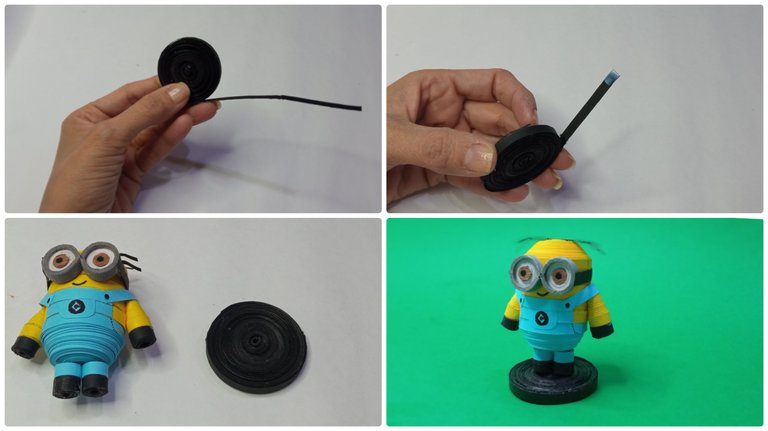
Paso 11
Por último pegamos 20 tiras negras de 43 cm por 0,5 cm para formar una tira larga y luego la enrrollamos hasta el final para formar un círculo cerrado grande que servirá de base para colocar nuestro Minion.Step 11
Finally we glue 20 black strips of 43 cm by 0.5 cm to form a long strip and then roll it up to the end to form a large closed circle that will serve as a base to place our Minion.
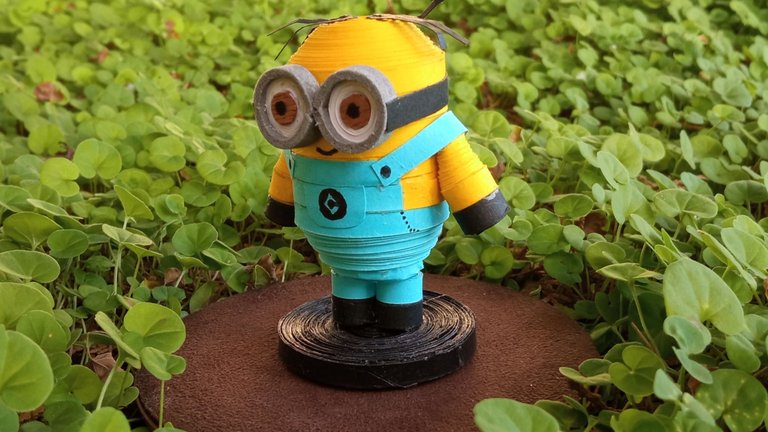
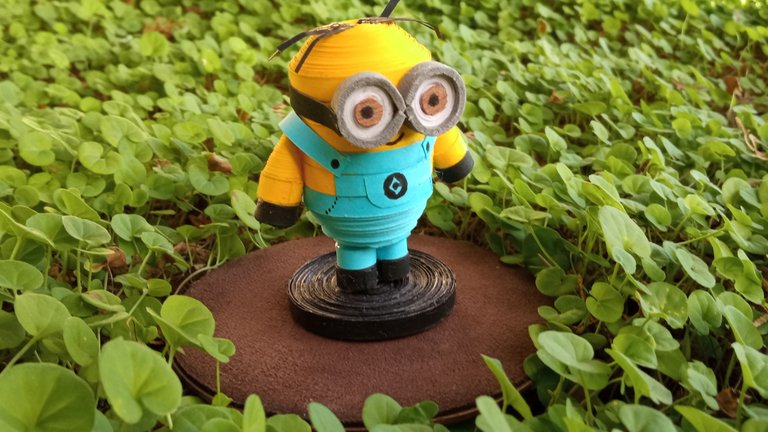
Listo amigos, así de lindo quedó mi Minion, espero les guste.
Ready friends, this is how cute my Minion turned out, I hope you like it.
Todas las fotos son tomadas de mi teléfono Redmi 9, para los collages usé la aplicación collage maker y para la traducción usé el traductor Deepl.
All photos are taken from my Redmi 9 phone, for the collages I used the collage maker application and for the translation I used Deepl translator.
¡Felicidades! Esta publicación obtuvo upvote y fue compartido por @la-colmena, un proyecto de Curación Manual para la comunidad hispana de Hive que cuenta con el respaldo de @curie.
Si te gusta el trabajo que hacemos, te invitamos a darle tu voto a este comentario y a votar como testigo por Curie.
Si quieres saber más sobre nuestro proyecto, acompáñanos en Discord: La Colmena.
Muchas gracias.
The rewards earned on this comment will go directly to the person sharing the post on Twitter as long as they are registered with @poshtoken. Sign up at https://hiveposh.com.
Your content has been voted as a part of Encouragement program. Keep up the good work!
Use Ecency daily to boost your growth on platform!
Support Ecency
Vote for new Proposal
Delegate HP and earn more
Gracias por el apoyo.
Te quedo hermoso amiga. Felicidades. Te cuento algo a manera de confesión, tenía en mente hacer una pulserita de minions, pero lo voy a dejar para más adelante, de igual manera nuestros trabajos son totalmente diferentes. Me encanta lo que haces, y con los cuadros estoy fascinada. Siga adelante con ese espléndido trabajo. Saludos amiga. Cuidate. 💖😘💕
Hola amiga, muchas gracias por tus palabras, si es cierto nuestros trabajos son diferentes y también me gusta mucho lo que tú haces, toda esa parte de la bisutería requiere dedicación y mucha paciencia.
Totalmente hermoso, estoy sorprendida de lo bién que se te da esto, me encanta los minions, me gustó mucho tu publicación ✨
Gracias amiga, me alegra que te gustó.
Congratulations @lilianap15! You have completed the following achievement on the Hive blockchain and have been rewarded with new badge(s):
Your next target is to reach 1500 upvotes.
Your next target is to reach 200 replies.
You can view your badges on your board and compare yourself to others in the Ranking
If you no longer want to receive notifications, reply to this comment with the word
STOPCheck out the last post from @hivebuzz:
Support the HiveBuzz project. Vote for our proposal!