Portada diseñada por mi en el editor de Canva
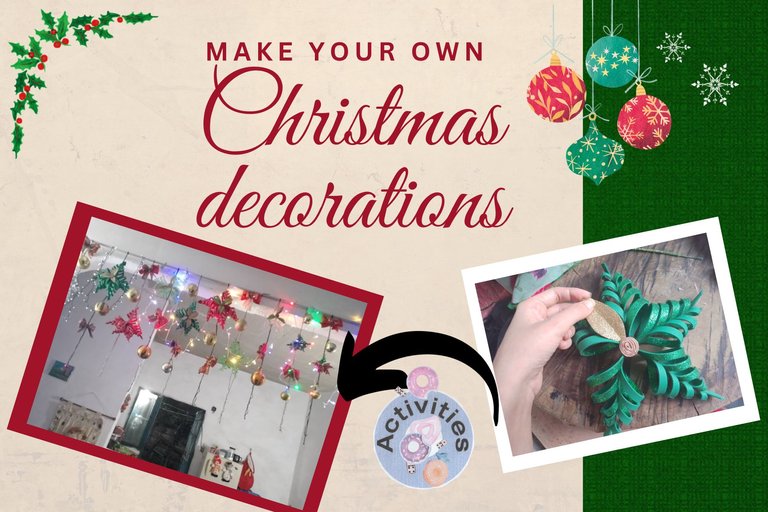
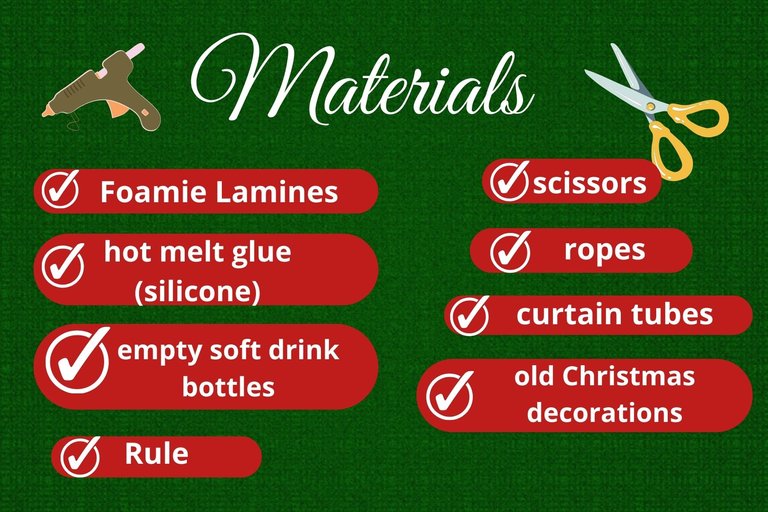
Hello friends, how are you? Today I want to show you how you can make a beautiful hanging decoration to embellish your home, it is very easy to make and mostly you will only need recycled materials such as soda bottles or old Christmas decorations that you don't like anymore but you can give them a second chance. Let's start with the materials you will need 😉.
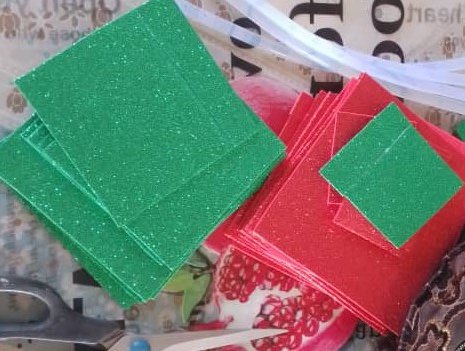
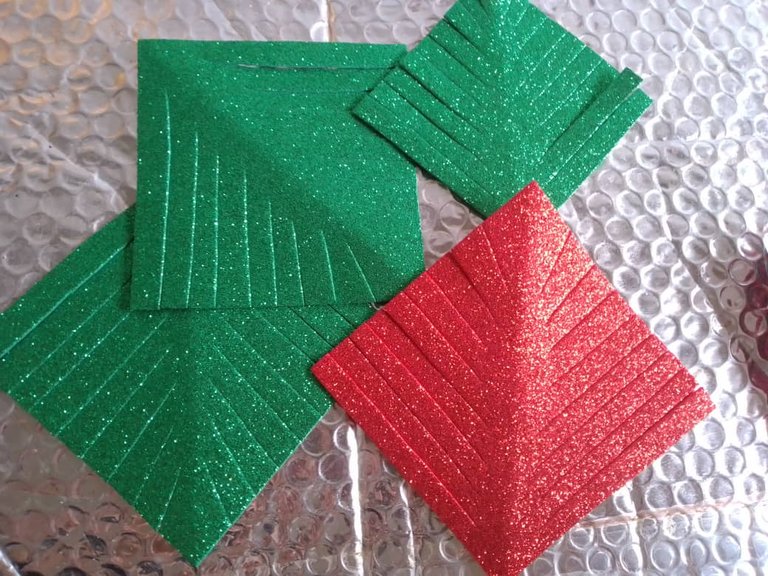
First of all you must cut out 12 cm by 12 cm squares from the fomai lamines, use a ruler to get the exact size, although you can make bigger or smaller squares, it all depends on your taste.
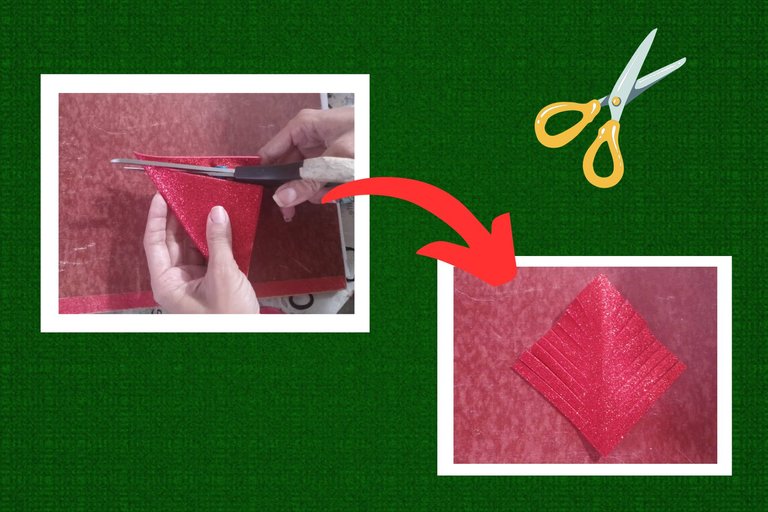
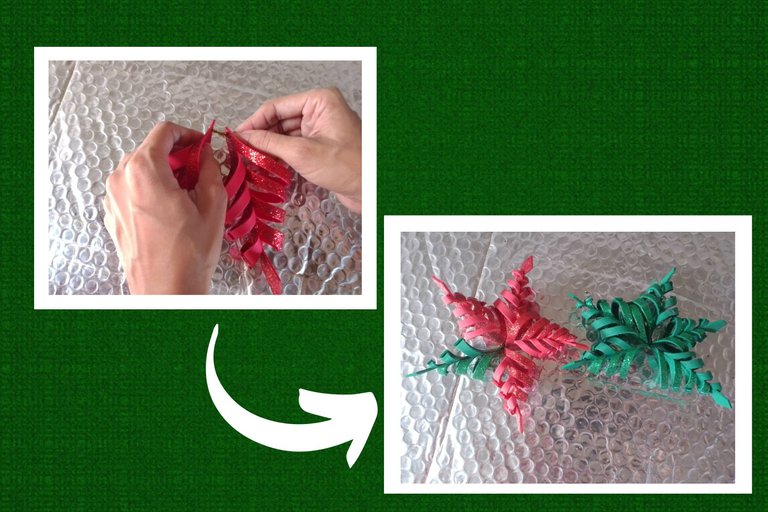
Fold the square into a triangle shape, then cut out 1 cm wide strips without going all the way through, as shown in the picture below.
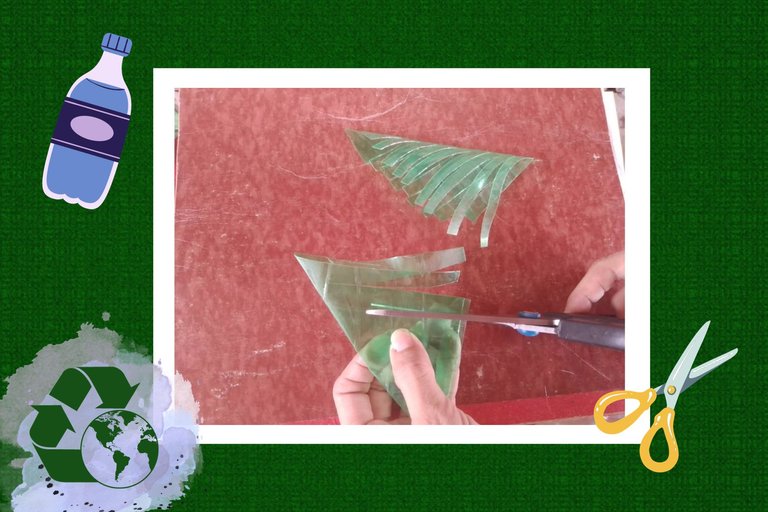
You can also use empty soda bottles and the decorations will be just as beautiful, just cut the bottles into plastic sheets and follow the same process as with the foami, cutting squares and then 1cm strips, avoiding reaching the edge.
Now, using hot melt glue and glue the strips as shown in picture 1 then flip it over as shown in picture 2 and glue the back strips, remember to glue a couple of strips on the front and then a couple of strips on the back.
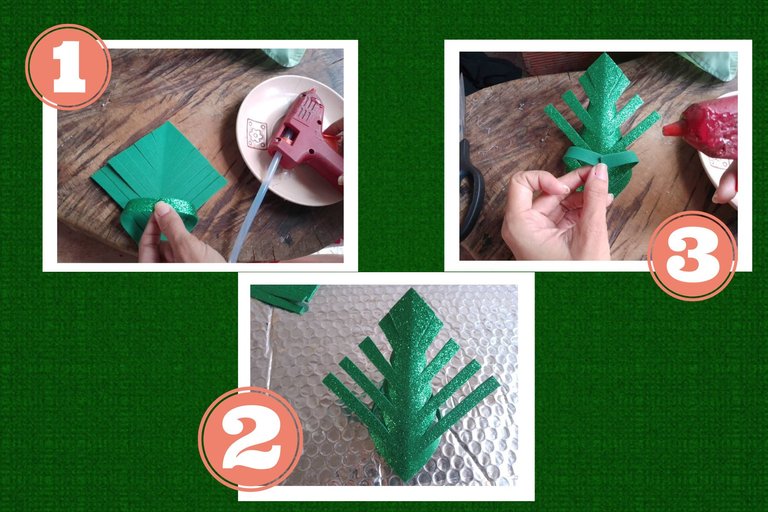
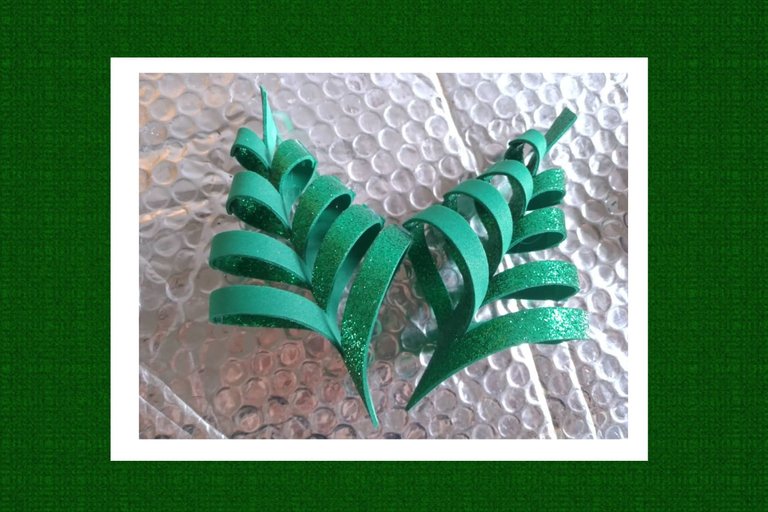
At the end you will get something like this
Then you must tie the figures together, for this you can pierce the foami using a needle and tie them with a thread, in my case I used chenil or pipe cleaner, as they are also called, as they have wire that gives them structure and it was perfect for piercing the foami.
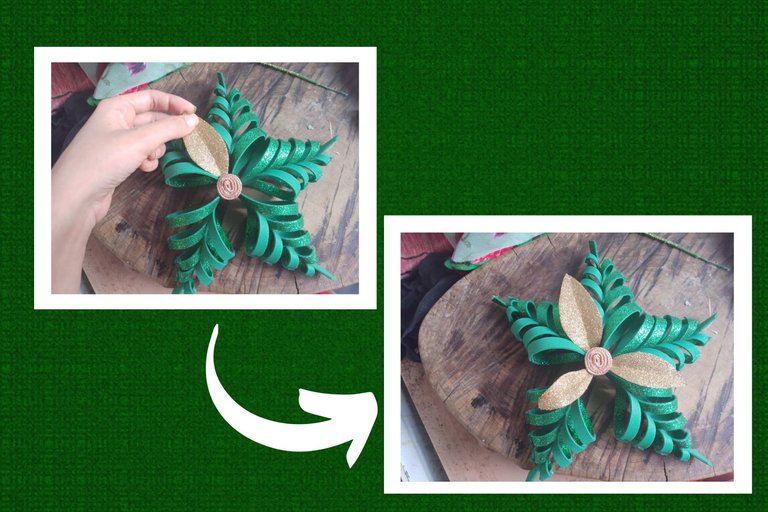
To decorate the stars you can use old Christmas ornaments and decorations that you don't like anymore, I put shiny leaves and some applique on them, look how pretty they look now.
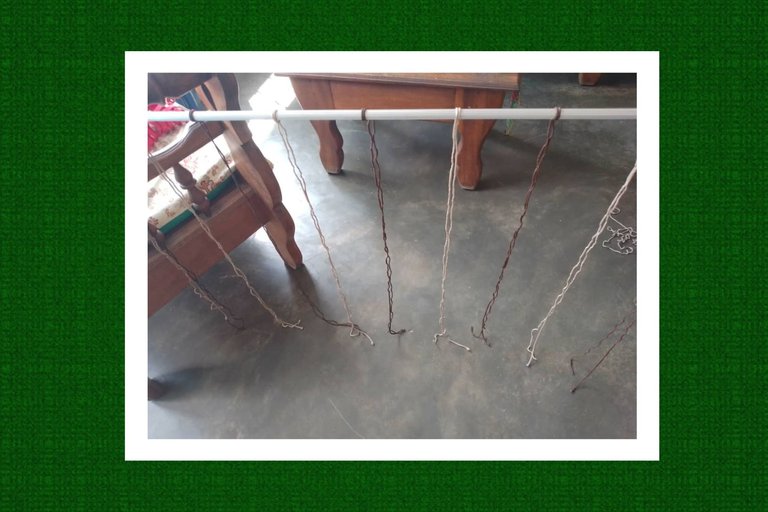
Now, take a curtain tube and tie some thin ropes to it and let them hang down, I used the thin ropes from an old handmade belt that I no longer wore.
Now, using hot melt glue (for stability) glue all the stars you made, both the plastic ones and the foami ones, and if you wish you can add Christmas bows and baubles. Oh, and that's Ron my kitty at the bottom. 😊

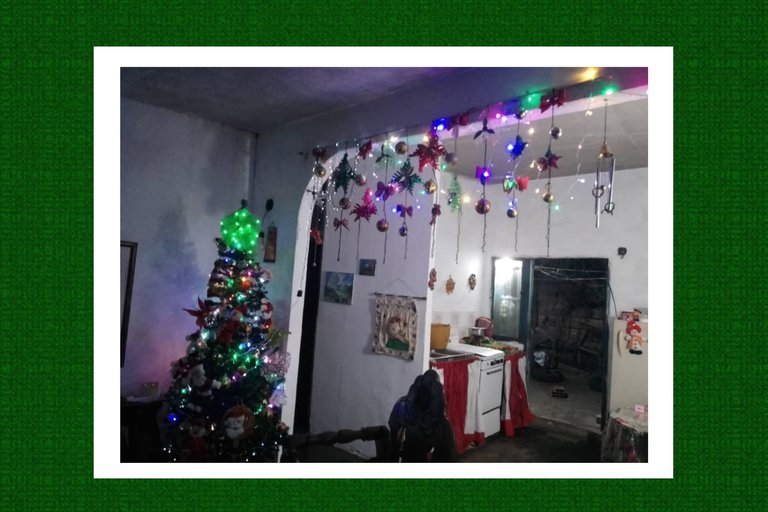
Finally I put the curtain tube in place, up there, added some Christmas lights and this was the result, it looks magical. 😍
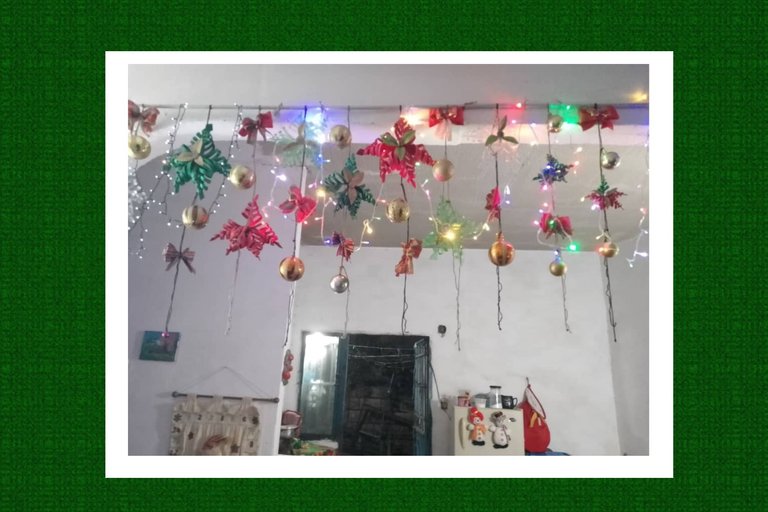
I even turned off the light so that only the Christmas lights would stand out in my newly installed decorations, it looks fascinating.
Well friends, that's all for today, as you can see, decorating our home is a matter of creativity, patience and good attitude, you can use any materials you want and you will make your house look like Santa's house. 😊

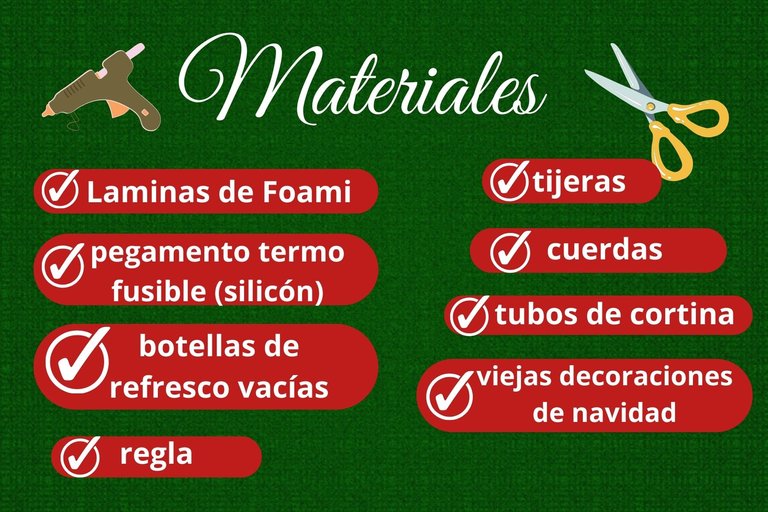
Hola amigos ¿cómo están? hoy quiero mostrarles la forma en la que pueden elaborar una preciosa decoración colgante para embellecer su hogar, es muy fácil de realizar y en su mayoría solo necesitarán materiales reciclados como botellas de refresco o viejas decoraciones de navidad que ya no les gustan pero pueden darles una segunda oportunidad. Comencemos con los materiales que necesitarán. 😉
En primer lugar debes recortar cuadrados de 12 cm por 12 cm en las laminas de fomai, usa una regla para tener la medida exacta, aunque puedes hacer cuadrados más grandes o más pequeños, todo dependerá de tu gusto.
Dobla el cuadrado juntando una esquina con la otra hasta formar una especie de triángulo, y después recorta tiras de 1 cm de ancho sin llegar al final, hazlo como se muestra en la siguiente imagen.
También puedes usar botellas de refresco vacías y las decoraciones quedarán igual de hermosas, solo debes cortar las botellas hasta obtener láminas de plástico y seguir el mismo proceso que con las de foami, cortando cuadrados y luego tiras de 1cm evitando llegar al borde.
Ahora, usando pegamento termofusible pega las tiras tal y como se ve en la fotografía 1 luego voltéalo como se ve en la fotografía 2 y pega las tiras de atrás, recuerda pega un par de tiras por delante y luego un par de atrás.
Al final obtendrás algo como esto
Posteriormente debes atar las figuras entre sí, para ello puedes perforar el foami usando una aguja y atarlos con un hilo, en mi caso yo usé chenil o limpia pipas, como también los llaman, ya que tienen alambre que les da estructura y me resultó perfecto para perforar el foami.
Para decorar las estrellas puedes usar viejos adornos y decoraciones de navidad que ya no te gusten, yo les puse hojas brillantes y algunos aplique, miren lo bonitas que se ven ahora.
Ahora, toma un tubo de cortina y átale algunas cuerdas dejando que cuelguen, yo usé las cuerdas de un viejo cinturón artesanal que yo ya no usaba.
Ahora, usando pegamento termofusible (para mayor estabilidad) pega todas las estrellas que hiciste, tanto las de plástico como las de foami y si lo deseas puedes añadir lazos de navidad y esferas. Ah! y ese que está en el fondo es mu gatito Ron. 😊
Finalmente puse el tubo de cortina en su lugar, allá arriba, le añadí algunas luces de navidad y este fue el resultado, se ve mágico. 😍
Incluso apagué la luz para que solo resaltaran las luces de navidad en mi recién instalada decoración, se ve fascinante.
Y bien amigos, eso ha sido todo por hoy, como pueden ver, decorar nuestro hogar es cuestión de creatividad, paciencia y buena actitud, puedes usar los materiales que desees y harás que tu casa se vea como la casita de santa.

Imagen diseñada por mi en el editor de Canva.
All images in this post are my own, taken with a ZTE Blade A51 and were edited in Canva.
Todas las imágenes de este post son de mi propiedad, las tomé con un teléfono celular ZTE Blade A51 y fueron editadas en Canva.
Queda precioso!
Gracias, de verdad, me alegra que les haya gustado.
Te quedó muy original, no hay excusas para no tener una bonita decoración y es muy divertido hacerlo uno mismo, gracias por mostrarnos las tuyas 👍🏻
Sí, de verdad fue muy divertido hacerlo, me alegra que te haya gustado, me encantan las manualidades.
Te felicito quedaron hermosos buen trabajo
Me alegra que te haya gustado 😊 Muchas gracias
It looks great. Love your decoration! Nice work! Keep it up!
Thank you very much 😊
Me encantó esa decoración, y con las lucecitas aún más! Quiero resaltar que explicas muuuy bien, cualquiera que siga estas instrucciones tendrá una decoración igual de hermosa :D
¡Felicitaciones!
1. Invierte en el PROYECTO ENTROPÍA y recibe ganancias semanalmente. Entra aquí para más información.
3. Suscríbete a nuestra COMUNIDAD, apoya al trail de @Entropia y así podrás ganar recompensas de curación de forma automática. Entra aquí para más información sobre nuestro trail.
4. Creación de cuentas nuevas de Hive aquí.
5. Visita nuestro canal de Youtube.
Atentamente
El equipo de curación del PROYECTO ENTROPÍA