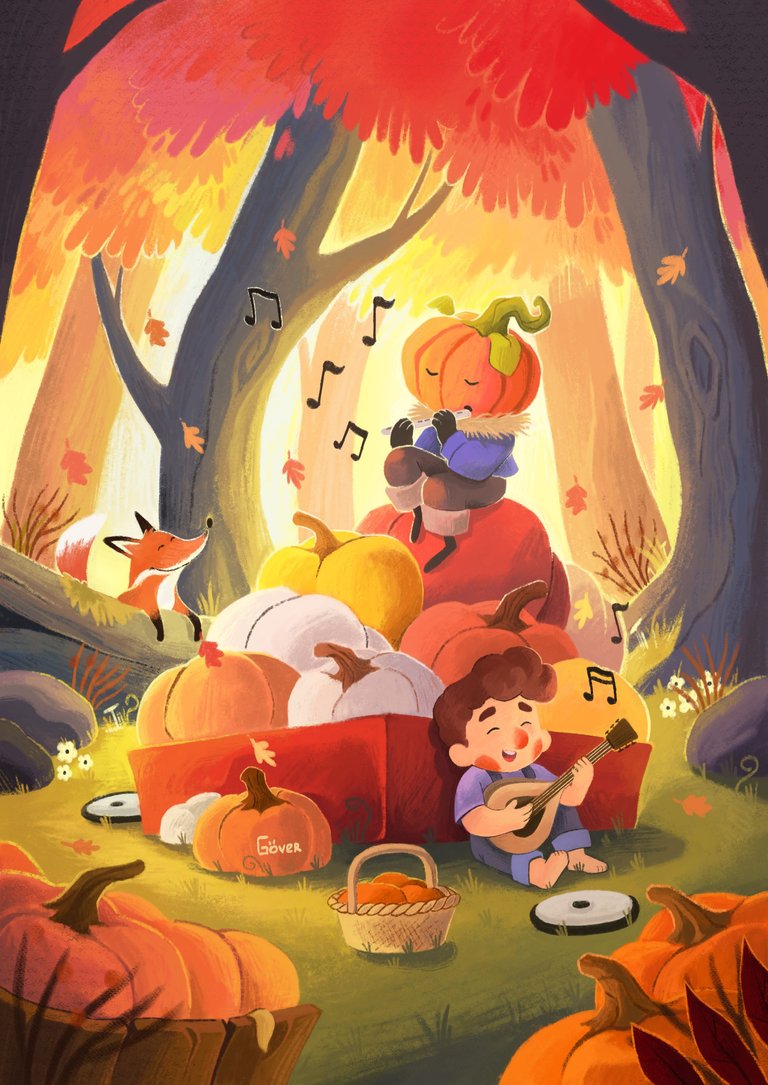
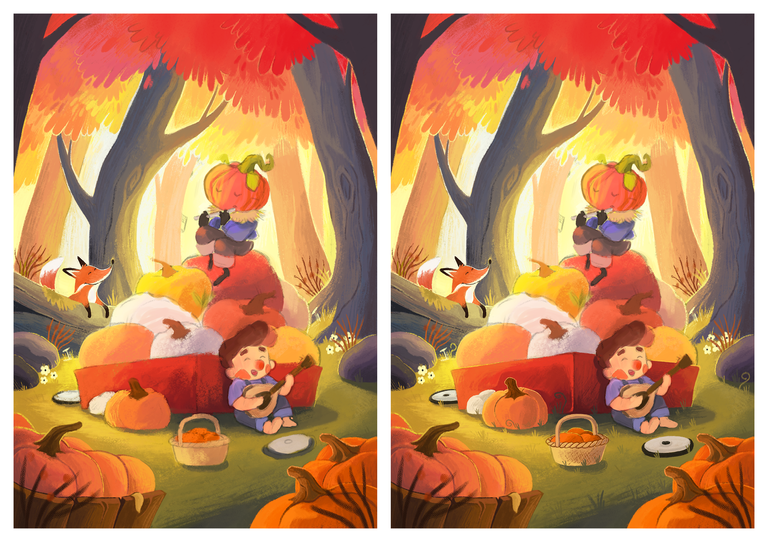
🎃 ¡Hola, amigos de esta increíble comunidad! Espero que estén pasando un excelente día.
Hace poco compartí con ustedes un dibujo de un niño calabaza. Pues hoy les quiero enseñar esta ilustración basada en él. Seré honesto con ustedes, esta ilustración ya la había hecho antes, pero no me siento muy identificado con ella porque pierde un poco la esencia del dibujo original, por esa razón decidí volver a hacerla, pero esta vez haciéndole honor al dibujo original y está vez si me siento muy feliz con el resultado final.
Debo decir que esta ilustración es la primera pieza oficial de mi portafolio jeje. Al fin decidí crearme mi portafolio digital, lo pueden encontrar en Behance por si le quieren echar una ojeada. Aquí abajo les dejaré el enlace.
- 🎃 Hello, friends of this amazing community! I hope you are having a great day.
- I recently shared with you a drawing of a pumpkin boy. Well today I want to show you this illustration based on it. I'll be honest with you, I had done this illustration before, but I don't feel very identified with it because it loses a little bit the essence of the original drawing, for that reason I decided to do it again, but this time honoring the original drawing and this time I feel very happy with the final result.
- I must say that this illustration is the first official piece of my portfolio hehe. I finally decided to create my digital portfolio, you can find it on Behance if you want to take a look at it. Here below I'll leave you the link.
PROCESO | PROCESS
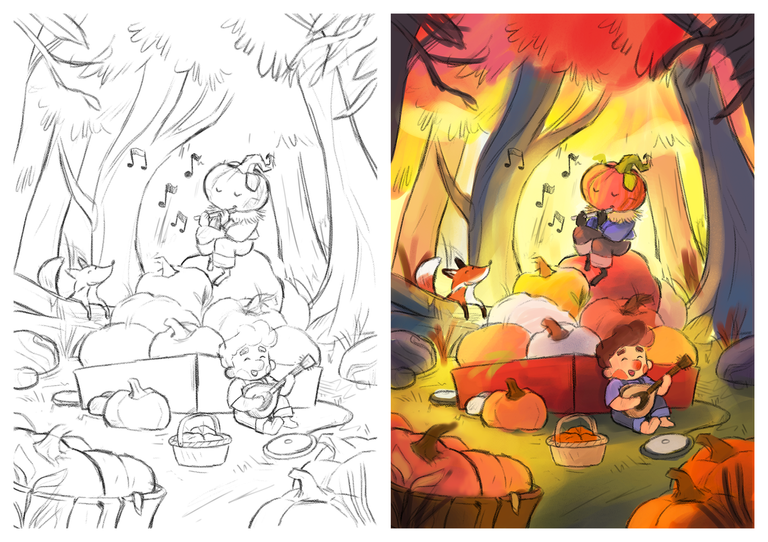
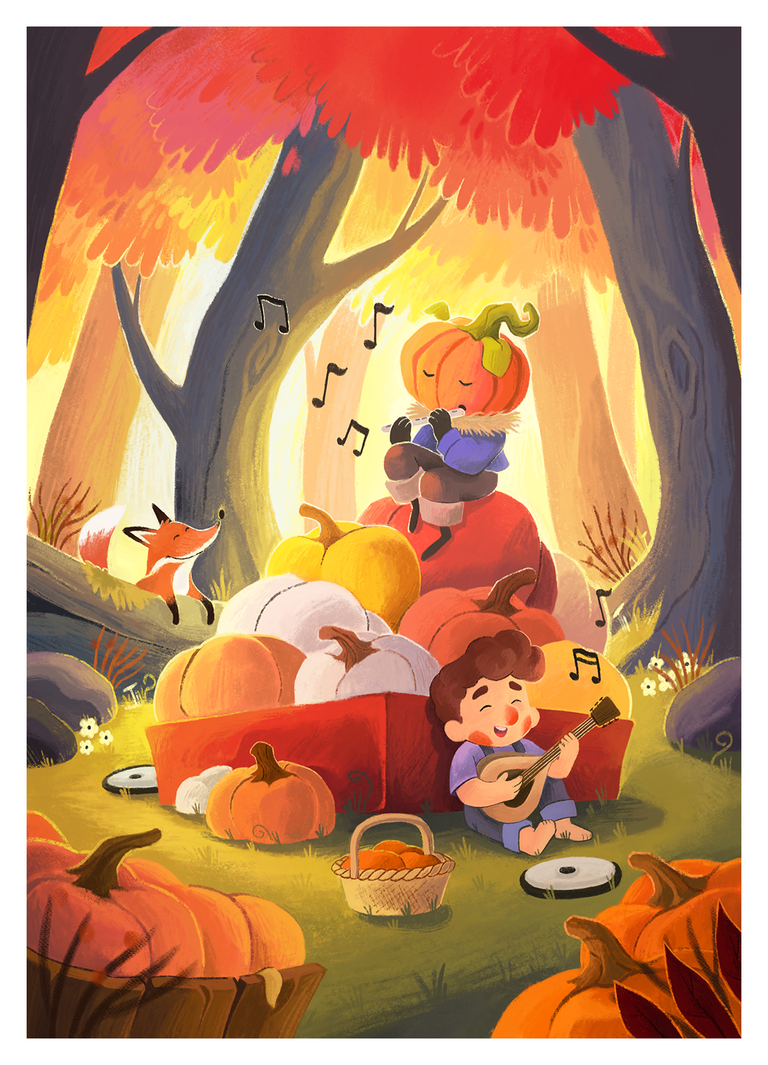
Bueno chicos, lo primero que hice fue hacer el boceto. La estructura del dibujo ya la tenía, porque el carrito de calabazas y los personajes ya estaban hechos. Lo único en lo que trabajé fue en el fondo, para hacer una escena única y muy mágica. A pesar de que ya tenía la base de los personajes ya hechos, opté por hacerle un pequeño cambio, decidí hacer a la calabaza tocando una pequeña melodía con su flauta, y al niño con un ukelele acompañando a su amigo en ese pequeño descanso que están tomando. También agregué a otro personaje extra que fue un zorrito muy curioso que los observaba bien feliz mientras los niños tocaban su música.
Después de hacer el boceto procedí a realizar el estudio de color, para ello quise utilizar colores muy otoñales, como los naranjas, rojos, amarillos y una especie de morado un poco azulado para darle el contraste que requiere la escena. Ese tono morado lo utilicé en la ropa de los personajes para que destacaran del resto del dibujo.
- Well guys, the first thing I did was to make the sketch. I already had the structure of the drawing, because the pumpkin cart and the characters were already done. The only thing I worked on was the background, to make a unique and very magical scene. Although I already had the base of the characters already made, I decided to make a small change, I decided to make the pumpkin playing a little melody with his flute, and the boy with a ukulele accompanying his friend in that little break they are taking. I also added another extra character who was a very curious little fox who was watching them happily while the children were playing their music.
- After making the sketch I proceeded to make the color study, for this I wanted to use very autumnal colors, such as oranges, reds, yellows and a kind of purple a little bluish to give the contrast required by the scene. I used that purple tone in the clothes of the characters to make them stand out from the rest of the drawing.
Una vez que tuve el estudio de color hecho, procedí a colorear el dibujo, pero, antes de detallar, corregí algunas zonas, pintando y dándole una forma más o menos final. Esto lo hago para tener una idea de cómo voy a hacer el detallado final y así no utilizar colores erróneos. Después de hacer eso, ahora sí empecé a detallar el dibujo, primero empecé por la parte superior y coloreé las hojas y los árboles del fondo, para colorear las hojas, utilicé tonos rojos, naranjas y amarillos, para el tronco de los árboles utilicé tonos de marrón, naranja y el morado ese raro que les comenté anteriormente.
Después de colorear el fondo, procedí a colorear al zorrito, y todos los elementos que están en ese lado del dibujo, tanto el tronco, como las rocas que estaban de ese lado. Luego coloreé el tronco que me faltaba del lado derecho y también coloreé los elementos que estaban en ese lado. Por último, le hice un pequeño detallado al césped para luego agregarle los detalles finales.
- Once I had the color study done, I proceeded to color the drawing, but, before detailing, I corrected some areas, painting and giving it a more or less final shape. I do this to have an idea of how I am going to do the final detailing and so I don't use wrong colors. After doing that, now I started to detail the drawing, first I started with the upper part and colored the leaves and the trees in the background, to color the leaves, I used red, orange and yellow tones, for the trunk of the trees I used shades of brown, orange and the rare purple that I mentioned before.
- After coloring the background, I proceeded to color the little fox, and all the elements that are on that side of the drawing, both the trunk and the rocks that were on that side. Then I colored the missing trunk on the right side and also colored the elements that were on that side. Finally, I did a little detailing of the grass and then added the final details.
Una vez que terminé el fondo, empecé a hacer el primer plano. Primero coloreé las calabazas que están en el lazo izquierdo, también coloreé el barril que contiene las calabazas y le agregué un arbusto seco para darle más detalle. Después de terminar esa parte procedí a colorear las calabazas del lado derecho y también le agregué otro arbusto muerto. Para finalizar, con el césped coloreé la cesta que está justo en el medio y las calabazas que están a su lado izquierdo. Por último, coloreé las ruedas y, ahora sí, terminé de colorear y detallar el césped, añadiéndole algunas hojas y arbustos secos para darle mucho más detalle.
Para este paso me tocó colorear el carro y el montículo de calabazas. Como pueden ver, utilicé varios colores, para colorear a las calabazas, pero primero coloreé al carrito y le añadí un poco de detalle. Ahora sí, coloreé a las calabazas y poco a poco fui agregándole sombras, luces y detalles, tratando de no dejar pasar el más mínimo detalle.
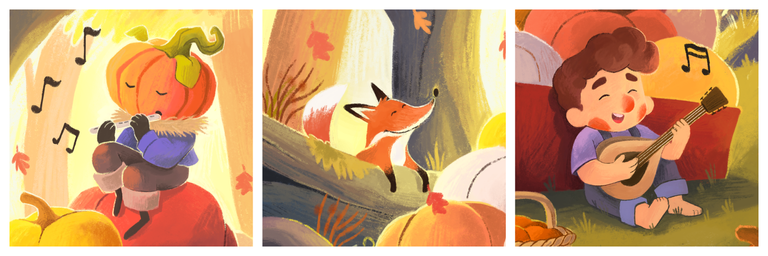
Para finalizar este dibujo, coloreé a los dos personajes. Primero empecé con el niño que está tocando el ukelele. Colorearlo fue fácil, solo me guié por los colores base y listo, el resto fue agregar un poco de detalle y el coloreado ya estaba terminado. Para finalizar, coloreé a la calabaza. Aquí me tomé un poco más de tiempo porque tenía un poco más de detalle, pero el proceso fue igual que el anterior. Como detalle extra, le agregué algunas notas musicales para que resaltara que los dos niños están tocando música.
- Once I finished the background, I started to do the foreground. First I colored the pumpkins that are in the left loop, I also colored the barrel that contains the pumpkins and added a dead bush to give it more detail. After finishing that part I proceeded to color the pumpkins on the right side and also added another dead bush. To finish, with the grass I colored the basket that is right in the middle and the pumpkins that are on the left side. Finally, I colored the wheels and now I finished coloring and detailing the grass, adding some dry leaves and bushes to give it much more detail.
- For this step it was my turn to color the car and the pumpkin mound. As you can see, I used several colors to color the pumpkins, but first I colored the cart and added some detail. Now I colored the pumpkins and little by little I added shadows, lights and details, trying not to miss the smallest detail.
- To finish this drawing, I colored the two characters. First I started with the boy playing the ukulele. Coloring him was easy, I just went by the base colors and that was it, the rest was to add a little detail and the coloring was done. To finish, I colored the pumpkin. Here I took a little more time because I had a little more detail, but the process was the same as the previous one. As an extra detail, I added some musical notes to highlight that the two children are playing music.
🍁 ¡Y listo! Espero que les haya gustado esta nueva versión de mi dibujo, honestamente esta versión me gusta muchísimo más y aunque me llevo casi una semana hacerlo, estoy totalmente feliz porque al fin tengo la primera pieza de mi portafolio, el próximo paso será crear un pequeño cuento, pero eso ya me llevará un poco más de tiempo.
¡Un saludo! Y nos vemos en el próximo post.
- 🍁 And that's it! I hope you liked this new version of my drawing, honestly I like this version a lot more and although it took me almost a week to do it, I'm totally happy because I finally have the first piece of my portfolio, the next step will be to create a little story, but that will take me a little more time.
- Best regards! And see you in the next post.
Instagram:@artbygover

Separador y Fotos editadas en Canva
Photos edited in Canva
The result is tender and wonderful, I love your technique. you make very beautiful scenes worthy of a fairy tale, it's great to see your work. Thank you for sharing your step by step with us.
@sagarkothari88 vote 17.5%
| Hive Curators Community | Support Witness | Follow Curation Trail |
Keep Up the good work on Hive ♦️
Muchas gracias querida amiga! Siempre es bueno recibir lindos comentarios de tu parte. Me alegra mucho saber que mis dibujos son de tu agrado, siempre le pongo mucho empeño a mis queridas ilustraciones.
Gracias por el apoyo!! 😊
Yay! 🤗
Your content has been boosted with Ecency Points, by @hive-130560.
Use Ecency daily to boost your growth on platform!
¡Enhorabuena!
✅ Has hecho un buen trabajo, por lo cual tu publicación ha sido valorada y ha recibido el apoyo de parte de CHESS BROTHERS ♔ 💪
♟ Te invitamos a usar nuestra etiqueta #chessbrothers y a que aprendas más sobre nosotros.
♟♟ También puedes contactarnos en nuestro servidor de Discord y promocionar allí tus publicaciones.
♟♟♟ Considera unirte a nuestro trail de curación para que trabajemos en equipo y recibas recompensas automáticamente.
♞♟ Echa un vistazo a nuestra cuenta @chessbrotherspro para que te informes sobre el proceso de curación llevado a diario por nuestro equipo.
🥇 Si quieres obtener ganancias con tu delegacion de HP y apoyar a nuestro proyecto, te invitamos a unirte al plan Master Investor. Aquí puedes aprender cómo hacerlo.
Cordialmente
El equipo de CHESS BROTHERS
Thanks for the support!
Very beautiful!
Thanks so much!! 😊